Overview
A detailed step-by-step on 7,62 Hard Life.
Preface
To the reader,
7,62 Hard Life is a very complicated and niche game. I first discovered it when it initially was released to Steam in early 2016 and played on and off throughout the years. Everytime I would hit a wall where my frustration at the obscure glitches and design decisions and put the game down for another year. I had to go diving through Russian forums or hassle the few people that had enough knowledge about this game in order to progress at many times.
Fast forward to the beginning of the year 2021, I’ve picked this game up again and had a quick realization. I wholeheartedly adore this game, in spite of its’ (many) flaws. I want people that come by and play it in 5 or 10 or even 20 years to be able to enjoy it like I have learned too, without all the trouble I had to go through in order to get a good experience.
So that’s all I have to say about this for now, this guide has taken me 100+ hours of solid work to write so far.
If it helped you, please leave a comment so I feel that my effort has been worth it!
Good luck,
ANickel
Before Starting the Game
If you are having issues with game crashes CTRL-F this page for the word crash and read the sections, this game has many quirks that can lead to consistent crashes.
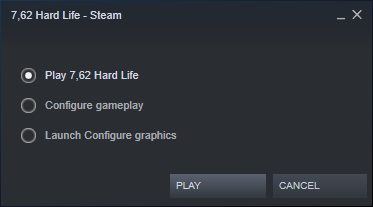
When you hit “Play” for the first time you will get this box that opens up, some changes should be made before you actually start your campaign and can be done in the two menus that cover gameplay and the graphics.
GAMEPLAY CONFIGURATION
Here’s a quick list of the various settings and their effects on the game.
Railroad
Controls whether or not the game autosaves when you use the railroad, and how much the ticket will cost you.
Papers Check
This is a very important setting, it will effect whether or not the local authorities will check your licensing to see if you are allowed to own the weapons/equipment/vehicles that you have. If you do not have the proper licensing they will confiscate the items and YOU CANNOT get them back. There is ways to get the proper licenses (whether legitimate or forged) that will be covered further in the guide.
Food
Will your mercenaries get hungry and have to be fed? Despite the wording of the setting, it is a simple ON/OFF toggle, if it is not checked you will not have to worry about food. I recommend this setting be turned off, as it tends to just add unnecessary micromanagement.
IF it is turned on, if your characters do not need food they will say they are thirsty, they are not actually thirsty this is just a bad translation. This is a source of confusion for a lot of players who think they need to drink something to survive, drinks are only used for stamina recovery during combat.
Additional Settings
I’ll leave out the settings that are self-explanatory and only cover the confusing ones.
“Disable Auto Health Regeneration” means that instead of healing slowly over a period of weeks you can only regain health by visiting a doctor, I recommend leaving this setting off as your healing is slow anyways, if you are seriously injured it will be a week before you are back in fighting condition.
“Allow Open Scope when no Scope Installed” RECOMMEND DISABLED If this option is ENABLED you will not be able to open the “Scope” menu if your character does not have a scope or sight of any kind on the weapon. If you click the “SIGHT” button (not hotkey) with a character without a sight your game will CRASH upon closing it.
“Ask NPCs about all known characters” Bugged option, if enabled is supposed to automatically ask an NPC about all characters when one is asked about, instead of having to ask individually.
“Treasure Hunt” Ability to use the metal-detector to occasionally find items.
Mines
Safe working with mines means that you won’t accidentally trigger any explosives when you attempt to disarm them, if you just save-scum mine-disarming anyways you might as well turn this off, although mines are not very common in the game and it gives you an incentive to acquire a character with the sapper skill.
GRAPHICS CONFIGURATION
Contrary to the name this actually contains non-graphical options.
Graphics
Here you are able to change the various graphics settings to your liking, this is an older game so you should be able to run it at max settings with no problems.
Windowed Mode
The game is able to be alt-tabbed in and out of easily, but it will CRASH if you attempt to do a manual save, you are relegated to quick-save and quick-load using the keyboard commands only.
Fullscreen Mode
You can save and load your game normally, unlike windowed mode. However, the game can only alt-tab three to five times before it CRASHES, so if you need to alt-tab in Fullscreen mode then quickly save your game beforehand.
Control
You’ll want to immediately turn “Max. Slomo” to the “Off” position, this can frequently crash the game or cause other issues.
Autosave Options:
As you’ve probably guessed this game does have quite frequent issues with crashing, I recommend turning autosave count to at least five to give yourself some lee-way in case of a crash or a mistake you make that locks you out of content.
CUT CONTENT RESTORATION MODS
There are various chunks of the game’s content that was cut-out and only released on the Steam workshop, these are those files that are compatible with English, the widescreen fix and a few others will turn your game Россия (Russian)
[link]
[link]
[link]
[link]
[link]
[link]
[link]
Recommended Additional Mods
[link]
A more detailed and nicer-looking map with a cool grid.
[link]
EXCELLENT MOD Adds many, many additional firearms and ammunitions and re-balances them to be more realistic, no more .22 Caliber FALS that hit you like a mosquito bite. (Make sure that you read the instructions and install the new executable for better stability.)
STARTING THE GAME
At this point, go ahead and start the game. There is still work to be done before your campaign starts but you’re getting close!
The first thing you’ll want to do is go to the “MODS” section of the main menu and enable all of the mods you downloaded. Then, go to the “SETTINGS” tab and navigate to the “GAME” submenu, we’ll be making some tweaks here.
These are the recommended settings for most players, feel free to change them if you feel they are too difficult. However, I would recommend at least leaving “Last Enemy Location” on, in-case the enemy is bugged inside of a structure or other object. You will be able to find them in this case and shoot-through the object to hit them.

The “EVENTS” tab will let you decide what effect you want to happen when certain events occur.
I would recommend enabling the pause and shortcut function on all of the following, if it is too much you can scale it back down later.

Make sure that the game has been restarted at this point so our mod selection and changes take effect. When you open the game back up you’ll be ready to start terrorizing South America.
Starting the Campaign

Here you can select your starting character and allocate your skill-points, starting out with some shooting skill will make the early game easier, but keep in mind that attributes and skills can both be greatly increased through character experience in the fashion of an RPG (Do thing, get better at it).
Go ahead and hit start when you’ve made your choices and wait for the first map to load.
A Rude Awakening

You begin the game talking to Marcelo Tron, a revolutionary commander that rescued you and brought you back to the revolutionaries’ camp after you botched your entry into the country.
Unfortunately your pleasant conversation is interrupted by a government scouting party that has found the camp. You’ll automatically exit the dialogue with Marcelo and he’ll hand you a pistol and tell you to go fight. While it may seem counter-intuitive you’ll want to immediately make a quick-save and sprint towards the enemies on the Southern border of the map.
This is your one-chance to make a good impression with Marcelo and if you do not engage very quickly then the Guerilla forces will quickly decimate the government party, leaving Marcelo unhappy if you’ve not managed to kill someone. Run up to the (most likely) wounded enemy soldiers and execute them with your pistol, try to do this for as many enemies as you can in order to get a greater reward from Marcelo.
As soon as you’ve finished the fight go ahead and open up your inventory.

You’ll want to immediately hit “Remove Bodies” in order to strip the bodies of all their loot and dispose of them. Now you’re free to sort through it and pick anything you want, keep an eye out for any intel documents as they are worth a lot to the rebels. You’ll want to loot a belt for storage, some armor for protection and a vest if one dropped. Look to obtain the brown “Belt with Holster” as you are able to carry a pistol-sized firearm in it and add an additional pouch for extra storage.

Before we do anything else, let’s go report back to Marcelo and hear what he has to say about our performance. Depending on how many enemies you killed, Marcelo will assign you a different rank. Obviously a higher rank will give you better starting equipment.
Once you’ve talked with Marcelo you’ll need to go get some equipment from the armory. It is the building in this picture on the very right side with the prisoner and the deserter outside of it.

Inside is the weapons master, let him know that Marcelo sent you to get some equipment and he will provide you with a starting loadout. If you have $100 from selling any intel or items ask him to help you master and zero your equipped firearm, it will max out your familiarity (adaptation) with the weapon, greatly increasing your accuracy.

Now what to do with all the crap lying about on the ground? You can either sell it to the Weapon Master through his “Pick up all Items and Sell” dialogue or you can walk over to a nearby storage object and deposit all the items on the floor through a dogtag menu.
Open up your inventory, right click on your dog-tags click the option in Russian, then “Working with Items” > (Whichever Container You Picked) > “Collect All Items and Put In Container”

Once you’ve got your equipment, it is time to chase after the remnants of the scouting party and put an end to them before they report back to the government. Hit the “LEAVE” button in the bottom right of the screen, it’ll open up the world map.

You’ll see a green-icon overlapped with your icon and that of the camp, this is the government forces. Go ahead and click northward in order to follow their direction. Once you’ve made it a sufficent distance from the camp you’ll be able to engage them by hovering over their icon and clicking on it, indicated by the red-arrow crosshair.

Refer to this guide on combat if you want to know a bit more than just click and hope for the best.
[link]
Once you’ve dispatched of the enemy make the trek back to the Rebel Camp, find Marcelo standing in his usual spot and inform him that you took out the escaping forces. If he promotes you, go ahead and report back to the Weapon Master for an equipment upgrade, at this point you might have enough money to buy some new equipment from him as well.
This guide uses the “Give Everybody Guns” mod, I highly recommend it even for new players as it reduces some of the strange balancing present especially in the beginning of the game.

If you still need a long-arm a good weapon for the early game is a shotgun, they hit like a truck, have a lot of different ammunition options and you’ll be able to bring it with you into the government controlled zone as they are classified as “Civilian” weapons (only applicable if you have paper-checks enabled) Make sure you grab some buckshot or slugs to go with it.

Once you feel comfortable with your equipment go ahead and talk to Marcelo again, here we have two options but I’ll go with what I picked in my playthrough.
Ask him “How are you?”, if it is after around 9:00PM or so he will give you an assignment to keep watch over the camp. As soon as you exit the dialogue you will have to immediately sprint and chase after the prisoner shown in this picture.

Once you’ve apprehended the prisoner head back to Marcelo and let him know about the attempted escape, he will give you a small reward, but all the cash we can get is useful.
Next tell Marcelo that you are bored, he will tell you to go collect some volunteers and return back to him.
The volunteers you can collect are:
- Servulo, found at the Kitchen
- The Three Skeptics around the Campfire to the North of Marcelo.
- The Fighter next to the Prisoner
Immediately take the item “Rico’s Photo” out of Servulo’s inventory and put it in your characters, this will be worth a lot of money later although it seems useless now. If you have any spare guns to equip Marco with he would be grateful (and likely much more useful), as he only starts with a pistol.
Return to Marcelo and repeat the previous dialogue, this time you’ve got people and he will let you in on the job. He wants you to go check out a nearby village that has been passing supplies on to the rebels, their latest shipment is late and you are to go and figure out the problem and bring back the supplies. Unfortunately he doesn’t have any cars to spare, so you and your new buddies will have to make the trek on foot. Helpfully, the area is only about a day away.

Upon arriving at the village you’ll get jumped by some bandits that were occupying the area. Defeat them and talk to the Village Elder located at this building.

Villarado Defense
Talk to the Elder and he will explain that the supplies were stolen by bandits, who he fears will swiftly return to dole out vengeance for your impromptu slaughter earlier. Talk to the Elder a second time and offer to help him with his bandit problem. He’ll reveal that the village has a stockpile of WW1 and WW2 Era firearms they bought off a traveling merchant for a hefty price.

While you can re-equip yourself with these weapons, their main purpose is to arm the townsfolk.
Tell the elder to dismiss all non-combatants and call all combatants to the village center with him. You’ll see some NPCs start to leave the map and others flock towards your location.
At some point some remnants of the bandits will come talk to you, you can either kill them or persuade them to leave. Either one comes up with the same end-result so it is up to you.
As they come in, talk to them and equip them with items from the stash.
MAKE SURE TO GIVE THEM AMMO!
Talk to the Native, Elias in order to temporarily recruit him into your party.
Once everyone is armed and ready, talk to the elder again. While there is multiple options for how this fight can go, I’ve found that it is by far the easiest if you form the line along the right river bank. The peasants will start to move and get set up. Before we join them we need to grab a special something though.

Click on the shovel by the outhouse in order to get the shovel, this will be critical for the upcoming fight. We can use it to build sandbag fortifications, which will provide us and our units with some necessary cover. Right click on the shovel and select the “DIG” option. You can rotate the sandbags with [ and ] as well as lower or raise them with PAGEUP or PAGEDOWN.
Due to the way sandbags are programmed they are unable to be removed once placed, so make sure to not put them in any places that might mess with the AI or your pathfinding.

The bandits will come from across the river and up-the-road, so you want to set up a row of sandbags on your side to protect you and your men.

If you have any mines, feel free to set them up on the opposite side of the river as they will help thin out the tremendous amount of enemies (50 in total!)
Once you’ve got everything set up, click the “LEAVE” button to go out to the map and then hit space-bar in order to pass time until the bandits arrive. When they do, you’ll get a big lag-spike from them loading in and the game will pause automatically as well as a comment from your character.
They will not be immediately hostile, you can attempt to (unsuccessfully) reason with the bandit leader however dumping 30 rounds of ammunition into him as soon as he gets within a reasonable distance will also work.
It is a difficult fight, just try to manage each of your soldiers as efficiently as possible. If they start taking hits don’t be afraid to prone and have them heal themselves or have your other soldiers help them out if they’re in shock. After you’ve killed everyone report back to the Elder, who will thank you and tell you that they found the bandit leader’s car by the riverside. You’ll have three options.
- Take the Car
- Leave the Car at Villarado and come for it later
- Give the car to the Village
Taking the car results in Marcelo confiscating it from you when you return to camp.
Leaving the car results in Marcelo confiscating it (he had a spy following you and saw your attempt to deceive him)
Giving the car to the village will force you to carry the medical supplies back to the camp by hand which can be difficult depending on how many of your men survived the fight.
After you choose what to do with the car, the elder will offer you his gold medallion and engraved Makarov handgun. It is up to you what to do here, but while the Makarov is very weak, it does look super cool and is a collectable. He will also offer you some gold dust, which you can take or refuse to increase your reputation with the village.
When you’re ready, head back to the Rebel Camp and report back to Marcelo. You’ll get more cash for every medical and food box you bring with you. Enjoy your newfound cash infusion and when you’re ready move onto the next section.
The Mine Assault
Next up we’ll talk to Marcelo, who will offer us a decent sum for every bandit you kill. However, the main goal of this mission is to find the bandit’s hideout and report back to Marcelo. Luckily for us, we have some new friends in the region that might be able to clue us into the bandit’s location.
Head on over to Villarado and chat with the Village Elder, he’ll suggest that the hideout is located somewhere to the Southwest of the village. While useful, maybe we can get some even better information. Find Elias in the village and ask him if he knows anything about it. He’ll give us precise directions to the bandit’s hideout, an old abandoned mining facility.

Once you’ve entered the facility, go ahead and turn right back around and leave. There are far too many enemies here for you to fight by yourself. Go ahead and wander around the region until a week has passed at which point you should return back to Marcelo to collect your reward for any bandits you may have killed and to report the location of the hideout.
Talk to Marcelo after reporting it and get yourself prepared to assault the mine with the rest of the Guerillas.

This fight isn’t too difficult since you have the backing of the rest of the guerillas, try and make some contributions to the kill count here and there but don’t feel like you have to push yourself too hard. Remember that if your glorious comrades fall you’ll be there to re-distribute their gear into your pockets.
After you’ve cleared the area, there will be a lot of loot laying around. Use the dog-tag menu to deposit it into one of the many containers in the area (I personally like to throw it all in the dumpster) in order to reduce lag. Now, we could pack up and head back to camp or we could do a little sniffing around.
If you click on your “key” in your quest inventory, you can select the GAZ that was generously left behind by the former occupants. However before we drive off with it we should check how it is doing. There will be some issues with the performance and the tire will need to be patched before we can safely return with it. Check these two garages, you’ll need to find some glue and a tire tube or rubber patches in order to fix the flat. You can also siphon some gas from the other vehicles you find around the base.

Once you’ve got the car all fixed up feel free to drive your new ride back to the Rebel Camp in order to complete this mission!
Espionage in Puerto Viejo
Before you go, you can get a “Restricted Zone Permit” from an outhouse in Cali-Cantinos if you don’t feel like dealing with Juan Rebenga or the forger.
Our next assignment from Marcelo, and the final assignment before we are left to run around free in the world is to study the troop movements and terrain of the government city of Puerto Viejo and to report back with our findings. This mission will make us neutral with all of the entities in the game (except for the bandits and the Palinero army), so it is the perfect chance to start over with a clean slate and wash your hands of the rebel business if you wish.
Put any illegal gear away in a safe place in camp and then talk to Marcelo to be transported instantly to Puerto Viejo. Make sure to bring some means of self-defense, because even though there are police present throughout the region they have little interest in helping some green-go coming through.
Once you arrive in Puerto Viejo you’ve officially completed the games introduction, the first thing you’ll want to do is talk to your local contact, Alexey Rezvi.

The reason you’re even in this country in the first place is to find and assassinate Ippolit Bashirov, he will give you some information and you’ll fill out a quick survey with him.
Your next job is to talk to Juan Rebenga to get a Restricted Zone Permit in order to follow the footsteps of Bashirov.
When you’ve finished exploring the city, go ahead and hit the leave button. Walk north up to to Santa Maria and be ambushed by some men hired by Bashirov.

Luckily for us, they left behind a Ford car that we can take to speed up our travels and carry more loot. Unluckily, it is about to fall apart.

Take the car and IMMEDIATELY head north to Santa Maria, there is a mechanic there that can completely fix our car for a price. If you do not go there as soon as possible the car will break and you will have to push it there. This is a common new-player mistake.
Once you arrive in Santa-Maria you’ll realize that you’ve made a terrible mistake, this place is a dump and once again there is armed men waiting to jump you. Bashirov really does not want to be found.

Dispatch of the bandits and take a look behind the bar, there is a Con Artist who can not only sell us nice supplies, but also fix our nearly broken down car.

Once he has fixed up our car we have one more errand here to do.
There’s a bandit in the west side of Town, we need his dogtags to give to the minister.
Pop him and his cronies and make sure to grab the dogtags from the leader, then head west to Artriga the capital of the country.
If you don’t want to kill the bandit for whatever reason, you can also buy a permit from Juan Rebenga for a substantial sum or acquire one for less from the forger.

We’ll find Juan Rebenga in the left side of the big government building on the ground floor. Talk to him and request access to the restricted zone, he’ll tell you he has a task that you can do in exchange for the correct paperwork. He needs you to kill a troublesome bandit located in Santa-Maria. What a coincidence! We just happened to fill him full of lead and have his dog-tags to hand in right away.
With the dogtags traded for some papers, we’ve managed to open up the game world. From here you have a few different options on how to play and multiple endings you can shoot for.
- Assist the Government
- Fight the Government as Rebels
- Fight Everyone as Independent
- Try and Find Bashirov on your Own
The Execution/The Captive

If you obtain this quest from Tanya Tormens she will ask you to execute the POW in the camp.
If you obtain from Juan Rebenga he will ask you to rescue him.
You can actually complete both of these missions despite seeming contradictory!
Enter the Guerilla’s forest camp and search the boxes outside of the armory, inside you’ll find a 9×19 pistol and some 9×19 blank rounds. Then search some crates across from those boxes which contain some expired blood bags. Walk over to the prisoner and talk to him, explain that you are there with the government and you’re going to help him escape. Give him the blood bags and shoot him with the blanks. He’ll pretend to die, and apparently the guerillas are too stupid to confirm it.
You can go back to Tanya and get your reward immediately, you will have to wait a week or so for the war-hero to make his way back to civilization in order to collect your reward from Rebenga.
Getting Licenses – Forgery
When the Government police forces inevitably search you, it would be a good idea to have the proper licensing for the metric tons of weaponry that you’re carrying.
There are two methods of acquiring the licensing, either acquiring some convincing forgeries or cozying up to the Government enough to be given the proper documents.
THE FORGERY ROUTE
In order to meet the forger we will have to do a few errands for some people.
We can start this quest-line by talking to Arturo Seuta, the bartender of Puerto Viejo. Try and chat with him about any recent news, after contributing a slight amount to his tip-jar he’ll let you in on a little secret. The TV Producer in Sagrada is looking for reliable people with “discretion” to help him out.
Note that if you walk into the other room of the bar, there’s a man that sells hunting equipment. If you check his available shop, he’ll be selling a forged hunting license for a large sum (usually around $16,000). If you only want the hunting license you can get it here.

Hop in your vehicle of choice and drive on over to Sagrada, the Director Paulo Venal can be found inside of the Unemployment Office on the east side of town.

After a brief chat with him, he asks us to help one of his friends. The director of the Publishing House of Sagrada is apparently in need of our talents. You can find him to the Northwest of the Unemployment Office inside of this building.

Inside, go ahead and talk to the Manager, Camacho Muaro.
After you let him know you were sent by Paulo, he’ll ask you to pick up some special inks and dyes for him. Luckily we won’t have to travel far, the local school is our contact for the goods.

Head inside and talk to the Graduate Student. He’ll try to rip you off, but if you’re smarter than a monkey you’ll be able to point out that the prices are not what he agreed to previously.
Begrudgingly, he’ll admit fault and sell you the equipment for a much more reasonable price. Head back to Camacho and hand over the ink to unlock the ability to purchase forgeries from him.
The following are available for purchase from him:
- Restricted Zone Permit – $10,000
- Hunter’s License – $13,000
- Police Identification – $15,000
- Military Identification – $20,000
- Secret Service Identification – $25,000
- Vehicle Registration – $15,000
Getting Licenses – Legitimate
Vehicles
Q: My car is breaking down all the time now, how do I fix it?
A: The only way to replace your car parts to prevent constant break-downs is to recruit the mechanic to your base and have him replace the parts via his “upgrade” menu. Take note, the “Weld holes and inspect” option will only fix bullet damage, it will not replace the parts that are causing the breakdowns. Despite popular belief, the mechanic in Santa-Maria cannot fix your car beyond bullet damage.
GAZ-69
60 L Tank
21 L / 100KM
5 Person Capacity
200 Trunk Capacity

One can be found at the abandoned Mine, needs to be repaired when you find it unless you want to push it all the way to Santa-Maria.
Ford Hatchback
40 L Tank
8 L / 100KM
4 Capacity
100 Trunk Capacity
Found shortly after leaving Puerto Viejo for the first-time during the Espionage mission. Drive to Santa-Maria immediately unless you want to push it there.
Unlocking Your Base
To unlock the player’s own base in the game there are a few prerequisite requirements.
- You have to be CGL 4 (Use Dogtags to Check)
- Completed the government or rebel quest to deliver a message to Emilio Calderon
- Be blackmailed by the Emissary in Sagrada
When all of these conditions have been met you can go to the bar in Puerto Viejo and talk to the shady British man in the corner, Cyrus Lond. He’ll give you a mission to go retrieve some information from a nearby Army Base taken over by a group of bandits. Accept the task and head over there, be prepared for a mostly close quarters fight.
Clean out the bandits from the facility and find the safe within the main building. Inside will be quite a few good items along with the documents you needed to find. Put them in your quest inventory and head back to Cyrus Lond.
There are two outcomes depending on your speed.
- If you head back and give him the papers immediately, you will be ambushed after leaving the city.
- If you take your time, he will have set up an ambush in the bar and you’ll fight him there.
After handing off the papers or killing Cyrus go to the bank and hand the banker the business card you were given. He will contact Simon.
Trader Mission
Random Encounter after a certain CGL, need to spam enemy with grenades to get highest chance of saving the trader.
Mechanic
Get 10+ Rep in Cuidad De Oro and talk to the drunk at the bar.
You’ll have to kill a series of bandits.
Sagrada
Santa-Maria

Olvega

Fuerte Calderon

Baron’s Plantation

Doctor
Campesino in the hospital
Mercenaries and Where to Find Them

Caesar
Puerto Viejo
Equipment Cost: $1,894
- $812 / Day
- $2,706 / Week
- $8,116 / Month

Toker
Campesino
Equipment Cost: $0
- $757 / Day
- $2,523 / Week
- $7,567 / Month

Sonar
Olvega
Equipment Cost: $1,680
- $792 / Day
- $2,640 / Week
- $7,919 / Month

Hawk
Puerto Viejo
Equipment Cost: $1,082
- $1,731 / Day
- $5,768 / Week
- $17,303 / Month

Pops
Equipment Cost: $1,420
- $2,527 / Day
- $8,423 / Week
- $25,267 / Month

Pepe
Campesino
Equipment Cost: $1,422
- $1,160 / Day
- $3,867 / Week
- $11,599 / Month

Sure
Ciudad-De-Oro
Equipment Cost: $891
- $2,888 / Day
- $9,624 / Week
- $28,872 / Month

Lambert
Cali-Cantinos
Equipment Cost: $0
- $1,806 / Day
- $6,020 / Week
- $18,059 / Month

Verchic
Santa-Maria
Equipment Cost: $2,593
$904 / Day
$3,011 / Week
$9,033 / Month

Dingus
Artigo
Equipment Cost: $0
$909 / Day
$3,029 / Week
9,087 / Month
Government Path
The Memories
Juan needs you to deliver a package and a letter to a drug lord Emiliano Calderon. He doesn’t want government agents to have “official” involvement with this unsavory figure so he needs you to do the delivery for him. Calderon’s estate “Fuerte Calderon” can be found to the west of Artigo. Be aware that you’ll be jumped by more of Bashirov’s thugs when you visit for the first time.

The Group
You’re tasked by Juan Rebenga with killing a rebel spy that is going to attempt to meet up with a few others in Sagrada, He’ll spawn in somewhere in the town and stand around in front of the Unemployment Office for a bit before leaving. Note that it is possible to get this mission via the phone, so you can accept it from Sagrada and have plenty of time to set-up. There will be a few suspicious “Locals” that will attack as well when you kill the spy.
The Producers
UNLOCK FORGERIES BEFORE DOING THIS QUEST
Another mission given by Rebenga, there’s a new drug that is flooding the streets of Sagrada and the government wants the dealers found and brought to justice. Head over to Sagrada and visit the “Students” located around the school-building. These “students” have been cranking out tons of drugs using the laboratory. Fill them full of lead to complete the objective.

The Native Algerians
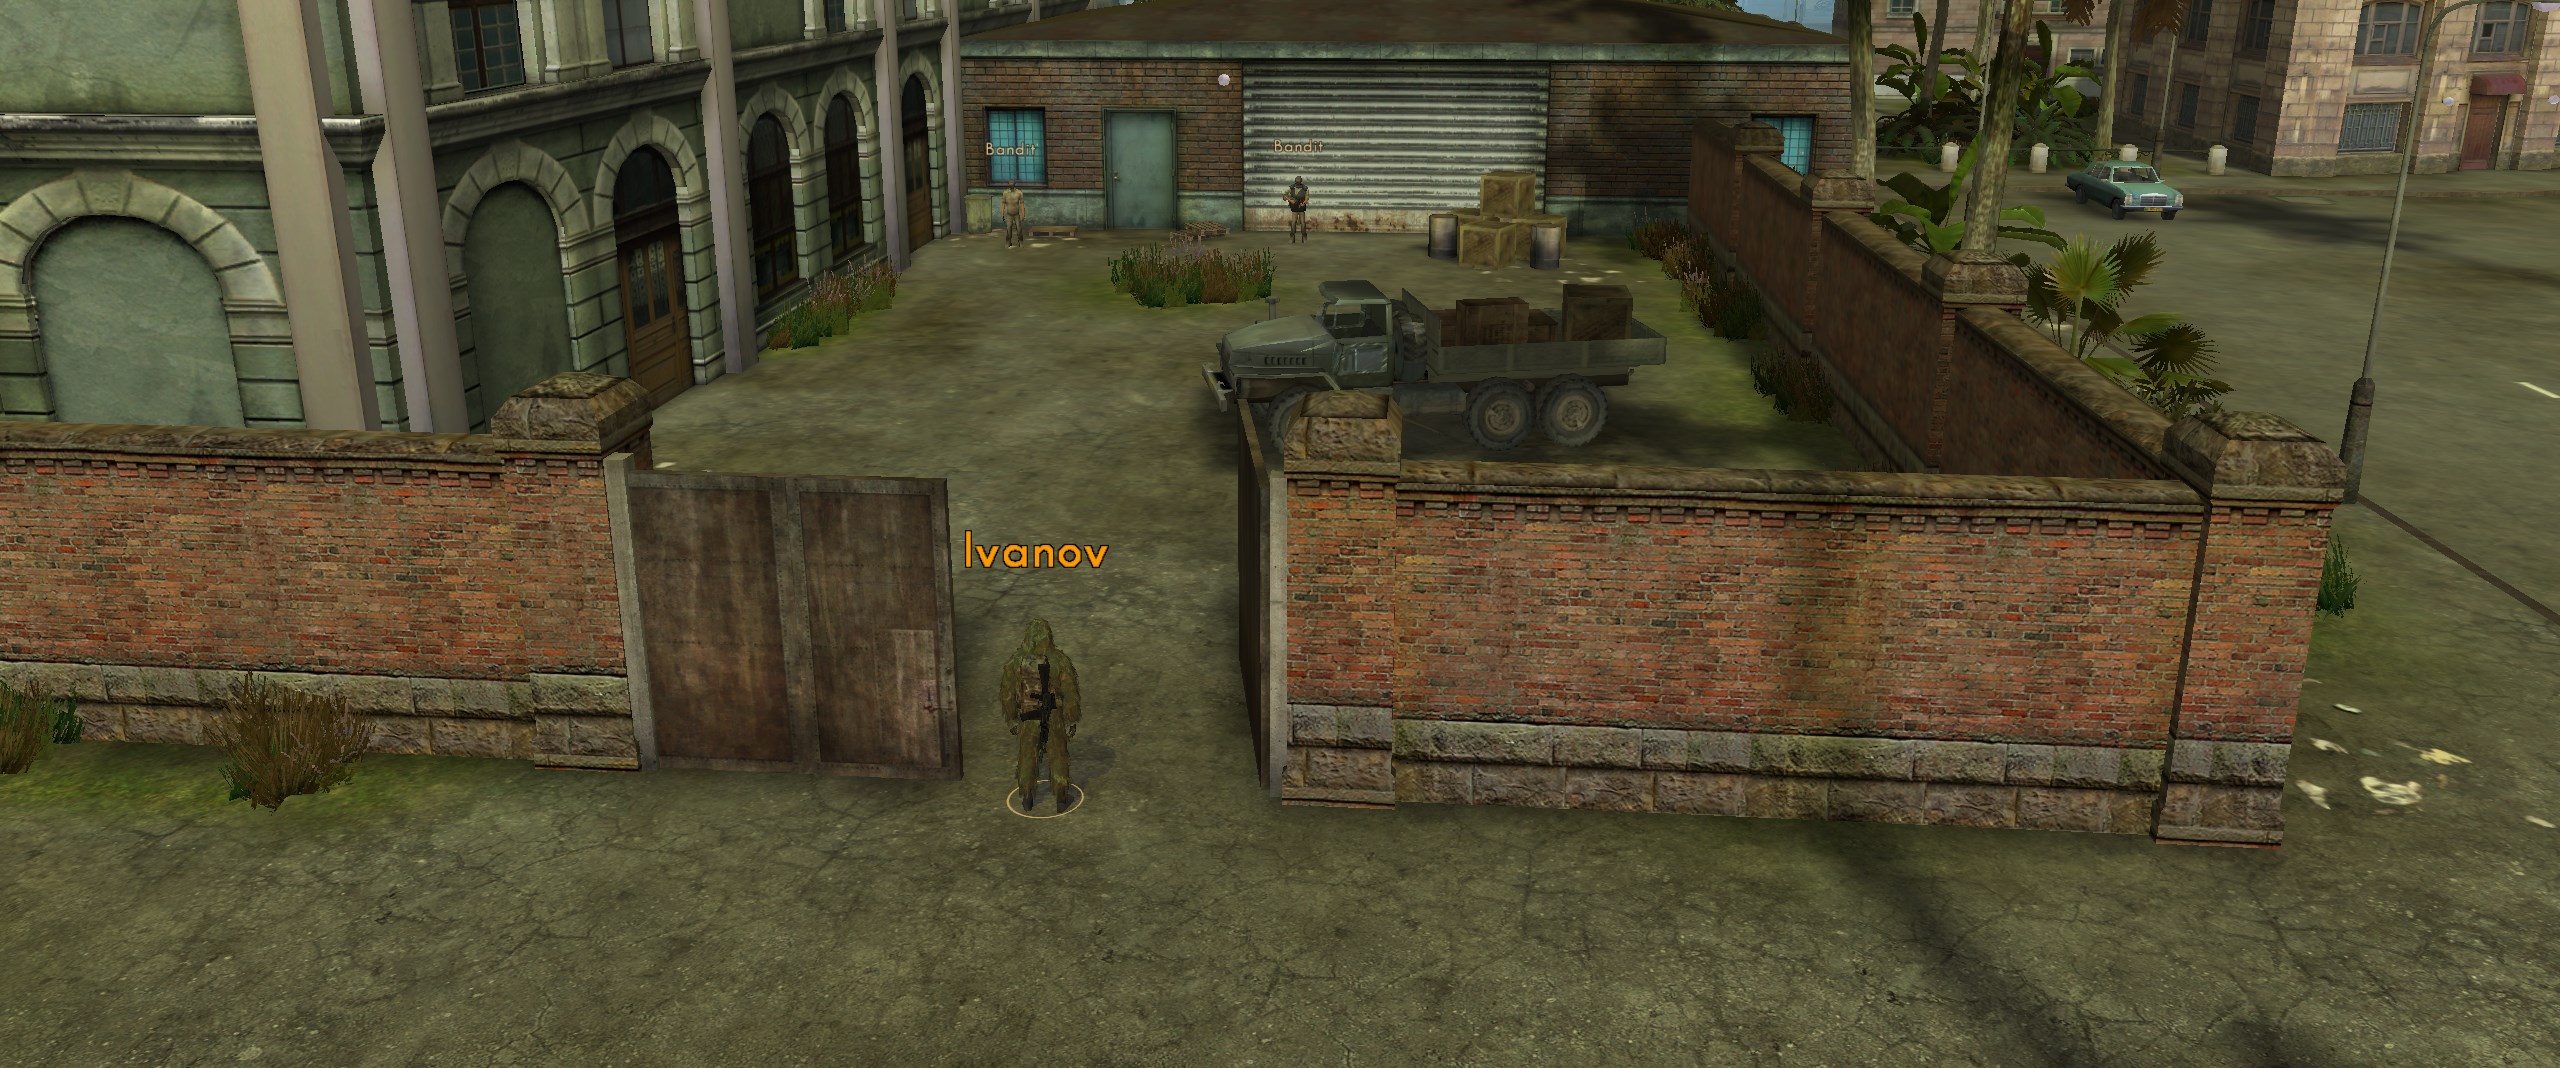
Juan Rebenga is once again asking you to do some dirty work, in this instance a group of native guerrillas associated with the rebels has been spotted in Cuidad-De-Oro. He needs you to make your way there to eliminate the two ring-leaders. The two can be found inside the small warehouse present in the below picture.
You can recruit the “Chief” to work as your commander at your base.

The Rescue
You’re given new intel that the rebels are planning to assassinate the police chief of Puerto Viejo, go talk to his assistant to set up a plan to keep this from happening. You’ll be given a temporary Police ID and asked to show up at 10:30 tomorrow in order to search each guest as they come through. However, for every guest you search you’ll get a small penalty. The person that we are looking for is Manuel Vargas. You need to search his basket TWICE in order to find the hidden snake within.
Upon completion of this quest you’ll be granted a permanent Police Officer ID that serves to allow you to carry “Service” weapons.

The Investigation
Given by the Police Chief’s assistant. While the assassin himself was stopped, where in the world did he get such a highly venomous snake? It will be your job to find the person who supplied the snake. The first thing to do is to ask the townsfolk who would have access to those kind of snakes, they’ll direct us to the museum curator. Once you get there ask him about it, he will be initially resistant but if you choose the options relating to him being an accessory to attempted murder and then afterwards threaten to tell the guerrillas that he double-crossed them he will give up everything he knows. Head back to the assistant to receive your reward.
The Intercept
A very large group of guerrillas will be traveling from the Forest Camp all the way upwards to Olvega, depending on how many obstacles they encounter they can take up to a week and a half to arrive. It’s best to camp out on the right side of Olvega as they will always approach from the eastern road. If you have still been on good terms with the guerrillas you can set up your ambush before you open fire as they will not be initially hostile. A series of grenade launchers can trivialize this mission as well considering they group up.

The Convoy
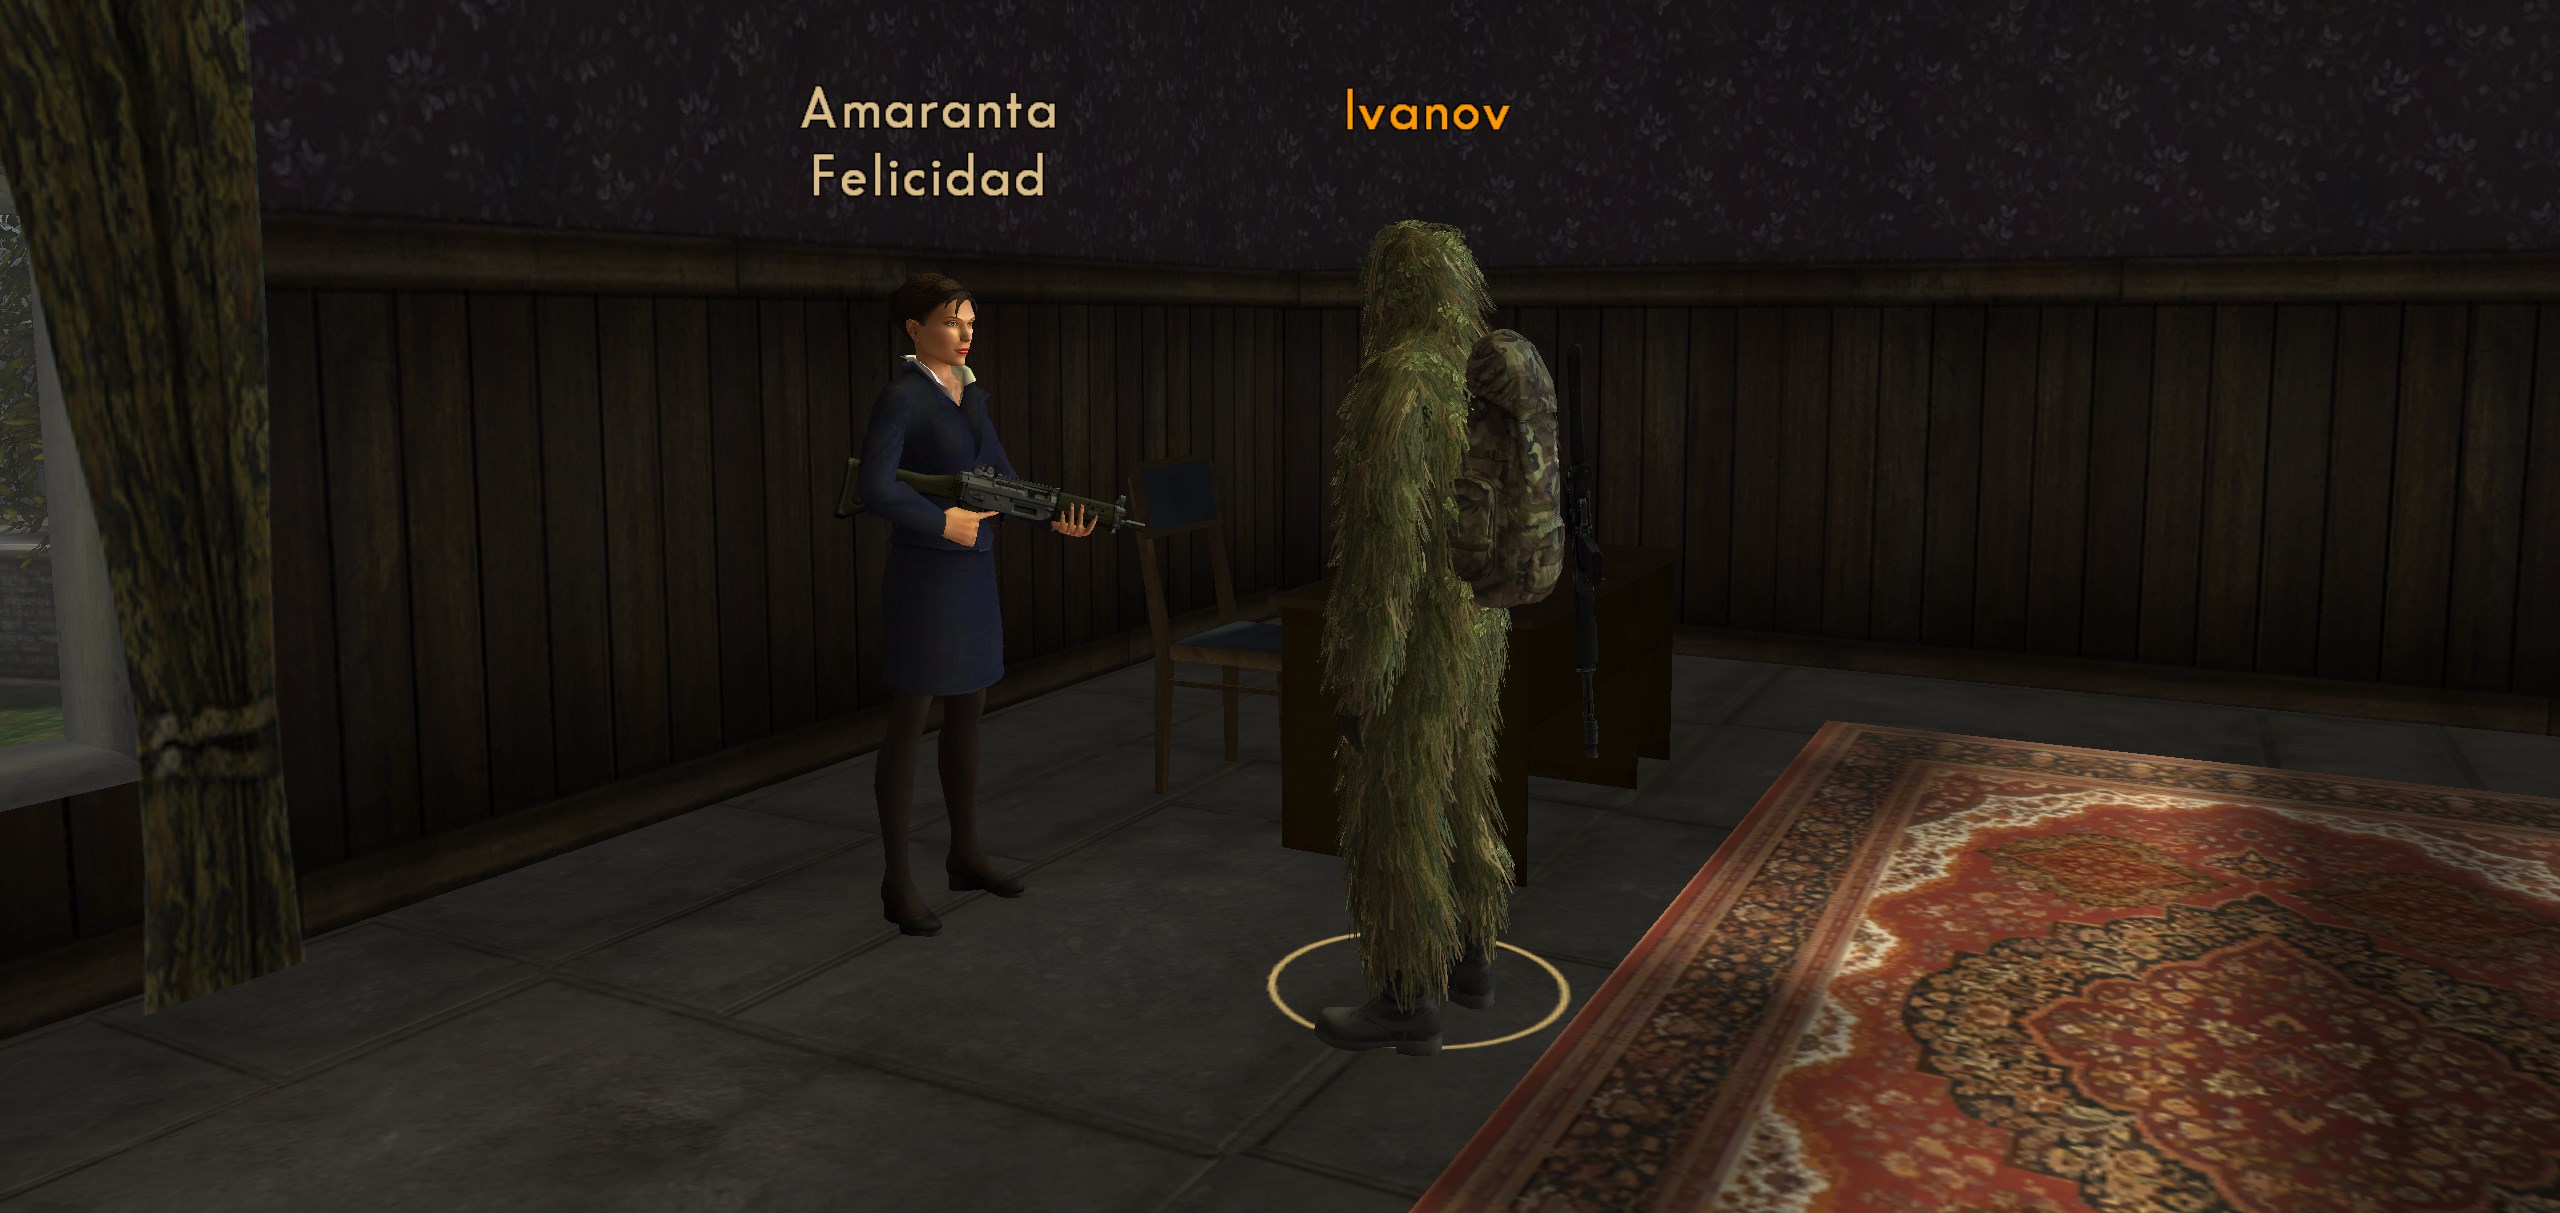
Obtained by talking to Ms. Felicidad located on the second floor of the government building in Artigo.
You’re supposed to follow a convoy leaving Artrigo and heading to Olvega, although she seems to have knowingly sent the convoy to die and will not react poorly if you fail the mission. Recommended to just let the convoy get killed, the massive amount of hours you will spend attempting this is better spent elsewhere.
The Gold
YOU MUST ACCEPT THIS QUEST IN PERSON OR IT WILL BUG OUT.
Talk to Juan Rebenga once again. The rebels have played their hand and will be attempting a full-scale attack on Cuidad-De-Oro in the hopes of capturing the city. Head over there and assist government forces in the town’s defense. A total of around 60 or so guerrilla troops will arrive in two separate waves, make sure you bring a lot of ammunition. There will be a brief period between waves where you can pause the game and resupply your soldiers through the car inventory menu.
Setting up remote explosives before-hand can help significantly, but make sure that not even one stray fragment hits any friendly troops or they will turn on you.
At the end of this mission you’ll be asked if you’d like to join the Army, if you accept you’ll be given an outfit, a military license and access to the armory at Artrigo.
Side Quests
“Politics”

Help Thomas Certino in Campecino eliminate his Political Rival.
WITH EITHER METHOD YOU CANNOT ATTACK THE POLITICIAN OR YOU WILL FAIL THE QUEST.
There’s two options for this quest:
1. If you have a high enough intelligence you can just run straight up to the politician and insult his policies until he becomes enraged and calls his guards to attack you. Just run away to a safe corner of the map and let the police force enact some sweet justice on them.
2. If your intelligence stat is not high enough he will disregard you, and you’ll need to recruit some outside help. Talk to the prostitute outside of the bar and ask for her help. You’ll gain her as a party member after paying her a small fee. At that point, talk to the politician as the prostitute and follow the dialogue options. He will become enraged and the same outcome will occur.
“Old Car for Rent”

Talk to the Fournier couple located in Puerto Viejo, they are stranded and their car won’t start.
DO NOT PULL THE PARKING BRAKE OR YOU WILL FAIL THE QUEST.
Go to the trunk and get the set of wrenches through the dialogue options. Then proceed to the hood and examine the generator belt, upon realizing that it is missing you can replace it with one of your own. Then, put the wrenches back and take the manual starter. Use the dialogue options to start the car (via the visual inspection tree) and talk to Henry Fournier. He’ll realize that he has no gas, and gives you some money to go buy a full gas-can for him. Give him a full gas-can and take the ride to Sagrada with them.
“Backpack”

Talk to the museum curator in Puerto Viejo. He’ll offer you a nice backpack for a reasonable price. Accept it and as you leave the building you’ll realize there’s a knife still left in one of the pockets. Return to the curator and give it back after he requests to get some good reputation.
“From Words to Deeds”

Talk to the owner of the hunting shop located in the bar of Puerto Viejo. He’ll tell you that the con artist Alfredo has taken advantage of a loan he offered him, and is refusing to pay it back. To get the money back head over to Alfredo and use whichever skill-check you have the highest numbers in, for most players this will probably be strength although if you’ve done a lot of quests before this it might be professionalism. Take the money back to the hunter to receive a pair of loaded dice!
Bonnie and Clive
Talk to the wounded man Clive in the hospital of Campecino. His love’s father hired some thugs to kill him and he barely escaped with his life, he tasks you with bringing Bonnie an engraved pistol as a sign that he is alive and in the hospital.

Pacifist Route
Head over to Santa-Maria and run over to the Lion Hotel. Inside, first talk to the servant, then the Former Mayor. Tell him “What if their love is real?” He will become enraged, talk to the servant again and ask him to go steal some of the former mayor’s wine bottles from the cellar. Then talk to Bonnie and tell her to come with you. The servant will catch you escaping, threaten to report him for stealing the wine and he won’t call for the guards. Sneak out the back entrance and leave town to avoid bloodshed.

Bring Bonnie back to Campecino to see Clide.
“The Backstab“
Head over to Puerto Viejo after reaching a certain CGL (7+?). Talk to the bartender there and ask him what’s going on recently in the bar. Give him a tip and he’ll reveal that the German in the bar is looking for an escort for his convoy. Go upstairs and talk to him. He’ll tell you to talk to his (extremely) patriotic mechanic downstairs and get the route from him. He’ll also give you a little flag of the country to admire. Talk to Martinez to finalize the plans and prepare yourself to head off into the jungle for about a week. You’ll follow Willi’s armored truck with a Mercedes Unimog. Keep in mind that you’ll have to leave your current vehicle in Puerto Viejo.

NOTE: If you want to keep the Unimog for completions sake you will have to glitch the game. Take a low-value vehicle like one of the motorcyles and bring it to Cali-Cantinos. Leave it there and make the (almost month long) trek back to Puerto Viejo on foot. This will come in handy later for a trick.
Begin the trip and follow the orange marker. After a certain point you’ll see a temporary location named “Ambush”. Go ahead and enter the map and gear yourself up, run to the other side of the map and talk to Willi, who will reveal that Jorge Banto attempted to assassinate him while his back was turned. Luckily for Willi, his guards were quickshots and managed to take him down before he could do any harm. Unluckily for Willi, Jorge was smart enough to leave a back-up plan. The armored vehicle is rigged with an explosive to blow and it is up to us to figure out how to disarm it.
If you think back to what we know about Jorge, he was a fanatical patriot and treated the flag of the country with the utmost respect.

If we cut the wires in the order of the flag we would cut them red, black, blue and then white. The bomb will be disarmed, but don’t let your guard down yet. A few moments after disarming it bandits appear from over the horizon and open fire. Since they spawn in a group, a grenade launcher is very effective at killing or shocking them. Make sure that Willis does not die, the quest will fail if he does. After taking out the bandits, talk to Willis who suspects that his partner Martinez set him up along with Jorge. Convince him to let you talk to Jorge before making any decisions, and then run back over to the other side of the map.

Jorge will admit that he went along with the plan, but was not aware of the full scope of the plan. He never wanted Willis to get hurt, only for the compromising pictures Willis had of him to be destroyed in the explosion. For the best ending, don’t kill him. Go back and talk to Willis about it.
Convince him that Jorge just wanted to leave but couldn’t because of the pictures. He isn’t happy with Martinez but decides he is pathetic and lets him live out of respect for their former relationship.
Clean up the loot and continue on the journey, same way as before. Once you hit the Palinero border you will be stopped again by some soldiers. If you talk to the commander you can choose options to bribe him for $15,000 in order to peacefully solve the situation. The $15,000 bribe is much less expensive than the $50,000 that will be required if you choose to open fire on the military so unless you are playing a hardcore rebel a bribe is the best choice.
Keep following the convoy again, if you wanted to keep the Unimog here is where the trick comes into play. Right before the convoy reaches Cali-Cantinos, arrive before them and use your key menu to select the vehicle you left there. This will switch the Unimog with the vehicle you left. Go back to the world map and pass time till the convoy reaches Cali. Go back into the map and talk to Willis, located near one of the exits. He will tell you that he no longer has any need for his weapon or his vehicle, and that he intends to abandon smuggling to take care of his mother.
Side Quests (2)
Modifying Your Weapons
Weapons in 7,62 are modeled the same after their real-life counterparts. A side effect of this is that you’ll have to use the proper attachments, or adapters to fit certain attachments on weapons that may be from different countries and use different mounting systems.