
Overview
Serious Sam’s Strategy Guide to a Seriously Successful Run or:How I Learned to Stop Worrying and Love Serious DifficultyThis guide is to be presented as an unofficial strategy guide in helping you, the player, in achieving the most you can under the pressuring circumstances of Serious difficulty — the true, and the most fun, difficulty of Serious Sam.Don’t forget to favourite, comment and leave a rating!
Contents
-
Introduction
- Short note on the contention of this guide
-
Serious Difficulty
- What has changed compared to previous difficulties
-
Weapons
- Bullets
- Revolver(s)
- Tommy Gun
- Minigun
- Sniper Rifle
- Shells
- Pump-Action Shotgun
- Double Barrel Shotgun
- Projectiles
- Rocket Launcher
- Grenade Launcher
- Lasergun
- Cannon
- Other
- Military Knife
- Chainsaw
- Flamethrower
- Serious Bomb
- Bullets
-
Enemies
- Part One
- Beheaded Rocketeer
- Beheaded Firecracker
- Beheaded Bomber
- Zorg Mercenary
- Zorg Commander
- Male Gnaar
- Female Gnaar
- Witch-Harpy
- Part Two
- Electro-Fish
- Marsh Hopper
- Kamikaze
- Kleer
- Part Three
- Cucurbito
- Werebull
- Zumb’ul
- Lava Golem
- Part Four
- Minor Biomechanoid
- Major Biomechanoid
- Juvenile Arachnoid
- Adult Arachnoid
- Cannon
- Part Five
- Common Reptiloid
- Highlander Reptiloid
- Demon Reptiloid
- Part One
-
Environment
- Indoors
- Outdoors
- Arenas
- Corridors
-
Coping Mechanisms: Broad Strategies
- Key Mapping
- Using Third-Person View
- Rocket Jumping
- Peripheral Vision and Unseen Enemies
- Causing the Enemy to Flinch
-
Co-op
- What changes in co-op with additional enemies.
- What changes in enemy behavior in co-op.
- How to support your friend.
-
Secrets & Shortcuts
- Secrets and Shortcuts to help you through your Serious difficulty run
Introduction
Serious Sam has been renown for several things since its first release in 2001, most notably its core gameplay of “run’n’gun” and its ability to overwhelm the player with sheer numbers, sometimes weighing out 300:1 in a single area.
The genius of the game comes from the simplicity of it all, with the single intention to progress through the level against all numerical odds in what’s regarded as the original Danmaku first person shooter (translating into ‘barrage’, ‘bullet hell’ and ‘curtain of fire’).
Although Serious Sam prides itself in tricking the player through several traps and outnumbering odds, I still feel disheartened by the majority of all players who will turn away such an exciting challenge as playing this game on Serious difficulty.
Serious difficulty does more than simply ramp up the spawn count and enemy health, it also redesigns enemy spawns, allowing for more encounters with tougher enemies, as well as giving the player double the ammo to fight them back.
The difference still sounds minimal, but it’s utilised enough that it feels like a whole different experience, and I can’t bring myself to play on a difficulty any lower.
This will not be a walkthrough, but it will be a detailed guide on how to overcome the challenge by providing you with details, statistics, tips and pointers in the right direction to beat the best of what Croteam has to offer.
Serious Difficulty
The Serious difficulty is, easily, one of the most infamous difficulties of the classic/arcade FPS world. It’s renown for its brutality in numbers, both in enemies and damage. Much like DOOM’s “Ultra-Violence” difficulty, Serious Sam’s “Serious” difficulty is ‘how it should truly be played’, as generally stated by members of the community.
To summarise:
- More enemies
- Altered enemy spawns
- x50/51 score multiplier
- x2 ammunition
- x2 enemy damage
- x1.25 faster enemy reaction time
- x1.25 faster enemy detection time
- Self damage is deadly
- Item traps are more dangerous
Weapons: Bullets

Damage: 10
Ammo: Infinite ∞ (reloading every 6-12 shots)
Effectiveness: Low
The very first weapon you start with alongside the knife. Speaking about the revolver ‘alone’ is redundant, as its partner is literally 10 seconds to the right of the first level in The First Encounter, and 10 seconds behind you across the lake in The Second Encounter.
When paired together, the revolvers prove to be a formidable weapon, albeit useless beyond the first few levels other than the few specific circumstances you might find yourself coming across.
Sometimes enemies might just be so far away that you can kill them with the revolvers before they’re near you, and due to the revolvers’ accuracy, you’re wasting no time, or ammo, killing them.
This weapon is the most versatile long-range weapon until you get a hold of the Tommy Gun, but it will still work wonders on any weak, low-count enemies including beheaded enemies, zorgs, kamikazes, gnaars, marsh-hoppers, harpies or electro-fish. On these enemies, players can experience the flinch strategy using the revolver, causing enemies to briefly pause so the player can make distance. This works well specifically on kamikazes.
It may sound like a well-rounded weapon, but to reinstate, its DPS is simply too low to deal with any mixed horde beyond the count of 20. It’s better to think of it as your sniper rifle for the weak.
The revolvers individually manage 6 shots before requiring a reload. A great tactic to remember is that if you switch to another weapon, your revolvers will have replenished their ammo, meaning it’s quicker to simply swap them out then back in after firing 5 shots to avoid reloading.
Serious Sam wiki article for Revolvers[www.serioussam.wikia.com]
_________________________________________________________________________________

Damage: 10
Ammo: 999
Effectiveness: Medium
Your first automatic weapon, bundled up as the coolest submachine gun ever designed. It does the same damage with the same accuracy as the revolver, but with a superior fire-rate. It will become the standard replacement for the revolvers, but early on there is very little ammo reserve.
The Tommy Gun proves itself immediately, being essential for accurately taking out weak or average enemies effortlessly, or for singling out larger enemies without needing to waste shotgun or rocket launcher ammo. Against any hordes early in the game, excluding ones with the werebull, you could almost use the Tommy Gun exclusively if not for the lack of ammo.
This also opens you up more broadly to the flinch strategy, allowing you to achieve it at a much faster rate against average enemies such as kleers, cucurbitos, zumb’uls, aludran reptiloids, werebulls, small and medium lava golems, minor biomechanoids as well as any enemy below those health thresholds.
This weapon will be your first primary method of creating distance between you and the enemies, allowing you to effectively prioritise and safely take out enemies at different ranges.
Although the Minigun may appear as a direct replacement, some experienced players may prefer to use the Tommy Gun when in tight areas due to its ability to fire immediately, as opposed to the wind-up time of the Minigun which can potentially leave you in danger.
Serious Sam wiki article for the Tommy Gun[www.serioussam.wikia.com]
_________________________________________________________________________________
Damage: 20
Ammo: 999
Effectiveness: High
Alongside the Rocket Launcher and Cannon, the Minigun is the crux of Sam’s arsenal. Dishing out 20 damage per shot, it provides one of the highest, most consistent DPS rates in the entire game. If it’s stocked up on enough ammo, the killing potential and crowd control provide endless capability.
The Minigun is arguably the most effective weapon for any situation with a mixture of enemies which range from weak to strong, at a distance from close to far. It allows for consistent damage amongst the faster, weaker enemies to the farther, stronger enemies, allowing you to prioritise which target to attack at any given second, creating distance and space in-between.
Although bullet ammo is valuable, it’s not particularly sparse by the time you get the Minigun. That’s not to say you should use it on literally everything, but you’re more than able clearing hordes of enemies without ruining your ammo reserve in the long run.
Effective strategies with the Minigun shine when defending yourself from projectiles, such as shooting the rockets from Major Biomechanoids, as well as the heat-seeking balls of Aludran Reptiloids, all the while maintaining direct focus fire on the enemy itself.
Serious Sam wiki article for the Minigun[www.serioussam.wikia.com]
_________________________________________________________________________________
Damage: 70 (unzoomed)/300 (zoomed)
Ammo: 100
Effectiveness: High
Your official, high damage, low rate of fire, semi-automatic weapon in Serious Sam. With a scope ranging from 2x-4x zoom to choose between a larger peripheral or a more precise shot for your tartgets, this is the most efficient weapon for long-range combat against tough enemies.
Before this weapon is discussed, the rule of thumb is that you must always zoom in when firing this weapon to achieve its full damage, otherwise you’re wasting its valuable ammo. If you’re caught in a pinch with it out, know that it is still 100% accurate unzoomed, and can still do 70 damage, making it viable to kill/flinch an enemy that caught you by surprised before switching weapons.
If you miss with the Sniper Rifle, you will not be able to switch weapons until the next bullet has been loaded, so be very wary of missing when enemies are close by.
300 damage may seem very luxurious, and it is, but the Rocket Launcher or Grenade Launcher can be more effective at taking down middle or long-range targets thanks to the significantly faster rate of fire, as well as the area of effect damage they apply.
It’s recommended to use the Sniper Rifle against arachnoids, aludran reptiloids, minor biomechanoids, werebulls, small/medium lava golems, zumb’uls and cucurbitos due to the significant amount of damage they do in proportion to their health, but it is not recommended to use it against major biomechanoids, large lava golems, demon or highlander reptiloids as the sniper rifle receives a damage debuff, taking significantly more shots to take down.
When you’re not in a major fight, the Sniper Rifle is also very effective at taking out kleers and harpies due to it only requiring a single shot, making the scenario a lot easier to digest.
Know that if paired with Serious Damage, the Sniper Rifle is viable to use against any enemy aside from highlander repitiloids and large lava golems.
Serious Sam wiki article for the Sniper Rifle[www.serioussam.wikia.com]
Weapons: Shells

Damage: 70 (10 per pellet)
Ammo: 200
Effectiveness: Low/Medium
Providing 7 pellets at 10 damage each, this is the first of two shotguns available in Serious Sam. Although, along with its brother, it’s placed back in the arsenal when Sam gets bigger guns, the Pump-Action Shotgun proves to be useful early on in the game, and when you’re indoors.
The single-firing shotgun is very cost efficient, and will take down almost any weak or average enemy in 1-4 shots, as well as ensuring the flinch status to create space for you.
Working best against enemy hordes below 20, the shotgun’s spread and fire-rate works to your advantage as it can evenly spread out damage amongst several weak enemies, causing several beheaded enemies or zorgs to flinch, or kamikazes and marsh-hoppers to explode.
Don’t be shy to use it, and be sure not to replace it entirely with the Double Barrel Shotgun, as the fire rate and ammo conservation is what makes this weapon so practical.
Serious Sam wiki article for the Pump-Action Shotgun[www.serioussam.wikia.com]
_________________________________________________________________________________

Damage: 140 (10 per pellet)
Ammo: 200
Effectiveness: Medium
What this shotgun lacks in fire-rate, it makes up for with a strong, well-placed hit. Be sure to obtain this weapon as soon as possible for the earlier levels, as its efficiency at taking down female gnaars, werebulls, minor biomechanoids, arachnoids and kleers is impeccable indoors.
Despite double the pellet count, the Double Barrel Shotgun is equally as ineffective as the Pump-Action Shotgun when used at medium-range due to the altered spread. With this knowledge, you should know to never use the Double Barrel Shotgun at medium range at the risk of wasting ammo.
This shotgun works best against the average strength enemies, specifically when they are charging at you so you can achieve point blank (140) damage. Due to its lack of fire-rate, the single-firing shotgun is generally better used to remove the weaker enemies.
Timing is the essential skill required when using the Double Barrel Shotgun, as if you miss a shot or it doesn’t do enough damage, you’re left vulnurable with the long reload times in-between. Once you get the hang of timing a shot well enough for consistent, point blank damage, you will be able to one-shot kleers and two-shot werebulls if dodged correctly.
Beyond the games’ halfway point, both shotguns fall very bleak in comparison to the rest of your arsenal, and will only become useful again if you are really lacking in ammo, or when you enter a new area and have your arsenal stripped away from you.
Serious Sam wiki article for the Double Barrel Shotgun[www.serioussam.wikia.com]
Weapons: Projectiles

Damage: 100 (+0-50 AoE)
Ammo: 100
Effectiveness: High
Alongside the Minigun, the Rocket Launcher is the most commonly used weapon across the entire Serious Sam franchise. This is due to its high ammo spawn and practicality during fights. It’s effectiveness comes from its overall damage, area of effect, and decent fire-rate.
Although it’s dangerous to use indoors due to self-damage, it’s incredibly useful against just about any enemy in the game given a well-placed shot. It’s capable of two-hitting werebulls, and capable of whittling down a horde’s health thanks to the area of effect damage, or completely annihilating weak enemies such as kamikazes, marsh-hoppers, electro-fish and harpies.
Consider it the alter-ego of the Minigun, but prevailing at taking down larger enemies and falling flat at efficient crowd control. Although its fire-rate is average, it’s incredibly easy to fire several shots that will hit arachnoids, reptiloids, lava golems or biomechanoids at any distance. Know that it’s recommended to fire an additional shot or two at reptiloids, lava golems or biomechanoids as their large projectiles might get in the way of your rocket and blow it up, deflecting the damage.
It’s fire rate and projectile speed makes it easier for you to dish out damage when diving from cover to cover without having to be in the direct line of sight when firing — use this to your advantage, as there will be many circumstances where this will happen. Once you learn how many shots it takes to kill an enemy, you can fire that many shots, then safely move onto the next enemy know that you have allocated enough rockets to defeat it.
The Rocket Launcher, along with the Lasergun and Cannon, is the most effective weapon to use during boss fights due to its consistent damage that doesn’t require your full attention.
The Rocket Launcher also enables the ability to rocket jump (at your own risk).
Serious Sam wiki article for the Rocket Launcher[www.serioussam.wikia.com]
_________________________________________________________________________________

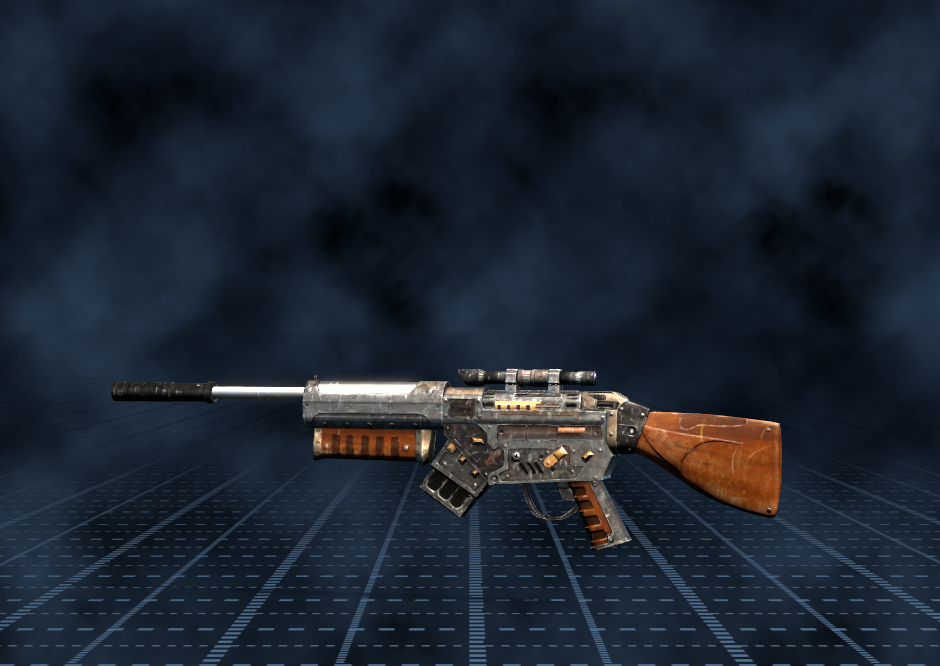
Damage: 75 (+0-100 AoE)
Ammo: 100
Effectiveness: High
The most underrated piece of equipment in Sam’s arsenal, this usually goes unused throughout the entire game due to the Rocket Launcher’s capabilities. With its higher direct hit damage and insane projectile speed and fire rate, the Grenade Launcher should not be ignored.
Although the Rocket Launcher has a lot of perks, the Grenade Launcher is essentially superior if mastered correctly. At a direct hit, it will do 175 damage (in contrast to the Rocket Launcher’s 150), it has the fastest explosive projectile speed if charged, and can be shot as fast as you can click. The Grenade Launcher also isn’t hindered by sharing ammunition like the shotguns and Tommy Gun/Minigun are, making its ammo pool essentially larger and easier to save.
Thanks to the bonus 25 damage, the Grenade Launcher can one-shot cucurbitos. The projectile speed makes killing distant werebulls, kleers, biomechanoids, arachnoids, reptiloids and horde enemies a breeze. The fire-as-fast-as-you-can-shoot capabilities allow you to lay out entire carpet bombs to create high DPS and creating heaps of space between you and the enemies.
You can use the explosion of the Grenade Launcher to boost yourself, but is entirely unrecommended as it will do more self-damage and is a lot harder to time correctly.
The Grenade Launcher projectile is capable of bouncing off of walls, as it only explodes on contact with enemies, or if its internal timer reaches 0 in a few seconds.
Binding mouswheel up/down to “Fire” will allow for a much faster fire rate, but I would argue it being ineffective in most circumstances as its charge and projectile speed are more important.
Serious Sam wiki article for the Grenade Launcher[www.serioussam.wikia.com]
_________________________________________________________________________________

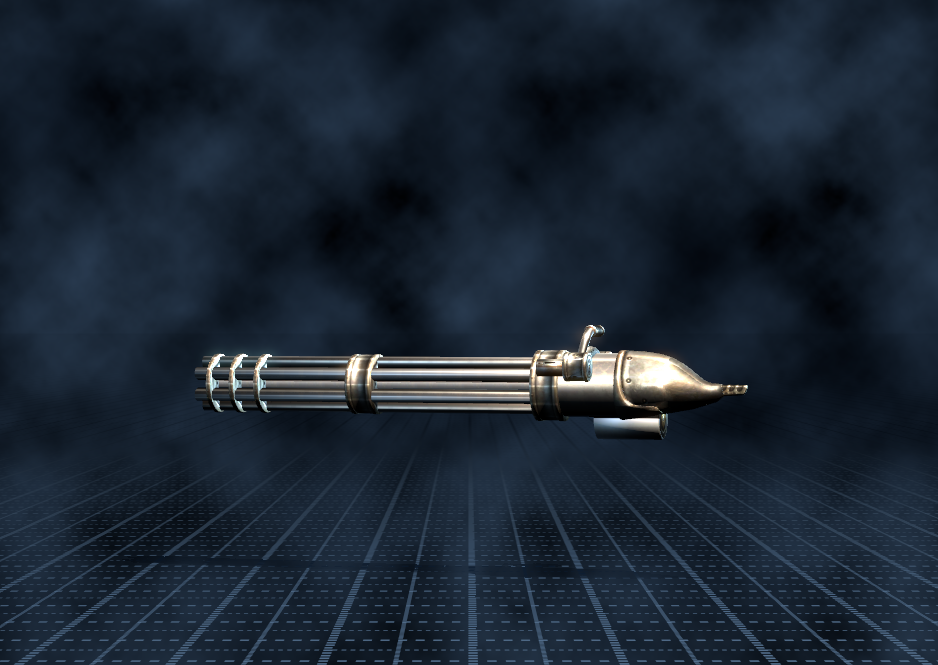
Damage: 20
Ammo: 800
Effectiveness: High
One of the more unfitting weapons in the game, the Lasergun is essentially a projectile-based version of the Minigun, but has a lower ammo count and ‘bullet drag’ due to the low projectile speeds making it impractical at first sight, but proving to be very effective to use when bullet ammo is lacking.
It would be harsh to say the Lasergun is objectively worse than the Minigun, but in most circumstances it simply isn’t as efficient as taking down enemies as the Minigun. What players should take into account though, is that it has its own unique ammunition, making it a fantastic Minigun replacement when bullet ammo needs to be preserved.
The Lasergun is very effective at taking down the same enemies as the Minigun, and is also incredibly good at taking down any enemy projectile in the game with ease. That is why I recommend to use it safely against Reptiloids, Biomechanoids, Arachnoids and Lava Golems, otherwise it’s just best to stick to the Minigun.
Serious Sam wiki article for the Lasergun[www.serioussam.wikia.com]
_________________________________________________________________________________

Damage:500 (750 fully charged)
Ammo: 60
Effectiveness: Very High
The biggest weapon in Sam’s arsenal; the key weapon in destroying any and everything. The Cannon provides are consistent rate of fire, insane amounts of damage, a fast projectile speed and the ability to not only pierce through weak and average enemies, but to also bounce off structures.
What a player needs to take note of is how to correctly aim a cannon, as it’s prone to falling over distance, so using it on distant, strong enemies on top of buildings may take a long time to master. Charging the cannonball will not only do more damage, but will also pierce through a lot more enemies before exploding. To use it to full effectiveness, for example, charge a shot and aim it directly at a strong enemy, and upon firing ensure that it pierces through several weaker enemies running at you.
The Cannon is the primary weapon that should be used against all bosses (when available) for maximum DPS output. Using it outside of a large fight or boss fight is not recommended, as its ammo is incredibly limited in comparison to other weapons.
Serious Sam wiki article for the Cannon[www.serioussam.wikia.com]
Weapons: Other

Damage: 120
Ammo: N/A
Effectiveness: Low
One of the two starter weapons, as well as one of the two melee weapons in the game, the military knife is a high damage weapon with very limited range that can be used on weak enemies, or average enemies if the player is feeling up to the challenge or feels it’s necessary.
Although it has high DPS, the Military Knife is simply not recommended on Serious difficulty as it leaves you prone to being damaged by a strong melee attack from an enemy, which can be extremely fatal. Even when paired with Serious Damage for heaps of DPS, it’s still not viable.
If you’ve got the talent to dodge small packs of kleers and werebulls and want to knife them down to conserve ammo, go ahead and use it. But on Serious difficulty, you should be well enough with your own ammunition assuming you find the secrets.
Serious Sam wiki article for the Military Knife[www.serioussam.wikia.com]
_________________________________________________________________________________

Damage: 25 DPS
Ammo: N/A
Effectiveness: Low/Medium
Essentially the knife replacement that was introduced in The Second Encounter, the Chainsaw provides high DPS at close-range combat that can be effective against weak and some average enemies, as it can cause the flinch status easy, to the point where enemies can’t react.
Particularly good against beheaded enemies, kleers, harpies and kleers, the Chainsaw can be devestating in the right hands. Unfortunately its strengths die out as horde numbers increase, along with many tougher, farther enemies using projectile attacks.
Note that the Chainsaw is insanely good against marsh-hoppers as they will dive directly into your chainsaw, mincing hundreds of them if you’re able to circle-strafe crowds of them properly. This is very high-risk if you’re not too good at it, but it will conserve a lot of ammo.
Serious Sam wiki article for the Chainsaw[www.serioussam.wikia.com]
_________________________________________________________________________________

Damage: 10 per flame (+burn damage)
Ammo: 999
Effectiveness:High/Very High
By far one of the most practical and necessary weapons in Sam’s arsenal, should it be used in the right circumstance, very little will get in your way. With an insane rate of fire, high DPS, its own ammo pool and the ability for the flame to pierce enemies, the Flamethrower is a hot miracle.
Thanks to how early you will encounter the Flamethrower in The Next Encounter, it’s incredibly effective against most early hordes of the game, incinerating almost any weak enemy instantaneously, and most average enemies with a few bursts.
There is no weapon better at causing the flinch status, as it can cause flinch on a single enemy several times in succession, rendering them harmless until the burn effect wears off. A single click can render a kamikaze immobile. It works very well against Kleers, allowing you to damage several at a time without having to prioritise and target a single one, the same goes for harpies and marsh-hoppers, as well as just about any other horde mix.
Don’t rely on this weapon to much as its ammo is very scarce in comparison to other weapons, but don’t be afraid to use it liberally when you believe it’s appropriate.
Please note that it does not harm Lava Golems of any sort.
Serious Sam wiki article for the Flamethrower[www.serioussam.wikia.com]
_________________________________________________________________________________

Damage: Serious.
Ammo: 3
Effectiveness: Very High
The birthday candle. The party cracker. The lone firework. The nuke. The worst case scenario. The last chance. The end. The do-over. The second chance. The big bang. The exterminatus. The be-all-to-end-all. The screen clearer. The bomb.
The Serious Bomb.
This doesn’t need to be explained, it does exactly what you think it does. This explosive will obliterate all non-boss enemies within 215 meters (or 700 feet), saving you from imminent destruction should you find yourself in an unwinnable situation, or if you’re absolutely certain it’s best to use it for a tactical advantage regarding your ammo pool of other weapons.
These are incredibly rare to come across, and will not be replenished by Serious Ammo Bags or anything of the sort, so once you use it, you won’t be coming across another for a while. Should you save up too many over the fear of wasting them, know that there are plenty of situations in the last few levels of every area in The Second Encounter where you may find appropriate.
Serious Sam wiki article for the Serious Bomb[www.serioussam.wikia.com]
Enemies: Part 1

The standard enemies in Serious Sam, coming in three separate colours to distinguish which of the three does what particular attack. Rocketeers fire a single projectile through the air, Firecrackers fire several shots across the ground that climb some short walls, and Bombers which will lob explosives and explode upon death. Best countered by using bullet or shell weapons.
Health: 19
Damage: 10 ranged/20 melee
Points: 200
Tactics: Side strafe their simple attack, using any high-ammo weapon to take them down in 1-2 shots. Any projectile-based weapon is simply overkill, so stick to bullets or shells.
Health: 19
Damage: 8 ranged/40 melee
Points: 200
Tactics: Like the Rocketeer, except several shots are spread across the ground. Dodge by stepping inbetween the shots, or by simply jumping over them. Use a weapon generous with ammo.
Health: 19
Damage: 20 direct (+0-30 blast radius)
Points: 500
Tactics: Like the rest, except throws a single bomb every now and again. Avoid these, and the explosion radius, by moving away from the where the bomb is landing. Try to always be moving, and utilise similar weapons to take them down as the other two variations.
Serious Sam wiki article for the Beheaded Rocketeer[www.serioussam.wikia.com]
Serious Sam wiki article for the Beheaded Firecracker[www.serioussam.wikia.com]
Serious Sam wiki article for the Beheaded Bomber[www.serioussam.wikia.com]
_________________________________________________________________________________

Essentially the beheaded enemy variant found in The Second Encounter, yet appearing less frequently but having more health and more damage. There is the standard red version which fires a single shot, and the rarer blue version that fires three shots in different directions.
Health: 40
Damage: 20 ranged
Points: 500
Tactics: Never much of a priority in a big fight as their projectiles are easy to dodge, whether jumping or stafing, so use whatever weapon that appears necessary (preferably bullet or shell-based) at the point of encountering them.
Health: 60
Damage: 20 ranged
Points: 800
Tactics: Very similar to the Mercenary counterpart, except rarer (usually one per pack), slightly more health, and more projectiles fired in a single shot. Dispose of them the same way you would with the standard mercenaries, by using any weapon with a high ammo pool.
Serious Sam wiki article for the Zorg Mercenary[www.serioussam.wikia.com]
Serious Sam wiki article for the Zorg Commander[www.serioussam.wikia.com]
_________________________________________________________________________________

The gnaar enemies, both variants, are a weak, relatively-fast meatshield that you will encounter in early fights and most predominantly indoors. They are incredibly weak and easy to dodge, but may hinder your progress when attempting to target more destructive enemies.
On rare occasions you will find transparent, limbless, flying gnaar. Be sure to prioritise these as they are difficult to take care of and may get in the way of explosive weaponry.
Health: 60
Damage: 7 melee
Points: 200
Tactics: Can be taken down in a few shots by a Tommy Gun, or by a single Pump-Action Shotgun shot. Their attacks can be dodged by jumping over them and sometimes balancing on their head to avoid damage. Easy to avoid.
Health: 90
Damage: 7 melee
Points: 500
Tactics: Can’t be taken down in a single Pump-Action Shotgun shot, but will definitely die to a single Double Barrel shot. Exact same tactics may be used on the female from the male, meaning you can still jump on or over their heads to dodge their attacks.
Serious Sam wiki article for Gnaars[www.serioussam.wikia.com]
_________________________________________________________________________________

Health: 100
Damage: 16 ranged/40 melee
Points: 1,000
Tactics: These are the only airborne enemies in the entire game, ignoring the odd few floating gnaar enemies. Witch-harpies are found always in groups, numbering from 3-50 depending on the location, all firing fast, small projectiles that do moderate damage. Although they fly, they can be found running on the ground if damaged.
Witch-harpies are usually first spotted very far in the distance, generally launching their projectiles at the same time due to their spawn and location of the player. While they’re in the distance, players can decide whether or not they want to remove them from the equation now — while dodging closer enemies — or later when they’re closer and the nearby enemies have been limited.
Players should be wary that if they do get close, they will have a swooping melee attack which will accumulate to a lot of damage, and is relatively harder to dodge than most other attacks as they will hone in on you.
Essentially any weapon works well on witch-harpies, especially explosives when they are clustered together, but the preferred weapon of choice is anything bullet-based or the Lasergun.
Serious Sam wiki article for Witch-Harpies[www.serioussam.wikia.com]
Enemies: Part 2
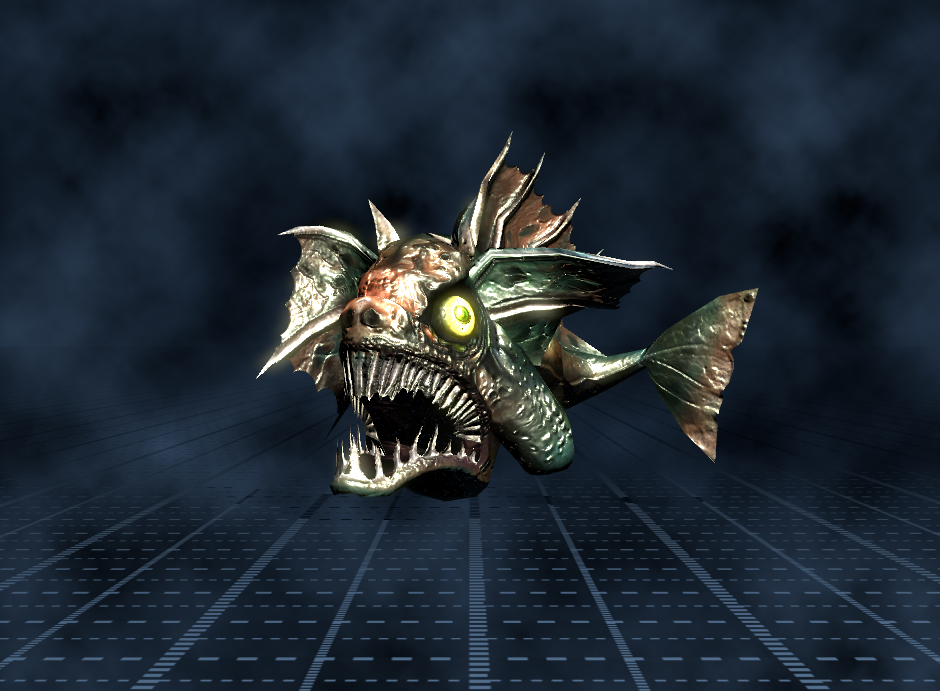
Health: 30
Damage: 30 melee/30 ranged
Points: 500
Tactics: The only water-based enemy in the entire game. These enemies have a long attack ranage, move incredibly fast, spawn in packs, and are very difficult to spot until they’re already too close. Even though they’re fish, they are capable of attacking you from land, and sometimes may even leap onto land to attack you.
Thankfully they have very low base health, requiring only a few bullets to kill, or generally a single shot from a shotgun to take down. This makes weapons such as the Tommy Gun or Minigun very proficient. Some players may use explosive weaponry in an attempt to wipe out packs at a time, but this can be very high-risk as you might miss, or will be subjected to self-damage.
Backing yourself into a corner or at the end of a passage-way will make the process of killing them much safer as they will remain in your line-of-sight, instead of managing to appear behind you.
When you find yourself stuck in the water, listen out for their gurgling idle sound, as this will give a good indication to their location so you won’t be struck by surprise.
Serious Sam wiki article for Electro-fish[www.serioussam.wikia.com]
_________________________________________________________________________________
Health: 9.5
Damage: 20 on contact
Points: 500
Tactics: Although a lone marsh hopper is not dangerous, in packs they can potentially be the most difficult horde enemy in the entire game. If not dealt with almost immediately, the player is subjected to being overwhelmed in moments, dying incredibly quickly if the damage continues to stack. They often appear in traps or in their own dedicated space depending on the level.
When these appear, they will require full attention to suppress their rapidly fast spawns. These enemies are the only kind to be in such a high number that they create their own boss health bar in The First Encounter. They are best combated by a lot of weapons, most particularly the Tommy Gun or Minigun depending on the quantity, and sometimes an explosive weapon to take out large piles at a time — though this is risky.
Due to the Minigun’s efficiency at crowd control on weak enemies, it’s the absolute recommendation when having to fight against mash hoppers, but many veteran players will say that the Chainsaw is also viable as marsh hoppers will leap into the player, getting hit by the weapon before they make direct contact with the player. This is high-risk, and it is recommended to learn how to circle-strafe to ensure all the marsh hoppers are infront of you at all times instead of leaping onto you from another direction. This saves a lot of ammo if done correctly.
Serious Sam wiki article for Marsh Hoppers[www.serioussam.wikia.com]
_________________________________________________________________________________
Health: 19
Damage: 60 direct (0-60 AoE)
Points: 2,500
Tactics: Quite possibly the most iconic enemy in the entire franchise, along with the kleer, the kamikaze is notorious across the entire history of video games for their infamous “AAAAAA” scream in massive numbers. Although they have incredibly low health, they are very fast, often protected by other enemies, and will do a whopping amount of damage from a single impact.
On Serious difficulty, you’re simply not going to recover or survive if more than one of these hits you, as you will either have lost all your health and armour, or you’ll be close to death. You cannot outrun the kamikaze enemies, so your best defense is a good offsense. Thankfully, pretty much every weapon in your inventory is superb at taking out these screaming nightmares.
Due to their low health, high density and large explosive radius, killing one will often trigger others to explode nearby, so the absolute best weapons are ones that have their own explosive radius, such as the Grenade Launcher or Rocket Launcher, or a weapon with a high fire rate, such as the Tommy Gun, Minigun or Lasergun. Shotguns are viable, and necessary, early on as the spread will help a lot by making them flinch, as well as they are a very secure way to ensure you won’t miss.
Whenever you find one too close to you, it’s highly recommended to use the Revolvers, Tommy Gun or Flamethrower, by firing them once to cause the kamikaze to flinch, which will allow you to take a few steps back before firing once more and saving yourself from being hit or impacted too hard by the explosive radius.
Keep your distance, be aware, prioritise correctly. You will come across a lot of these.
Serious Sam wiki article for Kamikazes[www.serioussam.wikia.com]
_________________________________________________________________________________
Health: 130
Damage: 20 ranged/40 melee
Points: 1,000
Tactics: The cornerstone of any horde encounter in the Serious Sam franchise, the Kleer is fast, agile, relentless and come in high numbers as well as appearing behind walls and spawning from dangerous secrets with no warning. With the ability to leap and throw a projectile, the kleer will turn a situation difficult if not dealt with fast.
Early on in the game, you will only have the Double Barrel Shotgun to properly counter them, and this is a difficult task. One of the most common strategies in Serious Sam is timing your Double Barrel Shotgun blast to ensure that all pellets strike the enemy. Thankfully, Kleers have 130 health and the Double Barrel Shotgun does 140 damage. This means that you must learn to shoot a kleer at point blank range, which can be done best as it’s leaping at you, or after you dodge it and it pauses.
Be sure to always be circle-strafing when you fight kleers, as you may miss your shotgun shot and it will hit you, and because you’re prone to being surrounded by several kleers from different directions.
Later on, the best weapon of choice is easily the Flamethrower, followed by the Minigun, the Lasergun and the explosive weaponry, preferably in that order. The Cannon is not only viable but necessary for an achievement, but be sure you’ve lined your shot up right so you can elimate as many as you possibly can to get the most out of your cannon shot.
You must learn to be able to continuously dodge kleers, as they will almost always be in a mix of other enemies such as kamikaze, werebull and projectile-firing enemies, all of which you must prioritise before the entirety of the kleers. When you dodge a kleer, it will remain still for roughly 1-2 seconds before turning around to attack again, you must always be aware of this.
To master this dodging, I recommend you keep the kleer(s) in your peripheral vision when playing in third person, or to acknowledge in your head what direction they had lept in, and when they will attempt to leap at you again. This is a very hard, but necessary, skill to learn for many purposes.
To help dodging, be sure to strafe in the direction that the kleer lept, this will generally make it miss its second leap and get it back in your line of sight to shoot at while you prioritise other enemies.
Serious Sam wiki article for Kleers[www.serioussam.wikia.com]
Enemies: Part 3
Health: 175
Damage: 40 melee
Points: 1,500
Tactics: The cucurbito is a considerably harder variant to the kleer. Minus the projectile, the cucurbito has the same charging attack, and will have the same cooldown time after it has missed its attack. Incredibly formidable due to being relatively harder to dodge, as well as having a large sum of health for a moderate strength enemy, the cucurbito will be an unforgiving pain in your side.
The cucurbito, when aggravated, will charge in a straight line directly towards the player, capable of swerving slightly in either direction if a side-stepping dodge is attempted, and moving even faster when it closes in on the player. If the attack connects and the player doesn’t move, they will attack in quick succession until the player is dead. Treat their charges like you would a werebull’s, and be wary that it will turn around to attack again.
The true difficulty behind the cucurbito is thanks to its health. With a grand total of 175, it’s impossible to one-hit it using the Rocket Launcher or Double Barrel Shotgun. Thanks to this, some less-experienced players may be thrown out of their comfort zone by having to quickly switch between weapons or struggle using an extra shot to take them down. If all the enemies are far enough away, shooting down the cucurbito with a Sniper Rifle will make things a lot easier, but the best suited weapon to take them down with is the Grenade Launcher, doing exactly enough damage to one-hit it. This is why you’re introduced to the Grenade Launcher along with a horde of cucurbito in TSE, as an indication by Croteam.
Automatic weapons are viable but you’re likely to be overwhelmed as even the Minigun isn’t all that fantastic at mowing them down in mixed packs (unless you’re very efficient with it).
The Flamethrower works exceptionally well at causing them to twitch, which will immobilise them and allow you to make a huge distance without being harmed.
Serious Sam wiki article for Cucurbitos[www.serioussam.wikia.com]
_________________________________________________________________________________

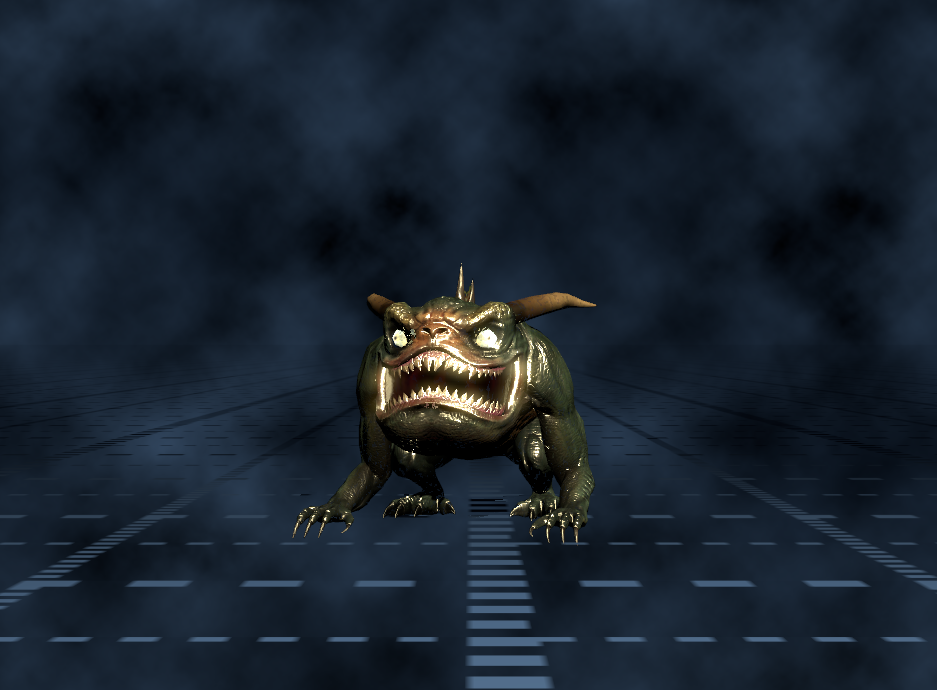
Health: 250
Damage: 40 charge/40 gore
Points: 2,000
Tactics: Werebulls have the highest base movespeed in the entire game, generally being mixed in with any type of enemy to help make a blended mix against the player. They will charge at the player and, if their horns connect, will send them flying away. Unlike kleers and curubitos, if a werebull misses it will attempt to turn around immediately to do a follow up attack.
Although werebulls are quite easy to dodge, they will force you to be quick on your feet in a fight, and will make prioritising enemies much harder as they’re an enemy that needs to be taken care of quickly before more spawn. At no point would you want more than 3 werebulls left ignored. The problem with taking them down is that they have quite a bit of health, meaning they will occupy your time while other, slower enemies make their way towards you.
If taken care of first, your options on maneuvering the arenas will be far greater. Thankfully, werebulls are a large enemy and are quite easy to hit. Two shots from a Double Barrel Shotgun will take them down early in the game, as will the Rocket Launcher and Grenade Launcher. Fully automatic weapons such as the Lasergun, Minigun and especially Flamethrower are viable. If they are far away, or you’re talented enough to quick-scope — yes, quick-scope — they will die in one shot to the sniper rifle.
They are a simple enemy, you just need to ensure that you are the one in control of where you move in the arena, not the werebulls.
Serious Sam wiki article for Werebulls[www.serioussam.wikia.com]
_________________________________________________________________________________

Health: 210
Damage: 20 ranged (+0~20 AoE)/40 melee
Points: 3,000
Tactics: Like a smaller, less distinguishable major biomechanoid, the Zumb’ul are dual-firing rocketeers that will do consistent damage and catch you off guard if you don’t pay attention. They often appear alone, with usually one or two others located elsewhere on the field. They will fire one rocket at the player, and one in the direction that’s presumed to be where the player is running.
Alone, Zumb’ul are fairly harmless. Only when they’re elevated above the player will the blast radius catch them, when they’re on the same ground as the player, their rockets will only go straight past the player. Their main strength comes from the player not knowing their location, or being to pre-occupied fighting other enemeis.
For distant or elevated Zumb’ul, the Sniper Rifle is perfect as it can allow the player to target them easily, and will one-shot them. For any Zumb’ul hiding amongst or in the back of a horde, any strong weapon will help you get them killed while still being able to maintain focus on the horde.
For the projectiles, know that one of the two fired will always be heading directly towards you, while the other will be off to the side to catch you if you’re running in that direction. If you’re unable to dodge the rockets by strafing, know that it’s possible to jump over the rockets if timed correctly.
Serious Sam wiki article for Zumb’uls[www.serioussam.wikia.com]
_________________________________________________________________________________

Health: 10,000 (L)/800 (M)/100 (S)
Damage: 20/40 melee (+0-10/20 AoE) (S/L & M),
Points: 50,000 (L)/2,500 (M)/500 (S)
Tactics: The most complex enemy in Serious Sam by a longshot, the lava golem comes in three different sizes, both with an AoE melee and AoE ranged projectile attack. Each time a large or medium lava golem is destroyed, it will split into smaller forms. Large and medium golems should be high priority in a fight due to their intense, consistent damage output.
The projectiles thrown by lava golems are able to be shot down, and will do as much damage as the health they have. Large rocks will have 40 health, medium will have 25, and small will have 14, meaning they will do 40/25/14 damage respectively.
Small lava golems are primarily a non-issue and can be taken down quite quickly with any weapon avaiable to you, though melee is not recommended due to their hard-to-dodge counter-attack. The best weapon to use is something fully automatic to dispatch of them quickly.
Medium lava golems are the most threatening, carrying a lot more health and damage than the smaller versions. These should be prioritised quickly in fights as their damage is staggering and hard to dodge when trying to deal with other enemies. A charged cannonball shot will not one-hit them, but following it up with a shot of rocket or Minigun will work.
Large lava golems are far less intimidating than they appear, but will carry an insane amount of health and have incredibly hard projectiles to dodge if not shot down. These large versions are very uncommon and will only appear a few times throughout an entire playthrough, usually appearing as their own type of boss. Cannonballs and explosives are your best friend.
Note: All Lava Golems are immune to the Flamethrower (for obvious reasons).
Serious Sam wiki article for Lava Golems[www.serioussam.wikia.com]
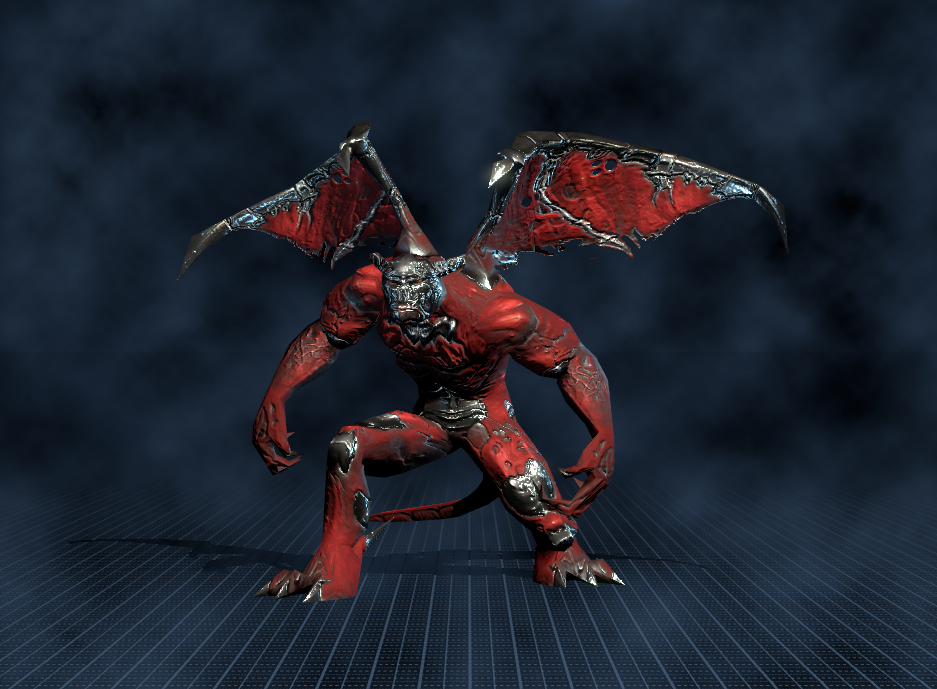
Enemies: Part 4
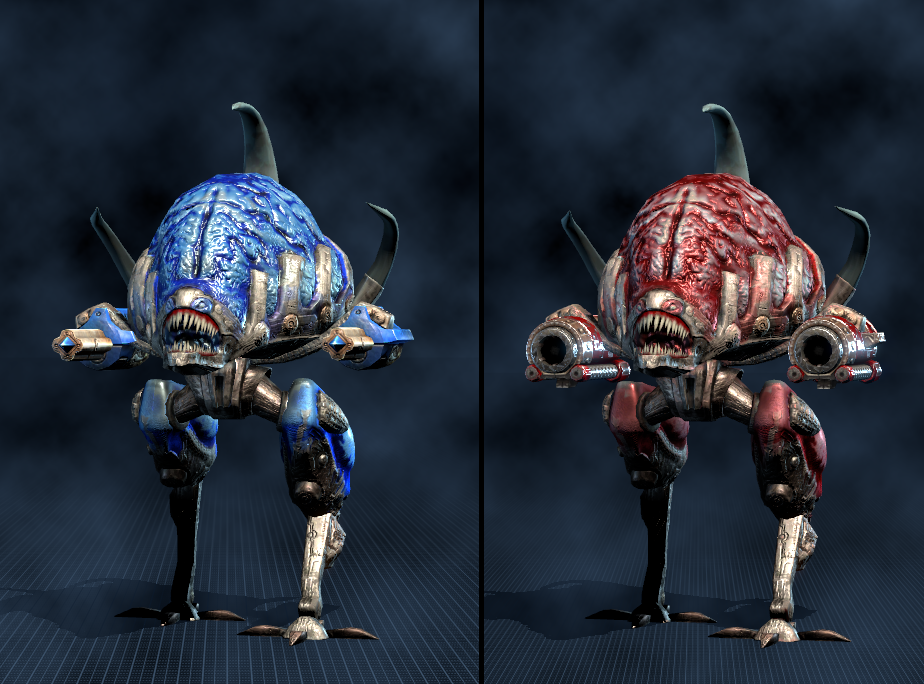
Towering, brain-shaped enemies that appear in two varieties. One is a smaller, blue form that fires lasers, with its firerate and projectile speed increasing with every difficulty, making them deadly on Serious difficulty if left unchecked and constantly avoided. The other is a larger, red form that fires two rockets in sequence, doing huge damage and can tear down a player in moments. Both of these enemies will generally be seen in the distance, but may sometimes spawn incredibly close to the player as a diabolical trap.
Health: 150
Damage: 10 ranged
Points: 2,000
Tactics: Possibly one of the most underrated enemies in Serious difficulty, the minor biomechanoid is capable of dishing out huge amounts of damage due to its constant barrage of laser projectile volleys. Although the damage is only 10, it adds up very quickly as usually there will be more than one minor biomechanoid, and if you’re hit by one laser, chances are you’ll be hit by several.
To avoid this, it’s possible to jump over the lasers, and they will never hit you as long as you’re strafing in one direction. They’re impossible to one-hit with a Double Barrel Shotgun, but one shot with Rocket Launcher or Grenade Launcher, or even some shots from an automatic weapon, and they’ll be dead.
Health: 750
Damage: 200 ranged (+0-100 AoE)
Points: 7,500
Tactics: To put the major biomechanoid on an enemy tier list, it’s up there right besides adault arachnoids, common reptiloids and medium-sized lava golems. They stand high amongst most weaker enemies, adding to the havoc with their dual rocket cannons which fire quite fast in sequence, dealing huge damage that will most likely ensure an insta-gib if directly hit.
From your perspective, major biomechanoids will always fire from their right launcher, then their left launcher — this is the key strategy to success. By using any fully automatic weapon such as the Lasergun, Minigun or (though not recommended) Tommy Gun and aiming it at the right launcher, you are able to easily destroy their rocket projectile without being harmed, and then you can quickly aim at its opposite rocket launcher to get the same effect. This will make them harmless.
Unfortunately, the major biomechanoid is rarely that simple due to its wide variety of spawning. They can often appear well behind a charging pack of enemies, still being able to fire their rockets, in which it’s best to fire explosive projectiles (if rockets, 1-2 more in case they collide with the biomechanoids projectiles) and then keep focus on the closer enemies.
If you fall into a trap where a major biomechanoid spawns incredibly close, you are most likely going to take damage. To mitigate this as much as possible, keep a Minigun equipped when you believe one may spawn so you can target its rocket launchers immediately, and continuously begin to jump to try and mitigate as much AoE damage as possible.
To dodge their projectiles when you can’t prioritise them, simply side-strafe.
Serious Sam wiki article for the Minor Biomechanoid[www.serioussam.wikia.com]
Serious Sam wiki article for the Major Biomechanoid[www.serioussam.wikia.com]
_________________________________________________________________________________

A fairly commonplace enemy type found both indoors and out far in the distance on high structures when outdoors, the Arachnoids can essentially be referred to as the ‘snipers’ of the franchise due to being the only hitscan enemies in the entire game, ignoring the fact they have a machinegun. These enemies are quite powerful, if a player can’t take cover from them, it’s recommended to take them out immediately.
Health: 300
Damage: 20 ranged/40 melee
Points: 1,000
Tactics: These enemies are frequently found sometimes in pairs or higher numbers, spawning in very uncomfortable positions that forces the player to take cover and unable to progress. They do incredibly high, consistent damage that will whittle your health away very quickly. If the player is incredibly close, the Double Barrel Shotgun works very well at causing flinch, but a Tommy Gun or Minigun will manage the same effect from a much farther distance.
To eliminate juvenile arachnoids from the equation immediately, the Sniper Rifle will one-shot them, just be sure you’ve got the space to make the shot without being harassed by other enemies.
Health: 600
Damage: 20 ranged/80 melee
Points: 5,000
Tactics: Although far more menacing with their size and red carapace, the adult arachnoids aren’t that much more of a threat. Aside from doubling the health and melee damage of their juvenile counterpart, their primary output of damage, the machinegun, remains the same.
The same strategies should be applied from the juvenile arachnoids to the adult variant, but more attention must be paid as they’re harder to make twitch, and will require a lot more attention to take down. Although the Sniper Rifle receives a debuff against them, it’s still viable, but sticking to explosive weaponry or fully automatic weapons is a better choice.
Serious Sam wiki article for Juvenile Arachnoids[www.serioussam.wikia.com]
Serious Sam wiki article for Adult Arachnoids[www.serioussam.wikia.com]
_________________________________________________________________________________

Health: 100
Damage: 100 ranged (+0-50 AoE)
Points: 750 (static)/1,000 (rotating)
Pretty much the most regular enemy in Serious Sam, the static and rotating cannons are incredibly uncommon and only appear near the end of The Second Encounter, the static cannons acting like a level prop, and the rotating cannons being set far and high in the distance. Both are capable of high amounts of damage, and are likely to gib the player instantly if they don’t have 200 health and armour.
The static cannon is only found as a secret in The Citadel, acting as a surprise as it will fire a cannonball at the player if the player doesn’t react immediately.
The rotating cannons will only appear in Land of the Damned and The Grand Cathedral, and will most usually be alongside several other rotating cannons. The perfect weapon of choice is the Sniper Rifle as it will one-hit them, and they are hard to target otherwise. Be sure to prioritise them quickly or to remain in cover, as being hit by the cannonballs is almost certified death.
Serious Sam wiki article for the Static Cannons[serioussam.wikia.com]
Serious Sam wiki article for the Rotating Cannons[serioussam.wikia.com]
Enemies: Part 5

Health: 400
Damage: 20 ranged/80 melee
Points: 5,000
Tactics: A relatively common enemy that is always in the distance, much like the familiar arachnoid enemies but instead launching fast moving, homing projectiles that will usually circle the player about two to three times before they expire. The projectiles will force the player to either move quickly on their feet when strafing, or will require attention to be shot down.
The use of strafing is very tactical against these projectiles. As the skill may not come naturally to some players, there is still a rule of thumb they can follow. If the projectile flies past to the right of the player, it is most likely going to circle back clockwise, returning to the left of the player. If done correctly, the player can move to the left, then move counter-clockwise and dodge the projectile once again without having to actually follow its movement. This works vice-versa on its direction. The reason this works is because the projectile cannot turn hard enough to catch the player on the way back.
To prevent any unecessary dodging if you’re not that proficient with it, or have enough struggles, always be sure to be facing the direction of the common reptiloid and possibly prioritising it first. If you use a fully automatic weapon on it, you can perform a strategy similar to the major biomechanoid, where you can shoot down its projectile as soon as it’s fired. To achieve this, aim at its chest.
Know that rockets are incredibly viable as all reptiloids are pretty much immobile (they can move, but often don’t and are very slow). Shooting several rockets, including additional if the projectiles destroy your rockets, and ignoring them to fight other enemies is a tactic that works well.
Serious Sam wiki article for the Common Reptiloids[www.serioussam.wikia.com]
_________________________________________________________________________________

Health: 2000 (TFE)/3000 (TSE)
Damage: 40 ranged/160 melee
Points: 25,000
Tactics: One of the biggest enemies in the game, alongside it’s bride counterpart and the large lava golem. It is the first encountered boss in the entire franchise. Much like the common reptiloid, the highlander will throw projectiles, although they are much larger, faster and harder to avoid. Thankfully, their projectiles can still be shot down, and they hardly follow the player.
If you continue to jump or strafe when encountering a highlander reptiloid while using a rocket launcher, chances are you will be hid very rarely. What’s more is that, unless in co-op, very few additional enemies will spawn to hinder your focus.
If you are uneasy about the projectiles, feel free to shoot at the highlander reptiloid’s chest using a Rocket Launcher, as it will break the projectiles before they can reach you. If you are confident in your dodging abilities, fire at the highlander reptiloid’s legs, as this will prevent the rockets from being destroyed by the projectiles.
The Rocket Launcher is preferred over the Grenade Launcher as the Rocket Launcher has a faster fire-rate, and fast projectile speed isn’t needed against an opponent which rarely moves. Fully automatic weapons aren’t necessary as their ammo is generally rarer and less effective in these fights. Later on you’ll have a cannon to use against the highlander reptiloids, so be sure to always fully charge them to ensure maximum distance, speed and damage.
There is a significantly larger variant of the highlander reptiloid named the “highlander’s bride”. It has 2x as much health as the regular highlander, and is valued 15,000 points higher. The reason I don’t have a separate area to discuss it is because it’s only discovered twice: once in a secret, and once in a co-op playthrough. The strategy to defeat the highlander’s bride are the same as the regular.
Serious Sam wiki article for Highlander Reptiloids[www.serioussam.wikia.com]
_________________________________________________________________________________
Health: 500
Damage: 40 ranged/100 melee
Points: 5,000
Tactics: A slightly upgraded version of the common reptiloid, the demon reptiloid has higher health, damage and a ridiculously speedy projectile that’s argued to be the hardest projectile to consistently dodge in the entire game. They will usually appear incredibly far away, making them very difficult to prioritise and kill.
As they are so far away, you’re limited mainly to the Minigun or Cannon to take down. The Sniper Rifle receives a debuff, and the Rocket Launcher projectiles are incredibly slow to make that distance.
Fortunately, like the other reptiloid projectiles, the demon reptiloid projectiles can still be shot down. Although it may seem like this would mitigate their difficulty, most of the time demon reptiloids will appear alongside charging enemies, making them very hard to prioritise when other enemies are so much closer. On top of that, the projectiles are insanely fast, and are capable of turning back to quickly hit the player if dodged.
Be very wary when fighting in areas that contain demon reptiloids, as the chances of being hit by their projectile are quite high until you become a true master.
Serious Sam wiki article for Reptiloid Demons[www.serioussam.wikia.com]
Environments
Serious Sam has a rather simplistic level design compared to other arcade/intense first person shooters of that time. It was meant to be linear, and it worked to its advantage. With this, you can pick out roughly four distinguishable environments that can apply to nearly every situation. Each different environment will more often than not have a different line-up of enemies with different placements, creating different challenges.
Mostly prominent early on in Serious Sam when your arsenal is focused more on shells and bullets, indoor sections will work to fight against the players movement, firepower and awareness. Thanks to the lack of space, you will have to be more reliant on your reflexes to snap onto enemy targets that hide around corners or appear when a trap is activated.
Indoors is also the only of the four environments in which the third person view may be a hindrance, as the player perspective will tend to come close and far excessively due to pushing against walls. This doesn’t mean you should neglect the third person view, but instead use it liberally where found appropriate, as you can move it around corners and doorways to see if enemies are hiding on the other side, allowing you to be prepared.
Although indoor environments tend to be quite spacious in some areas (without crossing over into the ‘arena’ or ‘corridor’ environment), they are still regarded as the hardest to maneuver and strafe in thanks to the several structures, ledges and platforms that will obstruct you. Talented enough, you may find it easy to continuously dodge enemies all throughout these areas, but the difficulty comes from the fact that the indoor environment is the only environment in which enemies will frequently spawn incredibly close to the player.
When indoors, be wary of:
- Lone, detached items that may trigger traps
- Enemies on high ledges and around tight corners
- Secret passageways and hideouts for health/armour/ammo
- Ways to backtrack or areas to climb when severely outnumbered
This environment tends to be very common in The Second Encounter, and recognised every now and again throughout The First Encounter. To be defined, just because you’re in a building structure and it doesn’t have a roof, that doesn’t really consistute it as ‘outdoors’. The outdoor environment are areas that are usually very expansive, but have several, small non-interactive buildings, trees, water or rocks.
Enemies will tend to spawn close and behind structures, or far in the distance depending on the location, most times managing both. It’s usually a lot softer and nowhere near as difficult as some arena or corridor battles, but can prove to be very tricky at times if not encountered properly. Much like arenas, enemies will usually spawn in the arena once you either enter or pick up an item near the center, and much like indoors, there are plenty of well-hidden secrets that are prone to tricking the player with a deadly trap.
Cover is your best friend in a lot of these areas, especially when ranged enemies are located far in the distance. Be sure to use sound very liberally as it will be hard to detect where exactly an enemy may be coming from in some crowded locations. Make sure you know the area well, because although getting lost is unlikely, making a wrong turn when trying to outmaneuver an enemy is very possible and could be the cause of death.
When outdoors, be wary of:
- Long-ranged projectiles from distant enemies
- Enemies that may spawn very close around certain corners
- The location of ammo and health pick-ups throughout the outdoor environment
- Clever secrets that may be hidden inside building assets, or far along the side of the map
These are where the biggest fights happen, and there’s pretty much at least one per level. To be defined, an arena is an open area with a large perimeter. Most arenas spawn enemies once the players either enter the arena, or pick up an item that’s in the center. The items that appear at the start of an arena are usually blue or red armour, mega health and serious or regular ammo bags. Depending on the length of the arena’s battles, sometimes items may spawn during intermissions.
Enemies will spawn either entirely at the opposite end of the arena, or periodically spawn from several directions encompassing the player. The contention of the arena environment is to test the player’s mettle; their ability to dodge, strafe, jump, aim and make correct weapon switches. This is achieved by the sheer density of enemy spawns, managing a large amount of enemies in somewhat of an endurance battle, increasing in difficulty until the end.
A key strategy in a lot of arenas is to shoot your way into a quarter segment of the area, so you can manage all the enemies that spawn in the distance, and make short work of any enemies that spawn close. This makes prioritising a lot simpler, and reduces the risk of failing to keep the enemies back that fall out of your line of sight.
When in arenas, be wary of:
- Secrets contained in breakable walls or holes
- Enemies that may be far and high in the distance
- Which enemies are faster than the other; prioritising well
- Where you are capable of moving to without being damaged
- What enemies may squeeze past you, and dodging them accordingly
Some of the longest, most memorable fights in Serious Sam come from the corridor environment. They are defined as an area which holds a fight in which it’s the player’s goal to continuously progress through a far stretch of oncoming enemies until they reach the other end. Some of the most notable corridor fights come from Metropolis, The Great Pyramid and The Grand Cathedral.
These fights are what cause the “S+M1” backpedaling joke to come from, as a lot of the time you will find yourself running backwards and unleashing your whole arsenal at the wave (or flood) or enemies. Like a war of attrition, the way to win in the corridor environments is to know which enemies to prioritise, and when to switch weapons and strafe. It’s similar to the arena environment, but enemies will almost entirely come from a single direction, with a much higher density.
It’s important to know when to be firing at the fast, charging enemies, and the larger, stronger enemies. For example, if you are shooting at a major biomechanoid to destroy its rockets, this doesn’t mean you have to continue shooting at it until it dies, as long as you’re damaging it you’re doing the right thing, because during this time the faster enemies will come closer.
Maintain consistency on all fronts, from your weapons to your movement. Realise your ammunition may be limited due to the overwhelming onslaught of enemies, and be sure to always make up for lost ground when you’ve been pushed back.
When in corridors, be wary of:
- Enemies that are on high ledges and far in the distance
- Which enemies are faster, which enemies need to be prioritised first
- Projectiles fired from enemies that you haven’t been able to priotise yet
- What choice of weapon you should use for a particular moment during the fight
- Secrets that may have come before the fight, are in breakable walls, or are off the path
“Coping Mechanisms”: Broad Strategies
Although Croteam doesn’t teach player strategies throughout Serious Sam, many intricate tactics are learned by individual players and shared through discussion. Some of these I’ve already mentioned in weapon and enemy descriptions, such as causing flinch, rocket jumping, strafing enemies outside of your vision, removing enemy projectiles, etc. but there are still tactics that arise from the player control setup alone, such as mapping your keys and using third person.
Whenever I play with friends, there’s the common complaint that they have difficulty switching weapons effectively due to how expansive Sam’s arsenal is. Accessing some weapon variants, such as the tommy gun or grenade launcher, require double-tapping keys (1-8) or excessive use of mouse scrolling, which can be incredibly disorientating in a fight. Making a blunt assumption, I’m sure a majority of the people reading this access their weapons the same way.
Granted, Croteam designed it so the practical variants of weapons are accessible through the first keypress between 1-8, such as the minigun, double barrel shotgun and rocket launcher, but at least to me, this doesn’t do you much magic when in a tight spot.
My solution is editing and mapping your weapon keys around your movement keys (WASD). I started using this idea when I began to play Quake 3 many, many years ago; a game that also relies on players quickly and effectively switching through their arsenal depending on the situation.
To give an example, I’ll give my layout:
I key out my most used weapons, and arguably the most practical to W’s neighbouring keys, with the minigun/tommy gun on Q and rocket launcher/grenade launcher on E. From here, I map our my other strong, important weapons to RFC. R is allocated the cannon/sniper rifle, F for flamethrower, and 1/2/3 for the basic melee/pistol/shotguns.
Know that if you use ESDF, you’re obviously not excluded from mapping out your keys. Just find out what works best and most effectively for you, and soon you should be instinctively switching between your weapons without having to move your fingers too far from your movement keys or by scrolling for too long with your middle-mouse button.
So many players, both new and veteran, seem to ignore this feature. Clearly that must indicate that it’s personal preference in playstyle, but I do believe it gives an objectively beneficial advantage that you would otherwise not get, simply by alternating between views by pressing ‘H’.
The third person view allows for an insane field of view that you would otherwise not get in first person, showing far out to the sides and a little behind the player. In a game where prioritising, focusing and dodging is the primary strategy, the third person view is a gift worth using. When alternating between first and third person view, the center of the screen will still focus on what the crosshair is aiming at, meaning your view will not be reset when you alter between the view, making it effectively seamless and easy to use.
The consequences of using third person and generally seen indoors, as the camera view in third person is prone to being pushed against the player due to the enclosed environment that it can’t push behind, such as narrow corridors and low ceilings. If there isn’t a sufficient space for the third person view, the game will immediately switch the player into first person, then back into third person when their is sufficient enough space for the camera. This can be very disorientating, and therefore players should only alternate out of first person when they want to use third person to see around corners or are in a larger room.
Two other nit-picks about third person is that, to make up for the wobbling screen when swimming in first person, the crosshair will instead hover and rotate around slowly. Also, due to witch-harpies, reptiloids and arachnoids being so far, sometimes aiming that high in third person will only give you a view of the grass and Sam’s legs, making it incredibly hard to aim.
Given it’s own “Rocket jump 100 times” achievement in The First Encounter HD, this is something that has been used since Doom, and popularised during the original Quake due to how it would advanced the player skill ceiling competitively. The idea is to propel your player character with the force of your own rockets explosion to position yourself advantageously while attempting to take minimal damage.
Serious Sam has several occassions where rocket jumping can allow you to be safe from an enemy spawn area, or to skip areas entirely. For the sake of both fun and difficulty, it’s recommended to at least attempt finishing all areas the way they are intended before you start to take advantage of rocket jumping, so use it only if you feel like you need to, or want to experiment.
There will be times in Serious Sam where enemies will come at such a wide angle that it’s impossible to establish proper focus on them all. A good player can distinguish an enemy by glance, knowing their attacks and movements. If you learn this, you will be capable of dodging almost the entire bulk of the horde without even paying true attention to them.
Sometimes a charging enemy, or an enemy projectile, will slip past you. Although it’s just one, if it hits it can throw you off entirely, and be the cause of death, so it’s important to keep control of your surroundings when such a thing happens. If something slips past you, do not turn around to kill it when you have a large amount of enemies rushing you. Instead, try to dodge its return attack by strafing away from it. This will force it to return to your field of view, and will allow you to take it down and then immediately resume killing the rest of the enemies.
It may sound very situational or difficult, but it’s not. Instinctually learning enemy movements is something that will come to any player that spends a fair amount of time playing.
Touched on in the weapon descriptions, flinching is a mechanic similar to DOOM’s ‘pain’-meter, wherein if the player deals enough to damage to an enemy, they will momentarily be stunned both in movement and attack animation, instead giving a pain animation. This is important to make use of as it’s potentially life-saving to separate the enemy from you just that little bit more.
I’m not too knowledgable on the intricacies that cause the flinch effect, but I believe it can happen in several ways depending on what weapons you use. For some enemies, it seems like a majority of their health must be taken away before they will flinch if using non-explosive weaponry, where they will only flinch once before dying. Some larger enemies will flinch several times if fired upon.
The flamethrower is particularly special, as it can cause several instances of flinching back-to-back on weaker enemies, and a few more times on moderate strength enemies. This is the weapon to use if you wish to intentionally cause the flinch status, as it can render enemies like the zorg, beheaded and kamikaze completely harmless. Explosive weaponry, the rocket launcher and grenade launcher, can cause instances of flinch to entire pockets of horde enemies, which will slow down the frontline and momentarily block the enemies behind them from progressing, creating more space between the player and the enemy.
Co-operation
Serious Sam has to undoubtedly be one of the most entertaining FPS co-op games. Up to sixteen players and a significantly larger amount of enemies to deal with. Even if you just want to have casual fun with a friend, if you’re playing on serious difficulty, you gotta know how to handle the situation.
Enemies in co-op generally work on a “first come, first serve” policy, where the first player in their line of sight will be the one who’s attacked. With this in mind, letting the player with the most health go first is the better idea, as they will have a higher chance of survival.
Enemies such as kleer and cucurbito are deadlier due to how the react after killing a player. If they killed the player by leaping or charging, the cooldown for them to do it again will reset immediately, leaping to the next player if they are nearby. This is diabolical and can lead to a lot of damage being taken, causing a chain of players to die assuming they all had very low health.
Unless highly skilled, many players consider the additional multiplayer enemies as ‘too much’ if there are less than three to fight against them all. The additional enemies do not have more health, but there are more in number, with larger enemies appearing at times.
At first glance it may look identical to singleplayer, but then you’ll soon realise that there’s a major biomechanoid where you usually wouldn’t see it, and a huge wave of kleers to back up that highlander, and a “GOOD GOD IT’S HUGE” highlander bride surprise in Land of the Damned. Sometimes you’ll even notice that fights just seem to be going a good three or four minutes longer. It makes for a challenge, but it’s a ridiculously fun challenge.
When playing with friends, focus fire and prioritising should differ between one another. If you both run into a bucket of enemies, and your friend opens fire at a red biomechanoid and you join along, yet there’s a pack of kleers charging at the both of you, go for the kleers instead.
That’s an example that applies to any scenario with any amount of enemies. Attacking a different enemy is always the most viable way to deal with a horde unless of course there is only one ‘group’ or ‘entity’ to be attacking. Watch each other’s backs, and keep everything at a safe distance.
As most players will do in Serious Sam, we all jump around excessively to hear that incredibly “hunf!” sound, and some may have discovered that you can jump onto the head of a friend without actually slipping. This can lead to one of you getting over a previous unreachable ledge without needing to rocket jump, or allowing it to work as an even bigger boost.
Although the game is completely linear, there still is backtracking at times. You and your friends don’t have to be going to the same place every time to press a single button, and could instead be spending time either lounging around or finding more enemies to kill. This quickens the time incredibly as once, for example, a button is pressed, the other player can continue immediately.
Secrets & Shortcuts
Serious Sam is an incredibly difficult game when playing on Serious, and personally, it’s simply impossible to beat it without taking advantage of the plethora of secrets which grant earlier access to stronger weapons, as well as health and armour.
By referring here, you can get an entire list of every secret in Serious Sam: The First Encounter.
By referring here, you can get an entire list of every secret in Serious Sam: The Second Encounter.
In reference to Mauritsio’s list, I will attempt to point out the significant secrets that I believe every player on the Serious run should be acquiring for an optimal chance.
- Secret #3
- Secret #6
- Secret #7
- Secret #3
- Secret #4
- Secret #2
- Secret #8
- Secret #2
- Secret #1
- Secret #3
- Secret #4
- Secret #3
- Secret #7
- Secret #4
- Secret #5
- Secret #1
- Secret #3
- Secret #4
- Secret #5
- Secret #8
- Secret #6
- Secret #7
- Secret #1
- Secret #4
- Secret #5
- Secret #6
- Secret #11
- Secret #1
- Secret #2
- Secret #4
- Secret #7
- Secret #8
- Secret #3
- Secret #4
- Secret #12
- Secret #1
- Secret #5
- Secret #6
- Secret #10
- Secret #11
- Secret #1
- Secret #2
- Secret #7
- Secret #8
- Secret #9
- Secret #11
- Secret #1
- Secret #2
- Secret #3
- Secret #8
- Secret #1
- Secret #11
- Secret #2
- Secret #6
- Secret #7
- Secret #8
- Secret #10
- Secret #11
- Secret #12
- Secret #1
- Secret #10
- Secret #11
- Secret #12
- Secret #15
- Secret #1
- Secret #2
- Secret #3
- Secret #13
- Secret #1
- Secret #2
- Secret #3
- Secret #5
- Secret #6
- Secret #7
Please note, clearly not all these secrets are mandatory. Many are skippable and are just a boost for your ammo, health and armour. By referring to Mauritsio’s guide though, you can tell which ones are the absolutely most important (such as the ones which allow you to find a weapon earlier).
Also, the reason The Second Encounter has so many more secrets mentioned is because after every set of levels, your weapons will have to be reobtained, and some will be placed as secrets again. A lot of the secrets in The Second Encounter are also significantly easier to obtain than from the first game.
Oasis
Entering one of the hardest rooms in the game, with the nearly limitless supply of marsh hoppers raining from the ceiling, you can avoid being down on the same floor as them if you rocket jump. If you time it right, you can rocket jump onto a small light fixed on the wall, then rocket jump again into the dug-out space above the room you’re meant to be sitting in. This will allow you to rain bullets and rockets onto the marsh hoppers while being at almost no risk.
Know that attempting the jumps themselves though are very dangerous, as they must be done once the marsh hoppers have already spawned, otherwise once you’re up there you will have nothing to do.
Karnak
Near the end of Karnak, in the courtyard right before the final fight where you will have to fight a large wave of marsh hoppers, kamikaze and kleers, there is a simple skip you can use to avoid the whole fight entirely, done with a single rocket jump.
As soon as you enter the area, there will be two light stands (circular bowls) on the left and right of you. By jumping on top of one of these, balancing (as you will slide off otherwise), then timing a rocket jump, you will be able to land on the mantle of the doorframe which you entered. From there you can run alongside the area on the walls of the courtyard, then into the final area.
Courtyards of Gilgamesh
As soon as you go outdoors in this level, you will be presented to a platform beholding a key item, but it is surrounded by a pit of spikes, and you cannot jump over it normally. If you have enough health (which you can by obtaining an early secret), you can safely rocket jump over onto the middle platform, then back off of it. This will save a lot of time.
The Grand Cathedral
After you have defeated the final horde out in the open, the gate to the Grand Cathedral itself will be open. Before entering, wait for the speed boots and serious damage to respawn. If you pick up the boots then the serious damage, then rush all the way through the gate and to the final boss, you will still have some left-over time to use your serious damage. You can unload a devestatingly large amount of cannonballs which can potentially take off more than half of the final boss’ health.
References & Sources
[link]
– The unofficial, primary Serious Sam wiki
Serious Sam HD: The First Encounter
Serious Sam HD: The Second Encounter
Personal experience
Community advice
Mauritsio, and his awesome guides to all the secrets in Serious Sam!