Overview
If you’ve been staring at the Hat in Time editor for an hour wondering, “what the peck am I suppost to do?” this guide is for you. This guide will go over the basics to making a Blue Time Rift.
The Mod Creator
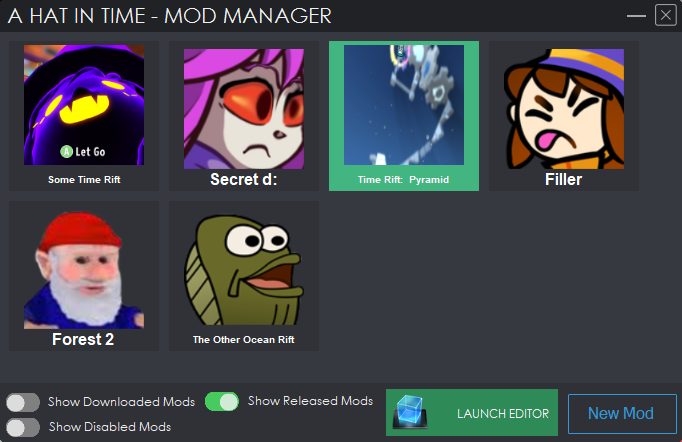
In order to begin making mods, you need to create the directory where your mod will go. That’s where the Mod Creator tool comes in handy. It should look like this (Except without any mods like I have here)
Within this box, you want to create a new mod. When you do create a new mod, another dialogue box appears. This is where you will specify your mod title, description, icon, and prepare and upload your mod when you finish it. You can change it at any time by clicking on the mod within the Mod Manager. Do note that your mod folder must not match a mod folder of the same name, otherwise you won’t be able to use it for your mod. You can click on the question mark icon to set an icon to represent your mod, but be aware that your icon must be a square image scaled by the power of 2 (128×128, 1024×1024, etc.) OR in some cases an even number square image (such as 500×500), and MUST be under 1 Megabyte (MB), as Steam won’t allow anything larger. You can go ahead and fill in these boxes as you see fit, but for my case I’m just going to throw in some simple text to be used as a place holder. Do not worry about tags or the other tabs, as these will only come into play when it’s time to upload the mod to the workshop.

The Hat in Time Editor
Important Note: During your modding, the editor may crash for a number of reasons, so remember to save frequently! Although an autosave is provided (toggleable at the very bottom-right of the editor window), it may not always work correctly, so remember to save manually every now and then!
Hat in Time runs on Unreal Engine 3, which is unfortunately no longer supported by Epic Games, instead focusing on UE4. Due to differences between the two engines, the game is unable to be ported to UE4 and therefore we use UDK for modding.

On this screen you will see the majority of the tools we will be using to make our level (and alot of tools we may never use). To the far left is the toolbar, which contains brushes and modes that can be used to create or modify objects to your liking. However because we will be using pre-defined objects to build our level, most of these will not be necessary for this level.
This viewport bar here allows us to change how we view the viewport, which displays our level.

- The P button is the Viewport type, allowing us to switch between Perspective or one of the 3 orthographic views to see the level from any of the 3 coordinate planes.
- Next to that is the button that allows us to enable or disable real-time movement and animation in the viewport.
- Following that are the various views we can use to see the wireframe, unlit, lit, detailed lighting, lighting-only views and collision of objects in our level. For the majority of the guide images will be using the lit view option. However, you may use whichever view you perfer when following this guide.
- The G button toggles Game View, which will hide the grids and additional visual aids provided by the editor so that you can get a rough idea of how a player will see the level without having to go into playtest mode.
- The Eyeball button when enabled will lock any selected actors to match the camera’s orientation until you deselect the object or toggle the mode off. This can be very useful for moving cameras and other assets, as the view of that asset or camera will match the view that you position yourself to within the editor.
- The square button with blue will change the speed that your camera moves through the level.
Above are some of the functions we will be using alot more.

- The load, favorite, and new buttons do as you’d expect, however, 3 different saving options exist
- Save current level will save the map and nothing else.
- Save all levels will save every level you have edited at the current moment.
- Save all writable packages will save any packages that you have specified a location to.
- Undo and Redo… Undo and Redo.
- This next block contains some of the most useful tools we will be using.
- Selection mode will allow you to select objects, useful when editing their properties.
- Translation mode will be enabled by default, and allows you to move your object along one of the three available axis (X, Y, and Z).
- Rotation Mode will allow you to rotate your object along one of the aforementioned axises.
- The last two in this group both scale objects, but have a key difference. Uniform scaling mode will scale every axis equally when one is modified, while Non-uniform scaling mode will only scale along that axis, however in both directions unlike most editors.
- This drop-down box is the coordinate settings for which grid objects will move along. You can toggle between each mode quickly using the tilde ( ` ) key.
- Local will move the object based on its rotation. This means if you rotate the object by 45 degrees, the translation axis will be rotated by 45 degrees.
- World will move the object along the world grid regardless of rotation. This is useful if you want specific translation when an object is rotated a bunch.
Local and World set side by side for comparison on an object with irregular rotations - The binoculars button allows you to search for specific actors within your level.
- This next button, when clicked, will open the content browser we minimized/closed earlier. Note that mimimized windows will be sent to the bottom-left of the editor, and can be expanded from there as well as closed.
- This next button, with a big K will open the Kismet window, which will be further explained when we get to making moving objects.
- The clapper button will open the UnrealMatinee editor, which will work with Kismet and allow us to make objects move or rotate.

At the bottom-left of the editor we have different status indicators. These will have exclaimation points next to them when there is an issue.

- The Lighting indicator determines whether you have your lighting built or if it requires a new build. Do not worry about building your lighting every time you edit an object.
- The Pathing indicator shows whether paths of AI are valid, which are only important with AI requiring pylons and when placing down spawnpoints.
- This last button won’t be an issue for this guide, but it tells you whether packages are invalid.
Finally, in the bottom-right of the editor, we have various settings that control grid snapping and auto-saving.

- The four text boxes, when an object is selected, allows you to set the object’s exact Uniform, X, Y and Z axis scales respectively.
- Past the four textboxes, you can set the grid snap when translating objects.
- Next to that you can set the grid snap when rotating objects.
- And next to that you can set the grid snap when scaling objects.
- Finally, you can set whether to auto-save and how often to auto-save. As the editor itself tends to crash for no reason, I recommend saving as often as possible, sometimes even saving after every individual change.
Within the viewport, you can look and move around by holding right-click and using WASD. This allows you to look through your level and also get different angles when positioning objects. You can alternatively hold left-click to move around and look around you, however you won’t be able to look up or down when moving with this method.
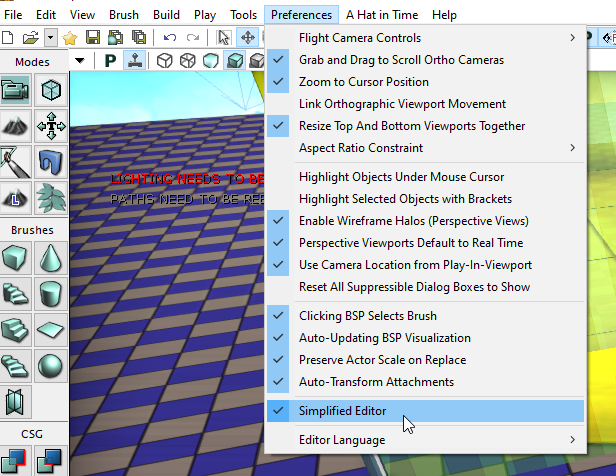
By default, the editor is in Simplified mode, which hides many options within the editor that map makers may find useful in the future. You can toggle off the simplified options by going under the Preferences tab, and selecting the Simplified Editor option. Keep in mind that all images and portions of this guide going forward will assume that you have the Simplified Editor option off.
The Content Browser
A Hat in Time is made from thousands of objects ranging from music and materials to models and animations. UE3 allows you to access and place these objects through an interface called the content browser.
Shown above is the main panel you will be using the most: The Content Browser panel. WIthin here you can find every asset within the game, as well as custom assets from mods you may have installed or assets you may have created. There are many different file types, some of which you may never use in any of your levels, others you will always use. We will go over these different file types as we progress through the level.


If you were to spawn in a spring through the Content Browser, you’d find that it doesn’t bounce you up in the air like they do in-game. That’s because springs are instead scripted objects known as actors. These actors are coded to perform specific actions and can be modified as much as they allow you to. Along with in-game assets are tools and objects used to optimize and polish levels to look as gorgeous as they do in-game.

The Levels panel allows you to manage levels and their components in an organized view. This will only be important when you have to do level streaming, covered in a seperate guide.
The Scene panel shows every object located in your level. You can use this to select hard-to-select objects or find specific objects that would take too long to select otherwise. Within this panel you can also edit their properties without opening a seperate properties window. This is very useful for mass copy and paste selection as well.

The Layers panel is useful for working with layers, covered in another guide alongside tags. This menu will become useful in organizing a large amount of objects.

Template Maps and Viewing Existing Maps
In addition to being able to open your own levels, there are also a few template maps available to view, as well as the entire game’s collection of levels for usage as examples.
On your first time launching the editor, you may not have any template maps available. On restarting the editor, the template maps will be visible. To access Template maps, click on the Create a New Level button at the very top-left of the editor. This will open a menu with five options:

- Blank Daytime consists of a thin BSP platform with the Mafia daytime sky and the bare essentials for lighting and spawning the player.
- Gameplay 1 features another BSP platform, but throught contains numerous gameplay elements commonly found in the game, such as Vaults, Dive pads, Dweller objects, Chests, Hooks and more. This map is great to use as a reference for how to set up these objects in your own levels.
- Time Rift (Cave) presents the barebones of a Purple/Cavern Rift, from its setup of Time Rift Gates and treasure pons to the Time Rift Ball’s area and the collision that prevents it from falling off the ledges.
- Time Rift (Water) provides the simplest setup to a level possible in the form of a time rift challenge. Included is the layout for a looping rotating block, which can be used to introduce you to using matinee to make objects move, as well as how checkpoints are setup.
- Blank Map shows the same map you see when launching the editor: a map with no objects of all, allowing you to create a level from scratch.
By clicking on any of these options, it will load up the map within the editor itself. From here, you can choose to view the elements within it to understand how they work, playtest the level in action, or modify it for your own experimentation. You can even choose to build upon these existing maps into your own unique challenges!
In addition to viewing template maps from the game, you can also view every map from the game! You can use these maps primarily as a reference tool for understanding how various gameplay mechanics work that may not be shown in the template levels, or to view how individual parts come together to create the finished level, from lighting to meshes and gameplay itself!

An important thing to note is that these levels are levels that have been compiled into a read-only map, often called a cooked map. Although you can modifiy some elements of the level, you are not able to save it as a new level. You can however copy parts from a cooked level into your own levels for free modification and usage.
Also important to note is that during the compilation processof levels, some actors may not be readable from the original level. One actor you may not see in any cooked levels as a result are Pons, so keep that in mind when viewing existing levels.
Every map from A Hat in Time can be found under SteamsteamappscommonHatinTimeHatinTimeGameCookedPCMaps within your computer (The location of your Steam Folder will vary by where you installed Steam). Within the editor, you can navigate through this directory to load any map from the game for use for reference!
Some maps however may consist of multiple maps loaded together through level streaming. If you load the main map in which these other maps are inserted in, they may not load the other segments. To see the other maps, load the other maps on their own before loading the main map. An example of this would be Nyakuza Metro, where you will have to load DLC_Metro_3DArt for any meshes to load in the main map DLC_Metro. Alpine Skyline works in the same manner as well as several other maps from the game.
Building Blocks
Now that we know what we’re working with, it’s time to get to the actual level building. To start we’re going to create our starting location, which will be a basic cube.
Levels are usually mostly made up of solid objects that don’t ever move, whether to provide boundaries to an area or to hold the player. These are called Static Meshes and can be found by filtering by static mesh using the Content Browser’s search function.
Blue Time rifts use blocks that are dubbed “secret_”, as time rifts require going off the beaten path and act as secret locations. By searching “secret” in the content browser, you can find every object that you can commonly find in every time rift. From there just click and drag the object into the level and it should appear inside the viewport.

From here, we can choose to translate, rotate, or scale it as necessary to fit our needs.
Using this, you can easily create most of the level without further help. However, a level full of objects that don’t move or one that doesn’t offer challenge is not one that will be fun. You can go on to later sections of this guide to learn how to make your levels more interesting, but this section will cover all the important parts required to make a level function.
Now you may be wanting to press that “Play in Editor” button, but doing so will crash the editor. That is because the game doesn’t know where to place the player, and therefore freaks out. To specify where the player will spawn, we will place in an actor called Hat_PlayerStart. This acts as a spawnpoint for the player and later on will also be used to spawn our player in checkpoints.
To place the actor, you need to find it in the Actor Classes panel of the Content Browser, and simply select it, and then click and drag it into the level like you did with the Static Mesh earlier. However, unlike when we placed our static mesh, we clicked the “Rebuild Paths” button to build pathing. This is so the spawnpoint can make clearance for the player to spawn and ensure that she won’t spawn stuck in the ground.
Now you can enter your level aaaaaaaaaaaaaaaaaaand….
As you can see, you’re now on a floating block in space. From here you can continue to build up your level and use tests to make sure that your level is possible to complete.


Remember to keep in mind that the direction of the spawn object is marked by a 3D arrow made up of 5 lines. Make sure to orient this in the direction where the segment of level will be so the player understands where to go.

World Settings
The world settings can be found by going to “View” > “World Properties.” These settings handle various properties of the level that apply for everything within it.

In time rifts, the player’s vision is blurred at a distance. This is the result of a post-processing effect called “depth of field.” Simply enable it under post-process settings under the Rendering tab.

The World Info tab is where you can find settings for the map, and more importantly, where you can change music and various other level properties through the Map Info “object.”
To create your map info, simply click the blue drop-down arrow and select “Hat_MapInfo.” This will create the map info file where you can set settings related to Visual effects, Player Modifiers, Music, and Chapter Info.
Music
Music in the game is handled through “Music Trees,” which handle when to play music based on conditions from in-game objects. There are two ways to add music to our level: Selecting an existing soundcue to play the same song throughout the level or use an existing music tree to cycle between songs. Another method would be to create a custom music tree, which we will cover in a later guide, as time rift music is already provided by the game.

Method one involves selecting a soundcue and setting it as the music track to play in our level in the map properties. We will be using the time rift music, Clock Towers Beneath The Sea. Simply select the file in the content browser, and click the green arrow next to “music tree” under the Music tab.
For method two, we will be using the TimeRiftBlue_MusicTree file, found through the search function. Select the music tree in the content browser, and then in the WorldInfo properties, click the green arrow next to the Music Tree setting to set the selected music tree as the one the level will use.
You may not be able to find the TimeRiftBlue_MusicTree file by filtering by music trees, instead have “All” selected and search using the text search function.
Player Modifiers
Player Modifiers change how the player behaves within the level. Three of these modifiers exist, and are:
- Is Spooky – Forces the player to only be able to use the Top hat and Dweller mask, and also forces the player to walk. This setting is used in Vanessa manor in-game.
- Is Time Rift – Pause menu says you’re in a blue time rift
- Treasure Hunt – Pause menu says you’re in a purple time rift
Visuals
This tab determines different effects that will change how post-processing in the level will occur.

Under the Visuals tab, you can set the Visual Template. This will change the background of your level, which can be of any template exising within the game. For Time Rifts, we will set this to TimeRift_Blue.

Creating Moving Objects
So right now you may have a level full of block and wonder, “When do I get to create clock movements?!?” If that is what you wonder, wonder no more, for this section will explain how to make your objects spin and move to your desire!
To start, you need to create an object that you want to rotate or translate. I will use a gear for this example. To start, it isn’t gonna do much other than exist, so we need to give it some movement.

Because it is a static mesh, it’s never gonna move in its current state, so to start, we must convert it to a mover. To do this, right-click on the object, hover over convert, and click on “Convert to Mover.” Doing so will allow the object to be interpolated (moved along its axis’).

When converting your static mesh to a mover, the engine removes collision from the object, which would mean that if we were to play the level right now, Hat Kid would fall through it as if it weren’t there! To fix this we need to give it back it’s collision by changing it from “NoCollision” to “BlockAll.”

In order to get are now non-static mesh to rotate or move, we need to give it a timeline that will tell it when to move to where. We will do this using Kismet via a matinee. The matinee acts as an animation timeline using keyframes to specify where an object will be on each axis. In order to make a matinee that will play on level load, simply set up the following in the Kismet editor.
While we’re in the Kismet window, it’s important to make our movement to loop. Simply select the matinee, go to the properties box at the bottom-right of the Kismet window, and tick “Looping.” If your object is rotating, you may also want to tick “No reset on rewind” as if you don’t and your animation is a non-full 360 degree turn, your object will jump back to place when the animation finishes, which may push the player back with it.


Now that your Kismet is set up, it’s time to specify where the object will be on the timeline. To access the timeline editor, simply double-left click on the matinee, which will open the Interpolation editor.
To get started, Right-click in the dark-gray area to the left of the window and create a new empty group (while the mover is selected). Name it whatever you like, but it helps to use a name that’ll help you distinguish it from others if you choose to use the same matinee for other moving objects.
Doing so will create a new group for your timelines to go in (although we will only need one for movement).


Now we need to create the actual timeline. Right-click on the new empty group and click on “Add New Movement Track” to create a new timeline. After this, right-click on the movement track and click “Split translation and rotation.” This will allow us to change the X, Y, and Z axis individually so we can achieve the movement we want.
To add a new keyframe, select the rotation or translation axis you want to change, place your timeline cursor where you want to add a keyframe (use the arrow keys to fine-tune it to an exact position on the timeline) and click the “Create/Add new Keyframe” button in the top-left of the window. To give the object movement, you need to edit it’s individual properties. These can be accessed by clicking on the node to select it, right click on it and select what you want to change from the drop-down menu.


- Interp Mode – Specifies how the keyframes connect from one to another. Each mode is color-coded with it’s own color.
- Curve – Movement from one position to another will be gradual, accelerating and deaccelerating as it goes from one position to another.
- Linear – Movement from one position to another will happen at the same speed throughout.
- Constant –
- Set Time – If you can’t get to the exact time you need with the cursor, you can select the exact time where your keyframe will be located on the timeline.
- Set Value – This is the main function you will be using; sets the keyframe to move the object to this position (in degrees or Unreal Units, depending on whether it’s rotation or translation).
For this case, we want our object to make a full rotation every 2.5 seconds. For this we will create a keyframe under the Rotate Z axis at the 2.5 second mark on the timeline. We will also move the end of the animation slider (marked with a red arrow at the bottom of the timeline) to 2.5 seconds as otherwise our gear will stop and go with no keyframes to tell it where to move. Once this is done, we will set the value to 360 (a full rotation) and set it’s interp mode to linear (to keep the gear moving at the same speed).
We need to also change the node at 0 seconds (auto-created when we make the movement) to also be linear; otherwise half of our movement will occur gradually and not at a linear speed.

Now if we play our timeline, we should see this:

Creating Checkpoints
Checkpoints are breakpoints that you will want to put at points in your level. No one wants to traverse the whole level all over again because they failed the last jump. Checkpoints are made up of 2 actors: A Checkpoint Volume and a PlayerStart actor.
To start, we need to set up both in the editor. You already know how to create PlayerStart points from the section “Building Blocks,” however you may not know how to make a volume. To make a checkpoint volume we will first create a new brush (press B to toggle brush visibility) from the tools menu. I will be using a square, but you can use whatever shape that fits your need. We will position and scale this brush as needed, as if it were a normal object (you can always change size and position even after you make a volume from it).
Once we have our brush in place, we go to volumes in the tools menu, hover over “hatintimegamecontent” and select “Hat_CheckpointVolume.” Now if you toggle the brush off by pressing B, you wil see a purple outline where our brush used to be. This is our checkpoint volume, which will activate whenever the player goes within it.
All that remains is to Adjust the settings of our volume and our PlayerStart so that they work with each other. First, we will change our PlayerSpawn, so select it, right-click it, and go to “Hat_PlayerStart properties.” This will open the properties window, which displays all of the properties of that object. Although you can change any as you see fit, we will only need to change two settings in this.
Since this isn’t the start of the level, we will tick Primary Start off. The Checkpoint setting will be our checkpoint ID, which you will increment for each checkpoint you add. Afterward, select the Checkpoint Volume within the editor, and the properties window will change to show the properties of the Volume.


All we need to change in the checkpoint volume is the Checkpoint ID, which will use the PlayerStart’s Checkpoint setting and set it as your spawn when you interact with the volume. For this to work, you need to match the volume’s ID with the PlayerStart’s ID, which will “link” them together.

When testing your levels, the editor will keep track of which checkpoint you left off on from the last time you tested the level. This allows you to start from a given checkpoint instead of having to work back from the beginning to the segment you are trying to test. To select which checkpoint you want to start at, simply click the drop-down menu titled “A Hat in Time” at the top of the editor window, hover over “Current Checkpoint,” and select which checkpoint you want to spawn at.

Congratulations! You have made your very own checkpoint! Whenever you finish your level, be sure to go back and set the current checkpoint to “No Checkpoint,” or else the player might spawn at the end of the level!
Optimization, Building, and Polishing Levels
You can build your map by going under “Build” at the top-left of the editor window.

- Geometry for Current Level – This will build Geometry and Collisions in your level. Only applies to objects that don’t have collision on their own, such as BSP.
- Geometry for Visible Levels – This will build Geometry that isn’t hidden that doesn’t already have collission, such as BSP.
- Lighting – Builds the lighting of the level by simulating a light environment based off of lighting around the scene. Lighting has 4 modes when building:
– Preview
– Medium
– High
– Production
When testing your level, it is best to use preview quality. When you’re releasing your level use the highest setting your computer can handle (perferably Production quality). - AI Paths – This button will build every path present in your level. Pathing will affect enemy movement within pylons and player spawns.
- Selected AI Paths – Same as building All paths but it will only build the paths of objects you have selected.
Build all will build every one of these without further input by the user.
If you were to build a large level, you’d notice it would take a long time to build. That is because the editor is building lighting to even the unused space in the level. To prioritize the objects in your level, we must use what is called the Lightmass importance volume. Simply surround your entire level with it to reduce lighting build times.


In-game, reflections are basically the surroundings of the level plastered onto a specific material. These reflections are created by an actor called the Cubemap. To make a cubemap, simply place one in the level from the actor classes menu in the content browser, right-click on it, and select “Update Cubemap.”

Culling volumes are an effective tool to use when optimizing maps, specifically larger ones that feature a large amount of meshes. Culling volumes allow you to stop rendering meshes based on size and the player’s proximity towards those objects, helping to reduce how much is rendered on screen at any one time. Using these is not necessary on most smaller maps however, as you may not have a large density of meshes that will affect performance most of the time.

You can create culling volumes like you would any other volume, but instead of going under hatintimegamecontent like you did for checkpoint volumes, you’ll find Culling Volumes under the LOD dropdown, called CullDistanceVolume.
After placing a culling volume in your world, within its properties you will find only a Cull Distances property. Under this, by default you will have 2 load levels (labeled [0] and [1]), each containing a size value and the distance at which an object at this size will be culled at. Only sizes below the given size value will be culled at that load level. You can add additional load levels by clicking the green plus button to the right of the Cull Distances property. You can have as many levels as you require for your map.
Within every static mesh within your Culling Volume, you will find a few additional options for culling. The Cached Max Draw Distance property is the distance at which the object you have selected will be culled at, based on the size that mesh fits under within the Culling Volume. In addition, if a culling volume’s settings is not working out for a specific mesh or detail, you can specify a Cull Distance under the Max Draw Distance property, which will override the settings set in your culling volume for that specific object, so it will be affected by its own value rather than the volume itself. This can be useful if important map details or objects you want to emphasize or make visible at longer distances are being culled by your volume prematurely.
Setting up culling may involve trial and error, so don’t be afraid to experiment with cull values during playtesting to ensure that players will be able to see key details or locations from a distance while also optimizing your level effectively.


Cooking and Publishing your Level
By following this section, the writer (me) assumes that you have completed your level and are ready to publish it. If you still want to add more to your level, go ahead and do so. You are able to update levels later on, but no one wants to play a level that isn’t complete in the first place.
Before cooking your mod, make sure to reset all level bits and set your checkpoint to “No Checkpoint,” otherwise when you open your cooked level you will start from where your checkpoint was set to.
Cooking a level compiles all the data needed for the game to load it without further input, allowing the main game to access the level as a mod. In order to cook a mod, several requirements must be met:
- You have filled out your mod info, icon, and description with text (Make sure that the mod icon is not above 1MB)
- You have set up a proper file heirarchy (more on that in a bit)
- You have tagged your level (set after the prior two point are met)
File Heirarchy
In order for a mod to compile, the compiler must know where the files are. In the case of maps, they must be contained within a maps folder so that they can be distinguished from other files without an unecessary file name checkup or sorting. Within the mod folder, create a folder named “Maps” and insert your map into the folder. If done correctly, the mod tool will detect your mod and show it under the Content Tab.

After you have set up your file heiarchy correctly, you will be able to tag your level with the level type. In this case, we will be marking it as a Time Rift.
Finally, you should be able to click the “Cook Mod” button under the publish tab.
Cooking the mod will bring up the command prompt, which will show it’s progress with compiling the mod as well as report any errors or warnings within the compiling process. These can be used to debug errors within your map.


From here we can go ahead and test the mod to make sure it behaves in-game like it does in the editor. You can choose to start from the title screen or in the level itself.

Once you have made sure that the level works as you want it to, it’s time to publish it to the workshop. To do so, simply click the “Submit to Steam Workshop as Playable Mod” button (Or the “Update Playable Mod” button if you’re updating the mod instead, which will also require specifying changes in the change log text box below the submit button), and it will do so automatically. Your mod title, description, icon, and tags will be used on the workshop page when published.
Further Information
Advanced Editor Features: [link]
Various How-tos: [link]
Guide to Kismet: [link]
Importing and Implementing Custom Hat Flairs: [link]
Creating Chapters: [link]
INI (Mod Data) Files and Configuration: [link]
Creating your own Death Wish Contracts: [link]