
Overview
Let’s face it: Game development and modding is all about being a wizard. Whether that wizard power comes from the mind or the heart, here are some additional resources and information to help you mend, focus and amplify your magic touch.(Editor’s note: I may revamp this entire guide to focus less on tiny details in the editor and more about performance metrics and debugging in the near future)
Keybinds
In your time of using the editor, you may have accidentally hit a button on your keyboard only for it to either change how the level is viewed or hide a bunch of your objects.
Unreal Engine 3 / Unreal Development Kit (The program empowering the editor, allowing you to mod the game) is a host to a wide variety of shortcuts intended to make your life just a tad bit easier. This section will list many useful ones that may remain relevant to you when building a level, however if you wish to know about every existing keybind, You can find a list of most if not all editor keybinds here, including most of what is mentioned below.[blog.tiaan.com] Keep in mind that many keybind are changed within the editor, so not every option listed in this link is reliable.
- Numeric Keys (not NumPad keys) 0 – 9 – Switch to a bookmarked viewpoint cameras. Hold ctrl while pressing a number key to set a bookmark (More on that in the Bookmarks section of this guide)
- B – Toggle the Brush (The Red Outline used to create Volumes. You will need to toggle it to see and select your newly created volume oftentimes)
- F – Toggle Fog
- G – Toggle Game View (Shows what you will see in-game, which will hide guide lines and volumes that you see in the editor, good to test how something will look in-game)
- H – Hide an Object
- Shift + H – Hide all objects
- Ctrl + H – Unhide all objects
- I – Toggle Level Coloration (Removes all color, usually to check lighting and shadows)
- K – Toggles Kismet Reference View (All objects referenced in Kismet get a green outline box around them)
- L + Left, Right, or Middle Click – Allows you to focus in and move around an object in a similar way to various modeling programs such as Maya. You can also use U + Left, Right, or Middle Click to move around the editor in the same fashion.
- N – Toggle viewing Navigational Nodes (Player starts, Pylons, and pretty much anything relating to pathing)
- R – Toggle showing the radius of point lights
- T – Toggle Terrain View
- Scroll with the mouse wheel while holding Right-click – Change how fast you move when holding right-click and using WASD to move around the editor. Scroll up to increase, scroll down to decrease.
- Home button – Moves and zooms the viewport to the selected object
- Alt + 0 – 9 – Change between the several view modes found by the viewport options, including Wire Frame, Unlit, Lit, etc.
- Alt + F, G, H or J – Switch between, in order of the letters listed, Perspective, Top View, Front View, and Side views of the editor. This allows you to both use 3D Isometric and Orthographic views.
- Alt + X – Toggle 4-Panel view, allowing you to see Perspective, Top, Front, and Side views simultaneously like in editors such as Source.
- Alt + E – Toggle Decal View
- Alt + W – Toggle Static Mesh View
- P – Toggle Pathing View
- O – Toggle Volume View
- Shift + H – Toggle showing or hiding FPS
- Shift + L – Show/Hide Stats (Relevant to Remote Control, covered later in this guide)
- Hold Z – Increase FOV
- Hold C – Decrease FOV
- L + Left-clicking on an object – Creates a Point Light where you click
- Alt + S + Left-click – spawn in a static mesh, as long as you have one selected within the Content Browser (this will also happen with just S + Left-click, but you will also move backwards, which is rather annoying)
- F4 – Open the Actor Properties window
- End button – Drops the selected object so that it is colliding with the object beneath it (good for making sure objects aren’t floating off the ground)
- Tilde ( ` / ~ key) – Toggle between World and Local coordinate reference. When in local, you translate the object according to the object’s rotation. When set to World, this will force the object to move along the X, Y, and Z coordinates.
- Space Bar – Change Between Transform, Rotate, and Uniform Scaling modes. This will not switch to Non-Uniform Scaling or Selection Mode.
- [ and ] keys – Change the Grid Snap scale
- Ctrl + Y – Redo
- Ctrl + Z – Undo
- Ctrl + Tab – Cycle between windows from the content browser as well as those found udner the View > Browser Windows tab.
- Ctrl + Shift + F – Immediately jump to the search browser in the Content browser from anywhere in the editor.
Tags and Layers
Tags are a way of labeling certain objects or sets of objects for organizational purposes. This can be used to keep track of something among a sea of thousands of similar objects. It’s easier to find a specific tag or set of tags than to select and check every single object until you find the right one.
Every object in the editor that you can spawn in through the viewport has a tag property. This property can be located under the Object tab, or searched through the search bar on the properties window. By default, the tag will be the object’s type (StaticMeshActor, SkeletalMeshActor, etc.) You can however change this to whatever you please, allowing you to organize as you wish.
When you change a tag, you may find that it will have moved in the Scene browser (Content Browser, by clicking the Scene Tab). When you click on the title of a column, it will sort alphabetically by that column. This means that if you click the Tag column title, it will sort all tags in alphabetical order.


Layers are very similar to tags in that they can be used to organize levels. However, unlike with tags, you can toggle whether those objects are visible or not per layer. Just like Tags, you can set a layer to be named whatever you like using the Layer property under the Object tab. You can manage layers under the Layers tab in the Content Browser, and you can toggle the visibility of a layer by ticking the check mark box next to the respective layer you wish to toggle. You can also view what objects are within each layer, as well as sort between layers under the Scene tab menu of the Content Browser in the same way you can for Tags.
The problem may seem that its too annoying to add a tag or layer to every object you wish individually, but you can also set the Tag and Layer of several objects at once. All you have to do is hold the control (ctrl) key while selecting objects, and you can select several objects and once. With this, you can set the Tag and Layer of a select group of objects all at once. This is very useful if you want to mark or be able to toggle the visibility of whole segments of a level, whether for editor performance or level building reasons.

Viewport Options
The Viewport Options include the various buttons and icons that allow you to change the view of the editor and what objects show or do not. This can be useful when dealing with a clutter of objects when making a full level. Some options are present on the hotbar itself, but if you click on the drop-down arrow, you will get many more options.
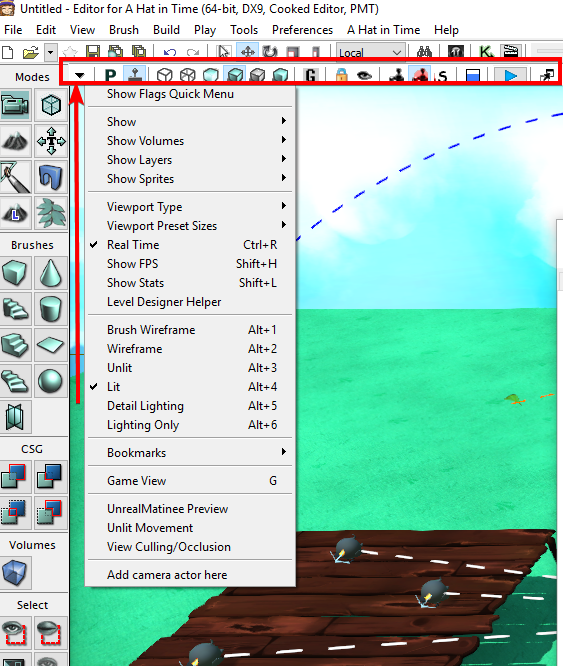
The Quick Flags menu will open a seperate window where you can quickly modify what shows up in the level. This will cover every setting under the Show category, covered in the following heading.
Within this menu, you can toggle on and off different types of objects to not show in the viewport. These can be changed under the Show category, and allow you to hide objects such as Static Meshes, Particles, Paths and a wide variety of object types. In addition, under the normal Show category, you can also find the Post Processing and Advanced sub-categories.
The Post Processing sub-category allows you to toggle various effects, such as Depth of Field, Motion Blur and many other effects done through Post Processing or World Post Processing.
The Advanced sub-category allows you to toggle the visibility of many more types of objects or visual utilities to help with level building. Some of the things you can toggle under this tab include Fog, Light Radius, Collisions and many more factors.
The Show Volumes category lets you toggle hiding or unhiding specific volume types if you do not want to hide every volume at once. Every type of volume can be toggled under this category.
The Show Layers category allows you to hide or unhide specific layers similar to how you can do so under the Layers tab in the Content Browser.
The Show Sprites tab gives you the ability to toggle on and off various sprites that make up actors such as fog, splines and more.
The next few sections of the Viewport Options cover various visual changes you can make to assist in level creation.
The Viewport Type setting allows you to switch between Perspective and 3 Orthographic (2D) views, which can be used to help line up objects easier than by perspective.
Viewport Preset Sizes is normally relevant to when the engine is being used to develop games on several platforms, but in this case is not necessary and therefore can be left alone for now.
Real Time allows you to toggle animations, particles and other similar devices playing within the viewport while building the level.
Show FPS allows you to toggle showing the current FPS of the editor while making your level.
Show Stats allows you to see the statistics available through Remote Control, which is covered later in this guide.
Level Design Helper is present but no function is known currently.
Brush Wireframe, Wireframe, Unlit, Lit, Detail Lighting and Lighting only are various view modes that can be used to debug a level, or simply make it easier to see what you’re building. The game will render in Lit mode, so this is considered default.


The Bookmarks category allows you to set and jump to bookmarks. More on that later in this guide.
Game View is a toggle that allows you to see what the level would look like in-game, including Depth of Field (if enabled), and also hides editor marks like Volumes and such from view. This is good for pre-viewing levels without having to go play in-editor.
UnrealMatinee Preview does not seem to toggle, but I would guess that it would allow you to see all Matinee movement happen in a level without having to play in editor.
Unlit Movement will toggle Unlit view whenever you move in the level, in order to make movement around maps perform better if the map is slowing down when moving around the map.
View Culling/Occulsion allows for alternate level views (Orthographic and Perspective) to see the effects of occulsion and culling on a level. This is only useful in multi-view modes and will select whichever viewport window has the yellow border.
Add Camera Actor Here will allow you to place a camera actor so that it sees exactly as you see in the viewport when clicking the button. This can be easier to set up than drag-and-dropping in a camera actor and manually placing it with some guesswork.
Bookmarks
Bookmarks allow you to set camera locations to jump around or view the level from various perspectives.

To set a camera, hold the control key (ctrl) and press any of the numeric keys (0-9). Once you set a bookmark, you can jump to a bookmark by pressing the numeric key you set the bookmark to. You can also set and jump to bookmarks through the Viewport Options menu.
Remote Control
Remote control is a debug tool that can be accessed by typing “rc” into the editor console. Doing so will bring up a seperate window that allows you to change and view various statistics and view modes while playing a level.

Author’s note: I am currently not sure how useful the following will be.
This tab allows you to change some game settings on the fly. Game Resolution will allow you to resize the game window without having to go into the settings. Texture Size allows you to change the max upload size of textures to the GPU, although effects take time to take effect or does not do anything noticable at the moment. Because Maximum Shadow Size only comes with one setting in the Hat editor, you do not have to worry about it.
The Post Processing Effects toggle does not seem to work as it will revert to false and take no effect when set to true.
View mode allows you to change between the many view modes you can cycle through in the editor. Keep in mind that the Shader Complexity View Mode may crash your game.
Slomo allows you to change the game speed at any time by setting a numeric value. Keep in mind that values above 10 may not work and that changing hats using the quick hat change menu (where the circle of hats come up) or any form of time dialation (including using Time Stop hat) will reset the slomo speed to 1.
Hat in Time does not currently feature any FOV feature and for that reason the FOV feature on Remote Control won’t do anything, and will reset back to 0 when trying to set a value.
The Showflags drop-down will allow you to toggle on and off various elements that let you view Bones, collisions, and more in live gameplay.
Toggling on and off Dynamic Shadows will turn off any shadows applied in real time, including the player’s shadow, the shadows of enemies, and many others.
Both the Show HUD option and the Players Only tick boxes do not seem to toggle or do anything at the moment.
While D3DScene also seems to not toggle, You can toggle both FPS and viewing memory statistics with their respective options.

The Actors tab allows you to see every actor and object in the current level. You can expand each folder of an object type to see every instance of it in a level. You can then select these objects and view their statistics from the editor property panel (Keep in mind that changing properties and settings of objects while testing a level in-editor will likely crash your game.)

The Stats page allows you to toggle various developer statistics that supposedly can be used to debug levels or test performance on a variety of aspects. However this isn’t very useful without extensive knowledge on the data that each one offers, but feel free to experiment with these and see if they prove useful to you.

Further Reading
Much of the information featured in this guide was found on the UnrealEngine Documentation page, which while outdated due to the discontinued use of UE3/UDK since the release of UE4, still remains one of the best resources to use when using the editor. This documentation will not cover anything specific to Hat in Time, but can help you get a grip with for example UnrealScript and making Materials, which are very extensive topics that would be difficult to cover in one of these guides. You can find this documentation in full from this hub page[api.unrealengine.com]
How to make your First Level: [link]
Various How-tos and documentation on mostly Hat-related actors and functions: [link]
Guide to Kismet: [link]
Importing and Implementing Custom Hat Flairs:
[link]
Creating Custom Chapters: [link]
INI (Mod Data) Files and Configuration: [link]
Creating your own Death Wish Contracts: [link]
As always, if you have any questions or concerns, leave them below in the comments.