Overview
SPACE BATTLES ONLYEaW allowed players to add their own custom names to each of the major warship classes for both the Empire and Rebellion. However, this feature is not present for the Zann Consortium’s warships. This guide will help you out in rectifying this issue, allowing Consortium ships to have custom names as well.DISCLAIMER: This may potentially cause MP desyncs. Caution is advised.
STEP 1: Preparation
In order to get started, you will need a BIG editor that will allow you to extract the necessary files. You can obtain one from this link[www.petrolution.net].
Essentially, we’ll be extracting the contents of the config.meg file using the above editor.
Once you have the editor downloaded, extract the .zip contents to a new folder, preferably where you can easily access it. You’ll be using the bigeditor.exe to do the extracting.
Using the BIG editor, press Open and search for your config.meg file. It should be located in your EaW directory as follows:

You should be greeted with the following screen:
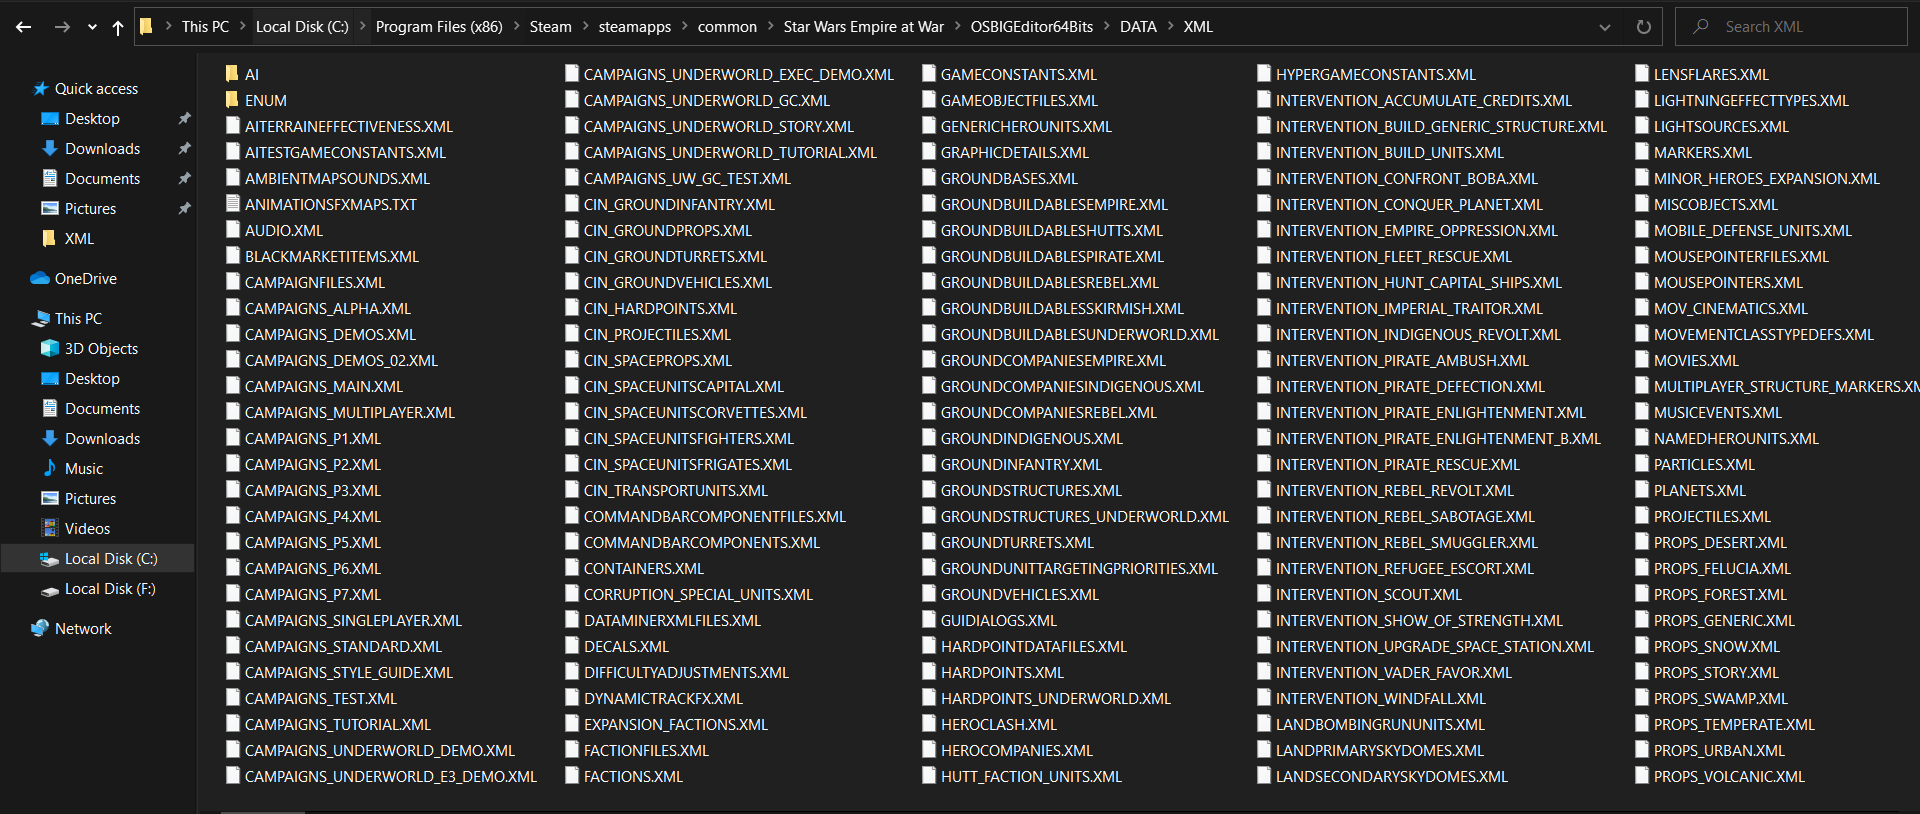
Before proceeding, you should also look for your GAMECONSTANTS.XML file, located here:

Make a backup of this file, as we’ll be editing this as well. Take note, however, that once you’ve extracted the contents of config.meg, there will be a copy of GAMECONSTANTS.XML among the extracted files. You can either edit that copy, or the one found in the file location listed above. Just make sure you don’t overwrite the edited file or this won’t work at all.
STEP 2: Extraction

Once you’ve opened the file in the editor, click on Edit at the toolbar, then Extract All (see above). Extract it to where it will be convenient for you to access it. Once done, you’ll find all the extracted files in a folder named DATA. Go inside it, then open the XML folder within. You should be greeted with this:
As you can tell, there’s a lot of stuff in here, but don’t panic: we’re not going to edit the majority of them. The ones we need are those that point to the warships themselves.
There are five XMLs that we’ll be editing:
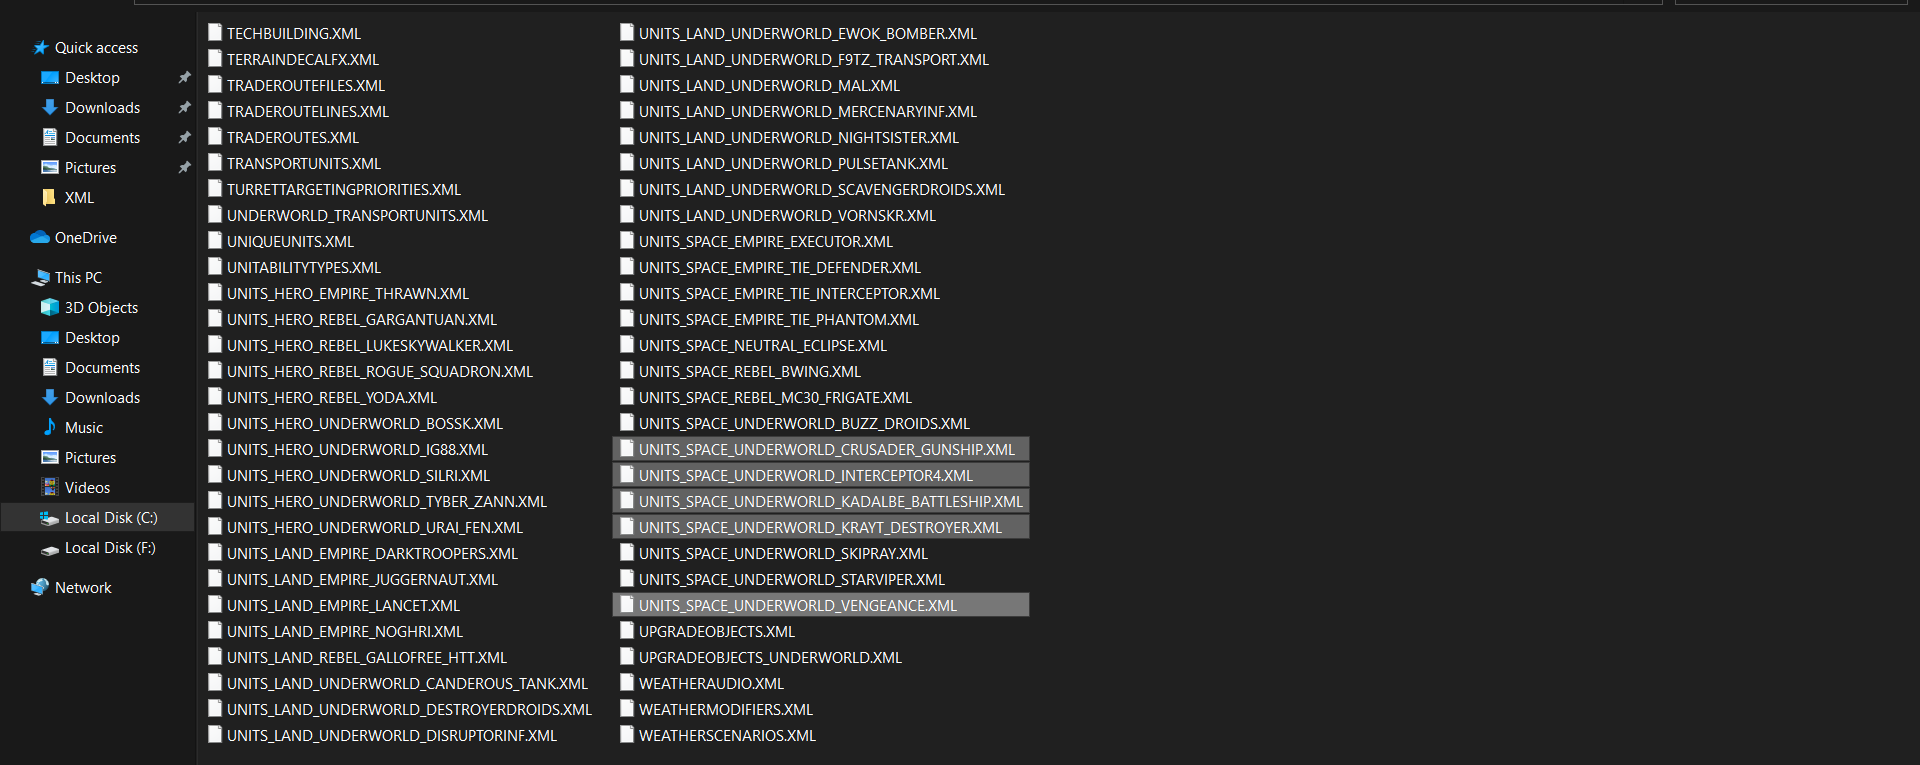
- UNITS_SPACE_UNDERWORLD_CRUSADER_GUNSHIP.XML
- UNITS_SPACE_UNDERWORLD_INTERCEPTOR4.XML
- UNITS_SPACE_UNDERWORLD_KADALBE_BATTLESHIP.XML
- UNITS_SPACE_UNDERWORLD_KRAYT_DESTROYER.XML
- UNITS_SPACE_UNDERWORLD_VENGEANCE.XML
Note: the Krayt destroyer is the internal name for the Aggressor-class destroyer; the Kadalbe is a misspelling of the Keldabe-class battleship.
STEP 3: XML Editing
Step 3 is the crucial step in order for the custom names to work. I’ll explain at the bottom of this section.
Let’s start with the Crusader Gunship first. Open up the UNITS_SPACE_UNDERWORLD_CRUSADER_GUNSHIP.XML file with a notepad application (I personally recommend Notepad++). You should be greeted with a wall of text.
First off, take note of the “SpaceUnit Name”, highlighted in the screenshot above. That is the unit’s internal name. Take note of this, as it will be very important for the next few steps. What you’ll need to do for now is to add the following line of code right after the line “<Scale_Factor>” (without the quote marks):

Remember the “SpaceUnit Name”? Now copy that name, without the quote marks, and paste it just before “.txt” (again, without quote marks). You should now have something that looks like this:
Repeat this procedure for the rest of the XMLs, taking note of their respective “SpaceUnit Name”. We’ll be needing them again later on.

Once you’ve done all 5 XML files, making sure to save each one once edited, you should now open your GAMECONSTANTS.XML file found among the files you extracted from config.meg (see Step 1 in case you’ve forgotten). If you haven’t already backed it up, back it up now. Once opened, search for the term “<ShipNameTextFiles>” without the quote marks. You should now see the following:
Again, the five ships’ internal names come into play. Just add them below the Tartan cruiser’s entry, using the same format as the Tartan. Once done, you should now have the following:

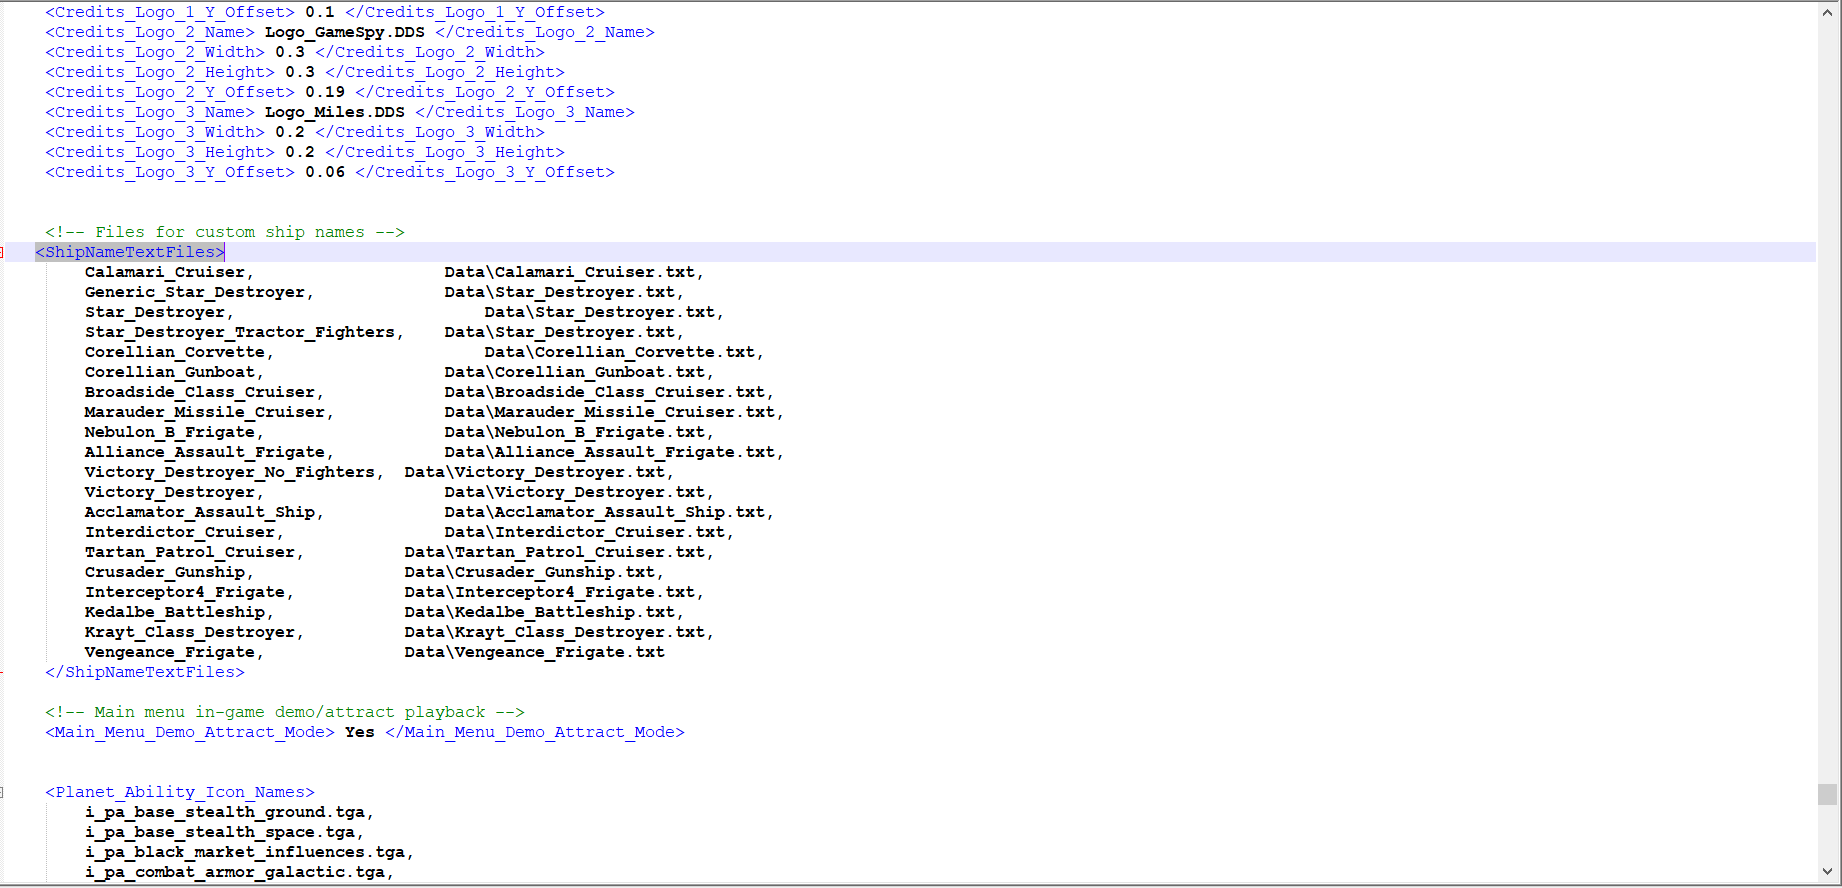
So why is Step 3 so important? To make this simple, let’s use the Crusader as an example. By adding the line <Moniker></Moniker> in its XML entry, we are basically identifying where its custom names will come from; in this case, its custom names will come from the text file “Crusader_Gunship.txt”.
Meanwhile, by editing GAMECONSTANTS.XML, we are now telling the game where it can find said text file containing the Crusader’s custom names. In this case, the text file can be found in here:
STEP 4: Text File Creation
Now we’ll create the text files needed to store our custom names. Refer to the screenshot below as per what we did in Step 3 when editing GAMECONSTANTS.XML:
Head over to the following directory:
In the case of the Crusader gunship, create a new text file and name it “crusader_gunship.txt” without the quote marks. Before you save, ensure that the text file encoding is UTF-16 LE, as the game only recognizes that type of encoding. Thanks again to Niko from the EaW Remake Discord server for pointing this out!
Note that the name is not case sensitive (compare the name with the one in the above screenshot), but must be spelled correctly for it to work.
Now in case you’re wondering why you don’t see the custom name text files for the Imperial and Rebel warships, those are found in the base game’s Data folder. For the Consortium, you must put them in the above directory, as they are an expansion-only faction. You don’t have to specify where exactly the files are located, as the game will automatically detect where they are so long as they are inside the Data folder. Big thanks to Niko over on the EaW Remake Discord server for this bit of info!
Repeat the steps above until all the Consortium warships have their own text file. Fill up each text file with any number of names that you want, save the file, and close it before testing if it all works.
Note: custom names are selected in descending order, starting from the top of the list until the end. It is not randomised at all. So if your first custom ship name for the Crusader gunship is, for example, Axiom, then every time you build your first Crusader, it will be called the Axiom. This also applies to the Imperial and Rebel ship names.

Use a list randomizer to shake things up every now and then. Here’s one you can try for yourself[www.random.org].
STEP 5: Moving the XML Files
This is pretty straightforward. Go back to the XML folder that contains all the extracted XML files from Step 2, including the unit XMLs we edited in Step 3. Copy everything and paste it in your FoC XML folder, located here:
As outlined earlier, if you were editing your GAMECONSTANTS.XML located the abovementioned directory, make sure you don’t accidentally overwrite your changes with the unedited GAMECONSTANTS.XML file that was extracted from config.meg back in Step 2. To be safe, just do a double check.
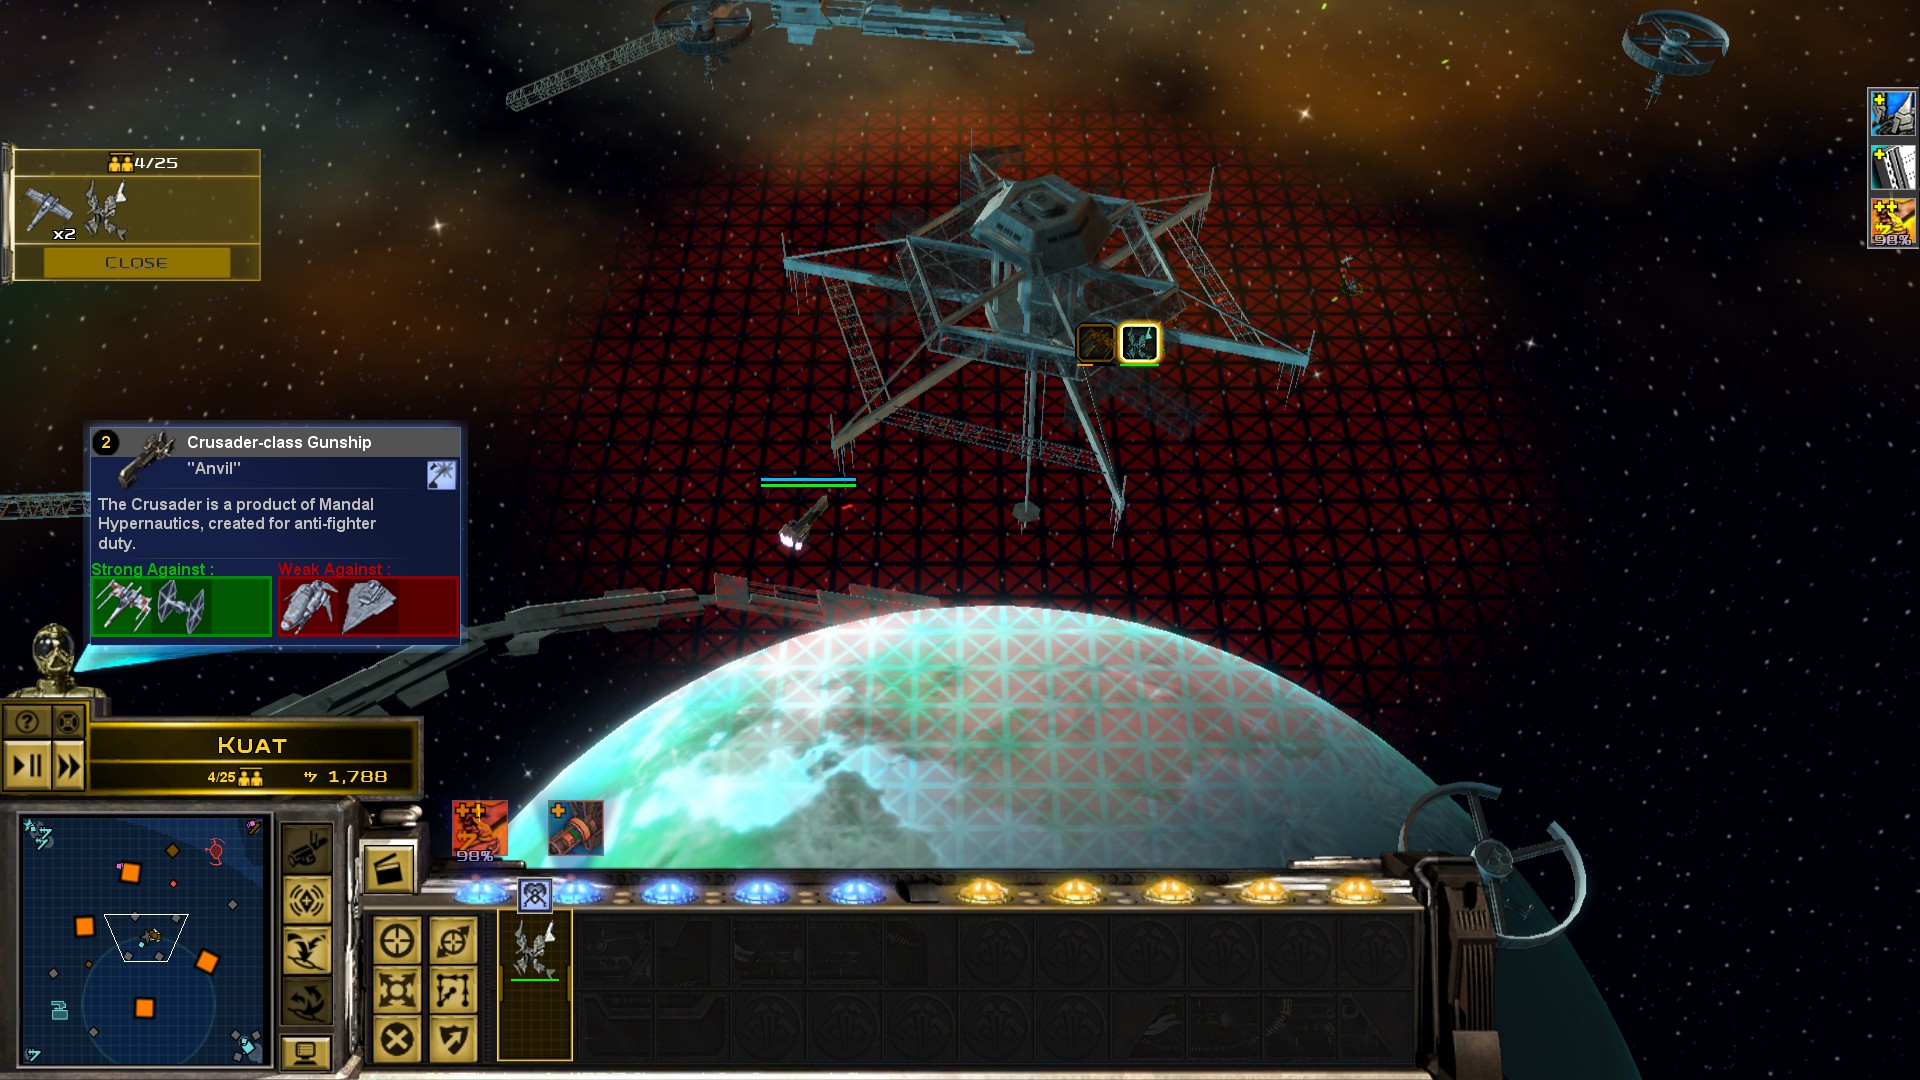
STEP 6: Testing
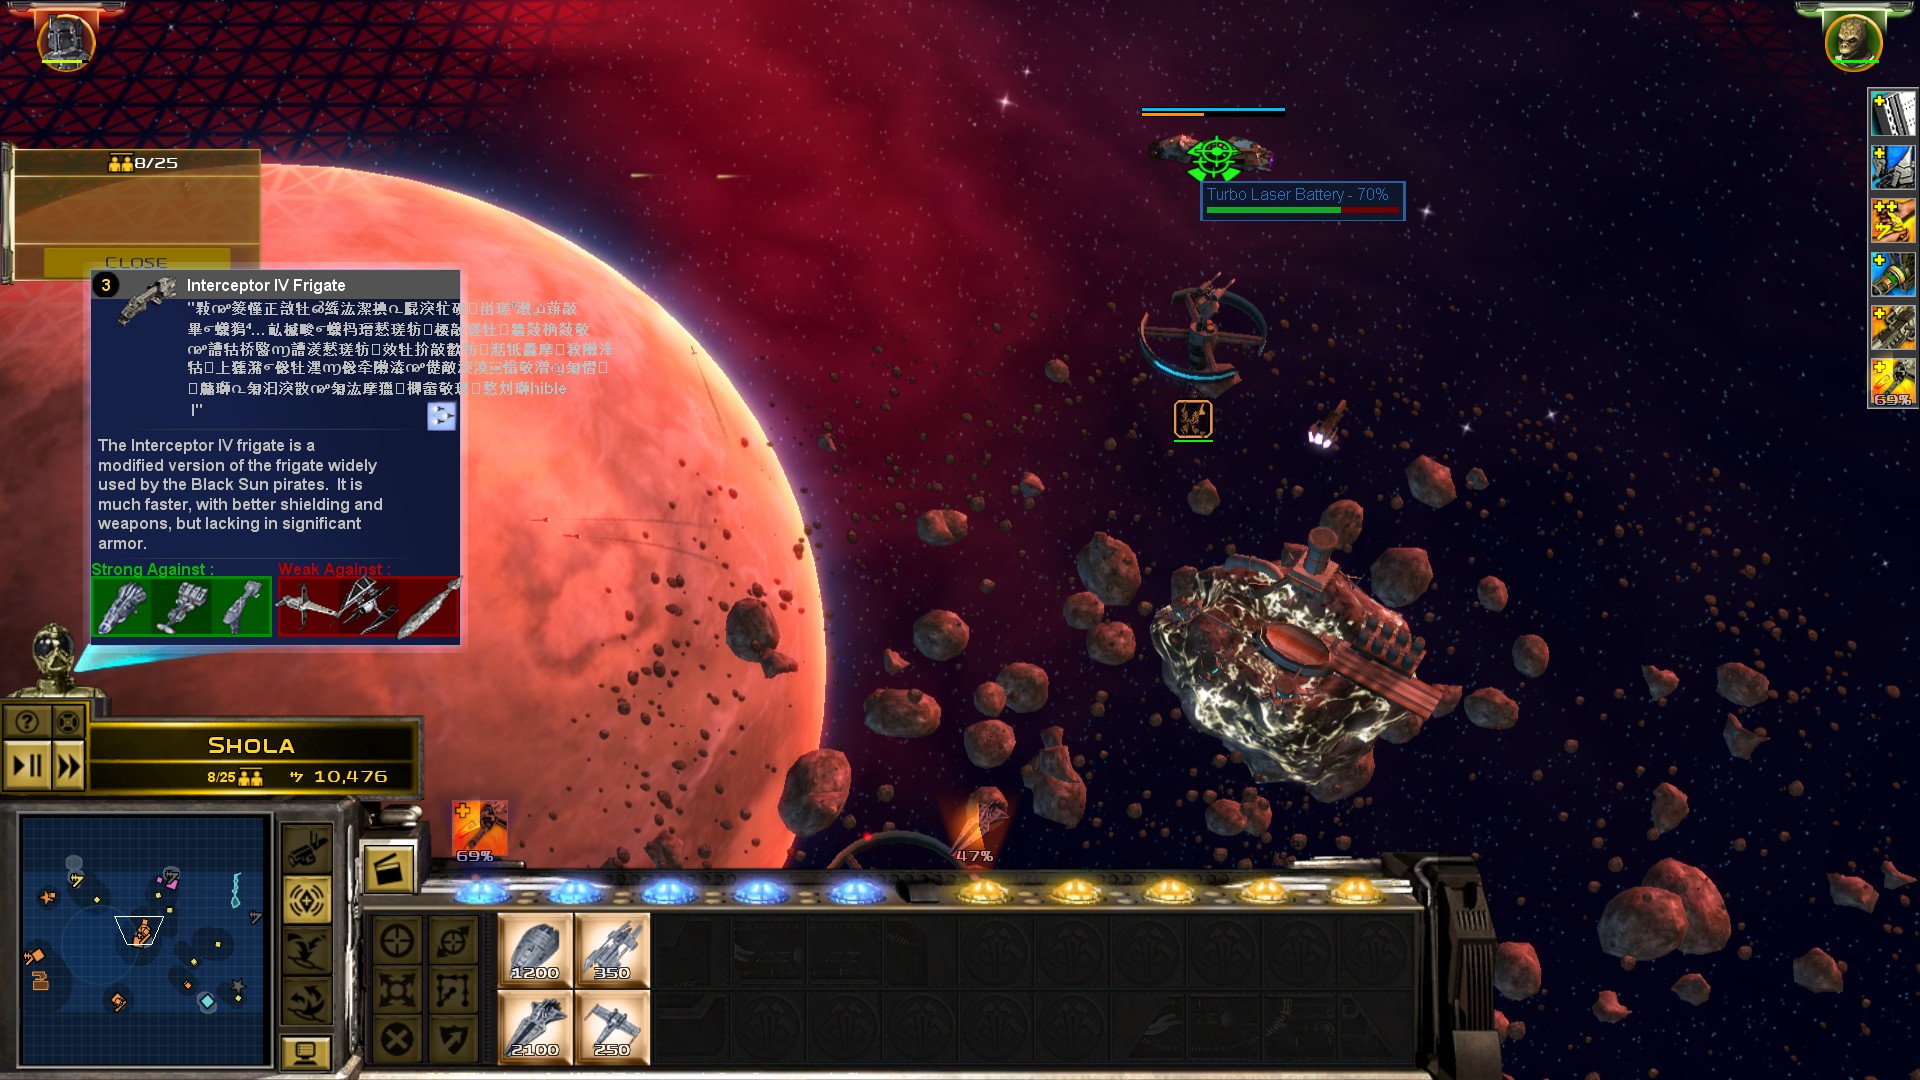
Now run Forces of Corruption and start a Space Battle skirmish as the Zann Consortium. Once you get to tech 2, build either a Crusader or Interceptor IV and warp it in. If you get this:

Hopefully this guide has helped you out!
Note: you won’t be able to play MP matches with this customized setup, unless your friend(s)/fellow player(s) also have the same setup. If you try to join a game that doesn’t have the same setup that you have, you’ll get a “Version Mismatch!” error. Revert all changes to the default if you want to play MP.
If you and your friends have followed this guide and want to try a match, this setup may potentially cause desyncs, but I can’t be too sure.
Appendix
This will be updated in the event of any changes/fixes to the guide.
08112020: If you used this guide, you won’t be able to play MP games (Version Mismatch error) until you revert all changes back to default settings. There is potential risk that desyncs can occur even if all players in a match have the same setup.
07112020: Version 1.0 of the guide released.
08112020: Version 1.1 released; minor update on MP compatibility.
09112020: Version 1.2 features a disclaimer on possible desync errors at the start of the guide, and minor edits in Step 6.