Overview
How to implament user-selected logos into your mod’sPrograms Used:* Blender[www.blender.org]* Model Converter[transport-games.ru]* Notepad++[notepad-plus-plus.org]* HxD HEX editor[mh-nexus.de]
Setup
First setting up the mesh you do exactly the same as you normally would, for simplicity you can just cut a section from your original mesh where you want to place the logo.

Convert the section to the games format, this will eventually be the one you use in your mod.
Now duplicate and remap the uv-map with the logo template and again convert it.
original.msh & original.msh.blob
logo.msh & logo.msh.blob
*optionally for accuracy I made a texture to make out the edges of each section.
.msh File
Now you have your mesh file. we’re going to add an extra line of code.
Look for the code section under indices and duplicate it;
uv0 = { },
You’ll now need te rename it uv1 as an example it should look like this;
indices = { normal = { count = 576, offset = 6912, }, position = { count = 576, offset = 7488, }, tangent = { count = 576, offset = 8064, }, uv0 = { count = 576, offset = 8640, }, uv1 = { count = 576, offset = 8640, }, },
And do the exact same for vertexAttr. Don’t forget to add your materials file location as wel.
It should look a little something like this;
function data() return { animations = { }, matConfigs = { { 0, }, }, subMeshes = { { indices = { normal = { count = 576, offset = 6912, }, position = { count = 576, offset = 7488, }, tangent = { count = 576, offset = 8064, }, uv0 = { count = 576, offset = 8640, }, uv1 = { count = 576, offset = 8640, }, }, materials = { “vehicle/plane/beechcraft_starship_logo.mtl” }, }, }, vertexAttr = { normal = { count = 1728, numComp = 3, offset = 0, }, position = { count = 1728, numComp = 3, offset = 1728, }, tangent = { count = 2304, numComp = 4, offset = 3456, }, uv0 = { count = 1152, numComp = 2, offset = 5760, }, uv1 = { count = 1152, numComp = 2, offset = 5760, }, }, } end
.msh.blob
Take note of the next values from your .msh file:
Now open both .msh.blob files, with your HEX editor.
Copy the HEX-code from your logo.msh.blob and paste it at the very end in the original.msh.blob while updating the offset(s) in your .msh file.
* HxD HEX editor[mh-nexus.de]
* I used display settings. | Bytes per row: 16 | Charset: ANSI | Offsetbase: dec | at the bottom you can see the count defined in “Length”.
As an example the earlyer .msh file now looks like this;
function data() return { animations = { }, matConfigs = { { 0, }, }, subMeshes = { { indices = { normal = { count = 576, offset = 6912, }, position = { count = 576, offset = 7488, }, tangent = { count = 576, offset = 8064, }, uv0 = { count = 576, offset = 8640, }, uv1 = { count = 576, offset = 9216, }, }, materials = { “vehicle/plane/beechcraft_starship_logo.mtl” }, }, }, vertexAttr = { normal = { count = 1728, numComp = 3, offset = 0, }, position = { count = 1728, numComp = 3, offset = 1728, }, tangent = { count = 2304, numComp = 4, offset = 3456, }, uv0 = { count = 1152, numComp = 2, offset = 5760, }, uv1 = { count = 1152, numComp = 2, offset = 9792, }, }, } end
.mtl File
For the materials you can copy/paste one of the games .mtl files and replace the textures with that of your own.
function data() return { params = { color_blend = { albedoScale = math.pow(1.37, 1.1), }, dirt_rust = { dirtColor = { 77/255, 75/255, 73/255, }, dirtOpacity = 10/100, dirtScale = 100/12.5, rustColor = { 80/255, 48/255, 35/255, }, rustOpacity = 50/100, rustScale = 100/34.77, }, fade_out_range = { fadeOutEndDist = 20000, fadeOutStartDist = 10000, }, map_albedo = { compressionAllowed = true, fileName = “models/vehicle/plane/starship_albedo_opacity.dds”, magFilter = “LINEAR”, minFilter = “LINEAR_MIPMAP_LINEAR”, mipmapAlphaScale = 0, type = “TWOD”, wrapS = “CLAMP_TO_EDGE”, wrapT = “CLAMP_TO_EDGE”, }, map_cblend_dirt_rust = { compressionAllowed = true, fileName = “models/vehicle/plane/starship_cblend_dirt_rust.dds”, magFilter = “LINEAR”, minFilter = “LINEAR_MIPMAP_LINEAR”, mipmapAlphaScale = 0, type = “TWOD”, wrapS = “CLAMP_TO_EDGE”, wrapT = “CLAMP_TO_EDGE”, }, map_dirt = { compressionAllowed = true, fileName = “models/vehicle/dirt_albedo.dds”, magFilter = “LINEAR”, minFilter = “LINEAR_MIPMAP_LINEAR”, mipmapAlphaScale = 0, type = “TWOD”, wrapS = “REPEAT”, wrapT = “REPEAT”, }, map_dirt_normal = { compressionAllowed = true, fileName = “models/vehicle/dirt_normal.dds”, magFilter = “LINEAR”, minFilter = “LINEAR_MIPMAP_LINEAR”, mipmapAlphaScale = 0, type = “TWOD”, wrapS = “REPEAT”, wrapT = “REPEAT”, }, map_metal_gloss_ao = { compressionAllowed = true, fileName = “models/vehicle/plane/starship_metal_gloss_ao.dds”, magFilter = “LINEAR”, minFilter = “LINEAR_MIPMAP_LINEAR”, mipmapAlphaScale = 0, type = “TWOD”, wrapS = “CLAMP_TO_EDGE”, wrapT = “CLAMP_TO_EDGE”, }, map_normal = { compressionAllowed = true, fileName = “models/vehicle/plane/starship_normal.dds”, magFilter = “LINEAR”, minFilter = “LINEAR_MIPMAP_LINEAR”, mipmapAlphaScale = 0, type = “TWOD”, wrapS = “CLAMP_TO_EDGE”, wrapT = “CLAMP_TO_EDGE”, }, map_rust = { compressionAllowed = true, fileName = “models/vehicle/rust_albedo.dds”, magFilter = “LINEAR”, minFilter = “LINEAR_MIPMAP_LINEAR”, mipmapAlphaScale = 0, type = “TWOD”, wrapS = “REPEAT”, wrapT = “REPEAT”, }, map_rust_normal = { compressionAllowed = true, fileName = “models/vehicle/rust_normal.dds”, magFilter = “LINEAR”, minFilter = “LINEAR_MIPMAP_LINEAR”, mipmapAlphaScale = 0, type = “TWOD”, wrapS = “REPEAT”, wrapT = “REPEAT”, }, map_logo = “player-logo-array”, polygon_offset = { factor = -10, units = -10, }, two_sided = { flipNormal = false, twoSided = false, }, }, type = “PHYSICAL_NRML_MAP_CBLEND_DIRT_LOGO”, } end
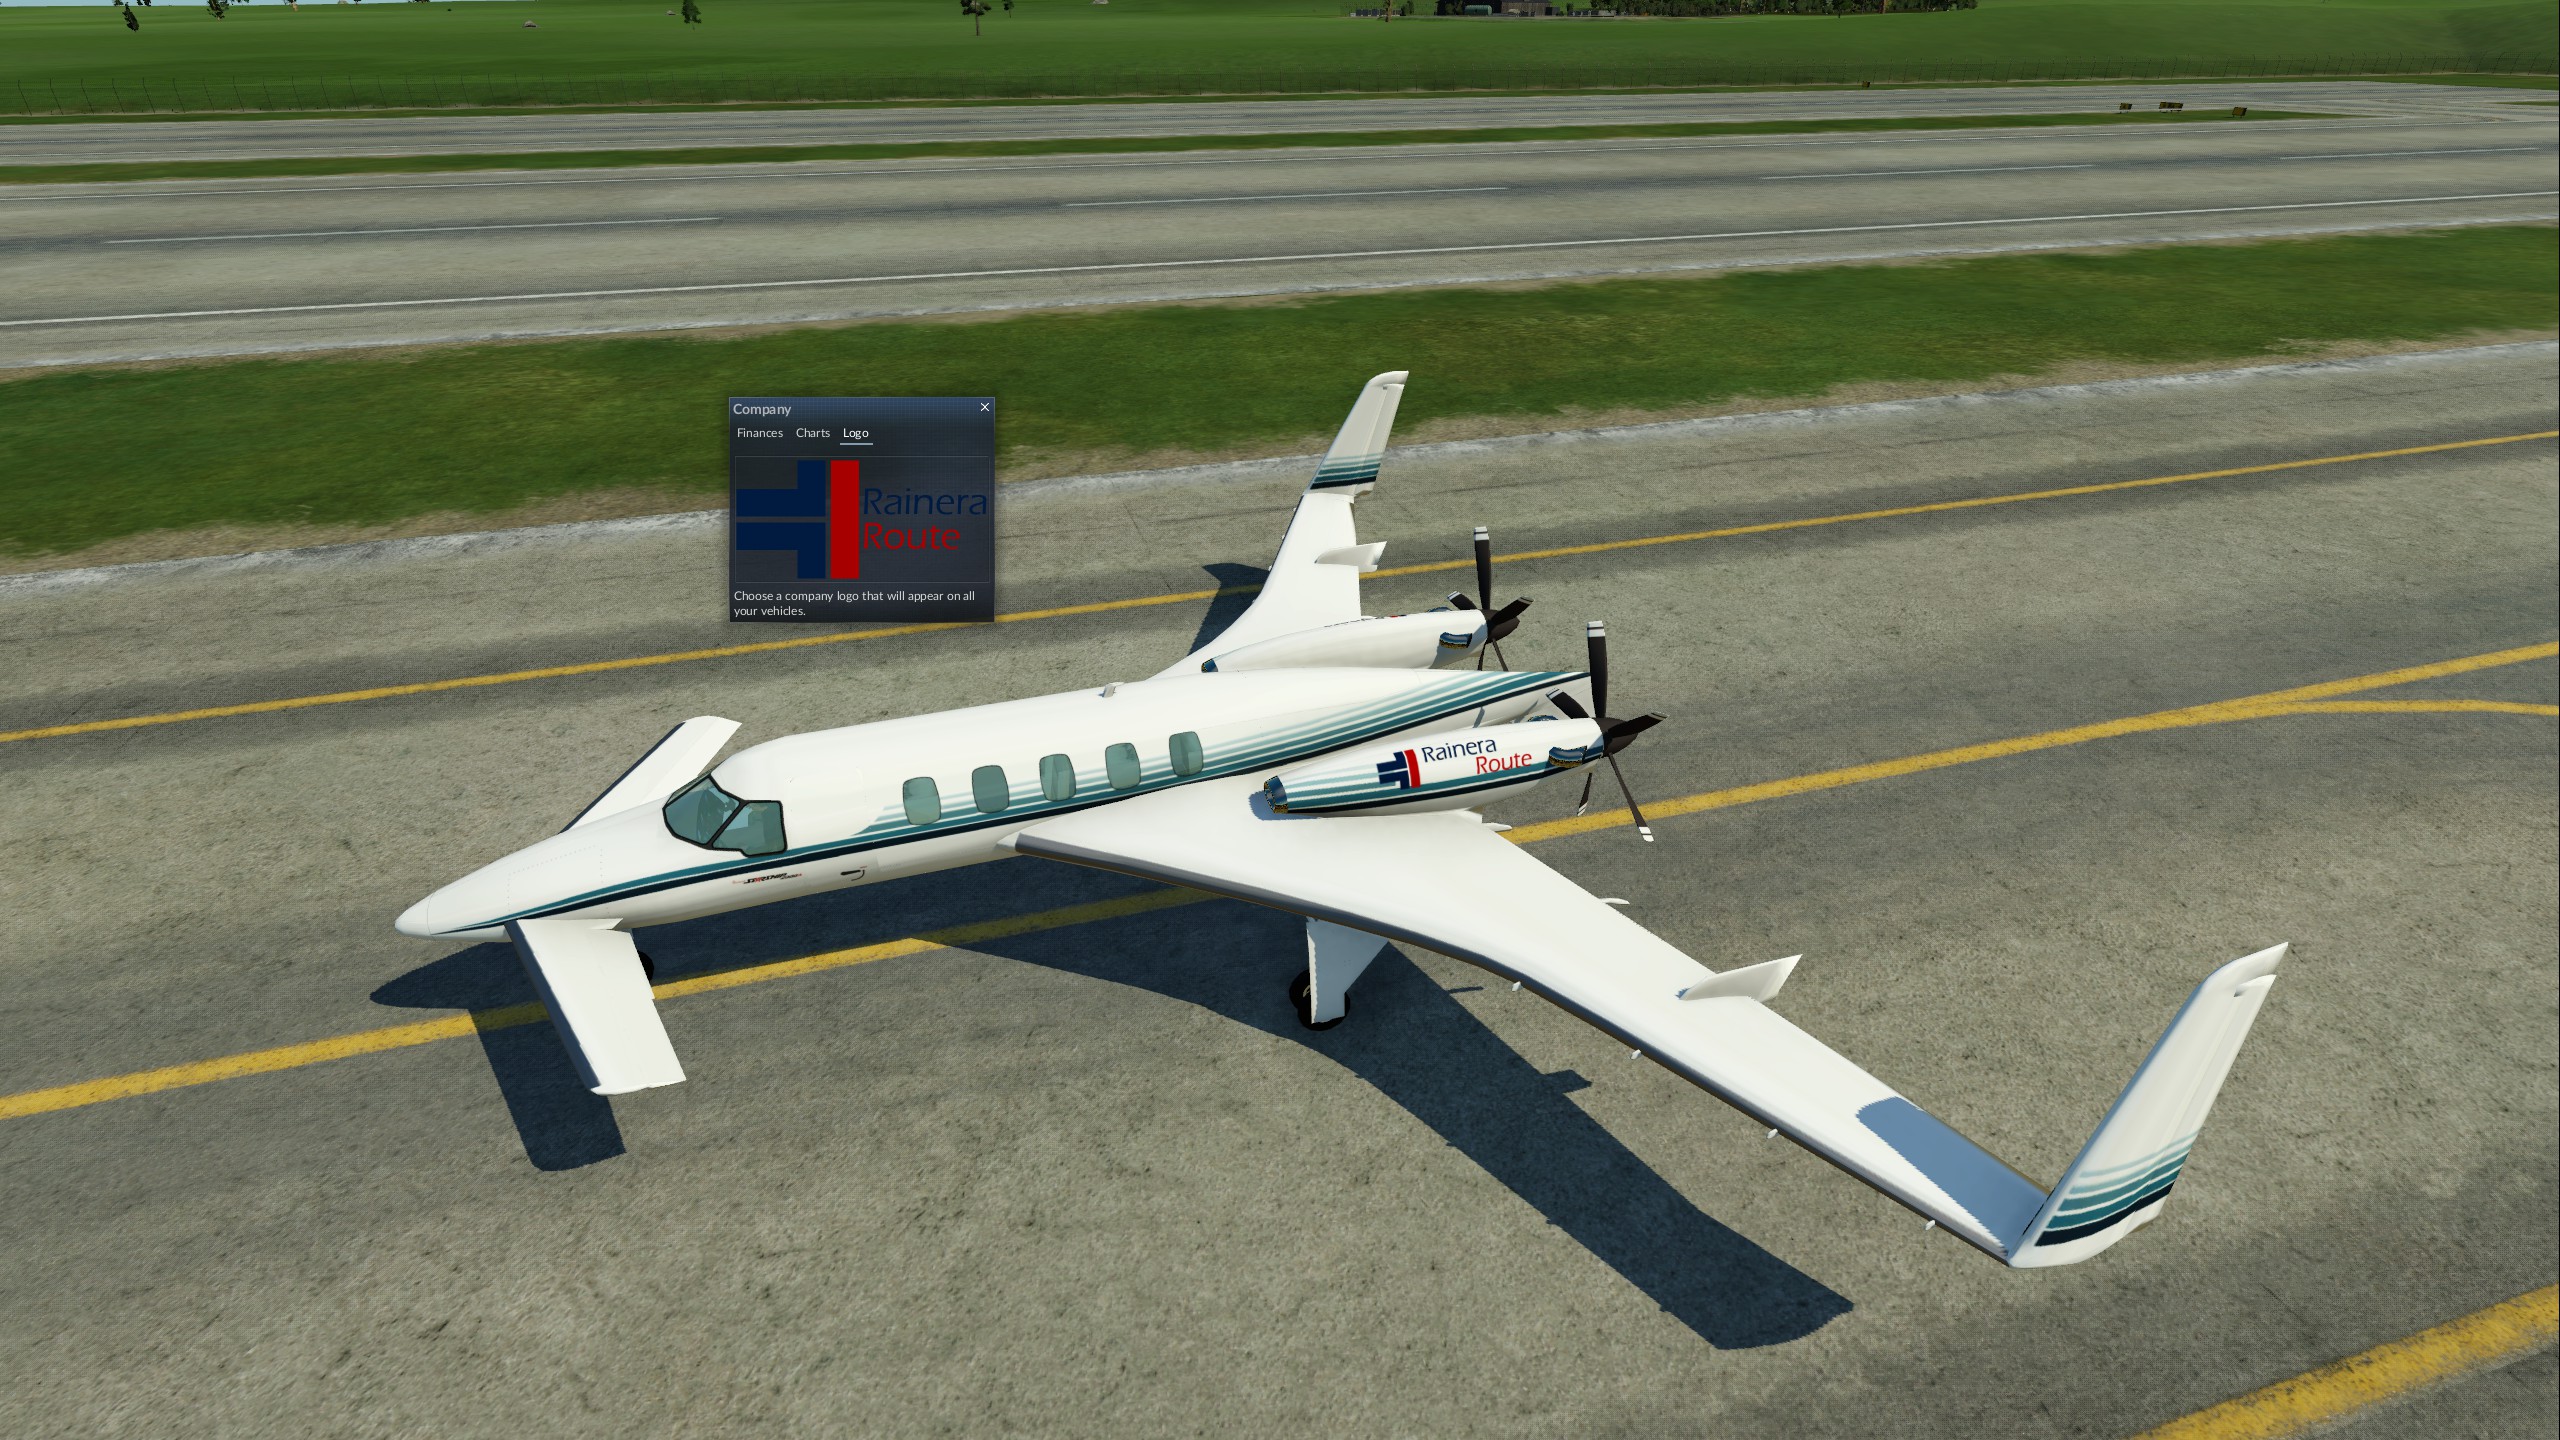
In-game
your end result should look a little like this:
Notes
If you mod with 3ds max or other program that exports ASE, Enzojz @transportfever.net has writen a converter that supports multiple-uv’s:
[link]
The Blender-plugin will support multiple-uv’s as well once the version for Transport Fever is released (or help test alpha0.5.0)[www.transportfever.net].