
Overview
This guide will show you how to change the graphics quality higher what the game automatically set or are you struggling to run this game and you need to find a way to get extra FPS boost by reducing the graphics quality to get a stable 60fps
About
We all have seen the Lacking Video options that the game offers. well i have found a way to adjust the graphic quality to suit your needs, for better or worse. The best part is that doesn’t matter what system you running it on, the game defaults to the highest graphic quality.
This guide was made base on my own testing. i might be wrong in some area
If you want to give me some feedback about this guide, correct something wrong in this guide or need support. Im active on this discord[discord.gg]
Note: This is a living guide which means stuff will be change or added base on more testing from me and the community.
PC’s tested
Desktop 1
OS: Windows 10 Pro
Processor: AMD FX-8350 Eight-Core Processor, 4300 Mhz, 4 Core(s), 8 Logical Processor(s)
RAM: 16GB
GPU: 2 4GB GTX 980 in SLI mode
Desktop 2
OS: Windows 10 Home
Processor: AMD Ryzen 7 2700 Eight-Core Processor, 3400 Mhz, 8 Core(s), 16 Logical Processor(s)
RAM: 32GB
GPU: RTX 2070 Super 8GB
Laptop 1
OS: Windows 10 Home
Processor: Intel Core i5-7200U CPU @ 2.50GHz, 2701 Mhz, 2 Core(s), 4 Logical Processor(s)
RAM: 8GB
GPU: Intel HD Graphics 620
Guide v1.4.4
Adjusting the Quallity – the files
There two files that you can adjust the quality of the texture, models, etc. in C:UsersYOUNAMEHEREAppDataLocalPineappleSavedConfigWindowsNoEditor or you can Press Win+R and paste this %LOCALAPPDATA%PineappleSavedConfigWindowsNoEditor

I highly recommend setting these two files to read-only (by right-clicking them and click properties) if you are going to edit them as this will stop the game overwriting them.


Adjusting the Quallity – GameUserSetting.ini
The first file called “GameUserSettings.ini” (from testing this doesn’t change the quality of texture and models)Inside you can adjust these value (note some are cap at 3 or 4 unless you make the file read-only)

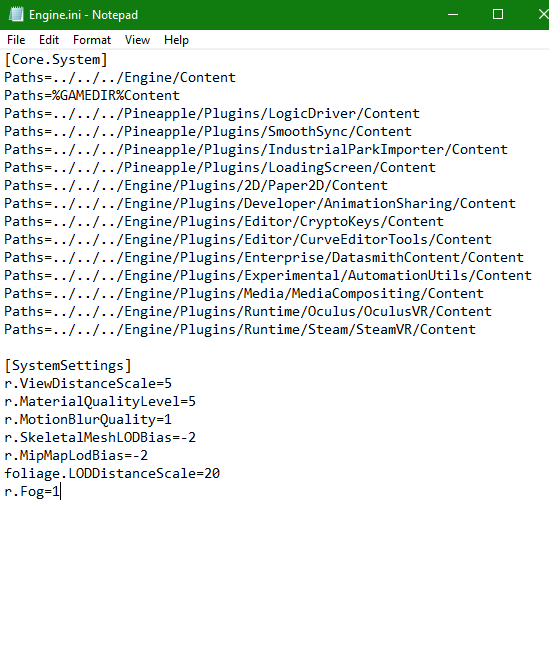
Adjusting the Quallity – Engine.ini (If GameUserSetting.ini doesnt change much)
The Second file called “Engine.ini” is where you can make a lot of changes to make this game look potato and give you PC an FPS boost. (Personally I found this to be more effective than GameUserSettings.ini)
By default, the file only has this section

If you want to Adjust the quality of texture, models, LOD, etc. You have to add these line of code
- 0 : Allow streaming of all mips
- 1 : Only stream the last mip. The other mips are always loaded.
- 2 : Don’t stream any mips. All mips are always loaded.
Results – editing the Engine.ini file


Graphic comparison
note: more screenshot will be added once finished the campaign
PC Spec
OS: Windows 10 Pro
Processor: AMD FX-8350 Eight-Core Processor, 4300 Mhz, 4 Core(s), 8 Logical Processor(s)
RAM: 16GB
GPU: 2 GTX 980 in SLI mode
Default settings
GameUserSettings.ini
[ScalabilityGroups]


Modify settings to max value (That these cards can do)
Engine.ini
[SystemSettings] (i have put some extreme numbers in here for settings that have no limit)


*Subject to change
From my short testing, i only see object and foliage render a bit further and out of bounds object look bit better from looking at a distance.
Recommended setting for low spec PC
Results may vary base your hardware
Test conclude on 24/06/20 on guide version 1.3
OS: Windows 10 Home
Processor: Intel Core i5-7200U CPU @ 2.50GHz, 2701 Mhz, 2 Core(s), 4 Logical Processor(s)
RAM: 8GB
GPU: Intel HD Graphics 620
First i start by testing the game default setting when the game boot up for the first time and seeing if the game decides what graphic need to be adjusted to make the game run a stable 60fps. If the game struggle to run 60fps on default setting i will adjust the Engine.ini file to a point where the game runs at 60fps and to see what the scarifies i had to make in order to achieved that 60FPS.
Looking at the GameUserSettings.ini after i booted up the game for the first time, i found out it defaulted the graphics to max settings. which was a bad choices as the game stick around low 20fps indoors and 15 – 19fps outdoors. one thing i notices that the Goo in Jelly fish fields look really white. (this could be to do with integrated graphic card)
Screen shots
note: i have blown up the FPS counter.
GameUserSettings.ini

in Game


After around 1hr of messing around with the engine.ini file, i found that i can get a reliable 30fps in the hub. there one major issue, that some object will render in at the same distance as the default settings are (most notable jelly fish fields. Which is taking the hit of fps. (i can’t seem to find a command to make these object render closer to the camera.) Also the Goo is fix when i modified the engine.ini
Screen Shots
GameUserSettings.ini

Engine.ini

In Game


Change Log
24/06/20 – v1.2 change some rewording some text so it make more sense
24/06/20 – v1.2.3 added new parameter in Engine.ini table.
24/06/20 – v1.3 added graphic comparison for default and modded (max value) config and low spec PC
24/06/20 – v1.3 change the about section so reader can get more info about this guide
25/06/20 – v1.3.1 Engine.ini table added know issue section of commands that have issue when in use
25/06/20 – v1.4 added new parameter in Engine.ini table and added recommended low spec PC
27/06/20 – v1.4.1 added new method to get to the config files
27/06/20 – v1.4.2 added new parameters in Engine.ini table. update low spec config.
13/07/20 – v1.4.3 remove spoiler text base on comments. Added know issue to Material quality thank to spongeis5
14/05/21 – v1.4.4 Fix typo in Engine.ini table base on feedback. Thanks to HANGRYAF