[All Heroes] Melee weapon cheat sheets
Introduction
This guide is there to help you get familiar with new melee weapons. It might cover topics that feel advanced, but it's written with the intent to be understandable for brand-new players, too.
To get the most out of a weapon, you need to know which attacks and attack combos are appropriate for which situation: What do I do against groups? What do I do against armored enemies? For this, the guide contains one cheat sheet for every weapon, outlining which attacks it has, what they're good at, and how they chain into each other.
It also includes info on how good the weapon's defense is, and tells you if it has any other special up- or downsides that you should be aware of. Because knowing your weapon's potentials and limits will help you make better decisions in-game, such as: Can I contribute if we aggro this patrol right now? Do I have a chance of reaching and reviving my downed teammate in the middle of that horde, or do we need to cut our losses? Should I be fighting this monster, or should I let a teammate do it, because I am better suited to creating space? Answering these questions always depends on your build, and for a large part on the strengths and weaknesses of your chosen melee weapon.
In the beginning of the guide, you will find explanations on how you read the weapon cheat sheets, and what all the attack property icons mean. As an example, you will also find the Torch's moveset here.
After that, you will find the remaining 53 melee weapons, ordered by hero.
Lastly, you will find links to related resources that I found useful.
To get the most out of a weapon, you need to know which attacks and attack combos are appropriate for which situation: What do I do against groups? What do I do against armored enemies? For this, the guide contains one cheat sheet for every weapon, outlining which attacks it has, what they're good at, and how they chain into each other.
It also includes info on how good the weapon's defense is, and tells you if it has any other special up- or downsides that you should be aware of. Because knowing your weapon's potentials and limits will help you make better decisions in-game, such as: Can I contribute if we aggro this patrol right now? Do I have a chance of reaching and reviving my downed teammate in the middle of that horde, or do we need to cut our losses? Should I be fighting this monster, or should I let a teammate do it, because I am better suited to creating space? Answering these questions always depends on your build, and for a large part on the strengths and weaknesses of your chosen melee weapon.
In the beginning of the guide, you will find explanations on how you read the weapon cheat sheets, and what all the attack property icons mean. As an example, you will also find the Torch's moveset here.
After that, you will find the remaining 53 melee weapons, ordered by hero.
Lastly, you will find links to related resources that I found useful.
Explanations
Attack boxes
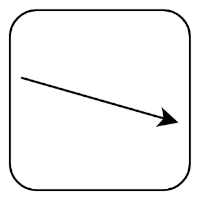 This is the most common type of attack, a slash. The arrow indicates the direction in which the weapon is swung. Naturally, downward slashes are suited for landing headshots. Horizontal slashes are useful for cleaving through multiple enemies, if the attack is able to. Upward slashes seem impractical at first, but they often have better effects to make up for it (higher damage, increased crit chance, bonus damage-over-time effects, etc). Also, with proper practice, headshots can even be landed with upward slashes. Refer to the further resources section for a tutorial that covers this.
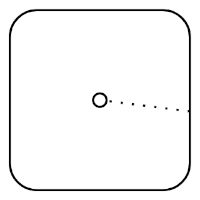 This represents a stabbing attack. Stabs are always directed towards the center of your screen. They are single-target attacks that can damage armored enemies. Most of them also deal increased headshot damage. The dotted line indicates which direction the stab comes from, but this makes no noticeable difference in combat. It is only included so that you can easily tell different stabbing attacks apart.
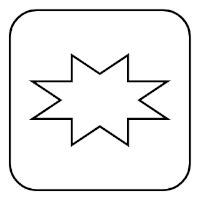 This represents a bash, which can normally only be performed with shield weapons. Since all shield bashes work the same, I will spoil their properties already: They always hit every enemy in front of you, dealing low damage but strong knockback, especially to enemies directly in front of you. A valuable self-defense tool for dense horde situations, or to try controlling dangerous elites.
Attack inputs
Let's do a quick summary of your inputs:Tapping left click gives you a light attack. Holding and releasing left click gives you a heavy attack (the game calls it "charged" attack). Note that holding a heavy attack for longer doesn't change its properties, it simply happens later.
Pressing right click cancels what you're doing to block, so you can even use it to abort a heavy attack, for example.
Pressing left click while blocking spends stamina to do a push, which doesn't lower your guard - you remain safe while pushing. If you keep holding left click, after the push you will follow up with the push attack. This does cancel your guard, so you may get hit! Also, remember that you are not restricted to the push attack after doing a push: If you tap left click to push, then let go of both buttons and press left click again, you will do a light or heavy attack.
Combo structure
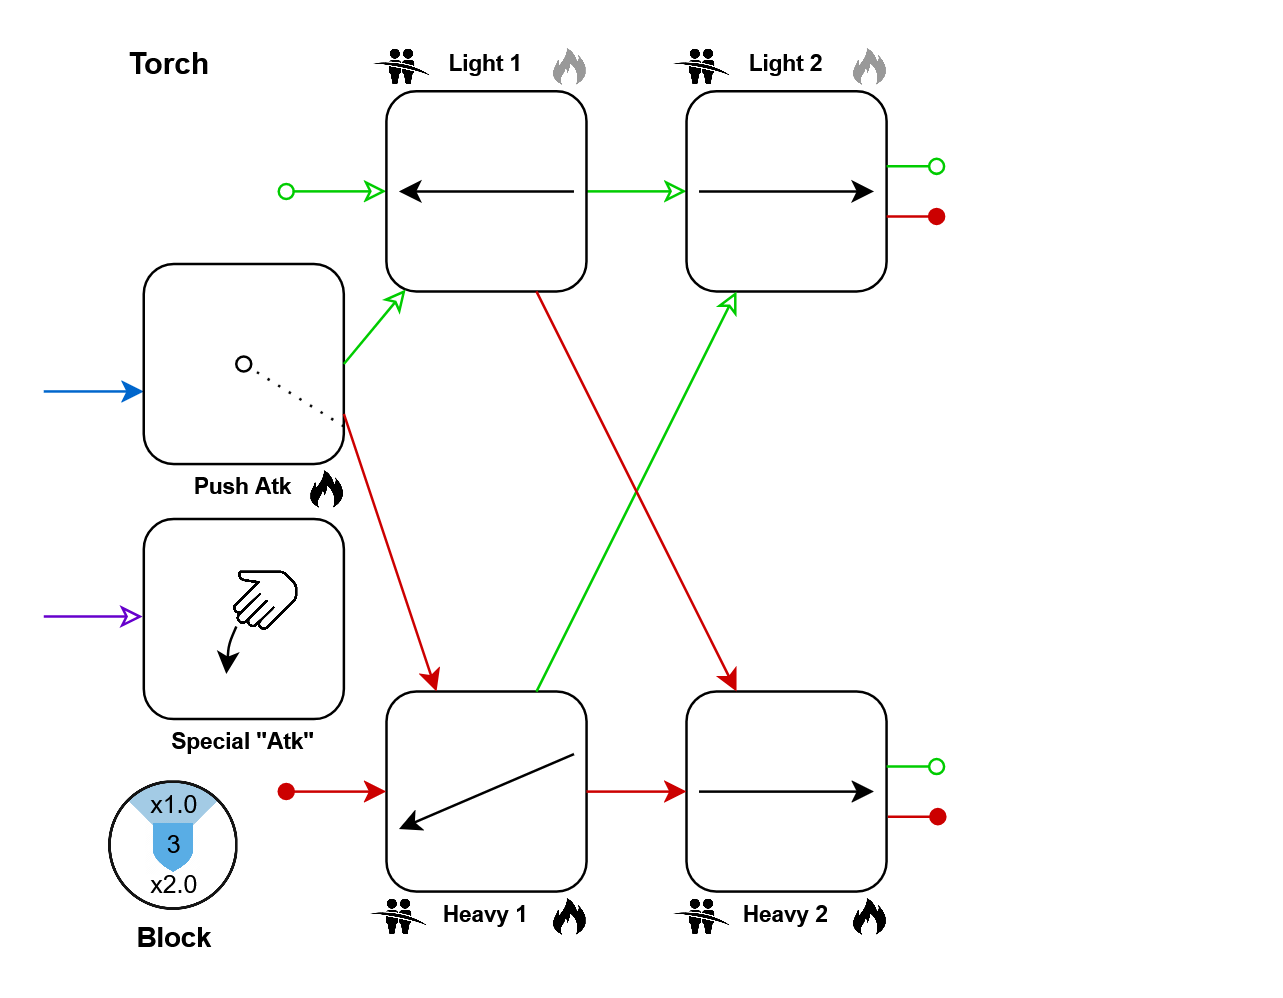
After performing any attack, you can follow up with either a light attack, or a heavy attack. In my graphs, outgoing arrows point towards the attacks that will be performed as a follow-up. Light attacks use green arrows with empty heads, and heavy attacks use red arrows with filled heads, so every attack box will have both an outgoing green and red arrow. Shortly blocking after an attack can be used to reset your combo to the start. And to access the push attack (blue) you need to block too, of course.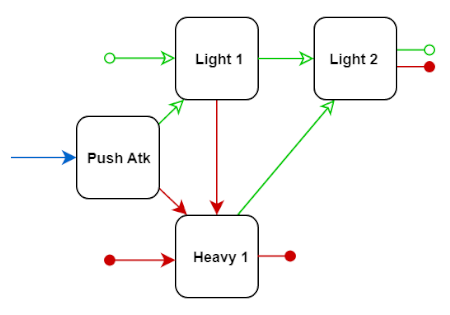
For visual clarity, arrows going back to the first light and heavy attacks are not drawn. Instead, you will see an outgoing arrow that ends in a circle. This does not mean that your combo ends, it's as fast as going to any other attack. So the weapon in this example could perform the following loop: [Heavy 1 > Light 2 > Heavy 1 > ...] forever, without stopping or slowing down.
Some weapons can perform a special attack, accessible by a different keybind (the game calls it Weapon Special). You will find its box below the push attack, indicated by a purple arrow.
Icon Glossary
Attack boxes will be accompanied by all kinds of icons, summarizing what this attack is good at. Use this information to plan your combos: If you want to fight hordes, try to find cleaving attacks that link into each other. And to fight armored elites, look for armor-piercing attacks linking into each other.
On the left side of the attack name, you will generally find icons telling you how well the attack cleaves. On the right side, you will find icons telling you what type of damage it deals. And if a heavy attack has special mechanics related to charging it, you will find icons below its name.
If only a single weapon uses a unique icon, it will be skipped here, and only explained in that weapon's details text.
 This attack is able to cleave through multiple non-armored units, but gets stuck on armored enemies (Including maulers, the elite chaos enemy with a huge axe and head armor). Note that there is still a cleave limit: If a group of enemies is too densely packed, you will only hit some of them. (If the icon is grey, the attack can just barely cleave the tiniest of enemies.)
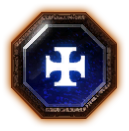
 This attack is realistically able to cleave through at least one armored unit and continue hitting more enemies after it. This is an uncommon but amazing property. Usually these swings still get stuck on chaos warriors, monsters and lords.
 This attack itself may only hit one enemy, but it causes an explosion centered on that enemy, which hits all other enemies around it. The explosion can hit an infinite number of enemies, since it has nothing like a cleave limit.
 This attack deals damage to armored units. (If the icon is grey, the damage is so small that it is clearly overshadowed by other attacks from the same weapon, so you might want to use those instead.)
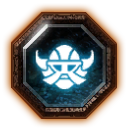
 This attack will destroy the wooden shields of enemies, if they try to block with one. Not possible against metal shields.
 This attack completely bypasses any shield held by enemies. Naturally, if the attack also happens to deal armor damage, this is great for dealing with shielded stormvermin.
 This attack applies a burn damage-over-time effect. Sienna's careers may have talents synergizing with these. Note that burn effects from melee weapons usually stack, so you can apply many of these to the same enemy simultaneously without losing any of their damage. (If the icon is grey, the burn is super short, only dealing 1 tick of damage.)
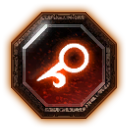
 This attack applies a bleed damage-over-time effect. There is not much synergy here. Note that unlike burns, bleed damage-over-time effects do not stack, but are simply re-applied.
 Holding this heavy attack for a specific amount of time suddenly increases its damage to an even larger value than usual. Keep in mind that any heavy attack without this icon does not do this: Normally, their damage is always the same, no matter if you release them directly or keep the button pressed for a while.
 This heavy attack can be charged forever, since your character will never let go of it automatically.
 This heavy attack can be charged forever, and while doing so your character will be in a blocking state. This block works as usual, meaning that it uses your amounts of stamina and block cost reduction, synergizes with class talents related to blocking, and the parry trait.
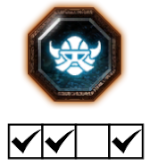 These checkboxes tell you which careers are able to use this melee weapon. For example, this weapon can be used by Bardin's 1st, 2nd, and 4th careers, but not as the Slayer.
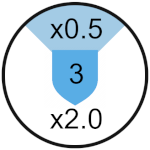 Lastly, every cheat sheet summarizes the defensive ability of the weapon: The center number is the amount of stamina shields that it has (Note: 3 stamina shields = 6.0 stamina). Every weapon has a frontal block angle, typically 90°, as displayed in light blue. Enemy attacks coming from this angle cost way less stamina to block than attacks outside of it. The numbers in the top and bottom show how the block cost is modified in- and outside of the weapon's effective blocking angle, so lower is always better. Keep in mind that you can improve the available stamina shields, the block costs, and the effective blocking angle with properties on your equipment.
 Some weapons only lose half a stamina shield when pushing, instead of a full shield like all the others. This greatly improves your defense by allowing you to dig your way out of otherwise fatal situations. These weapons will be marked with this icon.
And on the topic of blocking, here is what's special about shield weapons: Obviously, they generally have improved blocking stats as you will see in their infographics, and are the only type of weapon that may have shield bashes in their moveset. Furthermore, unlike all other weapons, they also allow you to block ratling gun bullets and the rat ogre's overhead attacks. And their push strength is also improved, being able to stagger a lot of elite enemies that otherwise wouldn't care. And lastly, the delay until your stamina recovers after pushing is halved when using a shield weapon.
On the left side of the attack name, you will generally find icons telling you how well the attack cleaves. On the right side, you will find icons telling you what type of damage it deals. And if a heavy attack has special mechanics related to charging it, you will find icons below its name.
If only a single weapon uses a unique icon, it will be skipped here, and only explained in that weapon's details text.
Cleave Properties
This attack is able to cleave through multiple non-armored units, but gets stuck on armored enemies (Including maulers, the elite chaos enemy with a huge axe and head armor). Note that there is still a cleave limit: If a group of enemies is too densely packed, you will only hit some of them. (If the icon is grey, the attack can just barely cleave the tiniest of enemies.) This attack is realistically able to cleave through at least one armored unit and continue hitting more enemies after it. This is an uncommon but amazing property. Usually these swings still get stuck on chaos warriors, monsters and lords. This attack itself may only hit one enemy, but it causes an explosion centered on that enemy, which hits all other enemies around it. The explosion can hit an infinite number of enemies, since it has nothing like a cleave limit.Damage Properties
This attack deals damage to armored units. (If the icon is grey, the damage is so small that it is clearly overshadowed by other attacks from the same weapon, so you might want to use those instead.) This attack will destroy the wooden shields of enemies, if they try to block with one. Not possible against metal shields. This attack completely bypasses any shield held by enemies. Naturally, if the attack also happens to deal armor damage, this is great for dealing with shielded stormvermin. This attack applies a burn damage-over-time effect. Sienna's careers may have talents synergizing with these. Note that burn effects from melee weapons usually stack, so you can apply many of these to the same enemy simultaneously without losing any of their damage. (If the icon is grey, the burn is super short, only dealing 1 tick of damage.) This attack applies a bleed damage-over-time effect. There is not much synergy here. Note that unlike burns, bleed damage-over-time effects do not stack, but are simply re-applied.Heavy Charging Properties
Holding this heavy attack for a specific amount of time suddenly increases its damage to an even larger value than usual. Keep in mind that any heavy attack without this icon does not do this: Normally, their damage is always the same, no matter if you release them directly or keep the button pressed for a while. This heavy attack can be charged forever, since your character will never let go of it automatically. This heavy attack can be charged forever, and while doing so your character will be in a blocking state. This block works as usual, meaning that it uses your amounts of stamina and block cost reduction, synergizes with class talents related to blocking, and the parry trait.Career Availability
These checkboxes tell you which careers are able to use this melee weapon. For example, this weapon can be used by Bardin's 1st, 2nd, and 4th careers, but not as the Slayer.Blocking infographic
Lastly, every cheat sheet summarizes the defensive ability of the weapon: The center number is the amount of stamina shields that it has (Note: 3 stamina shields = 6.0 stamina). Every weapon has a frontal block angle, typically 90°, as displayed in light blue. Enemy attacks coming from this angle cost way less stamina to block than attacks outside of it. The numbers in the top and bottom show how the block cost is modified in- and outside of the weapon's effective blocking angle, so lower is always better. Keep in mind that you can improve the available stamina shields, the block costs, and the effective blocking angle with properties on your equipment. Some weapons only lose half a stamina shield when pushing, instead of a full shield like all the others. This greatly improves your defense by allowing you to dig your way out of otherwise fatal situations. These weapons will be marked with this icon.And on the topic of blocking, here is what's special about shield weapons: Obviously, they generally have improved blocking stats as you will see in their infographics, and are the only type of weapon that may have shield bashes in their moveset. Furthermore, unlike all other weapons, they also allow you to block ratling gun bullets and the rat ogre's overhead attacks. And their push strength is also improved, being able to stagger a lot of elite enemies that otherwise wouldn't care. And lastly, the delay until your stamina recovers after pushing is halved when using a shield weapon.
Example weapon: The Torch
The Torch can only be equipped temporarily by finding it on certain levels, either to provide light in dark passages, or light something on fire. You can try to protect yourself with it, as it has reasonable cleave and stagger, but it doesn't block as well as an average weapon, and its attacks are slow. Its damage may be laughably low, but it at least applies burns on every hit. The weapon special key can be used to drop the Torch, switching back to your actual melee weapon. Or you can just use your weapon switching hotkeys.Markus Kruber
Greatsword
Greatswords trade attack speed for cleaving ability. If you can spare the stamina, use push attacks against armored enemies: They deal twice the armor damage as your heavy attacks, so without push attacking it'll take a while.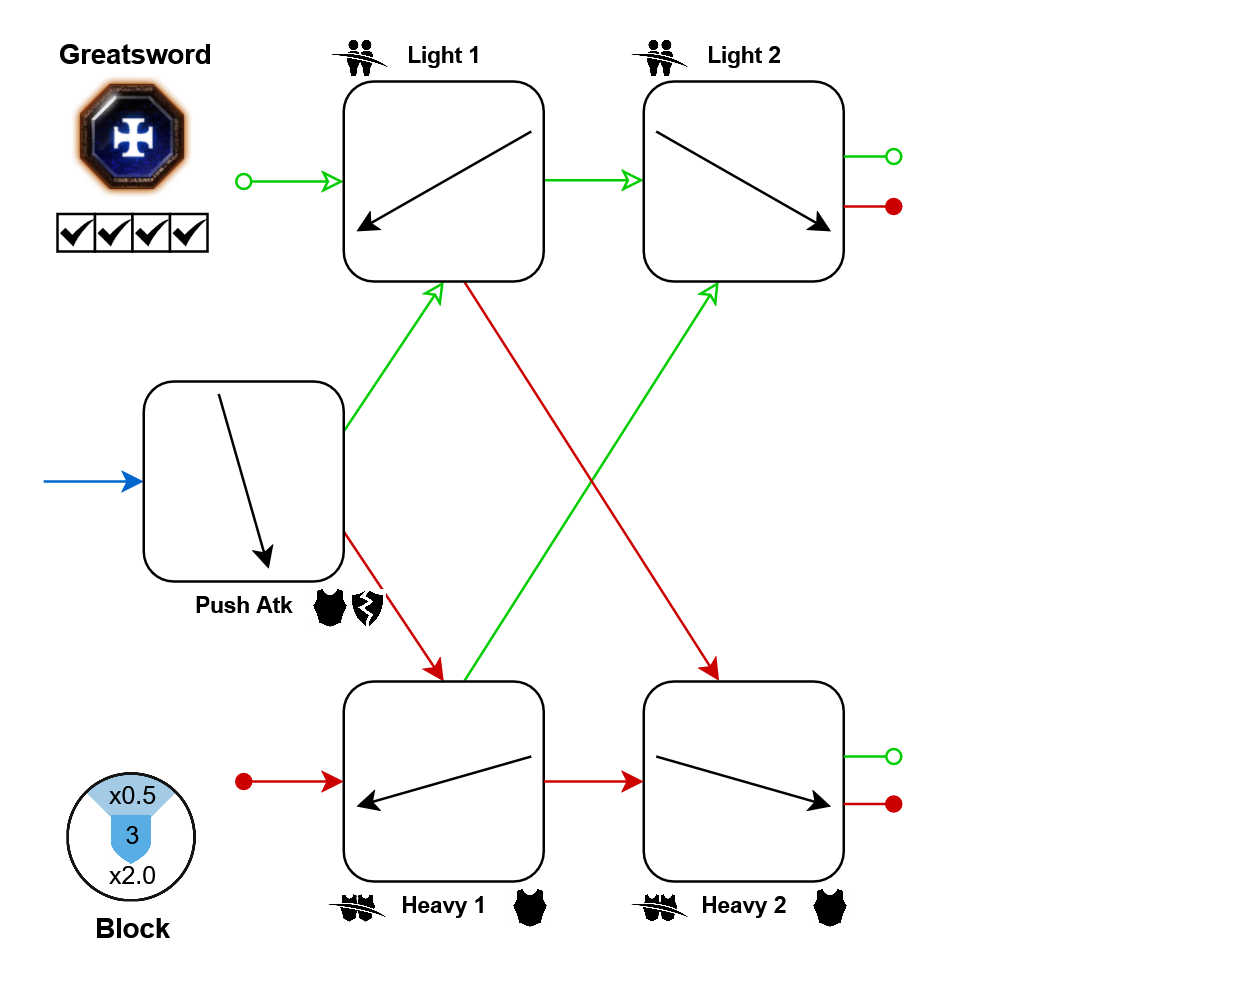
Same as: Saltzpyre's Greatsword
Halberd
The halberd has high range and damage, but is awkward to use without practice, since its attack properties are so wildly mixed. Light 2 has low damage, but both it and Heavy 1 deal greatly increased headshot damage. The Halberd's push attack has the unique mechanic of letting you choose which light attack to follow up with, by varying how soon you input it.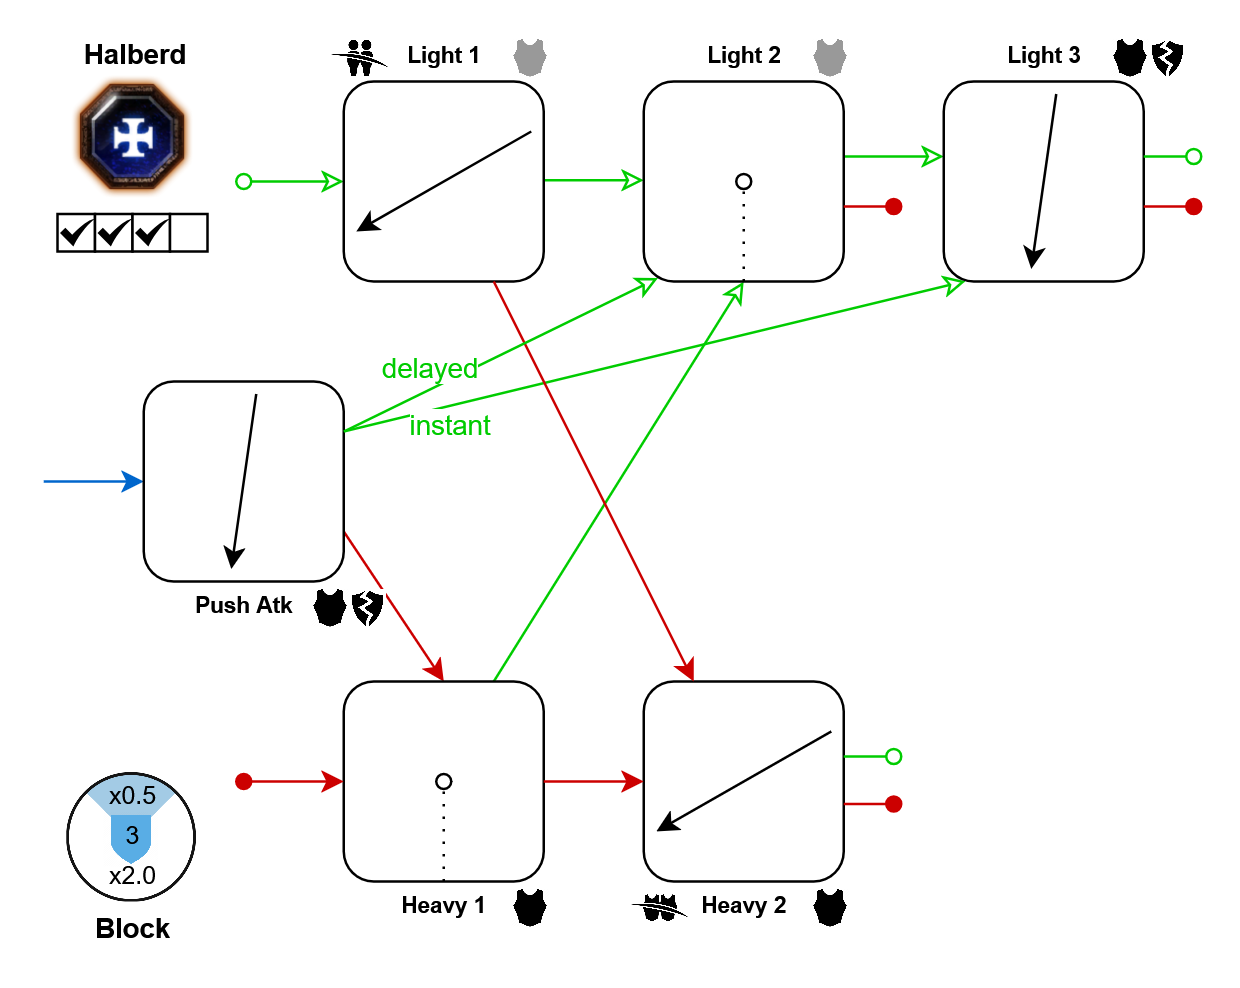
Sword
With an extra stamina shield, decent mobility, and good cleave, this weapon will make you feel well-protected. Its armor damage is generally on the lower side, but due to its good headshot multiplier, Light 3 can do some work.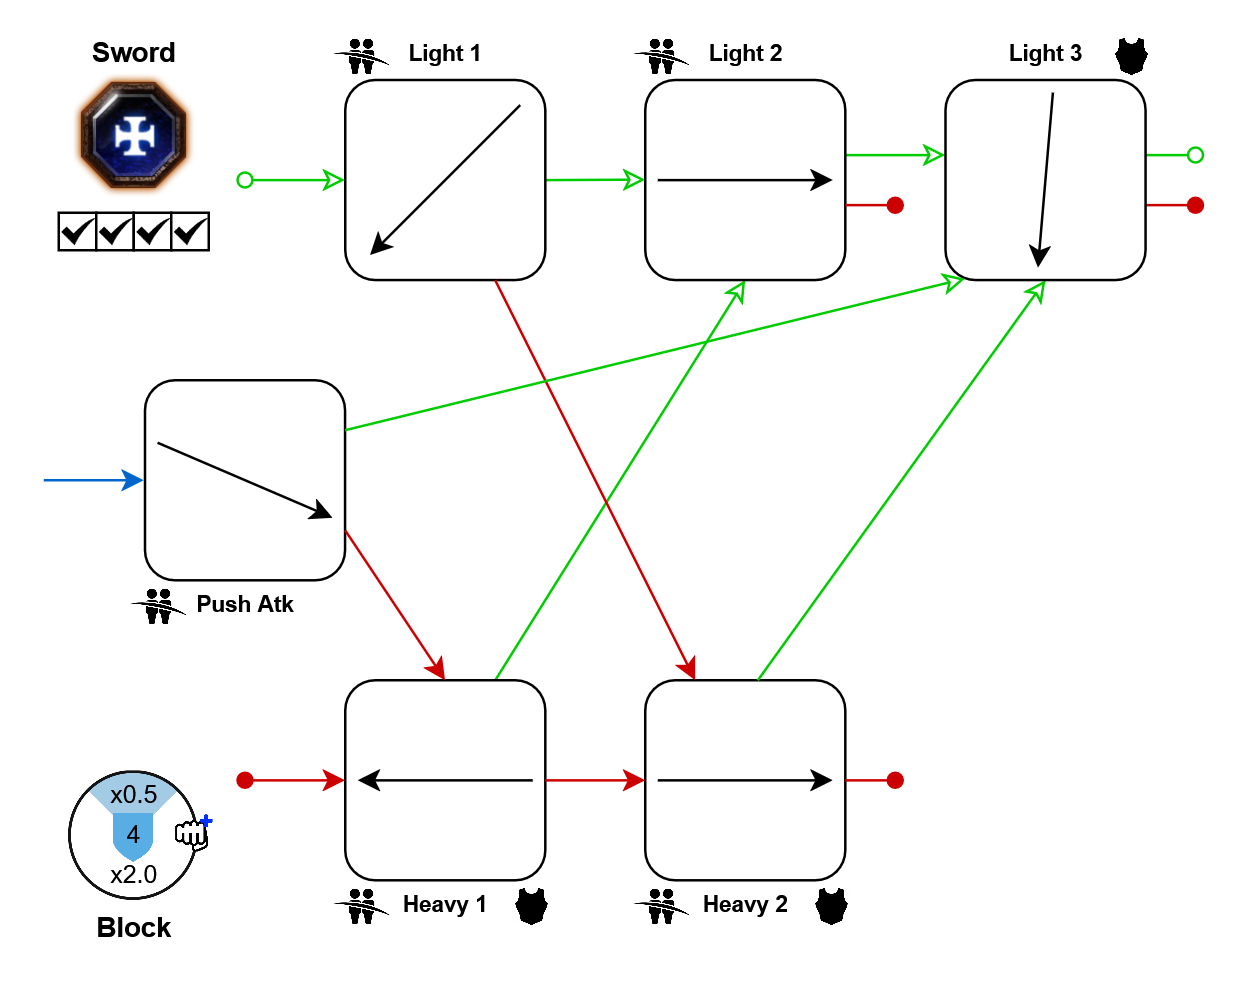
Movement tech: In further resources
Same as: Sienna's Sword
Same as: Sienna's Sword
Executioner Sword
This one attacks even slower than the greatsword, and also has a straightforward attack pattern. But you should keep a few properties in mind: Its light attacks may have subpar damage, but they have an absurd headshot modifier, which will be important to clear hordes quickly. The heavy attacks on the other hand deal monstrous armor damage. You can stand far back when preparing a heavy attack, because when you release it, Kruber will sprint forward.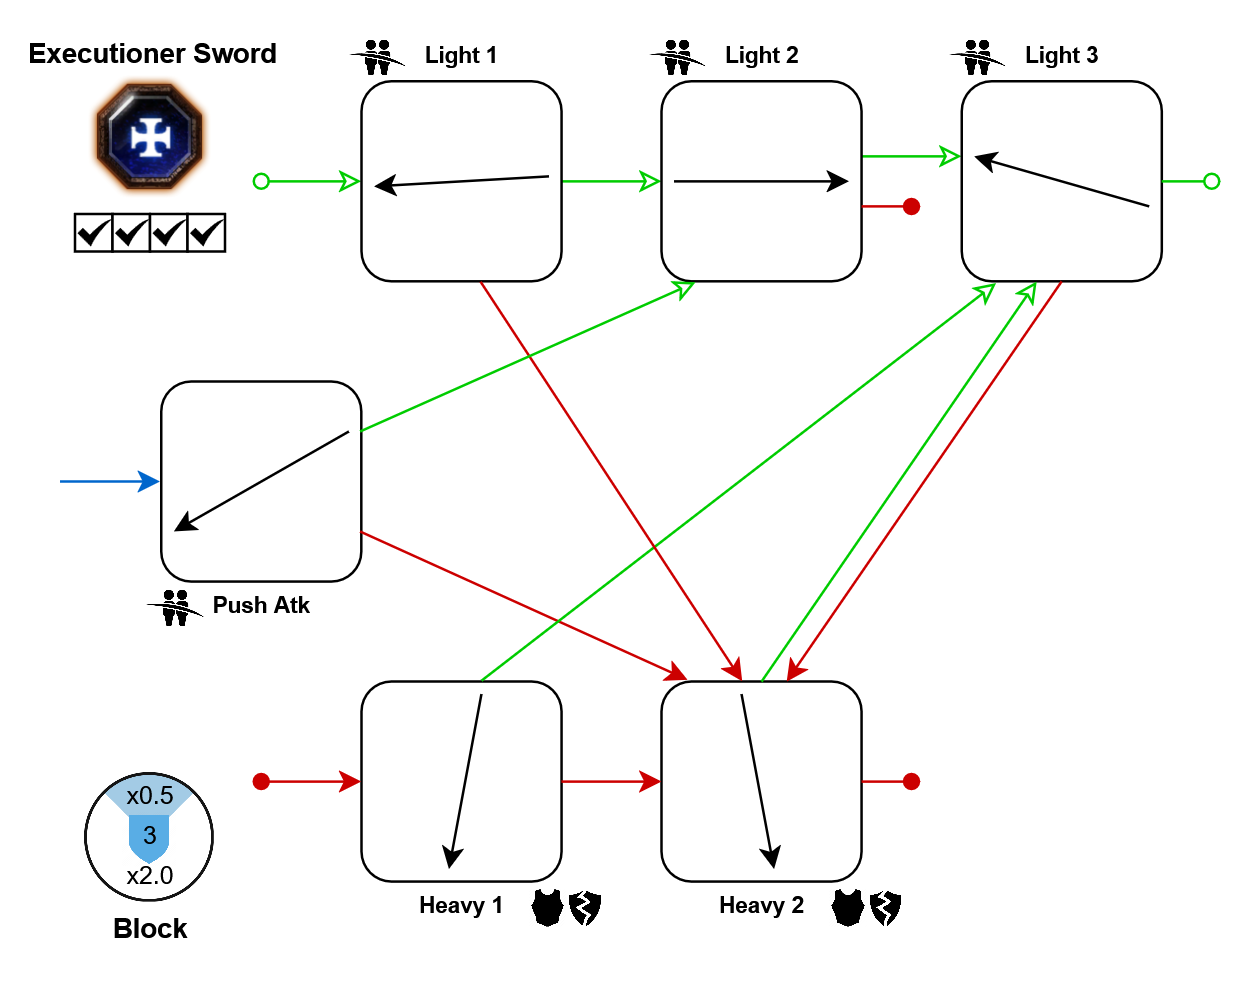
Bonus Crit:
- Light 3: 10%
- Heaveis: 20%
Great Hammer
Here comes another slow heavy-hitter! This one's heavy attacks don't only cleave armored enemies, but even knock them around quite well, buying you a lot of space. And while everything is tumbling around, weaving in one of its high-damage light attacks can make short work of an important target.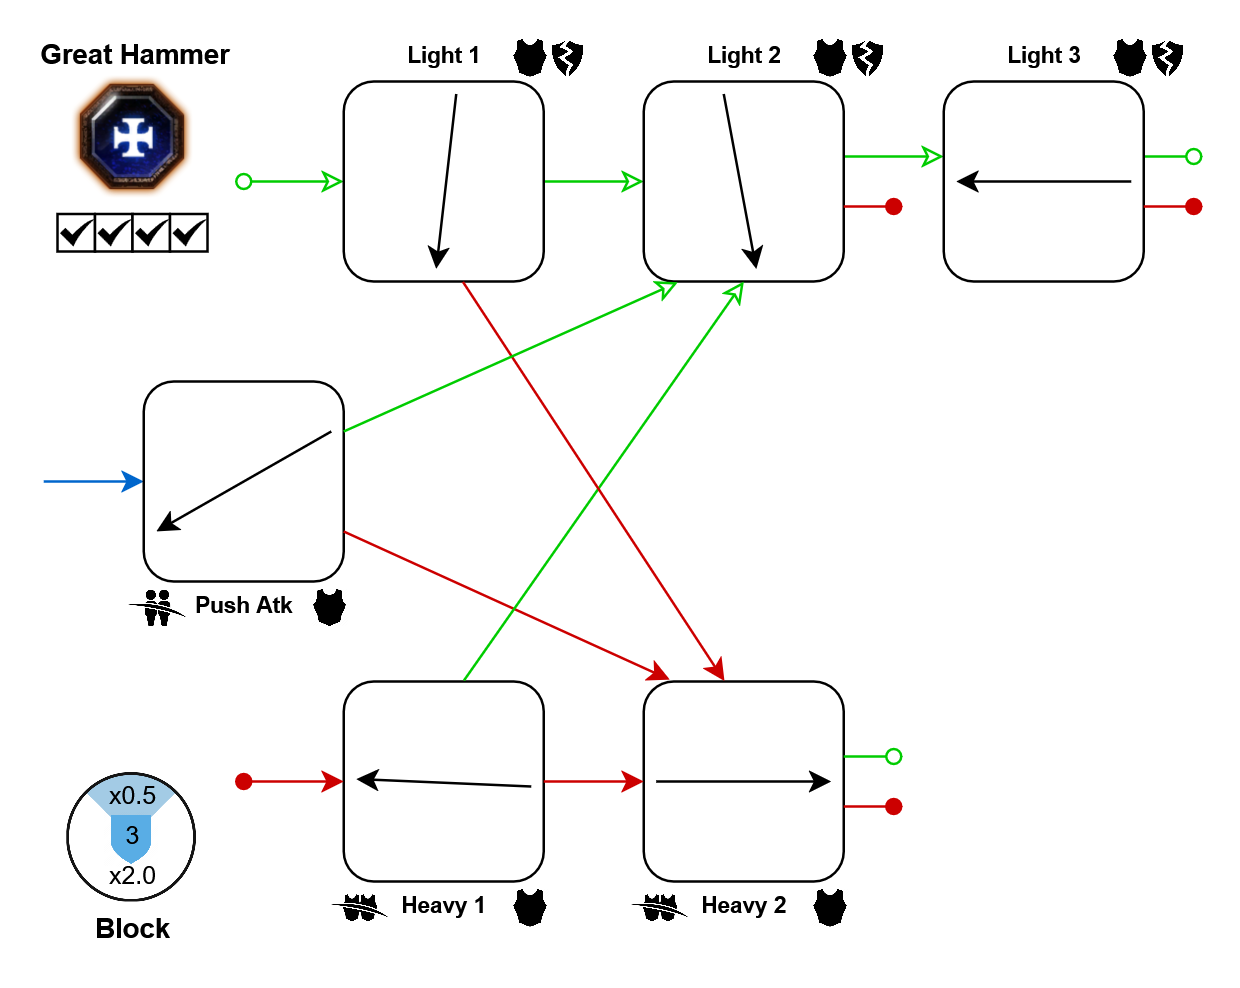
Same as: Bardin's Great Hammer
Mace
A well-rounded weapon with very good blocking abilities. It bears similarities to the Sword, but the key difference is that it trades the cleaving heavy attacks for single-target strikes with much higher armor damage.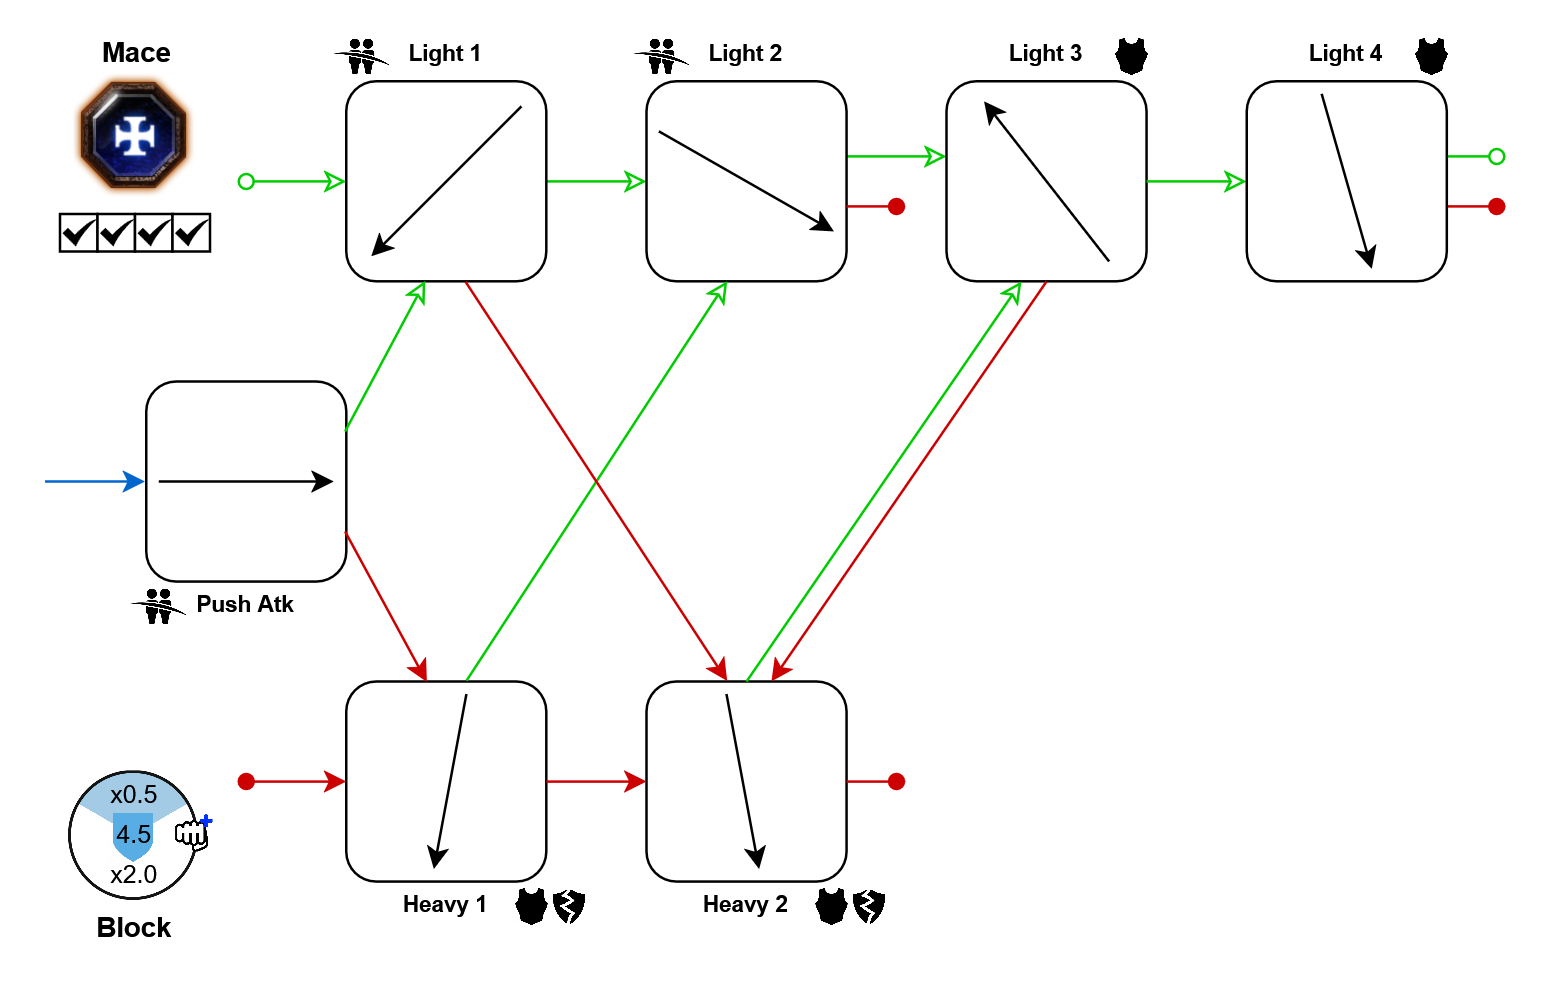
Bonus Crit:
- Light 3: 10%
Sword and Shield
A standard shield weapon. Its anti-armor combo is hidden behind the push attack, but with 5 shields you probably have the stamina to spare.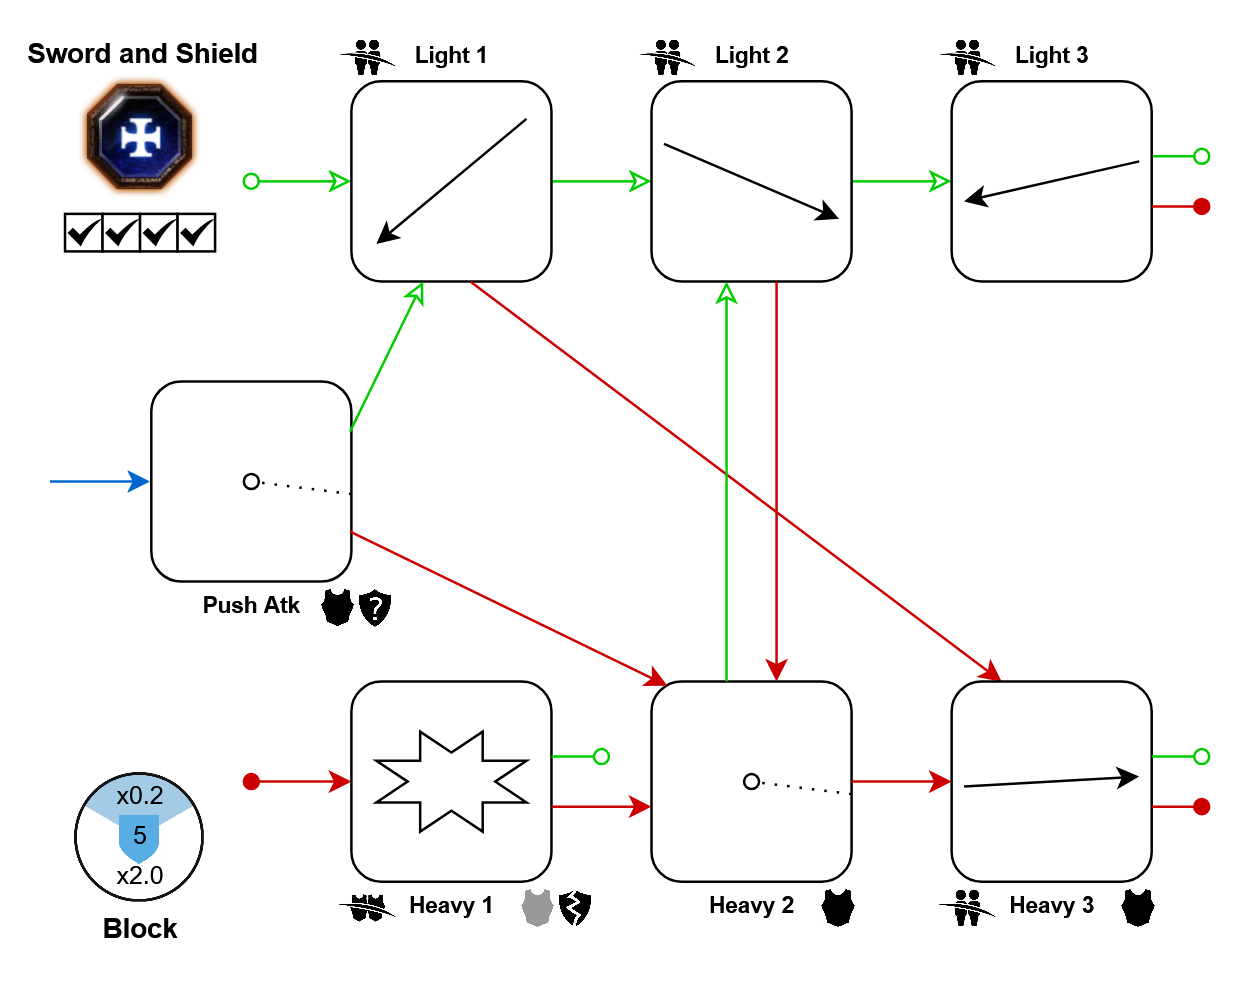
Movement tech: In further resources
Mace and Shield
Compared to the Sword and Shield, this one's cleaving attacks are better at staggering, but worse at actually killing groups. This one has an even larger effective block angle. Again, its armor damage is mostly hidden behind the push attack. And its push attack also has the unique mechanic of letting you choose which heavy attack to follow up with, by varying how long you hold it.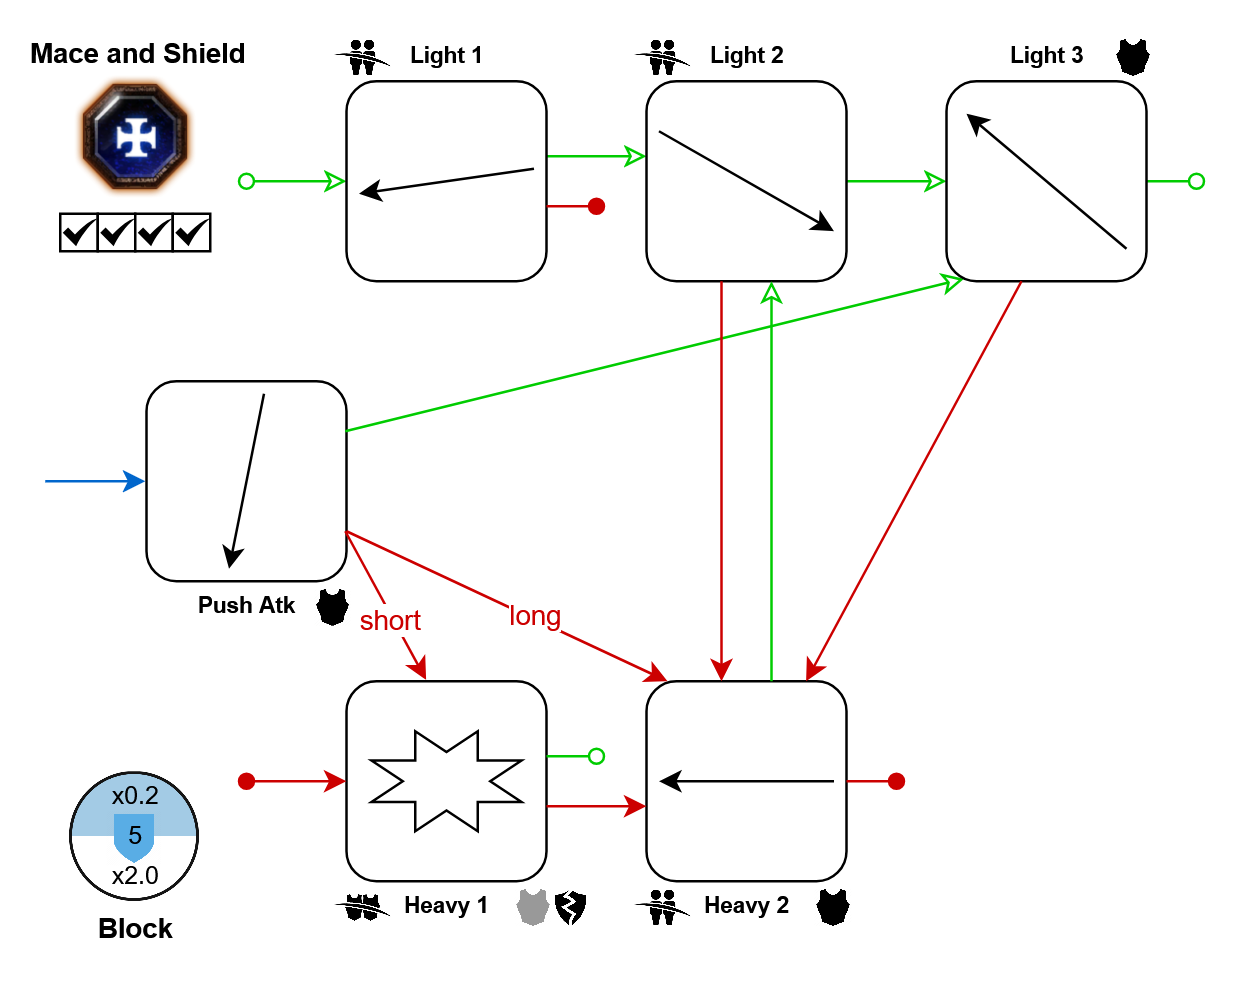
Bonus Crit:
- Light 3: 10%
Mace and Sword
If you felt like all previous weapons were too slow, you will be happy about this addition. Its lights are very spammable, and its heavy and push attacks using both weapons deal outstanding damage, whenever you have the time or stamina to use them.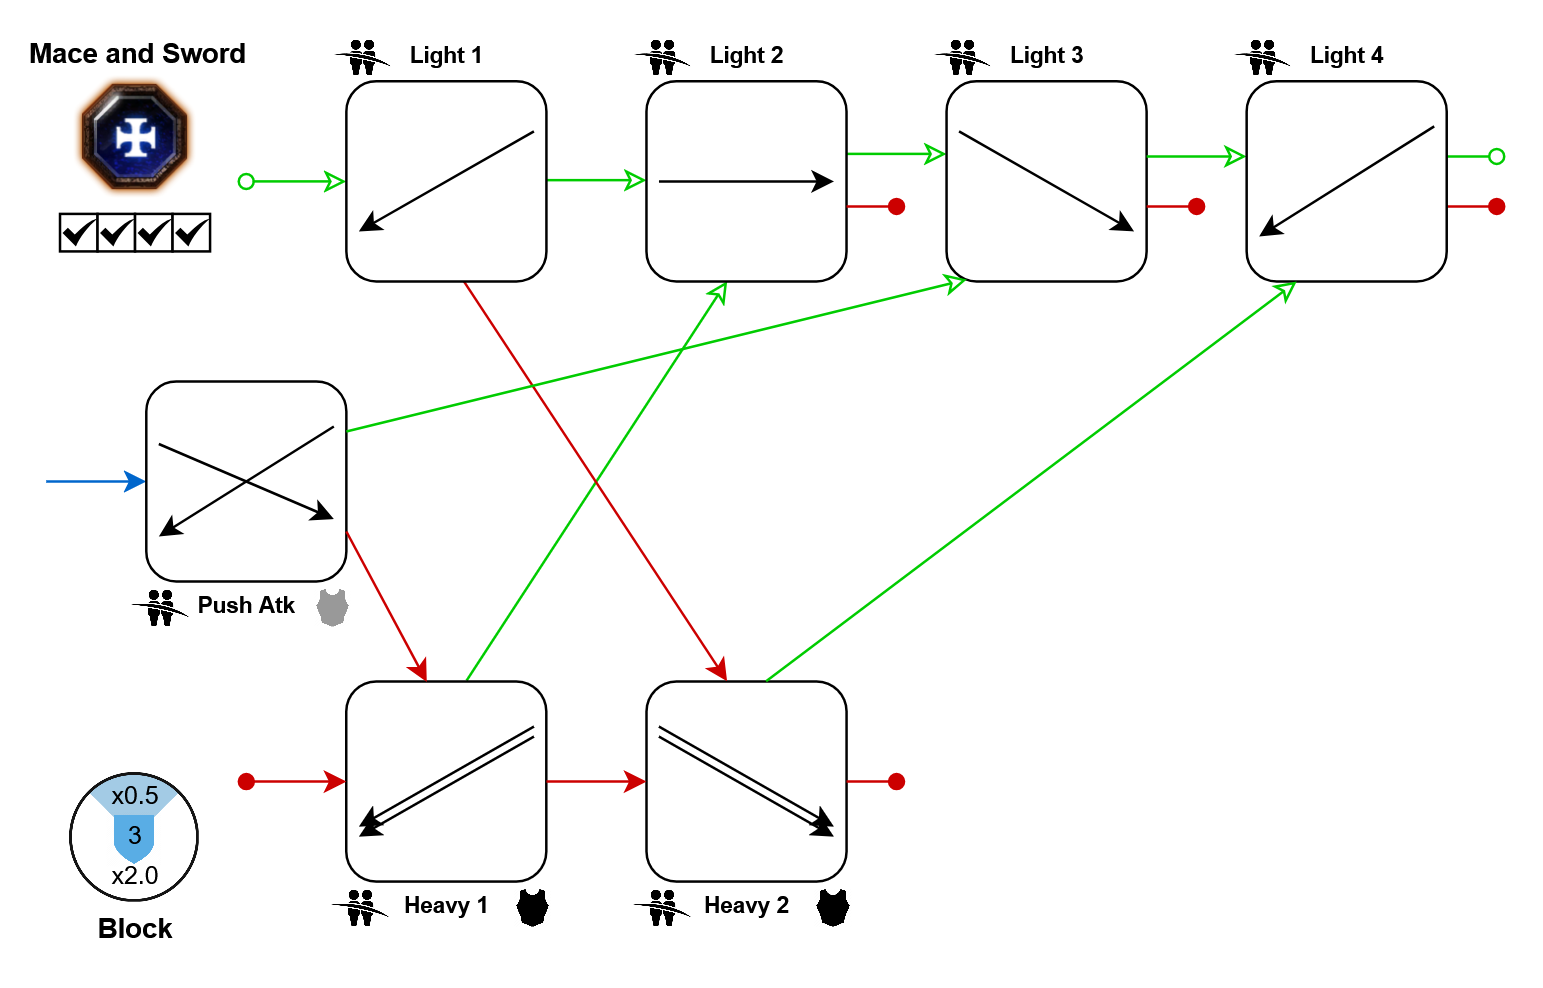
DLC: Back to Ubersreik
Movement tech: In further resources
Movement tech: In further resources
Tuskgor Spear
Very strong on the defense, due to its extra stamina shield, 180° effective block angle, and good stagger on its cleave attacks. Its armor damage is rather low, and its horde clearing speed suffers from being unable to chain many cleave attacks. This weapon is quite mobile while attacking however, and while holding its Heavy 1, Kruber even has 10% increased run speed.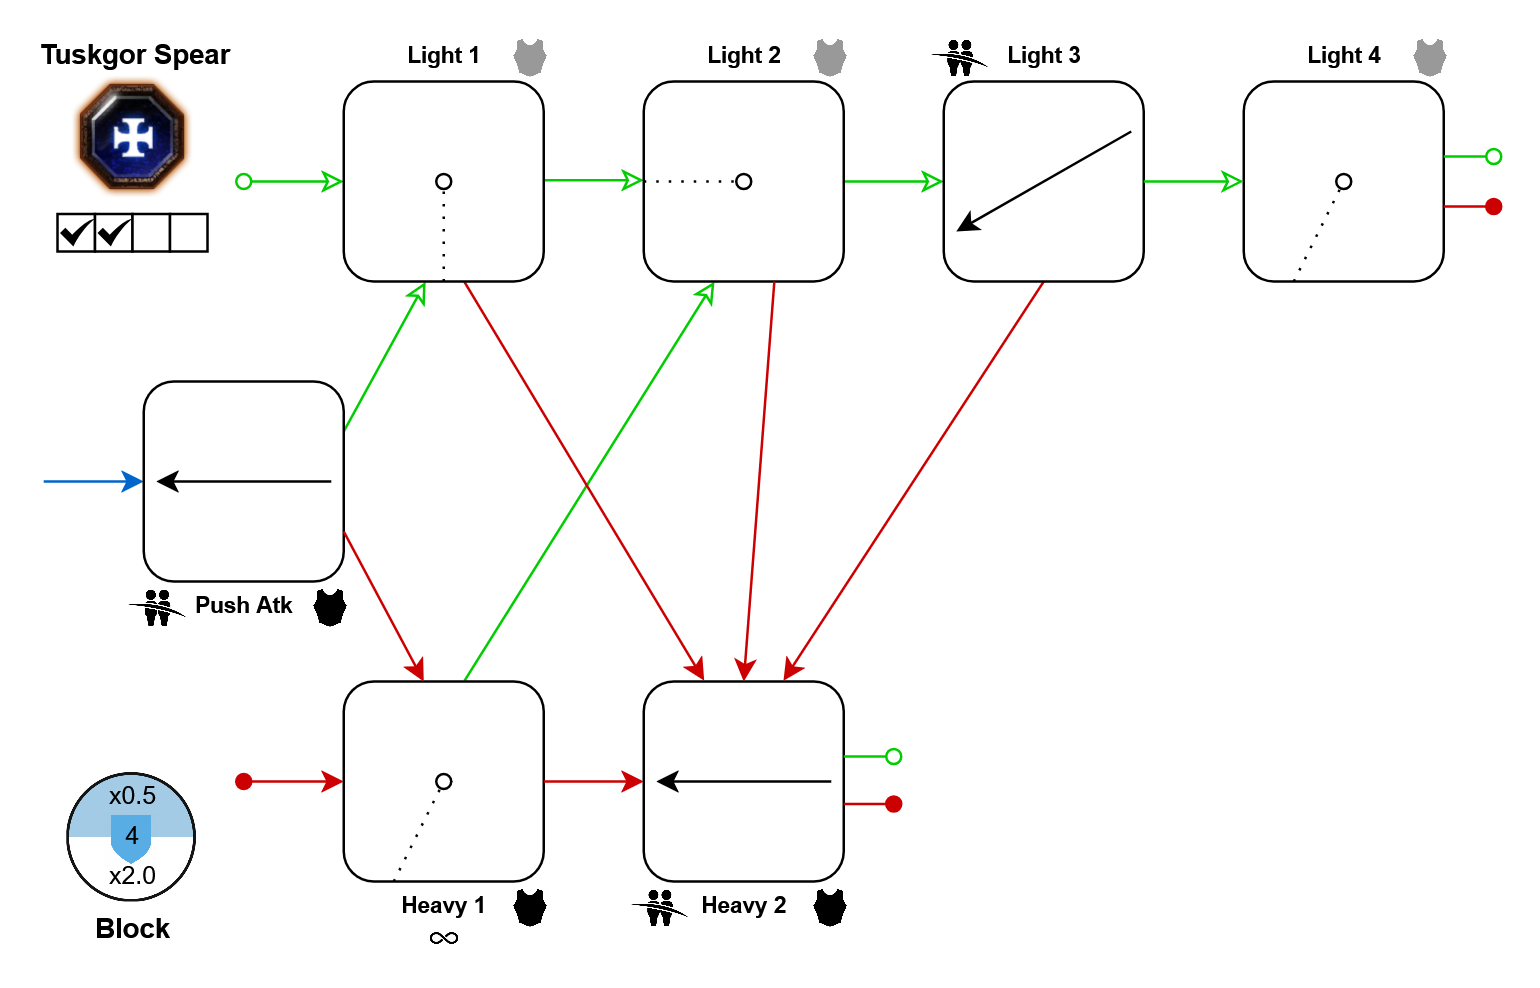
DLC: Winds of Magic
Movement tech: In further resources
Movement tech: In further resources
Spear and Shield
This shield weapon has the unique ability to attack while keeping its guard up. Landing these special attacks costs half a stamina shield, but can be especially useful against dangerous enemies such as berserkers. Its cleave attacks have good base damage, but keep in mind that Heavy 2's direction makes it unsuitable for cleaving.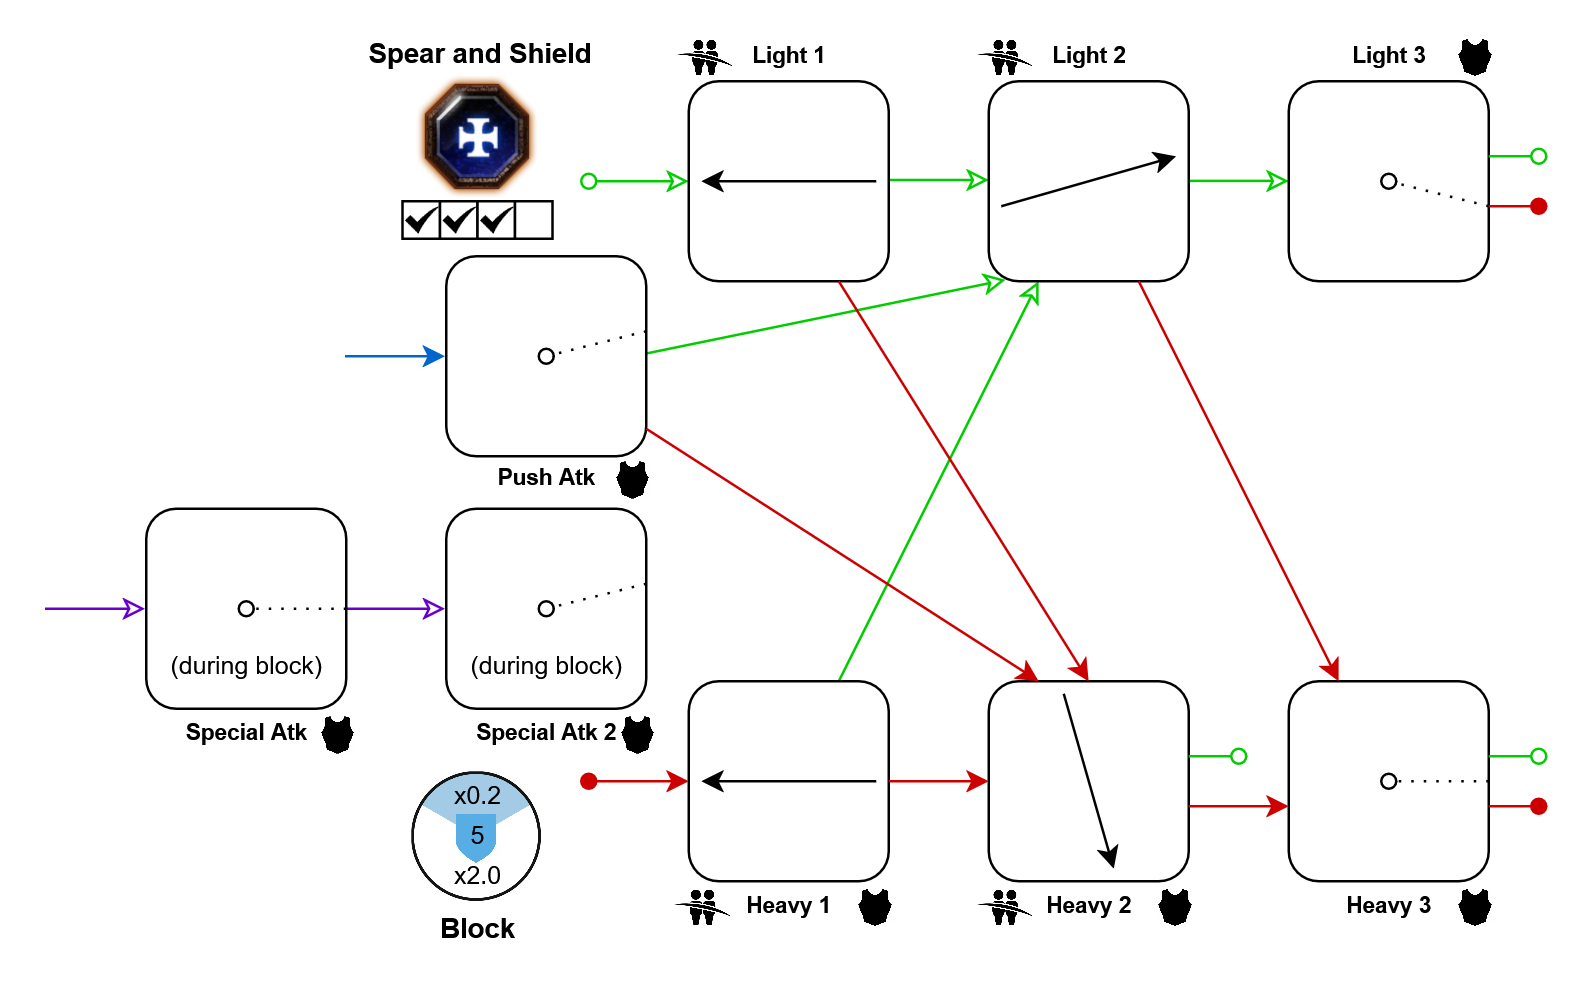
DLC: Forgotten Relics
Movement tech: In further resources
Movement tech: In further resources
Bretonnian Longsword
A high-damage all-round weapon that requires some getting used to. To get infinite cleave or single-target attack loops, alternating light and heavy attack inputs is required. This can feel odd at first, but produces opportunities to use the weapon's charge-block ability frequently.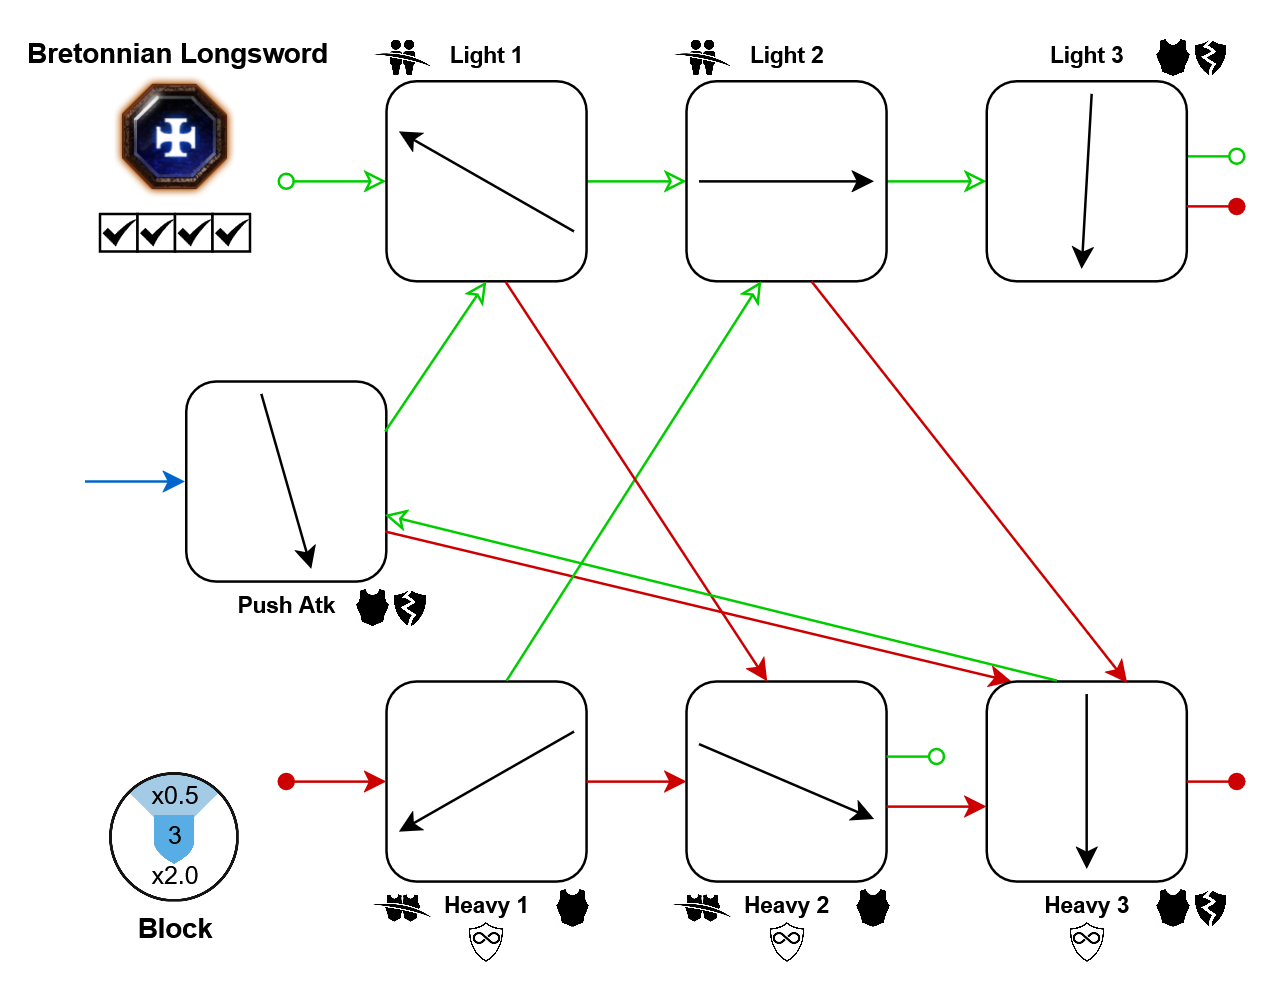
DLC: Grail Knight Career
Bretonnian Sword and Shield
Compared to the Sword and Shield, this one has an easier time accessing its armor-piercing attacks, but ends up with a weird horde combo: Light 1, a sword attack, followed by two shield bashes knocking the horde everywhere. With this weapon you also have the unique option to use Light 3 quickly instead of your push attack, which can be done by releasing left click after pushing with it, and then tapping it again.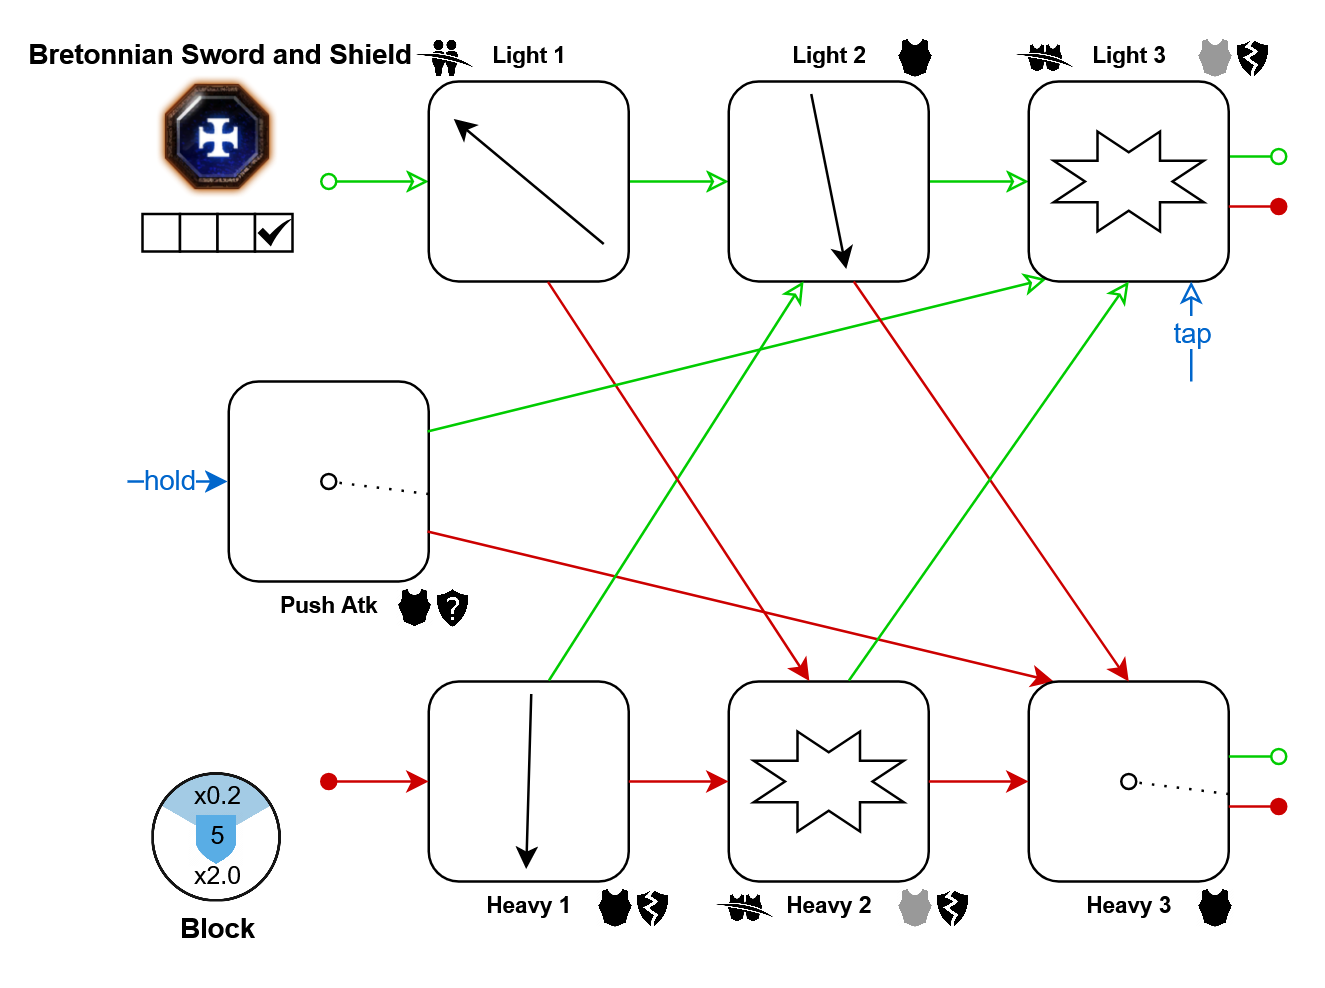
DLC: Grail Knight Career
Movement tech: In further resources
Movement tech: In further resources
Bardin Goreksson
Great Hammer
A slow and heavy weapon whose heavy attacks can cleave AND knock around armored enemies. After staggering a group of enemies with a heavy attack, weaving in one of its high-damage light attacks can destroy the most dangerous enemy.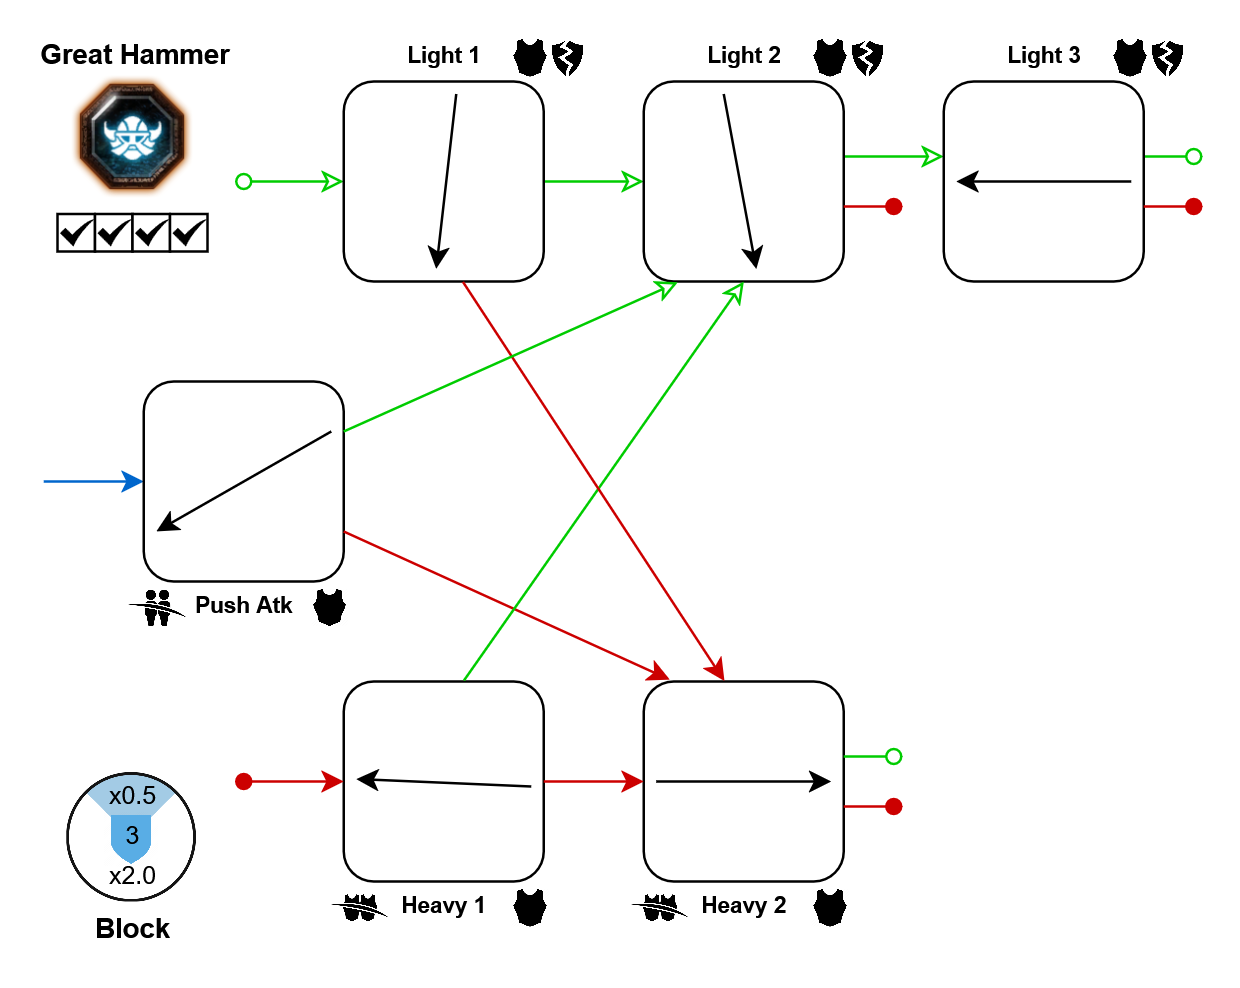
Same as: Kruber's Great Hammer
Great Axe
This one has practically the same moveset as the Great Hammer, but its heavy attacks behave differently: They can only hit a few enemies at once and get stuck on armor, but deal more total damage into the group of enemies.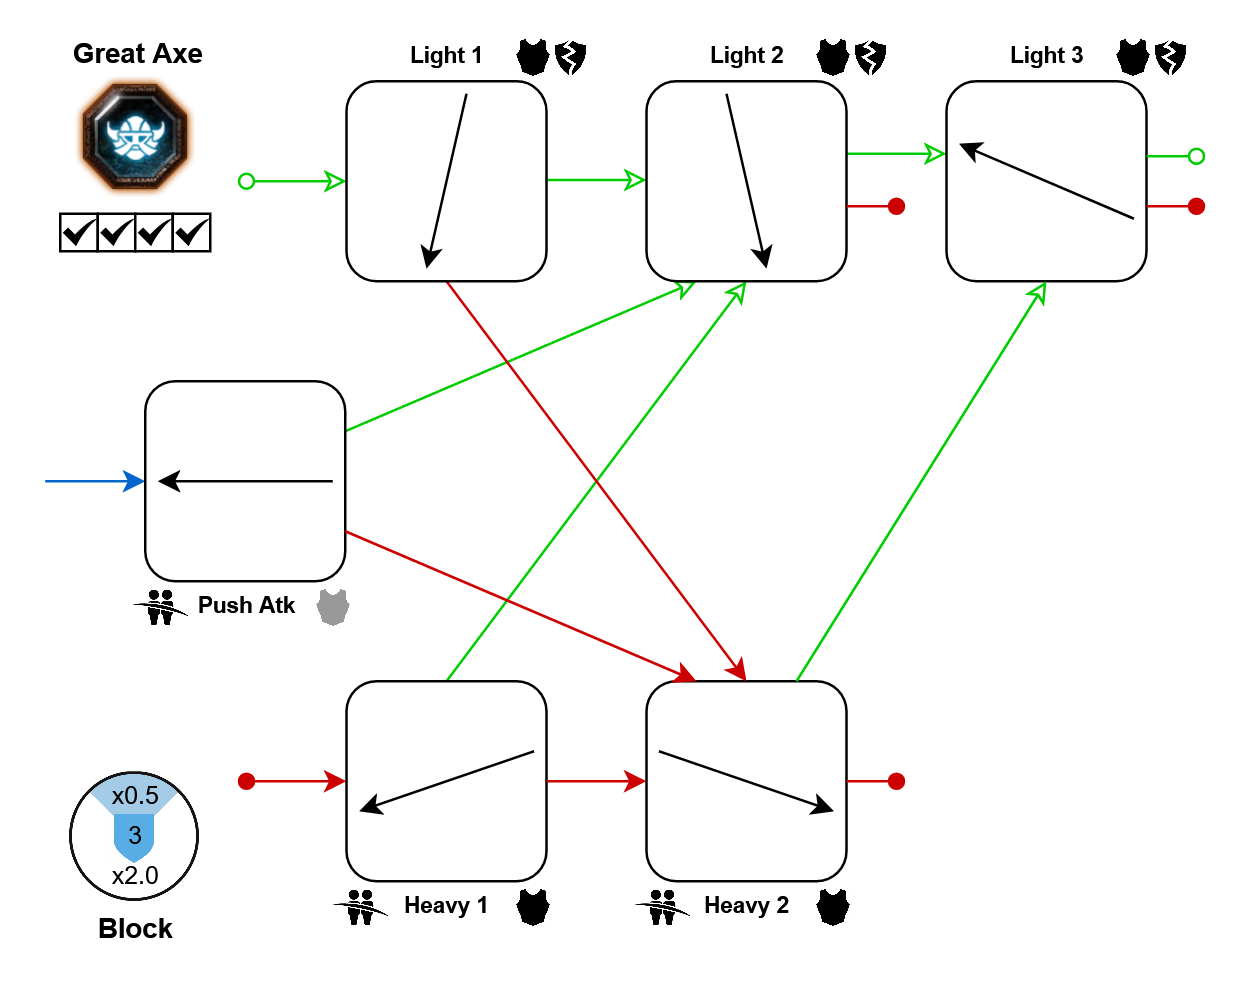
Bonus Crit:
- Light 3: 10%
Axe
This weapon focuses on single-target armor piercing attacks, making short work of elites, but during hordes you're often missing some cleave.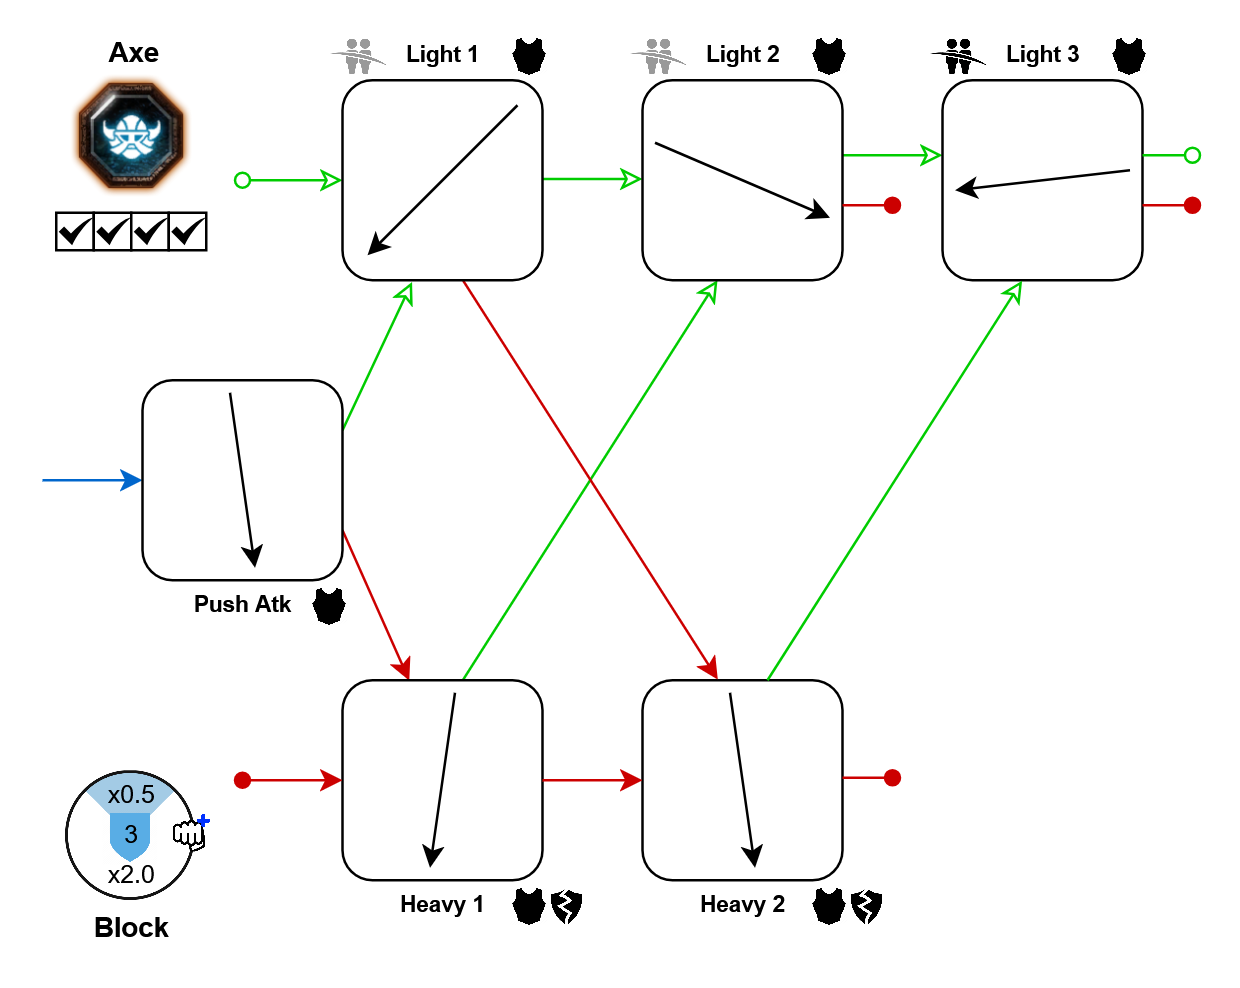
Bonus Crit:
- Push-atk: 10%
- Lights: 10%
Hammer
An all-round weapon with strong blocking ability. This bonus stamina and cheap push costs come in handy to start your horde combo with a push attack. Its heavy attacks deal as much single-target damage as the Axe's.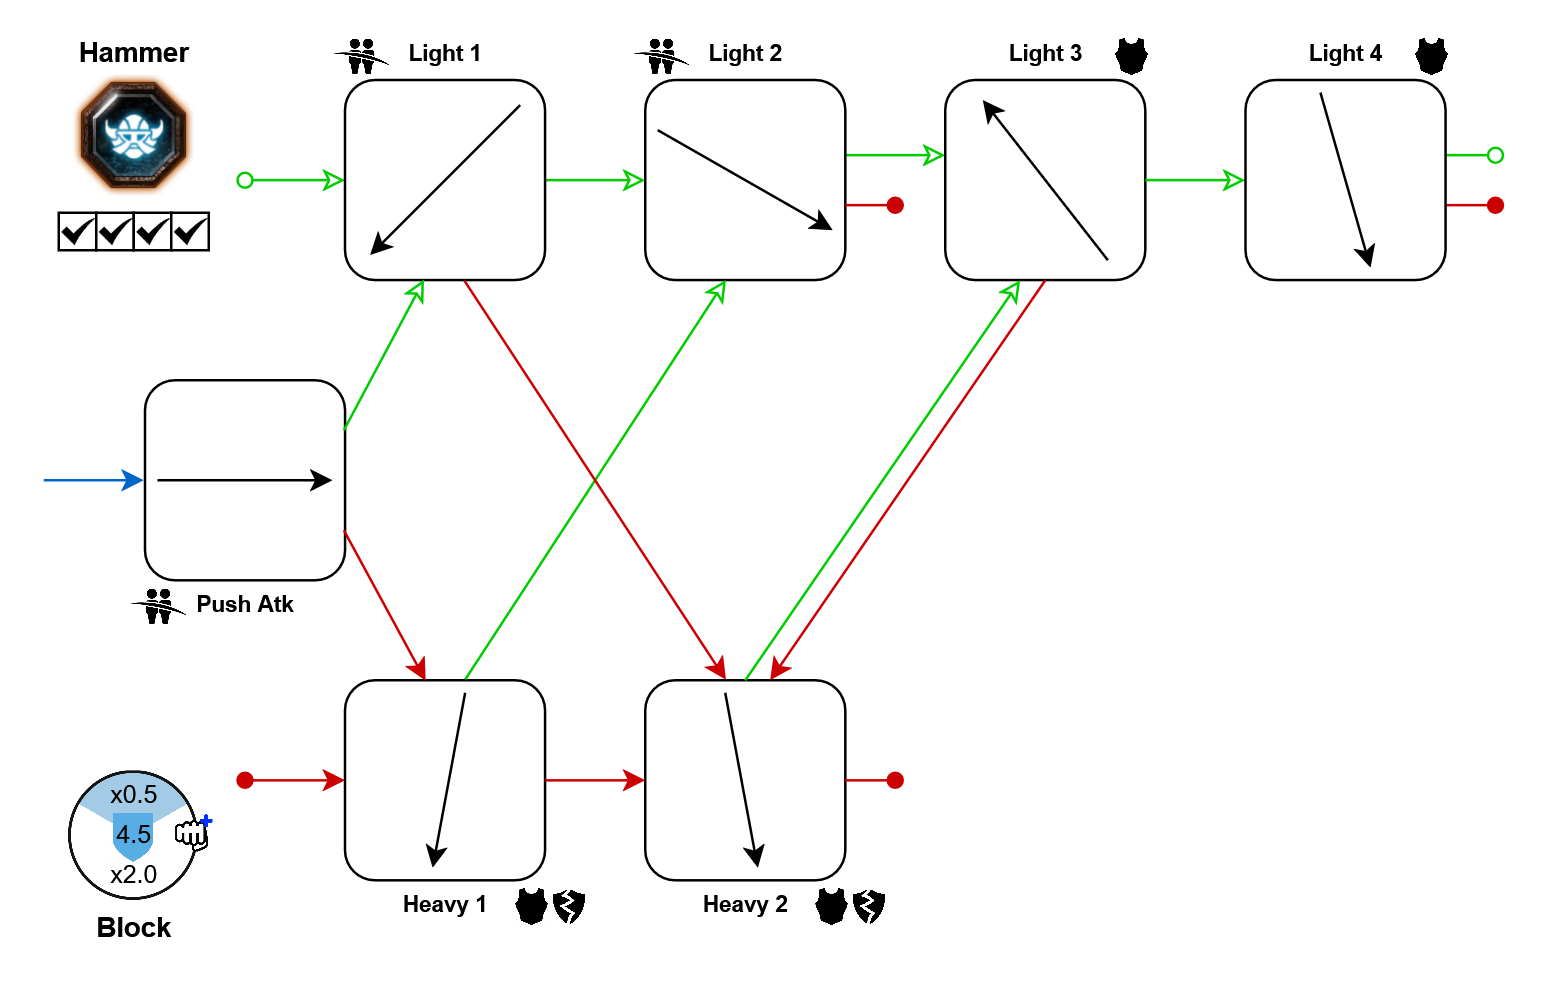
Bonus Crit:
- Light 3: 10%
War Pick
The push and heavy attacks deal outstanding single-target damage against both flesh and armored targets. Overcharge the heavy attacks to raise their damage to completely absurd levels, have Bardin sprint forwards, and completely bypass shields (bye-bye, shielded stormvermin). Tip: Once Bardin's arm starts tilting upwards, the overcharge is already complete. The cleaving attacks are sluggish, but can create quite some space against hordes. Heavy 3 can't be overcharged, but has especially strong stagger and can break multiple wooden shields.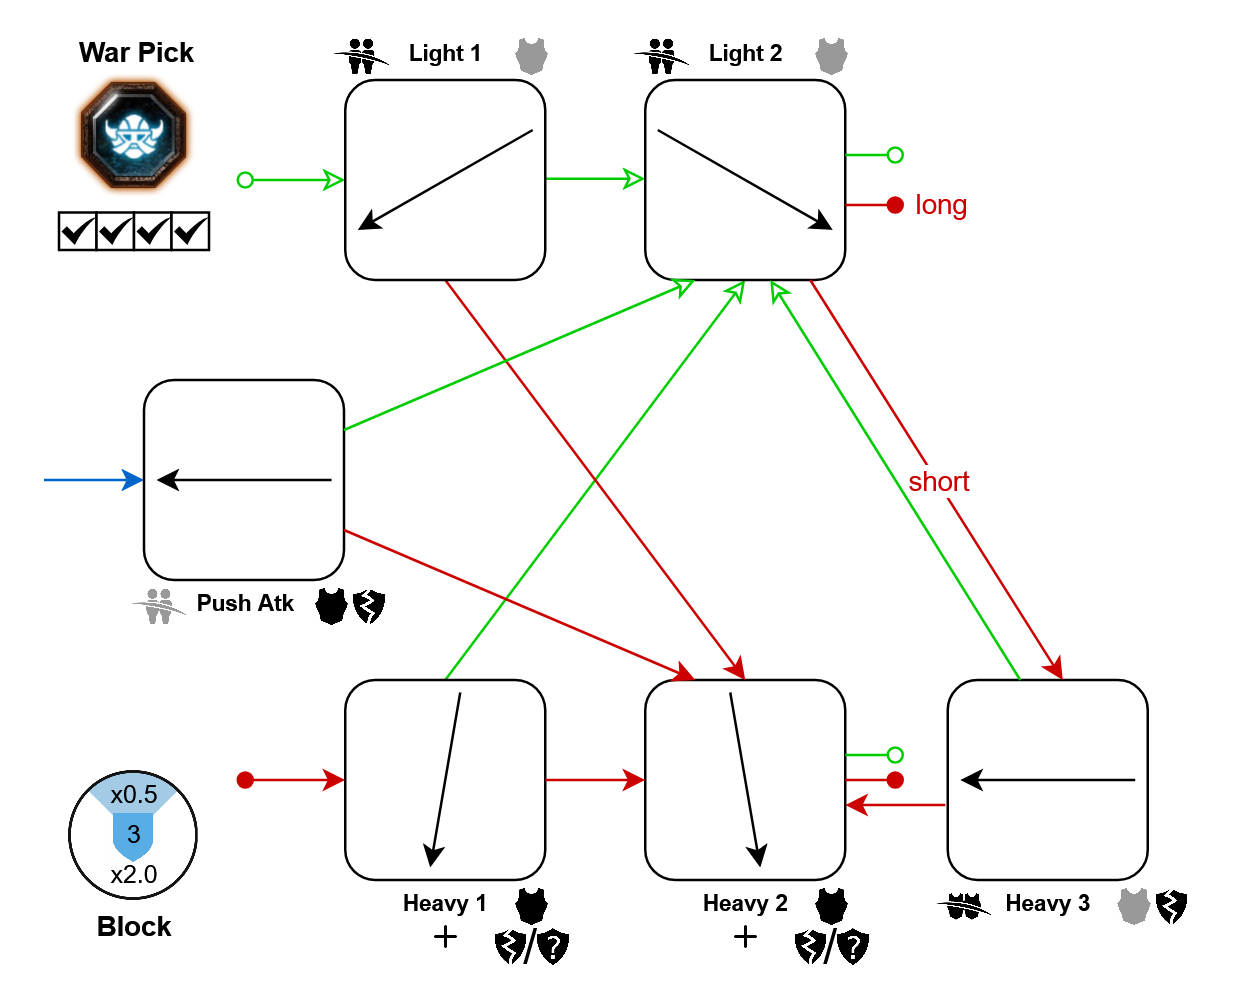
Bonus Crit:
- Lights: 10%
Axe and Shield
Unlike many other shield weapons in the game, this one has really good armor damage. You may not have many cleaving moves, but the shield bash helps, and Heavy 2 has way more cleave than you would expect from a one-handed axe.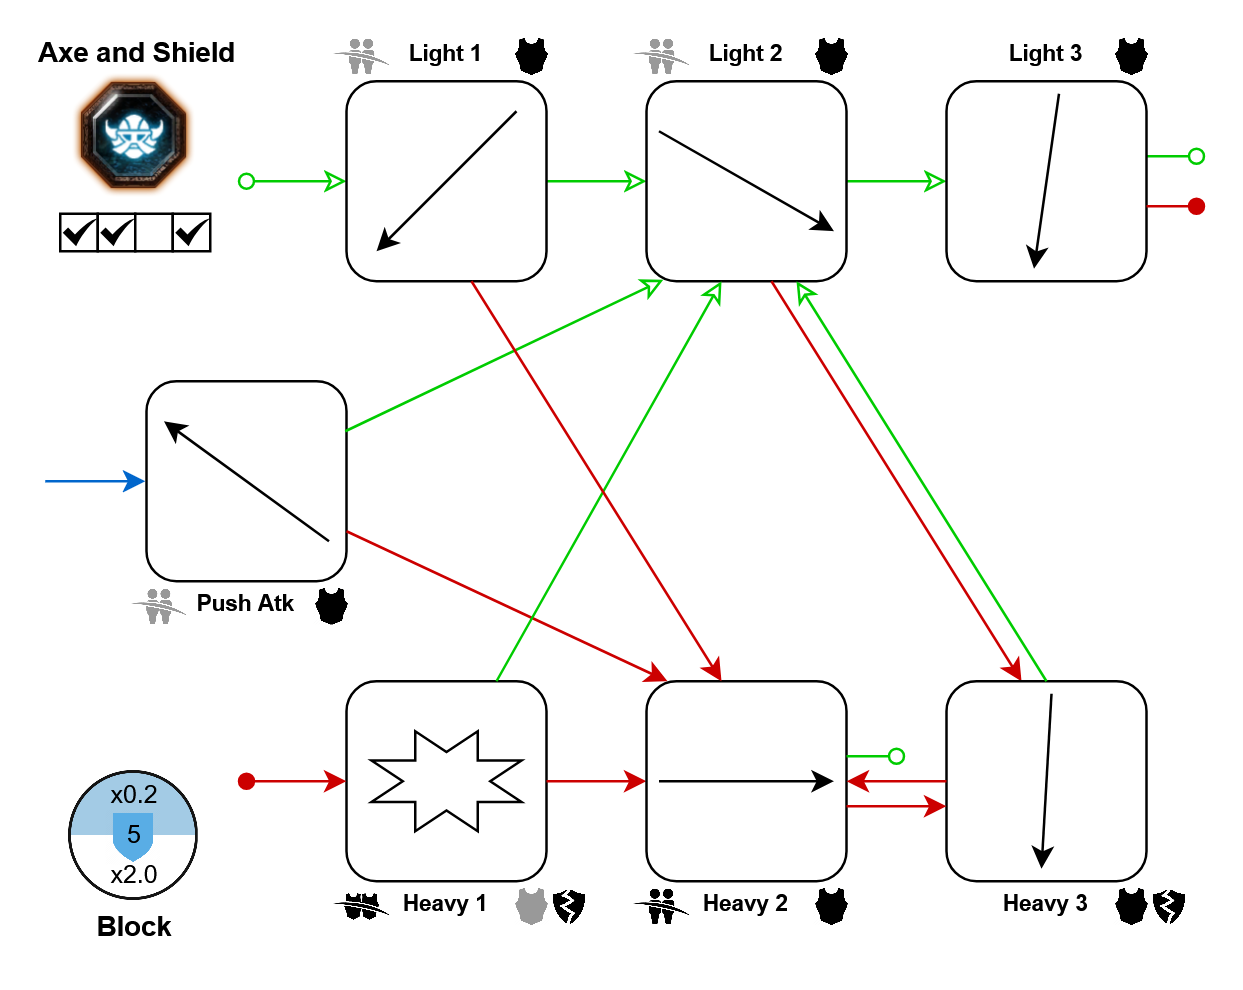
Bonus Crit:
- Push-atk: 20%
Hammer and Shield
If the Axe and Shield's single-target light attacks are not your thing, this one might be more to your liking, as its lights 1 and 2 have good group stagger. Its armor damage is hidden behind the push attack, however. The push attack also has the unique mechanic of letting you choose which heavy attack to follow up with, by varying how long you hold it.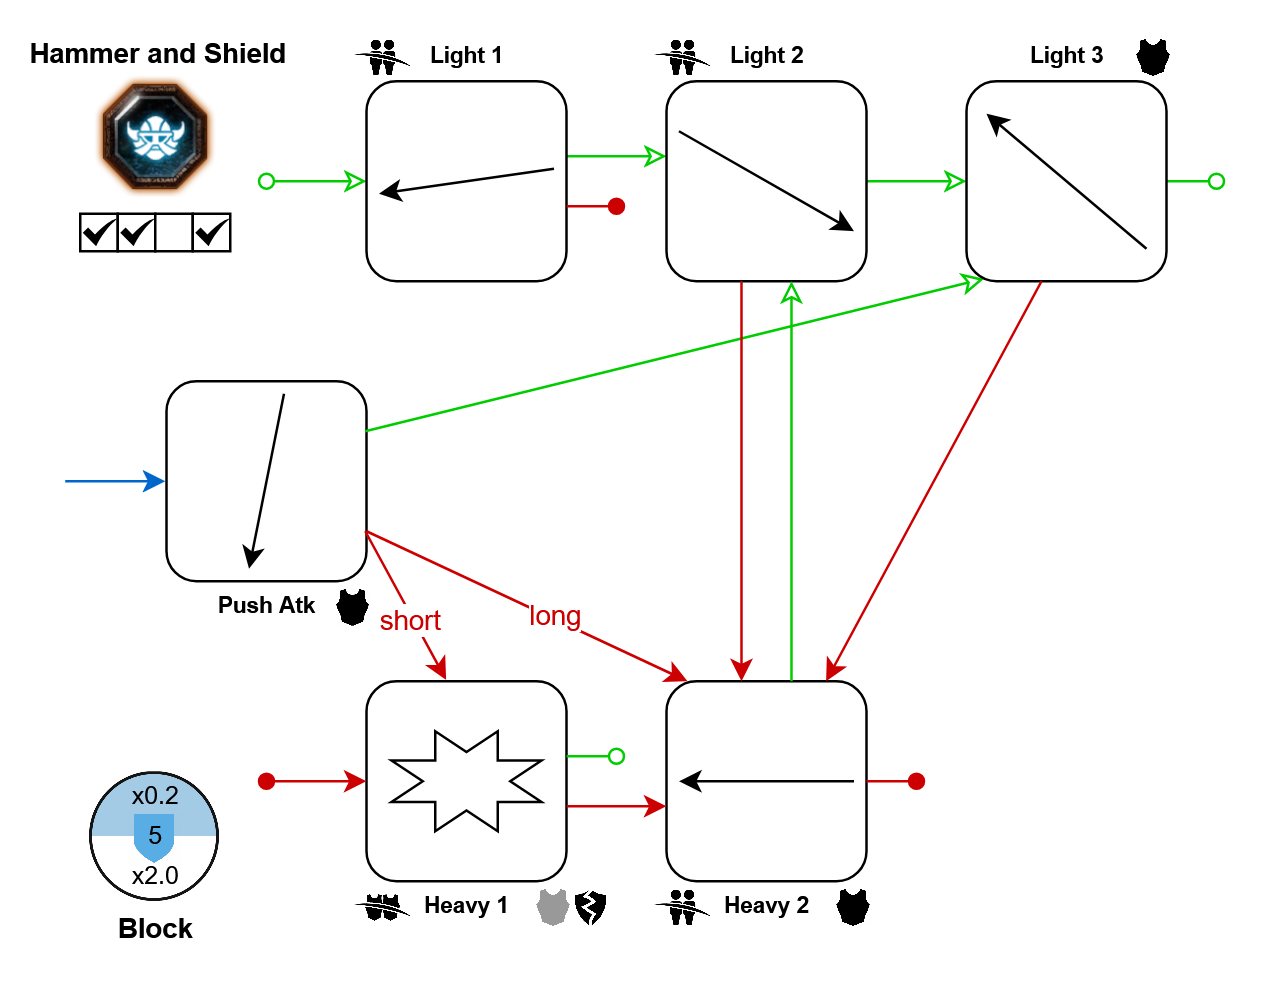
Bonus Crit:
- Light 3: 10%
Dual Axes
This alternative to the single-handed axe is more spammable and mobile: Its attack speed is much higher, but it deals less total damage per second and has absolutely zero cleave. Bardin happily jogs around while swinging, but loses one stamina shield and the ability to do cheap pushes. Also, its headshots have a decent multiplier, and the push attack deals great total damage, if you dare spending the stamina to use it.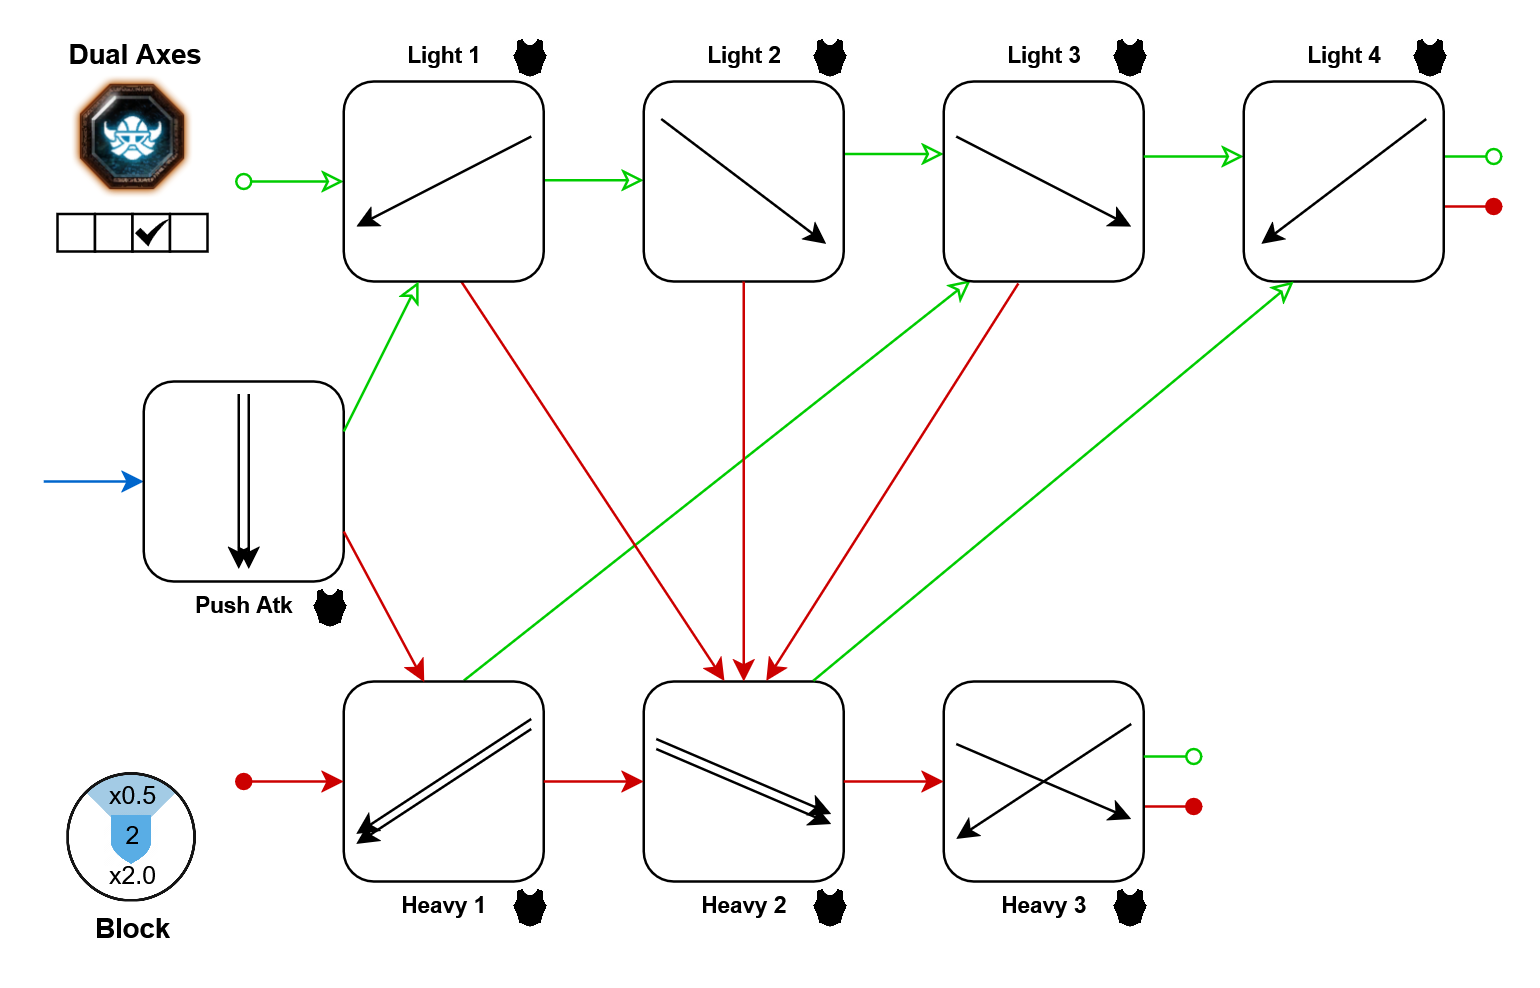
Movement tech: In further resources
Dual Hammers
These alternative dual weapons have significant differences to the Dual Axes: A lot of their attacks are good at staggering groups, and they have double the available stamina. In return, their attack and movement speed is not quite as fast, and armor can only be damaged by heavy and push attacks.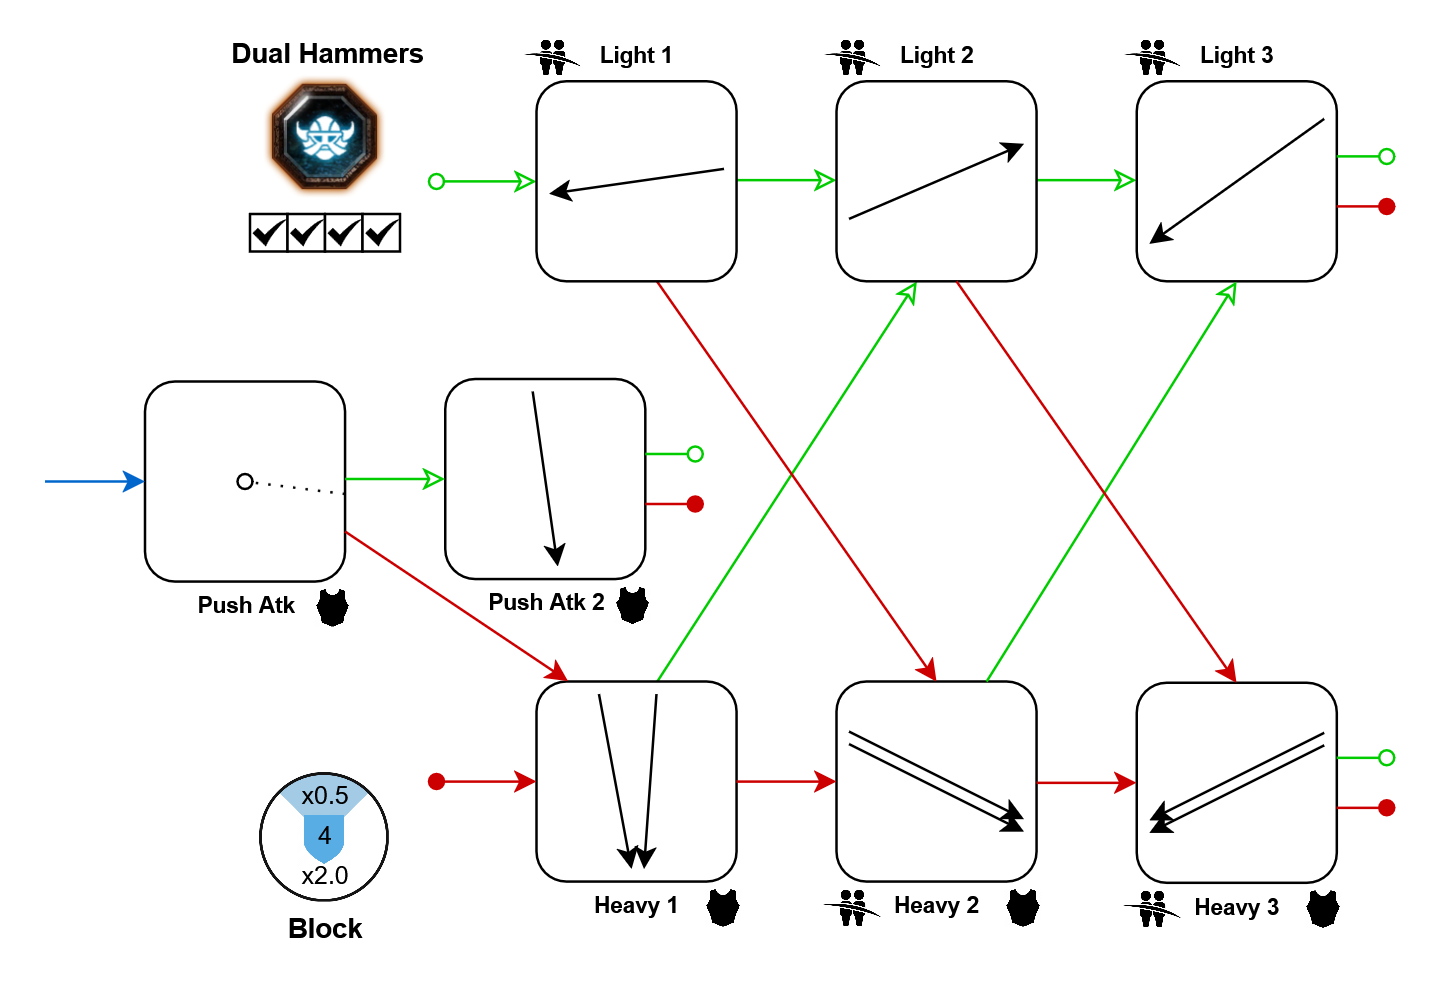
DLC: Back to Ubersreik
Movement tech: In further resources
Same as: Saltzpyre's Paired Skull-Splitters
Movement tech: In further resources
Same as: Saltzpyre's Paired Skull-Splitters
Cog Hammer
The Cog Hammer has a very simple moveset, with similarities to the War Pick. It attacks quicker though, and its heavy attacks have an increased headshot modifier. Sadly, you are unable to overcharge them.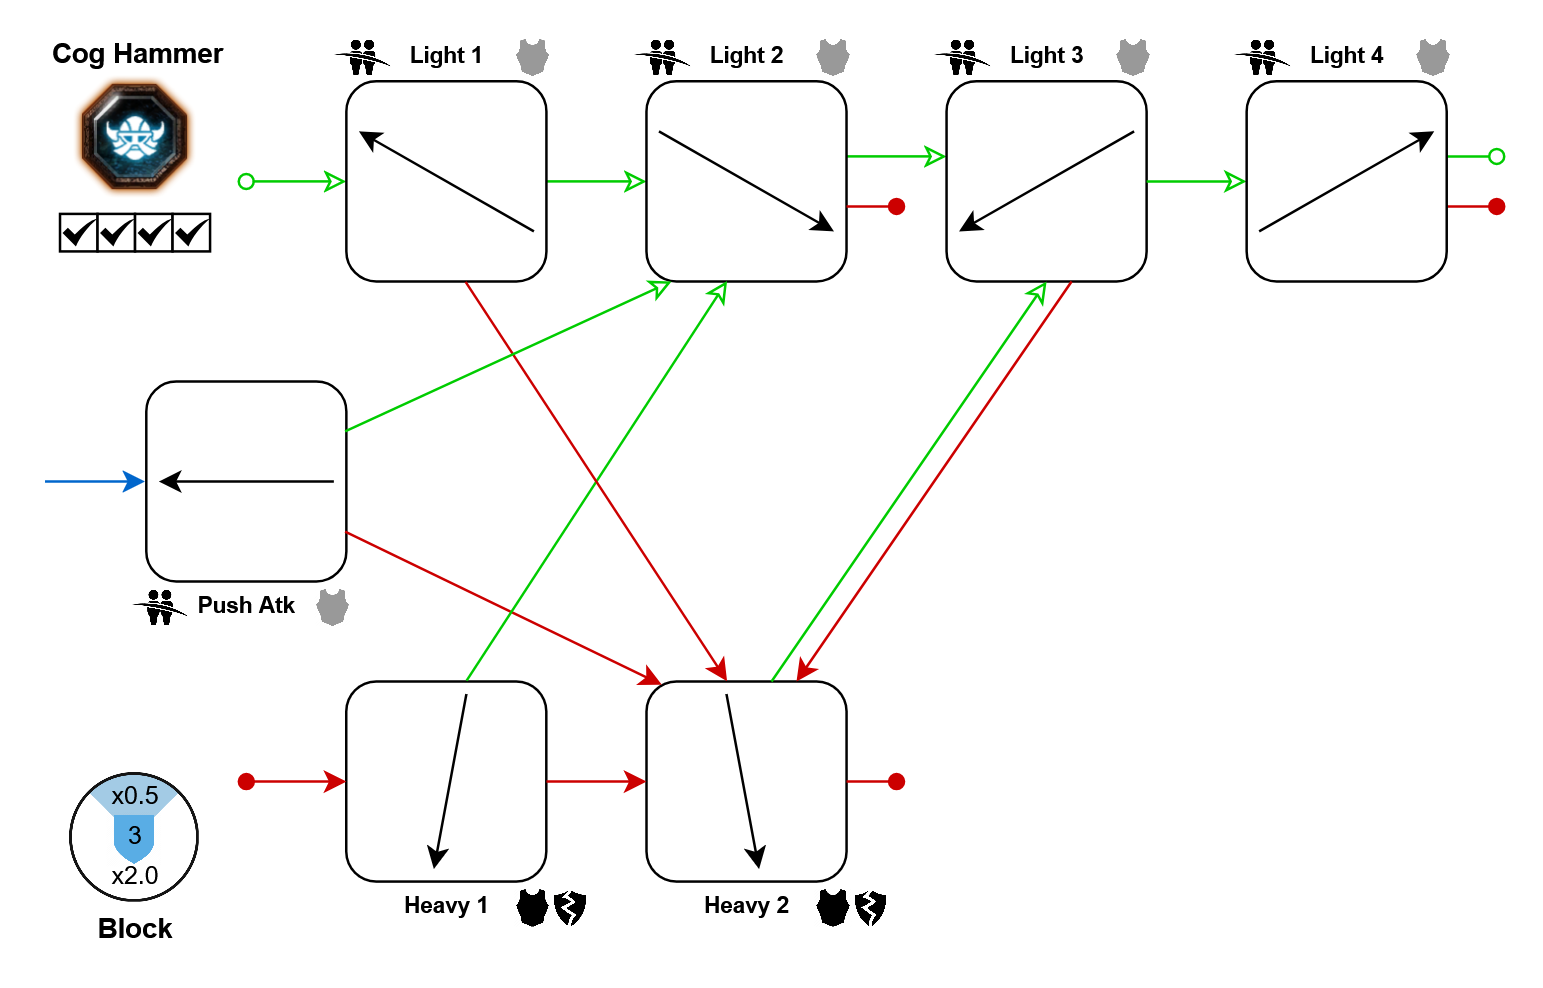
DLC: Outcast Engineer Career
Kerillian
Sword
Kerillian's one-handed Sword weapon is well rounded with good mobility, and unlike the other one-handed swords, focuses on a strong offense over blocking. Heavies 1 and 3 deal good single-target damage with impressive speed, while Heavy 2 rounds out your horde combo well.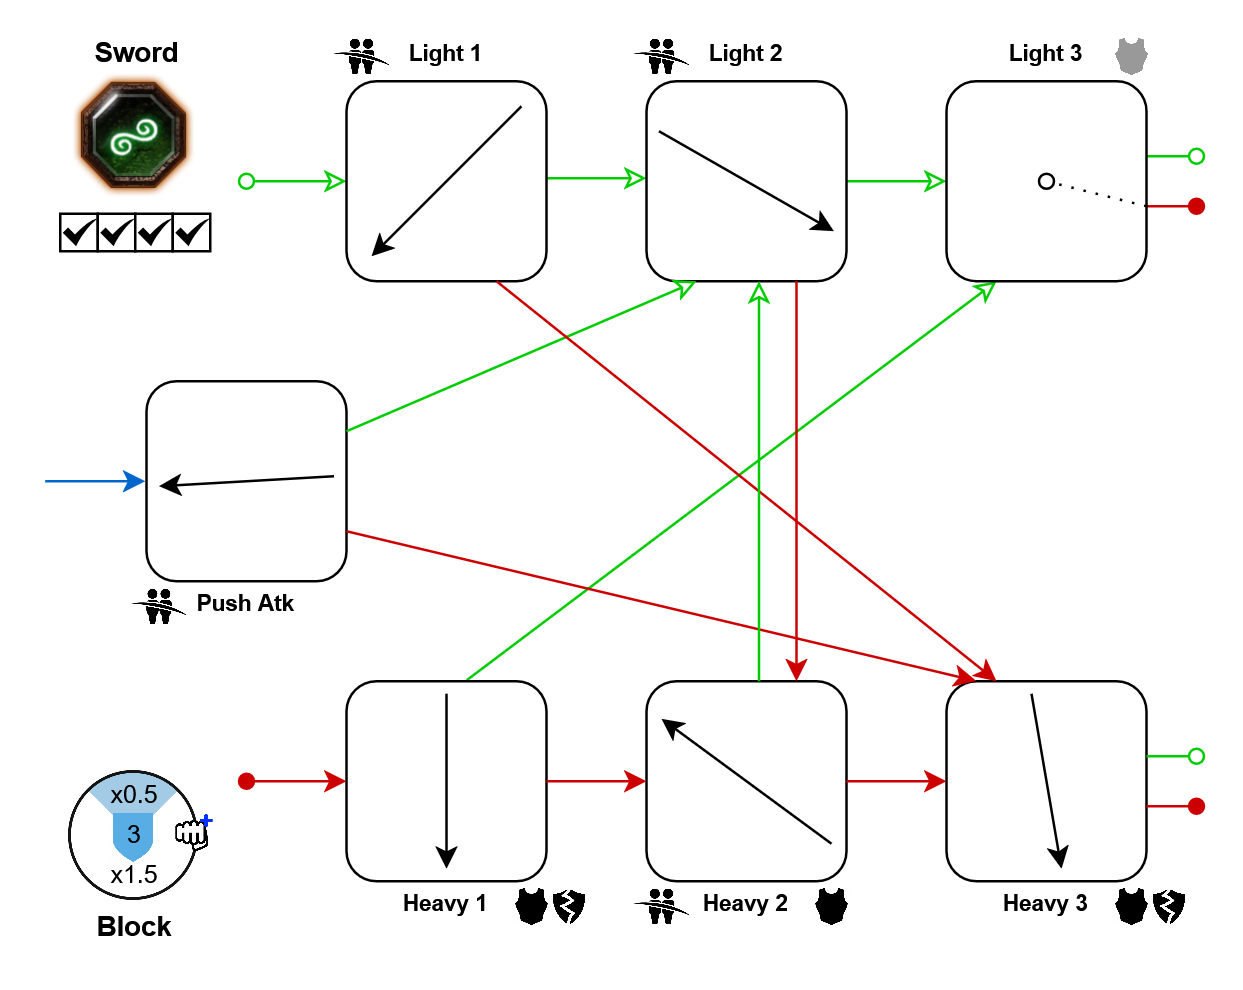
Bonus Crit:
- Heavies: 10%
Dual Daggers
To use this rapid single-target weapon, you should get used to two things: Firstly, headshotting with rising slashes (See section Further information for an explanation). Secondly, controlling enemies by shoving them around, as your blocking ability is abysmal, but compensated by reduced push costs. The push attack and lights 3 and 4 come with 10% bonus crit chance.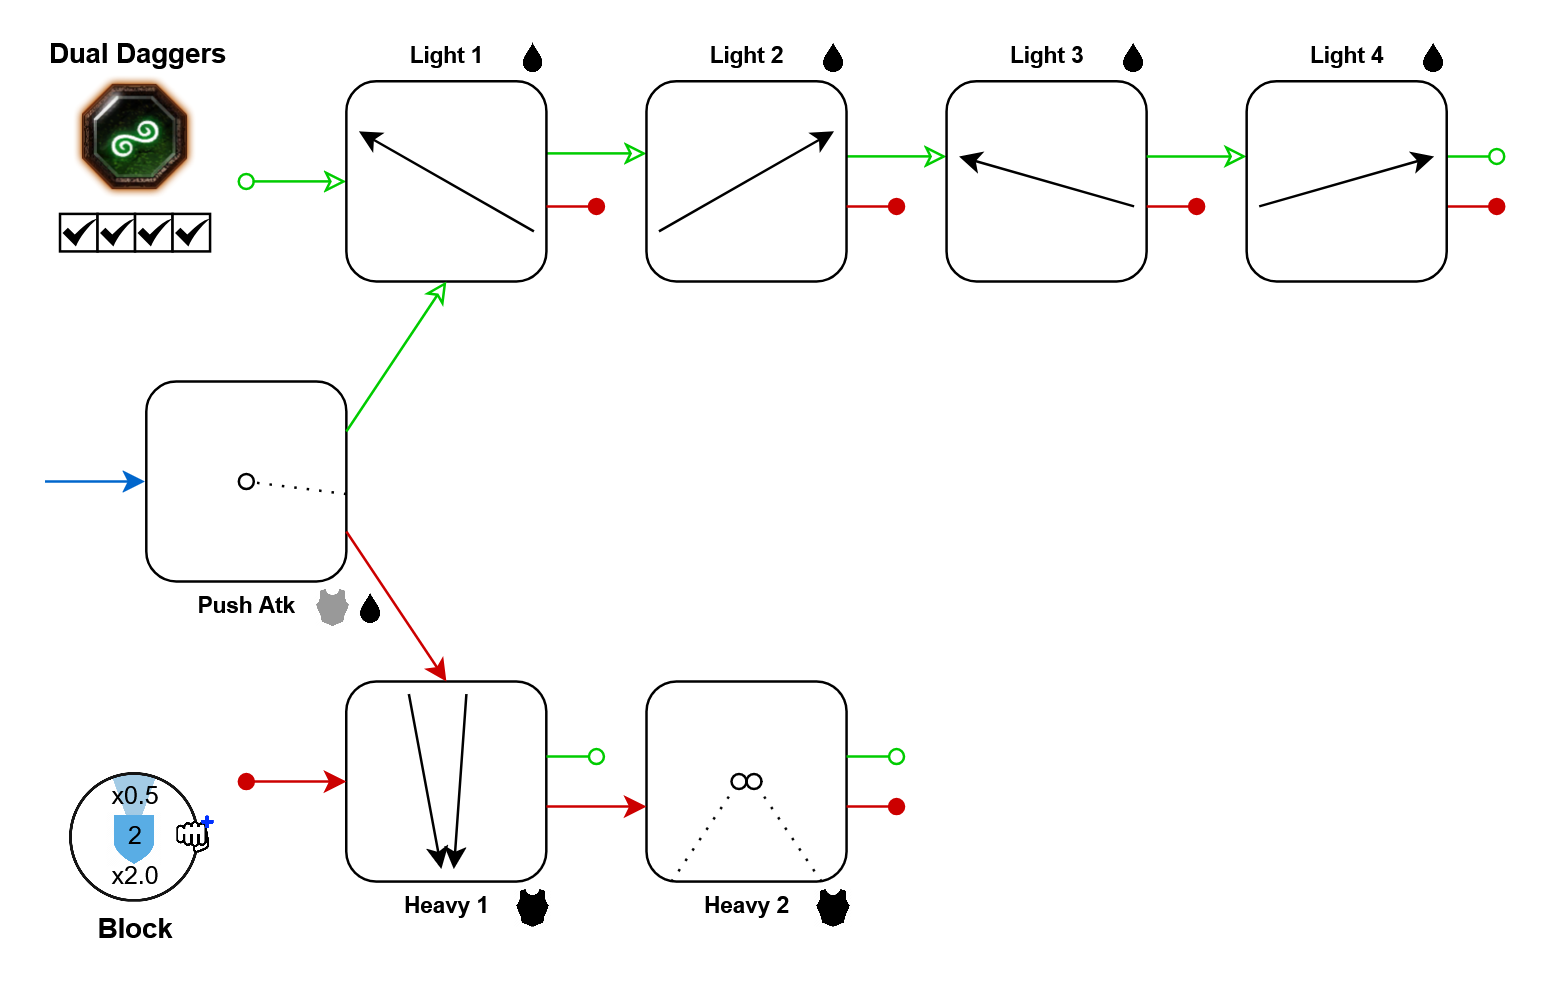
Bonus Crit:
- Push-atk: 10%
- Lights 3+4: 10%
- Heavies: 10%
Dual Swords
High attack speed and good cleaving ability makes this one of the safest horde clearing weapons around. Even when completely surrounded it defends you well, due to its unusually good outer block costs. It also activates Swift Slaying consistently, due to the insane crit chance bonuses on Lights 3 and 4. In return, dealing with armored enemies will take forever.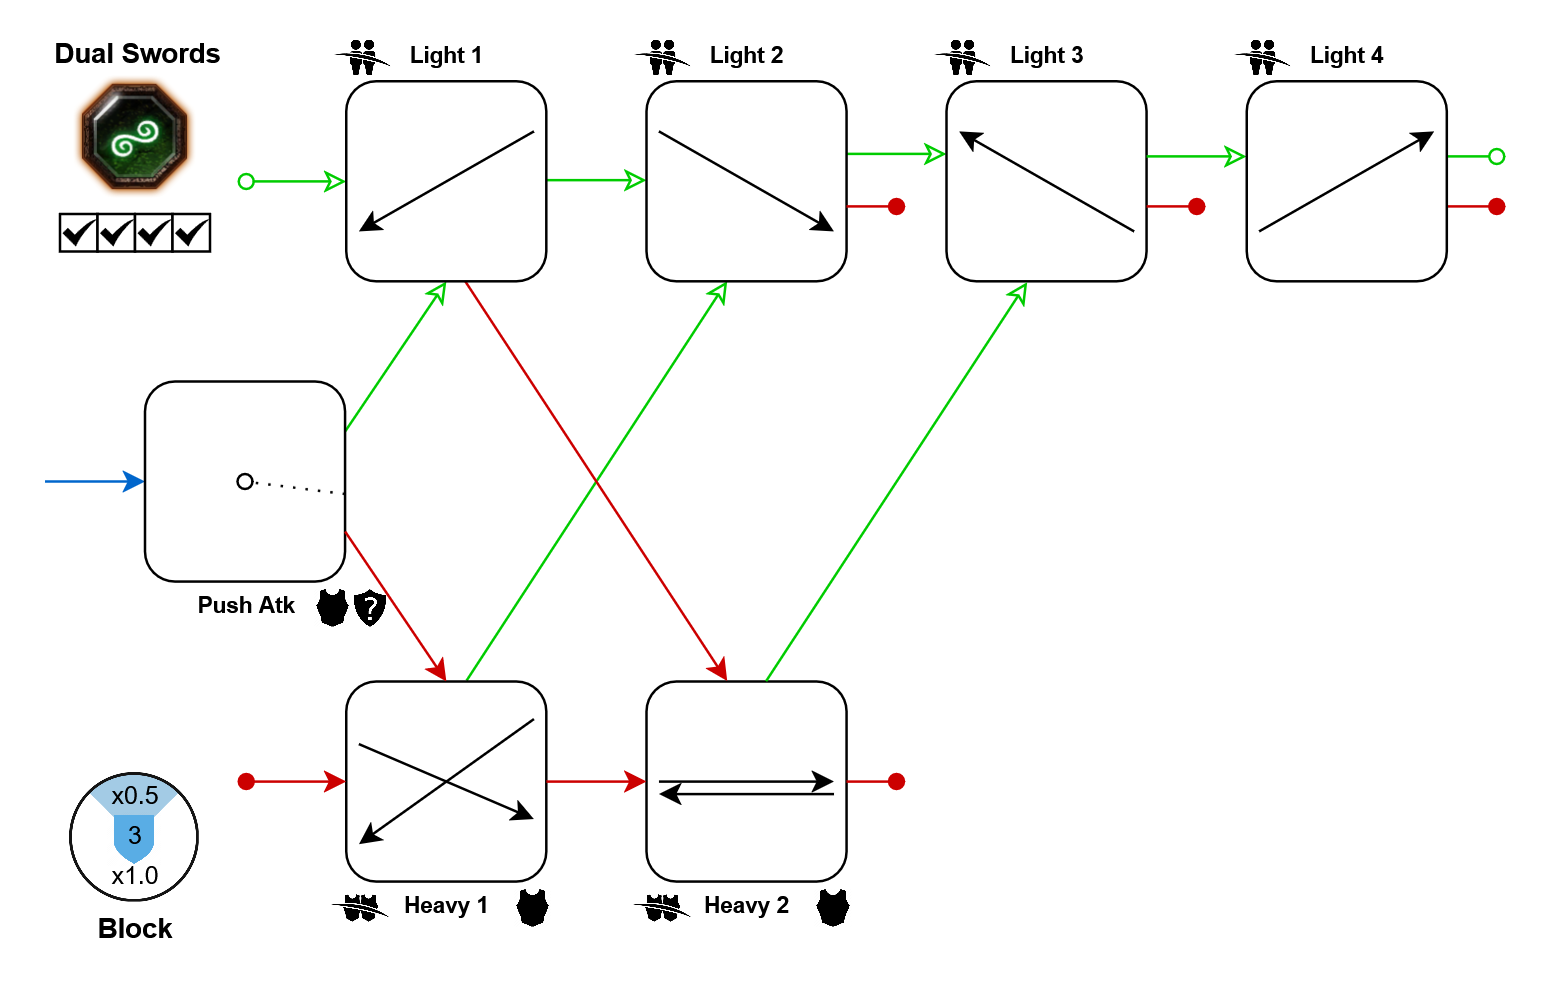
Bonus Crit:
- Push-atk: 10%
- Light 3: 25%
- Light 4: 50%
Sword and Dagger
This weapon combines the last two entries into one, giving you the ability to access any of their upsides, but requiring a bit of memorization to use correctly. It also comes with cheap pushing like the dual daggers, which you should make good use of, to compensate for the weapon's increased frontal block costs.Note: Even though it makes no sense, Heavy 1 hits like two cleaving swords, while Heavy 2 hits like two armor-piercing daggers, and not a mix of both.
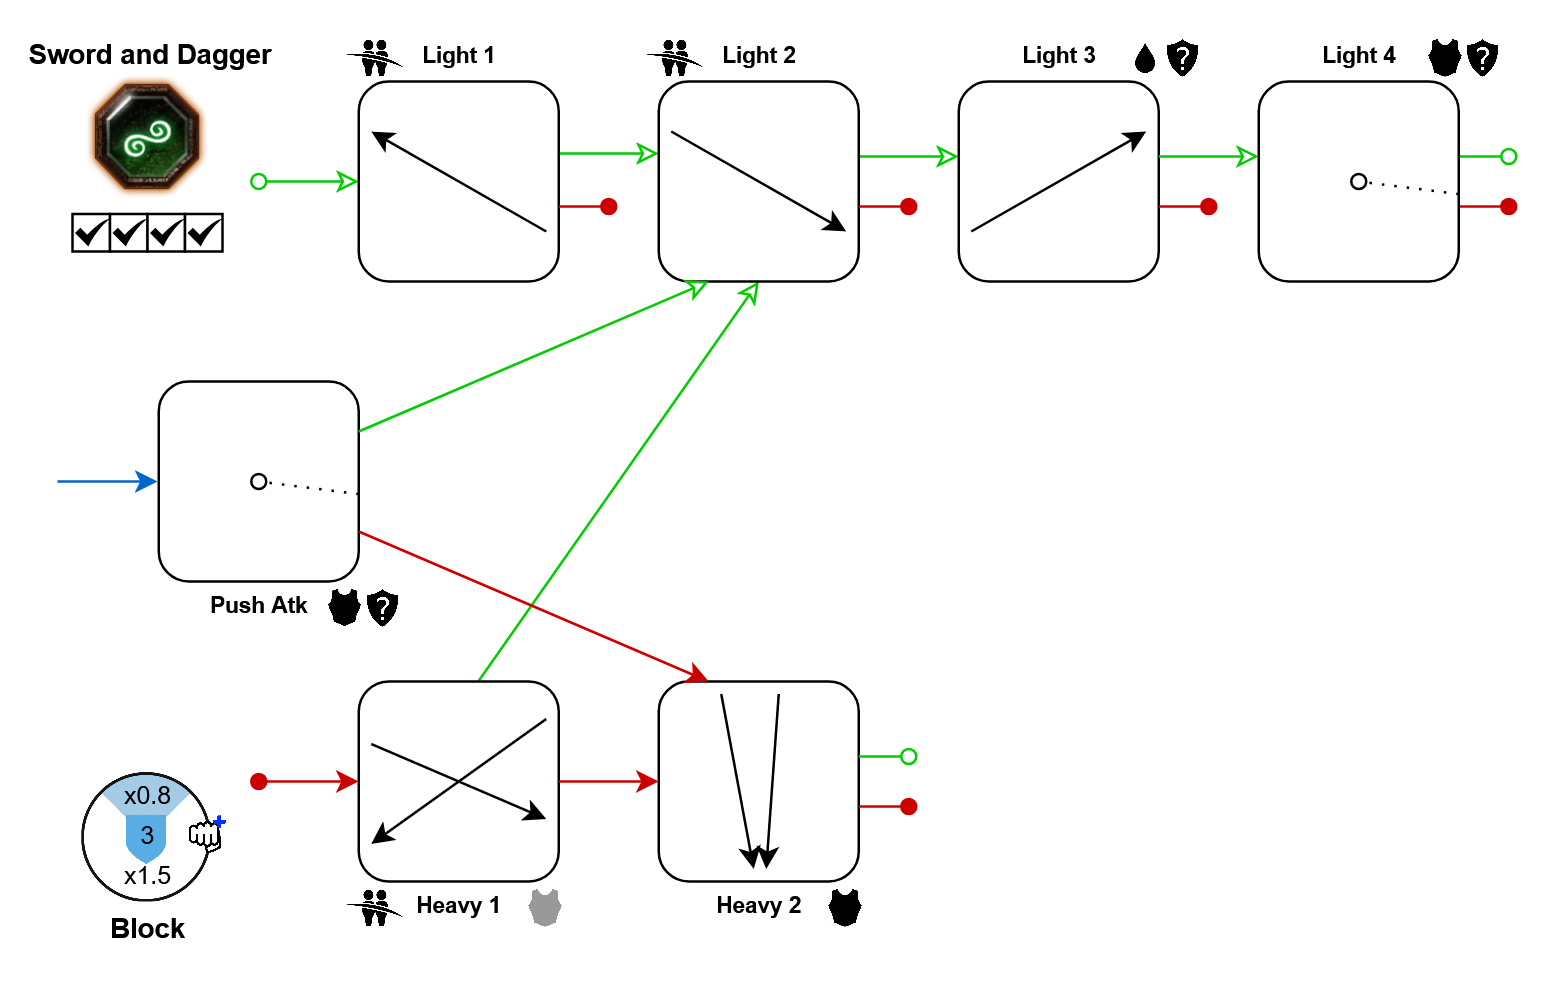
Bonus Crit:
- Push-atk: 10%
- Lights 3+4: 10%
Glaive
While the Glaive's light attacks are simple and effective, its heavies are quite odd: The quick armor-piercing overhead is executed after Heavy 1 the moment you press anything, and it cannot be held. But it's a great move with enormous single-target damage.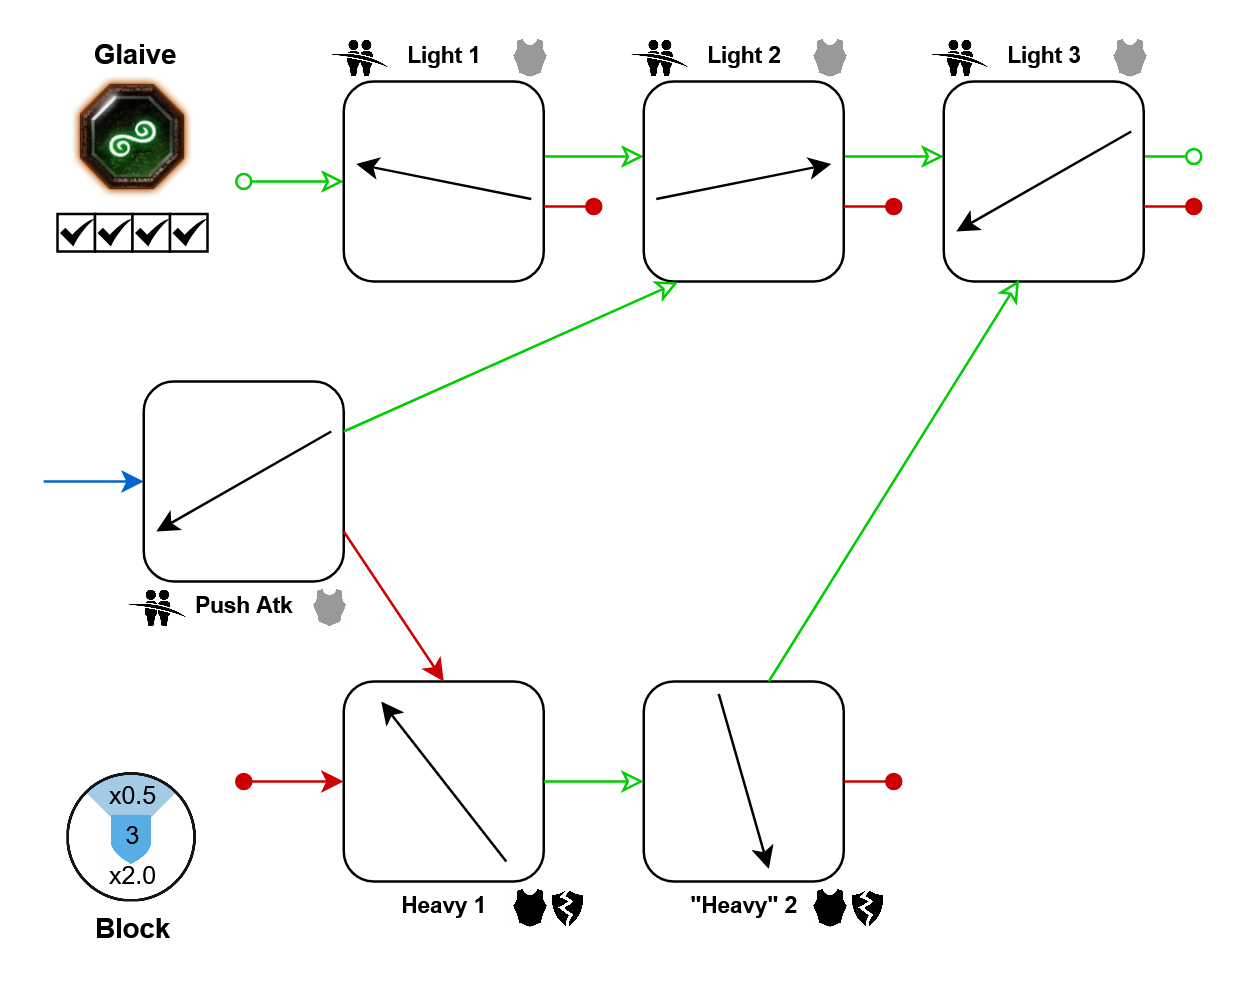
Greatsword
In typical Greatsword fashion, the light attacks have great cleave. Heavies are, again, where it gets weird: Inputting a heavy attack always gives you Heavy 1, even after itself. Quickly inputting light attack afterwards gives you the unique Light 3, which outperforms the other light attacks in damage and cleave.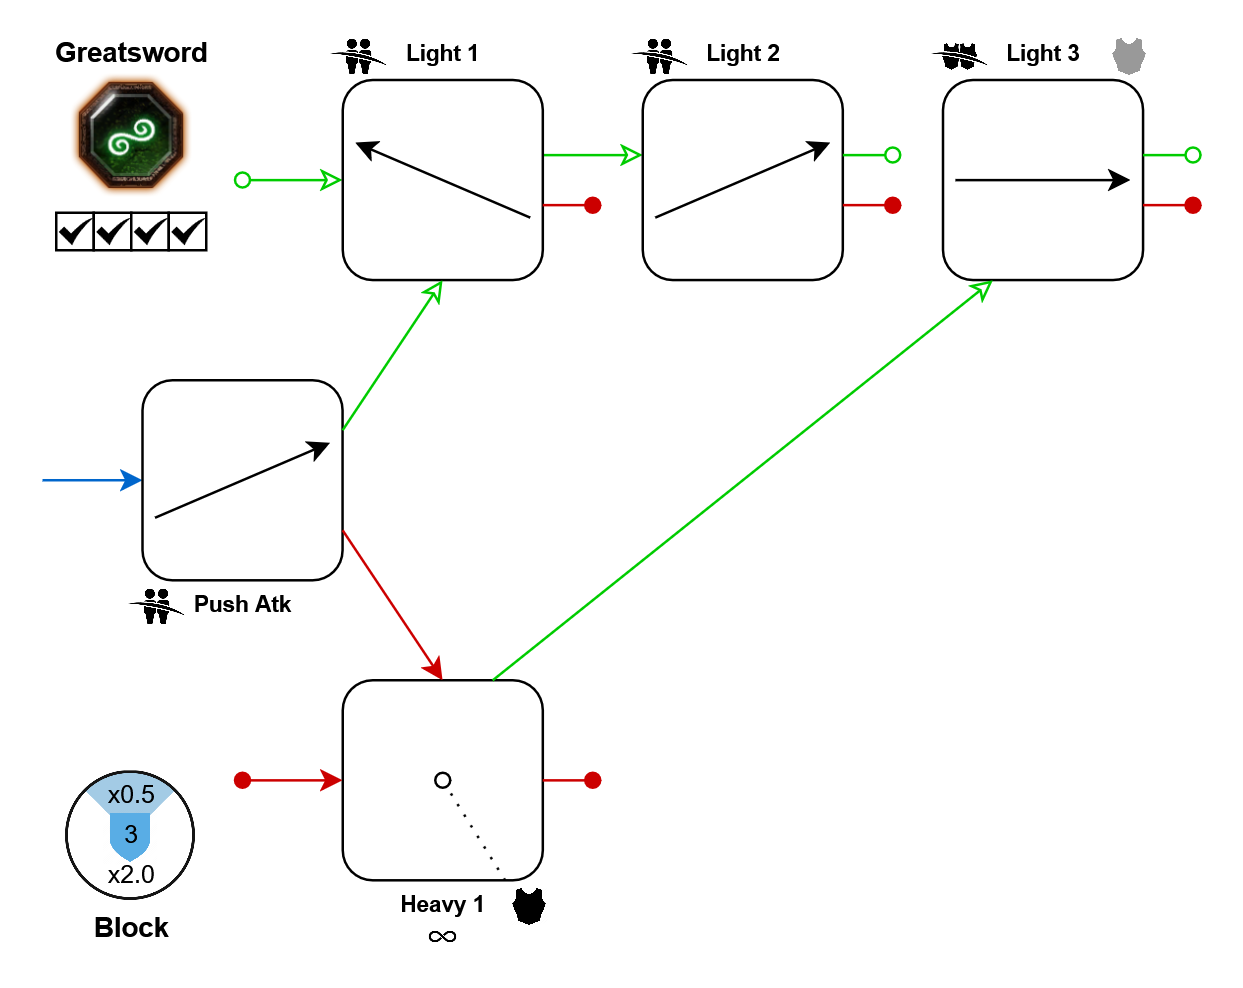
Bonus Crit:
- Push-atk: 25%
- Lights: 10%
Elven Spear
This spear's range and attack speed make it perfect for constantly poking at heads from a safe distance. And if things get too close for that, its 180° effective block angle helps keeping you protected. But if enemy groups become too dense you might become uncomfortable, as its cleaving attacks can not be chained into each other.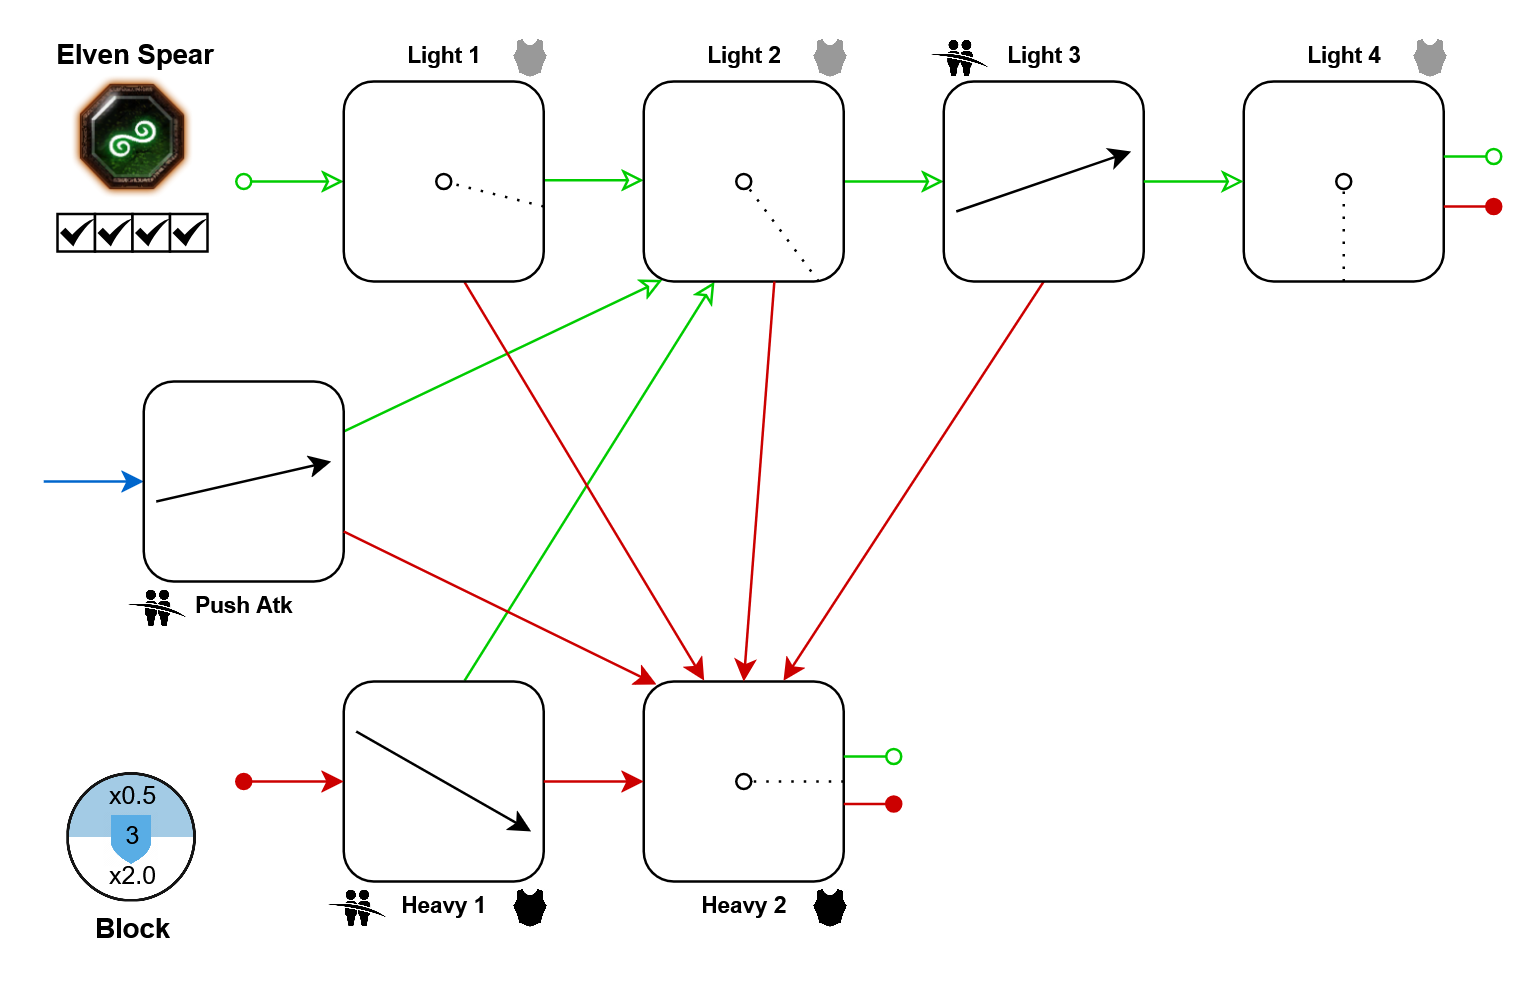
Movement tech: In further resources
Elven Axe
All the single-target damage you'd ever want in one weapon, but barely any cleave. So for self-defense, use the cheap pushes and good dodge range.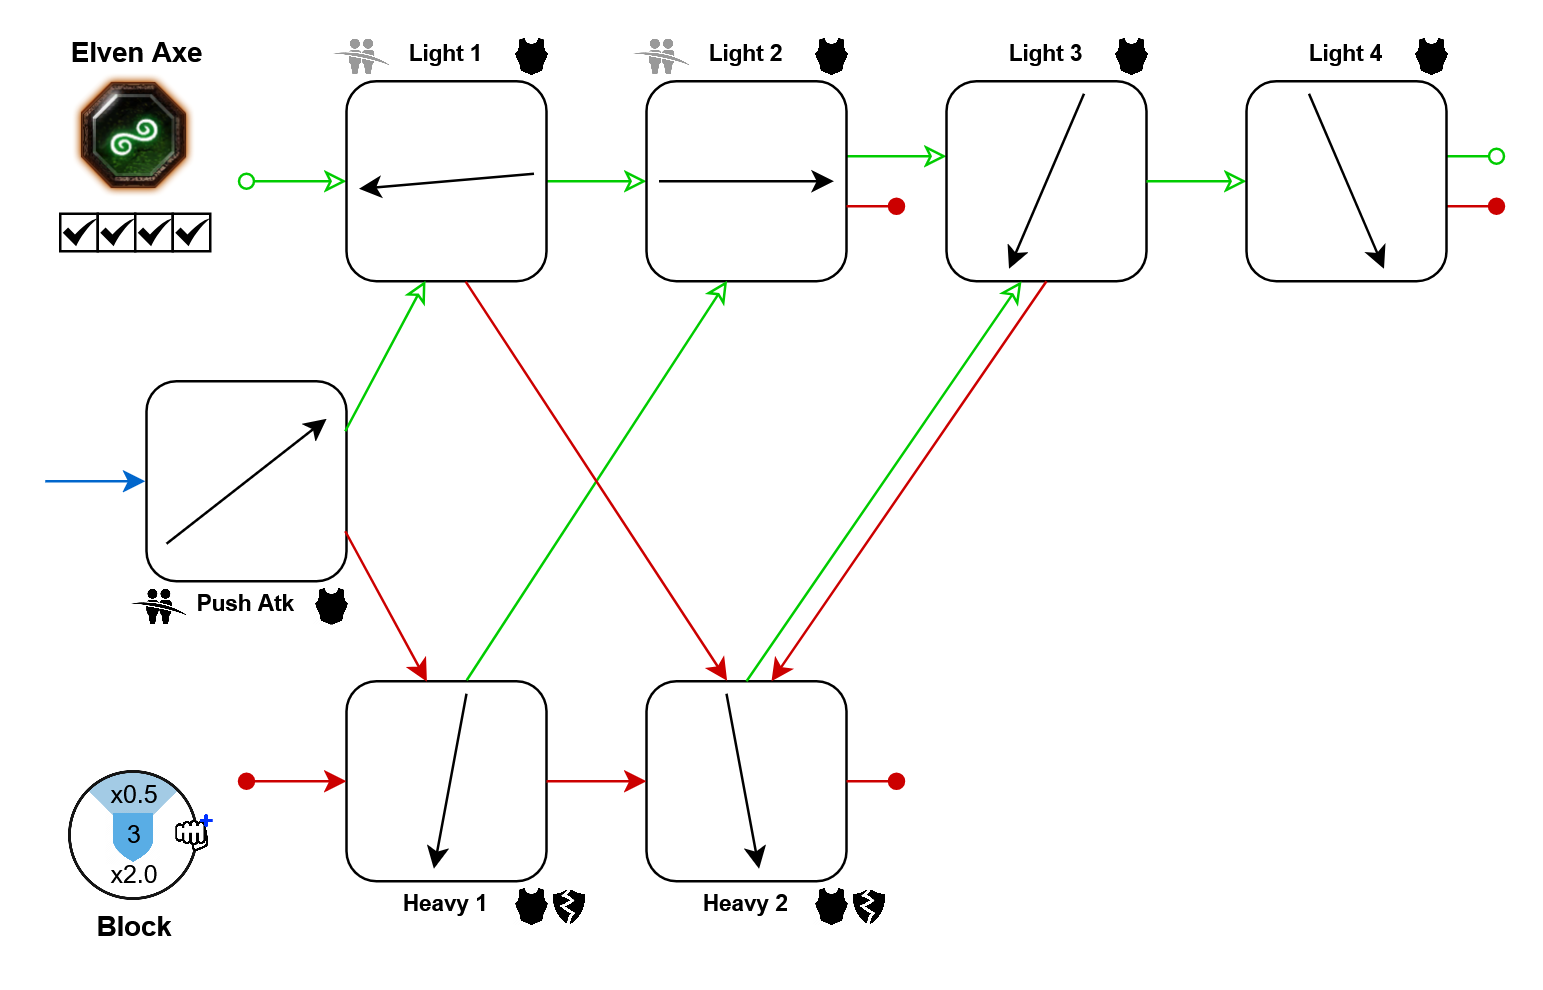
DLC: Back to Ubersreik
Spear and Shield
Kerillian's only shield weapon, and a rather well-rounded one as well. Its cleave attacks are decently accessible, and its best armor damage moves can be accessed after a push attack, which shouldn't be a problem on a career with +100% stamina regeneration speed.Note: Unlike the other shield weapons, this one does not improve your stamina recovery delay after pushing.
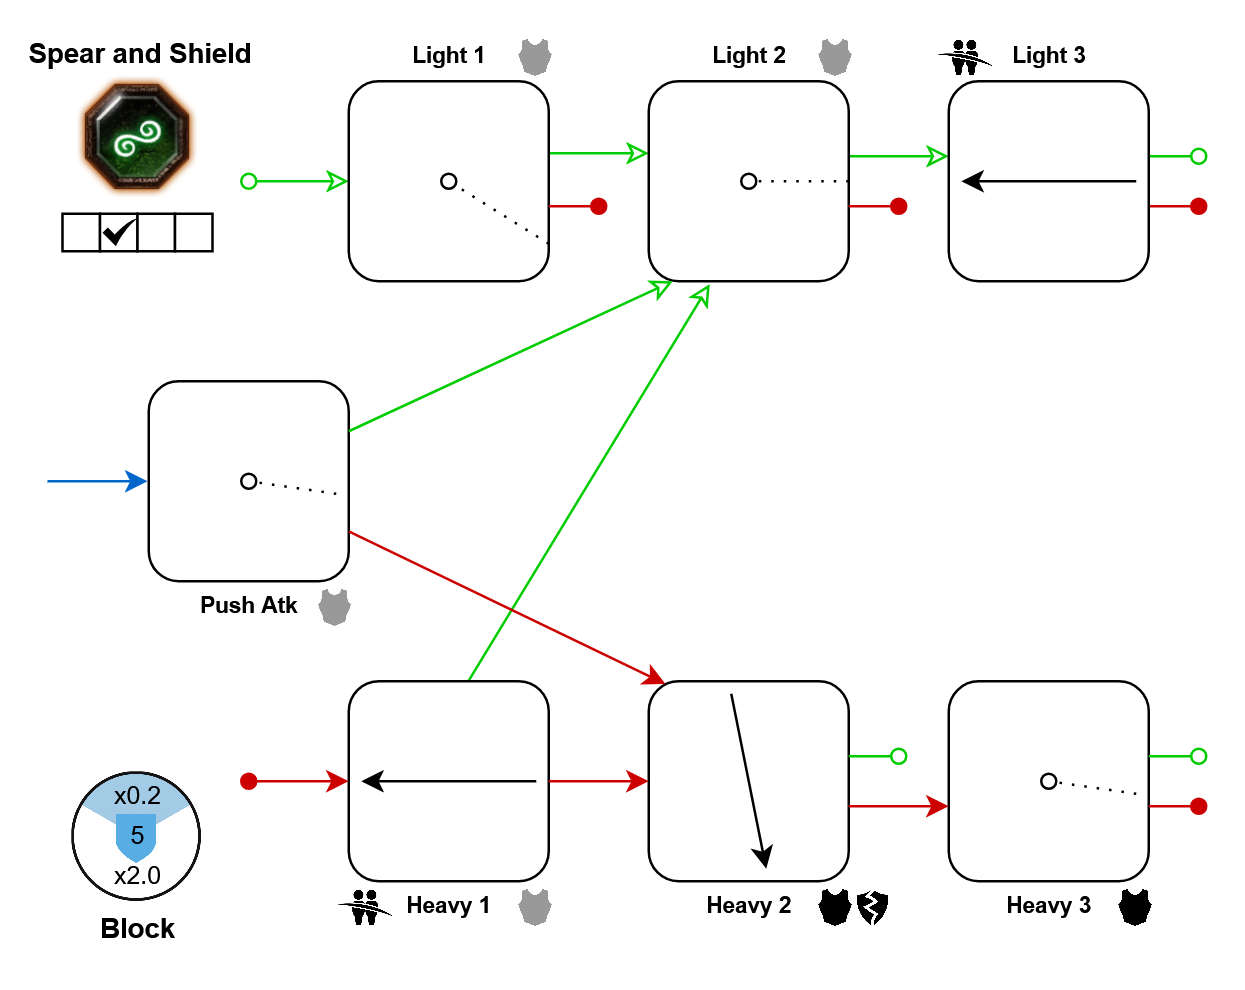
DLC: Winds of Magic
Movement tech: In further resources
Movement tech: In further resources
Briar Javelin
This ranged weapon can be aimed by holding right click, and then thrown. While not aiming, it acts like a melee weapon, though one that cannot block at all. Lights 3 to 5 have higher attack speed than the previous ones, and Light 5 even applies an additional bleed, meaning that opening with Heavy 1 and then going into lights leads to much better burst damage than spamming all lights.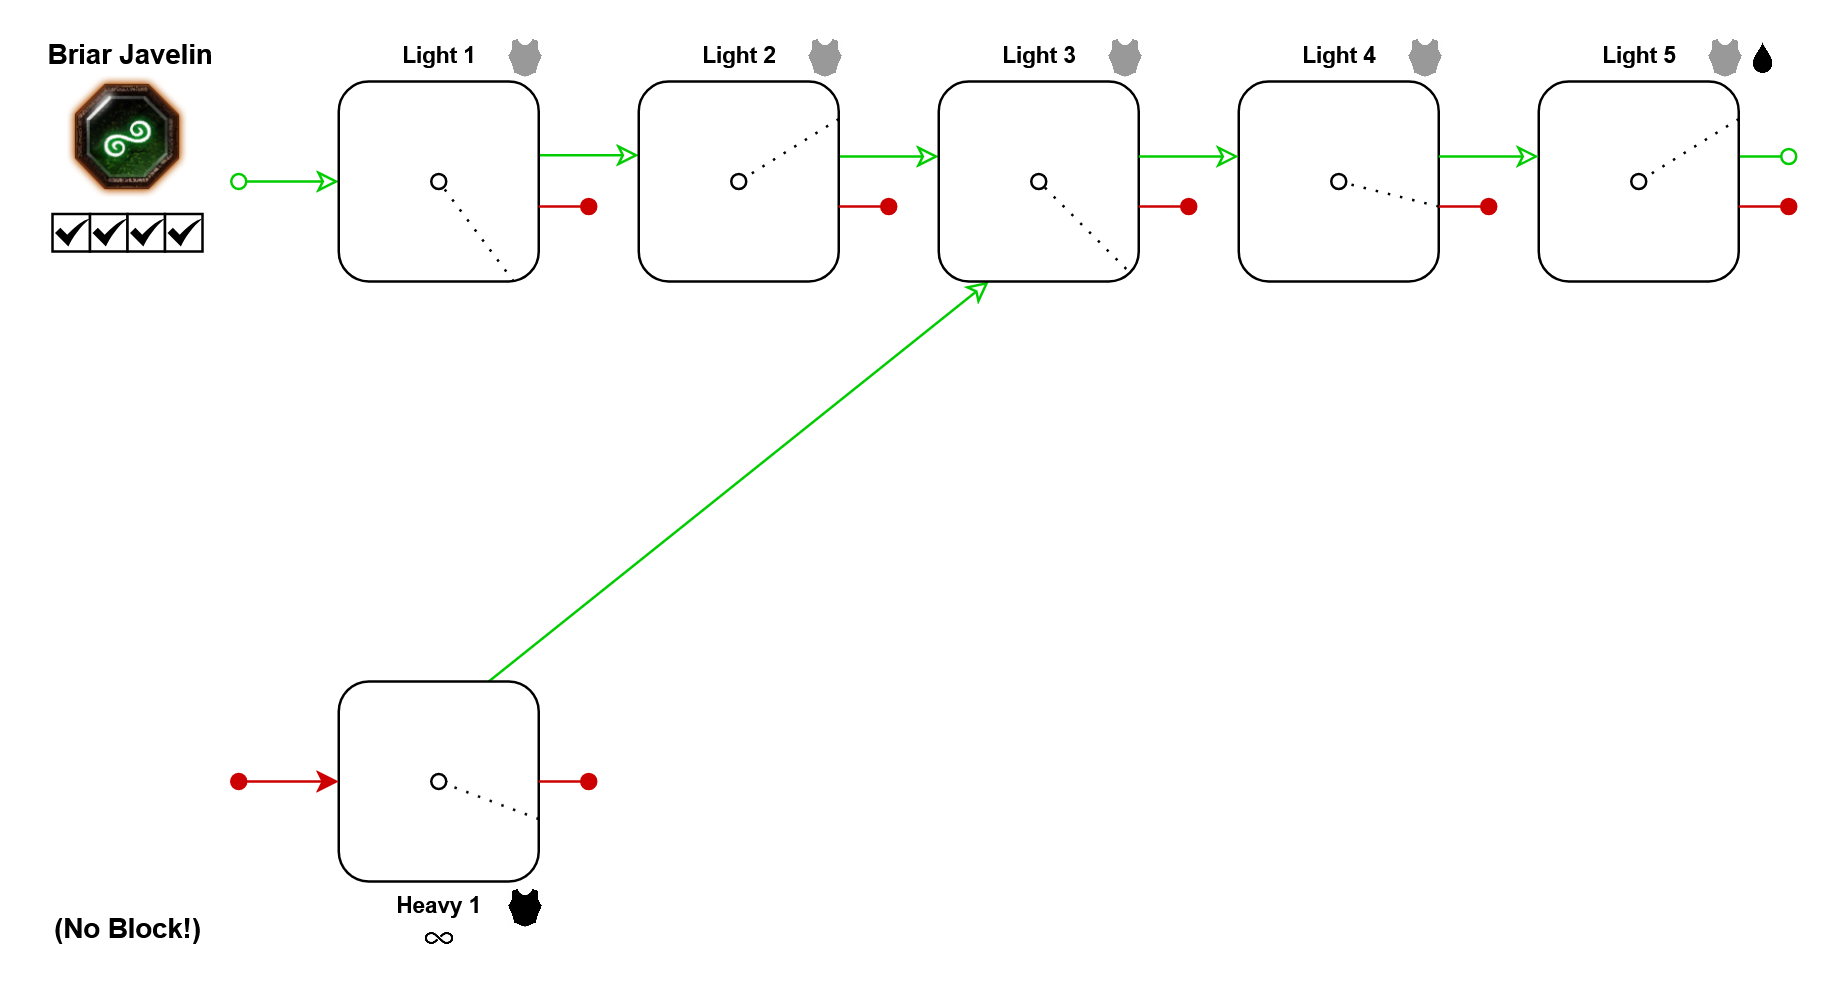
DLC: Sister of the Thorn Career
Movement tech: In further resources
Movement tech: In further resources
Victor Saltzpyre
Rapier
For a starting weapon, the Rapier has a surprising amount of unique mechanics. Unlike most of Saltzpyre's weapons, it has very good defense, considering its improved frontal block costs and cheap pushing. Its base damage isn't high, but its headshot multipliers are huge, especially against super armor. This makes Light 3's trajectory impractical, so using a block cancel after Light 2 and going into a Push Attack is often a good idea, enabled by the low push cost. Overcharging its heavy attacks roughly doubles their damage, which leads to a small increase in damage per second. The weapon special shoots a pistol without requiring ammo. The shot deals big damage against flesh at close range, but has a sharp fall-off and becomes almost useless at around Witch Hunter Captain's career skill range. Shooting the pistol while blocking does NOT interrupt your block, which is especially valuable against berserkers.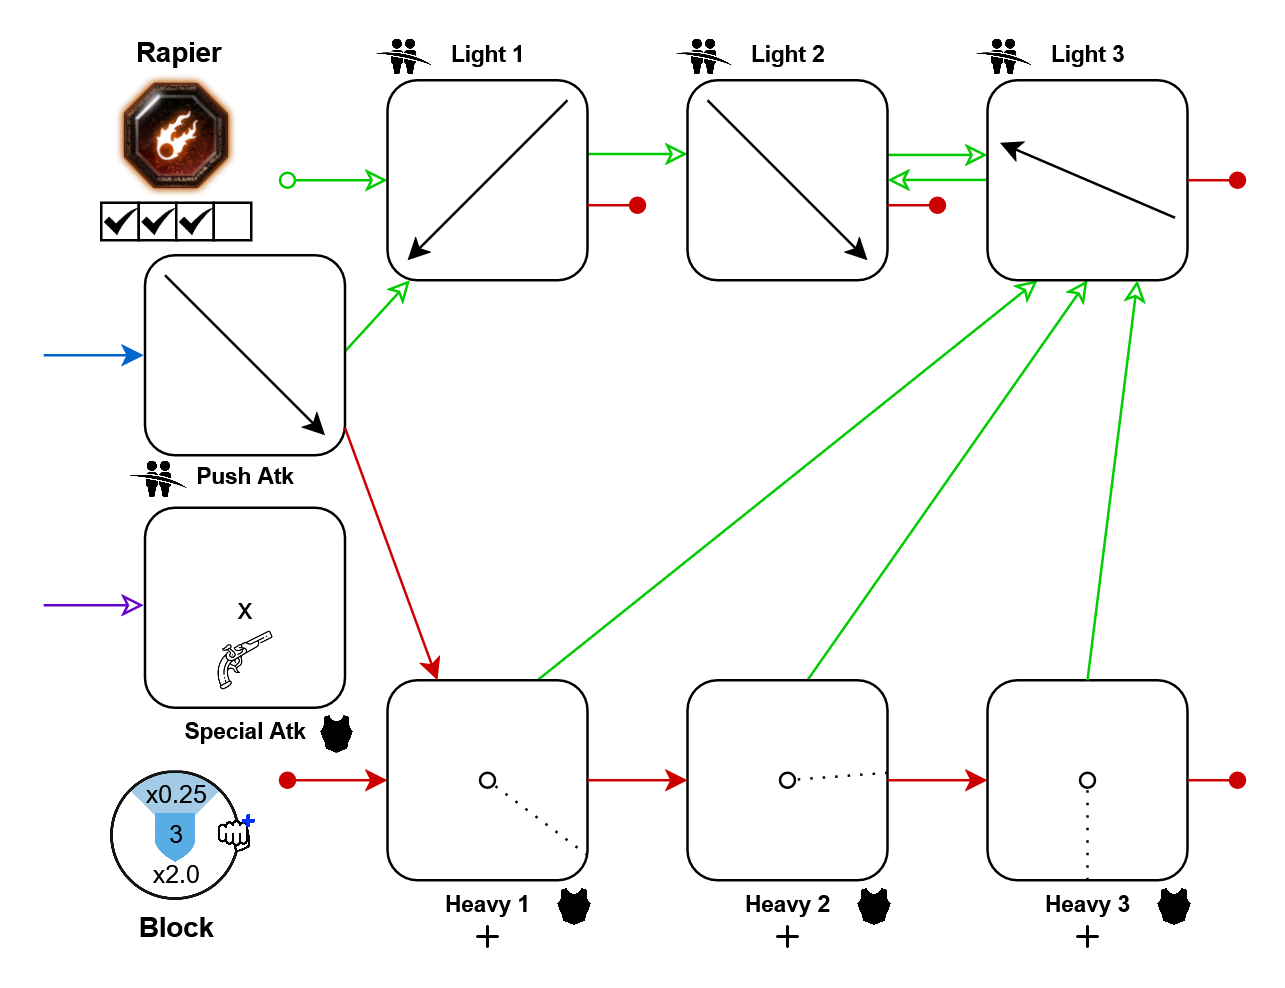
Falchion
This is Saltzpyre's closest equivalent to a standard sword. Its cleaving attacks deal above-average headshot damage, while Light 3 and the heavy attacks don't, but have big base damage instead. It also allows you to dodge well.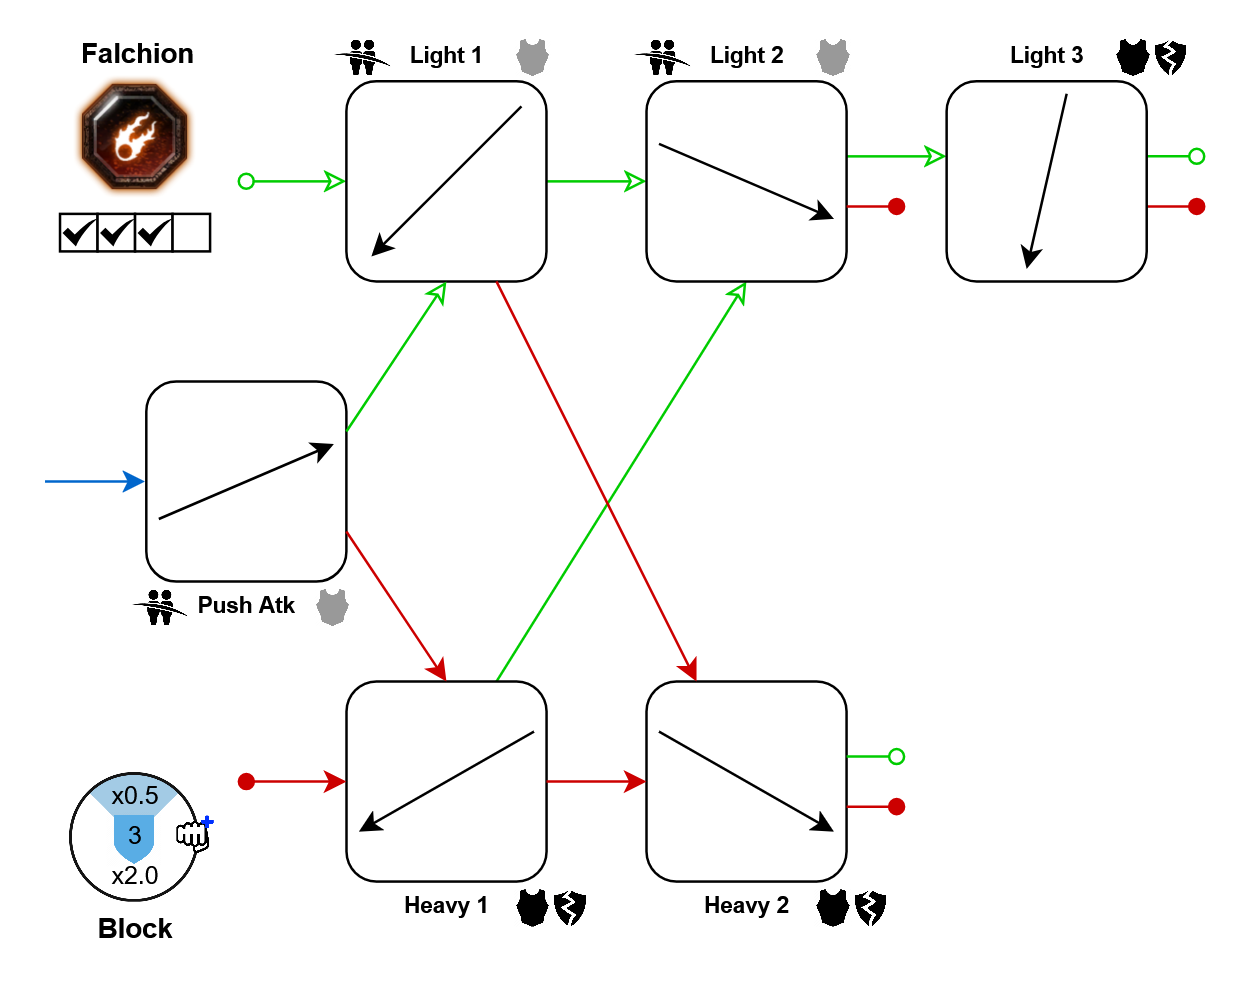
Axe
A single-target weapon with great damage potential and standard defense. Hordes can quickly get out of hand due to the lack of cleave, so you should make good use of your cheap pushes and good dodges.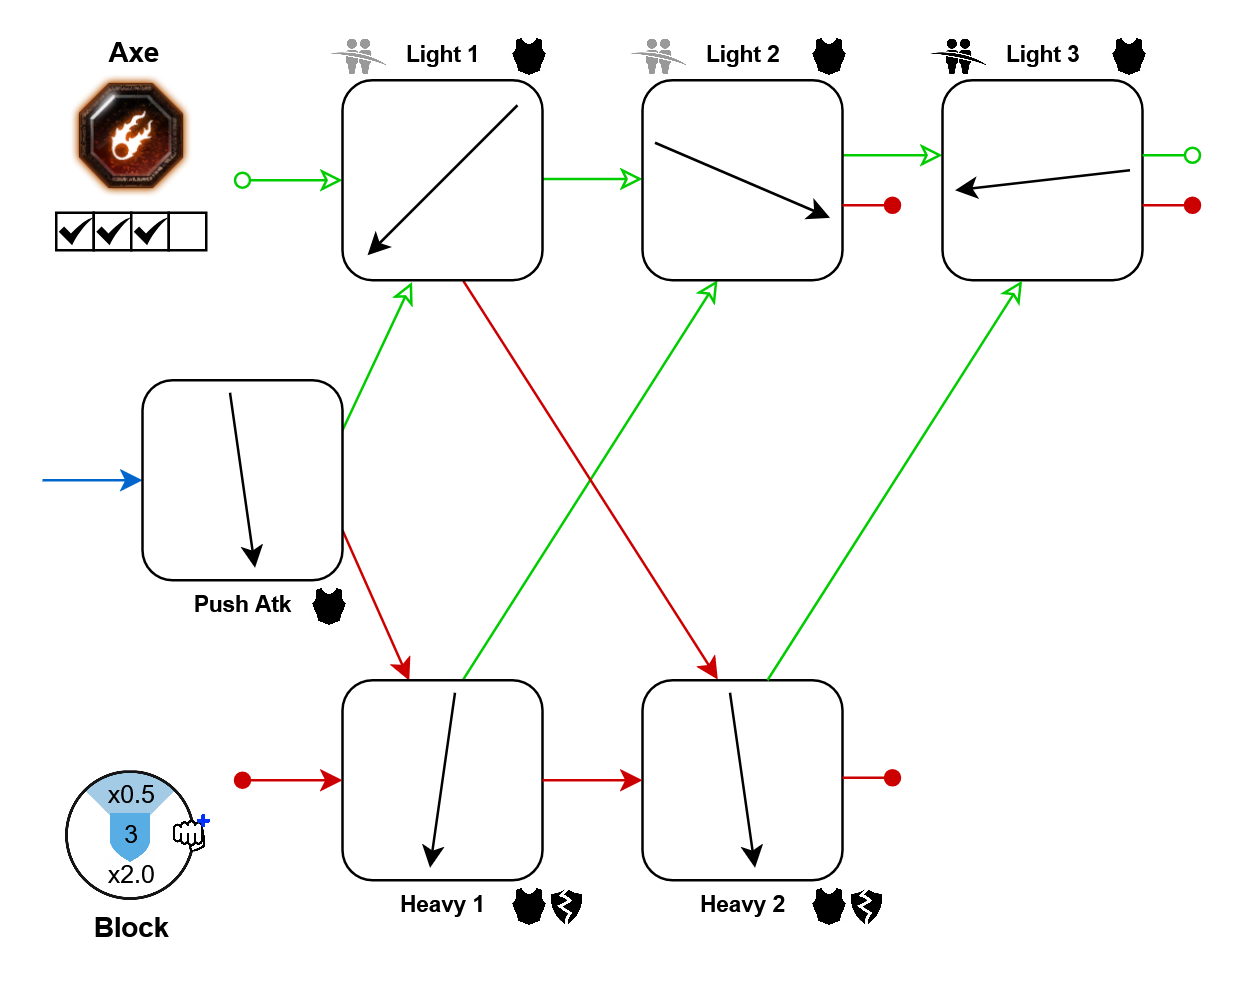
Bonus Crit:
- Push-atk: 10%
- Lights: 10%
Greatsword
The opposite of the Axe: Great cleaving attacks, but struggles with armor damage, as its best single-target damage comes from the push attack.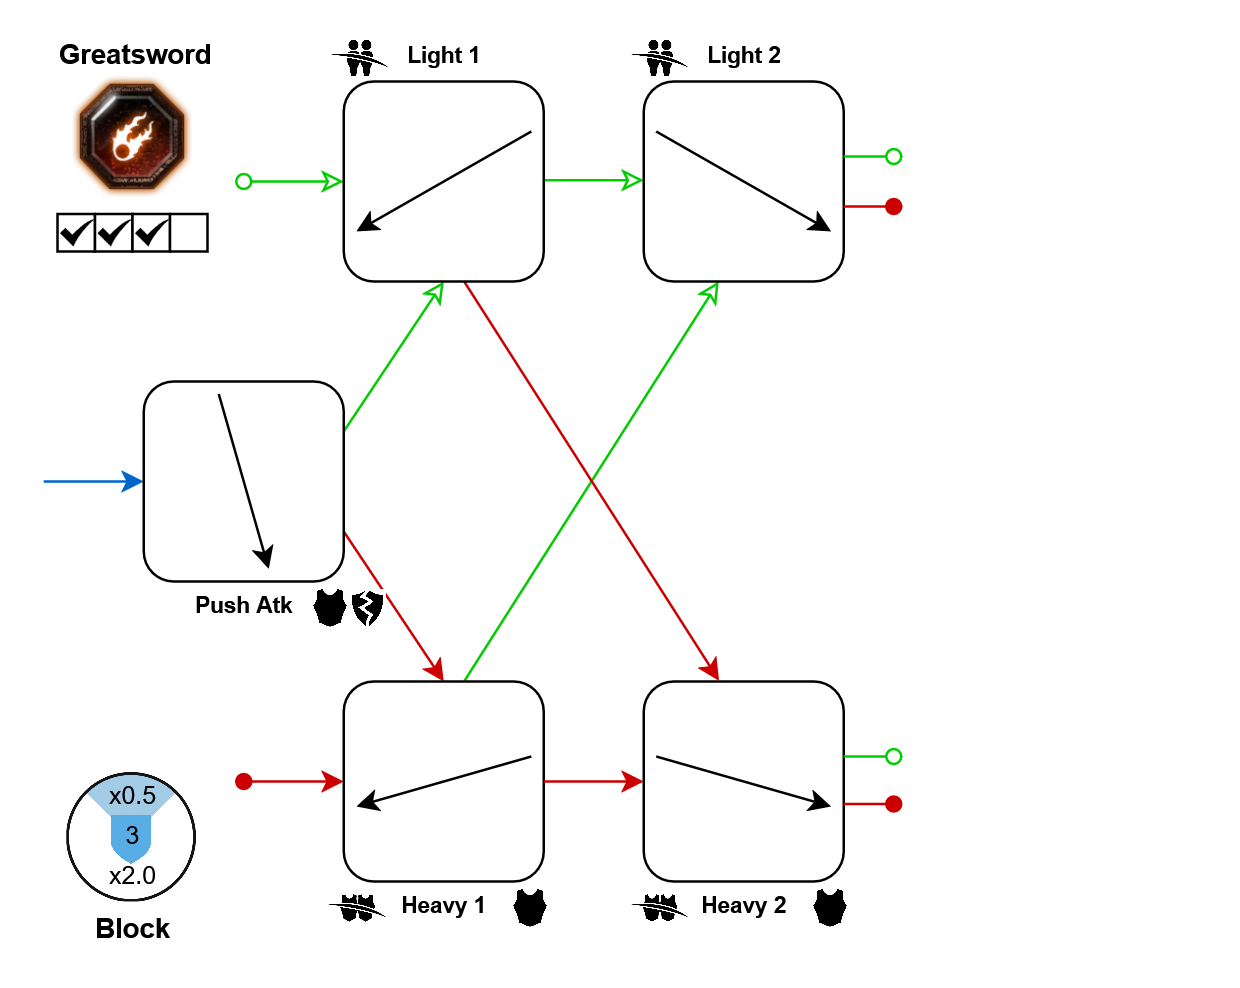
Same as: Kruber's Greatsword
Flail
Each of the Flail's light attacks is good at what it does specifically, so you should get used to accessing the right ones at the right time. The heavy attacks, on the other hand, just do it all! A great weapon for beating up skaven patrols.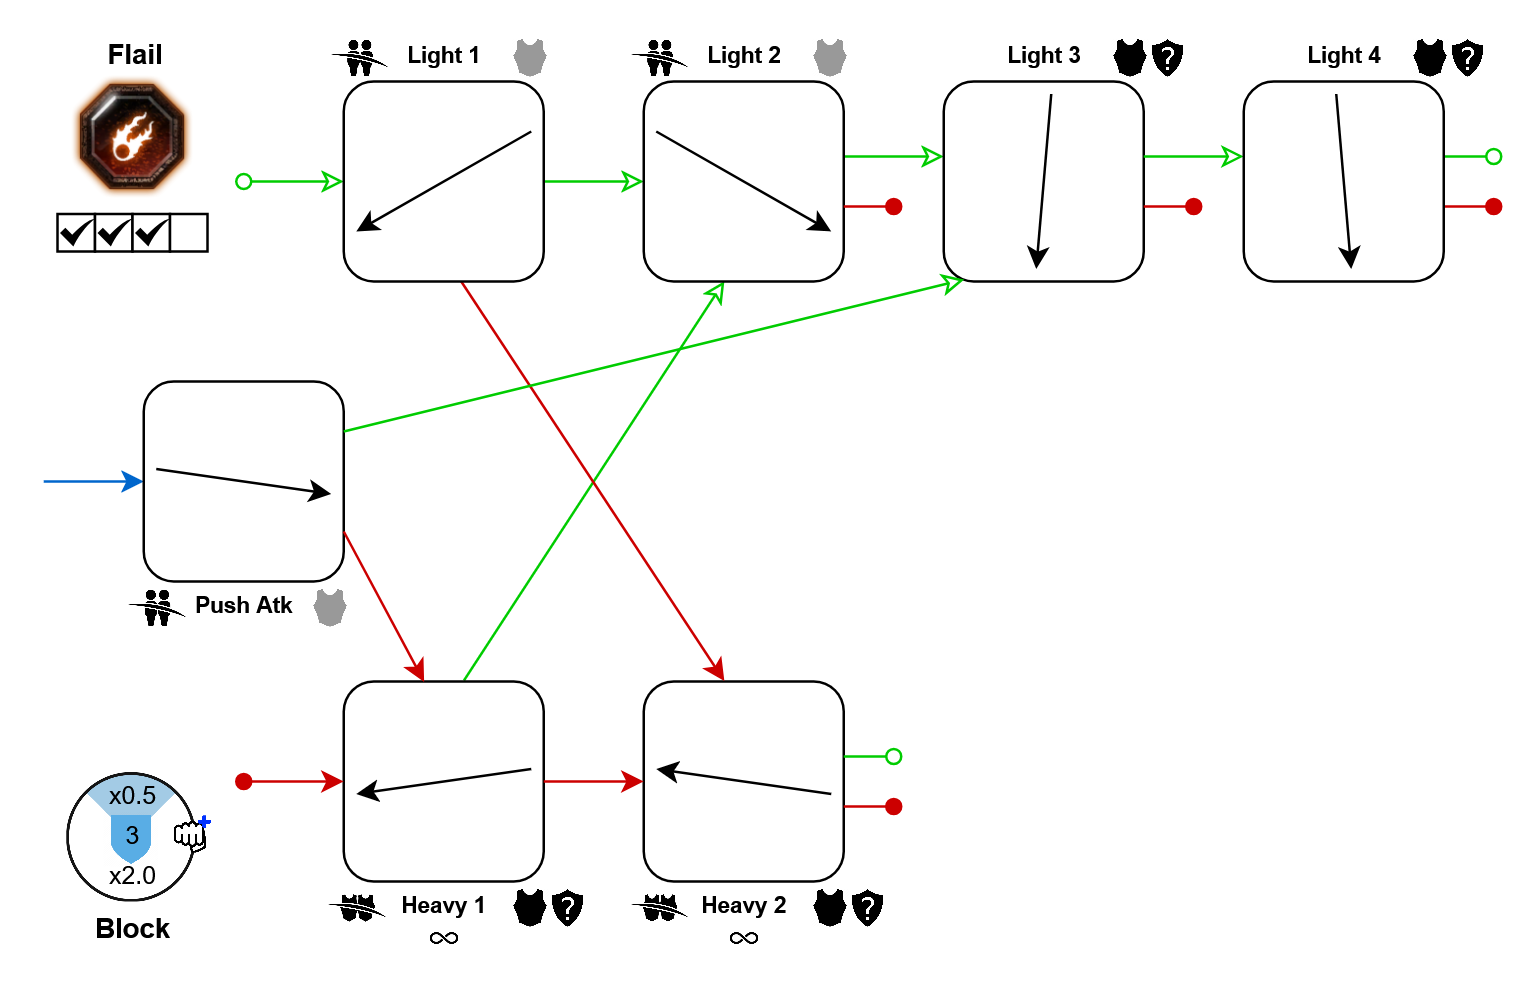
Axe and Falchion
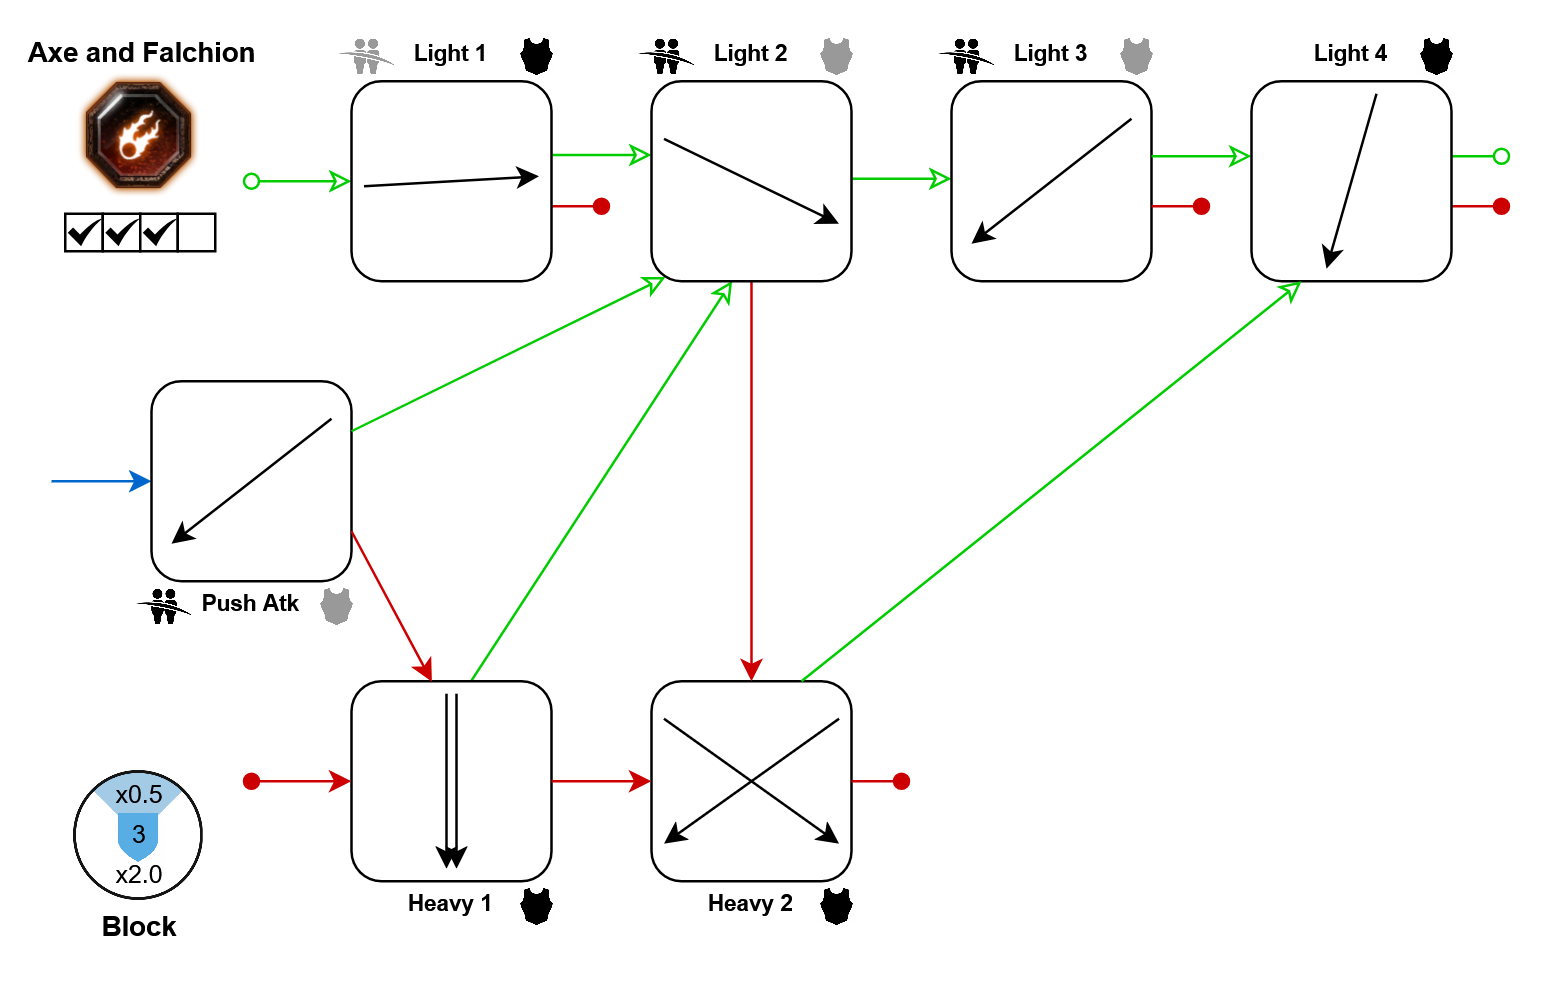
The light attack's properties vary wildly, but considering how good the attack speed is, you can still often get away with just spamming them. If you need to create more space against hordes, use the push attack, as it has improved cleave and also gets followed by the lights that also cleave well. For single target damage, it is possible to land double headshots with your heavy attacks.Note: Even though it makes no sense, both your weapons suddenly have the same properties when heavy attacking.
DLC: Back to Ubersreik
Bill Hook
This weapon is made for single target damage, range, and control. All its attacks have a big headshot modifier except Heavy 2, which has high base damage instead. The special attack pulls any single enemy towards you, staggering them. This will even interrupt attacking berserkers, chaos warriors, and hookrats, just not monsters or lords. Landing it costs half a stamina shield, which is cheap enough to bully any of these enemies for a long time. The special attack can also be weaved into your melee combos at any point, so loops like [Special > Heavy 2 > Special ...] are possible for safe takedowns. Due to its few cleaving attacks, the weapon may struggle against hordes, however.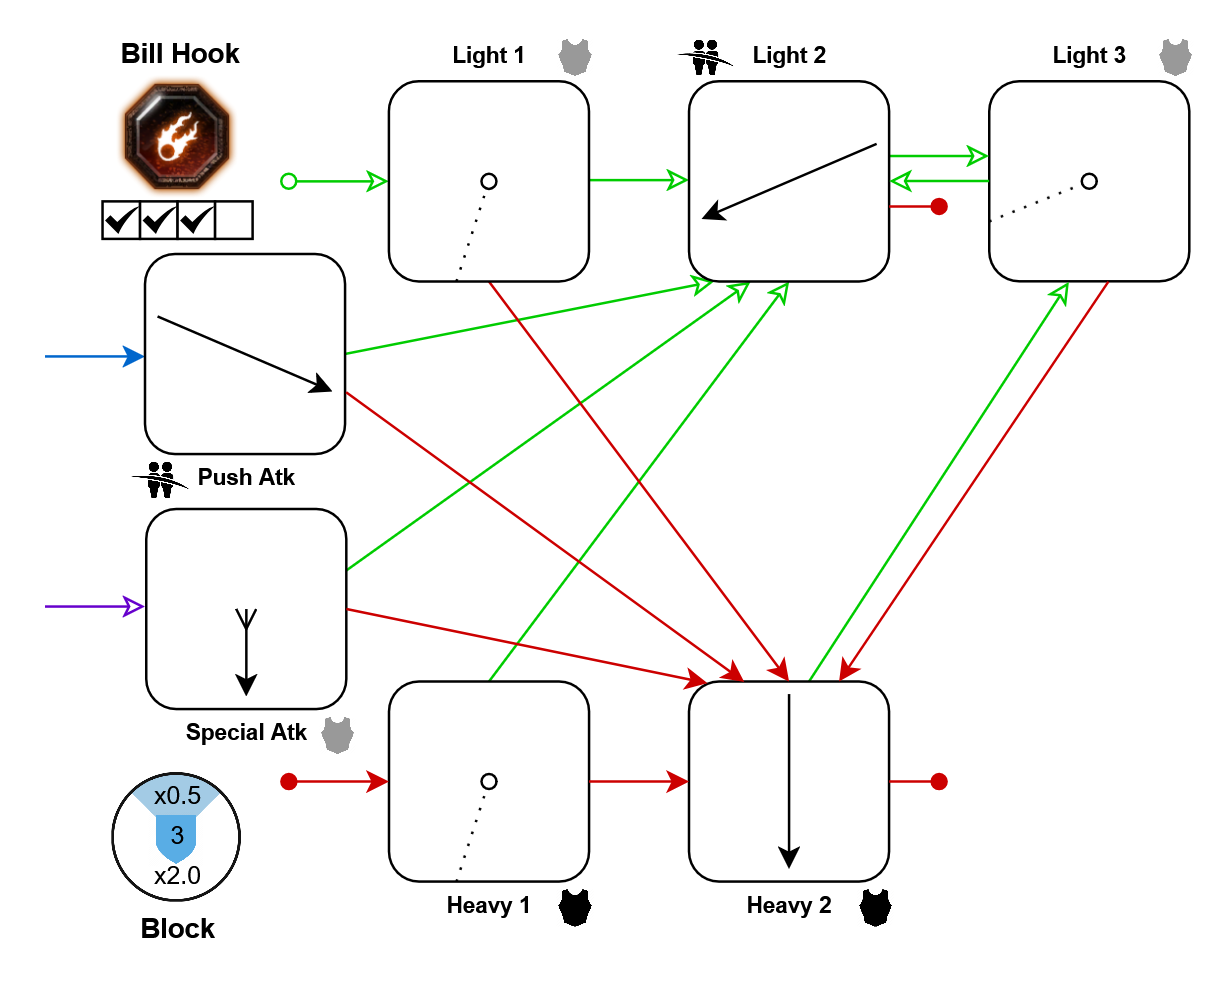
DLC: Winds of Magic
Movement tech: In further resources
Movement tech: In further resources
Victor Saltzpyre (2)
Warrior priest comes with so many weapons, they didn't even fit in the original section!
Flail & Shield
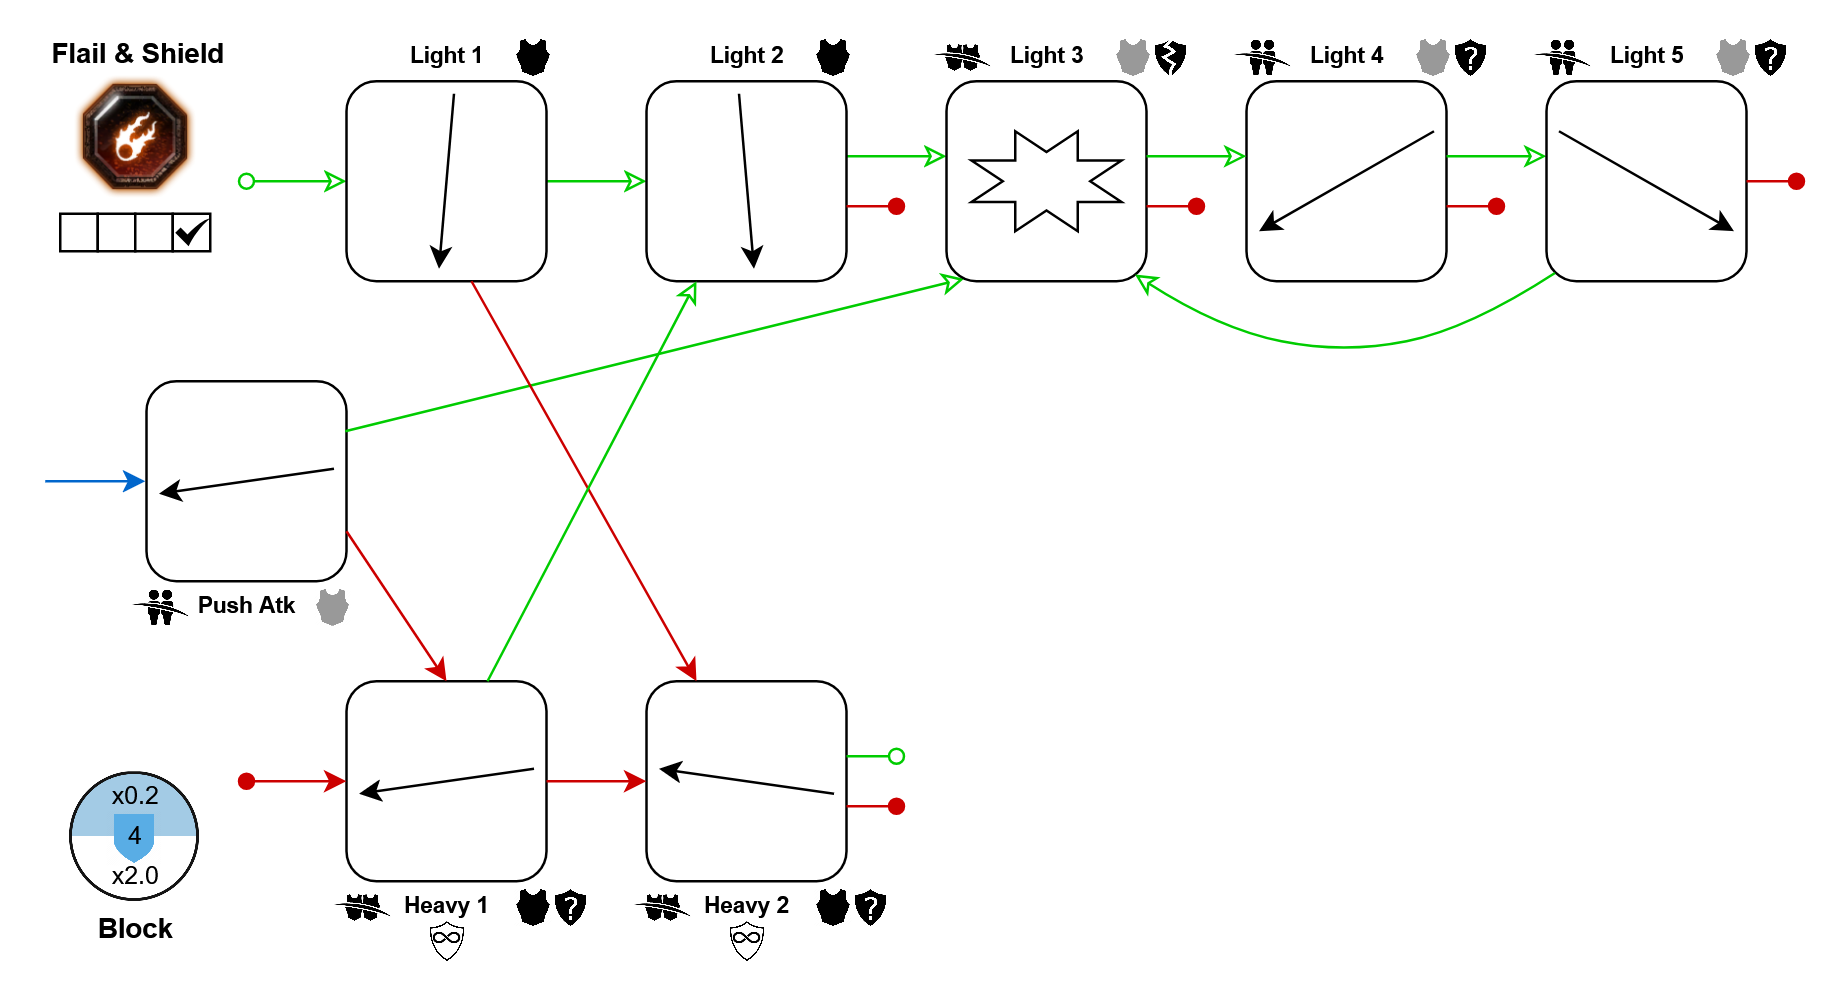
Like the standard Flail, you want to access the correct lights at the right times, which works differently because their order is swapped, with a new shield bash in the middle. And this weapon's heavy attacks do even more things at once, as they also block for you while charging, pay your bills, and prepare your favorite meal for when the mission is done.DLC: Warrior Priest of Sigmar Career
Reckoner Great Hammer
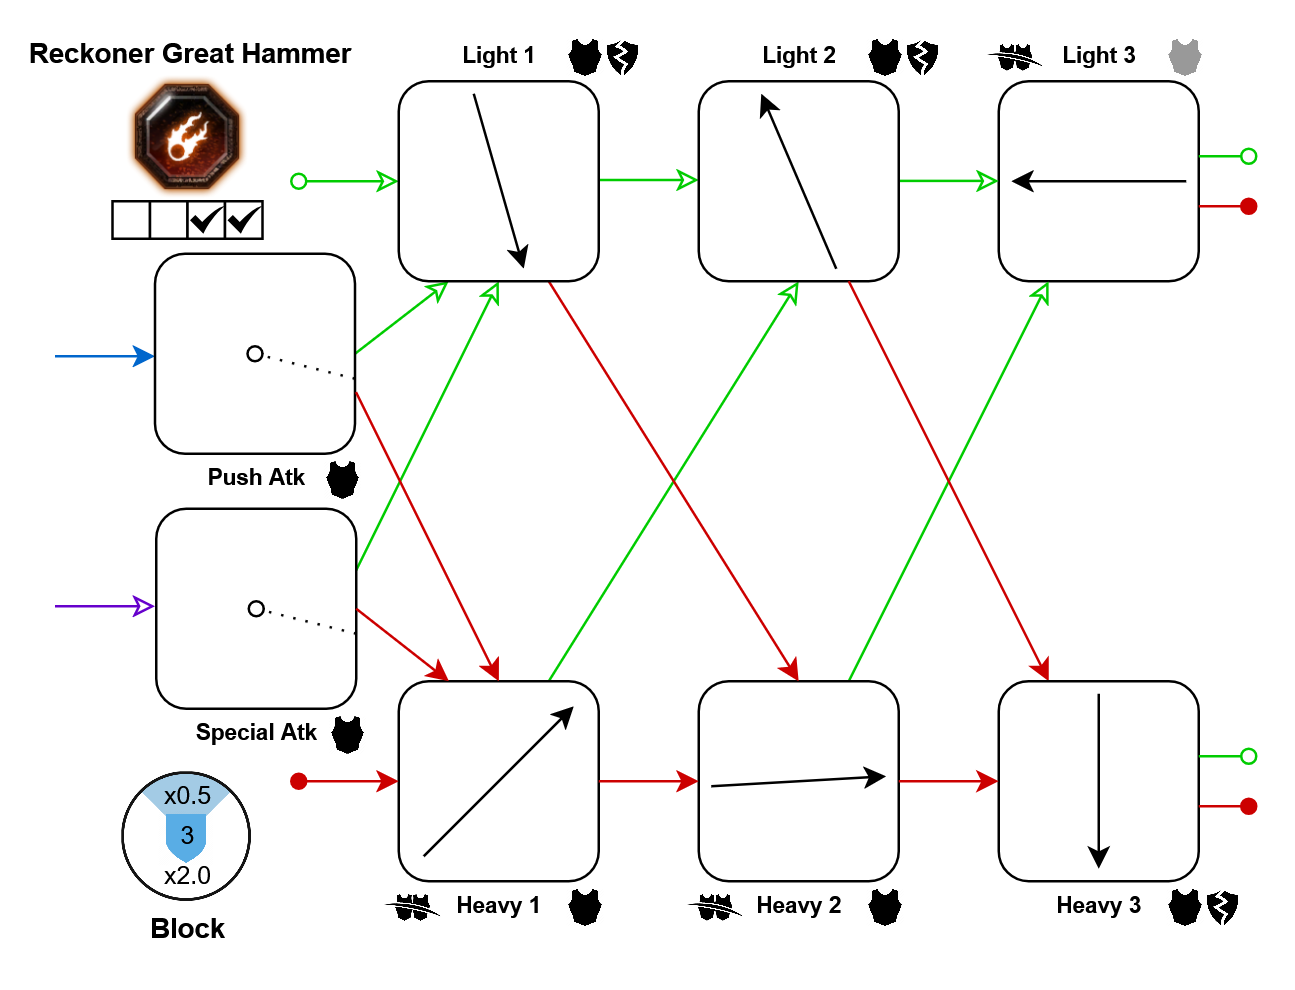
This hammer is able to bash everything around just as you'd expect, just be aware that unlike a standard Great Hammer, it mixes up the attack properties of lights and heavies on every third attack, which may take some effort getting used to. But the weapon rewards your efforts with increased damage on Heavy 1, and access to the bombastic Heavy 3, one of the heaviest hitters in the entire game. The push/special attack has decent speed but is otherwise underwhelming. It looks cool though, changing its animation based on your career!DLC: Warrior Priest of Sigmar Career
Bonus Crit:
Bonus Crit:
- Light 3: 10%
- Heavy 1: 10%
Paired Skull-Splitters
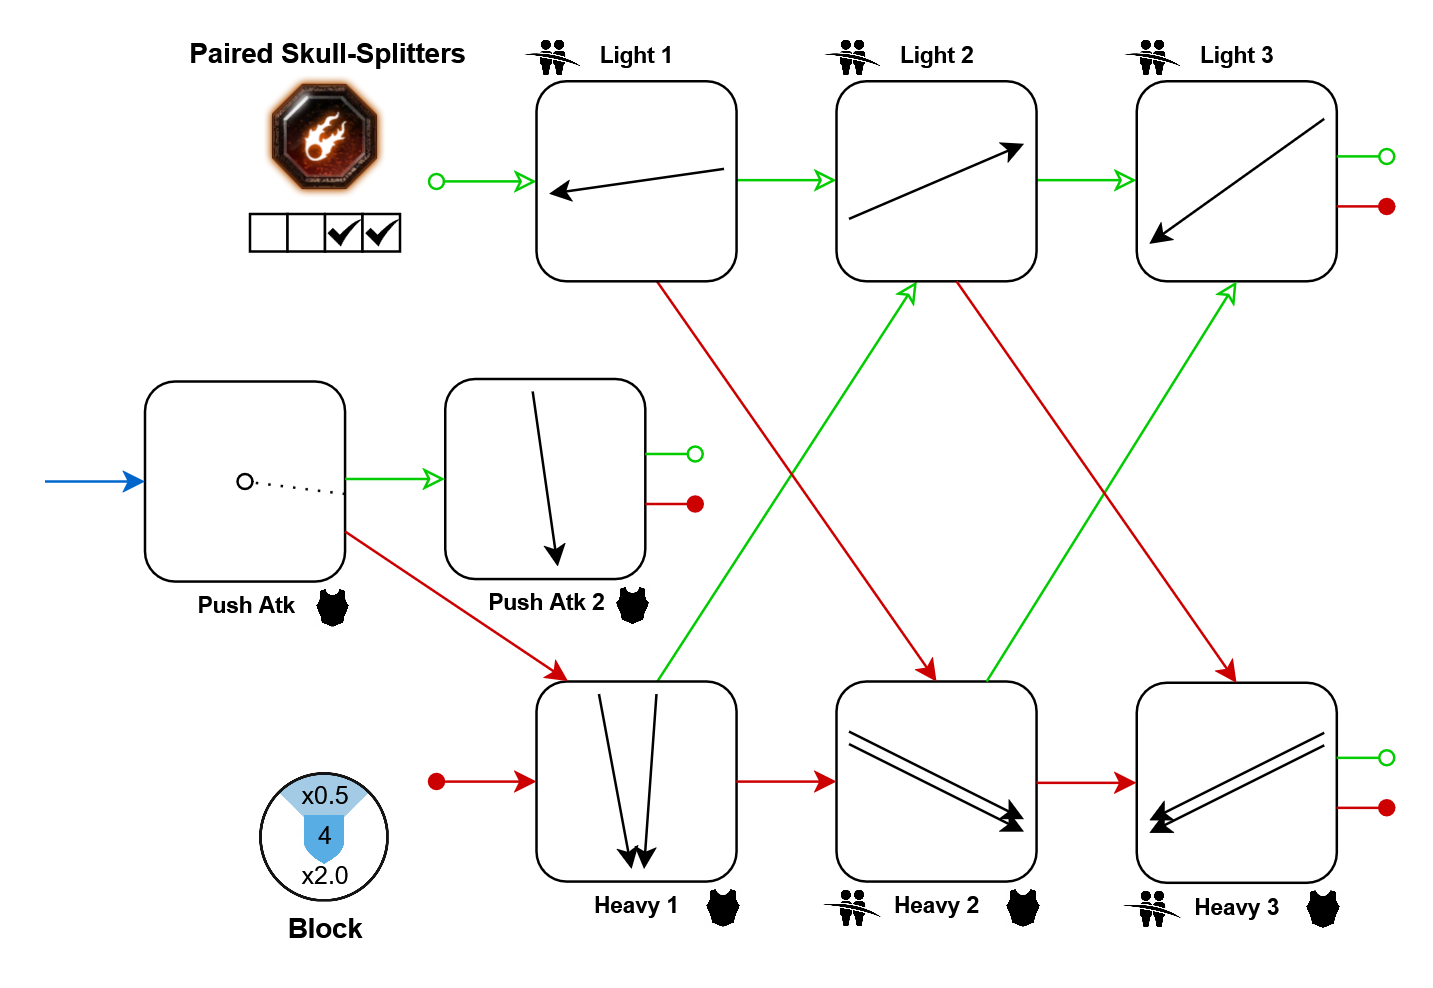
These hammers come with lots of stagger on your cleaving attacks and an extra stamina shield. Compared to the warrior priest's other options, their armor damage is a little bit lacking, so pick your other weapon accordingly.DLC: Warrior Priest of Sigmar Career
Movement tech: In further resources
Same as: Bardin's Dual Hammers
Movement tech: In further resources
Same as: Bardin's Dual Hammers
Skull-Splitter & Blessed Tome
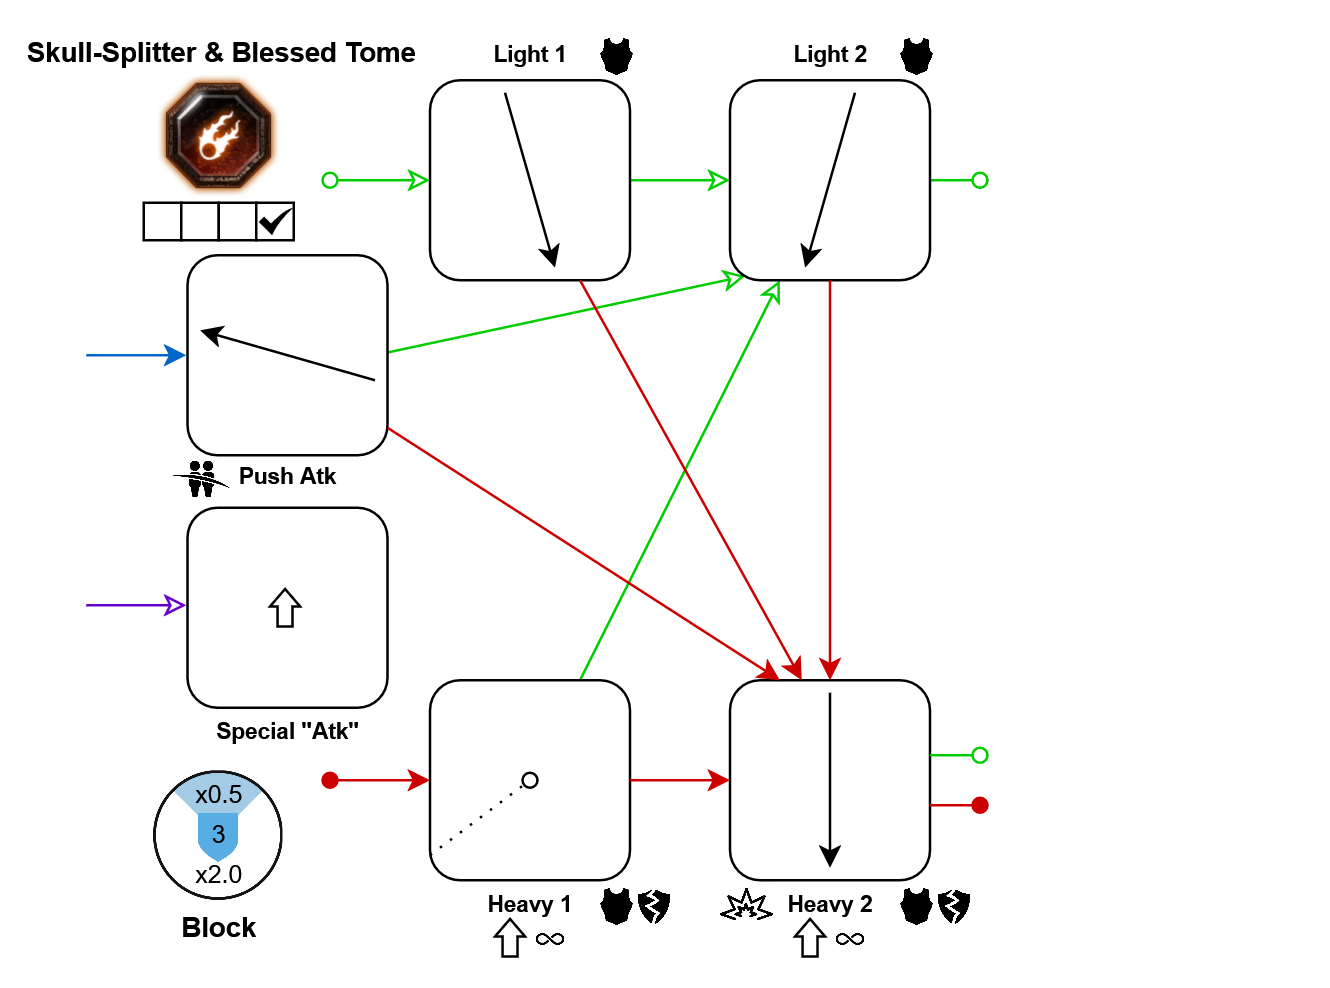
Even though this weapon may look like a hammer, it has the exact same single-target attacks that you know from the Axe, except for its push attack which cleaves like a hammer. And then there's the book, which can be charged up by holding a heavy attack or weapon special. This charge can either be stored for later, or used up by releasing a heavy attack for increased effects: Heavy 1 gains a forward dash and a little bit of damage, while Heavy 2 gains a large explosion around the attacked enemy, dealing damage to and staggering all nearby enemies, based on their distance from the explosion.DLC: Warrior Priest of Sigmar Career
Bonus Crit:
Bonus Crit:
- Lights: 10%
Skull-Splitter & Shield
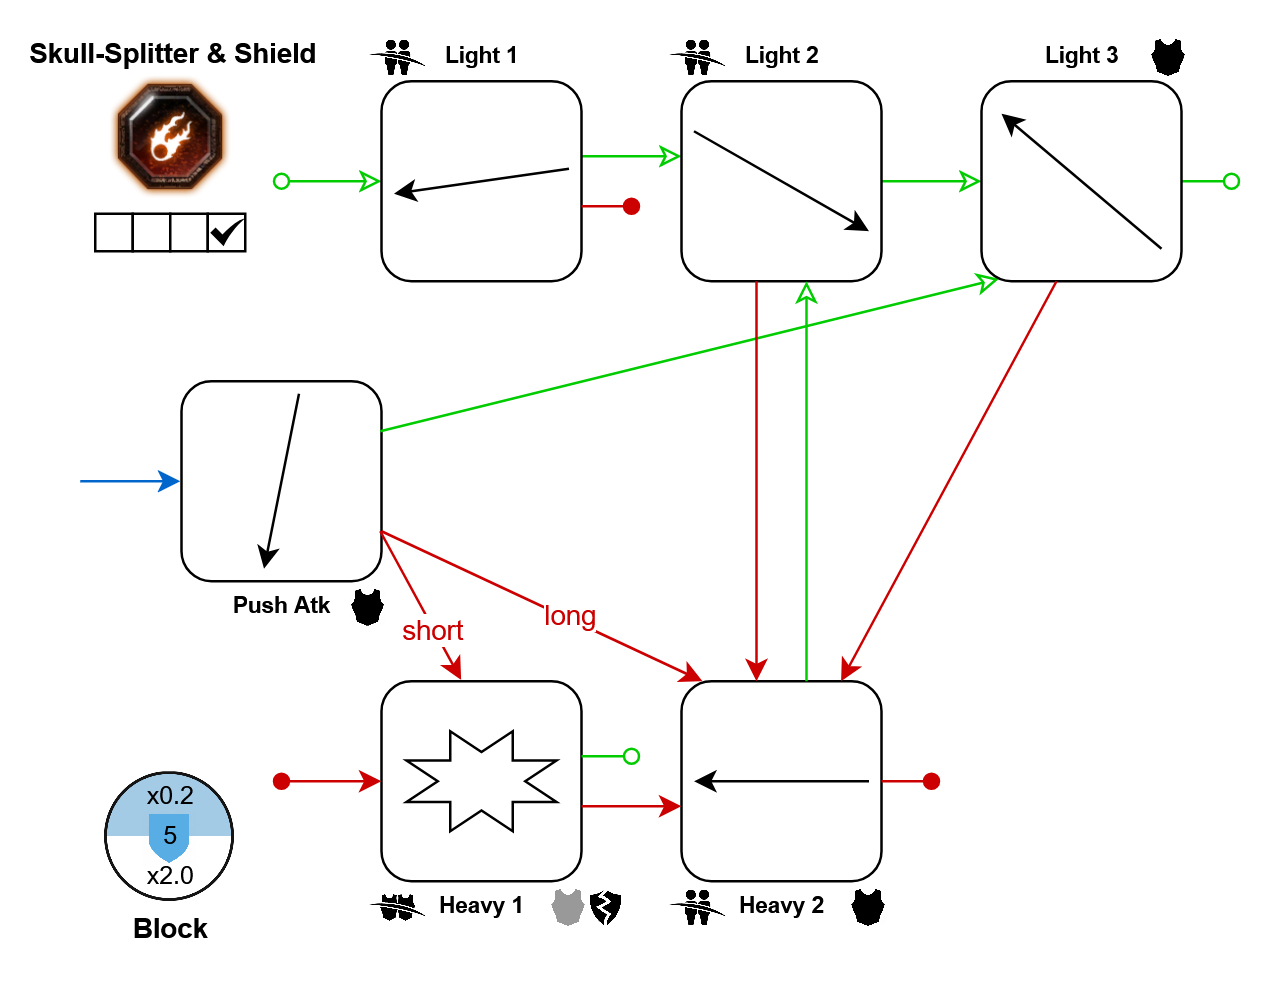
A shield weapon whose first lights can stagger groups well, but whose armor damage is mostly hidden behind the push attack. The push attack also has the unique mechanic of letting you choose which heavy attack to follow up with, by varying how long you hold it.DLC: Warrior Priest of Sigmar Career
Bonus Crit:
Bonus Crit:
- Light 3: 10%
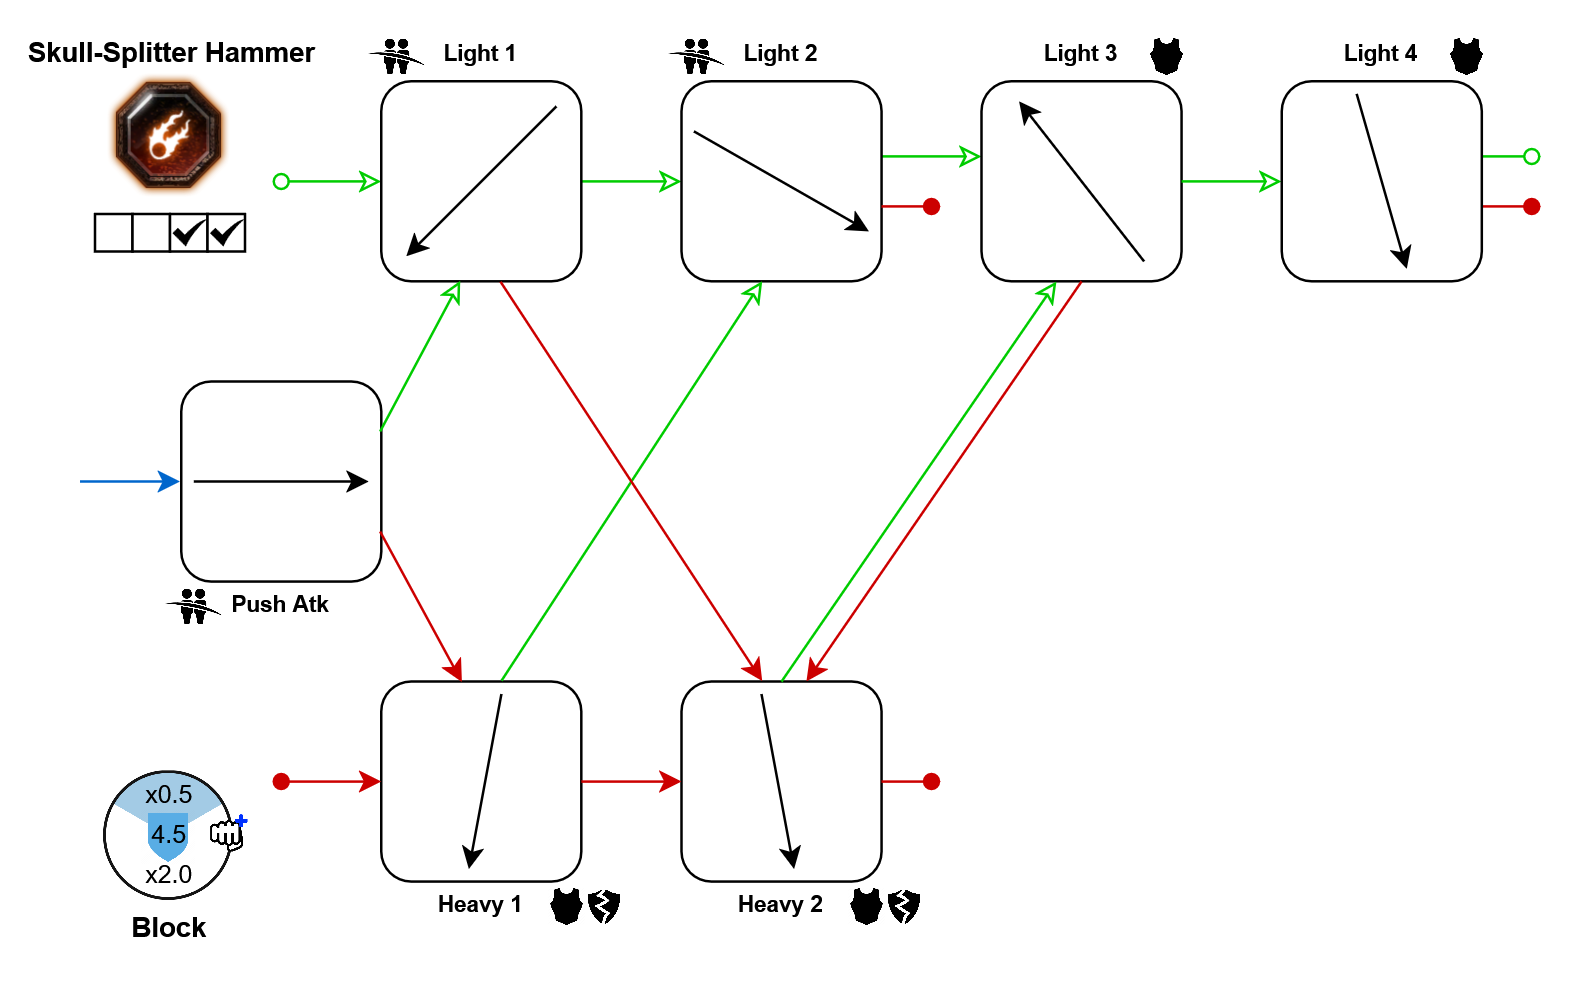
Skull-Splitter Hammer
An all-round weapon with improved blocking and cheap pushing, which can also be useful for starting your cleave combos with push attacks. Its heavy attacks deal as much damage as the Axe's.DLC: Warrior Priest of Sigmar Career
Bonus Crit:
Bonus Crit:
- Light 3: 10%
Sienna Fuegonasus
Sword
A defensive-oriented weapon, given its mobility, extra stamina, cheap pushes, and good cleaving attacks. Killing armored units could take a while though, so put Light 3's good headshot modifier to use.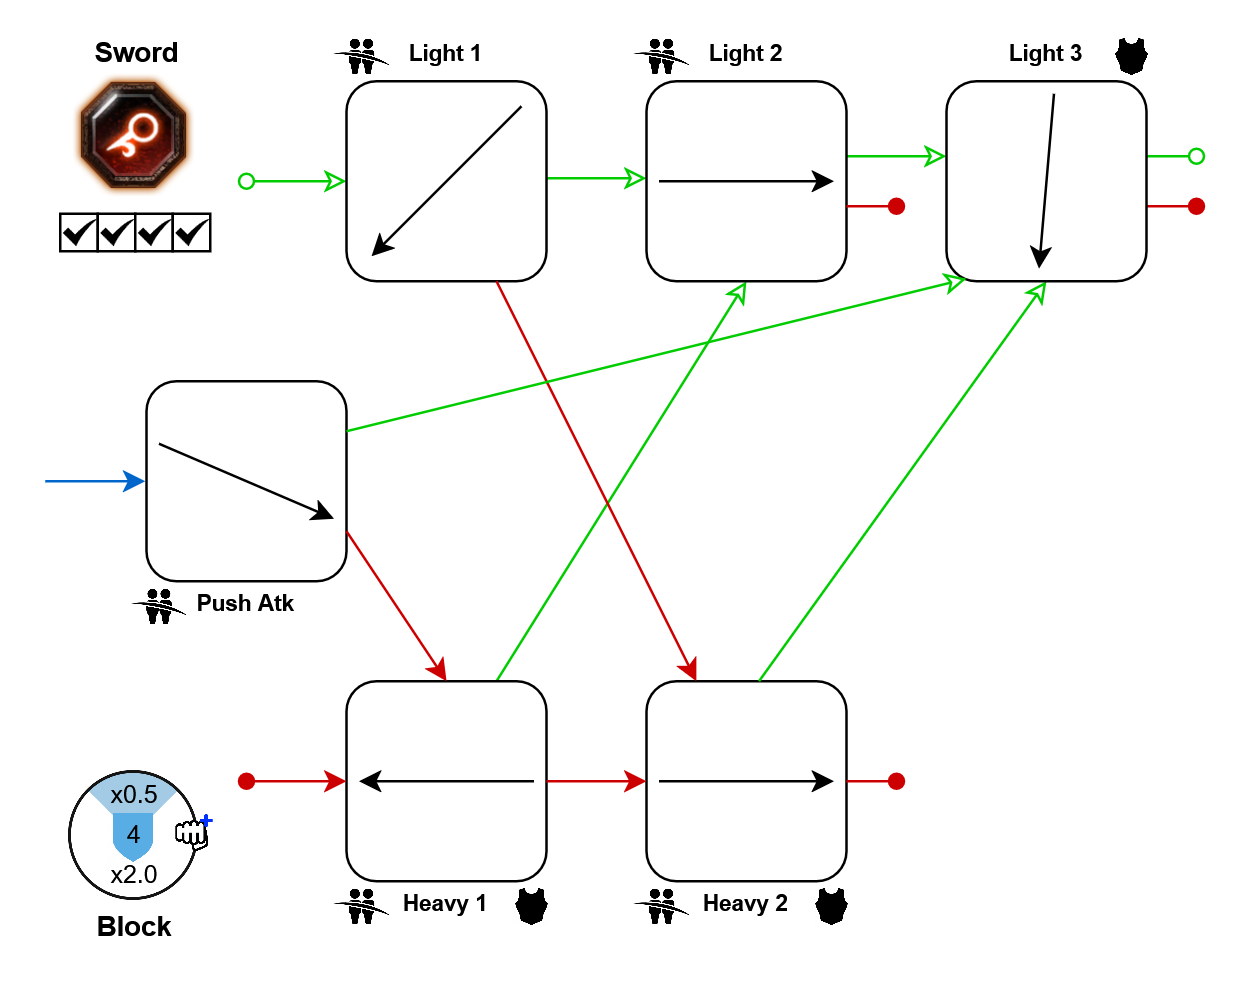
Movement tech: In further resources
Same as: Kruber's Sword
Same as: Kruber's Sword
Mace
A heavy-hitting weapon whose lights and heavies both start with single-target attacks, and then go into cleaving ones. So to quickly take down armored targets, get used to constantly block-cancelling your combos. Against groups, you can spam push attacks and lights, which has good attack speed but costs stamina. Looping heavy attacks is much slower, but they also deal far more damage into groups. The burns from Heavy 2 and 3 cannot be stacked.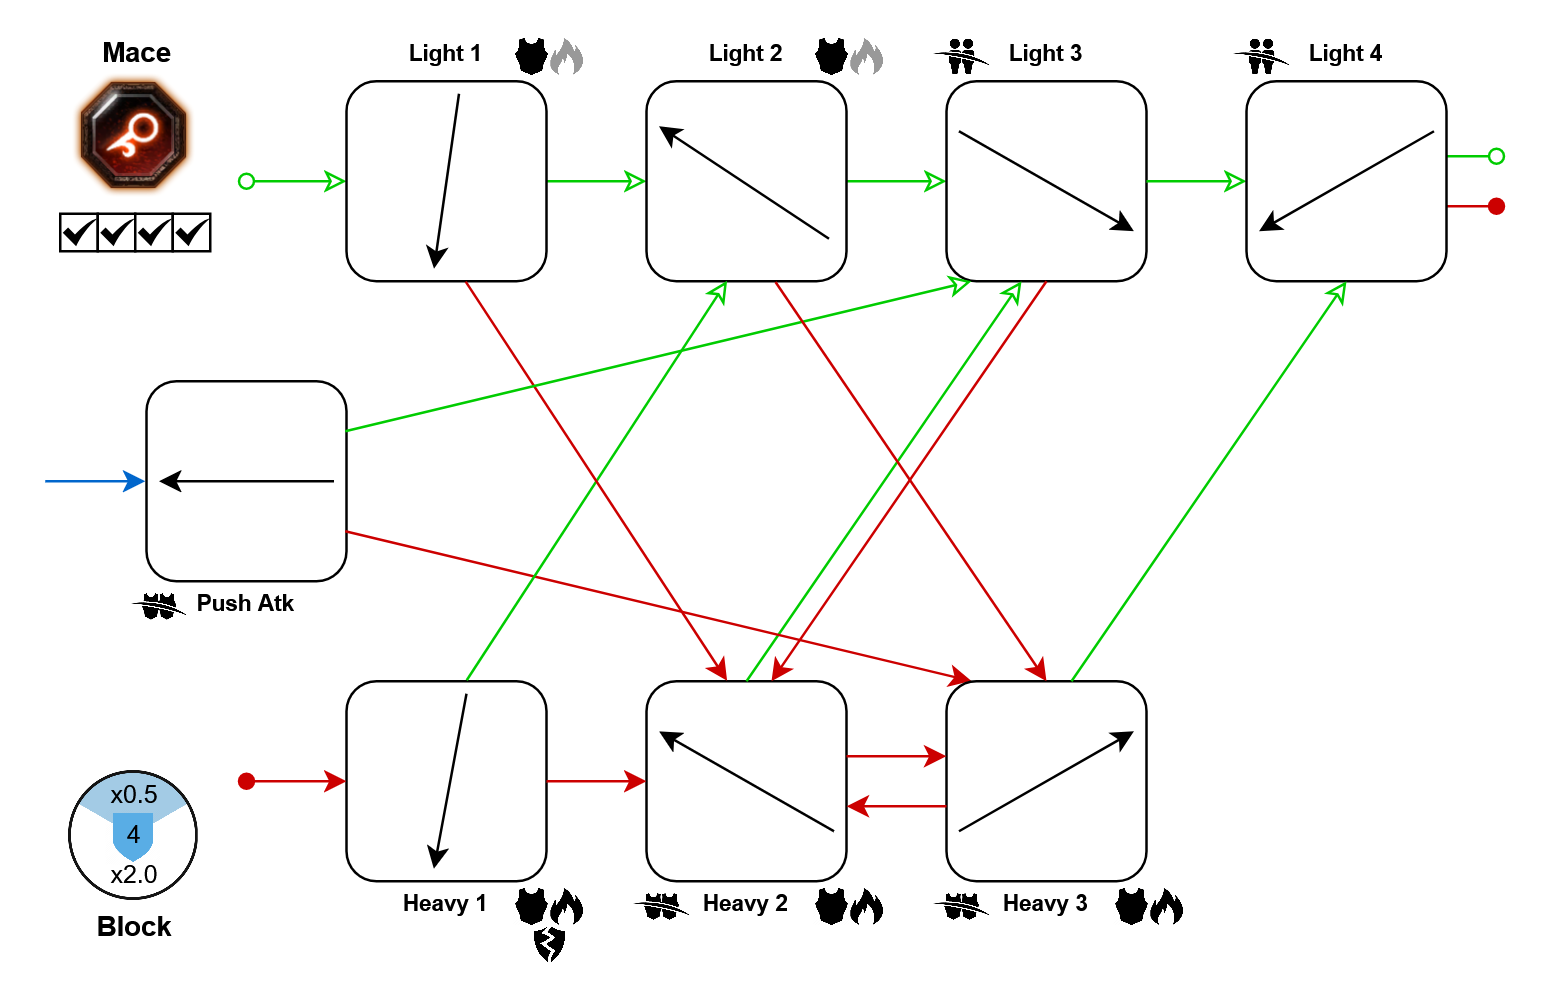
Fire Sword
A weapon defined by a single one of its attacks: Heavy 1, which actually works exactly like a shield bash, having infinite cleave, and being unable to headshot. It also applies a strong burn to all affected enemies and strongly staggers them, creating lots of space for you and your allies. You can repeatedly cast Heavy 1 by block-cancelling, or alternatively loop it with Heavy 2 or Light 1.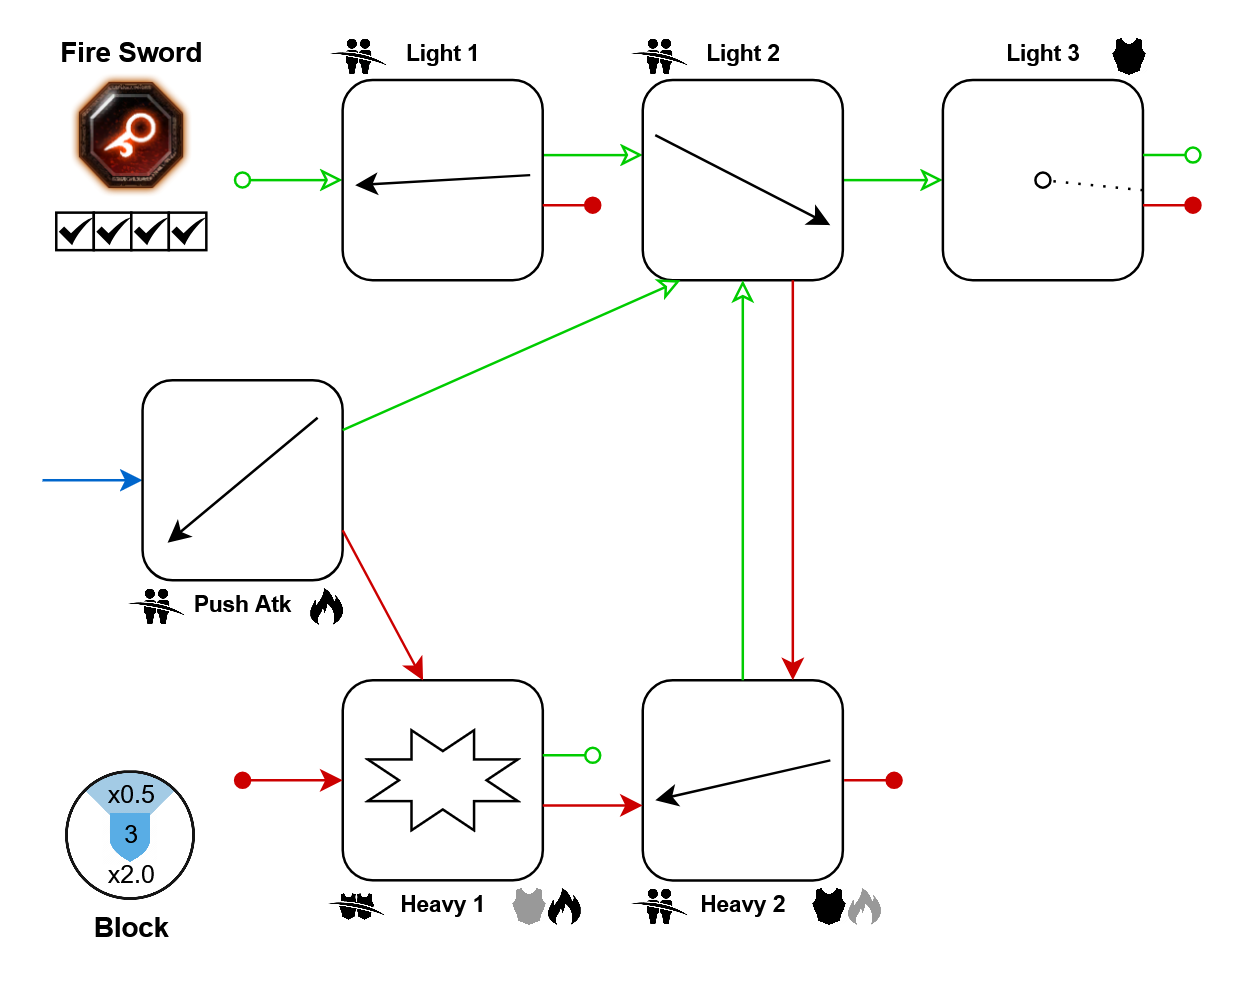
Dagger
The Dagger's Heavy 1 is a shield bash like the Fire Sword's, also having infinite cleave and applying a stagger and a burn. The burn is much weaker though, since it only affects enemies in the center, and only the first enemy will take more than 1 burn tick. The dagger's light attacks are much more spammable than the Fire Sword's, attacking faster and cleaving well. Just keep in mind that this weapon's only real way of dealing armor damage is Heavy 2, which is sadly only accessible after Heavy 1. The Dagger can also push with reduced costs, but has a reduced effective block angle in return.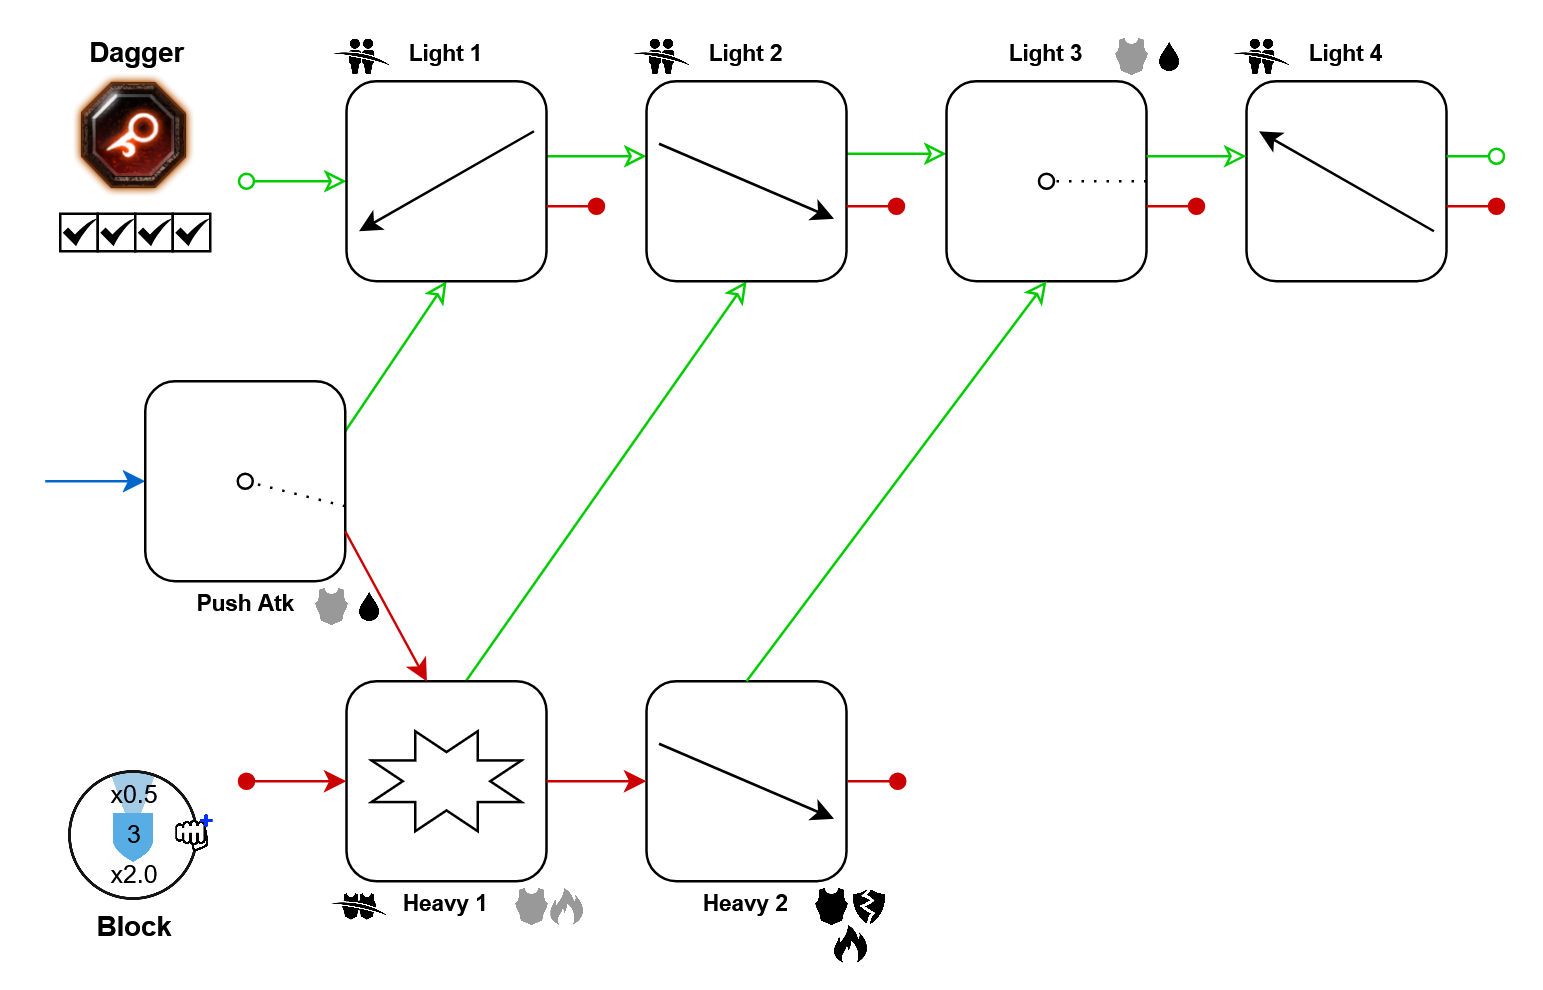
Bonus Crit:
- Light 4: 10%
Crowbill
The Crowbill is sienna's closest equivalent to an axe: Mostly single-target focused, and with decent dodges and attack speed. Heavies 1 and 2 have some cleave, while Heavy 3 doesn't but deals more damage, especially on headshot. This weapon is a popular choice for those who crave temporary health from killing blows, with the Execute talent at level 5.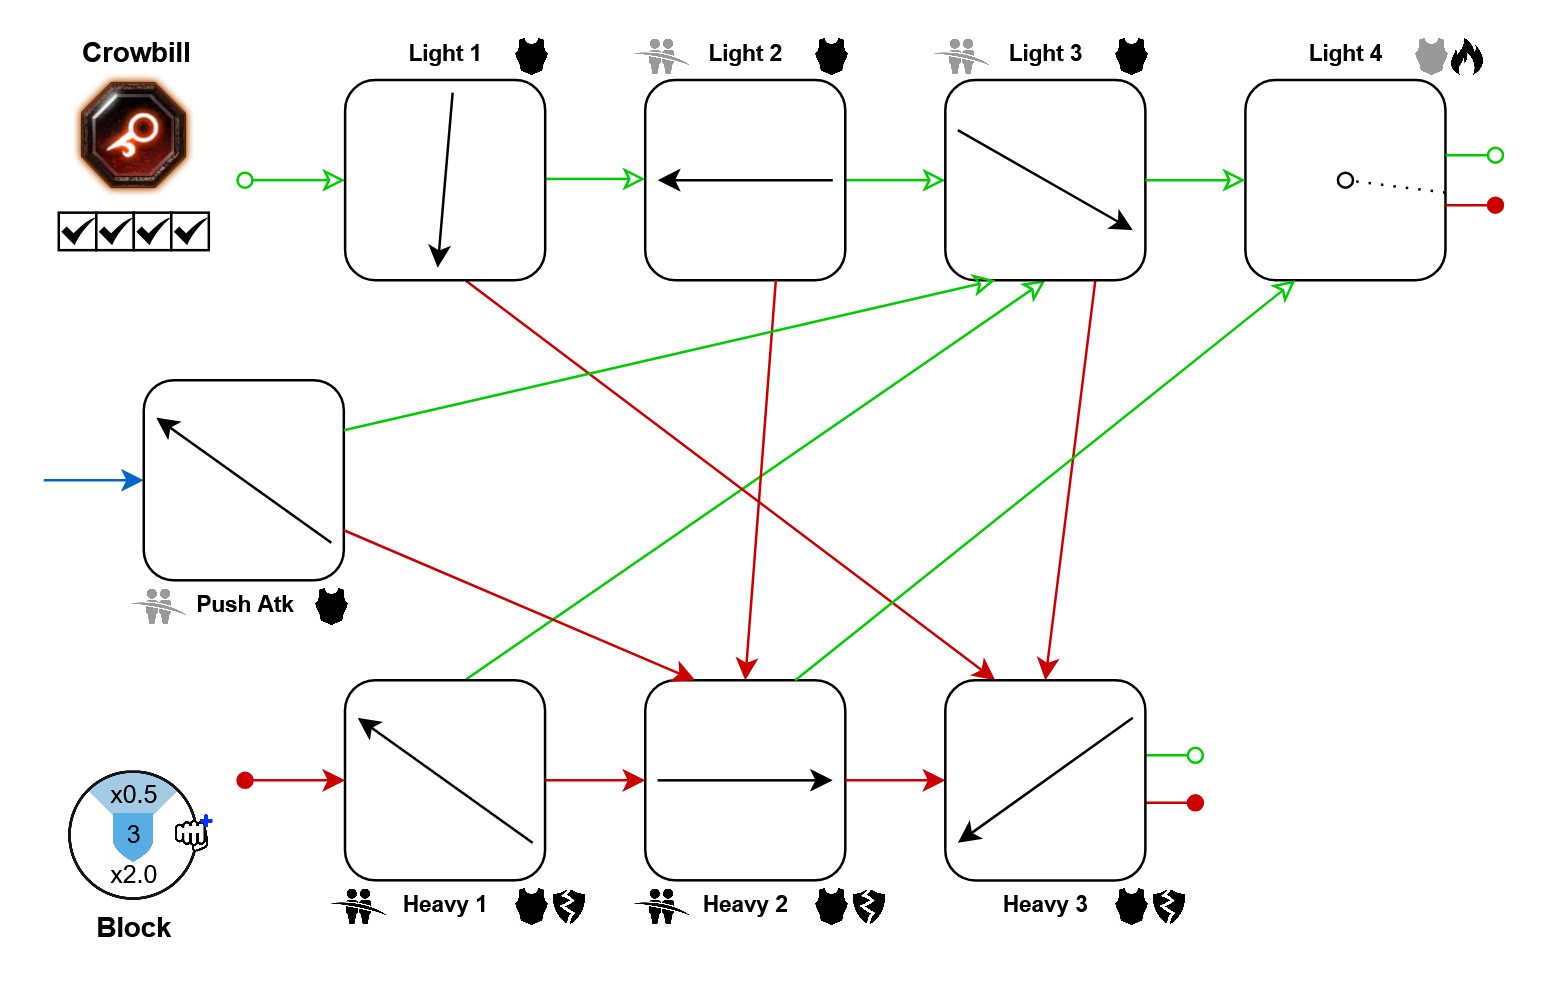
DLC: Back to Ubersreik
Flaming Flail
This one's attack properties vary wildly, so getting the most out of it requires some practice. The explosion caused by Heavy 1 deals little damage and does not apply the burn, but its area stagger can be quite helpful. Keep in mind that the explosion does not count for generating temporary health with level 5 talents, though. The primary target hit by Heavy 1 is staggered especially strongly: It can even affect chaos warriors. 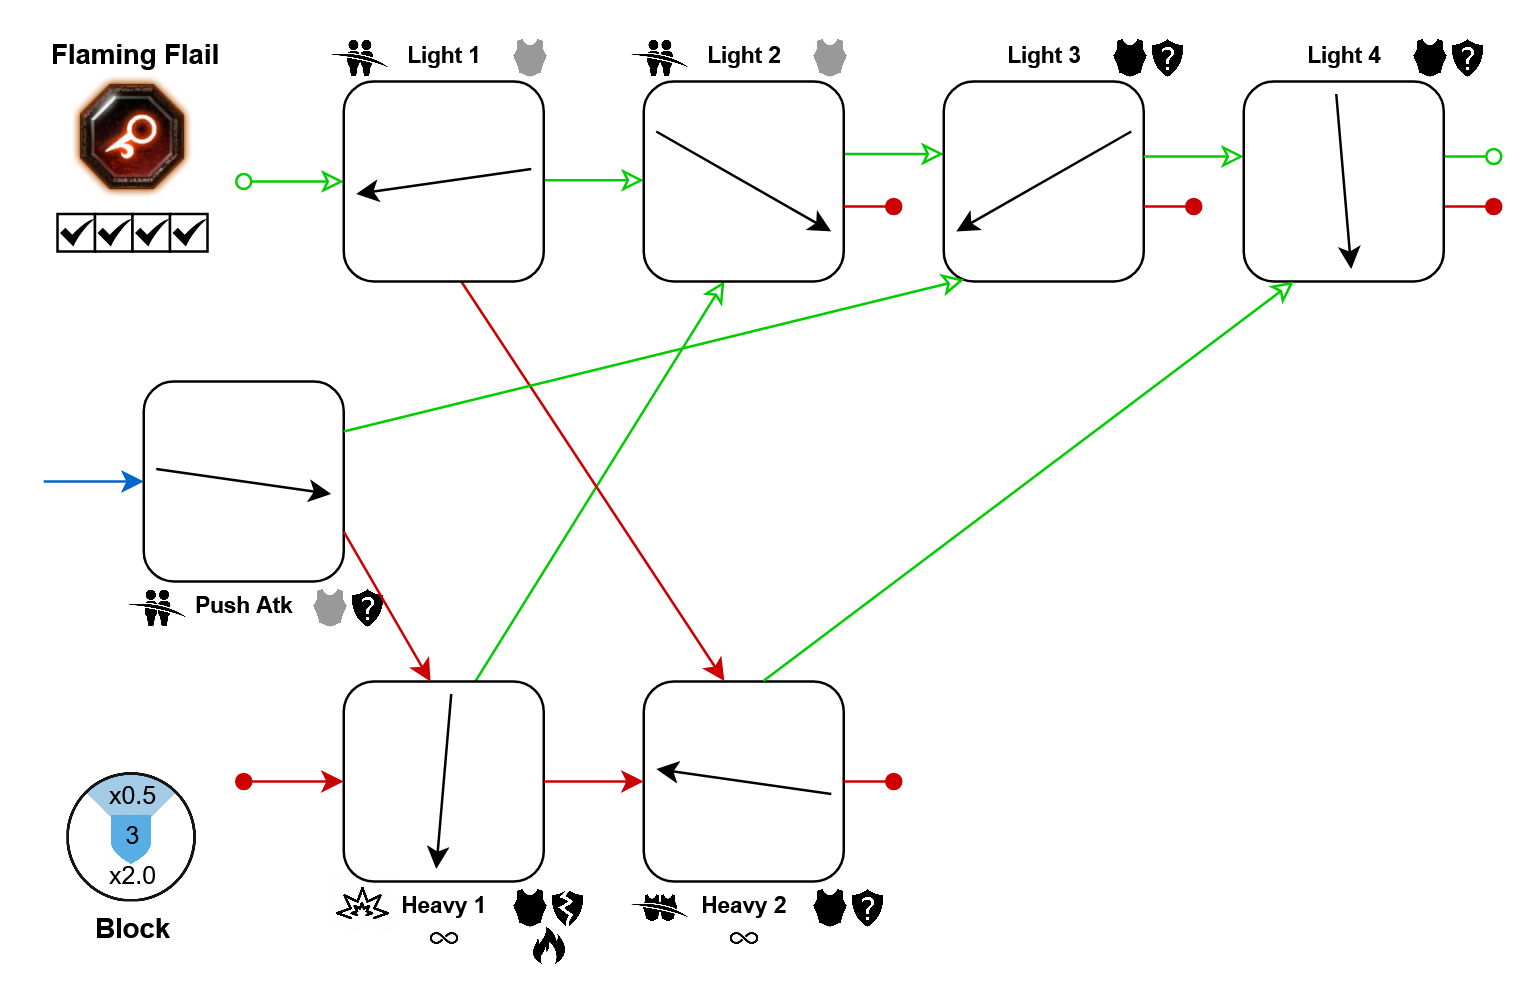
DLC: Winds of Magic
Ensorcelled Reaper
This flexible weapon comes with lots of cleave, and a special staggering attack. This special hits all enemies in front of you, barely dealing damage but applying a (non-stacking!) burn and even staggering armored units and berserkers. This can give you a lot of safety, and gains you temporary health from level 5 talents. But since it takes a long time to come out and can not be cancelled into block once begun, you do take a risk. Light 2 has an odd trajectory for a cleaving move, but its quick speed and burn make it worthwhile. Heavy 3 may have less cleave than 1 and 2, but makes up for that with almost doubled armor damage.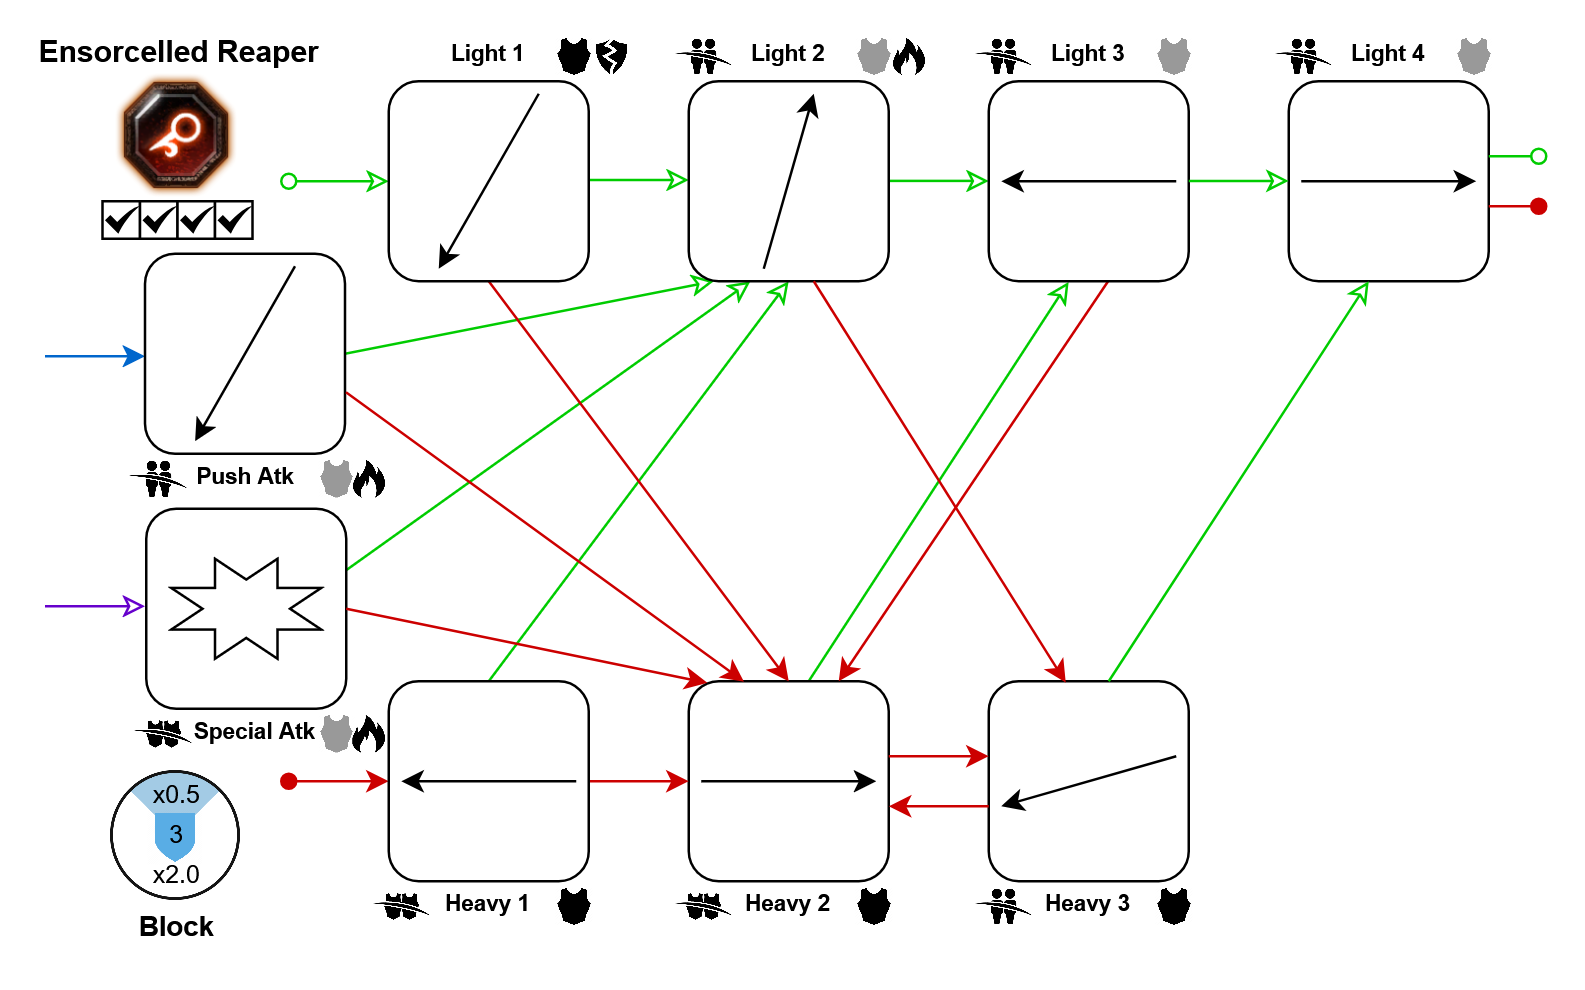
DLC: Necromancer Career
Bonus Crit:
Bonus Crit:
- Light 2: 5%
Further Resources
This is a random dump of other guides and stuff on melee weapon mechanics that I found useful, and you might as well:
To do more detailed testing, you don't want to rely on dummies, as they sometimes don't behave like real enemies. For this, you will need to hop on the modded realm (no worries, your progress is constantly copied from official to modded, so no need to spend time unlocking anything over there). Use the Creature Spawner mod to spawn mobs in the Keep and test anything. To see exactly how much damage and stagger you're doing, Test Assistant helps.
If you would like to see recommended melee weapon combos for different purposes, check out Optimal Melee Weapon Combo by Royale w/ Cheese.
As your movement speed is constantly modified while attacking, some weapons have attack loops that can be used to run faster. Novality's A Comprehensive Spreadsheet about Movement Tech lists a lot of these combos, and tests their movement speed depending on your attack speed.
Note: I've indicated movement tech being available for any weapon that can reach 10% bonus movement speed with base attack speed, according to this resource.
And there's A List of Everything You Wish Fatshark Told You by OrangeChris, which covers a lot of advanced stuff, not limited to weapon mechanics.
Mods
On the official realm, you can use the Armory mod to see exact weapon statistics for every attack. To interpret what this information means in practice, also install the Bestiary.To do more detailed testing, you don't want to rely on dummies, as they sometimes don't behave like real enemies. For this, you will need to hop on the modded realm (no worries, your progress is constantly copied from official to modded, so no need to spend time unlocking anything over there). Use the Creature Spawner mod to spawn mobs in the Keep and test anything. To see exactly how much damage and stagger you're doing, Test Assistant helps.
Guides
To learn headshotting with different types of attacks, How To Headshot by j_sat on YouTube contains useful tips.If you would like to see recommended melee weapon combos for different purposes, check out Optimal Melee Weapon Combo by Royale w/ Cheese.
As your movement speed is constantly modified while attacking, some weapons have attack loops that can be used to run faster. Novality's A Comprehensive Spreadsheet about Movement Tech lists a lot of these combos, and tests their movement speed depending on your attack speed.
Note: I've indicated movement tech being available for any weapon that can reach 10% bonus movement speed with base attack speed, according to this resource.
And there's A List of Everything You Wish Fatshark Told You by OrangeChris, which covers a lot of advanced stuff, not limited to weapon mechanics.
Wanna create cheat sheets like these?
You can use draw.io like me - To get you started, I have provided explanations and source material in this Google Drive[drive.google.com].
Versions, TODOs, Feedback
04/01/23: initial version
Feedback is wanted! My currently planned changes are listed below - if you'd like any other info included or want to suggest changes to the cheat sheet designs, go ahead.You may also find errors, or maybe you've played a weapon more than me and disagree with my info text for it. Right now, I'm open to hearing all complaints.
If the weapons change, or we get new ones, I'll update/add them the next time I actively play vermintide, so it might take a while. Developing the cheat sheet design and building them for all weapons has happened whenever I was bored in the keep, so it took 3 years lol
later fixes:
- uploaded Briar Javelin- fixed Sienna's "shield bashes"
- added the Halberd's special Push Atk > Light Atk pathing
- added the Bretonnian SnS special Push > Light 3 pathing
28/01/23: updated all cheat sheets to version 1.1
- added checkboxes for career availability- use differing arrowheads for tapped/held inputs, to improve colorblind readability
- added whitespace to all small diagrams to prevent steam's misplaced display box
28/12/23: updated guide with the Necromancer career and Ensorcelled Reaper weapon
12/07/25: updated all cheat sheets to version 1.2
- indicate shield-shattering attacks- update reduced push costs for many weapons
- update to current elven axe moveset
- fix class availability for kerillian's spear and shield
- update description texts for some weapons
08/02/26: various small improvements
- add a small intro section about inputs- skull-splitter & tome: add the missing infinity symbol to heavy attacks
- fix info about bleeds (they usually don't stack)
29/05/26: update to new game version
- integrate many weapon changes from the Weapon balance update 6.11.005/06/26: change layout
- added info boxes to list bonus info that many weapons have, e.g. DLC / movetech- fixed block cost modifiers of torch and rapier
TODOs
- include mobility info on cheat sheet (dodging, plus maybe movement tech)
More Warhammer: Vermintide 2 guides
- 【Updated to Patch 6.10】【All Careers】Legend Builds Collection★ 5 (2.6k)99k views7.6k ♥87 minUpdated Mar 10
- 【Updated to Patch 6.10】【Cataclysm Builds】Kruber all careers★ 5 (1.8k)60k views5.7k ♥33 minUpdated Mar 10
- 【Updated to Patch 6.11】Optimal Melee Weapon Combo★ 5 (1.9k)58k views5.2k ♥26 minUpdated Jun 11
- 【Updated to Patch 6.10】【Cataclysm Builds】Saltzpyre all careers★ 5 (1.7k)57k views5.6k ♥36 minUpdated Mar 10
- 【Updated to Patch 6.10】【Cataclysm Builds】Bardin all careers★ 5 (1.8k)57k views5.6k ♥33 minUpdated May 12
- 【Updated to Patch 6.10】【Cataclysm Builds】Sienna all careers★ 5 (1.7k)57k views5.4k ♥37 minUpdated Mar 10



This guide was created by its original author on the Steam Community. Are you the author and want it removed? Request removal.