Overview
An attempt to create a thorough mapping guide with lots of screenshots and videos, for people who are new to the mapping scene and wanna get started with creating their own maps.
—–Basics—–
Selecting a song
So, you’ve probably stumbled across the Editor by accident but felt a bit lost, since there’s no real guidance, and the choices are all yours. I’ve been there before after hearing a song I really enjoyed and wanted to map, so I hope I can provide something to start with and give back to the community that way.
Let’s get going with our first map!
You’ll need a mp3 of the song you’d like to map. For starters, I’d recommend choosing a song with a beat that’s easy to follow, without too many gimmicks, BPM changes, or too high BPM. I’ll use USAO – Try Again as an example for this guide, it was the first song I’ve ever mapped over on osu!.
Drag your mp3 into Quaver while you’re in song selection. This automatically creates a new empty map for you. Fill in the metadata with everything about the song:
– If there are non-romanized characters, use the English translation instead
– Tags should contain the song’s genre, as well as anything that helps other players find your map
– A source might also be something like another video game or anime/TV show
– Difficulty names can either be standardized (Beginner, Easy, Normal, Hard, Insane, Expert) or related to the song, but they should still show a clear progression in that case
Turn off BPM affects SV, and as it turns out 4 Key mapping is already complicated enough, so let’s stick to that for now 😛
Timing
Timing is a vital step towards creating a good map. Everyone who has played a mistimed map before knows how frustrating it can be to deal with.
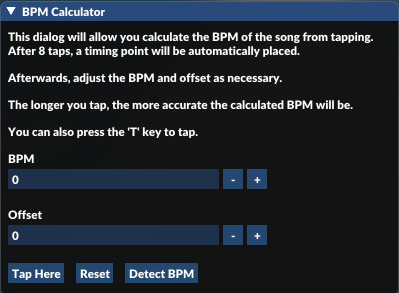
After you’ve hit ‘Sure’ on the metadata, you’ll see this small timing window:
If someone already mapped the song you’ve chosen, feel free to copy their timing after confirming it yourself. Don’t feel ashamed if you do so, it’s common throughout the community and I really don’t think anyone would be mad about that.
If not, here’s my method of timing – make sure to reduce playback speed to 25-50% while doing this to make it as accurate as possible:
BPM
Find a spot in your song where the beat is easy to hear, and let it play from there. Now tap ‘T’ to the rhythm for a bit, then round the result up/down to the nearest number ending on 5 or 0. Usually songs use BPMs that can be divided by 5 – but not always!
To check if your BPM is correct, skip to somewhere near the end of the song. If the BPM feels wrong there, try to adjust your BPM again until it’s consistent throughout the song (most likely it can’t be divided by 5 in that case).
The ‘detect BPM’ option works well in my experience – though I haven’t tried it on very many songs – but it tends to place the main metronome beat on a beat that isn’t the main one in the song. This can be fixed by offset.
Offset
This is measured in milliseconds and moves the point from which the map starts – which should always be the first beat. A positive number is later, a negative number is earlier. What I do is start by setting it to 0. Now find a main beat in the song (if you’d count 1, 2, 3, 4 to the rhythm, that would be your 1) and pause when the editor line is directly on it. Let’s say I found it here:

Leave your current position where it is, and increase the offset now, until the editor line matches up with a ‘number’ (main beat) line like this:

You should be pretty close to correct timing now. Reduce your playback speed and listen carefully if the metronome and song beat are exactly at the same time – if not, make small adjustments at a time until it feels on point.
Some common patterns to use
So we’ve gone through all that trouble, now it’s time to actually begin mapping! But where do we start? Let’s go over different patterns you can use and their terminology.
Close the BPM window by unchecking Tools > BPM Calculator in the top options, and disable the metronome by unchecking Audio > Metronome > Enable.
For everyone who has played osu! before, the biggest difference we have in VSRGs is the ability to map multiple instruments/sounds at once, as we can press more than just one key at a time. Doing that is called layering – I’ll get more into it later on.
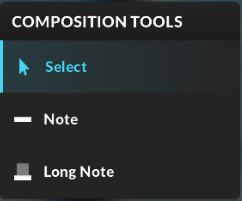
A single normal note is used for everything that doesn’t stand out too much. Fairly common in lower difficulties and during calm sections of a song, seeing single notes alone starts to get rare when things pick up. For heavier sounds, we can take advantage of using multiple normal notes (Chords), a good way to capture intensity that feels very natural to play.
Double (also Jump) – two notes in the same row
Triple (also Hand) – three notes in the same row
Quad – all four notes in the same row. Quads should be used wisely, best to avoid them if there isn’t clear justification
Long notes (also called LNs or Noodles) are commonly used to emphasize longer sounds, for example piano, guitar or vocals. Usually they are found in calmer sections – it’s hard to use them well in an intense section, if you’re also following drums on a 1/4 beat. Consistency is very important – it feels weird to only play half of the piano/guitar every time it comes up.
A common mistake newer mappers make is following vocals throughout the song – often it simply doesn’t play well. As a rule of thumb only map vocals if there isn’t anything more interesting to follow at the moment. Also make sure you get starting and ending point right when covering a sound with LNs.
There’s a variant that is way more dense and combines doubles and triples every 1/2 beat called jumpstream. Those are a lot harder to read and keep up with compared to normal streams at the same BPM.


I’ll get out of here while I still can, some people out there don’t appreciate noodle maps as much as I do D:
My personal comments, mapping mentality
In this section, I wanna share some of my personal mapping experience with you. Ultimately, I see mapping as an art not unlike other creative activities. If someone asked you and me to draw a picture of a mountain scenery, our results would be completely different, and that’s a good thing!
You’ll probably also see music in a different way than I do – so there’s no point in me saying do this exact thing, do that here. Make sure to try a lot of different stuff out and even if you don’t right now, I assure you you’ll feel proud of your maps some day.
Don’t aim too high on rating. As you grow more experienced at mapping, you can use hard patterns and know they aren’t off, but when starting out don’t go too high above what’s within your own ability to play.
Testplay your map. Many people do this too little, and it shows. If you aren’t able to hit a few notes, it doesn’t mean nobody can – but if you fail a whole section, it’s an indicator that there’s probably a more comfortable way to map the section.
Don’t copy-paste too much. Copypasting is good consistency-wise, but doesn’t make for very interesting beatmaps. Songs suited well for rhythm games offer many different themes you can map to – some other songs simply don’t go well in Quaver. Either they’re brutal to map well, or too repetitive.
Take it easy, don’t force yourself too much. While some people map quicker than others (I’m very much on the slow side), experienced players will notice rushed maps. Map only if you feel motivated to do so – don’t say “I’ll finish this today” to yourself when you don’t really feel like it.
Don’t be afraid to delete and redo a few seconds that didn’t work out. Sometimes the first idea that came to mind isn’t immediately the best one.
Don’t map continously at 100% playback speed. You will miss some important notes you wouldn’t have otherwise, and place some too early or too late. If there’s a lot going on at once, reduce playback speed to 25-50% to listen carefully. The only thing that bothers me is Quaver distorting/pitch-shifting audio on lower/higher speeds, osu! handles that a lot better imo 🙁
Don’t get too stuck up with one map/finishing a map. Sometimes you’ll lose interest in mapping a song or get frustrated because it didn’t turn out as you’ve hoped, it’s a normal thing for all mappers I know to happen. You’ll learn quicker if you move on to a new map instead of trying to fix/complete the old one.
Ask friends/other people for opinions on your map. Other people offer a fresh perspective and may see mistakes you’ve missed yourself – both is really valuable. Fellow mappers might be able to give you specific suggestions on what could be done in a different way.
Take a detailed look at other people’s maps you’ve enjoyed. You’ll certainly pick up a thing or two to implement in your own style.
Editor tips
– Right click on any note to delete it. Ctrl+C, Ctrl+V, and Ctrl+Z also work as you’d expect!
– Many songs don’t have every single sound snapped to a 1/4 beat. You don’t have to keep using a 1/6, 1/8 or 1/12 beat snap though, this option allows to change your snap to whatever you need right now (in the bottom right corner).

– This (located near the top) lets you zoom in and out of the playfield:

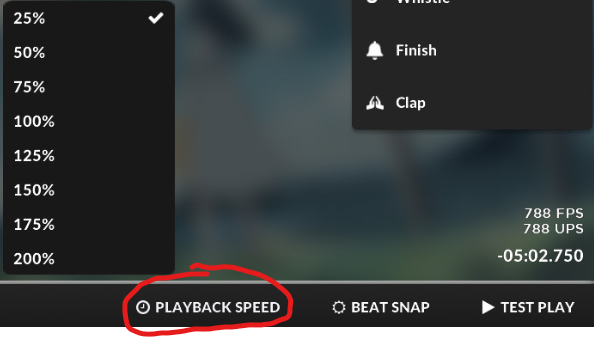
– This lets you testplay from the point you’re on right now. Right-click it to lower the speed if needed (in the bottom right corner).


– This lets you create, name, color, and switch on/off different layers. Really useful tool to keep track of everything – note how the synth sounds are faded out when not selected! (on the middle right side)


Mapping tips
The most important thing concerning any map is described in one word: Consistency. I could end this section right here, but let me explain a bit further 😛
First, identify the base rhythm of your song – it’s most likely going to be drums. Almost every single map out there respects this rhythm in some way by almost exclusively mapping to it on easier difficulties, or putting doubles and triples on the higher difficulties while many other sounds don’t get to have doubles/triples. Let’s listen to Try Again, just the first few seconds:
The song already starts with a loud, very noticeable beat. Notice the difference between the first and second drum sound though? The first one is called a kick, the second one a snare. Some mappers emphasize the difference by putting a double on kicks, and a triple on snares.
What you want to do is, once you’ve decided “okay, we want to double/triple the kicks/snares whenever possible”, stick to that decision – don’t give them just a single note at some point. Unless –
it’s an otherwise calm part, or intro/outro. That leads to the next point, song intensity, which maps should always follow.
Continue listening to Try Again until the song finishes. Try to pay close attention to all the different sounds, the song’s intensity in different parts, and how you could see yourself mapping those parts.
– Which parts sounded similar to each other?
These should also be mapped in a similar way.
– What’s the highest intensity parts?
These should provide the main source of difficulty in the map.
– What’s the most interesting thing that could be mapped in each part in addition to drums?
– Where is it feasible to map vocals, because there isn’t much else going on?
When mapping, I like to imagine myself as a young child who is always driven to the most exciting thing going on right now – that is what I try to focus on the most, unless it simply doesn’t play well that way.
Always think about why you map a section in this specific way you did. If someone asked you about it, you should be able to explain to them exactly what your thoughts were.
Mapping in practice – Try Again
(Quick note – this may come off as self-promotion, which isn’t my intention – I use two of my own maps for demonstration because I remember creating them well, and can explain my thoughts behind them in detail. If I used maps belonging to someone else, I could see most of their intentions, but I might interpret something wrong.)
Let’s look into how I mapped Try Again (which was the first song I’ve ever mapped!)
I’ll talk about the ideas I had for some sections, and several mistakes I unconciously made at the time. Here’s a video of my full map – if something goes by too fast, pause the video or set it to lower speed.
(I apologize for the stuttering, dunno how to prevent that :c)


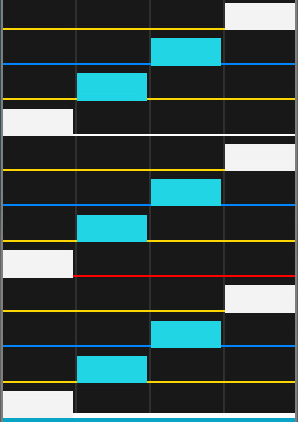
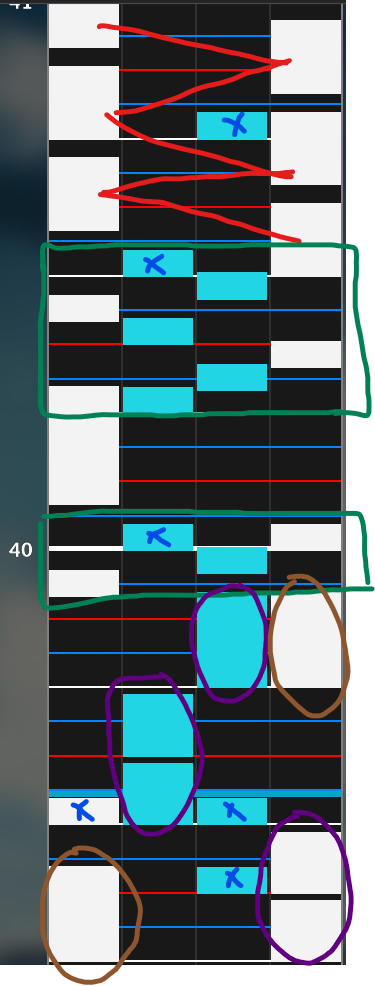
While I used a double for the kick, the snare isn’t doubled, which is unusual to do – arguably the snare is at least equally, if not more important than the kick. In hindsight I would’ve doubled both.


The notes I’ve numbered on column 3 form a 7-note long anchor, which you definitely want to avoid when mapping streams. It’s really straining to hit for the player and doesn’t add anything in particular to this map.
If this happens to you by accident, try moving a few notes around to break up the anchor, until there’s no more than 3 consecutive notes in a column. An easy fix could be moving the note marked with a 4 to column 4 instead.
I boxed in some more notes for another reason – these form a ‘backward hook’ kind of pattern where you go back to hitting a note again on one hand. It’s okay to use it sometimes in streams, but doesn’t feel as comfortable as other options, and can become really awkward to hit when used repeatedly – unfortunately that’s what I did xd

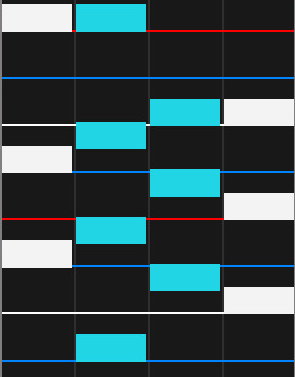
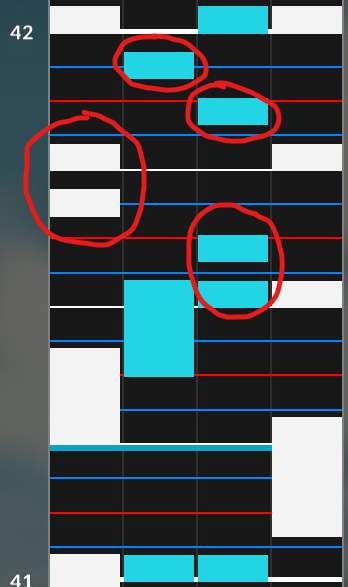
1:50 – One final thing to point out – I really recommend lowering the speed to spot my mistake here.
So I wanted to map these small bursts with doubles, but that’s not correct according to the rhythm presented by the song – because they’re snapped to 1/8, not 1/4!
What I should’ve done here is integrate some 1/8 stair patterns into the stream, but in a way that’s fairly easy to play – otherwise it becomes too messy. This is the kind of snapping mistake that may quickly happen when you don’t pay close attention, or map at 100% playback speed for too long.
There’s more mistakes to spot in my map, as well as several repeats of the same ones I’ve presented here – if you want to, watch the rest of the video and try finding some by yourself!
Mapping in practice – So Damn Tough
We’ve skipped ahead about 18 months in time, through me growing as a mapper, doing some modding on osu!, submitting my first mapset to a contest (results aren’t out yet, I’ll let you know :P), to my latest map which isn’t finished yet – it’s So Damn Tough by Crazy Astronaut. A very energetic, 7-minute long song that plays around with many different sounds and 1/6 rhythms.
https://www.youtube.com/watch?v=A2Hn591oHmM
The reason I wanted to show you this is to encourage you to keep on mapping – the difference in quality between this and Try Again should be quite noticeable – and how many different patterns plus attention to detail can be combined together to tackle a complex song.
Let’s jump straight into it:


First of all, an important thing to note about the entire section is that it uses 1/6 snaps until it finishes at about 0:58.
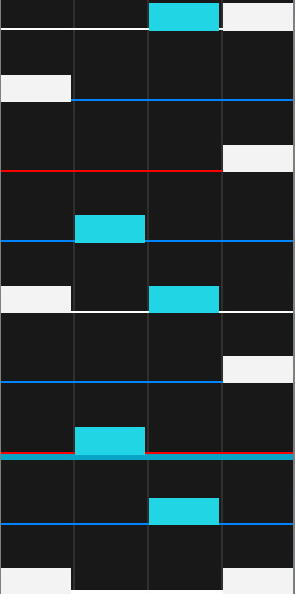
The violet LNs are for the loud, repeating synth sounds dominant throughout the section. A valid question would be why I didn’t put them all into a single column, I mentioned earlier that it’s good practice for similar repeating sounds – due to playability purposes. Having 2 notes in the same column at a time still keeps the idea present, while not being harsh on the player.
The brown LNs capture another set of short synth sounds, they are not as loud, and can be heard on every second violet LN occurence.
The green bursts mark the transitions between synth sounds that can’t really be defined as a single held sound, so just putting another LN down would feel off. Putting half as many notes (every 1/3) for the bursts wouldn’t match the pace of the song very well.
The blue normal notes are added to continue emphasizing the drums. On some lines where a drum sound appears there’s already 2 keys being pressed so I didn’t need to add more notes, but other lines were missing some.
The red LNs are the last set of synth sounds – these ones alternate in pitch, so I threw them into a trill pattern between two columns, using both hands to make it comfortable.
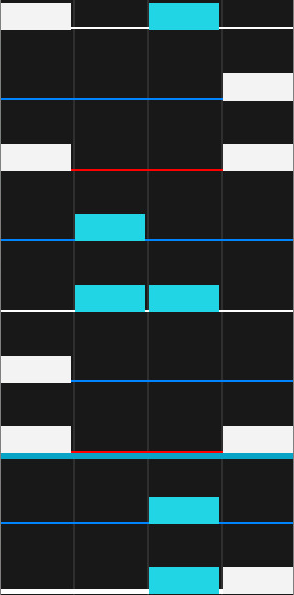
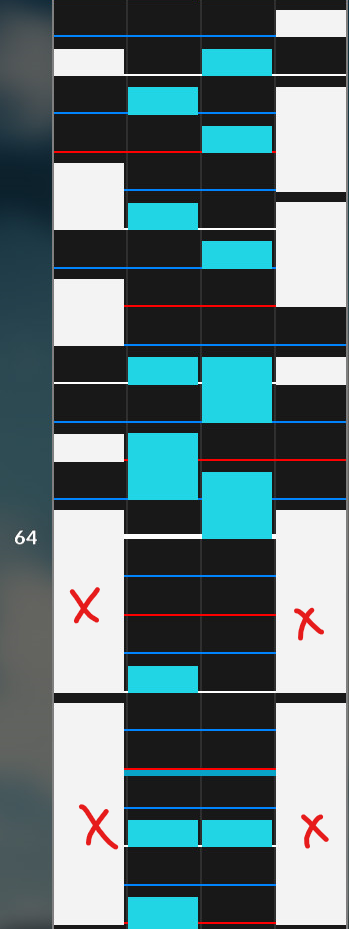
If you listen carefully, the two sets of jacks are repeated sounds – but the two single notes afterwards are of different pitch, so I wanted to avoid creating another jack there!
There’s also one normal note that should be added somewhere in this screenshot. Can you spot what I’ve overlooked?
I missed putting a double for the drum sound, right on the line the cursor is standing on.

I also play around with short LNs a lot to represent the different sounds adding to the basic beat, while making sure I didn’t miss putting notes on every 1/4 beat and doubles on the white lines.
—–Advanced concepts—–
A selection of mapping topics that’s a good read after you’ve gathered some own experience, maybe finished your first one or two maps, and are looking for something more.
Scroll velocity (SV)
At some point you’ve probably come across maps that manipulated how fast the notes drop on your screen. Here, I’ll show you how to apply that to your own maps, what plays well and creates additional immersion, and common mistakes to avoid.
Let’s look at what we need in the editor first. Click Tools > Scroll Velocity Editor to bring up this window:

Move your cursor to any line you’d like to apply a SV on, then click ‘Add’. Now there’s a new entry in the table similar to this one:

If you’d like to delete it again, click on the timestamp, and then ‘Remove’.
On the left side is something familiar by now, the timestamp including milliseconds where we’ve created the SV. What’s the multiplier though? Say the scroll speed you’re playing with is 20. Setting the multiplier to 0.50x makes it so your normal scroll speed is halved after this point to be 10. 2.00x on the other hand sets it to 20 times 2.00 – that’s 40!
Yes, you absolutely can set the multiplier to negative values like I did and it works, I wouldn’t recommend it though – it flips the playfield so you have to hit notes when they arrive at the top instead XD Just a fun fact, osu!mania doesn’t allow SV multipliers to be negative.
Now you might be wondering – if we use a 2.0x SV alone, the notes will fall down much faster, and make it so it’s extremely difficult to react in time at all – and that’s true, which is why speed ups are used in conjunction with speed downs.
Imagine you have two seconds before there’s a note to hit. If the SV is 2.0x for the first second, and 0.5x for the last second, concerning overall reaction time you’d end up with something similar to if there hadn’t been a SV change at all, right? With the difference we’ve applied some emphasis to the note following the SVs. That’s what we call a normalized SV.
Notes for normalized SVs
-> Put the speed up and speed down SVs into an empty gap between two notes. If there’s notes in between, it becomes too irritating. Both should cover exactly half of the gap, otherwise it doesn’t normalize to 1x – pay attention to the snap you need to use in order to do so!

-> It doesn’t matter if speed up or speed down goes first. Experiment a bit to see what the visual difference is!
-> Feel free to use any other values that add up to 1x. Bigger differences make the visual effect increasingly powerful, smaller ones look more subtle. For example, 1.5x – divide 1 by 1.5 to find out what the counterpiece multiplier should be.
-> Always remember to put a third 1x SV exactly on the emphasized note line so anything later appears at normal speed again.
The next question is, where’s a good place to use SVs? After learning about them, some newer mappers like to fill the whole map with SVs, which ends up missing their point. My best explanation would be on a sound or recurring theme that can’t be expressed well enough by just using a simple pattern – some songs will have more potential for SVs than others.
Evening is an osu!mania mapper who the majority of the community agrees upon is a master of the SV art. I wanna showcase one of his ranked maps as an example, PLANET//SHAPER by Camellia:
Obviously the score is amazing in its own right, but note how Evening uses SVs in this map to consistently underlay all kinds of different sounds, in a way that doesn’t reduce playability despite being a very hard map.
In fact, I don’t think any SVs in PLANET//SHAPER are even normalized, but some basic rules still apply. All stuttering effects on the small bursts, for example at 1:07, were done in this way:

Because there’s only a few milliseconds between every SV change, any minor changes wouldn’t be very noticeable. I believe that is why Evening went with 0.1x and 1.9x for them. For the SVs on the LNs, they match the sound the LN is representing. If the sound increases, Evening increased the SV on every beat as well, if there’s stuttering, he made them stutter on those exact points.
The calm part, starting at 3:21, is kept at 0.8x for a while, then 0.9x – an extended slowed down section like that is called a slowjam. Afterwards, the long LN at 3:47 is used to re-introduce normal scroll speed.
Honestly, I’m not a good SV mapper myself, so this guide section is probably a bit on the weaker side. If someone more experienced than me would like to add something here, I’d appreciate it a lot. I’ll just close this section out with some general thoughts:
-> Most maps already work fine without adding any SVs, it’s just the icing on top of the cake.
-> Don’t use SVs above 1.0x for more than brief moments. Players might heavily drop accuracy due to not being able to react fast enough.
-> SVs are always snapped to a certain beat, just like normal notes. Never use them unsnapped.
-> What you’re used to (because of playtesting your SV map a lot) might feel uncomfortable for other players. If your map includes SVs, it’s even more important to ask other players for their opinions!
-> Practice, practice, practice, play around with all kinds of different values and look at other popular SV maps to see how they work. SVs are really complicated and hard to use right, just like normal mapping you’ll learn a lot over time.
Creating a difficulty spread
Variable BPM
Modding
What’s a solid approach to maps made by someone else?
What’s considered good feedback?
In this section, I’ll try to answer both questions – it might be obsolete for a while as Quaver doesn’t currently have a modding system in place, but it’s still an interesting topic to cover c:
Any maps you submit for Quaver ranking are currently sent into a queue, which is attended to by Ranking Supervisors. When it’s your turn, your map may either be denied – you’ll be placed on a 3-day cooldown before your next attempt, and receive an explanation of what changes should be made – or accepted into the Ranked map pool.
osu! on the other hand uses a different ranking system that involves the community and other mappers before a Beatmap Nominator (BN) might show interest in your map. After completing a map, people will ask for other mappers to provide comments, which might be anything ranging from small playability suggestions to ranking criteria issues – that’s what we call modding!
This is an example of what an osu!mania modding page looks like, it’s a mapset I’ve also made some suggestions on a while ago.
[link]
To avoid miscommunication or frustrating people while modding, I’d like to give some pieces of advice – some of them might seem obvious, but they are good to keep in mind:
Try to view the map from a neutral perspective. There’s multiple possible approaches to a song that each have their own right, even though you might have mapped the song differently. If you don’t notice something that’s plainly off, assume it was the mapper’s intention.
When making suggestions about something that isn’t objectively wrong, but maybe doesn’t play well, the mapper might reject your suggestion. It’s nothing to worry about and a pretty common thing to happen. If you feel like the mapper didn’t quite understand your point, reopen the post and try explaining it further, but respect their decision afterwards – don’t turn it into an argument by forcing your opinion too much.
Keep your suggestions concise. A good modding comment begins with a timestamp, and then follows up with Problem (what’s the issue), Reason (why is it an issue/why are you suggesting this fix) and Suggestion (what’s your fix), but no further unrelated words (“felt like”, “in my opinion”).
Use screenshots for bigger change suggestions – an image can save you a lot of explanation, and is easy to understand for the mapper.
Avoid sentences with negative connotation. Especially other new mappers might feel really discouraged if you tell them “This map is bad because X”. This type of sentence can be turned into a positive one by saying “This map will play better if you make X change”.
If you’re unsure about why a mapper used a specific pattern or what they followed/layered, kindly ask them for their reasoning. Either it really was a mistake you’ve made them aware of, or they’ll explain the pattern choice to you, and you’ve learned something valueable.
Tell the mapper what they did well! It’s easy to just focus on mistakes, but praising cool ideas and clean execution feels very encouraging, and it lets the mapper know that they’re on a good path.
A really skilled modder will be able to understand what the mapper wanted to aim for better than they do themselves, and help them by guiding their map towards that point.
—–
Now that I’m done talking about what makes a good modding mindset, here’s a list of things you can check on other people’s maps 😀
Start by searching for and opening the Quaver ranking criteria.
-> Is the metadata correct? Are there any typos or something that could be added to the tags?
-> Do the background image and audio file meet the requirements?
-> Can autoplay achieve a 100% score? If not, the mapper has overlapped two notes at some point by accident.
-> If there’s multiple difficulties, do they scale up well?
-> Are there any mapping mistakes/inconsistencies affecting multiple sections throughout the map?
-> Anything on a smaller scale that’s off? This could include: ghost notes (notes without a sound counterpiece in the song), wrong snaps, too short/long LNs, inconsistency (such as missing drum notes I’ve pointed out in my own maps earlier), or incomplete following of a sound.
-> Any suggestions you might have to improve the map, or make it play smoother?
Hitsounds
Hitsounding in Quaver is rather simple to cover at the moment. I don’t know if there’s plans to include custom hitsounds similar to osu! – if it happens at some point, I’ll make sure to update the guide appropriately – but right now we only have these three options to talk about:

Hitsounds are the audio feedback you hear if you hit a note – if you miss, there’s no hitsound – also they provide an estimate if you’re being too slow or too fast while playing.
Whistle, Finish and Clap all replace the default hitsound with another sound. They can transform hitsounds from “just being there” to make it feel like you’re actually drumming along to the song while playing a map, providing an additional layer of immersion.
Try placing a few notes in the editor, and apply Whistles, Finishes and Claps to some of them to hear what they sound like!
Whistles can be used to highlight interesting non-drum kind of sounds, such as vocals, piano, violin or other instruments. Usually there aren’t many whistles in a map – only the most dominant of those sounds get one, or sometimes it’s to emphasize the beginning of another instrument (vocals) being introduced to the music.
A Finish can be put on loud drum or cymbal sounds that are often found at the end of shorter drum rolls, or interspersed between long drum rhythms to create some variety. Usually after that kind of strong drum sound, there isn’t another sound that appears immediately afterwards in the song.
Claps are the most commonly used hitsound. Either there’s actual claps in the song – I think you could guess where they go in that case 😀 – or they go well to emphasize the song’s main rhythm, especially during streams/intense sections. If you’d clap along to the rhythm in real life, put a clap hitsound on everything you’ve clapped to. Don’t use them during calm parts though.
For every other note just keeping the default hitsound is perfectly fine!
Normally you wouldn’t use two or more Whistles, Claps or Finishes on a chord. If you feel like the feedback isn’t loud enough, put a second one, but only do that if there’s clear justification.
It’s possible to put multiple different hitsounds on one note, which comes in handy on lower difficulties, where there simply aren’t as many notes.
In case you want to change a pattern or delete a note, don’t hitsound before you consider your map finished – you might delete or move a hitsound to another row by accident without realizing.
—–Conclusion—–
Final words
Useful links
[link]
The “what the heck is this dude on about with his kicks, snares, claps, and hi-hats” button
[link]
The “I wanna rank my beatmap, what do” button. Includes a description of the ranking criteria, and how the Quaver ranking process works.
[link]
Electoz’s osu! profile, an ex-Beatmap Nominator. They wrote a very detailed guide about modding, which you can download there. The Modding section in this guide is based around some of Electoz’s most important points.
[link]
My own osu! profile, in case you’re interested in my rhythm game background.
Changelog
30/7/2020 – added the “Scroll velocity (SV)” and “Hitsounds” sections
29/7/2020 – added the “Modding” section, put a link to the reference I used in “Useful links”