Overview
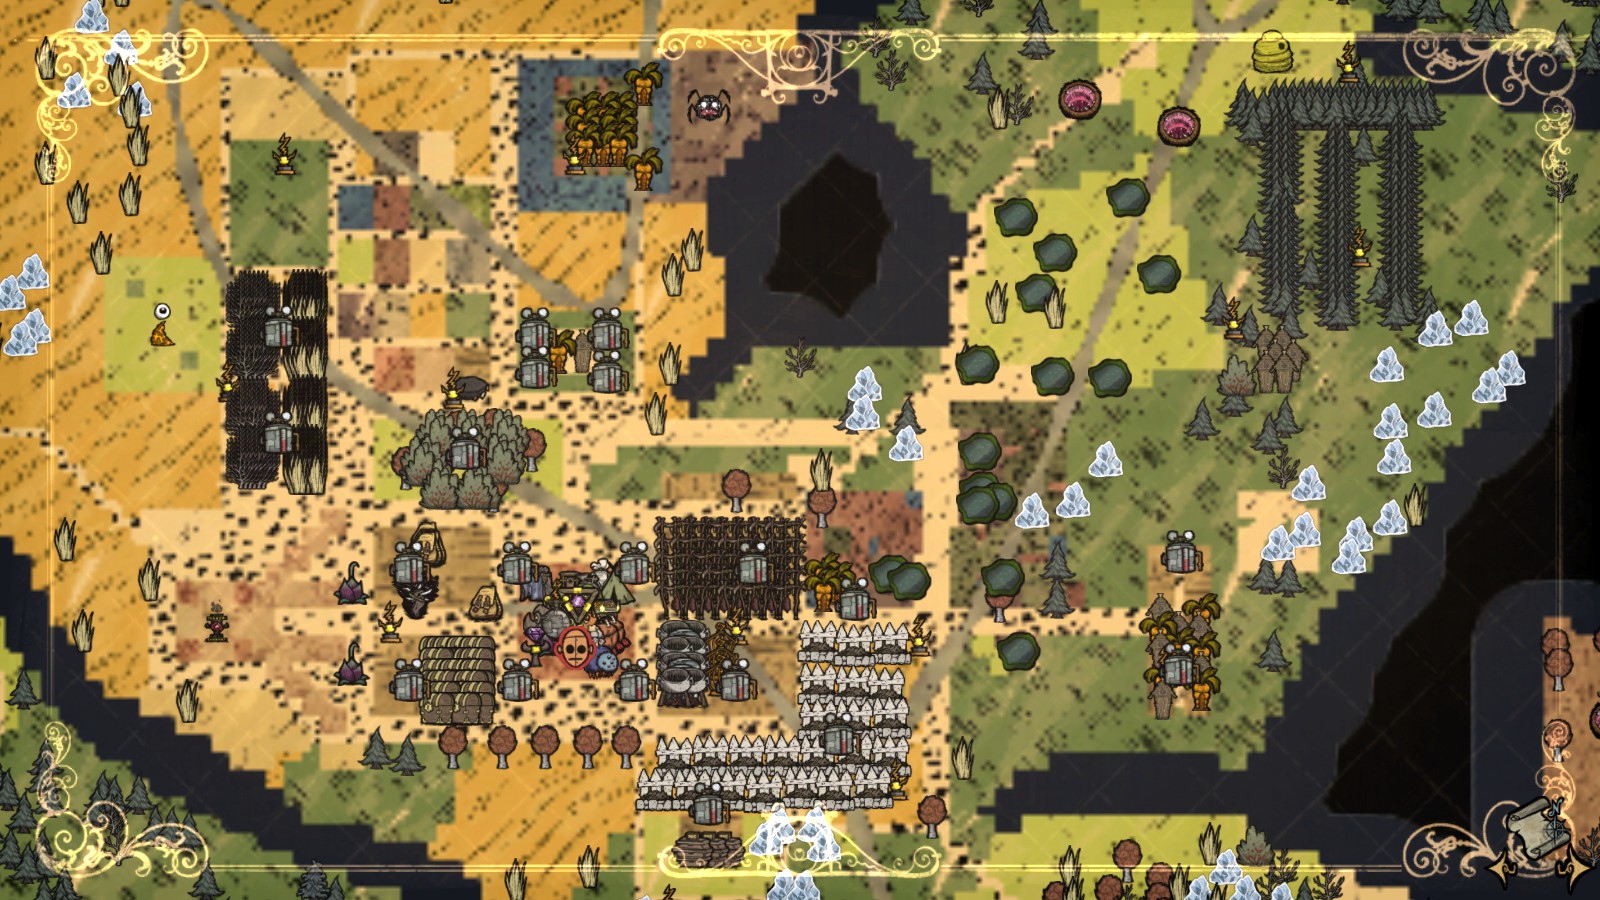
The goal of this guide is to help newer players develope an understanding of how to get your bearings in a new world. Hopefullly, it will teach you what to think about from day 1 and how to manage all the chellenges of surviving in Reign of Giants. The image attached to this guide is my farthest world and base, at day 800+ to date.I will also try to answer questions from the comment section and add any additional information or sections to the guide upon request.
Day 1 and Biomes
The primary goal of the early days, lets say 1-5, is finding the best place to set up a base. This means exploring the world for each biome, collecting all basic resources in your path. Deciding where to set up your base depends on where your key map locations have been generated. Each biome has its advantages, understanding what they are will allow you to identify where the most centralized location would be for an optimal base. Some key map locations would be the center of the map, the Pig King, Beefalo Spawn, Desert Biomes, Rocky Biomes, Ponds, and Worm Holes.
Biomes
Decidious Forest: Abundant- Birchnut Trees, Catcoons, Mushrooms. Birchnut trees give you replantable and edible Birchnuts, replanting large fields gives you a farm that can produce birchnuts, logs, twigs, and living logs. Pigs can help deal with the Posion Birch Trees that spawn. Catcoons give meat when killed, sometimes dropping their tail which is used for a winter hat. Otherwise they occasionally drop somewhats useful items. Can be befriended. Mushrooms, if concetrated, can be good fillers in the Crock Pot. Green can be cooked to give 15 sanity, raw Blue can give you 20 health but drain 15 sanity and cooked Blue take 3 health but gives 10 sanity.
The Pig King will usually be in this biome and is important later in the game. Glommers statue will only be found in a Deciduous Biome.
Desert: Abundant-Cactus, Tumble Weeds, Vultures. Cactus deals damage when picked but it is worth, especially with armor. Cooked it gives 15 sanity and some hunger and health, also gives a flower in summer which helps with that season. Tumble Weeds drop many useful items, primarily grass and twigs. Vultures can be baited with meat to give you a morsel and turkey leg when defeated.
Desert biomes are designed for summer and provide you with many things to survive. You can also find Volt Goats here which are a valuable resource. Desert biomes might be the best biome to have a base in but is usually far from other biomes. Dangers include Hound Mounds.
Forest: Abundant- Trees, Spiders. Trees of course. Spider dens can usually be found among the trees.
Basically a resouce biome for trees, not particularly crucial for base consideration.
Swamp/Marsh: Abundant: Reeds, Tentacles, Spider Dens, Merm Huts, Mushrooms. Reeds are used in a variety of later game recipies but your first use for them will usually be a bird cage. Tentacles are very dangerous but drop Tentacle Spikes and will usually fight spiders or merms. Spider Dens and Merm Huts just fight each other and tentacels.
Swamps provide many resouces at a high risk due to tentacles doing lots of damage from out of nowhere.
Mosaic: Abundant- Rocks, Turf. Rocks and flint litter the ground. The mosaic biome mashes all kinds of turf together and doesnt serve much purpose.
Savanna Abundant- Grass, Beefalo. Grass is everywhere in the Savanna. Beefalo are a very important resouce because they provide protection for early players from sudden hound attacks but later on their wool makes clothing and is an excellent fuel souce in excess, along with their poop.
Rockyland: Abundant- Wait for it… Rocks. Concentrations of rock will make easy mining for later game base building and many other things.
When you have located all the Biomes, measure where the ones of greater importance are and determine where the most OPTIMAL and centralized loaction to build a base would be. Make sure you dont take much longer than 4 or 5 days to find a location, even if it means not having some map information. Especially if you find key areas early.
Days 5-10, Establishing a base and securing food
While exploring your world, you should have been collecting full “stacks” of key resouces such as grass, twigs, logs, flint, stone, gold and charcoal.
It is recommended to make a science machine and destroy it day 1 or 2 to craft a backpack, shovel, spear, and log suit. You also craft a hammer to destroy the machine to get some resouces back and the loss of those resouces is inconsequential. Digging up grass tufts, saplings and outlying berry bushes to replant at your base is highly recommended.
Once you select a base location, you will want a few things up as soon as possible. These are: Fire Pit, Alchemy Engine, Chest(s), Crock Pot(s), and Grass, Twig, and Tree farms if you have them. Basic set up, a place for the night, some storage, and food optimization. Learning the intricacies of the Crock Pot recipies is key to maximizing your food items, but early on you’ll want to learn how to make Meatballs, Pierogi, Fish Sticks, Honey Ham, Bacon and Eggs, and Trail Mix. Acquiring the ingrediants for these foods should be a priority.
After you have a basic set up, you can begin to gather the resouces for a more complete early game base. Throughout the first season, you shoud constantly be gathering GRASS, TWIGS, LOGS, STONE, GOLD, CHARCOAL, SILK, GEARS, BEEFALO WOOL, MANURE, and of course, FOOD.
Established base and preparing for Winter/Summer
For an “Established Base”, im going to suggest having the following:
Alchemy Engine, with you having destroyed the Science Machine at your base once you have crafted the Engine since it give you all the Science Machine recipies as well as its own. (4 boards, 2 electrical doo dads, 2 cut stone. Also 16 logs, 4 gold, 12 stone.)
2-4 Crock Pots with 1 Ice Box (2 Crocks require 12 charcoal, 12 sticks, and 6 cut stone or 18 rocks. Ice Box requires 1 gear, 2 gold, and 1 cut stone)
5-10 Drying racks (5 Racks require 10 charcoal, 15 rope or 35 grass, and 15 twigs.)
As many Chests as you need.(requires 3 boards or 12 logs)
4 Advanced Farms (dont bother with cheper ones, 4 farms will requre 24 manure, 40 grass, and 16 rocks) and as many other farms as you can get to minize traveling for things like logs, grass, twigs, and berries. Grass and Berry Bushes require fertilization such as rot or poop once planted.
Bird Cage(Cage requires 2 Papyrus or 8 Reeds, 8 gold, and 2 seeds. The Bird Trap requires 3 twigs and 4 spider silk.) Optional but very useful.
Bee Box (requires 2 boards, a honey comb, and 4 captured bees, the net requires 1 rope 2 silk and 4 twigs). Also optional as bees dont produce honey in the winter.
If you start in Spring you will need a Fling-o-matic for Summer and you will want to plant it early in the center of your base to build around it. Make sure to keep track of its range. (requires 15 ice, 2 gears, and 2 electric doo dads or 4 gold and 2 cut stone).
This set up will make sure you have everything you need for winter or summer at your base. Also, in preparing for these season you will want to get the corresponding clothing. Winter hats range from Rabbit Ear Muffs, the Winter Hat, and then a Beefalo Hat. Winter Vests are good if you can find a Koalafaunt from the dirt piles. Summer cloths are harder to get but 2 thermal stones and an Ice Box will be an easy way to get through Summer.
Other items you will want to have stocked that are not involved in these structures is Pig Skin, Silk, Beefalo Wool, Spider Glands, Flint, Nitre for summer, Bone Shards, Manure, and Ice
Managing Health and Sanity
Health
Health can be tedious to increase if too much is lost early so take care to avoid risks until you have a basic set up.
Eating is the primary source of health early on. You’ll want to start cooking your food in a Crock Pot as soon as possible, but for some quick health, cooked berries give 1 health a piece and cooked carrots give 3. Eating butterflies restores 8 health but can be time consuming to chase if you dont kill them while they’re hovering over a flower. Hold ctl+F when near them to attack.
Crock Pot Reipies for health
Fish Sticks: +40 health, requires 1 fish and 1 stick, other slots are filler. Fish can be fished from ponds or as loot from dead merms during swamp battles. Fishing Poles require silk and Swamps are dangerous.
Pierogi: +40 health, requires 1 egg, 1 vegetable, and 1 meat. Last slot is filler. Carrots and mushrooms make good vegetable, egg requires a bird in a bird cage, and can be any meat.
Dragonpie: +40 health, requires 1 dragon fruit and 3 filler or sticks. Dragon fruit grow rarely from farms.
Honey Ham: +30 health, requires 2 full meat value and 1 honey, last slot is filler. Can be large meat and monster meat, or two morsel/turkey leg/small jerkey and a large meat.
Trail Mix: +30 health, requires 1 cooked birchnut, 1 berry, and another fruit(another berrie). Last slot is filler or stick
Large Jerkey+ 20 health, Small Jerkey +15
Other recipies restore less health but are not as efficient for resources. These include Fish Tacos, Chicken Nuggest, Froggle Bunwich, Butter Muffin, and Spicy Chili.
Farms are among the less efficient ways to acquire food but can be very helpful as a new planer and before/the beginning of winter as the food never spoils if left unpicked. If your farms produce Pomegranate or Eggplant, they can be cooked and eaten to restore 20 health.
Healing Items
Spider Glands are the earliest healing item, restoring 8 health on consumption. The glands can be crafted into Healing Salves which restore 20 health but require stone. Honey Poultice is the next tier up but are a much later game item requiring abundant honey and reeds.
Raw Blue Mushrooms restore 20 health at the expense of 15 sanity and only appear at night but can be good healing resource if you can handle the sanity drain which probably isnt the case for a new player. Cooked Blue Mushrooms Restore 10 sanity and cost 3 health.
Sanity
Consumables
Picking Flowers:+5
Eating most Crock Pot foods: +5
Eating Small Jerkey:+10
Eating cooked Blue Mushroom:+10
Eating Cooked Cactus Flesh: +15
Learning a recipe:+15
Eating large jerkey:+15
Eating cooked Green Mushroom:+15
Killing Slow Shadow Monster:+15
Killing Large Shadow Monster:+33
Sleeping in a Roll:+33
Sleeping in a Tent, Fiesta or eating Ice Cream:+50
Wearables
Note that Dusk and Night drain 5 sanity/minute
Garland and Winter Hat:+1.3/min(Hat requires beefalo wool and silk)
Winter Vests(Breezy and Puffy:+2/min(requires respective Koalaphaunt trunks and 8 spider silk. Puffy also needs 2 beefalo wool)
Top Hat and Catcoon Hat:+3.3/min(Top requires 6 silk, Catcoon requires 4 silk, 4 catcoon tail)
Standing very close to Glommer:+6.25/min
Tam O’ Shanter:+6.7/min
Standing very near a befriended Pig:+25/min(can be utilized while using pigs to chop tree fields for you)
Mobs, how to deal with them, and what they provide
I’ll try to start with the ones that are most relevant. But remember, ALWAYS wear armor when fighting mobs. Always.
It should be noted that every mob in the game can be kited relatively easily if you watch their attack animation and learn how many attacks you can get in before they can swing, then you just dodge that attack.
Spiders
Silk is very important early game so learning to fight spiders a must. Spiders are good for silk, monster meat, and glands. The silk used to make tools and clothing, including the sewing kit. You will need about 20 silk before day 20. The meat is good in crock pot recipies and the glands can craft healing salves.
Combat- Walking them into a trap avoids combat but is expensive.
During the day, you can walk onto the webbing to get them out of their den. Depending on the dens size there will be 1-3 spiders. Let them detect you near the web and have them follow you half a screen away from the den.
You can then kite their attacks to pick them off 1 by 1. If only 1 spider it is very easy to let him swing, move in the opposite direction to dodge, come back in with you weapon and stun lock him with your attacks until he dies. If there are muliple spiders (2-3), you must get them to attack at the same time and come in for 2 hits until you dodge/kite back again.
Doing this makes small groups of spiders easy to deal with. Move onto the webbing to pull 1-3 spiders until the den is empty. If the den is tier 3, make sure to kill it for the most silk value and a new egg to replant. Use caution on which dens to destroy immediately and which dens to let grow to tier 3.
Attacking spiders at night or dusk is very dangerous if there are more than 5 or 6 in the area, spiders will swarm you if there are too many. With experience and a better-than-spear-tier weapon one can easily take out multiple dens in no time.
Hounds
Early Hound waves are easy to kite, getting them to synchronize attacks and 2-hitting them until all are dead is easy with 2-4 or even 5 with a log suit. Larger groups will require other methods such as getting them to aggro beefalo, pig men, swamp creatures, spiders etc. You can also use tooth trap fields later in the game or a “Gauntlet”, a series of Pig and Bunny houses with Flingos near you base you help you fight either time of day.
Beefalo
Beefalo are a great fuel source and defense, but can also be farmed for meat and beefalo horns.
They drop 4 large meat, very useful, but unless isolated beefalo will come to each others aid. To isolate 1, hit it and let it chase you. Other Beefalo will also follow, but give up the chase earlier than the first Beefalo. Repeat until its far enough away not to draw more Beeflo to you and kill it. You can kite it easily, its “Attack Period”, or anount of times you can hit it before it can hit you back, is 4. So 4-hit dodge will let you take it out in no time. Note that this entire process can be a bit time consuming.
Koalaphaunt
Provides 8 meat and a Trunk which crafts into 1 of 2 types of winter vests or can be cooked and eaten for a large boost to hunger and health.
Found at the end of a trail of mysterious dirt piles, you follow the foot print until you find a Koalaphaunt. It must be cornered to land a hit to force it into combat. Note that later in the game this could be a Varg which summons hounds so care should be taken once the 2nd season hits although it can show up earlier.
Can be hit 6 times before needing to kite. High health but easy to take down. Can be easier to engage combat when running up on it while its sleeping.
Pig Men
Pigs drop Meat or Pig Skin, both very useful, but the Pigs can be hard to fight due to their kiting system. If alone, tanking their damage with armor is an acceptable strat.
You can feed them meat to bring them along to fight for you or help you chop trees, feed them Berries etc. to for them to poop.
Feeding them 4 monster meat, if you can spare it, will turn them into Warepigs. Kiting and killing them is easy if they’er alone, tanking is acceptable. They drop 2 large meat and a pig skin, very good.
You can exploit Werepigs for poop by dropping a large stack fruit/veg/flowers near them just at they are transforming and they will turn it all to poop in moments, then you can kill them.
Buzzard
Vultures drop 1-2 morsel and a turkey leg, making them an excellent food source.
They are attracted to meat laying on the ground, so place a piece of meat near their spawn and soon it will land. Stand back, wait for it to go near the meat. After it stops on top of the meat, it will begin to eat. Right after it stops moving, move in to attack it. Kite and kill, may take practice.
Bees
Are managable in small groups, run from swarms. Bees are mostly only good for catching, when trying to kill the hive for the comb, you must tank the first few killer bees with armor and a beekeeper hat if you have it. Take them out 1 by 1 with stun locks. May drop honey.
Treeguards
Very high health and damage, but can be attacked 3 times before it attacks back. Easy to kill but will drain much sanity. Good for living logs.
Lure Plant/Eye Plants
The eyes can be killed easily, just make sure to only fight 1 at a time until you get to the center to attack the Lure Plant.
Random tips and facts
This section will be an ongoing catalog of game knogledge and lesser known tactics. There is no specific order for the list. Suggestions welcome.
Its a good idea to place your Ice Boxes close enough to your Crock Pots to add ingredients directly from the Boxes into the Pots. Its just efficient. Placing your Crock Pot configuration before the Ice Boxes allows you to place the Boxes closet to the Pots than you would having place the Boxes first. Shift+Left Click when two containers are open to send 1 of the clicked item into the other container, perfect for Ice box to Crock pot
Thermal Stones can be exploited by placing 2 or 3 in a backpack and letting them reach max temperature next to a max fire in a fire pit (4 logs/poop/wool/turf or more less valuable fuel). Wear that backpack and stand next to the max fire until you begin to overheat/freeze depending on desired effect. Pop on clothing (the better the clothing the longer you will stay that temp) when you start taking damage. This will trap the heat and let you stay in that state far longer than normal and negates the thermal stones drag on your natural insulation. By this I mean a Thermal Stone loses insulation faster than you do naturally, so carrying one when it stops being hot/cold will actually give you an unwanted temperature faster. So unless you have zero insulation/rabbit earmuffs, only having clothing is better.
For early rot for fertilizer, go into a cave and see if there are light bulbs close to the entrance. Get in, get the light bulbs, and get out. They spoil very quickly. But take care around underground Bunny Men and Depth Worms, basically run from everything and have lots of grass/twigs for torches. Otherwise, i usually just keep a stack of flowers from early on and let them rot.
With your hammer from hammering down the early science machine, break down the Pig Heads on sticks at the touch stones for an easy 2 pig skin each. Using these to craft Football Helmets early on is probably the best way to stay equipped with armor for when danger sneaks up on you. If you are looking for early nightmare fuel, hammer them down on a full moon when their eyes glow.
Walking on paths give you a 25% speed increase
Planting a forest near a Pig Village will allow you feed the pigs meat (preferably and usually when you have monster meat to spare) and have them help you chop many trees at once. You usually get some large meat out of the deal if a treeguard spawns and kills 1 or all the pigs and your quick enough to pick it up before the pigs get it.
Spiders eat food off the ground immediately so have care when letting things die near them.
Waiting to chop trees at night is efficient for time as you can explore during the day and wait to use the resources for a camp fire until you need to stop and cook food so your getting the most out of the fire. Same goes for a large grouping of rocks.
Berries and Mushrooms will be your earliest fillers for the Crock Pot. Ice can also be used and never melts in an Icebox.
For meat, the earliest ways to get meat for Meatballs will be rabbits, moleworms if you havent dug up their burrow, monster meat if you have killed spiders/found their meat or gotten lucky in a swamp (along with merm loot), vultures if you know how to fight them, fishing from ponds if you have enough extra silk for a fishing pole, or killing/trapping frogs for frog legs.
The way armor prioritizes when you have a head and body armor on is the armor equipped SECOND is prioritized for degradation before damage is past on to the firstly equipped type. So with a log suit/football helm combo, you will want the log suit to be equipped second becase it reduces more damage and increase the life of your football helmet.
In summer, lure plants on screen will smoulder first before anything else. They have the highest priority to catch on fire of any item/structure. This can be used to effectively extend the range of your fling-o-matics by placing lure plants within the flingos range near something you dont want to burn. Note this only works if you place it on turf that doesn’t allow the eyeplants to spawn (cobblestone, marbel, wooden, rocky, sandy) and you have five of these turfs down in all directions.
Koalaphaunts also drop Manure similar to Beefalo but not as often. Keeping 1 or 2 alive near your base can give you some poop and an ememgency food source if needed. Beware Varg
About the Author
Still going strong
