Overview
Everything you need to know about buying and selling goods. The following topics will be discussed:- Buying items from NPCs or other players- Selling items to NPCs or other players- Setting up both basic and advanced trading routes- Tips and tricks
Buying an item or good
We start of with the very basics of trading: buying items and goods. Items can be bought in two different ways: by buying them through your island’s warehouse or by buying them at an NPC’s ark or an other player’s warehouse. Both methods will be explained in a step-by-step walkthrough.
Keep in mind that only goods can be purchased through this method.
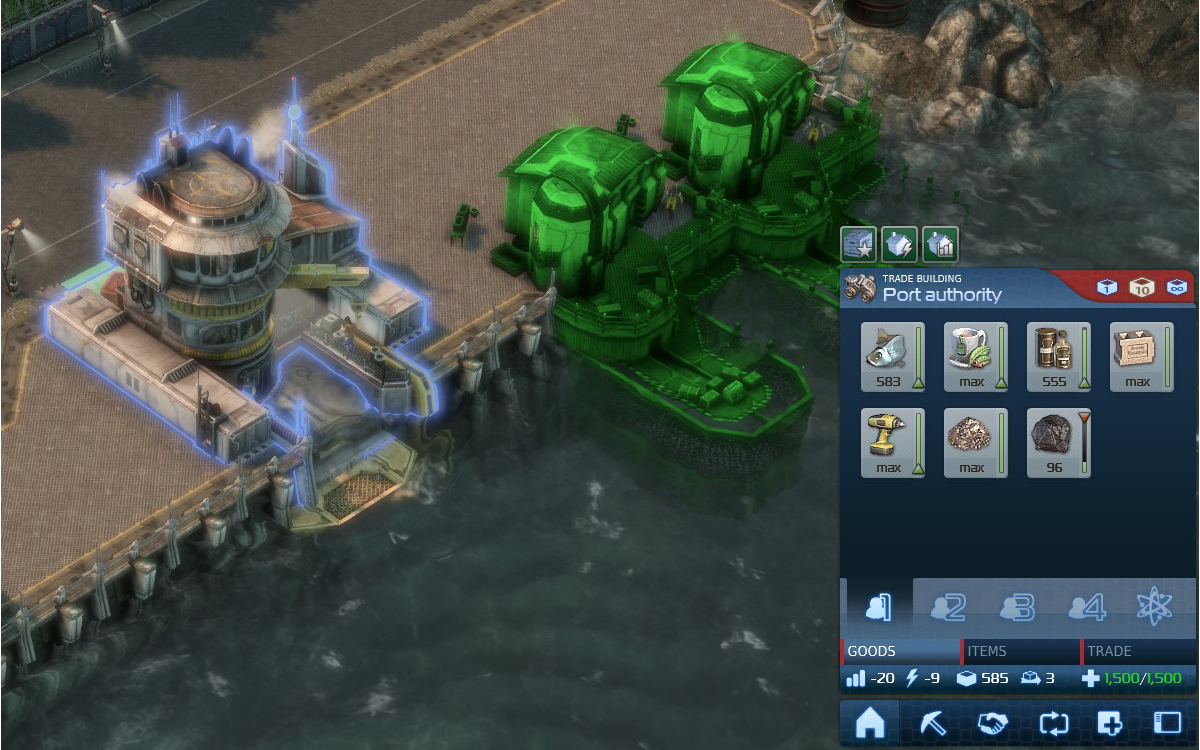


Keep in mind that this quantity is a limiter for the maximum amount of goods accepted to be bought for this island.

You will also recieve a message in the top right corner when you have bought or sold goods.

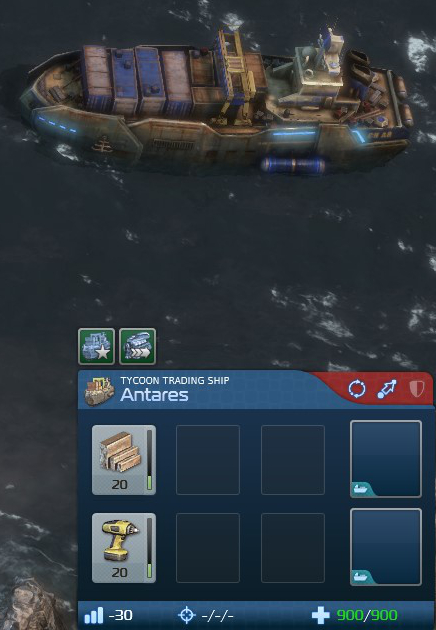
As said before, this method can only be used to buy goods. If you want to buy items like fertilities, prototypes, etc, you will need to head out with a ship to get them yourself. This procedure will be discussed in the following section of this guide.
With this method both goods as well as items can be purchased. Keep in mind that you will need a ship with a decent storage capacity.


Selling an item or good
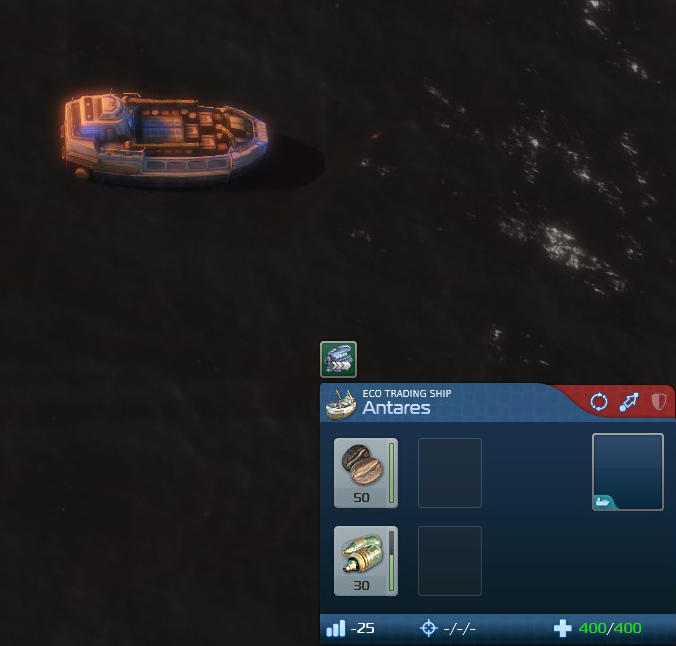
Besides buying items, you can sell them as well (obviously). In this section we will explain the selling progress. Once again there are two options considering selling goods and items: selling them through your island’s Warehouse or by selling them at an NPC’s ark or an other player’s Warehouse. Both these methods will be explained in a step-by-step walkthrough.
Keep in mind that only goods can be sold through this method.


Keep in mind that this quantity is a limiter for the minimum amount of goods which must be left in your Warehouse at all times. For example: when you have 200 tons of coal in stock and you decide to sell them and you set the limiter at 50 tons, the coal will be sold untill it reaches the 50 ton limiter. Once the stock raises to 60 tons, a total amount of 60-50=10 tons will be up for sale.

You will also recieve a message in the top right corner when you have bought or sold goods.

With this method both goods as well as items can be sold. Keep in mind that you will need a ship with a decent storage capacity.


Setting up a trade route
Setting up a trade route might be a bit tricky when you just have started playing Anno 2070, though once you have set up a couple of them, it shouldn’t form any problems. In this section of this guide, we will explain how a simple trade route is set up. The next paragraph will focus on making your trade routes more efficient.
In order to set up a trade route, you will have to open your Strategic map. This can be found in the bottom right tool bar. The Strategic map can also be opened by pressing F6.

Once opening the Strategic map, you will see three main windows just right of the map. These windows will be used to create a trade route. Creating a trade route can be devided into three steps, as we will demonstrate now.

Step one is pretty straightforward: we click ‘new trading route’ to create a new trading route. Once the trade route is established, you can click on it in the upper window to see the status of this trade route (such as the islands that are involded in the trading route and which ship(s) is/are in use for this trade route.
Once the new trade route is created, we will move onto step two: selecting the stations which the vehicle will pass and which goods he will either onload and/or offload. We will set up a simple trade route with one onload station and one offload station.

First of, we select two stations (as shown in the left picture). After that, we can select the good we would like to load onto a ship: loading onto a ship means using the green icon! Select the same good for the other station where the selected good should be offloading: this is done by using the red icon! Once this is done, your window should look simulair as the one on the right picture.
Clicking ones more on a good will give you the ability to adjust the quantity of goods being either loaded or offloading at each station. Important note: if you set the limiter (when loading goods onto a ship) higher than the capacity of one cargo slot of the ship you wish to use, the ship will only take the maximum of one cargo slot. An example: the limiter in the pictures above is set to 150 tons (by default). If you are using a Freight ship for this trading route, it will only load 40 tons of the selected good (which is the maximum amount of one cargo slot for the Freight ship). If you wish to transport more than just these 40 tons of the same good, you will need to make a second trade slot in the trade window.
Step three is the final step in the process of setting up a trade route. In the bottom right window of your Strategic map, we will select a ship or submarine which will be used for the trade route. If you happen to lack a ship once reaching this step, just close the Strategic map and build a ship: the trade route will be saved automatically. Once you have a ship to run this trade route, select it in the bottom right window of your Strategic map and you are good to go.

Making trade routes more efficient
When playing a large, continuous game, you will probably encounter a huge list of trade routes which have been created swiftly just to haul one, maybe two types of goods from one island to another. These trade routes should (if possible) be combined into one large trade route. ‘Why?’, you ask? Because it’s much cheaper to let a large trade ship run one combined trade route that letting run an entire fleet of small ships run all sorts of small trading routes. The most important advantages of having a combined trade route are:
- Lower maintenance costs. One Container ship is cheaper to maintain than (as few as) two Freight ships.
- Fewer fleet spaces are taken: A Container ship requires 5 fleet spaces, while two Freight ships already consume 6 fleet spaces.
- Easier to defend: When you find yourself in a hostile environment, it’s easier to defend one ship than an entire fleet.
So how do we set up an efficient trade route? Well first of all we need to find some trade routes which are currently used to deliver a really small amount of goods. Mainly in large, continuous singleplayer games, these trade routes are established swiftly just to transport one good for one island to another, for example vegetables or diamonds. These small trade routes should be combined into one larger trade route. This, however, requires a large ship with large cargo slots. A Container ship (Tycoon) is highly recommended, however, A Cargo liner (Eco) or a Sisyphus submarine (Tech) (DLC required) can also be used.
The main criteria for a succesfull combined trade route are:
- Make sure your trade route isn’t criss-crossing the whole map: always try to make a circle of stations.
- Try to load and offload at the same station as much as possible: loading and offloading goods at the same station takes the same time as just loading or offloading goods. Fast(er) loading and offloading is an absolute must.
- If you stumble upon a route which is too far away from the other trading routes, don’t bother trying to fit this route into a combined route: it’s better to keep these routes separate. This is because a combined route would take a tremendous amount of time to complete one round.
Tips and tricks
Through regular gameplay, I’ve come up with some tips and tricks which I will share with you here.
Somewhat similar to the last paragraph, but still a vital tip: use the right ship or submarine for each trade route. If you have a trade route which only considers the transport of one or maybe two goods, don’t use a Container ship or something similar in size to it on this trade route: use a Freight ship or even a Commando ship to transport the goods instead.

More information about vehicles and their capabilities can be found in one of my other guides:
In addition to choosing the right vehicle, you should also choose the goods you wish to transport wisely, for example: If you produce both rice and vegetables on an Island and you transport both induvidually to another island to process them to Health food, it’s much more efficient to process them first and transport them as finished goods.

Choose the right place to build your Warehouse, Port authority or Clearance terminal: this will prevent unnecessary deviations for your trade routes. Always try to build a couple of harbors around your whole island. This will ensure enough docking spaces for all your trade ships.


When I play large, continuous games, I often encounter a problem: playing with all three factions ensures a large palet of options considering building options, however, every faction has their own building specifications and required materials. Since you tend to produce building goods mostly on one of your islands rather than on all of them, I somewhat ‘invented’ a trade route which would destribute all the main building materials across all of my islands. I named it the ‘Bob the Builder’ trade route. here’s how it works:
Let’s say we want to destibute the six most-used building goods across seven islands/underwater plateaus: Tools and Building modules are produced on island 1, Concrete and Glass are produced on island 2, Wood is produced on island 3 and Steel is produced at island 4. The other three island don’t produce any of these goods. A spreadsheet will show the load and offload points for these goods. We will use a standard Container ship for this trade route (6 cargo slots, 60 tons each):


Important notes:
- The -60 means this good is leaving the island to be destributed to the other islands, the +10 means the good is being delivered to the island.
- Make sure you set an limiter on islands which are producing a good: this will ensure you will keep some of the destibuted good left for that island as well.
- Adjust the load and offload numbers untill the cycle is in balance. This is quite tricky and takes some time. All the effort will pay out though.
Do you happen to find yourself in a combat area? Do you need to transport goods? Don’t have the requirements to build strong combat ships to defend your trade ship? Try the Sisyphus! Due to its passive Silent Running ability, the Sisyphus cannot be seen by enemies searching for it on the surface map. The ‘digital visualization’ of the submerged vessel is visible only to the owning player. Besides that, the Sisyphus has six cargo hold which can hold 60 tons each, which makes it as good as a Container ship. The 60 ton cargo slots can be upgraded to a whopping 120 tons each! (Keep in mind that the Deep Ocean DLC is required to be able to build the Sisyphus).
There are a lot of upgrades available of trade ships, both equipable in an item slot on the ship itself as well as upgrades which can be activated in your ark. Im currently using two ark upgrades which involve trade ships. The first one is the ‘Container ship haulage diversification’ upgrade. This is a level three upgrade (which I developed myself), giving your Container ships 50% more cargo capacity per slot and upgrading its speed by 35%. This means you can have fully packed Container ships transporting a whopping 540 tons of cargo with the same speed as a Commando ship. Since I mainly use Container ships in large continuous games, a specific upgrade for the Container ship is really worth it.
Besides the specific Container ship upgrade, I also use a level two upgrade, giving all my ships a speed upgrade of 12%. This speed upgrade always comes in handy.
Futhermore, you can equip your trade ships with additional upgrades which each ship can equip. These upgrades can for example be bought from NPCs.
Other useful guides
Some may know that I made a bunch of other guides for Anno 2070 as well. Check them out!