Overview
This will be a series of guides that will be dedicated to the modelling processes required to take a model from Blender, be it a build from scratch, imported FBX, XNA Lara, MMD, Valve MDL/SMD/DMX, OBJ, DAE, PSK, PSKX or whatever format that is currently imported in to Blender and covert it to a usable prop, misc, character model asset to be used in the Source (TF2) version of SFM. I’ve decided to go with a Series of guides because there is just too much information to pass on and if I wait for this to be complete before releasing, we’ll be using Blender 3.0.I will be releasing guides as Works In Progress and updating them as I go. It’s the only way I can get this stuff out to you in somewhat a timely fashion while keeping ahead of the changes that are happening with Blender.Speaking of Blender, I started this guide as version 2.83 was just released, we’re now at 2.90 with 2.83 in LTS status. I will be using the most current available Alpha for the one or two version ahead of the version available on Steam, just to try and keep ahead of the Blender development. It will also help me make sure add ons are broken in the up-coming versions. To date there haven’t been too many difference between the Steam Stable release and the versions I have been using, however should I notice a big difference between version, I’ll highlight that difference. The version I’m using in this writing is Blender 2.91 (Alpha) and I’ll inform you when I change to something different. It will not cover how to port models to the SFM2 (Half-life:Alyx) or S2FM (SFM Reborn/DOTA2) versions. Part 1 will strictly be dedicated to installing Blender add ons and importing these different model types in to Blender. It will also discuss some of the texturing aspects for the imports and will touch on animation file imports for the different types. Just keep in mind that as far as I’m concerned, once a model is in Blender, it is just a model and not dedicated to any other model type and once in Blender should be convertible for use in a Valve Source Engined program. If your intent is to use this guide for converting models (Player or NPC) for use in Gmod or other Valve Source Engined games, the principles are almost the same, however I will not be going into the detailed set up of Collision models and player animations ot QC writing to get it to work in regular games. That is beyond the scope of this guide (hence why they are in the SFM Guides section.)I will not be discussing the how to get Source2 assets into SFM (Source)… or will I???. Read on to find out!The intent is not only to provide you with a text type experience, but to also include links to videos on my YouTube channel for content I cover in these guides. In regard to videos, some may not be available when I release a guide, but should follow eventually.
If you are using an Earlier than 2.80 version of Blender
If you are using an Earlier than 2.80 version of Blender use my previous guide or you are going to be totally lost. The user interface of Blender changed so drastically between 2.79 and 2.80 that most of us experienced users had to take a step back and had to relearn Blender all over again.
[link]Recent changes to the Steam Beta Opt-in menu of the Steam Client Properties for Blender now allow us to “Roll Back” to previous stable releases of Blender. We’re not stuck with having to download stand-alone versions if we want to stay with an older version (either permanently or to work with an older project). However, we are still stuck with only one version of Blender can be installed from Steam at a time. See this guide for the process:
[link]What Version of Blender and What Add-ons Do We Need
As I started to write this guide Blender version 2.83.4 (LTS) was the current version of Blender available on Steam.
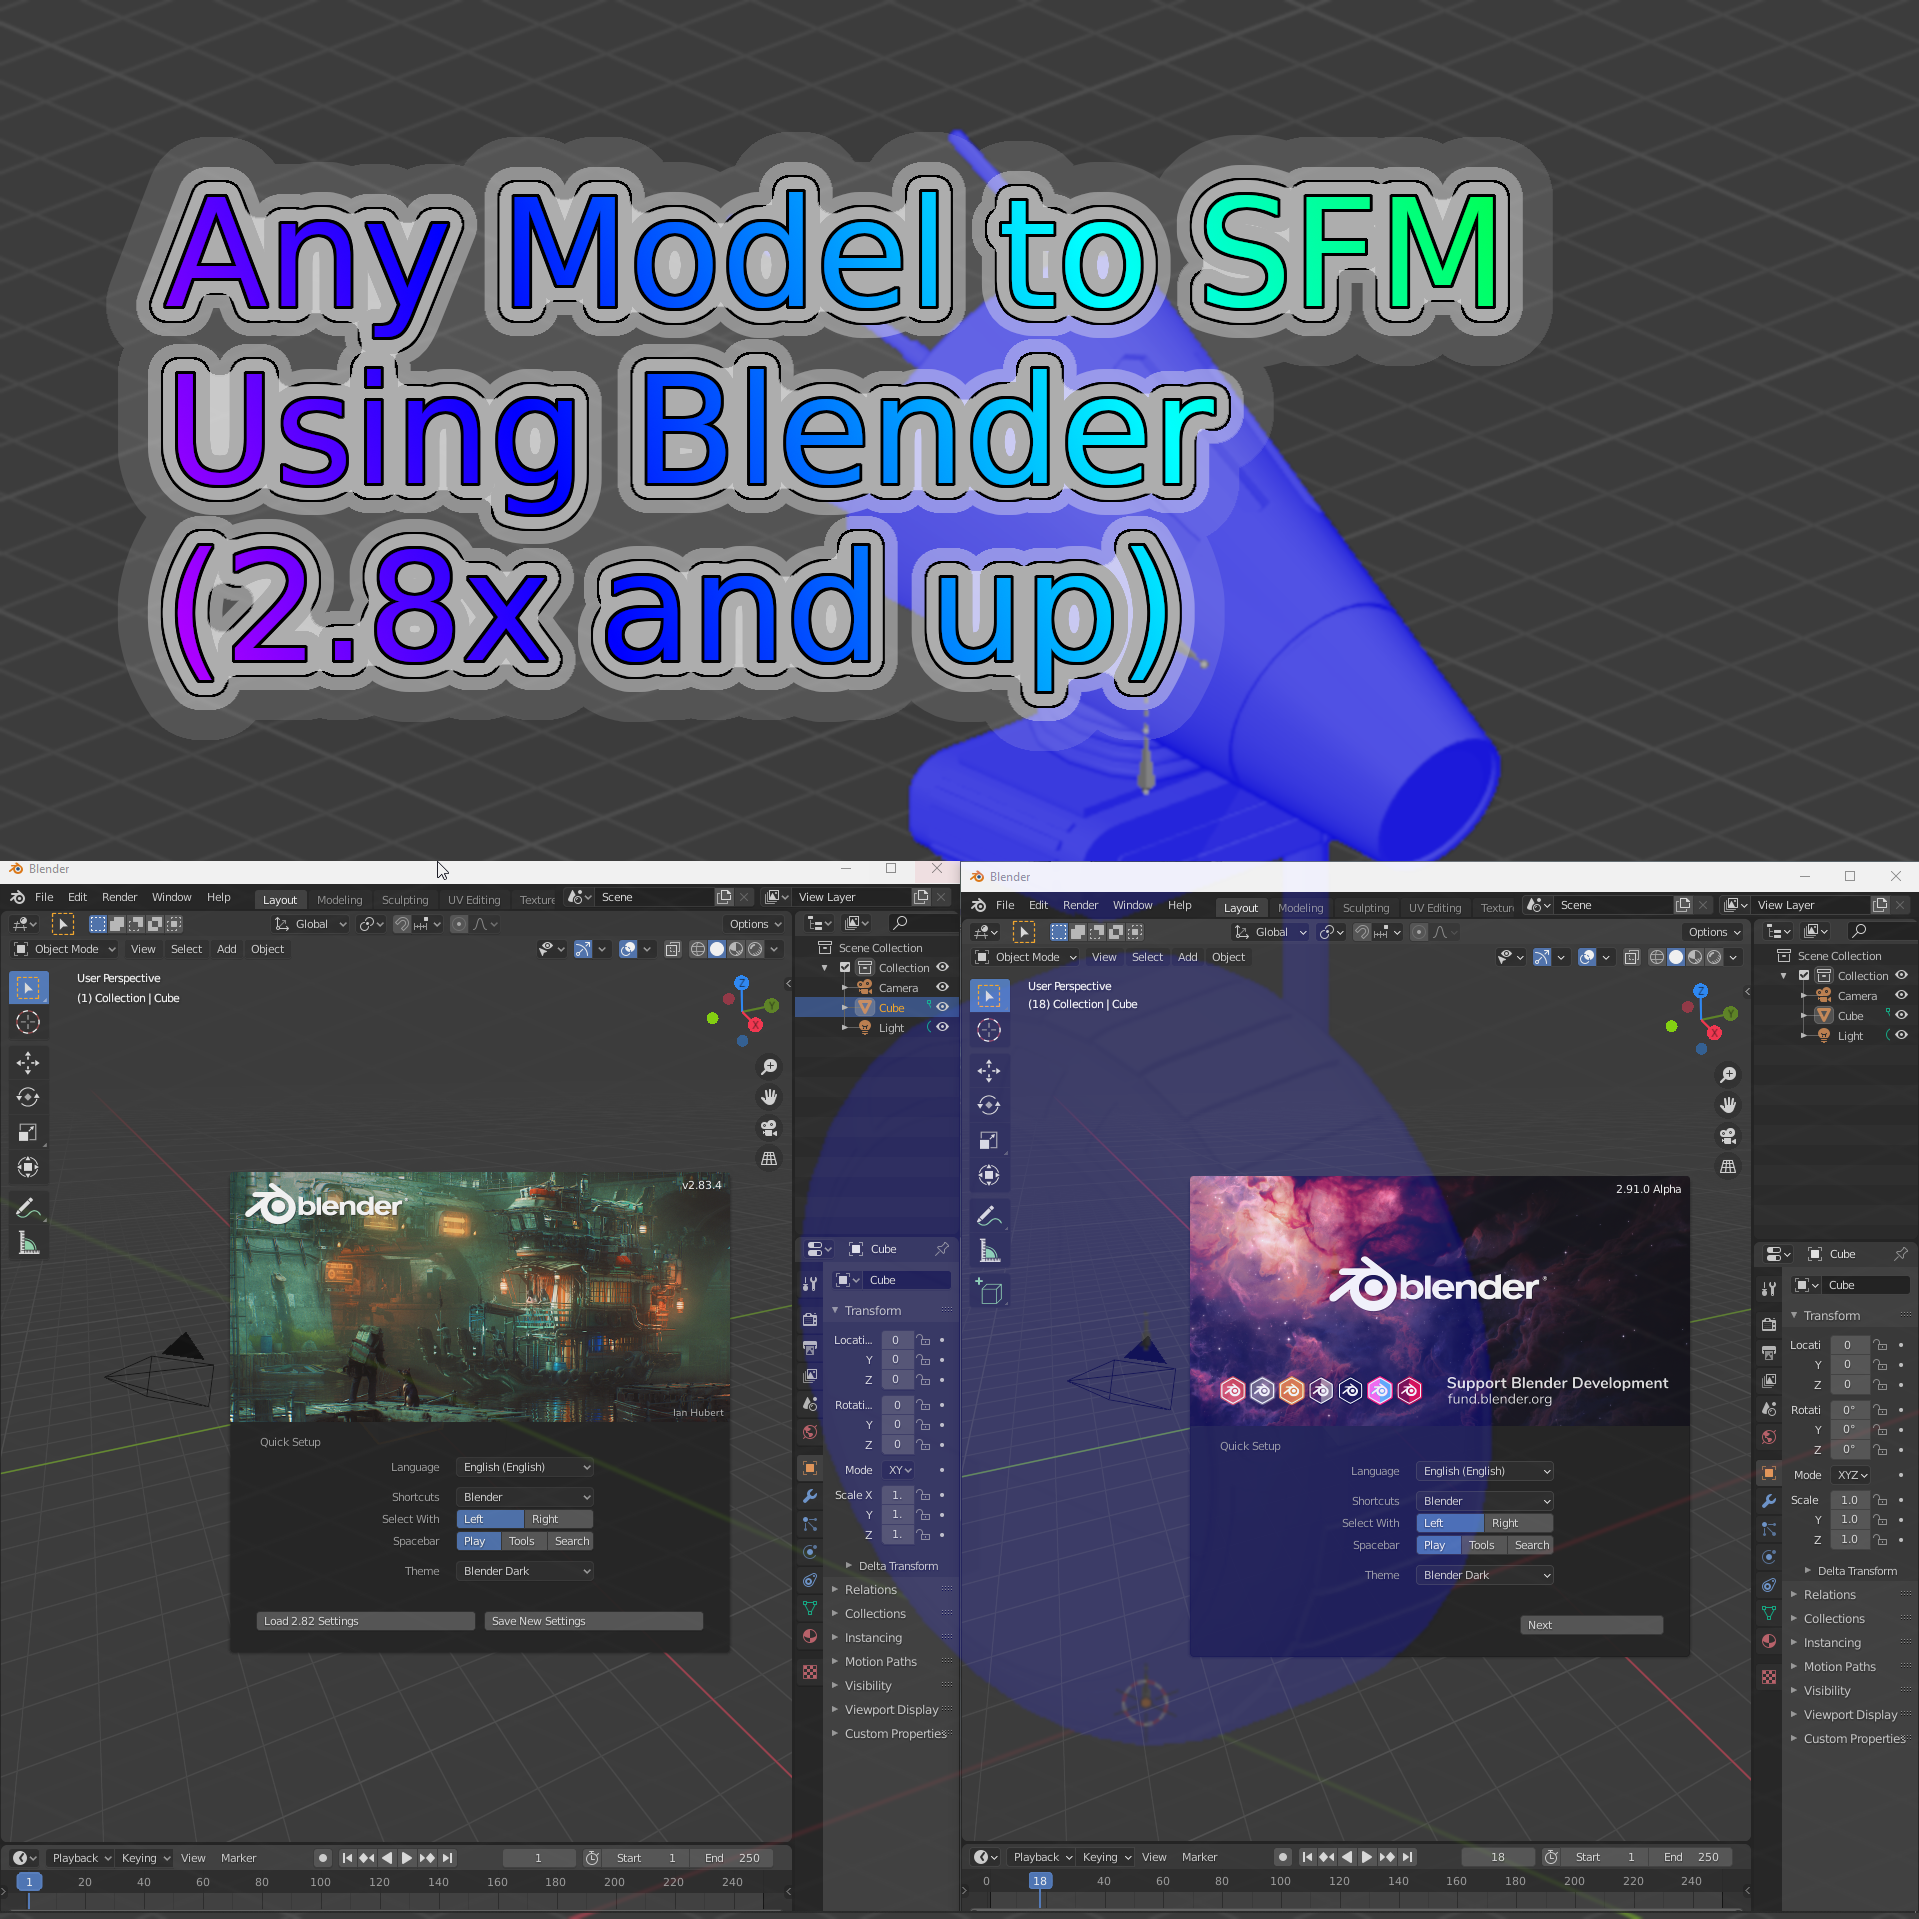
However, in order to keep ahead of the Versioning bubble that the Blender Foundation is creating, the version of Blender I will be using in this guide will be Blender 2.91 Alpha.

Fear not, other than a few additional features that are being added to the 2.9 series, the interface we’ll be using here are practically the same as the current version available on Steam. However, if I do discover something major between the current available on Steam and the version I am using, I’ll let you know.
Not only will this keep the guide current, but will also allow me to test the add-ons we’ll be using and provide me with the opportunity to warn the add-on developers of problems if they occur. Should an add-on break, I’ll roll that section of the guide back to the current version of Blender.
If you want to use the Current Alpha version being developed (and that I’m using), it can be obtained here:
Blender 2.9x Alpha [builder.blender.org]
Blender is a free, open source program and can be used for any purpose, without any fees.
Installing Blender from Steam is simple. Just go to the Steam Store page and click Free or Install Now link. Blender will be set up in your current Steam folders and the launch button will be placed in your Steam “Software” Library (same place as SFM, not in your “Games” Library)
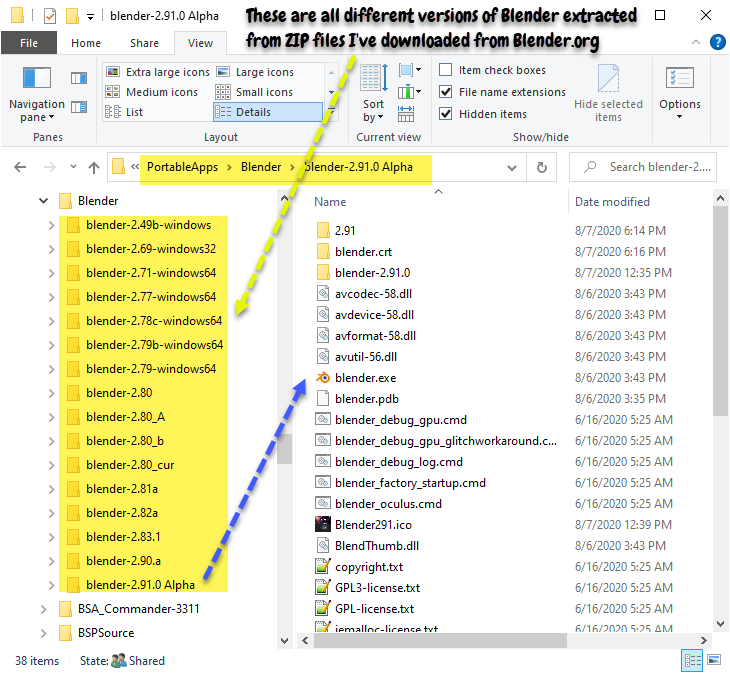
If you decide to get the Alpha (or any other version of Blender) from the link above or from the Blender Foundation [blender.org], I would suggest downloading the ZIP variant of the version you want to be able to run. The Zip can be extracted and placed anywhere on your computer and will not interfere with the version downloaded and installed from Steam. (Personally, I have about 7 different versions of Blender that I keep reaching backwards to Version 2.49b. I have these so I can use older add-ons that were not kept up to newer version standards.)

For example, I have a folder for portable apps (these are programs that can be stored and run from anywhere on my computer. They are not installed using an installer.) Inside that folder I have a Blender folder and inside that folder I have extracted various versions of Blender for backward compatibility of add-ons I use. I can drill into anyone of these folders, double click the Blender.exe file (or set up a shortcut to it) inside it and launch that version particular version of Blender.
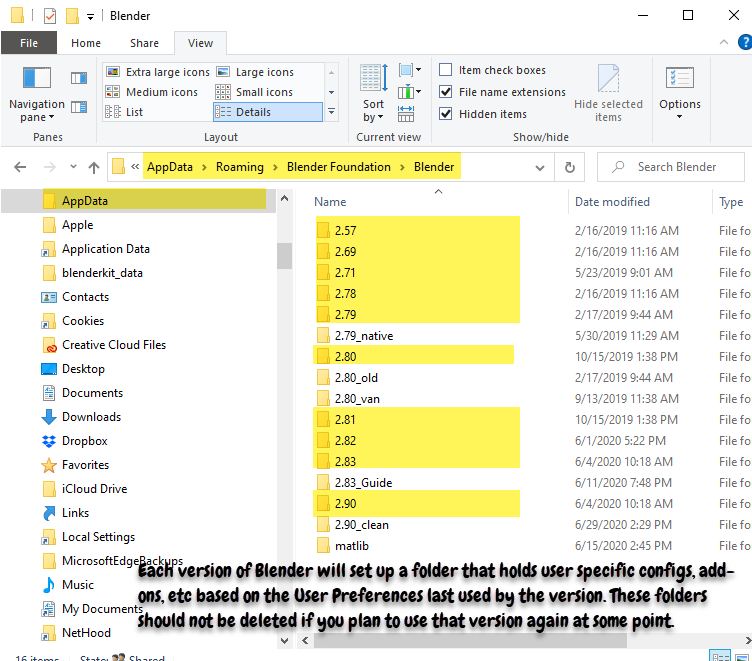
The first time you run Blender it will look in your USERS/<USERNAME>/Appdata/Roaming folder to see if you have custom configurations, add-ons, scripts, etc from an earlier version. If it finds a folder for a compatible version, the Splash screen will give you the option to import those settings into the New version. If it doesn’t, you’ll have to setup this stuff manually. On Close, Blender will create a new folder for the version or write new configurations (if you change and save the new configurations) to existing files in the new version folder.

You can run as many sessions of Blender as your computer’s memory will support. These can be multiple sessions of the same version or sessions of different versions (Again to have multiple versions of Blender, you have to download the stand-alone versions of Blender from Blender.org ) All you have to do is Right Click the Icon of the running session then click Bender from the list (if you want to run multiples of the same version) OR run the Blender.exe of the version you want to opened from where you have it installed on your system.
To begin, I’ll be using a Plain Jane install of Blender, the only add-ons that will be turned on are the ones that are enabled on install. We’ll discuss other built in and “special” add-ons as they are required and I turn them on during the process. I’ll try to keep things related to “special” add-ons in a particular section unless they are required throughout the process. (You’ll catch on as you go through the guide.)
Update:

Not only can we get these stats back to the bottom where we’re use to them being, but we can now load the stats into the 3D viewer and here is how you do both.
[link]Model Types
There are hundreds of different model formats ranging from OBJ and STL types (these usually don’t have armatures (bones)) through to MDL, DMX, SMD, XPS, PSK, PSA, FBX, DAE, PMD, PMX, VMD, VTA, etc and built from scratch types created in the editor itself. However it doesn’t stop there. Every game developer compresses their models into cache file formats that are specifically used by the game engine they use to make the game.
In order to get these models into SFM, we have to import them into a 3D Editor (like Blender, Maya, 3DsMax) and convert them to DMX/SMD format so we can use the Valve StudioMDL Compiler to create the Valve Binary Model type used by SFM (and other Source Engine Games).
The problem we have though is getting a model from its native format into the 3D Editor. This is accomplished using Import/Export Add-ons.
As Blender is a Free 3D Editor and is available here on Steam, that is the 3D editor I am going to use in this guide. As explained earlier, the current version on Steam is 2.83.4, however, I will be using 2.9X throughout the guide. The User Interfaces between versions is almost Identical, so if you’re using the Steam variant, you should have no problem using this guide.
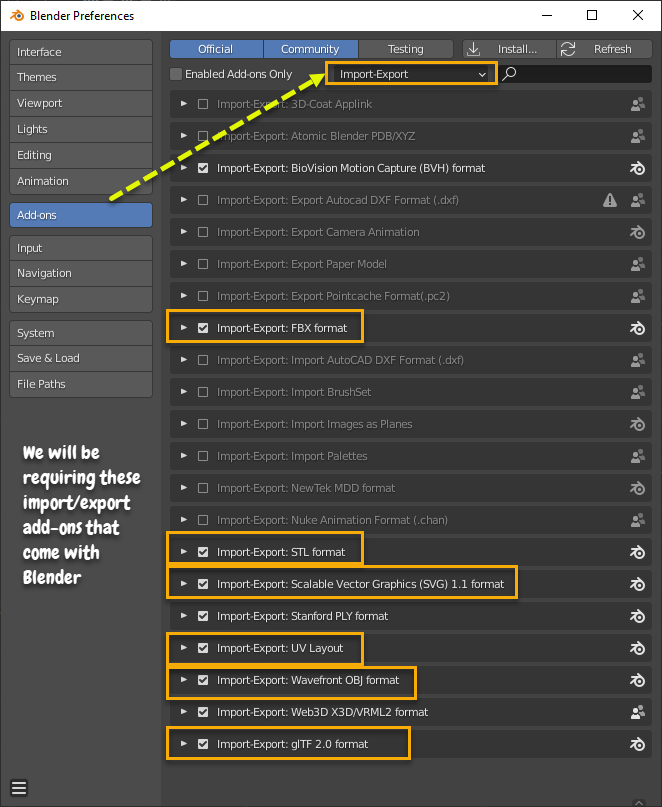
Blender has around 23 Importers/Exporters that come with it. The ones we’ll be working with in this guide are FBX, STL, SVG, UV Layout, Wavefront OBJ and maybe GiTF. Make sure you have these these are turned on (enabled) in the Blender Edit – Preferences – Add-ons panel.
Now, you’ll notice that there isn’t an Export/Import add-on for MMD, XNA, Valve, Skyrim, Fallout, Batman Arkham City or any other game model types. In order to get these model types into Blender we have to look for 3rd Party Custom (“Special”) Import/Export Add-ons. These are Add-ons like Blender Source Tools (DMX/SMD/VTA/QC), Cat’s Blender Tools (MMD – PMD, PMX, VMD), JohnZero7’s XPS Tools (XNA – MESH, MESH.ASCI, XPS) for the main model types that will be covered in this guide.
These formats are AutoDesk and Maxon proprietary file formats. There are no known import/export add-ons for these file types for Blender. If the model you want to work with is in one of these formats, you have to open them in Maya, 3DSMax or Cinema C4D (or find someone that has these programs) and export them to a format that Blender can Import, like FBX, DAE (for those with armatures) or OBJ (for models without armatures) then import those.
Before 3DSMax went to the .MAX format, models were exported in .3ds format. This format is still supported by Blender. The add-on still ships with Blender but has to be enabled to be able to use it.
If the model you want is embedded in a game cache file (for example Valve game files inside their VPK game Cache Files) the assets have to be extracted from those cache files before we can use the importers to import them into Blender. For this process we need an extractor like Crowbar. We know that Valve allows modding using their resources as long as it is not for profit and they are used in good taste. We’ll discuss this process in a section.
For other game model types, like those from FallOut, Batman, BioShock, Skyrim, Fortnite, etc, the extraction process is even more involved because of the varying levels the assets are buried within their cache files. We are not going to discuss these processes, they are to far outside the scope of the document. Besides, there are plenty of other places to get model assets that we don’t need to encroach on processes that may breach End User Agreements (EUAs) and may not be legitimate or even legal.
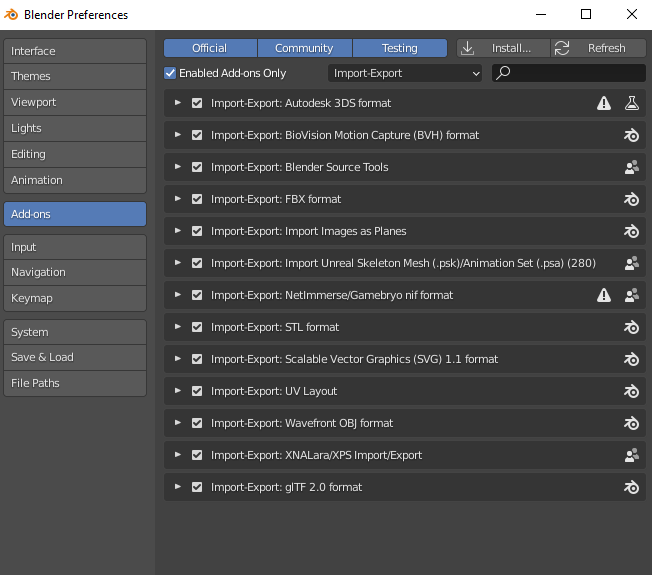
These are the usual Import/Export add-ons that I have installed in my Blender versions.
Use the following links to grab the Add-ons and Programs you need. Make sure to grab the ones that are specially written for the version of Blender you’re using.
These 2 are REQUIRED if you’re going to decompile or port models for the Valve Source Engine:
Blender Source Tools (by Artfunkel .DMX/SMD/VTA/QC)One of these links:
[link]
[link]
[link]
[link]
Crowbar (Valve Modding Tool by Zeq Macaw .VPK Extractor/Decompile and Compile Interface):
[link]
Optional based on Model types you want to work with
(MMD/VRChat Modding Tool by GiveMeAllYourCats and Hotox .PMD/.PMC/.VMD)
[link]
Cat’s Blender plug-in also incorporates Shotariya’s Material Combiner tool which is a separate download available here.
[link]
(By JohnZero7 XNA Lara – .XPS/generic.mesh/generic.mesh.ascii)
[link]
[link]
[link]
(By Befzz) (Must be manually installed)
[link]
(By NifTools.org (neomonkeus)) – Skyrim LE, Fallout 3 (does not work with Skyrim SE models.)
[link]
[link]
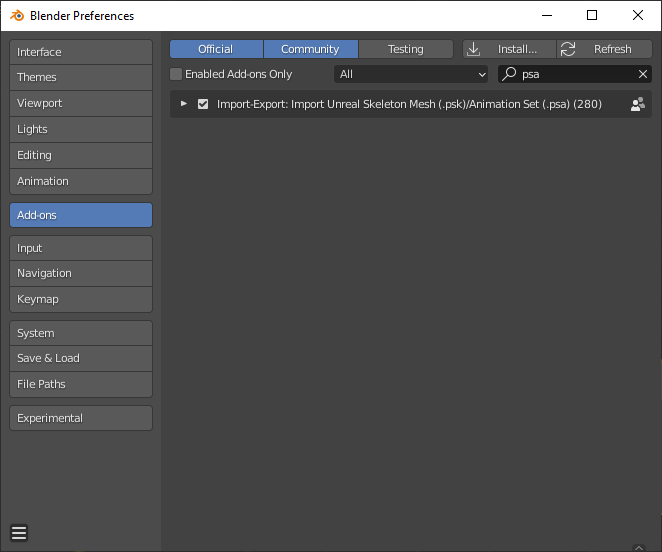
At this point, I have to start assuming that you have some sort of Blender knowledge. Installing add ons is something you’re going to have to figure out on your own. However, for those that need a little help, here are some videos on how to install Blender Source Tools and XPS Tools, Cat’s Blender Plug-in, JohnZero7’s XPS tools and NifTools Blender_NIF_Plugin ZIP downloads.
Befzz’s PSK/PSA add-on has to be installed manually into Blender. Installing from the ZIP file does not work on this add-on.
[link] [link]Model Sources
The first place to look for models is in your imagination. Blender is a powerful 3D modelling tool, however it takes a lot of practice to become proficient in modelling. That said, if you can imagine it, you can build it in Blender.
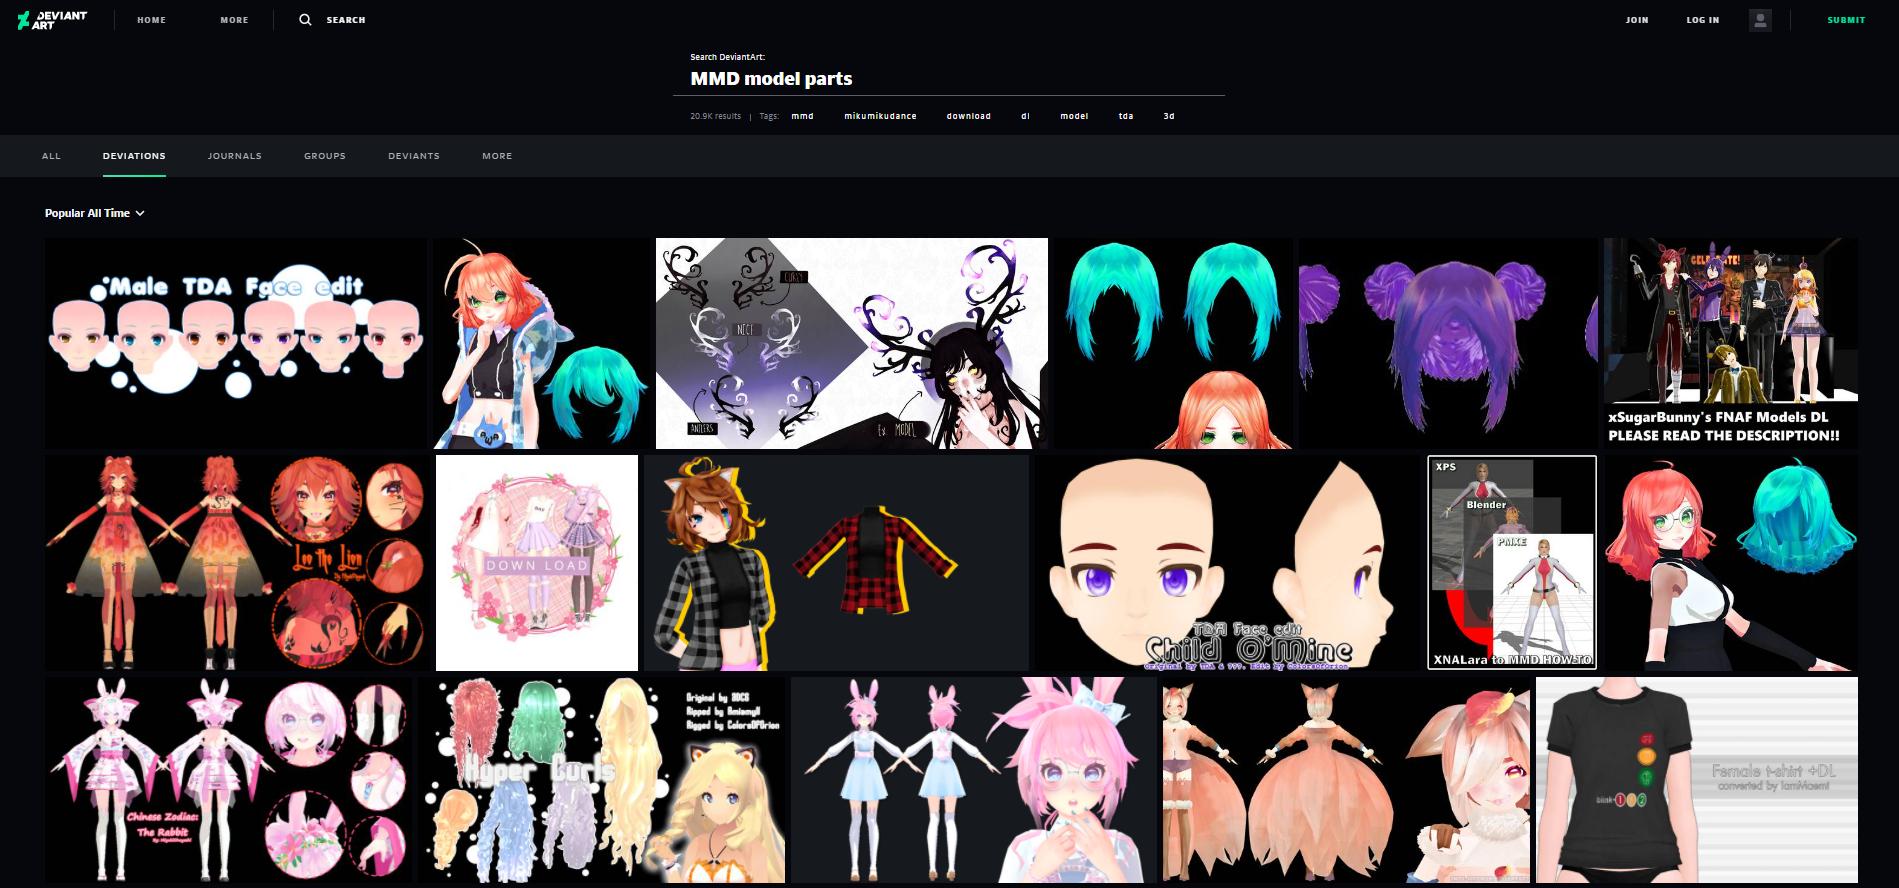
For those that don’t want to get into the intricacies of modelling and just want models ported to SFM, there are a TON of places on the internet to download models that are pre-made and might be rigged with an armature and textured. All you have to do is search for them.
For example, lets say I want a model of a 2020 Lamborghini Sian, all I have to do is Google it with refined search strings and if there’s one out there, I should be able to find one. However, don’t be surprised if you can’t find a free one… Just click links and maybe you’ll get lucky. Just because someone wants 300 dollars for a rabbit model doesn’t mean that you won’t find the same model on another website where it’s free.
Most people want want model assets from games. So here are a few good links for finding stuff like that.
BE WARNED THOUGH, ALWAYS SCAN ANYTHING DOWNLOADED FROM THE NET. I AM NOT RESPONSIBLE FOR ANYTHING THAT YOU HAPPEN TO PICK UP BY NOT BEING CAREFUL!!!

- Some Free Model Sources
- Valve Source Engine Game VPK files (We can extract these and decompile these using Crowbar)
- Other Game engine Asset Cache files (these require extractors to pull assets from the cache files, however read the End User Agreement (EUA) or check the game developers website for terms of use before you decide to do this.)
- The SFM and Garry’s Mod Workshops
- [link]
- [link] (model assets form various game consoles)
- [link] (Everything from basic OBJ props to MMD and XNA Lara models. This is where you will find game models from various game universes, including models already ported to SFM.)
- [link] (Various)
- [link]
- [link]
- [link]
- [link]
and
[link]Some Commercial sites: These are commercial sites that offer models for sale, however, they do have models that authors throw things out there for free. These free models range from unfinished work that need a lot of work to finish them, to models that don’t have armatures or textures, to fully functional models that have just been uploaded.)
- [link]
- [link] (These are sketchup models and are hard to work with. They may require a lot of work to port. Most models are built using leaf construction, meaning that everything is built with planes of polygons and are poorly constructed for SFM use. Something like working with brushes in Hammer to build maps.)
- [link]
- [link]
- [link]
What’s Next? – Game Cache Files
In the next sections we’ll look at some different model types and go through the Import processes to get them into Blender and some of the unique problems we’ll encounter in those model formats.
Models type that will be discussed here are
Valve Source(1) – .MDL, .VVD, .DX90(80&sw).VTX, .VTA, .SMD, .DMX
WaveLength – .OBJ
XNALara – .MESH, .MESH.ASCII and .XPS,
MikuMikuDance (MMD) – .PMD, .PMX and .VMD
FilmBox – .FBX
COLLADA (COLLAborative Design Activity) – .DAE
and I might touch on
Skyrim – .NIF and Unreal – .PSK(A)
Most games today don’t install game assets directly into folders on your computer. They use what is known as a Game Cache File (GCF) and each game developer uses a different method of creating these cache files depending on the game engine used.
Why Game Cache Files? Because they are more or less like a split compressed archive (Rar/ZIP) files, they take the load off servers when games are downloaded, instead of one cache file of 5 gigs (as in the old days), there are multiple files with limited sizes being downloaded and the server gets a chance to breathe between each file it serves. They also provide quicker access to assets used by the game, as most games now only load assets that are required by the user and discards unused assets while playing. This cuts down on memory usage and for those of us that are long in the tooth playing games, we don’t get the stuttering between levels or between different views we use to experience. Gaming is smoother now and faster with smaller and faster read times to retrieve assets from the cache files.
If we want to access these cache file packages, we need special unpacking software.
Because Valve allows modding and the use of their characters, I am only going to cover Valve VPK type Cache files. If you need something from another gaming company and they allows modding to their games then you’ll have to search the web for unpacking software for that company’s game. There are just too many to cover in this guide. Hint: BAE – Skyrim, UModel – Unreal Games
Unpacking Game Cache Files is not for the light of heart (or those that have a limited amount of disk space to work with.) SFM requires that the assets be available outside Game Cache files. What I mean by this is if I want the files from TF2, Black Mesa and CS:GO for use in SFM, I have to unpack the Materials, Models, Particles and Sound folders from the VPK Game Cache Files and place them into the SFM game folders. These titles will run at 102,000 files for Black Mesa and use up 23.8 GBs of disk space just for the assets, TF2, another 123,000 files using 13.8 GBs and CS:GO another 75,636 files and 12GBs of space. That’s a total of around 75 GBs just for those 3 titles if you want all the assets available in SFM.
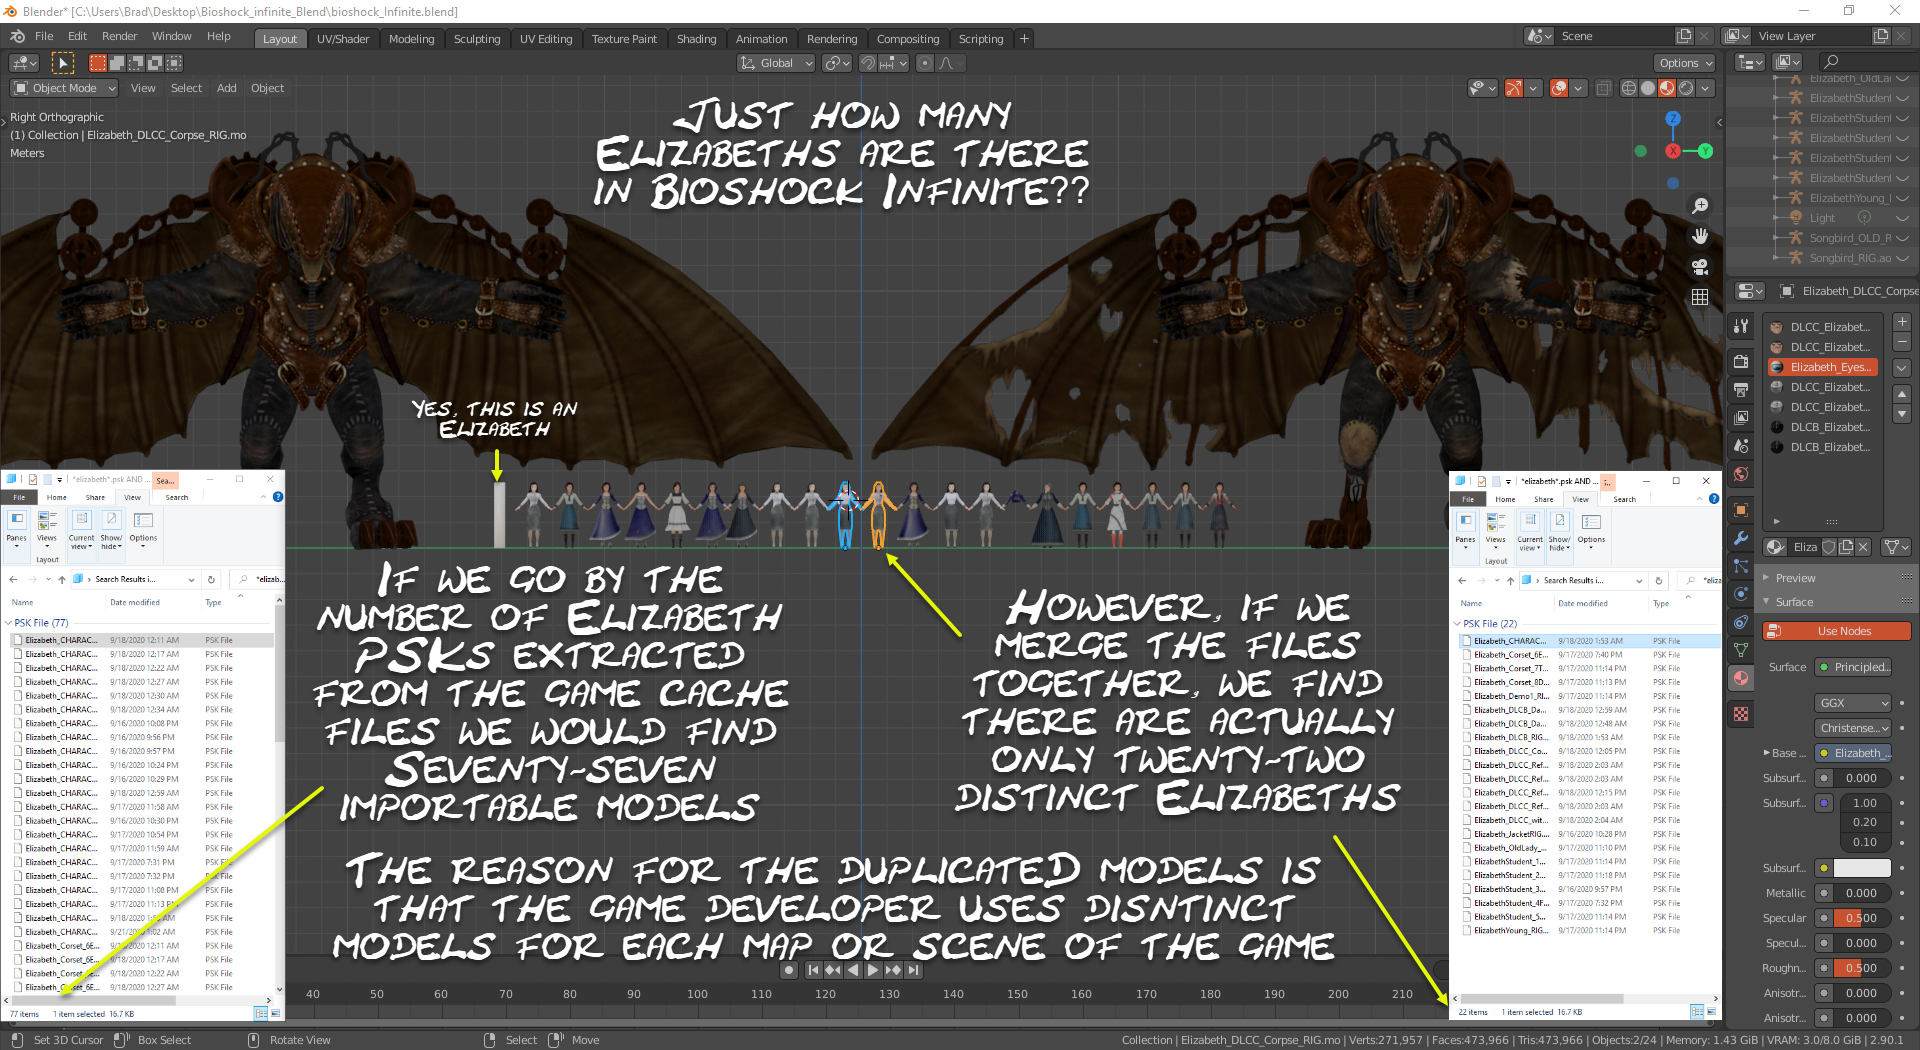
Now let’s say we want assets from games like Bioshock, Bioshock Infinite, Paladins, Batman Arkham City, Fortnite, or Skyrim. Well have a look at this. I took a couple of days to set this up and it stressed my external drive up quite badly doing it.
The extraction tools do not optimize exports and depending on how the game developers use assets in their game set up, there can be quite a few duplicated materials, textures and models in the extracted folders. These titled extracted using over 400 gigabytes of disk space and if you’re going to extract these particular titles all at once like I did, that is the amount of disk space that is required for the extraction process. This only includes sound files for a couple of the titles, if you want to extract the sound files then the extraction disk space requirement is even higher.


After extracting the games, I then merged the output into a single folder for each game. This allowed me to get rid of the duplicated and the required space drop to 114 gigs, less than a third required for the extractions, but, I required the necessary disk space on top of the extraction allocation to do the merge (So, over 500 gigs just for these titles).
Once I have the merge folders, I can delete the original extraction folders reducing the real estate used from over 500 gigs back down to only 114 (at least until I extract more titles.)
SO….
This is the process for extracting Valve VPK cache files. In this video, I’m unpacking TF2 for use in SFM however, you can refine the process to simply pull the .MDL, .VVD and the .VTX files out of the cache file for a specific model and stick them into a folder on your desktop for quick decompiling. Remember (for simplicity sake) that Valve Binary formats are not importable into Blender, they have to be decompiled before they can be imported. Also remember that if you plan to texture the model in Blender, you also have to pull the VTFs that are associated with the model as well. The textures have to be converted to an Image format that can be loaded into Blender. Blender (again for simpicity sake) does not import VTF images.
Importing Models (By Type)
In the following sections we’ll look at importing models. We’re just importing models at this point and maybe texturing them. We will not be importing animations at this point, that will be a section on its own.
The model types we’ll look at are…
- Valve Source
- XNA
- NIF
- PSK
- MMD PMD and PMX
- FBX (To include FUSE models rigged with the Mixamo AutoRigger)
- OBJ Lightwave (to include FUSE models exported from FUSE directly)
and Maybe… Just Maybe… - Valve Source 2
1. Importing Valve (Source) Models
Valve models have proprietary file formats that are exclusive to the Valve Source Game Engine and a model can be in 2 different formats:
1) Binary format – These are game ready models that have been compiled and are usable in game. They are made up from 7 different files and these are those files
a) <model_filename>.MDL – which defines the structure of the model along with animation, bounding box, hit box, material, mesh and LOD information
b) <model_filename>.VVD – which stores position independent flat data for the bone weights, normals, vertices, tangents and texture coordinates used by the MDL
there are 3 different .VT file that store hardware optimized material, skinning and triangle strip/fan information for each LOD of each mesh in the MDL
The VTX files contain data for hardware optimized material, skinning and triangle strip/fan information for each LOD of each mesh in the MDL, only the DX90.vtx is required for SFM as it uses the DX9 drivers.
c) <model_filename>.DX90.VTX
However as you decompile models, you may find models that also have these last 2 extension. There are for older models that were produced before DX9) and will import to Blender if the DX90.VTX is missing,
d) <model_filename>.DX80.VTX and
e) <model_filename>.SW.VTX.
f) <model_filename>.phy – containing a rigid or jointed (ragdoll) collision model (Not used in SFM as there are no physics in SFM when animating other than for the current TF2 models used in Record Mode which have this file already included)
g) <modelname>.ani – This file contains the information for on-demand loading of animation sequences created using a QC command (this is usually the Ref pose when you decompile the model or may be other sequence animations that have been appended to the model using the $sequence command in a QC.)
In order to get these files into Blender they have to be decompiled using decompiling software. When decompiled they become the second format required for importing into Blender.
2) Source Model Format – These are raw source files that can be imported using Blender Source Tools into Blender for editing. These files include the following File Types.
Type a) SMD and VTA – these are the old format originally used for the Valve Source Game Engine (we’re talking games like Half Life Source, L4D, Portal, DOD source, Bloody Good Time, Fist Full of Frags, Alien Swarm, Garry’s Mod here, not the GoldSrc Engine for games like HL, TFC, Blueshift, etc).
The SMD files contain the Mesh for the model and if the models have facial flexes a VTA (Vertex Animation) file will also be produced. When Imported into Blender, if the model has flexes and a VTA file, that VTA has to be imported onto the mesh that contains the flexes separately. When compiling a model that has flexes, the flexes have to be defined in the QC in order to make them available in Game.
This is also the only type that is currently available when a model is decompiled. There aren’t any decompilers at this present time that will decompile a model in to the second type of Source File.
Type b) DMX – This is the new standard for Valve Source formatted models. It is more robust and flexes are written into the model instead of to a separate VTA file. When imported, if the model has flexes they will automatically be added to Blender as the DMX files are loaded. When the model is compiled, the only flexes that have to be defined are the eyeballs and the flex controllers that control them.
NOTE: There is an importer add-on for Blender that is currently being worked on that will import model MDL files directly Blender without having to decompile the model, however, it is still currently in development stage and doesn’t work 100% of the time (so this is the only place in this guide it will be discussed.)
It is an Importer being developed by redXeye and his team and they are also trying to get this to work with Source2 models as well. However, as I said, it is in the early stages of development and does not work 100% of the time. If you want to check it out, that download the latest release from here. [link] After that, you’re on your own getting the model into Blender. Come back once you succeed importing the model or want to use Crowbar to decompile the model.
Valve Source(1) Engine materials and textures are also in a proprietary format. The VMT and VTF files.
VMTs are the material files that are called from a model and tell the textures how they are displayed when in game. These are text files and contain specific variable commands and call the texture images from locations contained in the commands.
VTFs are the actual texture image files. These are used to paint the model based on the UV layouts of your mesh and include all the diffferent types of textures, like the base colour, normal maps, enviromental and phong masks, etc.
In order to texture your model in Blender, the VTF files have to be converted to image formats (like .PNG, .JPG, .DDS, .TGA) that can be loaded by Blender, it does not supprt the VTF format natively (nor does it currently support GIFs).
So, where are all these models and how do I “decompile” them
If you’re looking for game models from the various games downloaded on Steam, then you’re most likely not going to find them in the game folders they’re supposed to be in. Game files have been compressed and packed into asset cache files so they can be delivered more efficiently and we need unpacker software to pull them out.
Prior to 2013, these used to be the GCF files that came with the game, and as you played the game, the engine would unpack the assets you required when you needed them. In 2013, the cache file system was changed, and now these files are called VPK files.
There are 2 programs you can use to extract (unpack) both GCF and VPK with. These are GCFScape (one of Nem’s Tools) and Crowbar (a modding tool created by Zeq Macaw).

I have downloaded and I have used the downloads from this site (or I wouldn’t be suggesting the link). This is the virus scan report on the 2 files offered by Moltard on that page. Both come back “Safe: No Threats Detected” However, as with anything found on the net, you might want to throw it through the Virus Checker you trust.


Crowbar is now a Swiss Army Knife for most things involving the Source(1) Game engine. It not only acts as an unpacker for Source Engine APK, FPX, VPK and GMod GMA files, it is also a Repacker, a Decompiler and a Compiler Interface for Source(1) Engined models (like almost ALL of them), Model Previewer and a Workshop Down and Uploader.
You can get Crowbar Here:
[link]
Tools Required for Decompiling and Importing Valve Models
Valve models that work in the GoldSrc and Source(1) game engines are in a proprietary binary format and we’ve already covered what files make up a model. To use these in Blender we have to “Decompile” them using a decompiler program.
There are a number of decompiler programs out there. These are programs that will read the Valve MDL, VVD, and VTX files for a model and convert them into the Valve Source Model Data formats (SMD and VTA) required for import into Blender. The Decompiler will also create a QC file making the import process easier (if you choose to use it).
There are currently no decompiler programs out there that will create DMX outputs of Valve Binary models. (That I know of at any rate!)
The Decompiler I will be using is Zeq Macaw’s Crowbar (and the link to get it is above.) The other compilers out there are programs like Cannonfodder’s Model decompiler, Hooches Fixed Model decompiler and Cra0kalo’s Enhanced Model decompiler, but the last time I looked at these they were extremely old, written to work with the old Valve/Steam delivery system prior to 2013 and very hard to find now. They require extra special setup in order to use. (I’m not sure if they will even decompile a HWM model.)
So, Crowbar is up-to-date, works with most of the current Goldsrc and Source(1) model types and is actively being upgraded and improved. (It will also decompile whole folder and subfolders of model files in one go, if that is something you want to do.)
To decompile a model using Crowbar.
It’s a simple as… (Remember you can click the image to blow it up)

That’s all there is to it. Really! It doesn’t matter if the model file being decompiled is a prop, character, vehicle, or are models containing animation data, anything that is compiled for use in Goldsrc or the Source(1) engine is decompiled the same way using Crowbar.
Depending on the options selected Crowbar will produce a QC, a SMD (Valve Source Model Data) for each body group in the model and VTA (Vertex Text Animation) files (if one is available), thes are what we require to bring into Blender.
For the Valve Source(1) game engine, Textures require to be in a Valve Texture Format (VTF, get it?) This is a proprietary format that only works in the engine for us to import or work with these texture in Blender, they have to be converted to an image format that Blender can use. Some of these are PNG, JPeg/JPG, DDS, TGA, BMP, etc. Blender does not work with GIF type files natively. If you want animated textures in Blender, then you have to use image sequences or movie (like MP4 and AVI) type files.
The process for converting these files to usable formats has not changed and require 3rd party software to do it. This software includes VTFEdit or the VTF add-ons used by the GIMP, Photoshop or Paint.net image editor.
There are already a ton of guides and Youtube videos on how to convert VTFs to Blender usable formats already, so I’m not going to go into detail on the process here. But for those that don’t know, the image editors can only convert one file at a time. The add-ons will allow you open as many files as you want in one go (as long as the VTF are in one folder), but when it come to exporting the files in a Blender usable format, they have to be exported one at a time.
VTFEdit however will allow you to convert folders and the reclusive folder under a selected folder of VTFs and will output those converted textures to a folder of your choice. But remember, if you don’t already have VTFEdit, it was a Nem’s Tool and that website is currently gone. But I have told you where you can find it earlier in the guide.
The Source SDK Content Folder
If you plan to modify any of the TF2 Characters either by adding mesh to them or to give them animations, use any of them as Reference Models in your project or are watching any of my videos where I refer to pulling reference models from the Source SDK Contents Folder, if you try looking for that folder, you’re not going to find it.
If you want to modify TF2 characters (other then the HWM heads from TF_Movies), then instead of decompiling the Character model, Valve has provided us with reference models for all the TF classes and these are the models we should be using. The reason being that these models don’t have any funky Delta Animations embedded into them or anything else added to them. They are pristine in nature. So, what I’m saying here is that let’s say you just spent 15 hours on creating an animation for the scout on a decompiled TF_movies HWM model and it looks perfect in Blender. However when you import that animation onto the model in SFM, your model to look like this…
[link]
Well, you should have used the Valve Reference model.
So where do you find the elusive SDK_Contents folder?? Well here’s your first VPK Extraction Exercise.
First, make sure you have the Source SDK downloaded and installed from Steam. If it’s not Bold in your Steam Library Tools library, you don’t have it… Get it! (just like you would any other game and it is FREE!)
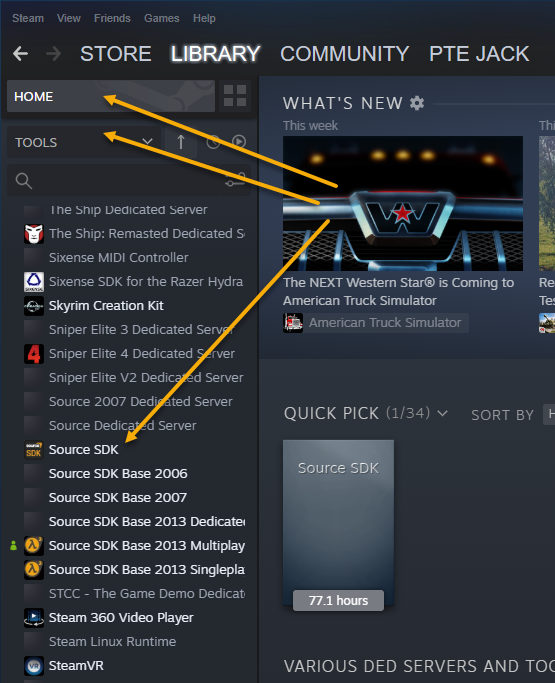
- open Crowbar or GCFScape (If using Crowbar, select the Unpack Tab)
- Point the program to the folder where you installed the SourceSDK and then drill into the VPK folder and select depot_211_dir.vpk
- Now,
For Crowbar, set up the folder you want to place the SourceSDK_Content folder into (it doesn’t matter where you put it, I’m selecting the desktop for simplicity sake)
Select the folder In the right screen and click UnPack.For GCFScape, Select the SourceSDK_Content folder in the right window, Right Click on it. Point the Browser to the folder where you want to extract it to (again, I’m using Desktop for simplicity sake), and press OK.

If you go into the folders that were unpacked and look in the TF folder, you’re going to find this
There will be more on the SourceSDK_Content folder and it’s uses as we go through the guide.

Importing Valve SMD/DMX/VTAs into Blender
Now that we know how to decompile a model, it’s time to get it into Blender. To import a decompiled Valve Model into Blender we require the Blender Source Tools add-on by Artfunkel.
The import process has not changed from when I started using Blender in 2013 through all the changes that have occurred to Blender. However, there are multiple ways that BleST can import the model.
These are,
- Import the mode as a whole using the QC to build it in Blender,
- Import individual SMD/DMX files and append them to a single armature, or
- Import individual SMD/DMX files and have them use their own individual armature.
The process is simple:
First we usually delete the Default cube.
Then Select File – Import and select the Source Engine (.smd,.vta, .dmx, .qc) Importer
When the File browser opens, on the right of the Folder/File lists panel, you’ll find the Import options for Blender Source Tools (BleST). Here are the options expanded with a brief explanation below.

- Import Animations – If this is checked on, SMD/DMX files that contain animations will be imported.
- Create Collections – New in Blender 2.80. Collections replaced the old Scene layers and the Group function. They provide the ability to group objects together under an umbrella so we can turn them on or off quickly in the outliner (as a quick example) but they let us manage much more as well.
If this check box is checked on, every SMD/DMX file found will be placed in its own collection and as you can see can become quite cumbersome. Unchecking the box will parent a SMD/DMX to its armature (depending on the selection in #4) Unchecking is my preferred method of importing Valve models especially if it is a complex or high polyed model as Collections can lead to problems when the model is exported for recompile. (more on this later), - Make Camera At $origin – I usually leave this unchecked.
- Bone Append Mode – Default for this is Append To Target. But let me explain.
Each SMD/DMX file is given a complete armature on decompile. As a model is imported this option gives us the ability to
a) validate against a target and add new bones if none exist,
b) Append newly loaded SMD/DMX/VTA files against a selected armature or mesh object so they meld into the existing armature, or
c) Create a new armature for each SMD/DMX imported so they all have their own armature.In most cases you will want to use the default (Append to Target).
- Up Axis (X, Y Z) This is the direction the model is pointing from toe to head. Blender uses Z is up and -Y is front as a default orientation. The TF2 Characters use the Maya Y is Up and Z is front as their default orientation method. So if we import these without changing this setting, the model will import with their backs on the Blender Floor. If we set this option to Y is up, the TF2 Characters will import standing on the Blender floor instead of laying on their backs.
- Rotation mode – the default rotation mode for Blender is Quaternion (Don’t ask, I really don’t want to go there) but to be brief, this uses 4 dimensional equations for rotation (W, XYZ).
SFM uses Euler rotations which are rotations measured in degrees. So when posing or importing animations, we want this set to Euler. - Bone shapes – By default SMD/DMX files import their armature bone shapes as Spheres. We have the ability here to turn off those ball (sphere) shaped bones into something else here. We can change them to either what our Blender Default shape is (usually Octahedral or Stick) or change them to Arrows or we can just leave them as the normal spheres were accustom to.
1. Importing using the QC
This will import the model based on everything it finds in the QC file.
- Point the File browser that opens to the folder where you put your Decompiled model SMD/VTA/QC files.
- Select the QC file that was created by the decompile process.
- Decision time – Make your option choices based on the commentary above.
- Click Import (SMD/VTA, DMX)
- and the whole model (armature and mesh) imports into Blender (which a bunch of big ugly dots all over it if there is a VTA file. More on this in a bit).
2. Importing Individual SMD/DMX files
- if you plan to append or validate against a target armature SELECT THAT ARMATURE
- point the file browser to and select the SMD/DMX file you want to import
- change the options as required
- Click Import (SMD/VTA, DMX)
3. Importing VTA files
- SELECT THE OBJECT THAT THE VTA IS FOR, This is the TARGET (usually the head object)
- Set the Bone Append Mode to Append To OR Validate Against Target (preferred is Append)
- Click Import (SMD/VTA, DMX)
- Your model will coat itself in big ugly dots, but the selected object will now have Shapekeys.
This video covers the import process of Source models for both Blender 2.79 (or older) and 2.80 (or newer), it does not get into texturing the import.
Texturing a Valve Model in Blender 2.8x and above.
To texture a Valve model in Blender now requires the use of the Shader editor. However, I am not going to cover this in this guide.
Why???
Because I’ve already written a in-depth guide on how to texture Valve models in Blender 2.80. The process for using the Shader editor has not changed in version up to and including 2.91 (So far, anyway.)
You can find that guide here…
[link]2. Importing XNA Lara Type Models
XNA models usually have a file extension like .XPS (newest format), generic.mesh or generic.mesh.ascii. To import these type of model into Blender 2.8x and above) we require the newest version of JohnZero7’s XPS tools (where to get and install was covered earlier).
The import process is pretty simple.
- Install the JonZero7’s XPS Tool add-on into Blender and enable it
- Get your hands on the asset you want to port to SFM and download it to somewhere on your computer.
In this example, I’m going to use a model of Rebirth Mason uploaded to Deviantart by SaltPowered. (Thank you Saltpowered for your contributions)
If you want to follow along, it is available here [link] and I’ve put the downloaded RAR file on my desktop - Extract the downloaded compressed file to somewhere on your computer (again, I’m using my desktop).
- in most cases inside the extracted model folder you should find the model’s .xps (generic.mesh or generic.mesh.ascii) file(s) and the textures it uses (which may be in TGA, PNG or JPG formats). If there are no textures, you’re going to have to find them somewhere on the net or create them yourself.
- Launch Blender and delete the Default Cube
- Select File – Import and find the XPS Tool importer (or use the XPS Tool tab in the Transform Tools menu)
- point the browser to the extraction folder then import the model.

In the File browser used by the importer there are some options we can play with.
Setting up Materials and Textures on a XNA Model

One of the sweet things about XPS models is that if the textures are in the correct place, turning on the material or rendered view, the model will texture itself. This is done on import.
This setup is usually just the base diffuse colours.
The process does not set up the normal, specular, AO or other texture maps. These you have to set up manually in the shader editor if you want to see them.
XPS models use a special special XPS shader as well, so plugging in the other textures is pretty simple, Just add an image texture node for the textures you want to add and plug them into the input nodes of the XPS shader.

If you start adding other textures and all of a sudden the textures look really botched up, it’s usually the normal map that is bad and has to be fixed. This model has this problem. All the original Normal maps are a grey colour where they should be bluish in colour.
Correcting the broken texture and plugging it in will get you back on track


3. Importing NIF Models
NIF is a weird format to work with and one I don’t have much experience with. However that said, I get a lot of questions about them because to the weird way the import. Things like” I’ve imported a Skyrim model but the armature is totally broken”, or “Why can’t I get a Skyrim (SE) model into Blender?” Well, lets have a quick look at one and get it into Blender.
Firstly, as I have already mentioned, the importer is game specific, meaning that it will only work on certain models EXTRACTED from their game cache files. (I’m not going to get into the Cache File extraction process, but there is lots of information on it on the net. {hint: BAE})
At the time of writing and using the most recent version of NIF Tools these are the known games it works with for modding. (This is taken directly from information in the Add on.)
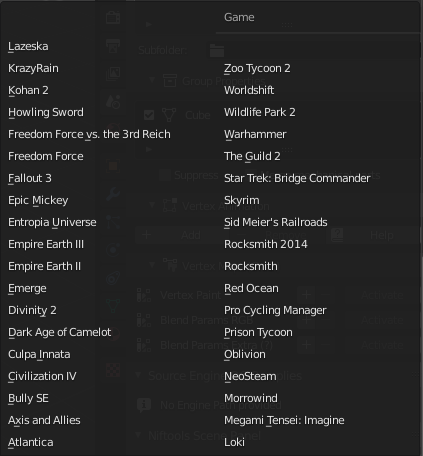
So let’s work with something it does work with. I own the old version of Skyrim, I have extracted the game cache files and the purpose of this section is to import a nif model.
The process isn’t as easy as the last 2, For Skyrim models other than the main characters themselves (and even these have multiple parts), we have to build them, piece by piece from the available meshes located in the (what???) 1874 folders of the meshes folder. Well, welcome to the world of porting models.
So, the process…
- Unpack the GFC to somewhere Blender can reach on your computer. (I have mine on a External Hard Drive)
- Fire up Blender and make sure the NIF addon is enabled via the Add On tab of the Preference Menu and delete the default Cube
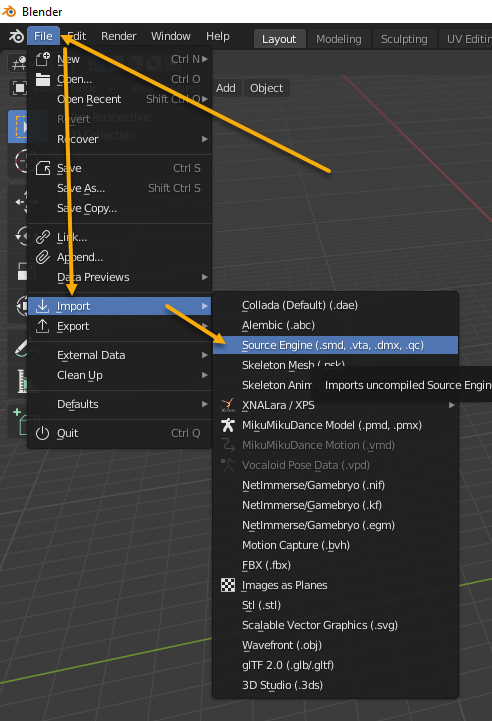
- Select File – Import and find and select the GameImmerseGameBryo (.nif) importer (we’re after models right now, not animations which we may not be able to pull in anyway)
- Start building your Character
Pro Tip: Add Folders to Favorites – Make your life easier, you’re going to be bouncing in and out of these folders a lot.
Most of the meshes you’ll want will be found in the
MeshesActors<charactertype>character_assets
Folder. In this example I will be importing the malebody_werewolf_1.nif mesh found in themeshesactorswerewolfbeastcharacter assets folder
- So we select a nif file, set the options, click import NIF and this is what we get.
Is this really the armature??? Is it really broken??? Do I really have to join all these bones together manually to make it work??
The short answer is No! This is not the real armature, no, It is not broken and NO, you don’t have to manually connect the bones. This is a binding type armature.
However the long answer is… - Inside the folder you found the Mesh NIF you should (or may not) find another NIF called Skeleton.NIF (If there isn’t one present, then the model is using a generic skeleton from some place else and you’re going to have to go looking for it).
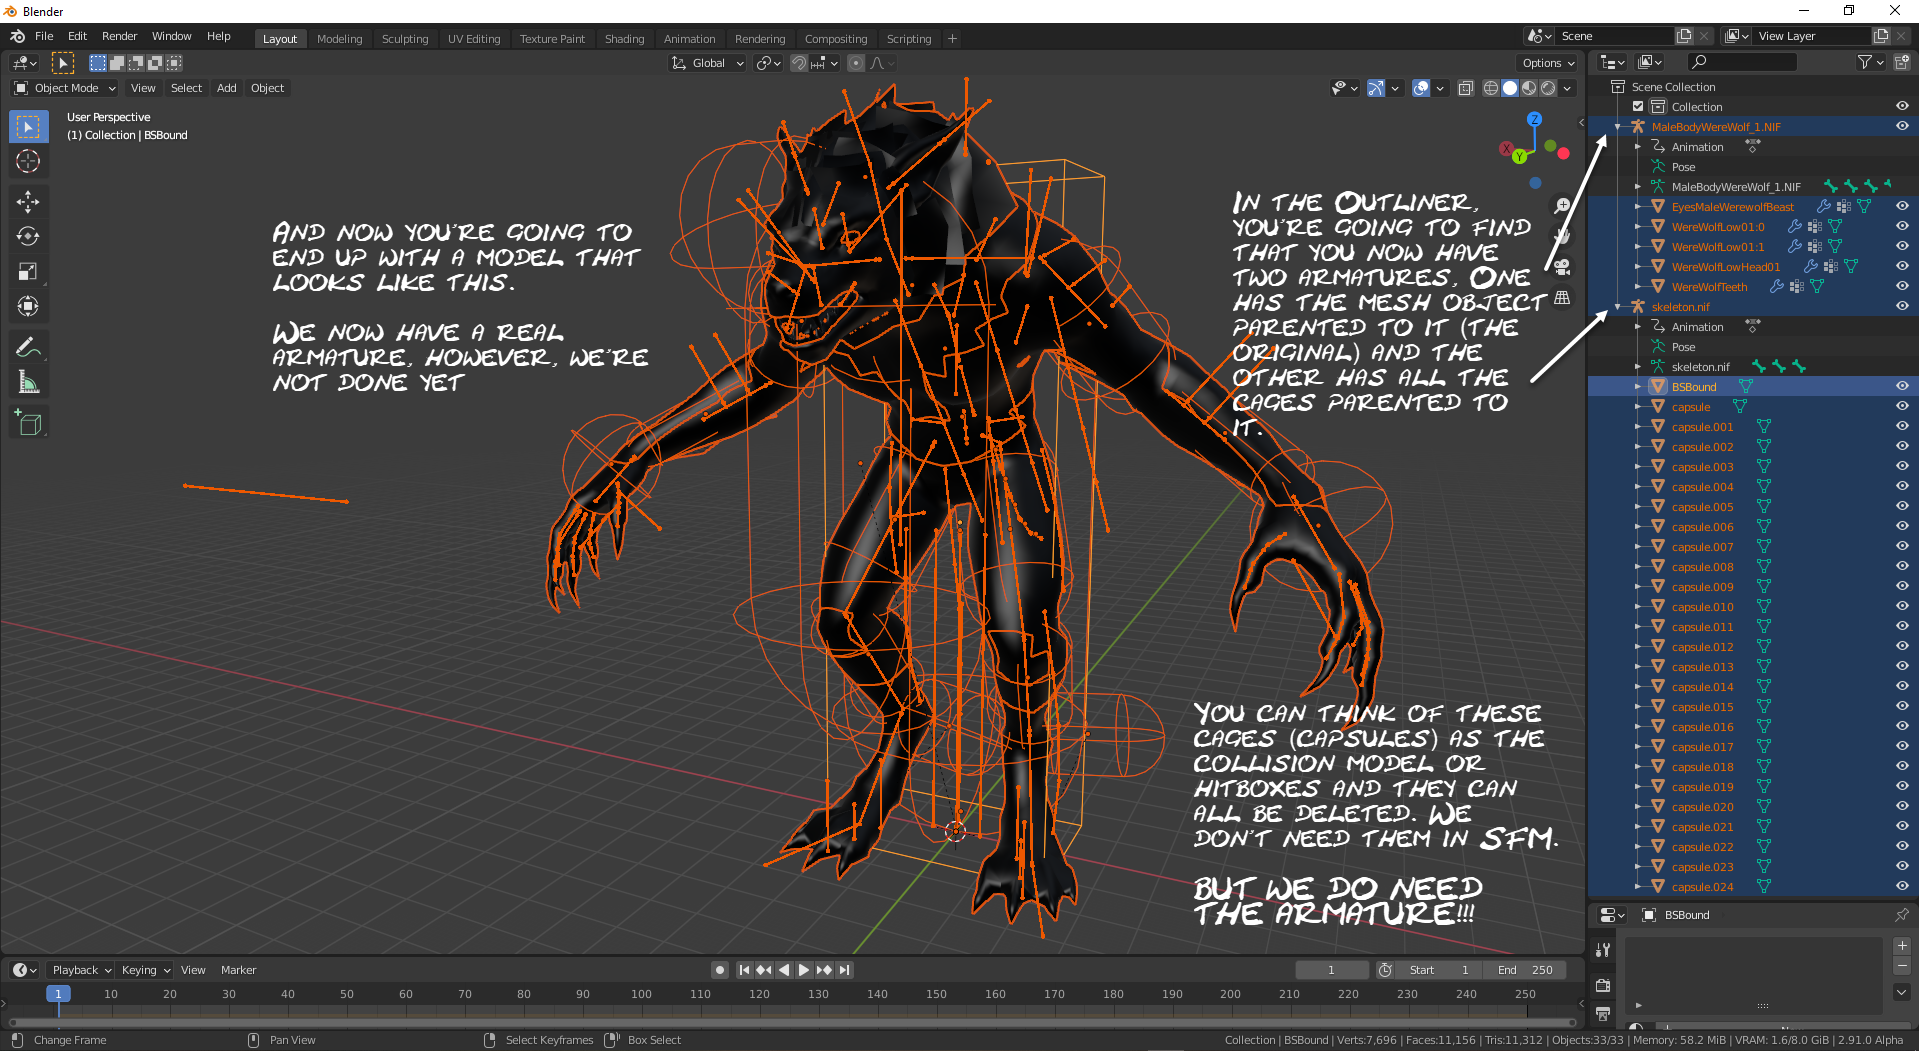
Using the Nif Tools Importer, Select it and import it onto the model and we end up with a model that looks like this…
- Delete the cages, (just select them in the outlner so they are all selected and press X) they aren’t required and unparent the character mesh objects from the original armature by selecting a mesh object, then in the Properties Panel select the Object Properties tab and expand the Relationships property. Click the X beside the Object the mesh is parented to to delete it. This will unparent the object from the original armature. This has to be done one mesh object at a time. As you unparent, the mesh object will jump in the outliner from being a member of the armature to being an object of its own.
(Just unparent the mesh, DO NOT DELETE ANY OF THE VERTEX GROUPS FROM THE MESH OBJECTS YOU UNPARENT!)
- Now select each mesh object, one at a time, and then select the Modifier tab and change the Armature Modifier from the original armature and have it point to the armature that we imported. This will join that mesh object to the new armature.
Once the Armature is reassigned to the mesh objects, if we put it into pose mode and move the bones, the mesh should deform to it. The small black bones that aren’t moving in this picture belong to the original armature and if the model is deforming properly now after testing the new bones in Pose mode, that original armature can be deleted so the model only has the one and active armature.


In the walk thru video below, I’m going to attempt to build an actual more complex and generic character model in case you need more help.
Nif models have their own shading and lighting tools which are loaded when we enable the NifTools add on. These tools are located in the Materials Property Panel for each mesh object and they are quite complicated..

In order to see the materials in their current form, we have to switch to Material or Render View Mode.
NifTools creates a basic Material Shaders for each material it finds. It also tries to find Base Textures and Normal maps. Like XNA models, if we want to view these textures in place and the way the are supposed to be, we have to edit the shaders for each material manually. (Believe me, this is going to get easier the more you do it. You learn what to look for and how they plug into the Shader nodes.)
So… Here we go… In Object mode!! (and this has to be done for each mesh object in the model and each material has to be deciphered and new shaders types added and mixed to compensate! )
- Change the view mode to Material View
- Select a mesh object, then select the material tab in the Properties Panel
- Make sure Use Nodes is enabled
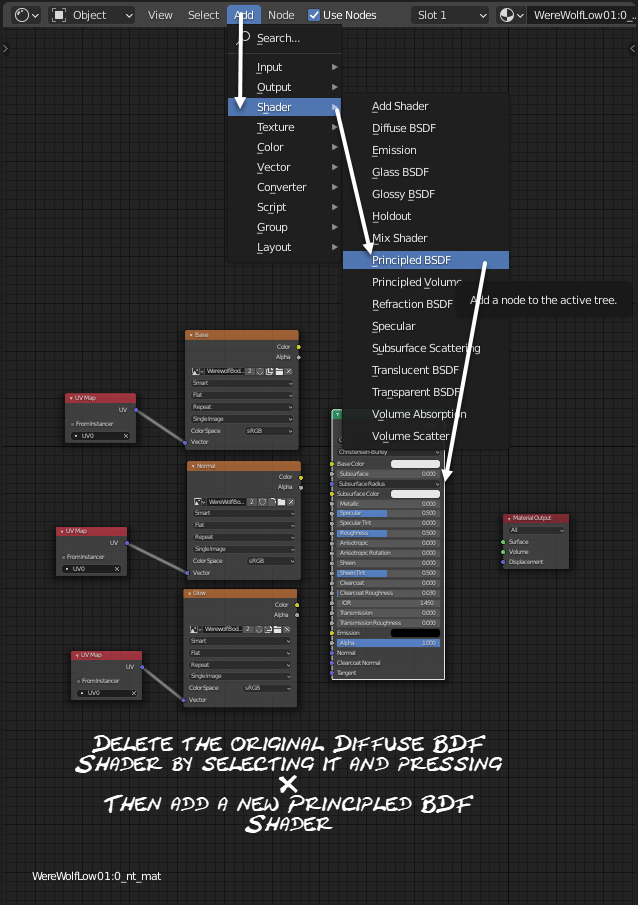
- Split the work area and load the Shader Editor into one of the windows
- The Nodes in the shader editor may be stacked on top of each other, grab an individual node and separate the nodes into connected groups.
- Delete the default Diffuse BDF Shader by selecting it and pressing X and ADD a Principled BDF Shader. (This will allow us to blend textures together using only one shader instead of adding a ton of different shaders and Mix Shader Nodes to piece them together.)


Out of room in this section!
Importing NIF Models (Continued)
- Now we start plugging the texture nodes into the Principled Shader Node adding mix and other shaders as required.
Nif Texture are named as follows.
<texture name>.dds are usually the Base textures (Plugged into the Base Color Input node)<texture name>_n.dds are (yup, you guessed it) Normal Maps (A Vector – Normal Map Node is added and the Image Texture node is changed to a Non-Color Color Space. The Image Texture node is plugged into the Vector Normal Map input then the output from that is plugged into the Normal Input of the Principled Shader Node.)
<texture name>_sk.dds are usually subsurface detail maps. These are tricky and need to be experimented with, but usually plug into the SubSurface Color input of the Principled Shader.
These _SK.dds files can also be Glow or Emission type textures, so like I said, Textures need to be deciphered as to what they are, what they’re supposed to do and plugged into the required Principled Shader Inputs or passed through some sort of BDF Shader then mixed into the material output with a Mix Shader where needed.
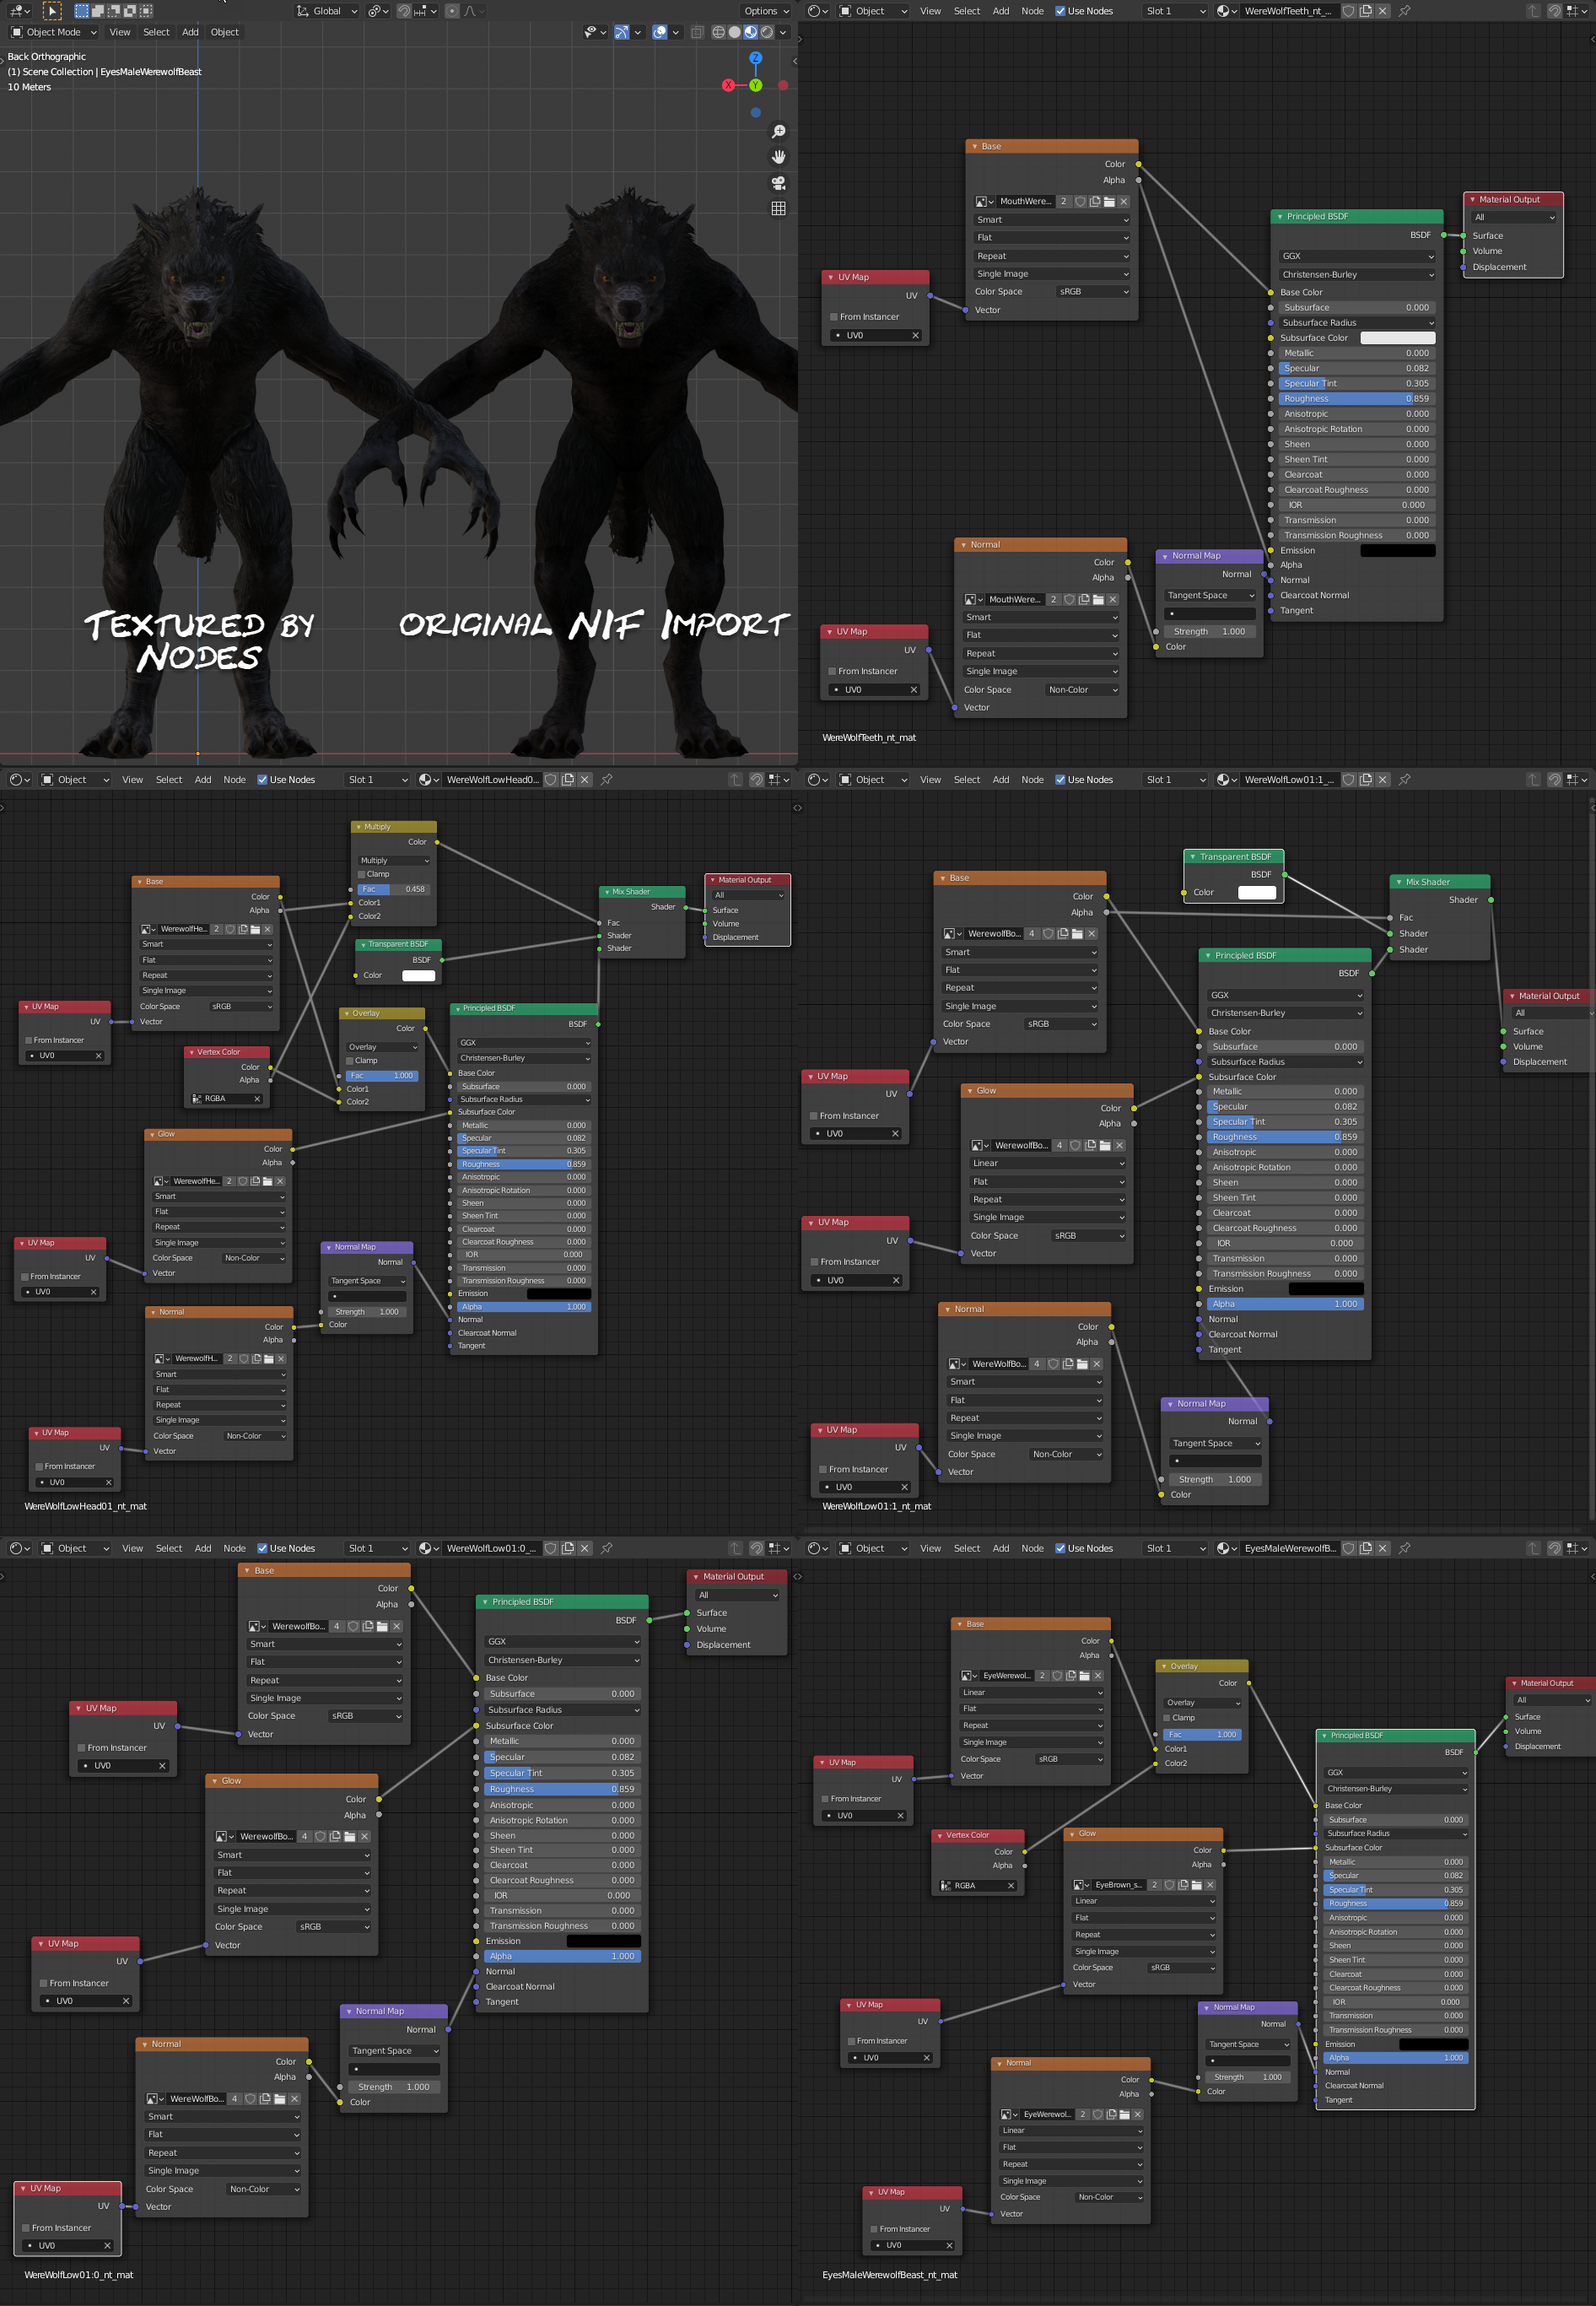
When the nodes are set up properly, you should get a representation that is close to what it is in the actual game. This is how I set up the nodes and the resulting textured model in Blender.
And that’s pretty much all there is to importing and texturing NIF type models in Blender. (Unless you want to be able to do something like this…)
Importing NIF animations is a very very complicated process requiring more programs and conversions. For now, I’m not going to go there because even I haven’t even got the process down yet and my exports are producing really bad results.
Like this!!!

But remember, we have only IMPORTED the model. Just because we have it in Blender and everything looks good there doesn’t mean that it is just going to export and port into SFM. It needs work (sometimes a lot of work) before we can really start adding animations to it and/or port it into SFM.
4. Importing PSK/PSA (UnReal) Models
PSK(Mesh) and PSA(Animation) models are associated to the UnReal game engine and I’ve already given you the URLs to download the Importer/Exporter add on for Blender earlier.
As you’re starting to learn by now, the process for getting a model into Blender is pretty much the same for most importers which is…
Find an extractor for the game and extract the game asset (Hint:UModel for UNReal) from the Game Cache Files, find an importer add on that supports the extracted file types (if one exists), install the add on, launch that importer and set options then select the model and import it. Convert the texture images to a format that can be loaded into Blender and use the Shader editor to populate the textures onto the model.
PSK/PSA is no different and is also a format that I don’t usually work with.
Again, UnReal is a very complicated system and model and texture assets are spread all over the place within the cache files, so finding them can be tricky, especially over huge AA rated titles like this. But let’s see if we can get something into Blender.
Process
- Extract the game assets from the Game Cache Files (Your homework for today is to learn how!)
- Load Blender and install the PSK/PSA add on and enable it (if you haven’t already)
- Delete the Default Cube then select File – Import and find the importer. (Skeleton Mesh (psk) for Mesh imports or Skeleton Anim (psa) for Animation Imports)
- Point the browser to the asset you want to import and start building the model you want to create. Some models will have an armature some won’t, some may only require a single model imported, others like the Party Bus from Fortnite will require multiple models imported and those may be different for the different type of asset you want to build.
- Model mesh usually import as grey clay and will require you to manually texture the materials using nodes. This is where the .Mat files come into play. They can help you quickly select the required textures for the Image Texture Nodes and tell you where to plug them into the Principled Shader input nodes. (My system identifies the .Mat files as a Microsoft Access Table Shortcut and doesn’t display the .MAT extension, but these files are really just plain text file types and can be opened in a text editor, like Notepad ++ without any problem.)
The Party Bus is a PSKX static prop and it doesn’t have an armature when imported. Model like this would fall into the OBJ Model type when it is time to get it ready for export. - So let’s find a model that might have an animation and see how we might import animations.
Well, these are the parts that make up the 1970 Batman from Arkham City. As you can see, importing characters can present their own unique problems, especially if the character is a multiple part import (most are, head, torso and misc clothing).
Each mesh object that makes up the model we want may have its own armature and each armature may have its own set of animations and there may be many animations for each object.
Animations for PSK models are contained in the PSA file type. and these animations have to be applied to the armatures they are meant for. If we try combining armatures at this point before adding the animations, when we play them the model simply falls apart or does not deform as intended.
SFM (Vlave Models) only allows one armature per model, so the challenge becomes, how do we get all these animations onto the armatures of the split PSK model then combine these armatures into one and port these to SFM. This is an advanced topic because PSK models don’t import cleanly. Armatures may be inverted in relation to or not line up properly with the mesh objects and have to be adjusted. However, as soon as we start fiddling with an armature that has had animations created from, we can break those animations because things don’t line up with the way things were when the animation was created.
Short story to what I mean by that is… Not all (or may be even NONE) of the animations are going to work with your imported model because of the complex methods used by the developers to get them into game. Applying PSAs to the model may result in something like this.
This is applying the same animation PSA file to all 3 armatures.
Not only do we get the abnormal rotations to the torso and head, but the jaw of the head is completely backwards.Sometimes, depending on the models and the way things work out, it is better to just port the model and manually animate it in SFM. But we’ll look at this later.


5. Importing MMD Models (PMD/PMX/VMD)
MMD models are most likely the hardest model to port to the Valve format.
The first and main reason reason is that most of these models are coded in Japanese.
Other reasons include,
2. Models have hundreds of bones, thankfully most models use the same bone set up.
3. Bones on different Bone Layers
4. Models are made up of pieces. (Ever wonder why anime model all look the same? This is one of the main reasons, the modeler reuses body parts from other models to create their own.)

7. Bone influences on mesh vertices that are over the 3 bone limit.
8. EVERYTHING is coded in Japanese, Bones, mesh, textures, shapekeys, EVERYTHING… (I have to keep saying this)
9. HIGH vertex counts.
10 – ???. And the list goes on.
That said, it isn’t impossible to port these models and get good results.
[link]
[link]
[link]
Heck we can even get the dance animations into SFM, if we want them.
[link]
(Notice the face being offset from the body in that last picture??? This is a common problem that will be covered later when we talk about armatures.)
Remember this section is only about getting the model into Blender, it is not about what we have to do to it to port it into SFM.
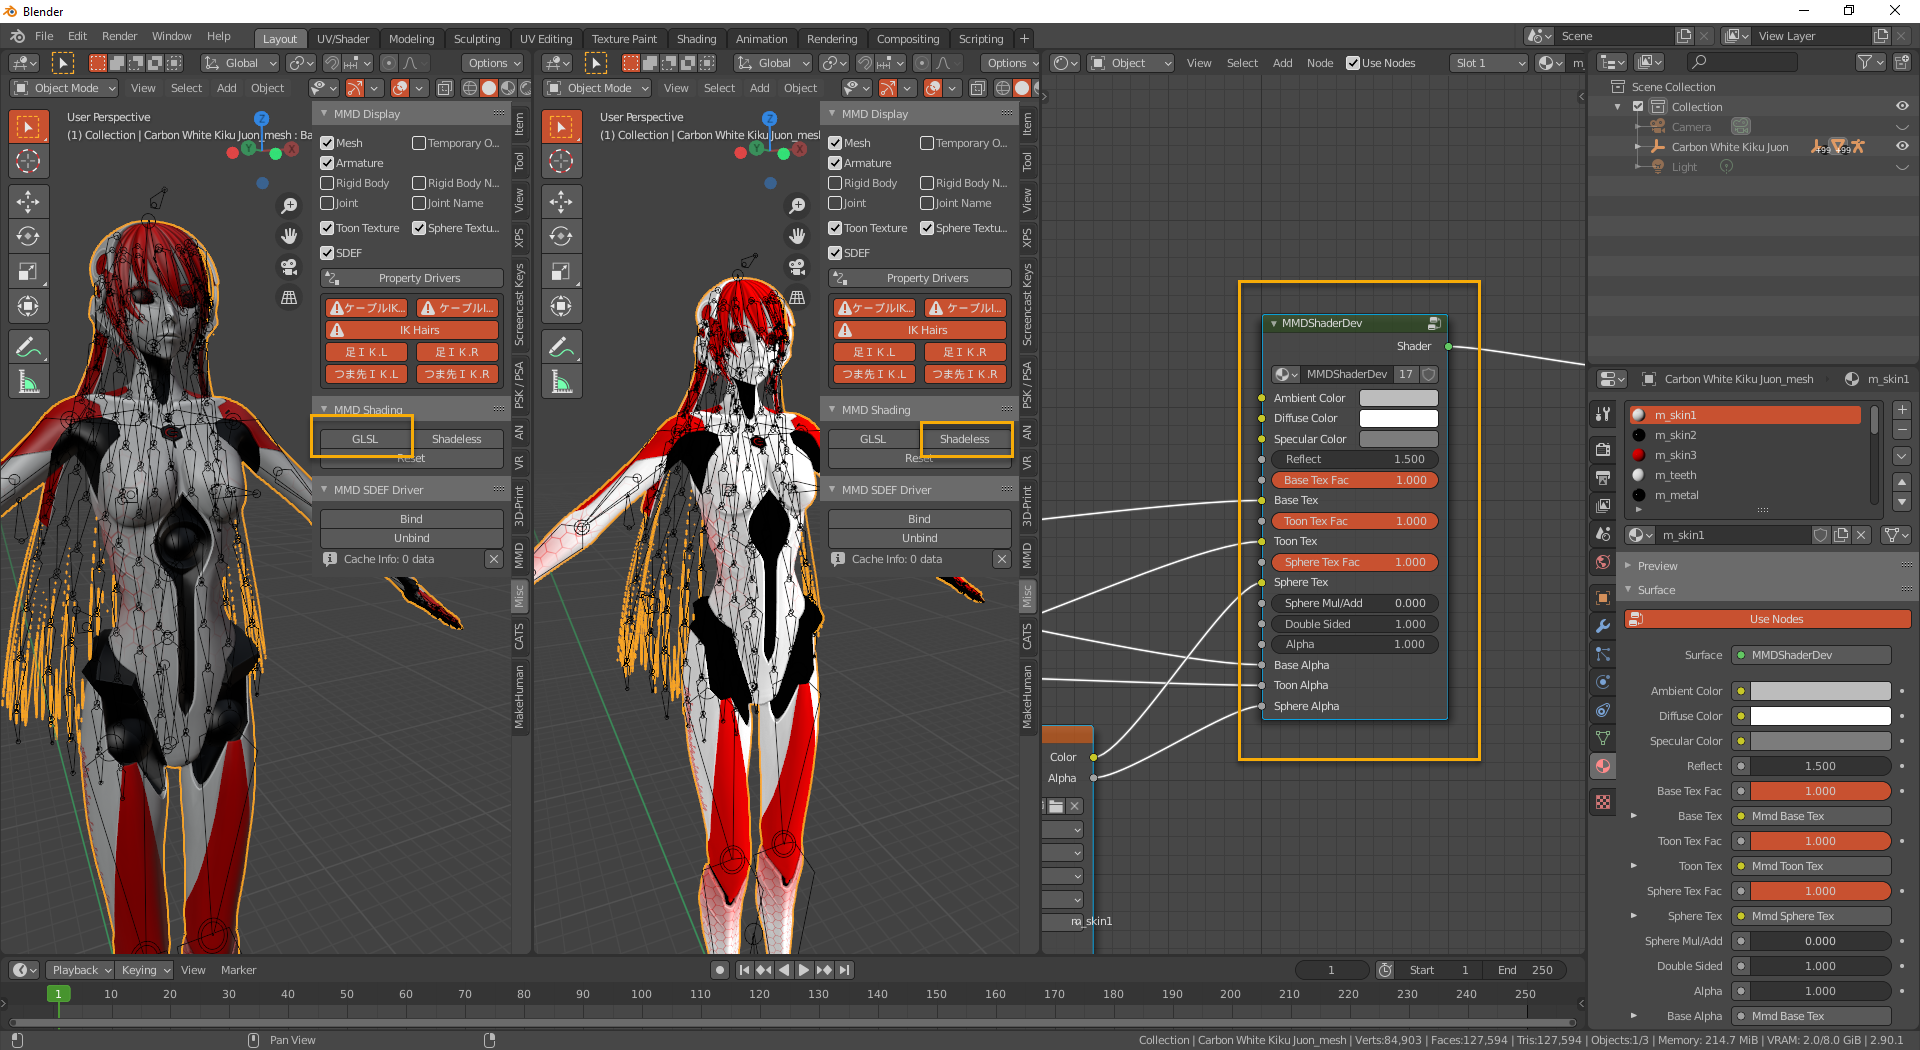
The model I’m going to use in this import example is this one, MMD Carbon White Kiku Juon DL by MaeveSterling and can be found here at [link] (if you want to follow along)

The reason I chose this model is simply because it has most of the traits I need to demonstrate the porting process.
This is the first time I’ve tried to import it so let’s find out just what problems this model might present. (It will be a complete shock to me if there are none!)
The Import Process:
The import tool we’re going to use is Cat’s Blender Plugin. Make sure you have it downloaded, installed and enabled in Blender.
- Download your model and extract it to a folder on your computer (I always just use my desktop as a build folder)
- Launch Blender, delete the default cube, then Select File – Import – MikumikuDance Model (PMD/PMX)
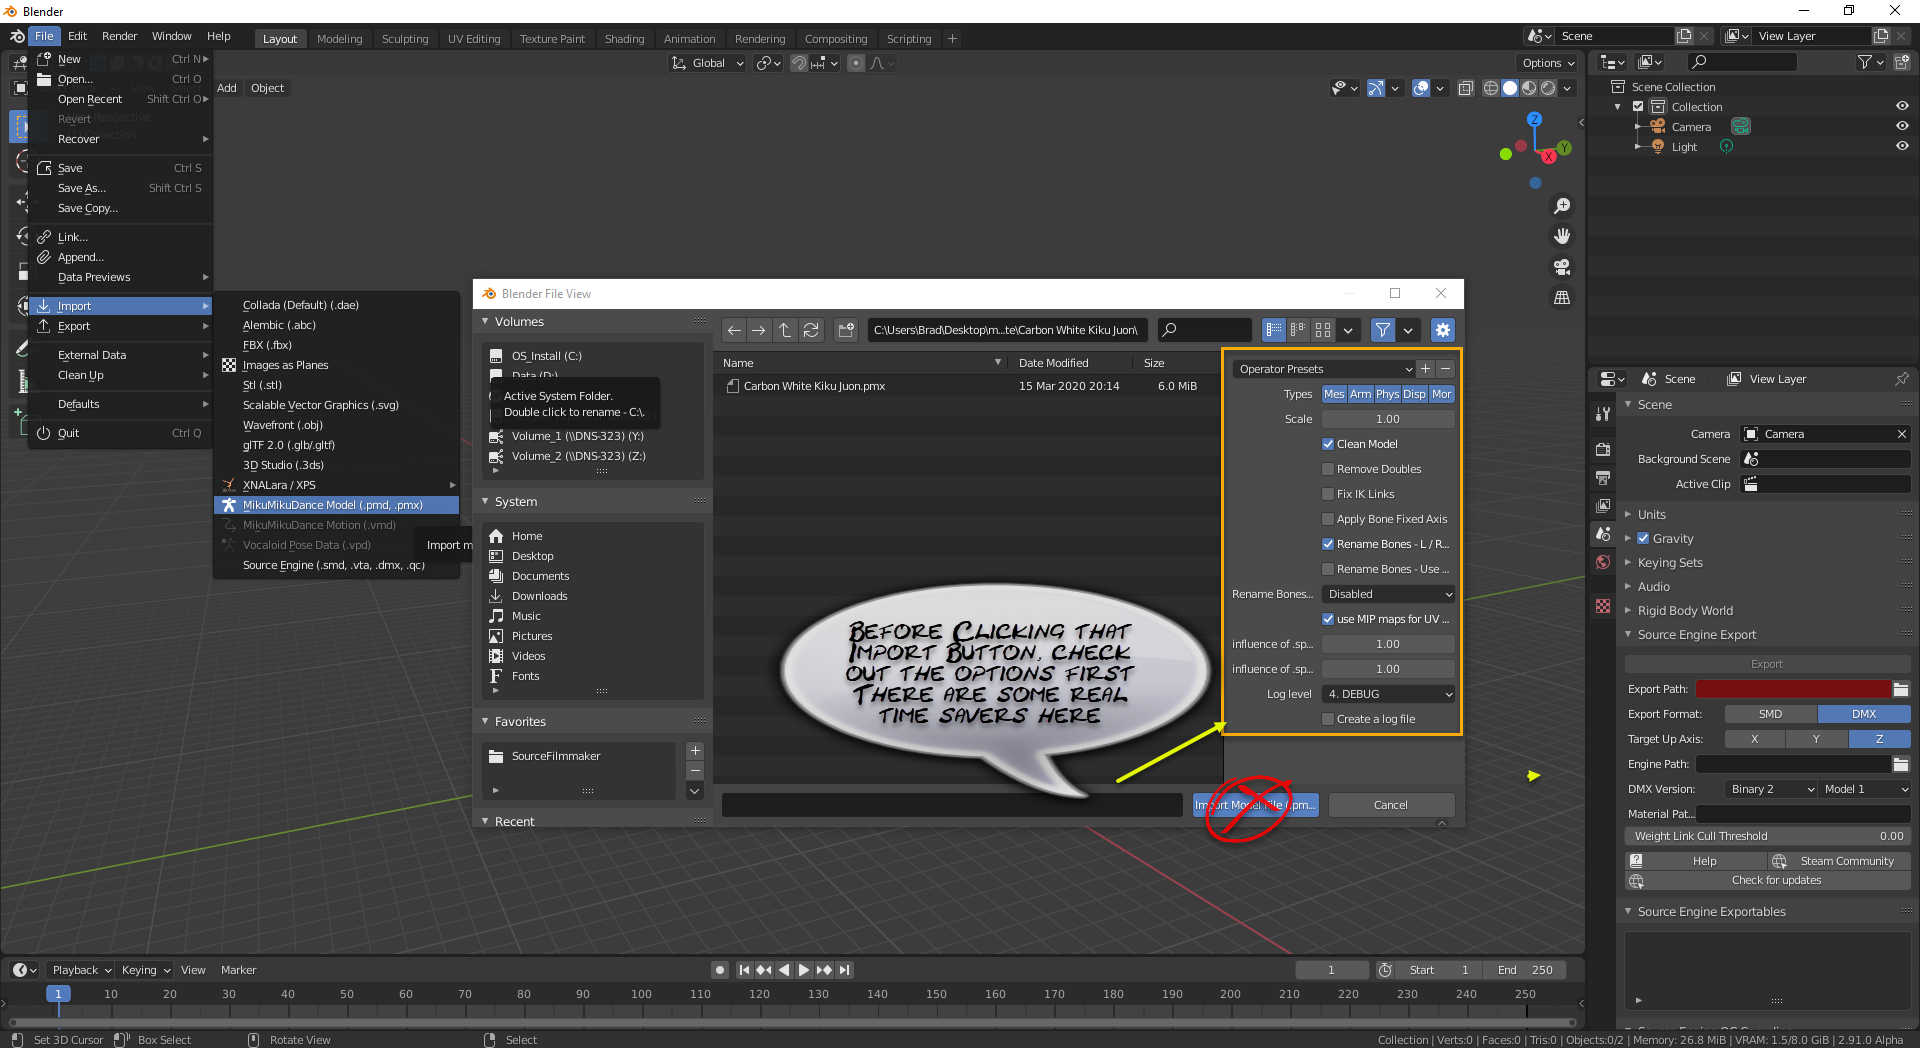
- Surf the file browser to the folder you extracted the model into and select the PMD/PMX file for the model HOWEVER, before you select Import, read on, there are a few options we might want to select.
- In the Import Options panel of the Importer there are a bunch of time saving features.
There are 9 different options that I use regularly.
- Types: These are the objects that will be imported, They can be turned on or off by holding Shift and clicking on them. In most cases we’ll want Mesh, Armature, Display (textures) and Morphs (ShapeKeys). The Physics objects are the Rigid Body collision meshes. Unless you’re importing this to put into a Game engine that uses Physics or creating animations in Blender that can use them, turn this one off, we don’t need it for SFM.
- Scale: MMD models at a scale of 1 import really tiny. As you get more proficient at importing models, you can set this to the scale of the universe you want to use the model in (ie TF2 and HL are 2 different scaled universes)
- Clean Model: this will delete unused or dulicated vertexes, edges or faces from the model. Care should be used here, because you may have duplicate faces (pointing different directions to stop backface culling.
- Fix IK Links: If you plan to use the IK constraints of the model to create animations, this will make the IKs a little more Blender friendly.
- Remove Doubles: Remember I talked about making sure your model is sealed, checking for non-manifold edges, well this will take care of most of that by welding vertexes together if they occupy the same location. Again, care is required here. We don’t want to weld the lips shut on a model that has shapekeys, also, some of they things like expressive speech bubbles, eyebrows and eye shapes controlled by shapekeys may be minimized to a single point and we don’t want to weld those together either.
- Apply Bone Fixed Axis: this will fix bones to better use Blender axis.
- Rename bones to use L/R suffix: The tool will try to match bones that are on the left and right of the Z axis on the X axis and append a L or R to the names. For instance HandL and HandR
- Rename Bones Use Underscore: Where the tool appends a R/L suffix, decide whether to use an underscore (_) or a Dot (.) infront of that appended L or R
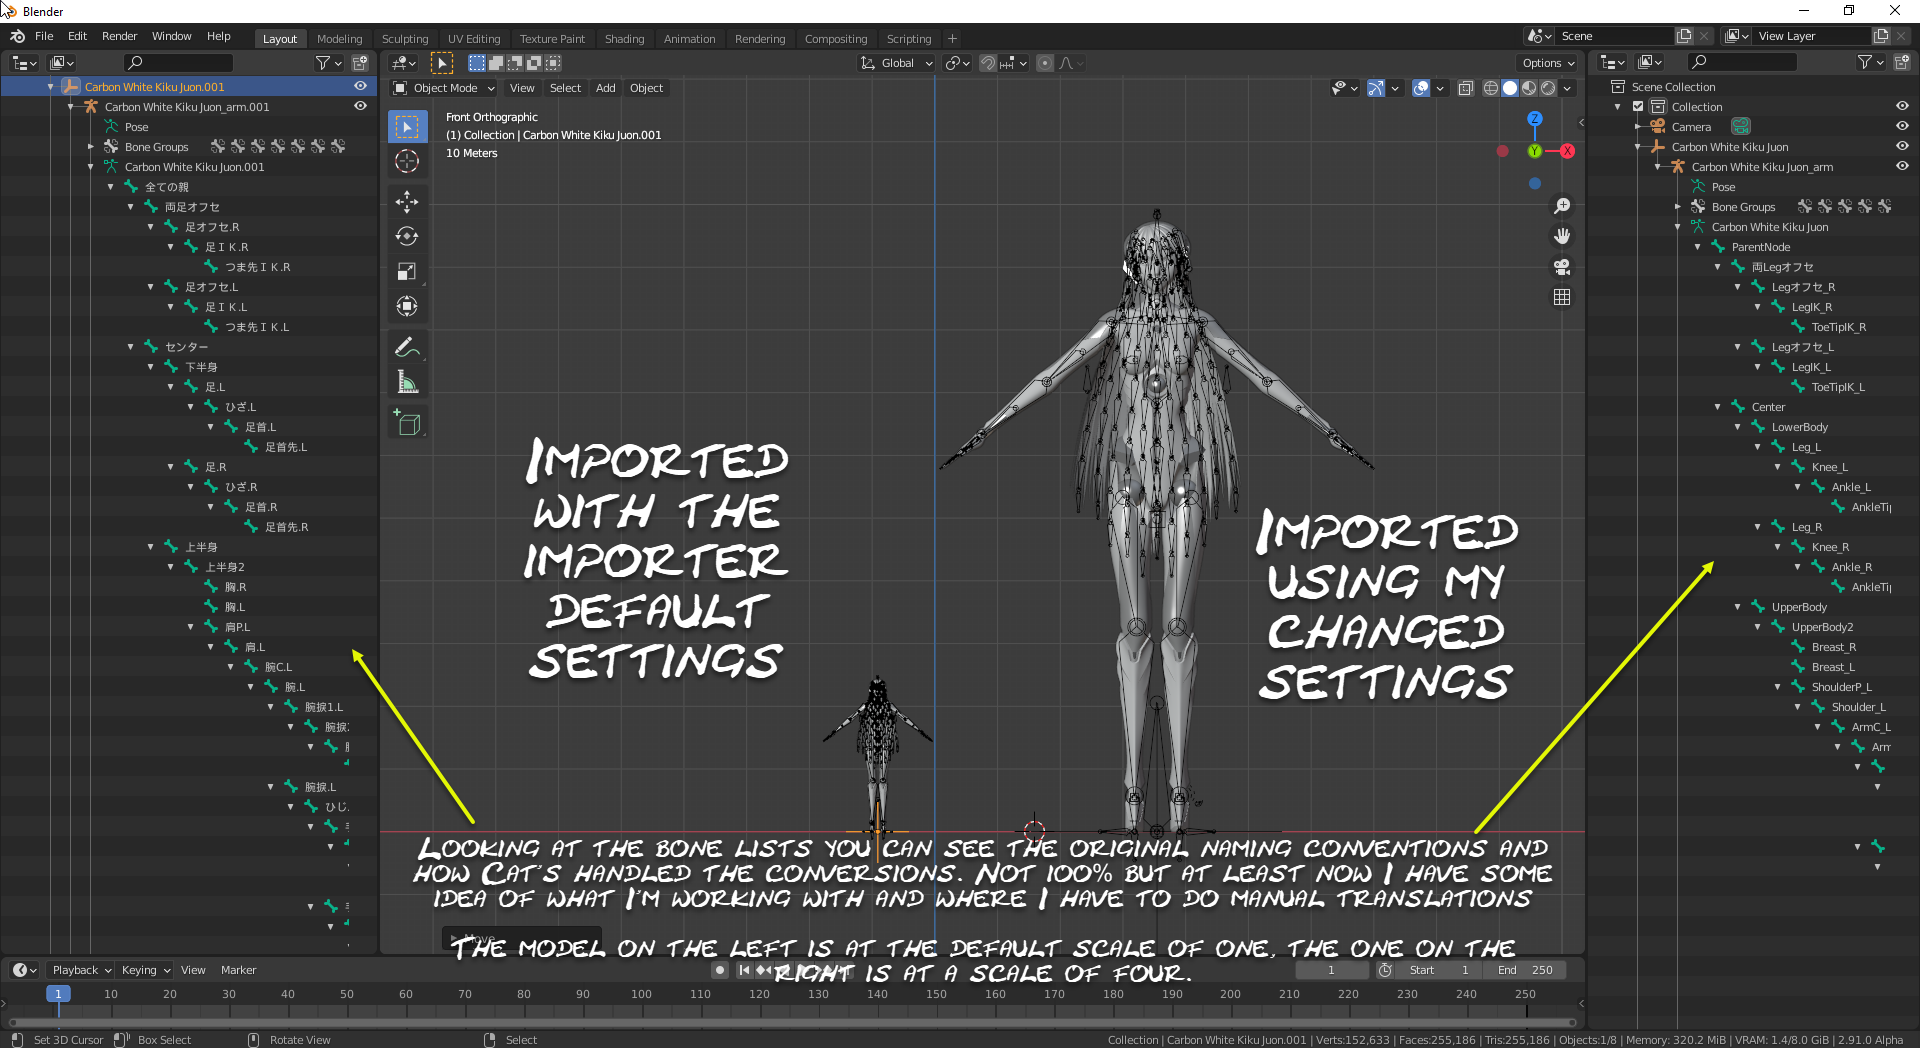
- RENAME BONES to English – (BIGGY HERE) The Cat’s plugin has an internal dictionary of bone names and because most MMD models use the same “Japanese” bone naming scheme, the internal conversion will take care of a lot of the renaming. However, if there isn’t a conversion name for a bone (custom bones), it will retain its Japanese naming convention. But this is a real time saver as you’ll see later.
This option does not rename things like Shapekeys, Mesh Objects or Materials, however there is another Tool in Cat’s arsenal that will do this for us, but it isn’t really available until after the model is imported.
- The rest of the options I usually just leave to their default values.
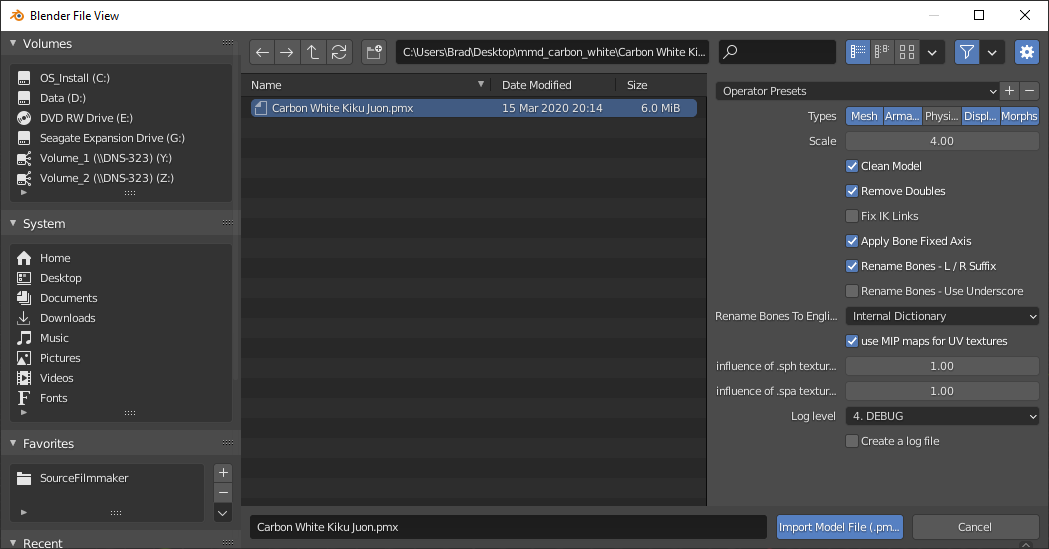
This is the Option set up I’ll be using for this model
- With the options are set, click the import button and the model should appear and here is a comparison of the model had I left the Importer at Default settings compared to my settings above.
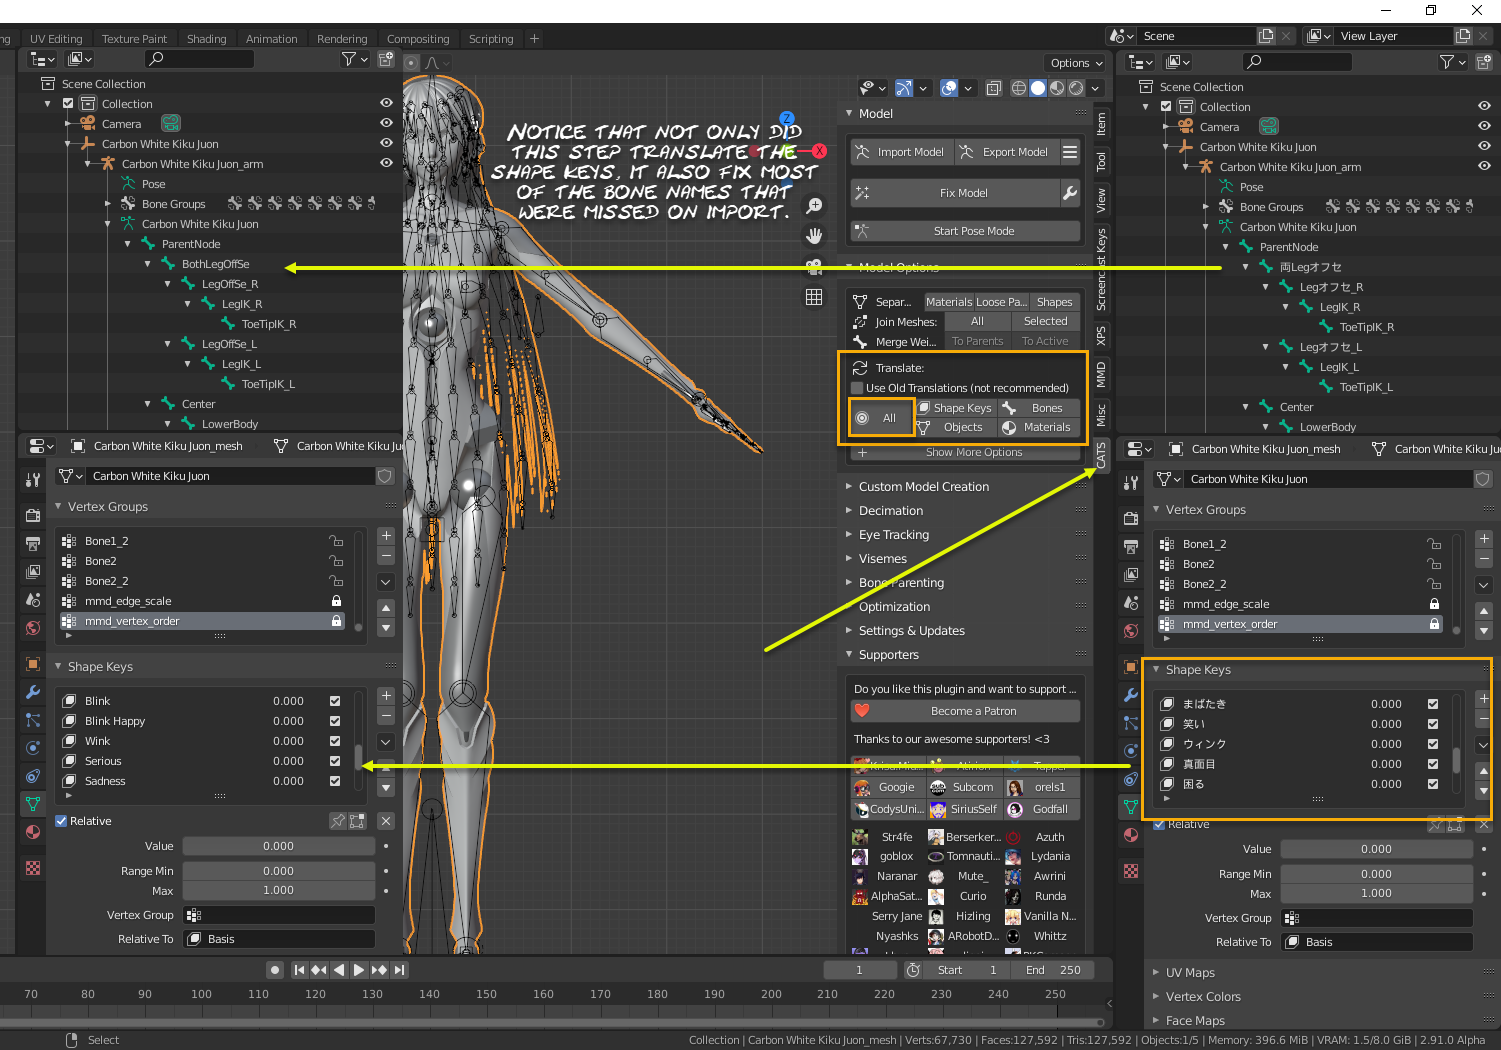
Now that the model is imported, it’s time to rename the other objects mentioned earlier. Find the CATS Tab in the Transform menu on the right of the 3D viewer and select it. Expand the Models Option panel. At the top of that panel you’ll find a Translate: Option. Leave the “Old Translation” box unchecked, Using Old Translations is not recommended any longer and using it may destroy the things we may want to do later. Now Click All, or if you want to do the objects one at a time, Click the other four buttons, one at a time, then check things like Object, Bone, Shapekey and Material names. They should be changed to English base on the translations available in the internal dictionary. Again, things may not be 100%, but now you can see just what needs to be translated manually. It’s just a matter of using a service like Google Translate and copy and pasting the translation back into Blender.
Importing MMD Models (Continued)
Texturing MMD models in Blender
I still maintain that texturing is only required in Blender to ensure that they are proper to the UV Maps. However, like XNA models, MMD models use their own special shaders and if the importer can find the textures, it will set up the material shaders nodes and texture the model automatically. There is a catch though, Blender has to understand the language the files are name in. If Blender can’t read the Texture named used, that texture will appear Pink on the model, but the shader should be set up. These you’ll have to point the Image Texture nodes to the proper texture manually.
What do you mean your model is still Clay Grey and untextured? Well there are 5 different texture setting you can use to see the textures on the model and a reset back to Grey Clay.
1. You can switch to Material View Mode (this will display the textures as seen by Blender)
2. You can switch to Render View Mode (this will display the textures base on Lighting in the scene and the render engine (eevee/cycle) in Blender you’re using.
3. Find the MISC tab in the Transforms Menu to the right of the 3d Viewer, There you will see a MMD Shading panel. If you select the GLSL, Shadeless or Reset buttons in that panel, the tool will switch you back to the View Port Shading mode and set up the and display textures based on the option selected.
4. GLSL: will show you the textures that would been seen in MMD using a GLSL shader.
5. Shadeless: will you you the way the model would look in MMD using a shadeless shader (Overbright)
and
the Reset button will change the model back to the normal Grey Clay used by an untextured model in Blender.
MMD Animation (VMD – Vocaloid Motion Data) Files
Vocaloid Motion Data (VMD) files contain both armature and vertex motion data (dances, movement, facial flexes for the songs they’re singing, etc). Because of the way they are set up, these files are not model specific and can be imported onto almost any MMD model as long as the model uses the standard MMD armature and shape key names. This is how they are able to multiple models perform the exact same routine in a MMD dance video.
It appears that the files are not reliant on scale of the model or location of bones or vertexes in the model, they merely apply information like IK movements and rotations, world space location and shapekey influences based on the name the animation requires to the model using them.
If you plan to use VMD files to add animations to your model for use in SFM, you want to add them before you start editing the model for the port. If you start adding/deleting bones, changing mesh before importing the VMD onto the model, you may break the model’s ability to use them.
As I said, the VMD contains both armature and shapekey vertex animation data and and both work in Blender when imported onto the model, however, I can only get the armature animation at this time. Facial expression posing in SFM still has to be completed manually.
The VMD file is a proprietary Binary file, so trying to open it in a text editor will not reveal any secrets.
We’ll get into importing animations a little later. Just remember that if you want to use VMD animations they have to imported BEFORE you start working on the model. This is an example of a VDM imported and rendered from Blender.
As you can see from that video, even after importing a VMD animation that would be fluid in the MikuMikuDance program, it will still require manual intervention to negate clipping, add hair flow, add jiggle, etc if we want to use it in SFM.
6. Importing FBX/DAE Files
FBX/DAE files are also weird model types. They can be any type of model, meaning the FBX/DAE may be a simple Static Prop containing only 1 or 2 bones, or a Character model of some sort with a simple standard armature or complex armature including IK constraints or they may just be an armature containing animations. You really won’t know until you get the file imported unless you know what it contains for sure. (Like a box of Chocolates! You never know what you’re going to get (unless you read the design card inside the box).)
That said, FBX files are complicated in the fact that there are many different versions of FBX (some proprietary.) Some will import with no problems using the standard FBX Import Add-on that comes with Blender, others may crash Blender completely or cause Blender to error out when trying to import because the version type isn’t compatible. (Another box of Chocolates.)
However, if you find that the FBX is not compatible with the Add-on, there is(was) an older program that was put out by AutoDesk call FBX Converter. This program is becoming harder and harder to find because AutoDesk stopped developing it. The last time I looked for it, I found it here [link] .

I’m not going to get into using this tool, it is old and there are plenty of tutorials already on the net. (More homework for you.)
With Blender 2.79, there were a few 3rd party type FBX Import/Export add-ons developed by other authors. These seemed to work with some incompatible types, however, I haven’t found any yet that have been upgraded to 2.8x/2.9x standards yet. (Mind you because I convert my own using FBX converter when I have a problem, I haven’t really looked.) But if you run into problems importing a FBX file, rolling back to 2.79, finding an add-on that will import it, saving the .blend file then opening that .blend file in the newer version Blender may be another option.
This is the import section, we’ll discuss Animation FBXs in the Animation Section later.
For DAE models, there is an included DAE import/export add-on with Blender as well, however, I have never really had an luck with this model type other to import a DAE into Blender 2.49b using the Mixamo 1.41 DAE Import add-on and then bring the model forward to a newer version of Blender. When I try using the included in the newer versions of Blender, most of the Armatures don’t match the mesh. (It weird and maybe with this model I can demonstrate what I mean.)
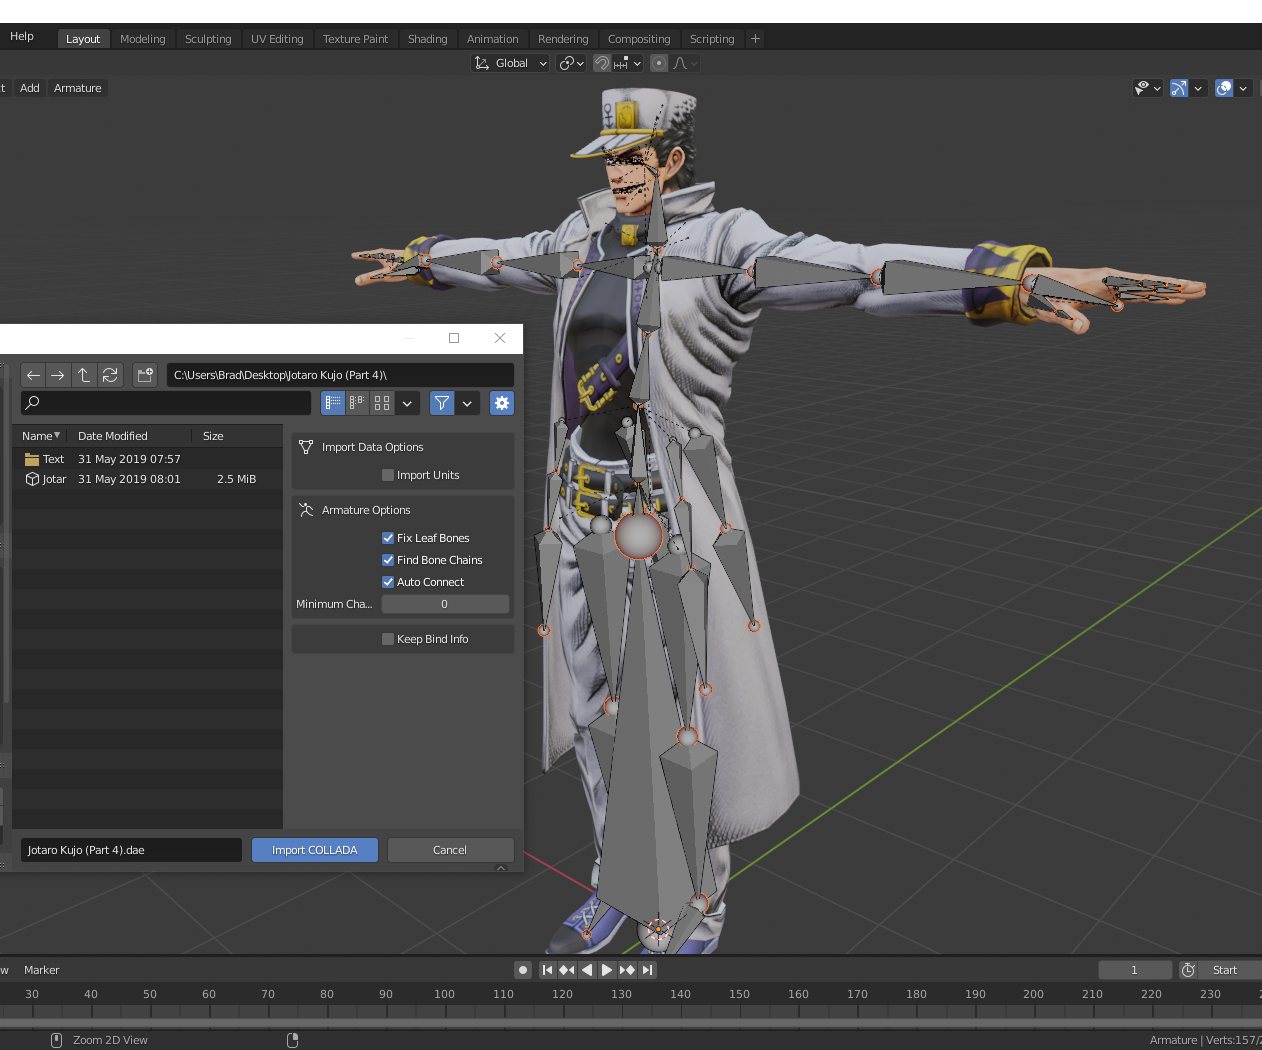
The model I’m going to use in this section is the Jataro Kujo from the PS4 version of JoJo’s Bizarre Adventure: Eyes of Heaven game that was uploaded to Models-Resource by Ziella. I’m using this model because it has both FBX and DAE models included. It can be found here if you want to follow along. (You must have an account to download, the set up and the asset are free) [link]

The import processes for both formats are quite simple:
- Download the model and extract it to a folder on your computer (I use my Desktop as a build folder)
- Open Blender, delete the Default Cube
- Go into Preferences and ensure you have the import add-on for the file type your working with enabled.
- Select File – Import – FBX or Collada (DAE) (depending on the file type your importing)
- Point the File browser to the file you want to import and set up the options of the importer before clicking the import button.
DAE Options
As I say, I rarely use DAE files, so you’ll have to experiment with these options to get the best possible import.- Import Units: If this is disable, the model will be imported using the Blender Units (measurements) you currently have active, if enabled, it will use the units the model was saved with. (You’ll have to experiment with this.)
- Armature Options:
- Fix Leaf Bones: Selecting this should fix rotations or other problems (this is probably why my imports don’t usually work for me as Collada models only support joints)
- Find Bone Chains: This forces Blender to find the best way to connect bone chains and ensure they are connected.
- Auto Connect: Forces Blender to connect parent bones when they only have one child.
Minimum Chain Length: If set higher than 0 it will prevent Blender from creating bone chains less than the number specified.
- Keep Bind List: Enabling this will keep information stored in the Blender Store BindPose container of the Custom bone property and use it later if you reexport as a DAE file.
Well SHOCK!! Using this DAE setup, it looks like everything (including the Head bones) imported properly. Because the PNG texture images were in the folder path specified by the model, the importer also created the basic Material Shader nodes and textured the model automatically. The Blender Developers must have done a major overhaul to the DAE importer since I last used it. (Time to start working on some Face-Rig avatars I guess!!)
Importing FBX/DAE Files (Continued)
The FBX importer is more complex, as a FBX can be any type of model. These settings will have to be experimented with as you import and may take a few attempts to get them right.
- Include:
- Custom Normals: If enabled and the model has custom normals, this will import those normals, If disabled and the model has Custom Normals, Blender will try to recalculate them if found.
- SubDivision Data: If the model has Subdivision data embedded in it and if this option is enabled, the importer will set up Sub-D modifiers. (This might be a good thing if the model is really High Poly. Being able to turn off the Sub division may help in reducing the poly count to acceptable levels) however, if this option is disabled the Sub-D data is converted into actual mesh.
- Custom Properties: If the model Author added any custom properties to the model before exporting the FBX, if enabled those properties are restablished as custom properties to the import. If disabled, they may be ignored
- Import Enums as Strings: An advanced topic and one above and beyond the scope of this guide.
- Image Search: If this is enabled, the importer will search any underlying folder for images the model might use.
- Transform:
- Scale: This is where yo can set the size of the model to the universe size on import. Again, as you port more and more models you’ll be able to use this function with better accuracy. Me, I leave this at default and prefer to use an actual reference model from the universe I want the model to be used in and manually scale it later. That way, if I’m importing animations, I’m not risking breaking them.
- Decal Offset: Decals are transparent or detail type textures applied to leafs of mesh that ride on the mesh of the model (like a tattoo, or a name badge, a warning label, etc). If the model has this type of mesh, setting this value higher than 0 will pull that mesh the value distance away from the models mesh
- Apply Tranform: Same action as selecting everything and pressing Ctl+A and selecting All Transforms. This is an experimental function that is still being developed and may break the model on import. Also again if you intend to import animations, it may break those animations because the model is not the same as when the animation was created and exported. I would recommend leaving this disabled and apply transforms just prior to exporting the SMD/DMX files.
- Use Pre/Post Rotations: Not sure about this, documentation has not been completed yet, so I can’t really say what this does. It is on by default and it you have tool tips enabled, if you hover over the option it says that for some models, you may have to turn it off. So, you’ll have to experiment with this but, leave it at its default state to begin with.
- Manual Orientation: Use this if your model imports facing the wrong way. For Blender the Z axis is UP, the -Y axis is the Forward Axis.
- If you import your model and is is lying with its back on the floor and the head it pointed toward the positive X axis (toward the right side of your monitor as you look at it), The the model was exported with the up axis being the positive X and most likely the Forward axis being the the negative X. If you wanted the model to use the Blender Up and Forward Axis, you would enable this option and set the
- Forward: to -X Forward
and the - Up: to X Up
- Forward: to -X Forward
- Animation
- Animation Offset: If the model your importing has animations and you choose to import those animations, I believe that this option will import those animations to start on the key frame set in this option. So the default is 1. If you change this to a different number, it will offset the the animation to start on that keyframe.
- Armature: The bone structure of a FBX model is strange, to say the less, and the bones are huge and it is very easy to get lost in them, especially if they overlap one another. There is no setting to limit the size of them in the importer. However, there are some settings here (which I usually just leave at default).
- Ignore Leaf Bones: Tip bones (like in the fingers) are also known as Leaf Bones and are used more or less to mark the length of the last bone that deforms mesh in a chain of bones. If this is enabled the importer will drop the last bone of a chain of bone, thinking it is a tip (leaf) bone. It is easier to do this manually, just in case, they don’t exist in all bone chains. Like you may have tip bones in the fingers, but not off the toe bones, enabling this will delete the tip bones in the fingers (which we don’t need), but may also delete the toe bones that we do require.
- Force Connect Children: This will force child bones to connect to their parent bone, even if there Head/Tail locations are in the same place. I usually leave this option disabled, as I am not sure is the parents tail is dragged and connected to the child’s head (as required) or if the child’s head is dragged and connected to the parents tail (which will really pooch the weight painting and rotation deforms of the mesh). I would rather do this manually if I require the bones be connected.
- Automatic Bone Orientation: This will force the importer to try and align the Major (parent) bones with their children. This can cause a major effect on bone rolls, again causing mesh to deform incorrectly when rotated.
- Primary Bone Axis: I am not sure what the add on considers to be Primary or Secondary Bones however the default is Y, which means the tails of the Primary bones will point to the rear on the Y axis (if they aren’t connected to their children)
- Secondary Bone Axis: I am not sure what the add on considers to be Primary or Secondary Bones however the default is X, which means the tails of the Secondary bones will point Right on the X axis (if they aren’t connected to children bones)

7. Importing OBJ/STL and FUSE Files
These are the most common and probably the most difficult model types to port to SFM. The reason being is that neither of them have an armature. This means that if you decide to use one of these formats, all your going to get is the Mesh and you are going to have to rig the model with an armature and weight paint it to deform to that armature yourself. Also a lot of these models are created in some sort of pose, meaning they aren’t in a standard Reference T or A pose and we have to rig them, weight paint them, then deform them back into a standard pose then apply then apply that new pose as the models new rest position. If posing the model ruins the mesh, we have to then remodel the vertices and fix the UV maps.
STL models are usually used in 3D printing and are generally sculpted or exported with extremely high vertex counts. A simple model can contain vertex counts over 1,000,000 Vertexes. This is because the displacement detail is modeled into the model, so the printer can pick up and print the detail (3D printers don’t use bump or normal maps, they need the detail to be actual mesh in order to print it).
Because they are used for 3D printing, they usually aren’t UV unwrapped or textured (most printer only print using 1 to 3 coils of filament depending on how many heads it has and the colour based by the filament itself)
These models need a lot of work and depending on the vertex counts may even have to be completed re-meshed, UV unwrapped, textured, given an armature and weight painted.
Here’s an example, This Ducati 1199 Superbike uploaded here [www.youmagine.com] to youmagine by Valcrow would be a great asset to have in SFM, however the model consist of 42 separate STL files with a total vertex count of 669+K, have no UV Maps, Materials or Textures and isn’t even constructed into an actual model.

Importing STL is the same as all the other model types I’ve gone through

- Download and extract the model (I use my desktop)
- Open Blender, delete the default cube and make sure you have the Blender included STL add-on enabled
- Select File – Import then find and select the STL importer
- Point the file browser to the extracted STL(s) and if there are multiples for the model, select them all or the ones you want to import.
- Set the Import Options There is just a simple set of options and we’ve seen before in the other importers with the exception of the Scene Unit and Geometry options.
- Enabling the Scene Unit will force the model model to use your currently active unit of measure.
- Enabling the Facet Normals in the Geometry Option will import the model using Flat Shading. All the Tri/Quad faces will have distinct edges, the model won’t be smooth.
- Click Import STL and the selected files will import.
If you chose to use STLs then from here, you’re pretty much on your own. They require way too much work to cover in this guide. However, that said, using some of the processes that I will cover in the rest of the guide will help you. I just don’t want to get into re-meshing models.
Importing OBJ models
OBJ models on the other hand can either be extremely low or extremely high poly. These are
- usually models ripped from games that the ripper can’t rip armatures for or
- models that an author has created as a static prop (like a statue or a fridge) and didn’t need an armature for or
- models someone has started and just thrown out on to the net to see if anyone will download and finish them or
- created and exported from character creation programs like FUSE.
These models may or may not be UV unwrapped, have materials and be textured, but they definitely won’t have an armature or be weight painted.
An OBJ Model is usually comprised of 2 main files (and then texture if they exist), the file name of these 2 main files will be the same and the file extensions will be .OBJ and .MTL. The .OBJ file is the mesh and the .MTL contains material data.
The model I’ll be using as an example is this one. Monkey D. Luffy from the PS3 game One Piece:Pirate Warriors uploaded to Model-Resources by 06hypersonic60. [link]
The OBJ Importer is pretty simple as well. To import an OBJ file:
- Launch Blender, delete the default Cube, ensure the Blender included WaveFront OBJ Format Add on is enabled.
- Select File – Import then find and select the WaveFront (obj) importer and point the file browser to where the OBJ file is and select the .OBJ file and set up the options you want to use
- Include:
- Image Search: If Enabled forces Blender try and set up Materials and textures using Sub folders of where the model files are (if they exist)
- Smooth Groups: If smooth groups exist in the OBJ this will force sharp edges around those groups.
- Lines: I’m not sure what this does, the tool description is pretty vague.
- Transform:
- Clamp: Clamps Bounds under the number given, 0 Disables this option.
- Forward: We’ve seen this in other importers, it allows you to rotate models so you can match the Blender Default rotations (-Y Forward)
- Up: This allows you to change the rotation of how the model imports to match up axis to the Blender Default (Z Up)
- Geometry:
- Split/Keep Vert Order: Split will omit unused (loose) vertexes where Keep Vert Order will import all the vertexes it finds in the model.
- Split by Object: If the model is broken up into separate mesh objects, enabling this will retain those objects as separate mesh objects in Blender, if disabled, the importer will try to fuse the model into a single object.
- Split By Group: if the model has Object Groups enabling this will attempt to split the groups into separate Groups. If disabled, the imported objects will be placed into 1 object.
- Include:
- Click Import OBJ.
If the .MTL file is missing, the Importer will still import the OBJ mesh and will set up a default material but the model will be grey clay in colour.
If the .MTL file exists, the importer will open the OBJ and try to create simple Material Shaders and load textures for them based on the material data contained in the file.
If your model imports and has a .MTL file and textures but the objects or the whole models’ textures are totally meshed up when you try to view materials on the model, it is probably not unwrapped or the UV islands have not been properly assigned to the proper materials or the author totally messed up unwrapping the model or packed the wrong textures for the model. But, if objects or the whole model is total black, the problem may be as simple as the import process set up the shaders but did not connect the BDSF shader output to the Material Output node input.
Ok, I’ve used the FUSE word during this segment. FUSE exports models as OBJ files and even though the same principles apply them the same as any other OBJ downloaded from the net, a lot of people want a dedicated section on FUSE, so here we go.
OBJ Files – FUSE!!! Imports
FUSE was a Bi-ped Character Creation program created and released on Steam by a company called Mixamo back in 2013. It was a Commerical program and cost around $40 when it was first released.
The program showed real potential for those into Indie game development because completely textured (with Allegormithic Substance configurable textures) Characters could be created on the fly and with the Mixamo Auto Rigger, given an armature (with animations) that could easily be injected into game engines.
The last Steam release was Version 1.3 and Mixamo decided to make the software Free to Play, they also opened the Mixamo Auto Rigger and all the animations they had to everyone. This auto rigger actually produced working models for both SFM and GMod.
Just before the next Steam release (ver 1.4 which would have added a bunch of new options like Blendshapes/shapekeys) Mixamo was bought out by Adobe and updates to Steam ceased.
Adobe then released FUSE as a free Beta tool to anyone who had an Adobe Creative Cloud account and called it FUSECC. The CC version included the updates that were going to add to the Steam version and was developed a little further until in April 2020 it was announced that FUSECC was being discontinued and remove from the CC list of apps on 20 September 2020.
It is now 27 Sept, 2020, I’ve checked my list of CC apps associated with my Adobe CC account and have found that I still have the FUSECC version available to me and it still works, however, this just may be a temporary thing until the next upgrade of Creative Cloud, so I can’t say that those who subscribed to it on the the CC will still retain it later or if it will be removed permanently at some later point.
I will say, that if you do have a FREE Adobe Creative Cloud account (if you don’t have an Adobe CC account, create one) and have not subscribed to FUSECC, check and see if it is still available. If it is, subscribe to it immediately. If it isn’t, sorry, too bad, you’re too late!
To make things fair for everyone (and harder for me), I am going to use the FREE Steam version of FUSE and create a model.
The Steam version of FUSE is free (originally a $40US program) and available on the Steam Store
[link]
There were also 2 character DLC packs for the Steam version that added more model and texture options to the program available here. These DLC packs may only be available to those who bought or downloaded them before Mixamo was bought out. However, that said the Brute pack may still be available by clicking the DLC link on the FUSE main store page.

The other DLC pack that was available when FUSE first released added even more character options (like the TF2 Spy and Sniper) and more texture options, but when Adobe bought Mixamo, the agreement that Mixamo had with Valve was broken and this DLC was removed. However, those of us that bought it when it was available still have access to it.
Then again, this DLC package may actually be pinned to the Main program and will download if you install it. I don’t know because I already have it installed.
Character creation in FUSE is pretty simple, Launch the program, add body parts, add clothing, configure textures and export OBJs. Done! (well… almost!, uhmmm… errr, well maybe not quite done!!, grrr…. actually, we have a lot more to do to it if we want to use it as a character model in SFM as a posable model!!!!)

I’m not going to give a lesson here on how to create a character in FUSE, that is not the purpose of this guide. So, here is a model I’ve just created.

Remember, this is the Steam Version of the program that has not been updated since Mixamo was bought out by Adobe. There are links here in the program that suggest that you can upload the model directly to the Mixamo Auto Rigger and rig the model there. That use to be true and the old Mixamo Server was like a paid access tool. Those of us that bought FUSE when it was first release had quota status where we could upload a certain number of models a month and add some free animations to them, however if we wanted more advanced animations we either had to credit up to them or buy them. That changed when Mixamo made FUSE a free to use program and they opened everything up to everyone. The server got to the point of being able to export ready to use SFM and GMod models complete with animations. However, when Adobe bought out Mixamo, this server closed, permanently and Adobe opened one of their own. If you try to use any of the external links to anything Mixamo within the Steam version of FUSE, you’ll end up with a 404 HTML error or end up being forwarded into this website.

So doesn’t this make FUSE a somewhat useless program now???
No Way!! We can still export these models as OBJs. They just require a little more work to port (or do they??).
We only have one model type we can export models from FUSE in, and that is OBJ. However there are export options to consider.
This is the difference between enabling packing textures and UV maps.


If you pack textures you’ll most likely want to use the higher resolution settings (2048×2048 or 4096×4096) or you’re going to lose details in your model textures because you’re combining a bunch of textures into one texture sheet.
To import FUSE OBJ models into Blender, it’s the exact same process as I mentions above in the OBJ section. Just remember that OBJ files do not contain an armature, but we’re going to address this in the Armature, Weight Painting, and Animations sections later.
When you import the model (or most OBJ type models) into Blender using the OBJ importer and look at them in Material view mode, they may not look pretty.
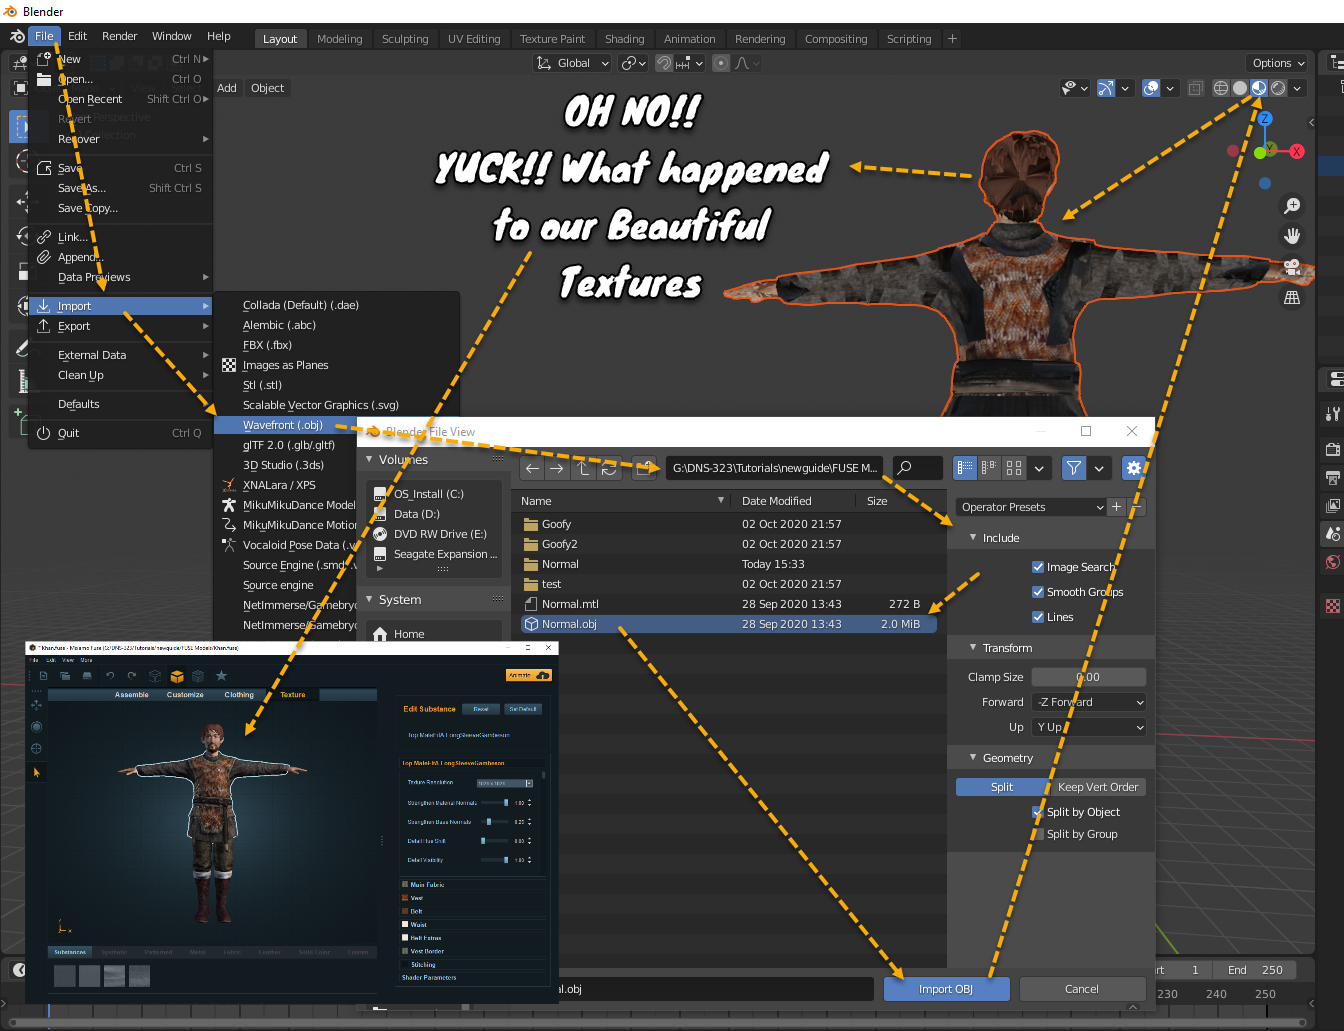
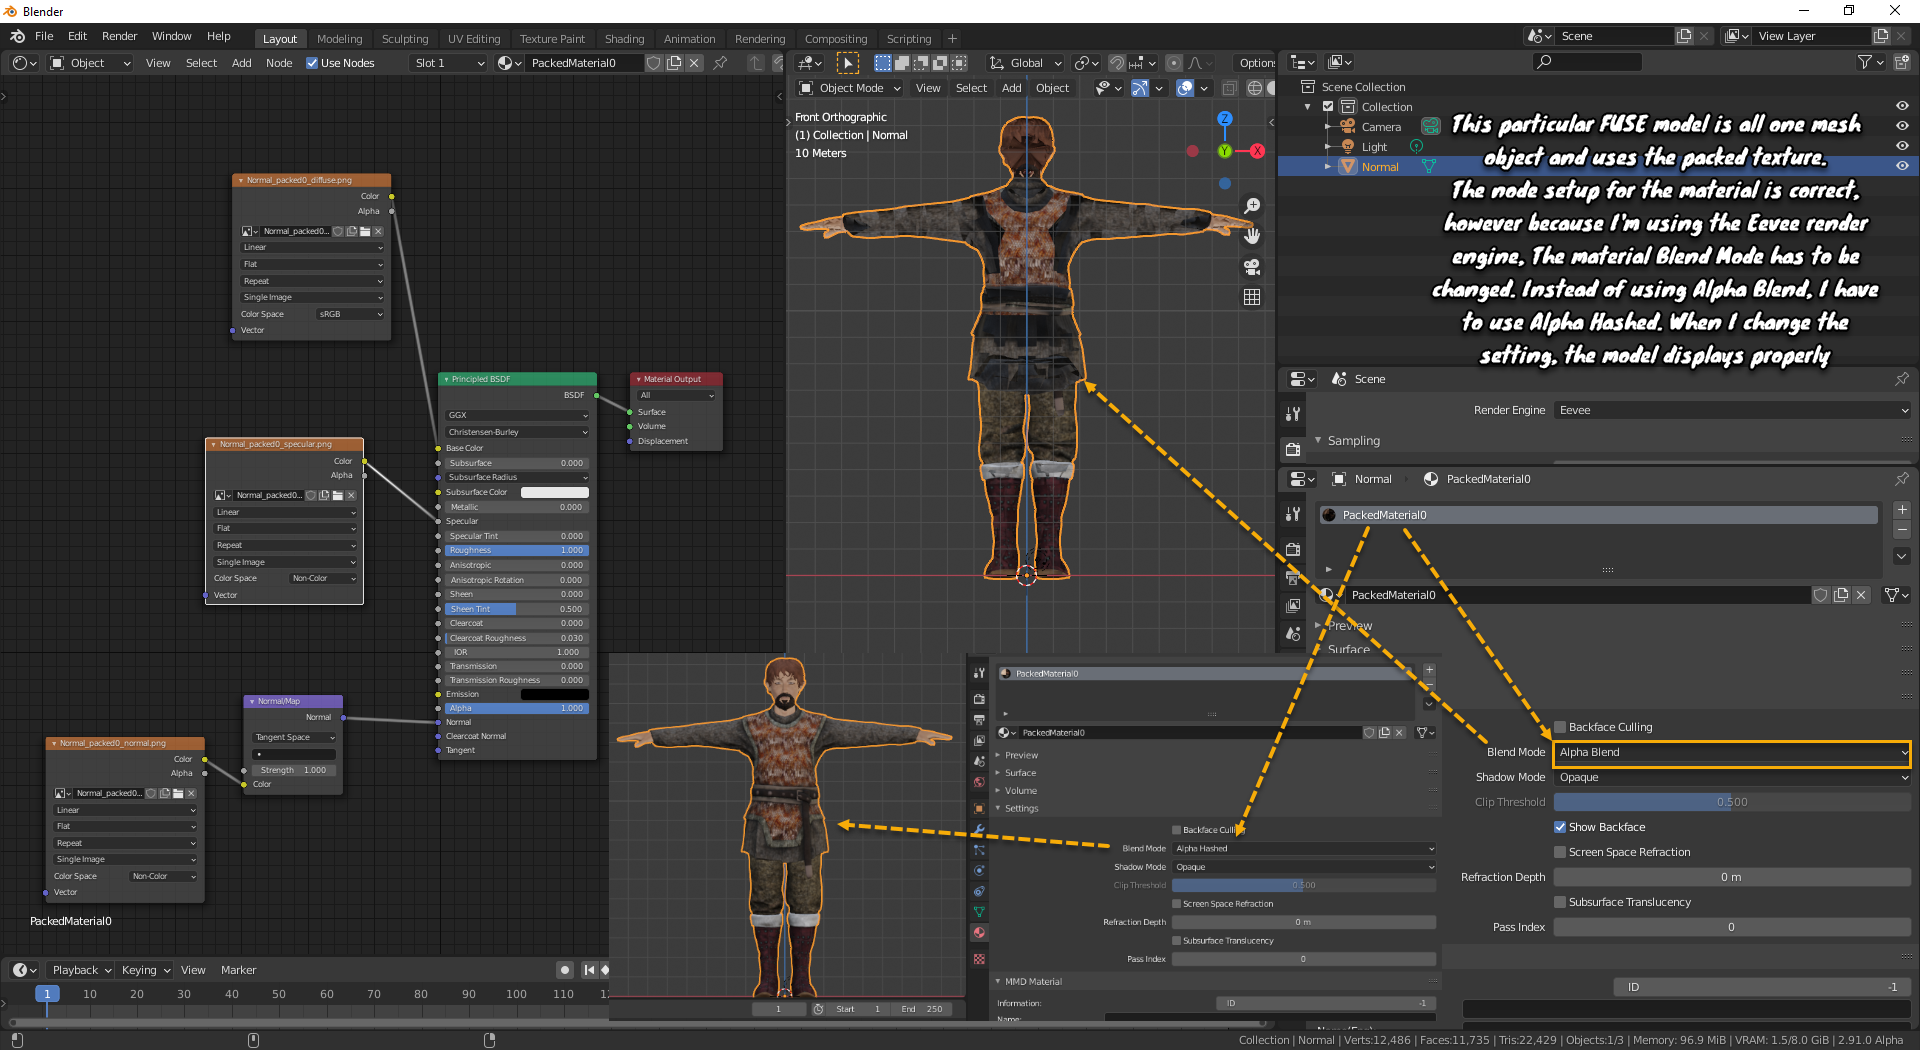
If after changing Blend Modes, the textures remain see through, then the problem may be in the mesh itself, the normals may be reversed. Rather than using the Invert Normal export option and re-exporting the model, it is most times better to do this manually in Blender, but we’ll get into that situation when we start talking about fixing mesh.
You now have a FUSE model in Blender. It won’t have an armature and depending on the export methods used from FUSE, the mesh may need some (or a lot) of work.
8. Importing Source 2 Models
This is still new territory and there aren’t many Import/Export add-ons to do the job yet. There are a couple out there in development and looking at some of the new options in Blender Source Tools, it looks like Artfunkle may be started to head down this road with it as well.
However, that said, I’m going to introduce another add-on that people have heard rumours about but are really sure about. This add-on is known as SourceIO and is being developed by REDxEYE and his team. This is currently an Import only add-on right now and the biggest downfalls for it is that it is still i development, there is no documentation on how to use it and I don’t think all Valve model types are supported yet.
What can be done with this add-on? Let’s look at the import menu
WAIT!! Does that say Import .MDL MODELS, VTF TEXTURES, BSP MAPS, SFM DMX SESSIONS AND HAS SOURCE2 capabilities WITHOUT having to DECOMPILE STUFF???

Yup it does. This add-on is suppose to import Source 1 Model MDL, BSP and Source2 VMDL_C files without having to decompile them (when it is fully developed).
With Import MDLs there is no control on what or how things are imported, like rotations, scale or how to import information like Object or Material naming (which can be a real problem) because some of these name include path information and end up be clipped (truncated) and become incorrect. Models import as grey clay and Shader nodes are not set up.
The model import does not include LODs or the phys (collision) meshes (if these are important to you.)
There is an option to write QCs but the QC generated is placed in the Blender Text Editor. It is not written to an actual file and is the QC itself is poorly coded. However, the information it does contain is an excellent jump off point for manual editing.
VTF imports are interesting though, no more having to convert VTF to PNGs to get them into Blender. But this tool is kind of broken. The textures are imported to the image editor and there is an option you can set to split the Alpha channel (which contain masks and opacity) off to it’s own image. This is broken in the latest stable release (3.7.11), but has been fixed in the master for the next release (3.8.0).
Here I’ve imported the Worker Bot A and the Demoman directly from the Valve binary .MDL files into this scene so you can see just what is imported or created by the importer.
Map imports is not fully functional yet but it will import map BSP files. These are some of the deficiencies I have found…
The map are not to universe scale (as you can see comparing the import to the demoman and the worker bot.) The import does bring in the materials based on the map’s entities VMT calls but the brushes (mesh vertexes) are not assigned to them and the UV maps are totally pooched (broken). So to texture the maps, you would have do complete unwraps and assign islands to materials and set up Shader nodes manually.
Glancing through the import, It does not look like we’re getting all the brushes or entities from the map, ie windows are missing and it does not import other entities like models (ie tractors, dump trucks, furniture, etc. are missing) However, we are getting BSPs directly into Blender. (Yay)

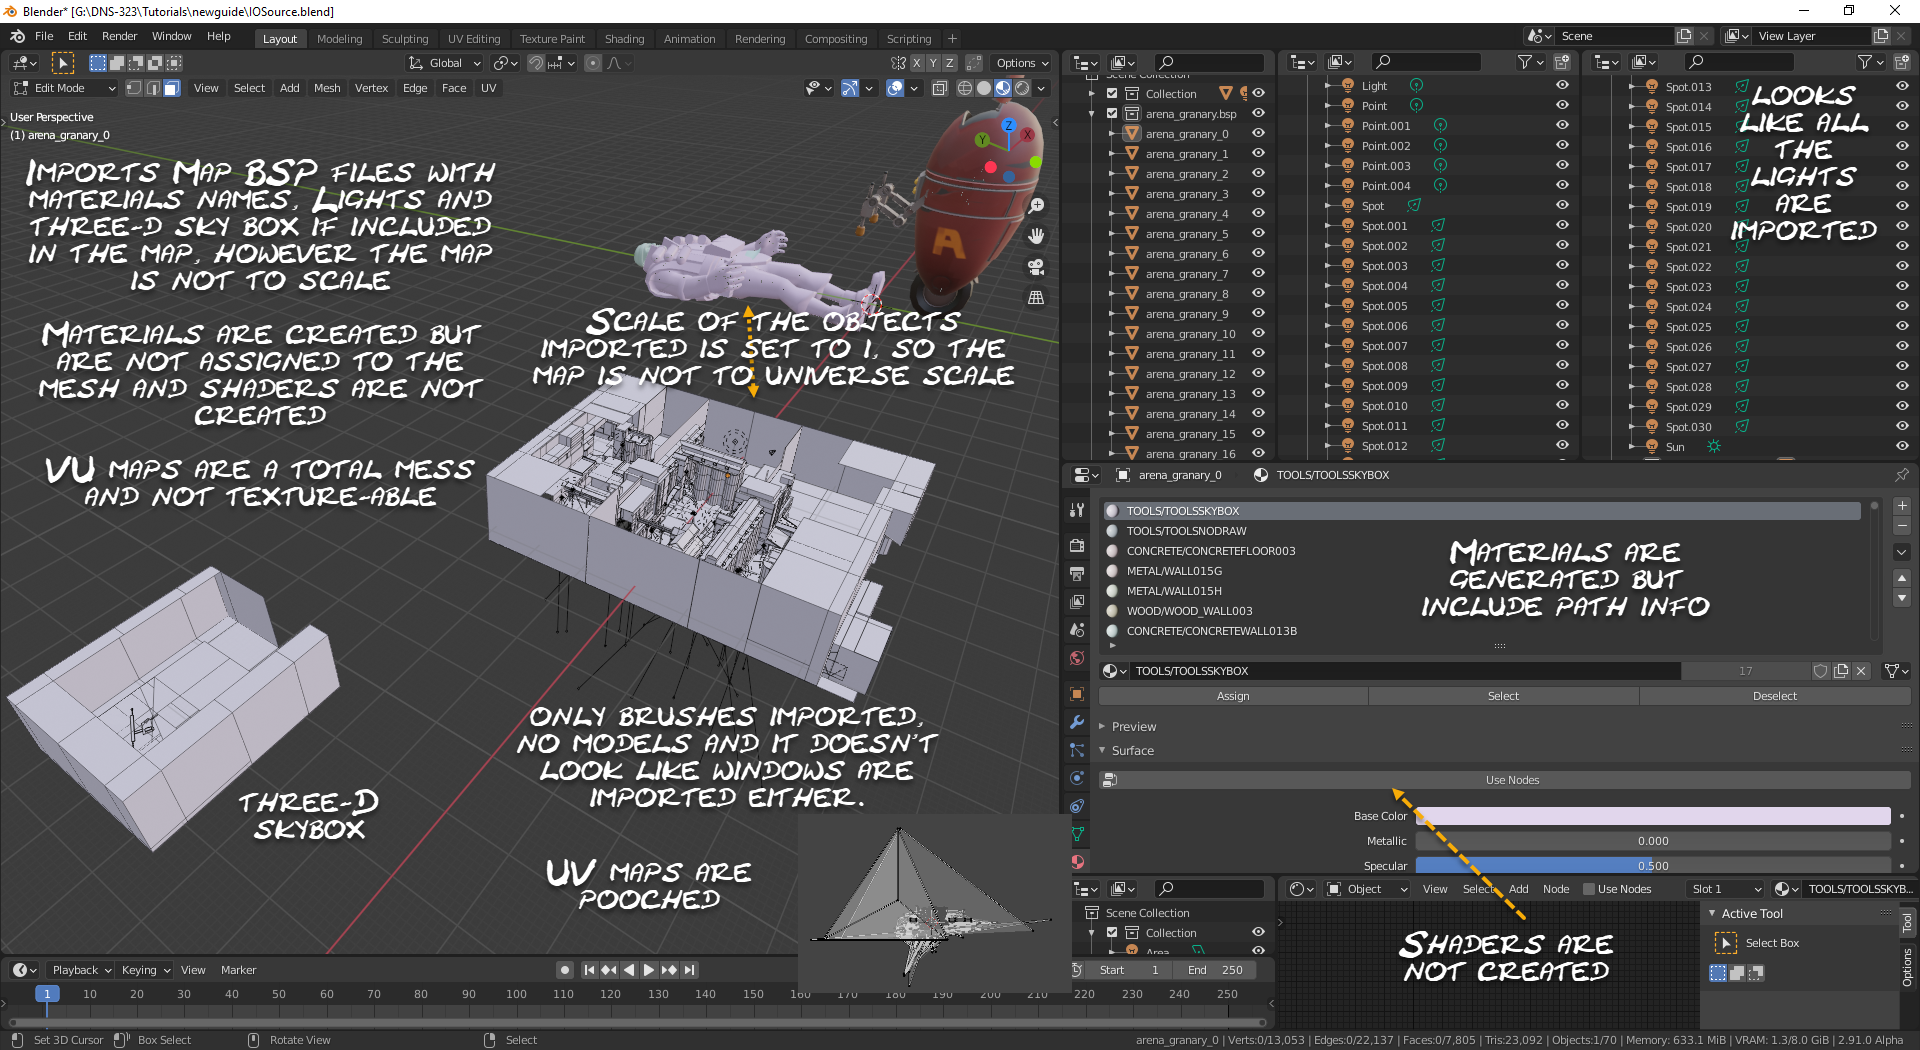
DMX Sessions imports DO NOT work (at least I can’t get it to work and not having any documentation doesn’t help.) However, this is may be because it is still being developed. If you look at the SFM2Blender.py file (one of the main driving python scripts I think), it’s empty, it hasn’t been written yet.
Another thing is that I don’t know is what version of SFM Sessions are going to be supported. Will it be the Source1 version of SFM (the TF version) or a one of the Source2 versions of SFM (also know as S2FM or SFM Reborn for the DOTA version and SFM2 for the Half-Life: Alyx version) or if it will import sessions from all 3 versions (and what about Portal IFM Sessions (for those of us who know what this is) ??).
In fact, at the time of this writing, Source 2 DOTA2 support is currently broken. This is because of an recent update to DOTA2 and REDxEYE is investigating. Trying to import a DOTA2 model will only give you an Armature without mesh.
As I say this add-on is in development and experimental phase, so you can expect glitches and breaks as it is being developed. This is why I left it for last, I didn’t want to get your hopes up because all features this add-on promises, just don’t work properly (yet). However, I am going to say that REDxEYE and his team are doing a fantastic job with this tool and the potential is huge!
Source2 Imports
This next picture is Alyx from the Source2 Game Cache files of HalfLife – Alyx.
I’ve imported, textured and posed it using the bones included in the import using this tool.
The Import scale is being compared to the TF2 Demoman and the Half-Life2 Alyx (Grey Clay) and it looks like the importer is importing Source2 models at the scale of the universe they belong to.
So, YES, we can now import Source 1 and Source2 models into Blender, and directly from their game binary files, no decompiling required.
The Source2 Alyx is comprised of 12 Mesh objects (separated by materials), totaling 63,384 verts. She has 268 bones (12 more than we can compile a DMX Type Export with.)
The import has a WHOPPING 2,652 Shape Keys. Not really though, this is because the importer is applying all the shape keys into every mesh object if the object uses them or not. The actual count is really 26 actual shapes with 195 corrective shapes for a total of 221 unique shapes all together. However, because the model is split up by materials, we still have to look at all the 221 shapes in each of the objects just to make sure they don’t really move vertexes and delete the shapekeys that don’t, but we’ll get into this in the Shapekey section.
Where to Get the Add-on and How to Install it in Blender
If you search Google for “Blender SourceIO” you’ll find links the REDxEYE’s GITHub.

To get the master, click the Code button on the main page.

The Release Version

- Launch Blender
- Select Edit – then Preferences
- Select Add-ons and Click Install
- Point the file browser to where the Download ZIP file is and select it. (Don’t unpack the Zip), then click Install Add-on
- Enable it.
If you download the Project Master (to take advantage of bug fixes and new features added), it is best to install the add-on manually. The process to do this is:
- Open the downloaded Master ZIP file
- Open a Windows Explorer session
- Point the Windows Explorer to your C:Users<username>appdataRoamingBender FoundationBlender<Blender Version> folder
- Drag or extract the SOURCEIO-Master folder from the project ZIP file into that folder
- RENAME the SOURCEIO-Master folder to SOURCEIO
- Launch Blender, select Edit – Preferences
- Select the Add-ons tab
- In the search box type Source and look for the add-on titled Import-Export: Source1/Source2 Engine Assets (.mdl, .vmdl_c, .vtex_c… and enable it
- close Preference and start importing.
Importing Source2 Models (Continued)
Getting Source2 Models into Blender
Like any other Valve game, HL:Alyx and Dota2 both use the VPK format for the Game Cache files and it looks like we can still use either GCFScape or Crowbar to extract/unpack the assets from them.

Source2 models have different naming conventions than their Source1 counterparts and formating is different as well. The primary file types we need to import the models are:
VMDL_C: These are the model files you need to import (.mdl is the Source1 equivalent)
VMAT_C: These are the associated material files (.vmt is the Source1 equivalent)
VTEX_C: and These are the texture files. (.vtf is the Source1 equivalent)
VMDL_C files will import as grey clay, the shaders are not set up automatically. Because these models are coming from a the Valve binary format, the add-on has to first dissect the binary data and rebuild it in Blender, so depending on the size of the model, it can take a bit before the model appears. The model will spawn in Blender using the rotations used in game and use the game scale, there are no options in the importer to make adjustments at this time.
Animation files??? It appears that Animations are built and orchestrated using the tools found in the Source2 Workshop Tools for the associated games. Where this animation data is written, I have no idea and the importer doesn’t have an import option for it anyway.

In fact on examining the Combine Grunt model, I found it had what looked like animation model files, however when I imported these files none of them had any animation data in them at all, no Actions, no Amimation Graph data, no NLA stacks. Then again, these may not have been animation type models in the first place. Source2 is new to me and I’m still trying to understand its structure.

Where Do We Find the Asset Data
In the Game Cache VPK Files
What I have done is used GCFScape or Crowbar and extracted the Materials and Models folders from the game cache VPK files into an extraction folder and place them in an extraction folder somewhere on my computer for each game. These 2 folders from each game should contain everything you’re going to need for importing assets. The file I extracted folders for HL:Alyx from was the pak01_dir.vpk file from the steamappscommonHalf-Life Alyxgamehlvr folder and the file I extracted the folders for Dota2 from was the pak01_dir.vpk file from the steamappscommondota 2 betagamedota folder.


Source2 Models can use materials from multiple other models. As an example the Alyx model here uses materials and textures not only from the Alyx character, but also from the GMan, Eli, Hahn, Olga and Lazlo characters as well.
I’ve already mentioned that these folders are not designed with the same hierarchy the Source1 engine uses. Models, materials and textures are mixed between these asset folders. For example, if I drill into the Modelscharactersalyx folder I extracted, I’m going to find that not only is the VMDL_c file is there, but there is also a folder called Alyx and a folder called Materials. In the Alyxalyx folder you’ll find a file called alyx_vmorf.vtex_c (this “maybe” the facical flexes (I doubt it), or because it is a vtex_c (as in textures) type file, “may be” the winkle texture map for the character. I’m not sure but I’m pretty sure it’s the latter.)
In the Alyxmaterials folder you’re going to 3 VMAT_c and 9 VTEX_c files which are material and texture file types needed for the model (but not all the materials and textures required to textures her, the others are buried elsewhere.
As I said, keep all the files in their proper Folder hierarchy when you extract/unpack them, it will make your life a heck of a lot easier when working with Source2 models.

Importing Source2 Models (continued)
What I have done is used GCFScape or Crowbar and extracted the Materials and Models folders from the game cache VPK files into an extraction folder somewhere on my computer for each game. These 2 folders from each game should contain everything you’re going to need for importing assets. The file I extracted for HL:Alyx was the pak01_dir.vpk file from the steamappscommonHalf-Life Alyxgamehlvr folder and the files I extracted for Dota2 was the pak01_dir.vpk file from the steamappscommondota 2 betagamedota folder.
Source2 Models can use materials from multiple other models. As an example the Alyx model here uses materials and textures from Alyx, GMan, Eli, Hahn, Olga and a special shared folder.
Now I’ve already mentioned that these folders are not designed with the same hierarchy the Source1 engine uses. Models, materials and textures are mixed between these 2 folders. For example, if I drill into the Modelscharactersalyx folder I extracted, I’m going to find that not only is the VMDL_c file is there, but there is also a folder Alyx and a folder called Materials. In the Alyxalyx folder you’ll find a file called alyx_vmorf.vtex_c (this “maybe” the facical flexes (I doubt it), or because it is a vtex_c (as in textures) type file, “may be” the winkle texture map for the character. I’m not sure but I’m pretty sure it’s the latter.)
In the Alyxmaterials folder you’re going to 3 VMAT_c and 9 VTEX_c files which are material and texture file types needed for the model.
As I said, keep all the files in their proper Folder hierarchy when you extract/unpack them, it will make your life a heck of a lot easier working with Source2 models.
Importing Source2 Models
And now the fun begins.
- Launch Blender and delete the default Cube
- Select File – Import and find Source Engine Importer and hover the cursor over it then select Source2 Model (vmdl). Don’t get confused if you have Blender Source Tools enabled, you’ll be able to tell the difference between the importers based on the types they import.
- Point the File Browser to the VMDL file of the model you want to import, select it
- The only option for this importer is Invert UV map and I leave this at the default (enabled) however, if you find that textures aren’t applying properly when you get to the texturing phase, you may have to start over and disable it or invert the UV maps yourself.
- Click Import Source 2 VMDL File and wait for the import to finish.
The model will import just like a Source1 model, complete as per the mesh, armature, shapekeys, materials that are found in the model, however, it does not set up material shader nodes so it will be grey clay on import.

I’m not sure if the importer is splitting the model up by materials or if the actual model is compiled this way, but it is a God Send that it does this. It makes Shader set up and texturing a snap.
Texturing the Model
The fact that the mesh objects are split by materials we’re going to try one of the other import options of REDxEYE’s importer. The Source2 Materials (vmat_c) Importer.
Process:
- Select one of the mesh objects
- In the Material Properties panel check the material name you want to find
- Select File
- Import
- Use the Source Engine Importer by REDxEYE
- Select Import Source2 Materials (vmat_c)
- Now the hard part, you have to find the .vmat_c file for the material. For a lot of the models it might be in the actual modelsmaterial folder for the model you’re working with. If it’s not, check the first part of the material name, it may be a material used by another model (like the GMan or Olga), check that model’s modelmaterials folder. If still not found, check the exported materials folder. and finally if STILL not found, you’re going to have to open an Windows explorer and search for files that contain the Blender material name. The Blender File browser is defaulted to only search the selected folder level, it can be set to search 3 reclusive level, but that usually isn’t deep enough to find the files.
- Select the VMAT_C file for the material
- Set your options,
- If you disabled the Invert UV option when you imported the model, you’ll want to disable it here as well.
- If the Extract Alpha Texture option is enabled (and the add-on does it’s job properly), if the texture has Alpha Channel information, it will be written to its own image for that image, one will be the RGB channels, the other the Alpha Channel.
- Click import Source2 VMDL file (programming error the addon still needs work… LOL)
WAIT FOR THE PROCESS TO FINISH
This is the result of importing that one alyx_body material

So what happens if the import of a VMAT_C can’t find the textures its looking for (because the VTEX_C doesn’t exist or you haven’t placed things in to the proper folder hierarchy?
Glad you asked!
In this example, I’m importing the alyx_head_02 materials and I’ve moved the VTEX_C associated with the materials up one level to the modelsalyx folder and attempted the import. The process took a lot longer than it normally does however, the add-on created the shader nodes, found the moved VTEX_C files and painted the model. It also created the TGA files and put them into the folder where VTEX_C files were found.

Got a note back from REDxEYE and he confirmed that the Add-on does do a backward search through all possible paths looking for VTEX_C files and Python being powerful language that Windows pretty much allows to look everywhere allows them to be found. This is why the add-on found the VTEX_C in my C: root and C:users folders when i conducted my tests. Texturing failed because Windows would not allow python to write to those (system type) folders (Yay Windows!).
However, if the VTEX_C is nowhere to be found the add-on will still set up the shader node with a principled BDSF and a disconnected Material Output node causing the mesh associated with the material to turn black. You will have to fix these manually. (I was hoping that it would set up a connected shader with an unassigned image texture node connected to the Base Color input forcing the mesh to turn pink.)
Keep walking through the materials for each mesh object setting up the .VMAT_C with the same name as the material until the model is fully textured.
Done.
VIDEOS For the topics covered in this guide.
Where to Get Nem’s Tools (VTFEdit, GCFScape) now that the Nem’s Tools Website is gone
[link]
Unpacking VPKs
[link]
Decompiling Source1 Models
[link]
Installing Blender Source Tools
[link]
Installing NifTools
[link]
Installing XPS Tools
[link]
Installing Cat’s Blender Plugin
[link]
Installing Befzz’s PSK/PSA Importer
[link]
Installing REDxEYE’s Source IO Add on
[link]