
Overview
This guide is updated as of Blender version 2.9. THIS GUIDE IS A WORK IN PROGRESS..! Even so, any suggestions are appreciated!
Introduction
Hello, I go by Arashi Faustes. I’ve been a lifelong hobbyist game developer (graphic design, 3D modeling, animation, texturing.. really, pretty much every aspect of it!) along with networking, community modding (Namely Spore Dark Injections!)[davoonline.com], 3D printing, being a massive clan/guild owner, and so many other things that are tech-related.. I can’t even name them all without having an excessively long list.

I have had several years of experience with Blender, long before I joined Steam (You may as well add an extra 400 hours of time to my Steam hours.) I specialize more in one aspect than others, and even until this day I am learning new things about Blender.
Be aware that Blender is a bit more difficult to learn than other alternatives such as 3DS Max, and even though I am providing the groundwork to learn Blender, I want people reading this guide to understand that they need to learn the details of Blender on their own.
This guide is primarily to display what a great program Blender is, and provide enough information for anyone to find a good introductory point in learning the program with maximum enjoyability.
Personally, finding the initial footwork of learning all the different things had been the most frustrating part about Blender, but really, it’s the only frustrating part about Blender. However, Blender 2.8 may as well be a complete rework from 2.79, as the entire interface is now a lot more user friendly, new, and that whole statement was me learning for several years on end with version 2.79 and older. Finding your footwork isn’t as difficult in 2.8+ as it seems.
You may want to download a copy of 2.79 for yourself right from the blender website[www.blender.org] to see how much of a pain it is compared to 2.8+. You don’t have to, it’s just if you’re curious to see what it was like.
If you try with the upmost seriousness in learning a version below 2.8, you’re torturing yourself, and it’s time to stop.
Experienced users may find use in this guide as well, due to the lack of documentation on 2.8+ as of now. A lot of things had been moved around, and sometimes it’s hard to remember all the new keybinds and locations of all the different things you might occasionally have needed in 2.79 and prior. It’s actually one of the reasons I’ve written this, just so I have a reference of information that I can quickly look back to without scrambling around trying to find something simple that is impressively hard to find.
Overview & General Navigation – The Basics
Before you get started with anything, you need to have Blender installed. You can either download it from the Steam store or directly from Blender’s Site, although I suggest you go through Steam so you continually stay up to the latest version. Blender is very stable, so you don’t have to worry about newer versions destroying older projects or files (Unless, of course, you’re making a file in 2.79 and transferring it to 2.8. You’ll need to reapply and relearn a lot of things all over again when you make that version change.)

[www.blender.org]
Please don’t torture yourself with 2.79..!

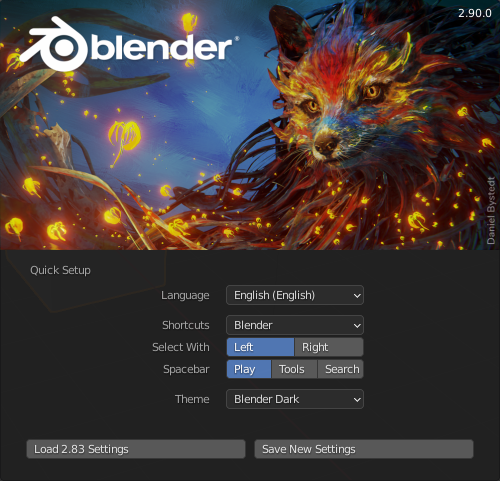
The above is the startup screen for when you first launch Blender 2.8+ (Namely 2.9, but this shouldn’t change much, if at all, other than the splash screen, in future versions.)
These are the default settings.
The layout of this is relatively simple, and the settings are already default set to what the majority likes their settings being as an industry standard. If you’re happy with these settings being left as “industry standard,” then you should leave them be. Every time you open blender, this shows, so you can close and open blender on the fly to change the settings if you’re switching your workload, instead of going into preferences every time you want to change it.
If you come over from Blender 2.79 or prior, it is in your best interest to switch “Left Click” over to “Right Click.” I like right click because it is what I am used to. This key is used to select objects, vertices, edges, faces, ect in all the different modes and windows of Blender.
Space bar, what you want set under that category, depends on what you’re doing.
For the most part, I like it set to Search when you’re 3D modeling, node editing, ect, so that you can put different shapes and objects into the scene at will. All you have to do is press space bar and start typing the name of the object or thing you want.
Setting the space bar to Play, will make it so that the timeline is ran. This is good specifically when you’re trying to animate something.
Setting the space bar to Tools, makes it so that the space bar will bring up a menu that lets you quick select move, select, rotate, ect. I don’t recommend this, as you should learn the key binds for these actions fairly quickly and it’s a bad habit to get into; relying on this when you could have the space bar set to Search instead.
Theme is self preference, as it changes the coloration of Blender. However, I like the dark theme look of Blender. It’s easier on the eyes. Dark theme master-race!
And that’s all you need to do when you first start Blender and see a big scary interface. From there, you can just click (left or right) in the editor and the startup box will go away.

I will be going over the basics of the interface in which you are greeted with.

- N/A 1
- N/A 2
- N/A 3
- N/A 4
- N/A 5
- XYZ axis indication. This displays which way all 3 axis’ go when you’re looking around. The XYZ axis is like a graph, with the X and Y axis’, but with a Z axis as well, as to make it a geometrically 3D space. The X and Y axis’s are laid on the ground– X goes left to right, Y goes forward and backward, and Z is height, up/down. If you were to click one of the circles on the axis indication, your camera will snap to that position. This makes working from image references very easy to do, and so many other different things like making sure something looks or lines up right, or look to scale with everything else you might have modeled in your scene.
- N/A 7
- N/A 8
- N/A 9
- N/A 10
- N/A 11
- N/A 12
- N/A 13

- Select tool. Used to select objects you click on while this is active. You can shift click to select multiple objects, or when you’re in edit mode, which I will talk about later, you can select all the vertices from one point to another in the shortest path possible using control.
- Origin tool. Sets the origin point with your cursor. Unlike the Select tool, the origin point is the location in which new objects can be spawned. There are other uses to this, though.
- Move tool. Displays arrows you can use to move an object in the “XYZ” axis. The shortcut for this is G. When using the “G” shortcut variant of this tool, you grab the object freely without locking it on any axis. If you press the X, Y, or Z keys, it will lock your movement in that direction. If you press numbers such as “1,” or decimal values like “1.25,” it will scale the selection relatively. 1.25, for example, will scale it to 125%, and .75 will be 75%.
- Rotate tool. The shortcut for this is R and just like grabbing/moving, it will move freely when you use the shortcut for it. It can be locked using the X, Y, and Z keys. You can also type degrees, such as “90.” It will automatically rotate your selection exactly that amount if you want to be precise.
- N/A 5
- N/A 6
- N/A 7
- N/A 8
- N/A 9
- N/A 10
There is no grid in blender, unless you enable it, which I don’t recommend for standard modeling unless you’re modeling something functional such as a 3D print or CAD work, so if you don’t lock your moving and rotating within a specific axis, it may be a hair off– for example, if it’s 0.000000000002949120 off, it won’t snap to that 0 if you just freely move it to what looks right.
All of these tools can be used in both object and edit mode the exact same way, and with almost every other mode.
Modeling – The Basics
Rendering & Camera Manipulation – The Basics
Sculpting – The Basics
Materials & Node Editing – The Basics
Animation – The Basics

However, I would suggest switching to the “Animation” tab for an easier layout by default to work with. You can switch to that from here.


Physics – The Basics
Game Engine & Python – The Basics
This may return in the future, but it had been removed due to the engine being highly outdated and was probably a lot to keep up with, and nobody honestly really used it anyways.
There isn’t much at all for any known titles on the market today who have honestly and exclusively used the Blender game engine, one of the reasons being due performance issues and optimization as in comparison to other game engines.
Regardless if Python is a very current language and no matter how good it is, the game engine needed a complete rework from the ground up. Doing this all in one version would’ve delayed the release of version 2.8 and would’ve put a lot more on the plate of Blender Foundation than what it was worth.
If you want to make use of Blender’s game engine, go to version 2.79 or prior.
Alternatively, there is an open source project available which is a rework of Blender’s game engine in its own little box, and is commonly interpreted as superior to 2.79’s Game Engine. This project was made firsthand by people who have worked with Blender. If you are interested in this project, go here, to UPBGE’s site.[upbge.org]