Overview
This is a comprehensive archery guide for War of the Roses that goes over all of the archers main perks, weapons, and attachments as well as how to best utilize them. This guide also covers the advantages and disadvantages of the different weapons and armors and how to deal with enemies in different situations.
Introduction
This guide is made up of seven sections, the first one covers new content for the game, specifically for archers. The other sections cover both basic and advanced information about playing as an archer. This information covers everything from weapons and armors, to tips and tricks. Much of the in game information is left for you to decipher on your own but this guide will attempt to give you a better understanding of what you are doing.
Kingmaker (New Content)
This section will cover new content and will change as adjustments are made to the game itself. Eventually this information will go into the categories they belong.
Changes to Hammer Head Bolt – This is now more of a support option, gone are the days it would do devastating damage against plate. The most powerful Windlass Crossbow setup does approximately 80 damage to a head encased in a Frog Helm. While this is still respectable an Armor Piercing shot, in the same circumstances, would probably kill that same individual. The damage is typically much less against other parts of the body and of course using a lower damage Crossbow setup will decreases it’s deadliness even further. What these bolts do now is stun and knock down opponents when utilized properly. A shot to the leg will cause an opponent to stumble and fall, a shot against a mounted target will knock the rider off of their mount. While it is difficult to kill an opponent with this bolt, it is very useful when supporting your teammates and great for dismounting enemies or slowing their advance. If you are using this, expect to use your sidearm as well and be prepared for a melee engagement as you may need to finish off your enemy close up.
Bows (Basic)
Bows
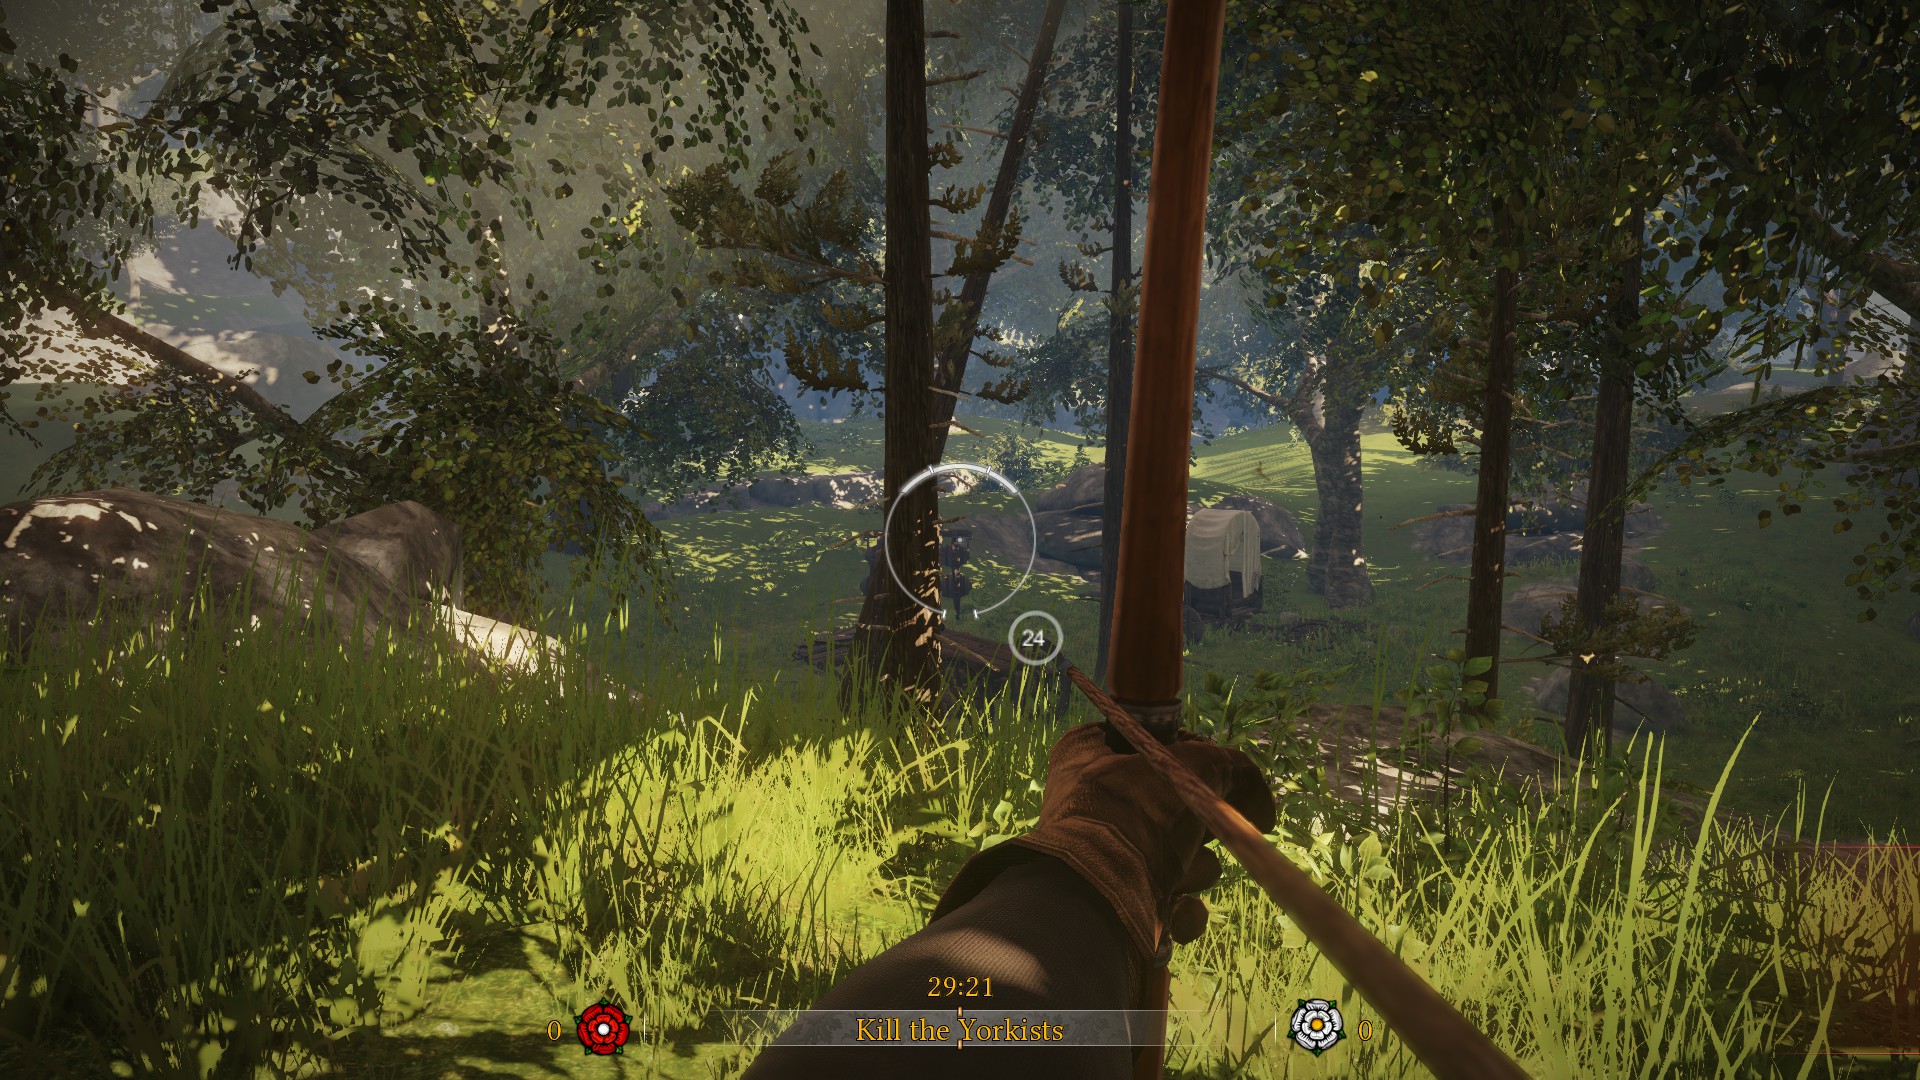
Bows can take a bit of getting used to when it comes to combat as archers adapt to projectile drop. By gauging the distance and aiming above a foe, arrows will land where you wish in time. For archers, a headshot is not always guaranteed kill and most will reap greater rewards from shooting an injured enemy. Bowmen do best lightly armored, as wearing heavy armor can considerably slow their rate of fire, but this does not prevent them from playing as they deem fit. Some archers prefer to fight up close heavily armored, only to use their bow to shoot a fleeing foe or before engaging in melee.
To fire a Bow you must hold the right click on your mouse. This will put you into first person mode as you begin to draw back on your bow. The indicator will brighten a bit when you are ready to fire; this is also when the moving lines on reticule reach the thickest part of it. Once these lines reach the top center of the aiming reticule this is usually when your arrow is at its most effective. This will grant a higher chance to penetrate armor as well as more damage. When you are ready to shoot, simply left click your mouse and you will do so. Holding “Shift” will also allow you to steady your aim.
Aiming reticule is shown below
Warbow – This bow lives up to its name by delivering the most damage and longest range of any bow, but it is not without drawbacks. The Warbow also has the slowest rate of fire and shortest length of time it can be drawn, of all the bows. These weakness can be somewhat mitigated by ensuring a low encumbrance load out and/or using the proper perks. Conversely the strengths can be improved upon with the proper attachments and/or perks. The long range and high damage make this an ideal bow for sniping.
Longbow – A sturdy and well-rounded bow, the Longbow does well in all situations but excels at none. It can be used at all ranges, the perks and your play style determining how this weapon handles. This is a great bow for those learning the ropes.
Hunting Bow – Archers on the go will appreciate this bow, best at short or medium range, the Hunting Bow does the least damage but will keep the enemy on their toes with a withering hail of arrows. Because of its short range it is best to stay at the edge of battle while firing arrows in quick succession at your enemies. The rapid rate of fire will also allow heavier armor to be worn without as much of an impact, though this will slow you down and possibly force you to engage a charging enemy rather than pull back.
Yew Self Bow – This is basically a hybrid of the hunting bow and longbow. It has a faster rate of fire than the Longbow but lacks the damage and range of it. If the Hunting bow did not pack enough punch for you or you felt the Longbow was to slow then try this Bow.
Elm Self Bow – The fastest bow, beating out the Hunting Bow in that regard. The damage is slightly lower but it improves on the Hunting Bow’s strengths.
Shaft Head
A fully charged arrow has a lower chance of deflecting and higher chance of penetrating armor.
- Standard – The twelve Standard arrows are good in all situations but do not dominate in any category. These are sometimes deflected by plate armor.
- Crescent Moon – These twelve arrows do the highest damage but are the most specialized and can only be used in certain situations. Unless you are hitting cloth or bare flesh, this will not wound, much less kill, your enemy. A shot to an unprotected face with these arrows will practically guarantee an instant kill however. Crescent Moon arrows are best used to hunt enemy archers as they usually wear cloth or have their vision unimpeded. When used properly, these arrows will clear the field of lightly armored targets.
- Swallow Tail – The Swallow Tail is another specialized arrow. It sacrifices range and has an ammunition count of nine but cause instant bleeding. These arrows do reduced damage against armor but when they do damage they cause a bleed effect, this is seperate from the normal bleeding that happens to enemies with low health. Lightly armored targets will not appreciate being shot by these arrows but heavily armored ones will not be as perturbed.
- Barbed – These arrows do reduced damage to armor, and do less damage than Standard arrows. However, like all specialized arrows they have their uses. The Barbed arrows have a higher ammunition count of fifteen and cause an instant bleed which is different than standard bleeiding. A fast firing weapon can make good use of the extra arrows but preferably against lightly armored opponents.
- *Bodkin – The Bodkin arrow is unique to the bow and has the longest range of any arrow along with Standard damage. While it does have a lower ammunition count of nine, the Bodkin arrow has the advantage of outdistancing all others, for those who like to fire from afar. There is a chance these will deflect off of plate armor.
- Armor Piercing – The twelve Armor Piercing arrows do less damage than Standard ones, but makes up for this by bypassing some armor absorption. What this means is a solid hit against plate from this arrow will do higher damage against the enemy than a Standard arrow would. But while these arrows are good against armored opponents a hit to an unarmored one will do less than a Standard one would. These are rarely deflected by plate.
- Flaming Shafts – As you might imagine these arrows are on fire. Your ammo count does not suffer from the flame of your arrows and you receive the standard twelve shots. Only the initial impact of these arrows suffers a slight damage reduction, but once they hit, the enemy will begin to receive burring damage over time. This is not the same as bleeding and setting a target on fire will not guarantee its death, the flames will however, make them a beacon for everyone to see as the fire engulfs them. There are some drawbacks to using these arrows though. They will stand out while being fired, making you a clear target. These arrows may also slightly impede your own vision while using Eagle Eye (especially with crossbow). While these arrows can be used in all situations, they are not ideal for one shot kills or attempting to remain hidden.
Attachments
- Double Quiver – This attachment will not only double your ammunition count but double the encumbrance from said arrows and halve your ammo regeneration speed. This will basically give you extra arrows up front at the cost of them taking longer to replenish and a little extra weight. How useful the Double Quiver is depends on you. If you find yourself running out of arrows right away and don’t mind a little extra encumbrance then this can be your solution.
- Footed Shafts – This attachment will allow your arrows to travel further at the cost of half of your ammunition regeneration rate. If you find yourself not shooting as far as you would like and regenerating arrows faster than you can shoot them, then this attachment is for you.
Crossbows (Basic)
Crossbows
Crossbows have a relatively low learning curve when it comes to shooting because of their high range and full charge. The bolts they fire tend to fly straight, hit what they are aimed at, and have a lower chance of being deflected. The drawbacks to these weapons are their low rate of fire and vulnerability while reloading. Being struck while reloading will force you to begin the process again, making reloading near enemies a bad idea. However, crossbowmen can do well with armor and when balanced with the proper Reload Mechanisms, can have a wide variety of play styles.
To fire a Crossbow you must first load the bolt by holding down right click. Unlike the Bow, this will not put you in first person mode but will leave you in third person and prevent you from moving. You will be vulnerable while loading; a single interruption will force you to restart. You will however, be able to survey your surroundings by moving your mouse as you load. While loading a red pronged strip will circle your screen indicating your bolt load progress. As this is a goes on a smaller red prong (or latch) will orbit within it. Left clicking will make the small prong push down and attempt to latch on the bigger strip. When successful this will increase the reload speed, if missed it will temporarily halt your progress. That is known as the Crossbow’s Active Reload Game and can be essential to increasing your rate of fire. Once the red pronged strip makes it full circle your bolt will be ready and you can then fire. Right clicking again will put you into first person and your shot will always be fully charged, unlike the Bow. Holding “Shift” will steady your aim and while the crossbows can be held up longer than most Bows, the aim will go down if you hold off firing for too long. Swapping out your Crossbow, when loaded, will cause you to reload all over again unless you have the proper attachment to prevent it.
Crossbow Active Reload Game shown below. As you can see the load leaves you vulnerable.
Steel Spanned Crossbow – This is the most powerful ranged weapon available, with the most range and damage. It also has the slowest reload speed of any weapon, but can be a powerful sniper weapon with the proper set up. It does best at very long to long range.
Horn Spanned Crossbow – This crossbow reloads extremely fast, though not as quick as bows, it has a range that surpasses them. With that said it also does not do as much damage as the Warbow or even Longbow. This crossbow does best at medium to long range and with or without armor has a good reload speed. It is ideal for those who like to fight near a melee or run from one.
Reload Mechanism
- Hand Drawn – This is the basic Reload Mechanism and has the fastest passive reload speed; it also has the largest notch for the active reload game. Success or failure in this will not result in a big reward or penalty. Those who prefer passive reload speed and wear lighter armor will get the most benefit from the Hand Drawn Reload Mechanism.
- Pull Lever – This Reload Mechanism is the polar opposite of the Hand Drawn one. With a slower passive reload speed, success in the active reload game will almost always complete the reload of your weapon. The notch strip is extremely small and if you have not mastered this mini game, the Nimble Mind perk is basically a requirement. This Pull Lever is great for heavy armor as the passive reload speed will matter very little, but only if you are successful.
- Push Lever – The Push Lever Reload mechanism is a more balanced than the Pull Lever version. While not as quick a passive reload as the Hand Drawn one, it is faster than the Pull Lever with a bigger notch strip and almost as big a reward for the active reload game. This also works well with armor and while Nimble Mind is still useful it is not as necessary.
- Windlass – The Windlass Reload Mechanism has the slowest passive reload of all the Reload Mechanisms and has a notch strip smaller than the Hand Drawn has. It also has the largest penalty for failing the active reload game and the smallest reward. Despite all this it has one major advantage, increased damage. For those who are willing to have a low fire rate and extended vulnerability the extra damage can finish an enemy in one hit.
Quarrel Head
Crossbow bolts are always fully charged and have a lower chance of being deflected by plate because of it.
- Standard – Read the description in Bow section.
- *Hammer Head – Due to projectile drop, these bolts have a shorter range than any other bolt or arrow, as well as the lowest ammunition count at only six. The Hammer Head does blunt damage and are unique to the crossbow. A shot with these against a mounted opponent or the leg of a grounded opponent will knock them down, off their horse or feet respectively. These are best used in support and have low damage, only a wounded enemy will die with one shot.
- Crescent Moon – Read the description in Bow section.
- Swallow Tail – Read the description in Bow section.
- Barbed – Read the description in Bow section.
- Armor Piercing – Read the description in Bow section.
- Flaming Shafts – Read the description in Bow section.
Attachments
- Double Quiver – This attachment will not only double your ammunition count but double the encumbrance from said bolts and halve your ammo regeneration speed. This will basically give you extra bolts up front at the cost of them taking longer to replenish and a little extra weight. How useful the Double Quiver is depends on you. If you find yourself running out of arrows right away and don’t mind a little extra encumbrance then this can be your solution.
- Safety – This attachment will allow you to swap out your crossbow without having to reload it when switching back. The cost for this is reload speed and halved ammo regeneration. If you are forced to switch without having fired a readied shot, you will have that shot ready to use when the opportunity arises, avoiding the delay of reloading. How useful the Safety is will depend on your play style. Those who find themselves frequently engaged in melee and do not mind a slower reload speed will get good use out of the Safety. It will allow them to load their crossbow ahead of time and approach an enemy with a different weapon drawn. When engaging in close combat they can switch to the crossbow and catch the enemy by surprise or use it to fire at a fleeing foe.
Armor and Secondary Weapons (Advanced)
Encumbrance
Encumbrance is one of the most important factors for any archer. It is based off of both the weapons you carry and armor you wear, as well as the attachments for them. The higher your encumbrance the slower your rate of fire and the more difficult it will be for you to outrun an enemy. While everyone has the potential to reach the same max speed with perks, the lower your encumbrance the sooner you will reach it. Your encumbrance will also affect the rate at which you climb ladders.
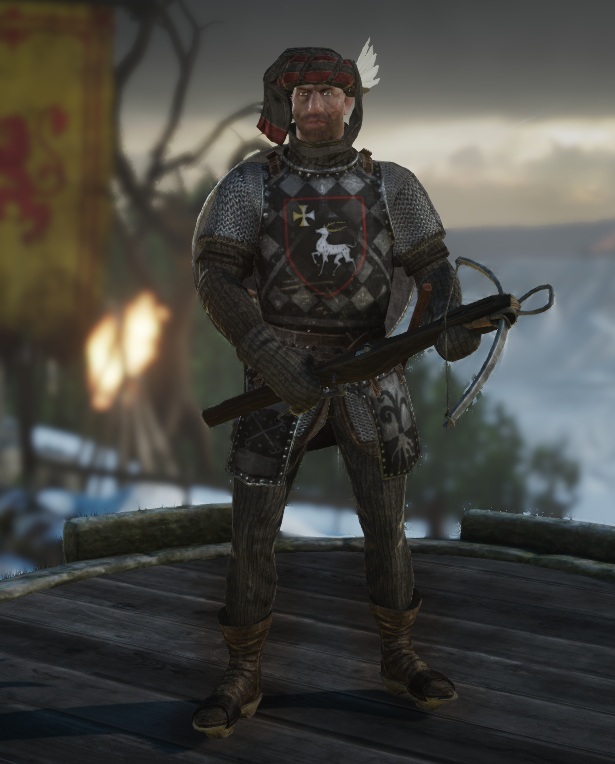
Armor – As with everything there are advantages and disadvantages to armor for all archers.
- Light armor will allow an archer to both shoot faster and escape easier. Of course if you are caught you can potentially be killed faster as well. This armor will also allow you to climb ladders quickly and reach a higher vantage point.
- Medium armor is a balance of survivability and speed. Your fire rate will go down slightly, which is more noticeable with bows than crossbows, but will add a little bit of protection if you are hit. Climbing up ladders is done at an average speed with this armor type.
- Heavy armor will slow your rate of fire with all weapons considerably. This penalty is less noticeable with crossbows and the ones using high reward active reload mechanisms will barely be affected. If you are wearing heavy armor holding your ground will often make more sense than fleeing from an enemy, as you will have higher protection and lower acceleration. When climbing ladders you will be extremely slow, leaving you exposed for a longer time.
- Helmets – There are many options for helmets and like the different armor types it will be up to your personal preferences regarding protection and encumbrance. Most archers prefer an unobstructed view which will leave their faces vulnerable to both melee and ranged attacks. One way around this would be to use a helmet with a visor, that way you are one press of the “V” key away from extra protection or vision.
Shields – If you are not interested in heavy armor or want even more protection, a shield might be something to consider. Shields can offer offensive improvements as well. A sidearm used with a shield can focus on adjustments that increase damage rather than health for parrying. Shields also provide a passive defense against arrows which can come in handy.
- The steel shield has a high encumbrance but covers a large portion of your body and can handle a good many attacks. The attachment can add some durability but also adds even more encumbrance for this already heavy shield. Aside from offering a strong defense the passive protection on this shield is superb. The steel shield can be worn on your back and will stop all but the most well placed shots from catching you unawares. This is especially useful to crossbowmen with long reloads as they are left the most vulnerable. But keep in mind this will only protect your back and a shot to your limbs or head will not be prevented.
- The buckler has low encumbrance and is an effective defense in a pinch but cannot stand up to many blows as it has a small area of defense and can break easily. There are multiple attachments to increase the durability of the buckler but these will also increase its encumbrance and/or lower your melee swing speed. When not on hand this shield is worn towards the front of your left hip and if positioned properly, can absorb incoming arrows. It works best when standing on higher ground as archers shooting up have a higher chance of hitting the shield instead of you.
Sidearm – As your main weapon will be a bow or crossbow, your primary melee weapon will be a sidearm. These are all one handed weapons that can be wielded single handedly or alongside a shield. Melee with an archer is inherently slower than with a Footman because they lack their passive decrease in weapon encumbrance. Like all weapons the higher your encumbrance the slower your attack speed. There are three separate categories of side arms based on damage type all with different strengths and weaknesses. Keep in mind that every weapon in each category varies and will have different strengths and weakness as well as many different ways to adjust them. When using these weapons without a shield you can also parry attacks but not as effectively as a Footman with Riposte can. If you plan to parry often make sure your weapon is equipped with the health necessary to do so.
- Swords are best against lightly armored opponents and the easiest weapons to wield. A strike from any part of the blade will do high damage against light armor. They can also be adjusted to swing through multiple opponents at the cost of damage absorption while parrying. This however does not work against plate and only a thrust will penetrate it at reduced damages.
- Axes are good all-around and the slashing damage can penetrate all different armor types. It does nearly the same amount of damage as a sword on lightly armored targets but is not as easy to use since damage will only be effective when the head of weapon connects. Using ‘q’ will also allow some axes to change damage type as some have piercing which is more effective against plate.
- Maces are best against plate, the blunt damage ignores a lot of plate’s protection but overall they do less damage. A mace used against cloth will not do as much damage as a sword or axe would. Maces also tend to be the slower than other side arms and must connect with the head to do damage.
Daggers – These are usually a last resort but can be devastating up close if used properly. You cannot parry with daggers.
Archer Perks (Basic)
These are the perks you must pick between in order to play as an archer; you may only use two.
Longbowman – This can only be used with bows and will increase the rate at which you draw your bow. What this perk does is affect how quickly you draw back on your bow, so while you are aiming the indicator around the aiming reticule will reach its effective mark sooner, which allows you to shoot quicker. This is useful to any bowman looking to increase their rate of fire.
Nimble Minded – This can only be used with the crossbow active reload game and increases the size of the notch, lowering the difficulty. While all of the crossbows can use this, only the ones with the smallest notch and highest reward will receive a real benefit. This perk is only useful if you find yourself having difficulty with the crossbow active reload game.
Forest Warden – Increased movement while aiming can be useful for all archery weapons. This will allow your character to move faster and strafe quicker while you are aimed and prepared to fire. Play style will determine how useful this perk is to you, but typically weapons with a fast reload and fire rate will get the most benefit as they suffer the least downtime readying each shot.
Sleight of Hand – Increased passive reload speed can be useful for all archery weapons. This will affect how quickly an arrow will be ready to fire. This means that for bows your arrows will be ready to be drawn sooner and for crossbows the weapon will wind up faster while you reload. Passive reload speed is also affected by encumbrance, so those with heavy armor or a weapon that reloads slowly will find Sleight of Hand useful.
Marksman Training – This can be used with all archery weapons and makes the arrows travel further by decreasing the projectile drop rate. This perk will effectively increase the range of all projectiles but proper compensation for projectile drop, as well as practice, can usually replace this perk.
Steady Aim – This can only be used with a bow and increases the time in which you can keep your bow drawn. All bows can only be aimed for a short while; an indicator around the aiming reticule will give you an idea as to how long this is. The length of time each bow can be drawn varies between them and the more powerful the bow the shorter the time. Your aim will drop and you will break concentration soon after the lines from each end of the indicator meet at the top center. This perk will increase that time slightly and can be useful if you find yourself without enough time to aim.
Eagle Eye – This can be used with all archery weapons and will allow you to zoom in 2x and 4x with the “Ctrl” key. Weapons which are least affected by projectile drop receive the most benefit as the range of the arrows will be able to match the magnification. While this makes Eagle Eye ideal for sniping there is one drawback from this perk. While injured the Eagle Eye zoom in will impair your vision with blood typically reserved for the edges of your screen.
Strong of Arm – This can only be used with a bow and increases the length of your full charge. While the bow is aimed the indicator around the aiming reticule will give you an idea of how powerful the shot is. Peak charge is typically reached when the two lines from either side of the indicator meet at the top center. With this perk however, the lines will keep moving giving the charge more power. This can be useful if you want to increase your odds of penetrating armor.
Regular aim
2x zoom from Eagle Eye
Regular aim
4x zoom from Eagle Eye


Additional Perks (Advanced)
These perks are available to everyone; some are more useful to archers than others.
When it comes to Defensive Perks you can always wear armor, but shields require a seperate perk to use. If you chose to focus on Armor Training you will receive benefits like a lower armor encumbrance, additional armor absorption, bleeding resistance but no bandaging, and/or a faster pick up from being knocked down. You can only take two and all can be useful in their own way. If instead you opt to use Shield Bearer the above benefits will not be available to you but you will still be able to wear any armor of your choosing. Aside from having a shield you will also get some bonuses while using it. You can lower the shields encumbrance, increase your movement speed while blocking, and/or bash your shield into an enemy, briefly knocking them back. As with all perks you can only choose two in this category.
Supportive Perks have situational uses for archers and come in two categories as well. If you fight well away from the battle the Watchman could prove some use as it will show the names of targets sooner, the other perk in the category will slightly increase the rate of capture for conquest mode. Both of those options are highly situational. The Surgeon category will allow you to bandage faster, revive fallen allies faster, and/or see enemy status effects. Most archers will get a huge benefit from being able to see bleeding enemies as they can quickly finish these off. Being able to bandage and/or revive a fallen ally are also both useful but how useful any of these are will depend on your playing style. A loner won’t need to revive too many allies but may need to bandage constantly.
The Movement Perks might have the biggest impact on your playing style as an archer. Most archers have to be able to move quickly to escape their enemies and you can do this in one of two ways, on foot or horseback. Calvary is not always optimal for an archer as you will lose out on many of the various bonuses from being on foot and will not be able to fire from horseback. You will however be able to get to locations first and can set yourself up in an ideal location to wreak havoc. A nearby horse also makes for a quick escape if a footman heads your way. Despite those two advantages there are many benefits from traveling on foot. Infantry perks will allow you to reach a higher max speed, accelerate faster, jump higher, survive falls from larger heights, and/or climb ladders faster. You can pick only two, which you decide on depends on your play style. Do you want to climb faster to avoid enemies, fall from heights enemies will not follow, outrun your enemies, or perhaps hop over a fence leaving your foes behind? While on foot you will be less conspicuous than traveling by horse and you will of course be able to fire at your leisure.
Officer Perks are the final category and only the squad leader can use them by pushing “Z” or “X” for the two you have equipped. As an archer you can use these bonuses to make up for deficiencies or improve upon strengths. You can increase weapon damage, recover ammo quicker, heal over time, increase armor absorption, increase run speed, increase mount speed, or increase your total health. All can be useful in different situations and only you can decide what is most beneficial to you from your experience. When in a squad, anyone with the Officer Perks unlocked will be able to push “T” and target an enemy, ally, or capture point they aim at. This will cause a yellow circle to appear on the target and mark it for all your allies to see.
The yellow indicator is even visible through objects.

Tips, Tricks, and Game Modes (Advanced)
Tips and Tricks
Now that you have a better idea as to what it is to be an archer how can you best use some of these weapons and abilities?
Headshots
Only those who focus on damage and pick their targets wisely will be able to kill with a single headshot. An enemy with a plate helmet covering their head is difficult to take down in one shot but it is possible. One way would be to use a powerful crossbow with Armor Piercing bolts; these will some armor and with enough damage, will kill the enemy in one hit. A normal arrow or bolt, with enough damage behind it, will have the same effect but will require much more precision. A well placed shot through the visor can bypass the toughest of helmet defenses. It goes without saying but if the enemies face is exposed always go for that. Not even cloth will mitigate any of the pure damage.
Bleeding
A bleeding foe is a prime target for any archer. With the proper perk you can see a bleeding enemy and unless they are hit by a projectile that causes them to instantly bleed, a bleeding foe is already near death. Bleeding usually kicks in when approximately 20% of a person’s health remains. It is a damage over time effect which makes a timer appear and shows your enemy how much time he has until he bleeds out. Only a heal over time buff, extra health buff, or bandaging will stop the bleeding effect. There is also a perk that will prevent an enemy from bleeding or bandaging. The bleed timer is shorter or longer based off of the amount of health the enemy has, the higher the damage the less the time. A bleeding enemy will usually go down with relative ease or will stop to bandage allowing you to line up the perfect shot.
Pick Your Target
Once you know what you are equipped to deal with, focus on the enemies you can handle. An archer with arrows that cannot penetrate plate should be looking for soft targets only. If you do choose to focus on something like that, make sure your sidearm can compensate for your ranged weakness, a blunt weapon or axe will keep those pesky knights on their guard.
Pick Your Battles
This may sound silly but, don’t be afraid to run away! Archers are usually very mobile and should make the most of it. While you may not be able to stand toe to toe with fully armored Footman you can usually outrun them. Be careful when turning your back as a well-aimed charge can knock you off of your feet.
Pick Your Environment
You are an archer and do not need to meet the enemy on their terms. Find a secure location and let your arrows fly. You never want to be out in the open if you can avoid it, try and find places with lots of cover or height advantage. This will help you to remain unseen for as long as possible. An added benefit of finding some high ground will be shooting down on unsuspecting foes.
“Shoots” and Ladders
When it comes to high ground, a ladder is an archer’s best friend. If you can climb up quickly you will leave slower enemies in the dust. Any enemy foolish enough to attempt to climb up after you will be asking for you to shoot them in the head, for a potentially devastating effect. You can even make a game of it with the proper perks. An archer, in the right environment, can climb and survive falls from greater heights. Enemies can chase you around indefinitely until either you, or your would be attacker, tires of this game. At that point you can either engage them or they will give up and find easier prey.
Be Aware of Your Surroundings
The deadliest enemy is the one you don’t see coming. Even if you are secure in your location do not underestimate your foes ability to find a way behind you. Tunnel vision is the cause of many an archers death. Paying attention to sounds will help even if your eyes are focused in one spot. The sound of a blade being unsheathed is very distinct and could mean trouble. If you hear an arrows or bolt whiz by, be on the lookout for a red indicator on your screen. These indicators will give you a general idea as to which direction you are being attacked from.
Mark Targets
Aside from getting a few extra points for this, marking targets will alert your teammates to potential threats. If you are trading shots with another archer make sure to mark him with the “T” key. Not only will this make it easier to track your enemies’ movements, but this may also get your teammates to chase and kill or flush out the offending archer. Bonus points are given for knocking down a targeted enemy and targeting an enemy that gets knocked down.
Dealing with Armor
First off, look for gaps in your opponents armor. Different armor will have different weaknesses and most arrows can find a way to do some damage to a target. Many helmets do no protect the neck or face and an enemy usually has less armor on their arms or legs than they would on their torso or head. The damage may not be as significant on the limbs but it is better than no damage at all. If your arrows cannot handle an opponents armor it helps to have a sidearm that can.
Dealing with Shields
An enemy approaching with shield raised will have opening at the top of their head and legs. If you are not confident you will hit the head go for the legs. They are bigger targets and less likely to be protected, an arrow getting past their shield may give the enemy pause as well.
Dealing with Footmen
Footmen come in many different forms, but you can be assured that all will start on foot. Lightly armored footmen can keep pace with and possibly outrun you but they will not be able to absorb your arrows. Fight the battles you can win and remember you will always have the range over them. All footmen heavily armored or not can charge after you, this short burst of speed can help them catch up to you or knock you down. Dodging this is essential to handling them, if they miss with a charge they will need to build their top speed up to even attempt to catch you. This ability has a relatively long cool down so the enemy will not be using it constantly.
Dealing with Cavalry
Staying out of the open is essential to dealing with Cavalry. An archer caught out in the open cannot outrun a horse and will have difficulty hitting a fast target that is actively trying to dodge your shots. Using cover or staying high and out of reach will either make it difficult or impossible for Cavalry to reach you. While your mounted enemies themselves may be hard to hit, horses make for large targets and will die just as their riders do. Take out a knight’s horse and you can pick him off or escape at your leisure. Regardless of what you do, be aware that an unhorsed knight can charge just like a Footman.
Dealing with Archers
By now you should have a better understanding of the strengths and weaknesses of archers and if you can figure out their play style you will know how to handle them. Of course the best way to deal with an enemy archer is simply to locate and shoot them before they shoot you.
Game Modes
There are currently three game modes.
In Team Death Match archers can play as they like, picking off wounded enemies nearby or sniping from afar. Just try not to get yourself killed as team lives are limited!
Conquest Mode requires teamwork. Only your enemies will appreciate nearby archers that simply watch as an undefended point is taken and no one else is around to guard it. Be prepared to engage in melee when you are needed to defend or take capture points.
Pitched Battle Mode also requires teamwork. A lone archer can be easy pickings and if killed will not be able to rejoin the fray until the next round. Here archers can watch over fallen enemies for those foolish enough to attempt reviving them or potentially kill the enemy outright. Conversely they can prevent allies from being executed until someone can revive them.