
Overview
Some old maps of the four Goddess artifact locations as well as the locations of the three Maidens (and keys) for novice players. Note that the scale of the maps are relative and rely on significant landmarks / doorways and is not a shot-by-shot guide like in the good ole Nintendo Power days … because those days are over. Based on the V.1.7.9 and V.1.8.0 versions of Age of Barbarian.
Overview & Map Symbols
The maps should be pretty self-explanatory. In the maps where there are more than one level depicted, the level name and level covered are shaded in the same charcoal and/or menstrual smear.
SYMBOLS — I AM 12 AND WAT IS DIS
• Skull — Checkpoint. The skulls with the blood spot(s) are the ones where you start a level.
• Drop Arrow — Essentially a safe spot to drop off from a higher ledge or elevation. Not all safe drops allow you to mantle (climb) back up.
• Wavy Arrow — Used only once for a specific long jump in level 7-3. Obvious one way ticket to Paradise is obvious.
• Stone Archway — Door or cave where you press UP to enter. This includes certain gates that are locked by switches (those are usually noted).
• Foot Print — Pathing from a door / cave entrance to another section of the level. Usually accurate, but due to space issues, some doors are not depicted (the path is usually pretty straight-forward anyway).
• No Entry Sign — Death pit. These drops will kill your character instantly. For teh_lulz
• Exclamation Point — Trap of some sort. Spikes, dead falls (falling rocks), buzzsaws, and swinging blades all kill your character instantly. Makes you wonder why a Tinker won’t create a buzzsaw trap and sic it on a Basilisk for the bloody fun of it.
• Checkmark — A lever switch is located here. There are no optional switches in the game, so these are usually pretty mandatory.
• Key — Denotes a key’s location for unlocking the door to a maiden’s boss.
• Lock Inscribed in a Circle — Locked door or gate that requires a Key (see above) to operate.
• Explosion / Star thingy — Breakable wall. Use HIGH-STRIKE and LOW-STRIKE to destroy a wall completely. Note that “breakable walls” are not always made of stone or rock, but other materials as well.
• Pointing Finger — Similar to the marker used for the “end of the level” exit by Criansoft. Represents an irreversible transition to the next level.
Area 2 — Forest of Azga
The Forest of Azga requires at least two playthroughs on V.1.8.0 to rescue the maiden “Priestess” Aishi and collect the artifact. Personally, I recommend getting the artifact first (bonuses first) since the bonus stat will aid you in the long run (both characters).
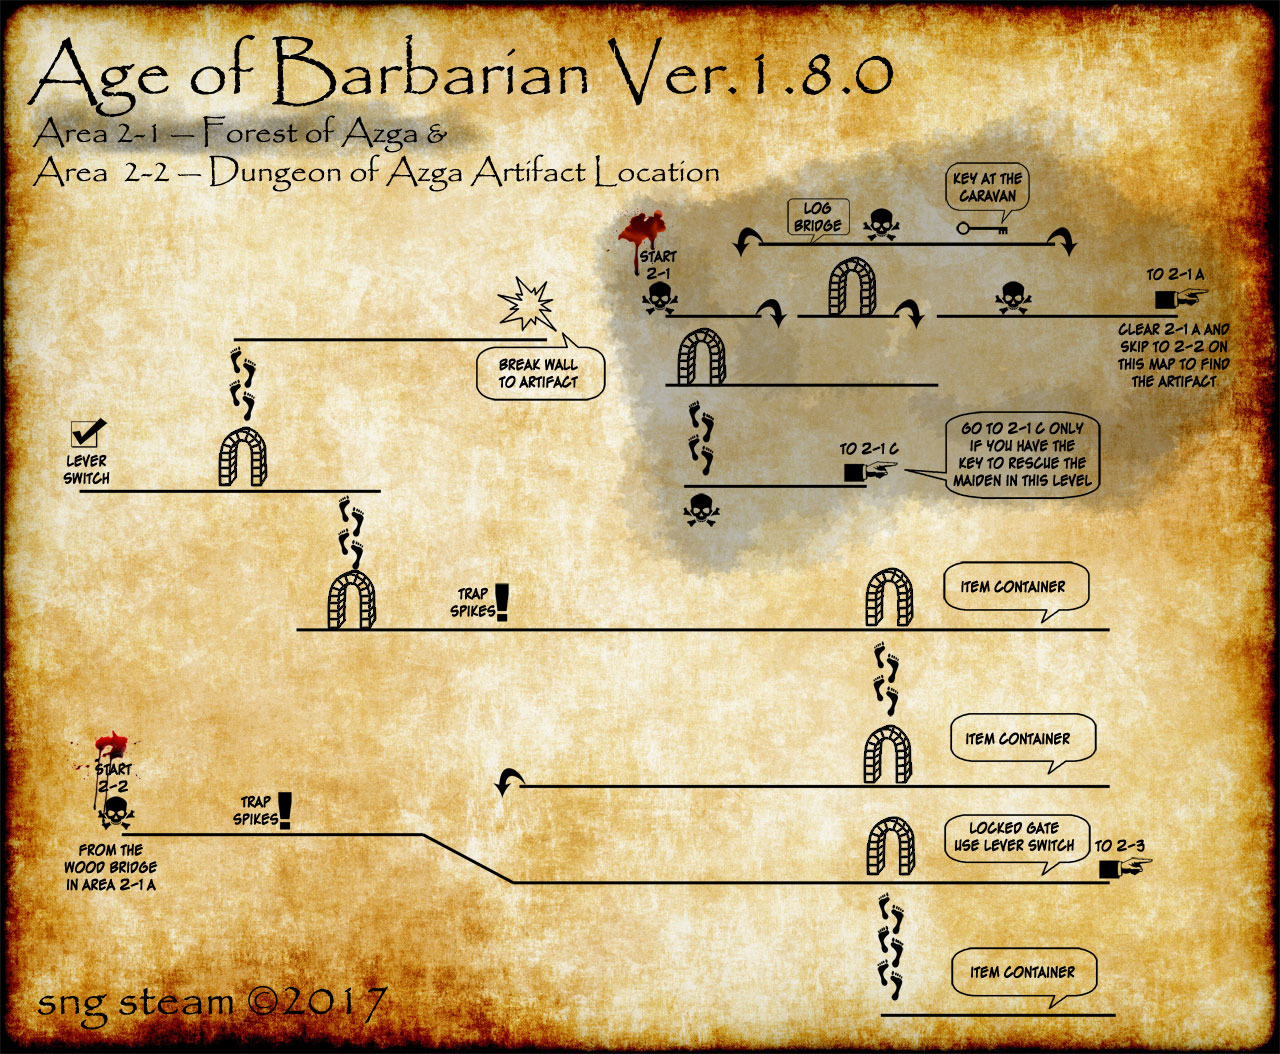
Area 2 — Artifact Location
• Area 2-1 — The most expedient path is to take the upper path (where the key is), and exiting on the right edge of the level. Not shown on the map is the section of Area 2-1A where your character needs to kick two bridge supports to exit the area (this section is straight-forward once you know about kicking the bridge supports).
• Area 2-2 — This level requires the operation of a lever switch to open the locked exit gate. The artifact is in a “side corridor” (for lack of a better term) that ends in a seemingly dead-end with a wall perforated by holes (light shines through the holes, which is your clue to “test for secret doors”). With traditional wood elves, secret door detection is a 1 in 3 chance of success. With a map, there is a 100% chance of success. Eat crap and die, Dungeon Master.
Map for the Area 2 Artifact
Area 2 — Maiden & Key Location
• Area 2-1 — Take the upper path to collect the key from the caravan master. Know that once you have rescued the maiden in this level, the annoying cut-scene will no longer be played. With the key collected, go to the lower left of the level and locate the cave with the five Rogak (one will be hacking up a caravan member near the cave exit). Continue on this path to the Rogak Slaughter House (Area 2-1C).
• Area 2-1C — The maiden is at the “lower” portion of the level (it may be labeled as 2-2B for all we know … there is no level marquee to indicate anything changed). Be sure to flee the blood pool as soon as possible (there are infinite enemies there) by mantling onto the elevated wood platforms. The door to the Demon Snake is actually just before the exit to Area 2-3; use the key by pressing your LOW-STRIKE button in front of the keyhole (there is no HUD indicator, even if you have it turned on for location ledges and doorways).
Map for the Area 2 Maiden & Key

Personally, I found the Demon Snake annoying at first, but once you find the timing on the HIGH-STRIKE, then dodge-roll left pattern, the battle is more tedious at low level than at mid-level. You can check out Suicidal Sheep’s Boss Guide for more details.
Area 3 — Mountains of Kar-Azza
The Mountains of Kar-Azza require at least two playthroughs to rescue the Maiden Eyla and to collect the artifact. Personally, I’d get the artifact first, since the bonus stats assist you in the long run.
Area 3 — Artifact Location
• Area 3-1 —This section always plays the same regardless which objective you seek. Take the lower path (the one with the three caves, and where you exit the third cave to make progress), and kick over the dead tree to continue. It should be noted that the cut-scene with the captured maiden Eyla will play even after your character makes a successful rescue. Most times, it will just be the maiden walking without any enemy guards or the presence of the Witch, Julianna / Belith ← LOL @ the ™ infringement.
• Area 3-2 — In this section, locate the “upper” path (the majority of rope bridges) and exit to Area 3-3A. Just make sure to jump over the punji stake traps before the last rope bridge (this is the ledge where you jump from a slightly higher ledge to a lower one). It occasionally still surprises me.
• Area 3-3A — The artifact is at the very right edge of the level; head all the way over and instead of mantling up the ledges towards the exit to the boss, keep making headway right to a cave flooded ankle deep in water. Break the wall (no really good clue here … perhaps the water kinda looks like its seeping through, but it could just be layering issues) and the artifact is with the giant b00b statue.
Map for the Area 3 Artifact

Area 3 — Maiden & Key Location
• Area 3-1 —This section always plays the same regardless which objective you seek. Take the lower path (the one with the three caves, and where you exit the third cave to make progress), and kick over the dead tree to continue. It should be noted that the cut-scene with the captured maiden Eyla will play even after your character makes a successful rescue. Most times, it will just be the maiden walking without any enemy guards or the presence of the Witch, Julianna / Belith ← LOL @ the ™ infringement.
• Area 3-2 — In this section, locate the “lower” path (where the two waterfalls can be found) and operate the lever switch to exit to Area 3-3A. Note that the cut-scene for each character playthrough only plays once (so as Rahaan, you only need to beat off that auto-pouncing sabre-tooth tiger once as you fap hard to Sheyna showering). The biggest threat here are actually the bats. Stand still and hit them with one HIGH-STRIKE each to avoid getting Hyborian Age rabies.
• Area 3-3B — This level can be confusing, since the room pathing “loops” (or ‘wraps’) around from one side to the other. The door to the Basilisk is easy to find (just follow the screaming woman), but the key is harder to find unless you’re mapping things out. To make it weirder, your character will find the key (and the Witch making lulzy taunts) that could throw off your sense of direction.
From where you saw the witch lowering the fresh meat of the day to feed her pet monster, head down and left. Continue going left and locate a doorway (not shown on the map due to the lack of space) with a deadfall trap. Just past this deadfall is the key. Collect the key and hop back (valid intentional shortcut) to the door to the Basilisk.
Map to the Area 3 Maiden & Key

Surprisingly, once you understand how the game allows stun-lock for some bosses, the Basilisk is insanely easy. Again check out Suicidal Sheep’s Boss Guide for details. Personally, I found that your character only needs to Parry once or twice to get close. Once you get into weapon range, tapping the HIGH-STRIKE only to keep the boss in stun-lock lets you win.
Naturally, to keep in weapon range, you need to inch your character forward just slightly. Just watch the boss — if the boss “bounces” to the left after a hit, do not step forward (you probably reached the edge of the room). Let the boss get juggled back into your weapon range, and use single HIGH-STRIKES to maintain stun-lock (doing double HIGH-STRIKES will start moving your character forward).
Area 4 — Jungles of Chuth
The Jungles of Chuth allows you a single playthrough to rescue the Maiden Kirina and to collect the artifact, but you will not explore the other areas (and experience some messy death traps) unless you play through again.
Area 4 — Key Location
• Area 4-1 —This level has the important key. After exiting the cave after the second checkpoint, head left into a cave filled with black-skinned warriors. That path ends up with a wall of ivy that blocks the path to the key. Fetch the key and head to the next Area 4-2.
• Area 4-2 — For this level, enter the first ominous looking cave. From there, travel left, beat off some Shikss and enter the unique looking Kraken skull cave. Use the key to open the gate (insert release the Kraken joke here) and head into Area 4-3B.
• Area 4-3B — This level has the artifact and the door to the Tentacular Horror (‘Kraken’) boss. You locate the artifact first before the maiden (notice that for all maiden escort sections, there are no jumps, traps, or other environmental hazards – only plain floors). The artifact is in the sewer system’s left edge. Break the wall and collect it before operating the two lever switches to open the gate to the Tentacular Horror.
Map for Area 4’s Artifact, Maiden & Key

Again, you can refer to Suicidal Sheep’s Boss Guide for details. Personally, I found the battle one of the easier ones once you realize that the boss doesn’t move until you damage it. With that in mind, if you ƒü¢k things up and need to recover life or use items, just back off to give yourself some room. The boss’ most dangerous move is actually its teleportation (dive under water, reappear somewhere else), since if it decides to re-emerge where you are standing, it will immediately attempt to decapitate you (one hit death, like the a$$hole dragon).
The issue for most players is getting close to the boss and landing that much under-valued HIGH-STRIKE. The boss’ tentacles will block your path, and lash attack you once you’re in range. HIGH-STRIKES or the JUMP-STRIKE (level 8 move) can get you close, but I found that the JUMP-STRIKE can be risky if there are multiple tentacles between you and the boss — should the iffy hit detection mysteriously “warp” you close to the boss, you’ll be down a head and one spare life / resurrection instantly.
I found it tolerable to inch close and use single HIGH-STRIKES to cut off the tentacles (which are infinite spawns with each boss appearance). Once there’s nothing between you and the “Kraken”, you can inch close, stop, attempt a HIGH-STRIKE and see if the boss is in range. Once the boss is hit, do not move, but prepare to dodge / sprint away from the boss if it decides to surface right next to your player. Otherwise, you simply wade around, locate the sum’b!tch and repeat the process.
Area 7 — Necron’s Fortress
Necron’s Fortress (barring the save game loading issues from the data based off of Save Slot 1) is actually not as hard once you realize where you need to go. If you’re intent on clearing out enemies, etc. then you’re going to have a harder time. The skeletons need to be defeated, but the undead zombies can be avoided if they are close to the edge of a screen, and you need to exit the opposite end — just dodge-roll past them and run.
FYI — undead monsters are slain only with the POWER STROKE (level 2 move), and once they have a small amount of HP left (basically if your POWER STROKE can dock the remaining HP to 0 or less, you can successfully kill that undead entity). It’s times like these that you wish you had Miles or Greldon in your party. One Turn Undead, and Necron won’t have much of any army.
Area 7 — Artifact Requirements
• You are required to rescue / free the maiden Kirina from the Jungles of Chuth in order to access a particular section of this level (behind a Red Skull door barrier). Otherwise, you ain’t gettin’ no artifact, boy-O.
Area 7 — Artifact Location
Area 7-3 — Upon exiting the hallway with the two swinging guillotine traps, you can head right to a doorway by a right-edge facing balcony exit (the balcony / sun room has an item container). The doorway near the balcony / sun-room exit leads to some dude’s Magical Laboratory. The artifact is in there (past the Red Skull door in the magic lab).
The rest of this map is fairly accurate … the most important things to remember are:
• Guillotine Traps — The swinging guillotine traps are handled differently by the characters. Rahaan needs to move and duck to the lowest point of the swing. From there, he needs to wait for the blade to swing past his head (going back up behind him) before he stands and dodge-rolls to safety. Thanks to ShaRizel’s videos, we know that Sheyna possesses enough speed to sprint behind a blade as its moving away from her, and she will make it to safety on the other side.
• Jill Sandwich (Ceiling Crusher) Trap — To avoid becoming a Jill Sandwich (now pretty much ™ porn on most image boards), break the wall on the right and exit. The Elixir of Life in the room is a lure, but you can get it only if you broke the wall in a previous attempt.
Map for Area 7 Artifact

Check Suicidal Sheep’s Boss Guide details. I got nothing good to say about Necron’s battle, although I found the Demon battle to be more tolerable. Necron’s battle has one good thing — he teleports once he’s damaged. That’s good in a way, since it gives you time to recover (unlike the witch, who tanks your hits despite having less health and DEF). Bosses who can tank your character (Dragon and witch seem to be the only ones) or who can recover faster than your character should be considered balance issues that need to be addressed. — until you find an exploit.