
Overview
This Guide focuses on an Artists workflow, Setup and implementation for an Asset from Maya to CryEngine 3 EaaS. This Guide assumes you have a basic understanding of asset creation, UV mapping and texture creation for assets specific to the standards of within the Games Industry as well as basic knowledge and navigation within Maya and CryEngine
Part 1: Installing the CryEngine Exporter
The first thing you’ll need is to Install the Exporter for Maya & Photoshop as well as any other programs you use. All the Tools you need for this can be found in the CryEngine Steam Folder: Program Files (x86)SteamSteamAppscommonCRYENGINETools
- You will need to make sure you have your Build Location set by using SettingsMgr.exe
If it is not set then you can scan for builds and navigate and select your CryEngine folder.
- Next use CryToolsInstaller.exe and Install the Tool for the Programs you use, In my case Maya and Photoshop.


Part 2: Setting Up & Exporting Maya to CryEngine
If you have completed Part 1 correctly then you should have a new Tab in Maya called Crytek

For this Guide I’ll be using a Oil Barrel I created for the Game Miscreated currently on Steam Early Access
- Your Asset: As this guide focuses on CryEngine I will not go into the creation process of the asset and assume you already have something ready, even something as simple as a cube will work.
- Material Setup: CryEngine Requires you setup a material for your asset in your selected 3D Package. It saves it to a .mtl file which can be updated or edited at any time from you 3D package. A Simple phong material will do for this.
You can see that the material is applied to the mesh - Proxies: Models that need a Collider (which is most models) should use a custom physics proxy primitive. It is fair more efficient to use what Crytek refers to as a “proxy primitive” that the Engine renders in over a mesh exported from Maya. There are a few types that you can use: box, sphere, capsule and cylinder. It’s recommended that you create your Proxy out of primitives and try to not use a mesh unless you really need to (example: the sides of stairs or roofs are hard to use primitives on) I used a Cylinder for the Barrel and just like the Mesh it needs a phong Material applied to it as well.
- MAT.ED Setup: Now that you have your mesh and proxy with there respective materials you need to add them to the MAT.ED (Material Group Editor)
Select you Mesh, Proxy and select “Create Group From Selection” What you name the group will be the name it uses when you export the .mtl file (I use the Mesh name followed by _MAT) - Proxy Types: Next you need to set your Proxy settings to render in Engine as a primitive. You can do this by adding the word: box, sphere, capsule or cylinder to the UDP (User-Defined Properties)
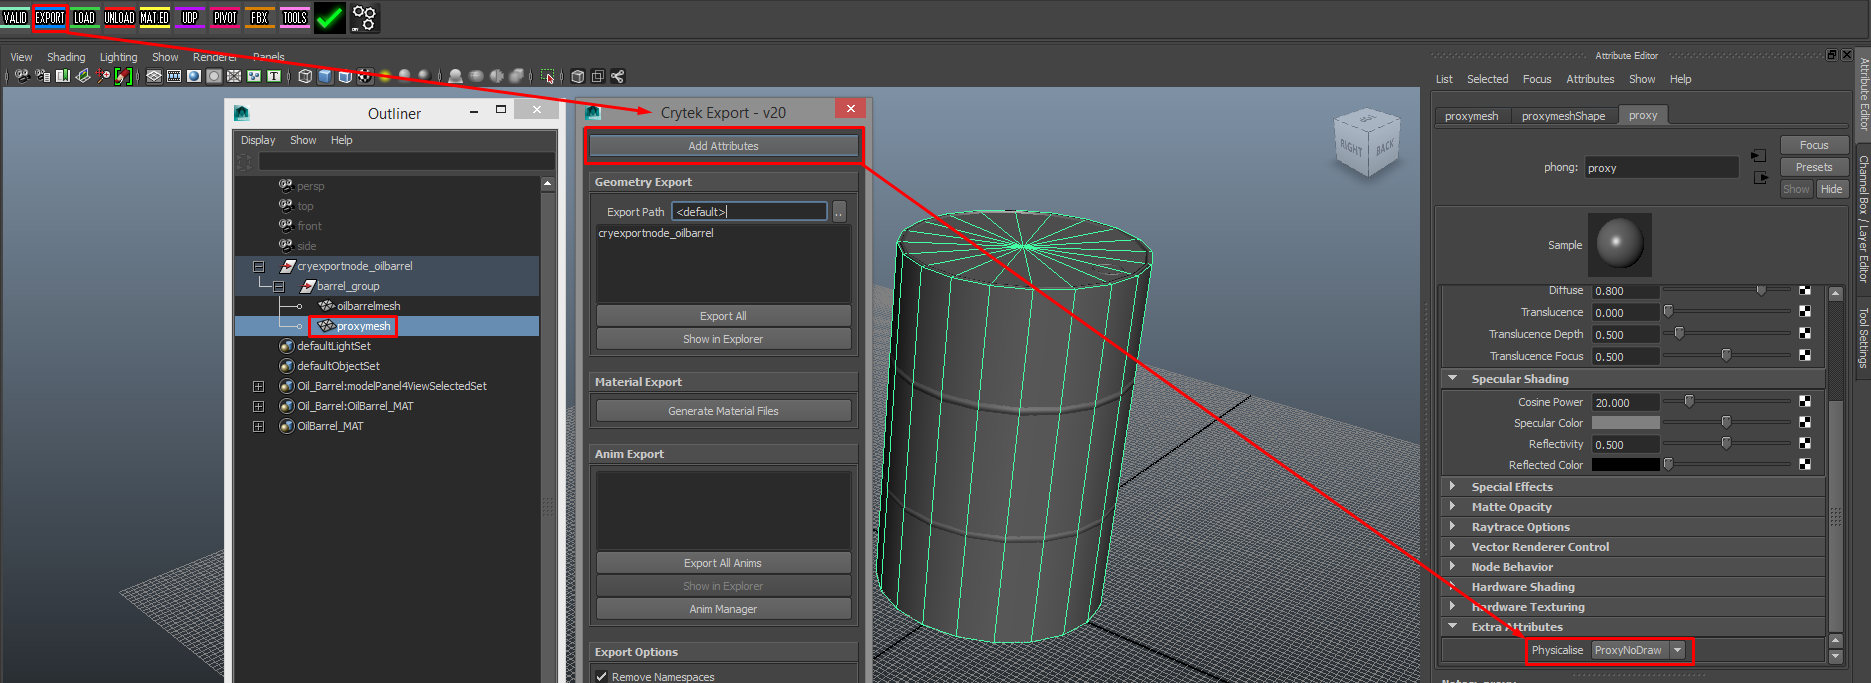
Note: You need to add these to each proxy mesh you have - Physicalise Attributes: You also need to Add Attributes and set you materials Physicalise for both your Mesh and Proxy for CryEngine to read the different meshes as either a ProxyNoDraw (proxy) or None (Mesh with no Proxy). You can also use Default which will use the mesh as a proxy but its not only recommended for testing purposes.
- Group Setup: CryEngine requires a special Group Setup (In the Outliner) which you can do manually or using the Tools Button then Create CryExportNode.
The Manual method naming convention is:
cryexportnode_Name (oilbarrel)
↳Name_group (oilbarrel)
↳ oilbarrel_Mesh (can be whatever you like, I just use the same as the other groups with _Mesh)The Proxy can be called whatever you like as well BUT needs to have _group at the end in order for CryEngine to pick it up as a proxy as well as being located in the Name_group group as this is used to pull source meshes and proxies from the exported .cgf file into the engine.
If you have multiple, each proxy needs to be named differently.
i.e: proxy1_goup
proxy2_group - LOD or (Level of Detail): LOD’s are recommended for most games but are not always needed if your just creating an environment for presentation purposes. This guide assumes you will be using your assets within a game production pipeline and it’s a good thing as you might need them when creating larger more complex maps or environments.
There a many different programs out there for creating LOD’s quickly such as Simplygon or PolyCruncher which will cost you $$$ but you can also do them by hand it just takes more time but can be more accurate. Alternatively you can also use the reduce tool within maya OR the LOD generator within CryEngine. The issue with the LOD Generator within CryEngine is it generates and assigns separate textures to each LOD resulting in 3 extra maps for each LOD you create which is not optimal. These textures are not needed as your textures automatically reduce themselves through mipmaps.
I use PolyCruncher for Maya and recommend it over all overs. Its Cheap, Dynamic and simple to use
Your setup requires certain naming conventions just like your proxies and groups and needs to be located within your Mesh_group Group:
↳Name_group
↳ _lod1_Name_group
↳ Name_lod1
Same setup goes for using Multiple LOD’s you just need to duplicate the lod group and update the lod# (lod1, lod2, lod3 etc) - Exporting to Engine: Set your Export path to somewhere in you CryEngine GameSDK Folder, Select your Mesh and Click Export Selected/ All, then Generate Material Files. If you get any warnings (Yellow) just click Ignore or correct them and Continue Export.


All Information related to Basic Setup in Maya Discussed in Part 2 can be found Here[docs.cryengine.com]
Part 3: Texture Setup for CryEngine
CryEngine uses .tiff texture files and if you’ve used the CryToolInstaller correctly then there will be a new format called CryTIFPlugin when you go to File, Save As, Format

- Something new in CryEngine EaaS is PBR Rendering. This means normal texture setups are not going to work well. The new PBR setup uses Diffuse (Alpha can be added in the Alpha Channel and enable it in Engine using AlphaTest), Specular is the same but the Normal map has changed slightly. Now your gloss goes in the Normal Maps Alpha Channel.
- When you have your Diffuse, Normal, Spec & Gloss all setup and ready go to File, Save As, Cry TIFPlugin then you need to name it accordingly (Diffuse = _diff, Normal/Gloss = _ddna & Specular = _spec)
- Place all your textures in your GameSDK Folder (I place mine in a folder with my Mesh and Material file to keep it my folder setup all clean easy to find.
All Information related to Texturing Discussed in Part 3 can be found Here[docs.cryengine.com]

Part 4: CryEngine Setup
With the previous 3 parts completed we are ready to open up CryEngine and connect everything together.
- Locating your Asset: In the RollupBar you can add your Oject from the Brush Section then filter to or navigate to your object. Select it and drag it into the scene to place it. For Maya your Pivot Point will be based on the center of your scene (grid) so make sure your model is centered.
By default your Model will look something like this
Your Material will look something like this
Note: If your asset looks solid Red with no light specular shading as seen above your material is not connect to your mesh or setup correctly, you’ll need to fix it in your 3D Package or restart the engine to update it
- Surface Type: The Surface Type needs to be set for Both the Mesh and Proxy Mesh. Bullet hits pull from the rendermesh surfacetype but melee and footsteps pull from the proxy mesh so there are some cases where they need to be set differently or the same.
- Glossiness: Your Glossiness should be set to max (255) as this will be controlled through your Gloss map. Same with your Specular However these can act as Color/ Value overrides IF you need but it’s highly recommended you edit through your texture map itself NOT the material.
- Texture Maps: Your Texture Maps are pretty Simple. Clicking the … Next to Diffuse, Specular & Bumpmap will bring up a Preview Browser where you can navigate to your texture files and select them.
- Advanced Maps/Settings: There are lots of other settings such as detail Mapping, Blendlayers, Offset Bump mapping but these are advanced techniques I will not go into in this Guide. Glow Amount and 2-Sided are both easy options that you can use if required for your type of asset (2-Sided is Under Advanced)
- Check your Asset: You can check that your proxy and LOD’s are working correctly by going to RollupBar/ Render Settings (4th Tab) and ticking Show Proxy under Profile Options. To show LOD’s open the console under View/ Show Console then typing e_debugdraw 1 Select the asset and under its brush Params adjust the LodRatio to 255 so you can see the switch from a short distance.
If all goes to plan then your Asset should look something like this


I hope you found this guide helpful and good luck!
– Carl, Artist@Miscreated