Overview
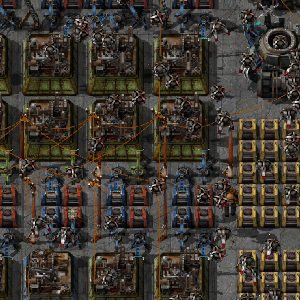
Efficient layouts for producing some different items. You can use these in your game, or get fresh design ideas and make your own version. Different designs for early game, midgame and lategame are shown.
Introduction
If you’re creating a massive crafting queue that goes on for over a minute, then stop right there! Factorio is centered around building up an autonomous industrial empire, and it’s important to make your crafting automatic. Whether you’re struggling to get a system working or just want to visualize a more space and time efficient design, this guide will offer some designs.
You can use the designs in your game, or take ideas from it and make your own version. Different setups may be efficient in their own way.
Red Science Tech Designs
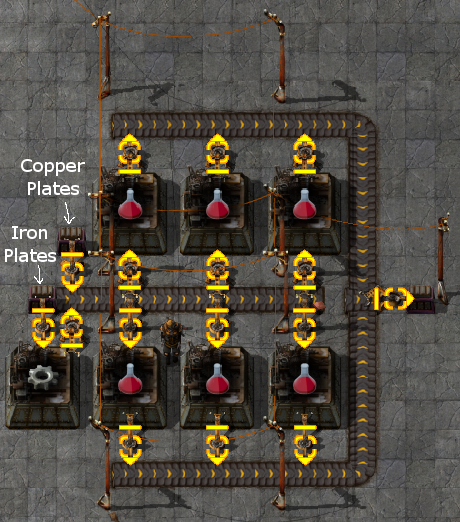
Since the Iron Gear Wheel takes 0.5 s to make and the pack takes 5.0 s, the maximal ratio would be 10 science assemblers : 1 iron gear wheel assembler. In practice, you don’t really need that many science packs so I would suggest somewhere between 1:4 to 1:8.
For the Red Science input, you want to put 200 Iron Plates and 100 Copper Plates for every 100 Red Science Packs.
This layout uses a 1:6 ratio. You can choose any ratio between 1:2 and 1:10, depending on how fast you want it to go. The arrows take a long time to edit in so I will leave them out from further images.
Speed modules are shown, you can use efficiency if you want less energy/pollution. There’s probably no reason to scale bigger than 1:6, even 1:4 would probably be fine.
When you get Logistics Drones researched, they can do everything pretty efficiently without trasport belts. Set up the requester chest in front of the iron gear wheels to request about 20 iron plates. Then the requester chests for the red science packs should request copper plates and iron gear wheels. Note that you need a roboport with some logistics drones for this to work.
Green Science Tech Designs
Note that the making inserters takes Assembler 2+.
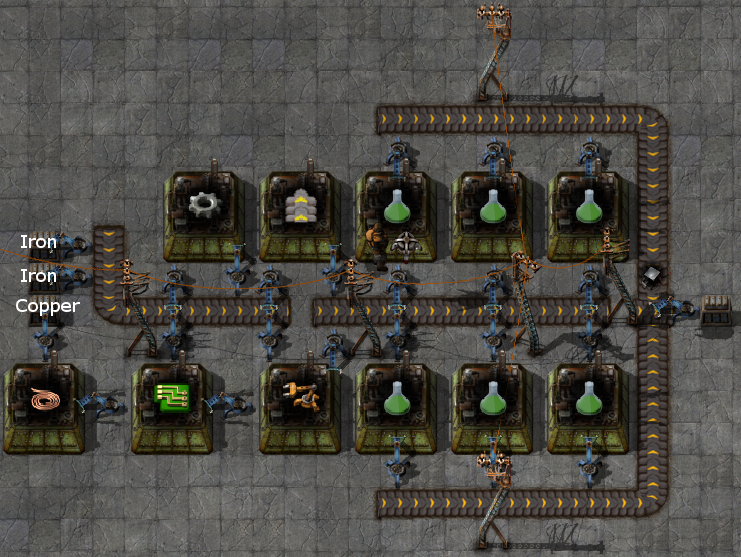
The time ratios for these packs are a lot more complicated. One copper wire assembler can’t quite feed the chip assembler fast enough, but together they make 2 chips per 1.5 s. For every 3 iron gear wheels (1.5 s), 2 goes to the inserter and 1 goes to the transport belt. So assuming everything gets enough iron plates, then 2 inserters and 2 transport belts are made every 1.5 s. Green science packs take 6 s each. Thus, the maximum ratio is 1:1:1:1:1:8.
For the Red Science input, you want to put roughly 400 Iron Plates and 100 Copper Plates for every 67 Green Science Packs.
In practice it is hard to continuously supply a lot of these assemblers so I made one that has 6 green assemblers. As noted above, you can have up to 8 green assemblers in this setup (or less).
The machines take so many iron plates that you are going to want 2 inputs for it. So put half of the iron plates in one chest and half in the other.
WIth logistics robots, you can just have an Assembler+Requester+Passive Provider for each step in the process.
TIP – You can set the Passive Provider Chests to only have one slot available to machines so that it doesn’t fill up with tons of intermediate products. You don’t want to have 2,400 inserters, do you?

Blue Science Tech Designs
Blue Science Packs take twice as long to make as the Green Science Packs. Given the crazy resources that you need for the Blue Science Packs, your research will probably be limited by them. I would recommend try to get the logistics system asap so that you can make these a lot easier. Getting that research takes 150x Science 1 + 150x Science 2 + 150x Science 3, which is doable.
Just like the other designs, you can make more or less assemblers at the end as your resources can handle. The bottleneck is probably going to be Advanced Circuits, which take 8 s each. So with only one assembler making Adv. Circuits, you’d only be able to supply 1½ Blue Science Pack assemblers. For more throughput, make more Adv. Circuit assemblers (2:3). Don’t worry if the smart inserters get backed up.
As noted above, this design is bottlenecked by Advanced Circuits. Two assemblers making Advanced Circuits would be able to supply 3 Blue Science Pack assemblers.
For the plastic, you have a supply line:
Pumpjack → Crude Oil → OIl Refinery → Petro. Gas → [+Coal] Chemical Plant
Be careful not to let the refinery get backed up because of the other products. Crafting them into solid fuel is the easiest way to get rid of them.
EDIT: I forgot to route the copper wire to the advanced circuit when I put this layout together. To fix it, change the bottom row to Circuit ← Wire → AdvCircuit, where the arrow is a fast inserter and the Advanced Circuit assembler is in the same spot. The copper input can be moved to the bottom.
And this is why logistics robots are awesome!

Solar Panel Designs
If you use solar panels for power, then nighttime can be an issues for your power grid. To maintain power throughout the whole day-night cycle, you’ll need to have acculminators. From my experience with solar panels, you want to have roughly the same number of acculminators as solar panels. Try not to stray too away from a 0.8:1 ratio either way. If you use steam/boilers then you can make less acculminators and rely on the steam power during the night.
During early game you can just build them where you have space. Since you will probably expand your industry, don’t hesitate to move that solar farm, since it doesn’t really matter where you put it. If anything, try to place the solar equipment far away from the precious area in the center of your base.
By this time you have quite a lot of space, and an energy bill to match it. If you mix in the roboports, then you can try to fit them in nicely, but I usually just move the solar equipment a little bit to fit it in there. Building solar en masse is a lot easier with blueprints and construction bots. Here’s the cell that I use:
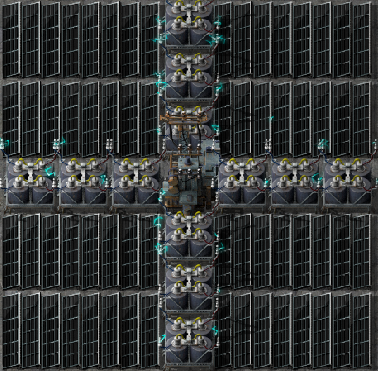
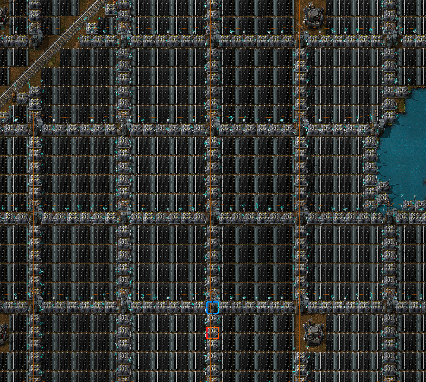
The substation in the middle has enough range to reach all of the acculminators and solar panels. This cell has 16 solar panels and 12 acculminators, so it’s a bit low on the acculminators. I usually fill in other areas with extra acculminators to offset this. So when I say this is a cell, I mean you take this and repeat it in a grid for as big an area as you want. Here is what it looks like with multiple cells gridded together:
Closing Remarks
The amount of automation that would want to put in your base is up to you. You can have transport belts move the corresponding resources into the chests labelled in the designs above, or just manually stick in a couple stacks of the material it needs.
I wouldn’t OCD about getting things perfectly automated because automation is so much easier when you get to logistic robots.
Let me know if you guys have other designs that you want to share or want designs for other processes.

