Overview
Factorio is a game requires players to solve logistic and engineering problems that might be overwhelming for a new comer. So this guide were made to provide overall info to new players who is interested to learn the basic knowledge before getting into the game.
The Engineer
Before getting start, here is some little tips and tricks for any engineer out there.
-
Patience is important.
There are countless designs and solutions possible and so as the problems come with it ten-fold. This can be quite a frustration so the engineer need to be very patience.
-
Simplified and organized
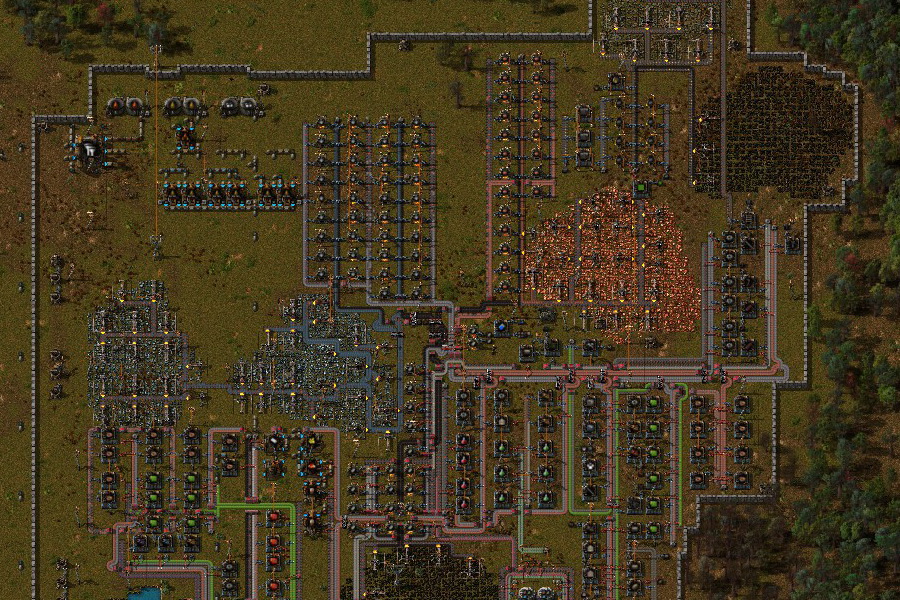
A “spaghetti” type of factory may not be completely bad, but a simple layout can makes logistic problems much easier to be solved and detected.
-
Keep an eye on alien
Some faunas are extremely hostile and territorial. They can be attracted by pollution from the player’s factory and will attack you from any direction so make sure to set up a good defensive system with turrets, traps, and obstacle. (Unless playing in peaceful mode)
-
Engineering can be a game of guessing or calculating.
Sometime logistic problems can be solved by a simple solution but sometime they don’t, so make sure to be ready for some complicated math or factory layouts.
-
Some mistake (no matter how big they are) can be deadly
Misplaced the layout by one block can result in an entire factory block to be removed.
The outpost running out of ammo can result in an entire production section to be shut down.
Ran out of electricity can result in the base being overrun by the hostile faunas.
One mistake in this game is mostly resulted in something very bad, so be careful.
Resources
Resources are required to keep your base running and acquire techs. Running out of them are usually bringing disasters, so watch out!


-
Players’ base generally required a lot of raw material of iron/copper/uranium ores, oil, coal, stone, and sometime, water. So keep the supply line running can not and will not be neglected by any excuse. And if it possible, keep them running with little problems as you can.
-
Depending on coal to produce electricity too much is not ideal.
Coals are required in some crucial production as well as in electricity (especially in an early game). Depending too much on coal power means coal shortage can effectively cut your base from electricity and cripple it. Having an alternative way to make electricity like solar power or nuclear power is recommending.
-
Raw woods, don’t throw them always outright!
Woods can be used as an emergency fuel (beside crafting electric poles), so store them somewhere near a steam power plant and inject them in the system when coals are running low.
-
Use the rail network, you must.
Local resources will eventually dry out. However, rail system can deliver resources from a long distance in quantity with much cheaper and more effective than an alternative (transport belts/robots) so there is no need to shy away from it.
Electricity
Electricity is a life force of all factory. Without it, your factory will be severe disable and vulnerable to native faunas. There are three ways that electricity can be produced in game : steam power, solar power, and nuclear power and each comes with its own advantage and disadvantage.
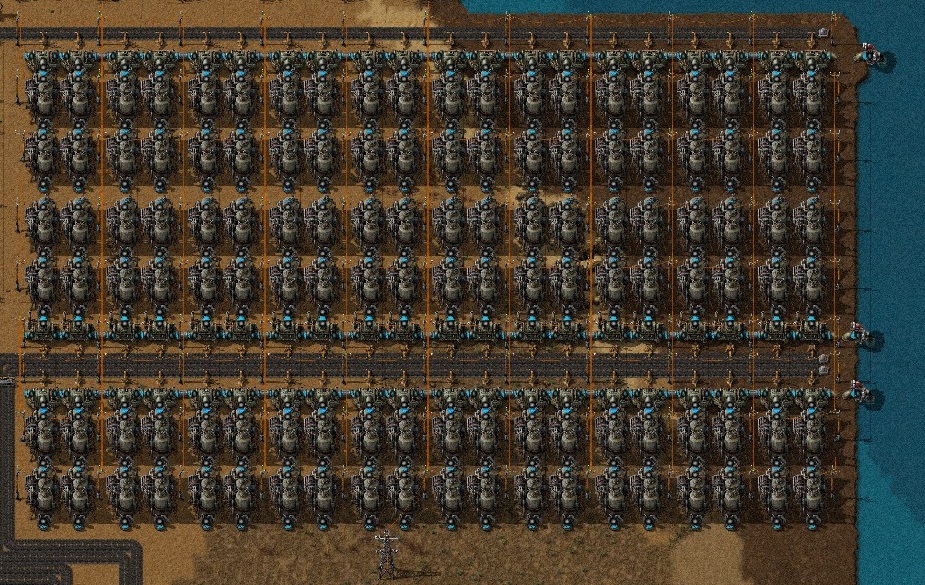
- The effective ratio of steam power production is :
Offshore pumps
Boilers
Steam engines
Electric mining drills
12040≤18*Max electricity output : 36 MW
Note A : Each
Note (*) : If work at full capacity (36MW) without drill upgrade.
- The effective ratio of solar power production is :
Solar panels
Accumulators
10084Max electricity output : 6 MW (4.2 MW Average)
Max electricity store : 420 MJ*Note (*) : This power can run a factory with 42 MW/s consumption for 10 second.
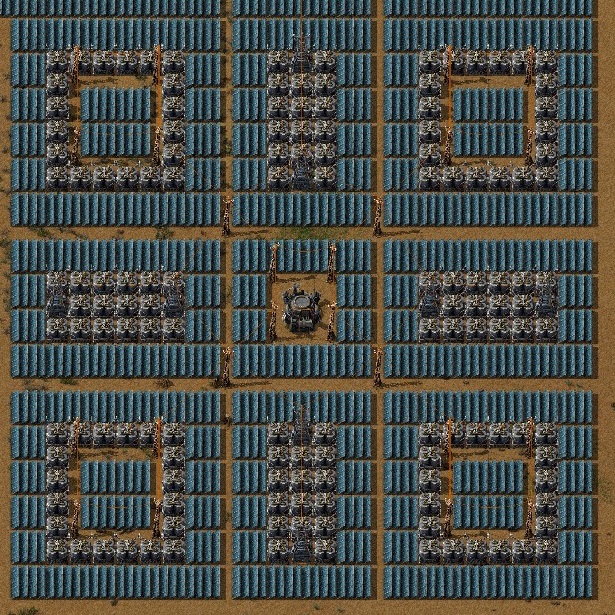
- There is no solid ratio for nuclear power plant but here is the crucial part :
TypeGiven (per unit)Consumed (per unit)Bonus40 MW–+40 MW Neighbor core
Heat exchanger
~103 Steam/ sec10 MW–Steam turbine
5.82 MW60 Steam / sec– - To get a neighbor bonus for nuclear reactors, they must :
-
-
Have all three of their heat pipes connected to each other.
-
- The nuclear power will work when
-
-
pipes.
-
- Basic nuclear power plant layout (2×2 4.12 (~4)4882.4 (~82)
Max electricity output : ~480 MW / 465.6 MW (practical)
Note A : Each pack of 12-
-
-
-
Electricity info can tell you how much of electricity is produced and drained
You can open an electricity info by clicking on any electric pole nearby or in a map. The first bar (satisfaction) need to be longer than the second bar (production) or your factory will run out of juice (electricity).
- A table comparing steam / solar / nuclear power
ComparisonPower Production Per UnitModerateLowExtremely HighPollutionExtremely HighNoneLowSource of powerFuelsDaylightUranium Fuel CellTechnology RequireNoneSolar TechsNuclear TechsResource InvestmentModerateHighExtremely HighSpace RequireModerateExtremely HighLowRisk of Faunas AttackExtremely HighNearly ZeroNearly ZeroEffect ByFuel ShortageNight TimeUranium Shortage
- Always have every possible ways of
-


Transport Belts


Transport belts are the basic way to carry stuffs around your base automatically by yellow belts be the slowest and blue belts be the fastest.
-
Each transport belt have two side (left and right). It is NOT wise to put different items on the same side (unless there can be filtered by well-placed splitters) or else the contaminated belt will cause the line to be stuck and wasted player time.
-
Curvy main bus* and assembly line may not necessary be ineffective, but straight main bus and assembly line are much more easier to organize and expand.
(*) Note : “Main bus” is an organized pack of transport belt that carry a large various kind of item like a tree trunk which can be broken into branches to feed the resources to assembly lines. it is the most common way to set up a base in Factorio.
-

Inserter
Inserters are used to put material into assembly machines or others. They will move times from its front (indicated with yellow line) to its back (indicated with yellow arrow) as long as they are powered/fueled and programmed.
- There are 7 types of inserter, with different color and unique ability :
TypeFeaturedSpeedElectricityRun with coals / Required no electricityExtremely slowN/A
(Normal) inserter
Cheap to produce and low power drainSlowRequiredLong handed inserter
Two tiles rangeModeratedRequiredFast inserter
Faster than normal inserterFastRequiredFilter inserter
Can take specific items set by the engineerFastRequiredStack inserter
Can take multiple items at onceFastRequiredIs Filter and Stack inserter combineFastRequired -
-
-
-
-
-
They can pick up multiple items at once at high speed; very useful at load/unload cargo.
-
For example, they will not put items into an assembling machine that do not required such items (like copper ores into a gear assembly machine), or chests with a limited quota (set within the chest – shown as a red square) or anything but fuels into a fuel-powered machine.
- Inserter can interact with anything with item slots as shown in the table below :
Furnaces
Assemble machined
Chemical plant
Lab
Gun turret
Locomotive
Cargo wagon
Vehicles
Boiler
Burner mining drill
Roboport
Centrifuge
Oil refinery
Rocket silo
Chests
Buffer Chest
Active Chest
Passive Chest
Requester Chest
Storage Chest


Techs
Techs provide players with cool stuffs, better equipment, bonus, and advancement to win the game. However, one techs can only be researched at a time (multiple labs only speed the process up) so make it count.
 Advanced Electronics (2)
 Automation (3)
 Electric Energy Acumulators
 Fluid Handling
 Logistics (3)
 Oil Processing
 Rocket Silo
 Solar Energy
 Electric Energy Distribution (2)
 Fast Inserter
 Nuclear Power
 Stack Inserter
 Logistic Science Pack
 Chemical Science Pack
 Production Science Pack
 Utility Science Pack
 Advanced Material Processing (2)
 Advanced Oil Processing
 Battery
 Concrete
 Electric Engine
 Electronics
 Engine
 Explosives
 Flammables
 Low density structure
 Lubricant
 Plastics
 Robotics
 Rocket Control Unit
 Rocket Fuel
 Steel Processing
 Sulfur Processing
 Circuit Network
 Cliff Explosive
 Coal liquefaction
 Kovarex Enrichment
 Landfill
 Laser
Laser Logistic System
 Military Science Pack
 Nuclear Fuel Reprocessing
 Optics
 Space Science Pack
 Uranium Processing
 Military (4)
 Atomic Bomb
 Defender
 Distractor
 Destroyer
Explosive rocketry
 Flamethrower
 Rocketry
 Uranium Ammo
 Modules
 Productivity Module (3)
 Speed Module (3)
 Effectivity Module (3)
 Effect transmission
 Railway
Note :
- First priority techs are required to build a rocket silo in Factorio.
- Second priority techs are improving engineer’s quality of life and work.
Rail Transportation
- A brief train setup procedure is :
Build railways
Connecting your base to your destination with rail. Either by robots (through SHIFT key) or manually place the rail.
-
Place a train stop
Place train stop on top of the rail at your destination and your base (if didn’t have one). The arrow of the train stop MUST match the way of an incoming train, or the train will not dock in.
-
The inserters can be either Fast / Filter inserters or Stack / Stact Filter inserters like this :
-
Place Rail Chain / Rail signal on crosses and junctions
Rail Chain signals (the blue one) will indicate where the train should stop and set the rail to be a one-way rail (indicated by its arrow).
Rail Signals (the three light one) can be placed beside the Rail Chain signals to set the rail to be a two-way rail again.In case of junction :
-
Rail Chain signals’ arrow must be pointing toward the crossing / junction.
-
-
-
Place your locomotives and cargo wagons on the rail
Set a schedule on your locomotives and (optional) set filters by clicking a middle mouse on a specific (empty) slot in the cargo.
Additionally, two or more locomotives can be placed on each sides of cargo to make the train move back and forward in an automatic mode. An example is shown below here :
Note : it is not advice to set up a train like this but using a double rail system instead.
-
Switch train mode to “Automatic” (in the train GUI) to set off the train.
-
Especially for an inexperienced engineer who never built a multiple-way railway before. Running an experiment on your rail first to prevent a potential disaster or use a double railway instead.


Vehicle


Vehicle can be researched and used for various role with its unique features.
- General Info of land vehicle:
TypeHealthArmorLowest Top SpeedInventory slotsWeapon450Light87.6 km/h80Heavy machine gun2000Medium50.1 km/h80Cannon / Flamethrower / HMG3000Heavy~46 km/h80 + 10×6 gridCannon / Flamethrower / HMG
- Weapons :
TypePrimarySecondarySupport—
Mags
—Cannon shells
Flamethrower ammo
Rockets x 4 slots
—— -
They can be used to crush faunas nests and providing player a additional protection and firepower. But be careful, tanks can get stuck and quickly surrounded by faunas quite easily.
-
Knowing how to use car properly can help you expanding your base or exploring greatly.
-
You can put your vehicles in your inventory at anytime (by hold a RMB on it). But you can’t use their extra inventory this way and have to refuel it every time you place them.
-
Grenades and robots can be used / deployed while driving a vehicle


Robots
Robots can help player doing some chores or delivering goodies in a tight spot.
- How do Logistic chests work :
TypeReceive Item FromAdditional Taken / Recieve
Storage Chest
Active Provider Chest
Engineers’ Request / Trash SlotsRequester Chest
Other Logistic Chests
Engineers’ Trash SlotsEngineers’ Request / Trash Slots -
Request lists in Requester Chest can be set by cilck on the chest, click in a request slot in the middle of GUI (Graphical user interface), and select the item and number you want.
- Here is all info you should know about roboport :
-
Roboport’s green area means the range of Construction robot. Brown area means the range of Construction and Logistic robot.
-
The brown area need to be connected in order to share robots and networks. The connected roboport will be shown with dash lines.
-
-
See the table above to learn how item will be delivered for each chest.
-
-
Here is all info about Personal Roboport :
-
Modular or Power Armors can be modified with a portable roboport to let Construction robots working from your inventory.
-
-
-
-
Hostile Faunas
You are not alone on this planet. Most faunas are hostile and will attack you. You need to learn about your enemy as well as yourself, as the wise man once said, “Know thy self, know thy enemy. A thousand battles, a thousand victories”.
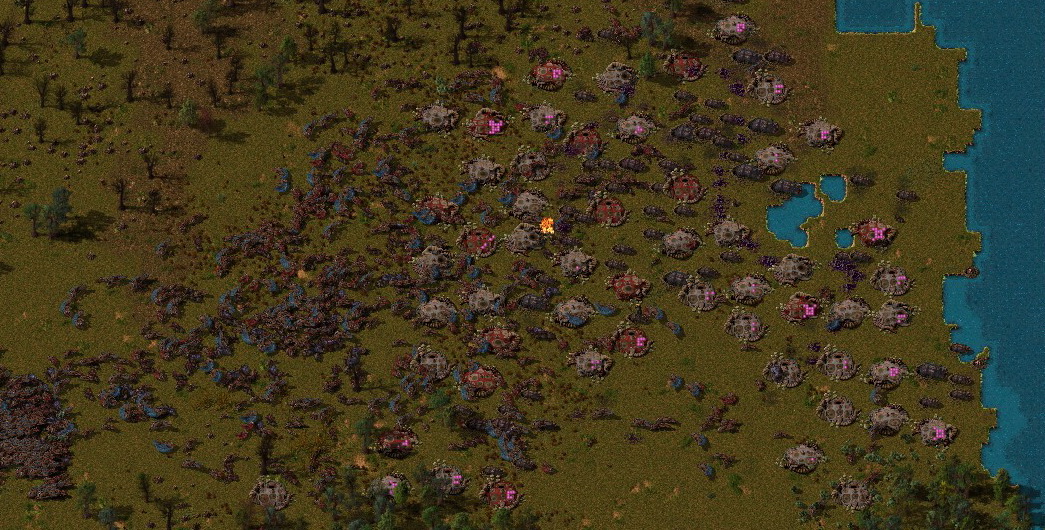
- Land Faunas
BiterRange (m)DamageSpeed (km/h)Health
Small
Melee7 (Physical)43.215Medium
Melee15 (Physical)51.875Big
Melee30 (Physical)49.7375Behemoth
Melee90 (Physical)64.83000SpitterRange (m)DamageSpeed (km/h)HealthSmall
1312 (Acid)4010Medium
1424 (Acid)35.650Big
1536 (Acid)32.42001660 (Acid)32.41500WormRange (m)DamageSpeed (km/h)HealthSmall
2536 (Acid)(Static)200Medium
3048 (Acid)(Static)400Big
3872 (Acid)(Static)750Behemoth
4896 (Acid)(Static)750 - Faunas Nest
TypeHealth350
-
-
-
-
-
-
Weapon and Security System
There are a lot of choices to defend and attack in Factorio. You maybe provide with a pitiful firearm at first but as the tech go, you will get access to more firearms with high caliber and good defensive structures. Use them, plan them, adapt them as you must to survive on the planet and keep the factory grows.
- Personal Weapon
Type of weaponType of ammoShooting speedTechFast (4 / sec)[None]
Submachine gun
Very Fast (10 / sec)Shotgun
Shotgun shells
Slow (1 / sec)Combat shotgun
Moderate (2 / sec)Flamethrower
Rapid (60 / sec)Rocket launcher
Slow (1 / sec) - Support Weapon
Type of weaponBase DamageEffectTech
Grenade
35 explosionN/ACluster grenade
35 explosionExtra grenadesLand mine
250 explosionStun large targetsLand mines
Slowdown capsule
N/ASlow enemyPoison capsule
8 poison / secN/ADefender drone
5 PhysicalN/ADistractor drone
7.5 Laser3 units / capsuleDestroyer drone
10 Electric5 units / capsule - Security Structure
BuildingDamageAccuracySpeedRequired
Gun Turret
(Depend on Ammo)Always hitFast (10/s)Laser Turret
20 (Laser)Always hitSlow (1.5/s)Flame Turret
3 (Fire) + IgnitionLowRapid (30/s)Oil
Artillery turret
500 (Area of Effect)Hit on targetSlothful (0.3/s)Artillery shell
- Defensive Structure
StructureHealthUsageRequired
Stone wall
350BarricadeStone wall
Gate
350EntranceGate


Combat and Strategy
- Armor
TypeGrid SizeTechInvestment
Light armor
N/AN/ALowHeavy armor
N/AHeavy armorFairly LowModular armor
5×5Modular armorModeratePower armor
7×7Power armorSlightly High10×10Power armor 2Extremely High - Armor Modules
Disclaimer :
- Every Modules with MK2 REQUIRED their weaker one to craft.
- Every Modules is stackable, EXCEPT Nightvision and Discharge Defense.
- Every Modules REQUIRED their own tech to craft.
Power GeneratorPower outputGrid TakenSolar Panel
10 kW1×1Fusion Reactor
750 kW4×4Energy StoragePower CapacityGrid TakenBattery
20 MJ1×2Battery MK2
100 MJ1×2Energy ShieldEnergy UsageGrid TakenShield PointsEnergy Shield
24 kW2×250Energy Shield MK2
36 kW2×2150Defense DeviceEnergy UsageGrid TakenDamageLaser Defense
600kW2×275 (Range : 15)Discharge Defense
[All Available]2×2100 (AOE : 8)EquipmentEnergy UsageGrid TakenBonusNightvision
10 kW3×2NightvisionExoskeleton
200 kW2×4+ 30% SpeedBelt immunity
100 kW1×1Immovable by BeltPortable RoboportCapacity / ChargingGrid TakenMax / RechargeWorking Area35 MJ / 20 kW2×210 robots / 2 ports30×30 tilesRoboport MK2
35 MJ / 20 kW2×225 robots / 4 ports40×40 tiles
-
Tactic 1 : Maintain your logistic network
You can NOT win over the faunas without a well-supplied and well-maintained base. Reduce all possibility of logistic meltdown (resources shortage / radar shutdown / power outage / worn down defensive line) to make sure the faunas will stand no change against your mighty machinery.
-
There is no need to safe your best equipment for the later use. Use them as you must.
-
Faunas are weak to fire attack. But be careful not to burn a forest down. A wildfire can spread very quickly if left unchecked.
-
More of fauna nests destroy, the stronger they become. Only destroy their nest if it’s necessary (like the nests that are too close to your base/outpost or on needed resources).
-
Especially around a power plant or a vital part of base / transportation.
-
It is not wise to approach faunas nests in the early game. However, with a help of gun turrets; you can somewhat eradicate a small nest without much of injury.
To do a turret creep,
- Place turrets near a faunas nest.
- Quickly loaded the turret by Shift-click with mags and let the turret do the job.
- Get closer and repeated until all the nest is destroyed.
-
Walls can be place double for a better defense line. This tactic was used once in an ancient time to effectively slow down and pull back enemy siege.