Overview
This will be a short guide on basic sniping and counter-sniping tactics on realistic military games such as Arma, Squad, DayZ and etc.Note that this will cover more specialized techniques used by snipers, and will not cover basic gameplay controls such as shooting, zeroing your rifle, etc
Overview
A sniper is a marksman who engages targets from positions of concealment or at distances exceeding the target’s detection capabilities. Snipers generally have specialized training and are equipped with high-precision rifles and high-magnification optics, and often also serve as scouts/observers feeding tactical information back to their units or command headquarters.
In addition to long-range and high-grade marksmanship, military snipers are trained in a variety of special operation techniques: detection, stalking, target range estimation methods, camouflage, field craft, infiltration, special reconnaissance and observation, surveillance and target acquisition.
In short, snipers are specialized marksman who operate deep behind enemy lines, gathering information and executing high value targets. Unlike a normal marksman, snipers are trained in a multitude of different skills, such as camouflage, stealth, and infiltration.

Positioning
Positioning is one of the main factors that contributes to being an effective sniper. Characteristics of a good position are:
An elevated position above your target area will give you a larger field of fire, allowing you to more effectively engage your targets. The ideal elevation is higher than the expected target area, but not too high as to expose your silhouette against the sky. This is called “skylining” and should be avoided at all costs.


A concealed position should distort your human-like figure, making you seem like a part of the terrain.
Vegetation and low hanging trees make exceptionally good concealment, the irregular pattern of the foliage distorts your appearance from a distance, especially when combined with good camouflage. The shade provided by some trees should also work to darken your silhouette, blending your figure into the shadow.
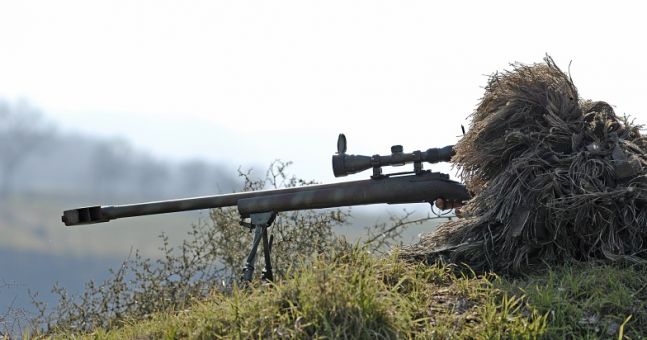
A ghillie suit is a powerful tool to camouflage yourself. A ghillie suit hides and distorts the distinct shape of your figure, blending you into the background. A ghillie suit should be used effectively near and around foliage, and should act as a blanket to cover up the shape of your human body.

Choose a position around a large concentration of foliage, and try to hide any recognizable part of your body. The shade provided by the foliage around you would also help to darken your figure, merging you further into the environment.


Spoiler alert


In some games, foliage like grass and bushes might not render at a certain distance. And thus, reducing the total effectiveness of the concealment. Keep this in mind when searching for a good position.
Any kind of solid material around your position should work as cover if you start taking fire. Cover also helps to hide your thermal heat signature, reducing the chance of getting detected by a thermal camera. Although you should prioritize concealment more, as full ghillie suits and heat masking masks usually works well enough to cover most of your thermal signature, and usually once you start taking fire you should start relocating to a different position, but any kind of cover is welcome if things start to get dirty.
A low-profile position means a position that is least obvious to the enemy without compromising the overall effectiveness of the mission. An obvious position, such as a tall clock tower or an elevated treeline would be easily guessed if the enemy knows your general direction.

Consolidating your position
After you’ve found a suitable position, start digging in. Mark common patrol areas and infrastructure. Use all sorts of landmarks such as: a building, wrecked car, treelines, and even a boulder to mark various ranges(methods for ranging are down below). You can use a bipod or something solid to prop up your rifle, but make sure it doesn’t reduce the effectiveness of your concealment. Use traps and proximity mines to strengthen your flanks, giving you time to react if a patrol squad comes around your position. Stay alert of any sounds and movement around both your target area and your own position. Be prepared to lay down and look through your scope for as long as required.
Range
The ideal range of a target is somewhere between three hundred to eight hundred meters. Eight hundred meters is considered the maximum ideal range for your average, full powered rifle cartridge, such as the standard 7,62x51mm NATO round in use with most standard western sniper rifles. Ranges beyond eight hundred meters requires more specialized magnum rounds, such as the more powerful .338 Lapua and .300 Win Mag. In longer distances, you might also have to account for windage and travel time(if you’re going to use Advanced Ballistics). Rounds such as the .50 BMG provides the longest range and highest terminal velocity available. These rounds are able to be accurately used to some degree of effectiveness up to three kilometers away, but are a pain to carry and needs several hundred meters in range to stabilize, and such are not well suited to your typical, scout and go mission.
Ways to estimate distance between you and the target are as follows:
Using a rangefinder is probably the easiest and most accurate way to gauge the range of a target. The rangefinder can be relied on to provide accurate numbers, just by pressing “T” by default(on Arma 3). A rangefinder is best used by a spotter/sniper team, where the spotter is able to provide the range so that the sniper will only have to zero in and take the shot.
A view through a rangefinder, the range is accurately displayed on the right-hand side.

Mildot estimation is the practice of using mildots(small round dots on your scope reticle) to estimate a rough distance using a set formula. The formula is as follows:
H(1000) : D = Rm
H = Height of the target (in meters)
D = Amount of dots it spans
Rm = Range in meters
The average height for a human being is between 1,6 – 1,8 meters. In Arma, everyone is exactly 1,8 meters while standing straight, and 1,6 meters while on the default ADS position. You can also use doorways(which are around 2 meters tall) and other structures to estimate range. This formula can be used accurately on scopes with accurate and working mildots.
The height of the target is 1,6 meters tall, spanning exactly four mildots. By inserting this number into the formula, we get four hundred meters, which are the same range provided by the rangefinder

This method is considerably less accurate compared to using an actual rangefinder. But with experience you will be able to adjust and estimate your shot accurately.
Shot estimation is the practice of using the impact of live rounds to estimate a target distance. The first shot fired would be zeroed to the most likely range at which the target may appear, and the following shots would be used to further narrow down your zero until you get a good enough idea of the range of the target, allowing you to take the final kill shot. This method is only recommended whilst the target is not present and if the two mentioned methods above are not possible. A suppressor or other sound masking techniques are vital to prevent you from compromising your own position due to continued fire. The dust generated by the pressure of your shot might also alert the enemy of your position, but this problem is less apparent in more humid and wet environments.
When to fire.
Firing your shot at the right moment might be a difference between life and death, and a failed or successful mission. Finding the right moment to take the shot is crucial in the art of sniping. A missed round might cost you your life. There are several things to consider when you are about to fire your shot.
If you are planning to do recon, killing the first enemy you come across might not be the best option. Your gunfire might expose your position to everyone in the area, and even if you’re using a silencer, the enemy will likely have others around him. Unless they spot you first, refrain from firing a round and let them pass.
If you are planning to assassinate a high profile target, make sure to identify them first. Never take the shot if you are not sure. And if you do take the shot, make sure that it eliminates or kill them permanently. Fire another round if you are not sure.
Hitting a moving target is more of a gamble than precision, and should only be done on desperate situations. Make sure the target stays stationary when you are about to take the shot.
The position of the target is crucial when considering the moment to take the shot. Ideally, you must be able to see the chest of the target for you to be able to accurately hit them. If the target is situated around a lot of solid cover, you might want to wait for them to expose themselves more. Open fields and grasslands makes great target positions to ensure a hit.


The value of a target is it’s value towards the enemy’s asset. An high-ranking officer might be a more worthy target than your regular private. A machine-gunner might be a more valuable target than an ordinary rifleman. Eliminate the targets which presents the most danger towards you and your fellow soldiers.

Shot timing/masking
A high powered sniper rifle has an extremely loud noise profile if not equipped with a sound masking device such as a silencer, risking alerting the enemy of your position. To circumvent this, a sniper might choose to time their shots to match other kinds of loud sounds such as an artillery shell, loud engines, or a loud thunder. This tactic can be used as a substitute to an actual suppressor.
Shot placement
Shot placement is where you aim on the body of a target to ensure a successful hit. Generally military snipers shoot at much longer distances, and would usually aim center-mass(the chest cavity), providing them a larger target that is easier to hit from a distance. In situations where the target must be taken alive however, it is advisable to aim for the legs or other non-vital areas, disabling their mobility and minimizing blood loss. On hostage situations, a clean kill must be ensured to reduce the chance of the target harming the hostages. In these situations, a headshot landing right on the brain might be preferred, immediately killing the target and greatly reducing the chance of a hostage being harmed. These shots are best done in ranges less than a hundred meters to ensure absolute accuracy.
Relocation
When presented with multiple targets, always relocate to another position after a couple of shots. Make sure to take note of all the possible positions around you and make a route between them. Relocating will prevent the enemy from easily triangulating your exact position and mount a counter-attack. Play around your enemy’s behaviour. If they start to get a general idea of where you are, start moving to another position. If they engage your previous position, start moving to another. Keep your movements discrete, don’t just suddenly run into another position. Utilize cover and concealment to move around.
Escape
An escape route is vital if you’re planning to leave your position alive. An ideal escape route leads into somewhere with a lot of cover and is large enough to lose the enemy in, a forest, for example. Avoid any highly populated areas, such as villages and towns. Avoid open rivers and common patrol routes. Stay away from roads and highways. Don’t move in the direction of the search party, instead move around them. Don’t lead them towards your rendezvous point. Utilize traps and grenades to create diversions. Diversions like smoke, flares, and remotely detonated explosives works to lure the enemy into a set area, providing you some time to create some distance between you and the enemy.


Spotter
A spotter is another element of your typical sniper team. A spotter’s job is to generally assist the sniper in completing their mission. A spotter is generally the more experienced of the two, they provide the range, position, and target for the sniper to engage while also accounting for wind and other environmental factors. A spotter also gives the sniper information about the impact of a bullet, helping them adjust their aim accordingly in case of a missed shot. They protect the sniper’s flanks, and observe things outside the sniper’s small field of view. They help the sniper in carrying heavier loads during a longer recon type mission. A spotter is usually equipped with a Rangefinder, and an automatic weapon to assist in close to medium range battles. An experienced sniper could operate without a spotter, but the extra utility in having a spotter generally recommends having them for most missions.

Counter-sniper tactics
A sniper is one of the hardest types of enemies to counter, especially if they are fairly experienced. A well trained sniper almost always have the upper-hand in a firefight. But there are a couple of ways to counter them.
The best way to survive and not get killed is to not get shot in the first place. This guide will teach you how to effectively avoid dangerous situations involving a sniper.
Read your surroundings
Being able to read your surroundings is a valuable skill. Note every possible cover, concealment, and firing positions around you. These positions are usually situated somewhere elevated, where the shooter has a bigger line of sight and are able to engage you safely in a safe position. A fairly experienced marksman would probably choose a fairly concealed position, but not the most obvious one. Scan the area for any concealment, including trees, bushes, and other kinds of vegetation. Avoid open terrains like plains and roadways. Always move behind any kind of cover. Being able to effectively read and avoid these areas will keep you away from the sight of a trained marksmen.
Scout the area
Scouting the surrounding area for potential threats will enable you to easily make decisions based on the situation. Scout potential firing positions, making sure that no threats are around. This could be easily done using long range scopes and binoculars.
Keep moving
Always be on the move. Staying on the move decreases the chance to get hit by a player’s bullet. A sniper will most likely wait for the target to stop moving before opening fire, ensuring an accurate hit. By moving you’ll force them to lead their shots, accounting for travel time. Few snipers dare to expose themselves by risking a missed shot.
Limit your exposure
Don’t stay in the open too long. The longer you’ll stay, the more vulnerable you are. Avoid areas where you might have to expose yourself too much. When moving, sprint towards the nearest cover, giving the least amount of time for a sniper to adjust and hit their shot.
Move unpredictably.
Don’t just walk straight ahead and not expect to get shot. In places where you expect a sniper to be around, move from cover to cover, stopping for a random amount of time before rushing to the next cover. Instead of running into the cover straight ahead of you, try to randomize your direction, alternating between left and right. This would keep snipers guessing where you will move next, forcing them to rely on their reactions alone.
A sniper would probably choose an elevated position. Start searching the area for elevation, including hills, tall buildings, and sometimes even a tree. Keep in mind a sniper would choose a well concealed place, focus your search around trees and bushes where the sniper might be hiding. Use an infrared/thermal optic to search for any unnatural heat signatures.

Once you get a hold of their position, start the process of engaging. The best way to engage a sniper is by using heavy ordnance such as artillery and mortars with a large radius. Direct fire equipment such as a grenade launcher or a rocket propelled grenade also works if you know their exact position. Close air support elements are more precise than artillery if you give them the right targets, but generally have a smaller target area. Communicate with your fire support commander to dispatch the sniper.

If you are around less than a hundred meters away from the sniper, you might not want to risk calling artillery on top of yourself. Meanwhile, the sniper continues to lay down accurate fire from their position, picking off your squad members left and right. In this situation, a plan to rush the sniper might be ordered. If you have the location of their position, start using basic infantry assault tactics to engage the sniper. Use the machine gunner to pin the sniper down, and order the grenadier to fire a smoke round on the sniper’s position, while the rest of your squad forms an assault element. Once you manage to close a good distance, use fragmentation grenades and anti-personnel munitions to eliminate or injure the sniper.
Author’s note
This is my first time making a guide, ever. So bear with me if I missed something important or if there were flaws in my instructions. Please comment any mistakes in the guide and I will respond and fix it as soon as possible.
Thank you for reading <3