Beginner's guide to all things Old One in 2026
Why have I decided to do make this guide?
I've spent many hours helping other players with their achievements and in a lot of cases their journeys will take them through a level that will result in them having to fight the Old One. This beast can be very daunting for newer players or those unfamiliar with how he works, but he's a boss that mostly benefits from preparation, rather than pure skill. That's not to say you can't beat him with raw skill, but he's a rather predictable foe so understanding each attack will make the fight significantly easier
Quick disclaimer, I don't believe I am a particularly "good" DPS content player on Dungeon Defenders, there are absolutely players far better than I, I've just played a lot against the various Old One bosses in DD1, and this will also only apply to the live version of DD1, Redux is exempt for the purposes of this guide.
Also, there is a workshop map available here - https://steamcommunity.com/sharedfiles/filedetails/?id=97839153
I would highly recommend this workshop map for players who just want some basic reps to get a feel for what each attack does, as between each version of the Old One, there isn't actually that much variation in his attack properties, it becomes more about how fast or often he attacks, once you feel more confident in your Old One boss fights I would use the Great Old One as your practice ground (If you have him unlocked), as once unlocked he is very easy to reach on ranked and you don't lose anything if you die at any point.
Also, there is a workshop map available here - https://steamcommunity.com/sharedfiles/filedetails/?id=97839153
I would highly recommend this workshop map for players who just want some basic reps to get a feel for what each attack does, as between each version of the Old One, there isn't actually that much variation in his attack properties, it becomes more about how fast or often he attacks, once you feel more confident in your Old One boss fights I would use the Great Old One as your practice ground (If you have him unlocked), as once unlocked he is very easy to reach on ranked and you don't lose anything if you die at any point.
Who is the Old One and where are you likely to find him?
The Old One is the menace in charge of the invasion of Etheria, you can kill all the goblins, orcs and ogres but you'll never stop the invasion until you've defeated the Old One.
- Old One - Crystaline Dimension End of Map Boss on any Difficulty
- Great Old One - The secret boss which can be found on Crystaline Resurgence Part 3 (CR3) after completing Crystaline Dimension as well as Dread Dungeon - Crystaline Resurgence Part 4 from the Lost Quests tab on Nightmare Hardcore and then completing CR3 again, remembering to interact with the Monolith on the North of the Map to unlock a portal by the centre crystal
- Ancient Old One - Tavern Incursion (TI) End of Map Boss on any difficulty
- True Great Old One - True Boss Rush (TBR) final checkpoint on Nightmare
- Ultimate Old One - True Boss Rush (TBR) final checkpoint on Ruthless
here's a list of all the variations of the Old One you might stumble into on your adventures to protect Etheria:
- Old One - Crystaline Dimension End of Map Boss on any Difficulty
- Great Old One - The secret boss which can be found on Crystaline Resurgence Part 3 (CR3) after completing Crystaline Dimension as well as Dread Dungeon - Crystaline Resurgence Part 4 from the Lost Quests tab on Nightmare Hardcore and then completing CR3 again, remembering to interact with the Monolith on the North of the Map to unlock a portal by the centre crystal
- Ancient Old One - Tavern Incursion (TI) End of Map Boss on any difficulty
- True Great Old One - True Boss Rush (TBR) final checkpoint on Nightmare
- Ultimate Old One - True Boss Rush (TBR) final checkpoint on Ruthless
What kind of Heroes should I be running if I want to fight against the Old One(s)?
There are 3 main factors that decide who I would recommend to play with:
- Do you want to play solo?
- Do you want to play in a group?
- Personal preference.
- (Secret 4th option, are you fighting GOO with AB lockouts)
Most players just getting into learning the Old One while playing solo will probably see the most benefit from either a Squire/Countess, a DPS Monk (Separate from a Hero Boost Monk) or an Apprentice. The cool thing about these options outside of the Apprentice is they generally prefer to use DPS pets anyway, so things like dealing with the trash mobs becomes much easier.
- The trade off with the Apprentice is you will almost likely be doing the most damage to the Old One's limbs, but at the cost of having to manually deal with the mobs (An example can be shown if you scroll down to the Nightmare True Boss Rush section) due to the Apprentice usually preferring to use a Propeller Cat or Chainsaw Corgi which are damage boost pets, not DPS pets.
- The DPS Monk offers far better pet damage scaling than any other hero in the game, so if you're looking to use a DPS centric pet, don't sleep on the Monk. Also worth noting if you're using the Mischief Maker as your weapon (Which can be found as an End of Map reward from Temple of Polybius), you can aim your weapon to land between both feet on the feet stage and both hands when OO does a double hand slam on the chest phase to damage both limbs at the same time (Shoutout Vivi for that one I learned about that trick watching her streaming TBR, https://www.twitch.tv/vivienmeow).
- The Squire and Countess are much more friendly for newer players thanks to their ability to block. (I was a Countess user a lot when I began my early reps of learning the Old One) The original Old One from Crystaline Dimension might not really benefit from this ability to block thanks to his high downtime between attacks, but especially for GOO, blocking can be incredibly useful as most attacks, and the knockback from the shockwave, can be almost completely eliminated with good timing and safe positioning (Super Legendary Squires also make up the bulk of armorless GOO clears for chasing that secret achievement, myself included) .
If you decide to play in a group, either a Countess or Hero Boost Monk (That focuses on Hero Boost more so than damage) are essential, as these provide an AoE damage boost for all friendly players in range. Most duos getting into OO will pair one of these with an Apprentice, especially early on when their gear gatekeeps them from using some burst damage options including the Gunwitch, who aims to use her Witch's Curse and Icy Needles to do burst damage, a Spin Squire, which is a DPS Squire that prioritises big swords like the Honey Sword, and has the advantage of damaging multiple limbs at once with his Circular Slice, the Barbarian and Hermit are also more than viable options but they are beyond the scope of this guide as they are not as widely used and the players willing to use them in an Old One fight are almost definitely comfortable enough this guide probably isn't for them. The Warden is also a nice support option in larger lobbies thanks to her AB2 which provides players with temporary overhealth and a little bit of healing, while having the movement speed herself to get out of the way of incoming attacks and high overall damage for mob clearing or in the lobbies where burst damage isn't a priority.
In pub lobbies that include Old One fights, namely Tavern Incursion and True Boss Rush on RL, the majority of lobbies will include at least 1 Hero Boost Monk, and 1 Spin Squire, often 2 or 3 Spin Squires
- Do you want to play solo?
- Do you want to play in a group?
- Personal preference.
- (Secret 4th option, are you fighting GOO with AB lockouts)
Solo
Most players just getting into learning the Old One while playing solo will probably see the most benefit from either a Squire/Countess, a DPS Monk (Separate from a Hero Boost Monk) or an Apprentice. The cool thing about these options outside of the Apprentice is they generally prefer to use DPS pets anyway, so things like dealing with the trash mobs becomes much easier.
- The trade off with the Apprentice is you will almost likely be doing the most damage to the Old One's limbs, but at the cost of having to manually deal with the mobs (An example can be shown if you scroll down to the Nightmare True Boss Rush section) due to the Apprentice usually preferring to use a Propeller Cat or Chainsaw Corgi which are damage boost pets, not DPS pets.
- The DPS Monk offers far better pet damage scaling than any other hero in the game, so if you're looking to use a DPS centric pet, don't sleep on the Monk. Also worth noting if you're using the Mischief Maker as your weapon (Which can be found as an End of Map reward from Temple of Polybius), you can aim your weapon to land between both feet on the feet stage and both hands when OO does a double hand slam on the chest phase to damage both limbs at the same time (Shoutout Vivi for that one I learned about that trick watching her streaming TBR, https://www.twitch.tv/vivienmeow).
- The Squire and Countess are much more friendly for newer players thanks to their ability to block. (I was a Countess user a lot when I began my early reps of learning the Old One) The original Old One from Crystaline Dimension might not really benefit from this ability to block thanks to his high downtime between attacks, but especially for GOO, blocking can be incredibly useful as most attacks, and the knockback from the shockwave, can be almost completely eliminated with good timing and safe positioning (Super Legendary Squires also make up the bulk of armorless GOO clears for chasing that secret achievement, myself included) .
Group
If you decide to play in a group, either a Countess or Hero Boost Monk (That focuses on Hero Boost more so than damage) are essential, as these provide an AoE damage boost for all friendly players in range. Most duos getting into OO will pair one of these with an Apprentice, especially early on when their gear gatekeeps them from using some burst damage options including the Gunwitch, who aims to use her Witch's Curse and Icy Needles to do burst damage, a Spin Squire, which is a DPS Squire that prioritises big swords like the Honey Sword, and has the advantage of damaging multiple limbs at once with his Circular Slice, the Barbarian and Hermit are also more than viable options but they are beyond the scope of this guide as they are not as widely used and the players willing to use them in an Old One fight are almost definitely comfortable enough this guide probably isn't for them. The Warden is also a nice support option in larger lobbies thanks to her AB2 which provides players with temporary overhealth and a little bit of healing, while having the movement speed herself to get out of the way of incoming attacks and high overall damage for mob clearing or in the lobbies where burst damage isn't a priority.
In pub lobbies that include Old One fights, namely Tavern Incursion and True Boss Rush on RL, the majority of lobbies will include at least 1 Hero Boost Monk, and 1 Spin Squire, often 2 or 3 Spin Squires
The Old One is a predictable creature
What do these fights all have in common?
Every version of the Old One is separated into 3 cycles (assuming you don't do enough burst damage to skip a cycle), and each of these cycles is split into 3 phases; the feet, the chest, and finally the head, which will always be fought in the same order. While some of the individual traits of the attacks he can perform can differ between each version, the base attack types will always be the same. The attack names I use here are not necessarily the official names for these attacks, these are the names I use myself to refer to them.
The feet stage
While this is up to speculation and personal preference, the feet stage is historically what has given me the most grief as in my experience this is where the higher % of the floor can be covered in fire (This may not strictly be true, but this feels like it).
- Hadouken. this attack appears on all 3 phases. OO will throw one arm into the air, and let off a single fireball projectile that will loosely track and home in on where you're standing, if you jump as the projectile leaves his hand, it will always fly over your head and therefore miss you, but it might catch you if you jump again. If this lands on the floor, it will leave a little pool of fire behind which will linger for approximately 20 seconds
- Single stomp. OO will stomp either foot directly into the ground a few feet in front of him. If this directly lands on you, it will kill you every single time regardless of your HP or resistances. This is also referred to as getting "goomba'd" . There is a small wind-up animation to this as he has to raise his leg to stomp it, so you should always have enough time to get out of the way before this stomps you. While the attack itself does has an AoE splash to wherever it lands, the falloff is very aggressive so as long you aren't goomba'd, you will most likely survive this attack.
- Double stomp. OO will stomp both feet simultaneously. The wind-up animation time is slightly faster than it's single stomp counterpart, and the same goomba rules apply to the double stomp as they do the single stomp. Upon his feet hitting the floor he will let off a shockwave, which can be seen as a blue ring that rapidly expands to the edge of the playable platform. Getting hit by this shockwave will knock you back significantly, in most cases knocking you completely off the map, and inflict massive amounts of damage while doing so. Conveniently, this can jumped over with relative ease so the damage and knockback you receive can be avoided altogether. I would recommend if you're closer to the middle by where the feet typically land to start your jump just before he hits the ground, and if you're playing in a multiplayer lobby, especially if you're not the host, the window where you can safely jump late gets narrower the more lag is introduced to the fight, so you will need to consider jumping earlier than you might otherwise get away with as the lobby host. The knockback however can be absorbed by a blocking hero, such as the Squire, depending on your weapon's block stat, you may still take some damage from the attack if that block number is below 100, but your knockback will be reduced by 99% to a mere little nudge.
- Meteor shower. OO will raise both hands at the same time and then drop them, which will unleash multiple fireballs onto the platform at once. These fireballs, which I will refer to as meteors, do not track or home in on you, instead they fall directly downwards on to the platform and leave pools of fire upon impact. You can quite easily predict where these will be as a shadow will appear on the floor where they are expected to land.
Once both feet's HP has been reduced to zero, OO will raise most of the platform to his chest, the furthest portion away from him will not raise with you, anyone caught not on the platform when it rises will be treated as if they have fallen off completely (There is a case I will discuss later where this doesn't count as an instant death)
The chest stage
- Hadouken. This functions exactly the same as it does on the foot stage, and the same method of dodging will also work here, the fireball itself will become easier to spot as you reach the chest and head stages as the camera angles become more forgiving for the player.
- Single slam. This functions very similarly to the single foot stomp from the feet stage, however this version can track you across the length of that hand's half of the platform, with some tricky exceptions close to the edge, and can still goomba you if you are hit directly with it.
- Double slam. Much like the double foot stomp, each hand will plant at the same time and always in the same place, also leaving behind a shockwave for the player to jump over with significant knockback and damage to the player, and will instakill if you are goomba'd by it.
- Meteor shower. This again functions identically to the feet stage including the shadows on the ground to show you where they're going to land and leaving behind a pool of flame.
- Blue beam. OO will project a beam from his chest which will track and follow you anywhere you try and move on the stage. This beam however will always mirror your movement on a delay, so if you can keep moving in any direction (Ideally not towards him at least) the beam will never reach you to do damage. The ability also cannot be blocked by a blocking hero.
- Green beams. OO projects 3 smaller green beams from his chest, these will do similar damage to the blue beam, but instead of tracking you, will move around the floor in random directions. While technically nowhere is safe, you're far less likely to be hit by one the further out you are on the platform, this also gives you more time to react.
You will need to reduce the HP of BOTH hands and his chest to 0 before you can move on to the head stage. The platform will once again shrink a little more.
The head stage
- Hadouken. No change here from either previous phase, it's just a little easier to see coming thanks to the more forgiving camera angles.
- Single slam. Just like on the chest phase you'll be tasked with moving out the way to avoid being hit directly, and this can still track you across that hand's half of the stage.
- Double slam. Just like the chest phase both hands will be slammed down onto the platform capable of instakilling if they land directly on you, and will send shockwaves across the entirety of the stage.
- Meteor shower. No change here to the previous stages. Little meteors will land on the platform.
- Blue Beam. No change from the chest stage, will just follow you around.
- Green Beam. The only change here from the chest stage is you now have to dodge 4 beams, instead of 3, but they will still aim erratically across the entire platform.
- Red laser. OO with fire a red laser which will track you much akin to the blue beam, but this beam will leave behind a pool of fire where the end of the laser touches on the ground. This can be completely blocked by a blocking ability however.
- Sonic Blast/blue breath. OO will take a deep breath and then send a shockwave down the centre portion of the stage, which like the other shockwaves will knockback tremendously and do significant damage if it catches a player, it's recommended to stand to the side when this happens.
- Fire breath. OO will again take a deep breath and then from left to right will breathe a large stream of fire across the stage. This fire doesn't linger but will hurt when it catches you (there's no way to avoid it completely)
- Swipe. 1 arm will sweep across the stage, any player caught in it would be swept to the side, and often times off the map. This doesn't reach across the whole stage and there is space if you're stood close to his head to jump over the arm and avoid being plunged. It can be either arm.
After you've done 1/3 of OO's max HP you will be reset to the foot stage and the cycle repeats.
Distinguishing the Great Old one from the Old One
As you progress through the game naturally and stumble into each new version of the Old One fight you will be faced with new challenges and in some cases restrictions on how you're typically allowed to play any boss fight in Dungeon Defenders. Let's break down what separates these Old One fights from one another.
All the fights from Easy to Nightmare are the same functionally, the only change is the HP and resistance scaling on the boss and his limbs. Archers and Orcs are typically the only mobs you'll have to contend with on the platform and with typically do you no real harm. Normally he will have to cast either the Meteor shower or taunt the player before he can repeat an attack he's already made.
Ruthless difficulty is where the first real gameplay differences happen. As of patch 10.6.17, on Ruthless, passive mana generation to the tune of 100 every 5 seconds was added, which made this version of the Old One so much more tolerable, but is otherwise the same fight still.
This boss can only be attempted on Nightmare Hardcore.
This video is Dungeon Defenders legend Theoran clearing the Great Old One
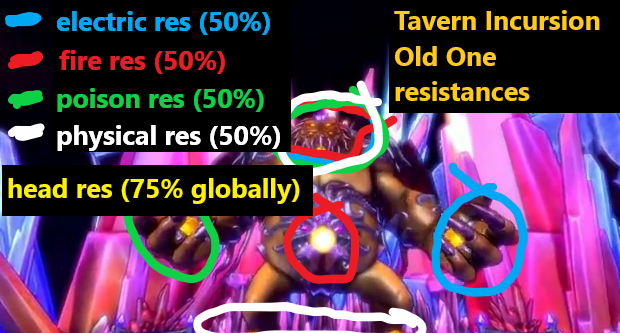
(The image above also applies to the GOO version of this fight)
This is probably where the first real difficulty spike occurs. This version of the Old One attacks considerably more often and with more malice each attack doing more damage that it's Crystaline Dimension version.
- First of all, he no longer requires to taunt the player or cast his Meteor shower before he can use an attack again, which is definitely more noticeable on the chest stage when he decides to use on his laser attacks.
- Mages, Djinns and Dark Elves can now also spawn in any phase on the platform. The Djinn can be tricky as he has enough spawn protection to get at least 1 guaranteed attack before you can kill him.
- From every version of the Old One fight from here on out, every time you progress to the next phase (From feet to chest, chest to head, head back to feet), you will gain a full refill of mana and all players will be healed, on the first phase you can only heal for a maximum of 400K HP, on the second phase onwards a maximum of 800K HP. However, every time you reach the feet stage again, you will be temporarily forced to relinquish your mana before you get a fill, with the idea being it forces you to go on cooldown, if you can get more mana dropped from another player between the tick the mana's dropped and the cooldown starting you can continue using your ability as normal, even if that ability has technically been locked (It will lock itself when you go on cooldown though).
- Once you've depleted GOO's HP to 2/3 (where you would typically start your second cycle), most heroes' secondary ability will be disabled, and this will last until the end of the fight. Example of the kind of abilities you're going to lose here are Squire's Circular Slice (Spin) and Countess Joust, these abilities aren't used that often in this GOO variant anyway. When you've completed your second cycle and deplete his HP to 1/3, most primary abilities will now be locked away. This includes but isn't limited to Hero Boost for Monks, Overcharge for the Apprentice, Wrath for the Warden, Call to Arms for the Countess and Blood Rage on the Squire. To make up for this, players are granted a 50% permanent damage buff for the remainder of the boss fight (sure this doesn't really compare to the kind of boosted damage you'd get from normal cooldown usage but it's better than nothing).
- The last major difference is after taking enough damage yourself (I don't have the real number but it feel like it's around the 2m mark), fairy pets will no longer heal the player (Other healing pets like Lover's Cupids are not affected by this at the time of writing but could change in the future one day.)
Crystaline Dimension Old One
All the fights from Easy to Nightmare are the same functionally, the only change is the HP and resistance scaling on the boss and his limbs. Archers and Orcs are typically the only mobs you'll have to contend with on the platform and with typically do you no real harm. Normally he will have to cast either the Meteor shower or taunt the player before he can repeat an attack he's already made.
Ruthless difficulty is where the first real gameplay differences happen. As of patch 10.6.17, on Ruthless, passive mana generation to the tune of 100 every 5 seconds was added, which made this version of the Old One so much more tolerable, but is otherwise the same fight still.
CR3 Great Old One (GOO)
This boss can only be attempted on Nightmare Hardcore.
This video is Dungeon Defenders legend Theoran clearing the Great Old One
(The image above also applies to the GOO version of this fight)
This is probably where the first real difficulty spike occurs. This version of the Old One attacks considerably more often and with more malice each attack doing more damage that it's Crystaline Dimension version.
- First of all, he no longer requires to taunt the player or cast his Meteor shower before he can use an attack again, which is definitely more noticeable on the chest stage when he decides to use on his laser attacks.
- Mages, Djinns and Dark Elves can now also spawn in any phase on the platform. The Djinn can be tricky as he has enough spawn protection to get at least 1 guaranteed attack before you can kill him.
- From every version of the Old One fight from here on out, every time you progress to the next phase (From feet to chest, chest to head, head back to feet), you will gain a full refill of mana and all players will be healed, on the first phase you can only heal for a maximum of 400K HP, on the second phase onwards a maximum of 800K HP. However, every time you reach the feet stage again, you will be temporarily forced to relinquish your mana before you get a fill, with the idea being it forces you to go on cooldown, if you can get more mana dropped from another player between the tick the mana's dropped and the cooldown starting you can continue using your ability as normal, even if that ability has technically been locked (It will lock itself when you go on cooldown though).
- Once you've depleted GOO's HP to 2/3 (where you would typically start your second cycle), most heroes' secondary ability will be disabled, and this will last until the end of the fight. Example of the kind of abilities you're going to lose here are Squire's Circular Slice (Spin) and Countess Joust, these abilities aren't used that often in this GOO variant anyway. When you've completed your second cycle and deplete his HP to 1/3, most primary abilities will now be locked away. This includes but isn't limited to Hero Boost for Monks, Overcharge for the Apprentice, Wrath for the Warden, Call to Arms for the Countess and Blood Rage on the Squire. To make up for this, players are granted a 50% permanent damage buff for the remainder of the boss fight (sure this doesn't really compare to the kind of boosted damage you'd get from normal cooldown usage but it's better than nothing).
- The last major difference is after taking enough damage yourself (I don't have the real number but it feel like it's around the 2m mark), fairy pets will no longer heal the player (Other healing pets like Lover's Cupids are not affected by this at the time of writing but could change in the future one day.)
The Ancient Old One from Tavern Incursion (AOO)
What separates this version from any other Ole One fight we have already?
The first and most unique feature about this Old One fight is that he he is fought simultaneously with defending the tavern from mini bosses and mobs. For the sake of this guide I am only going to talk about the AOO fight itself, the tavern will only be briefly mentioned when it directly applies to the fight. If I refer to the Tavern at any point here, I mean the Tavern in the map, not the Tavern lobby/home.
In terms of difficulty for the main fight itself in a vacuum, in my personal opinion I believe this lies somewhere between RL on the original Old One from CD and GOO from CR3.
The first change that separates this fight from the previous 2 is being able to return to the Tavern fight at essentially any time. While you're on the feet stage there is a teleport available to use freely and without restriction to travel to and from the Tavern fight. This may not come up as often in group play but certainly when playing solo you will find this convenient. Alternatively, this version of the fight has a unique trait with falling off, Should you fall off the stage in the AOO fight at any point, instead of being immediately killed, you instead take approximately 50% of your max HP and if that isn't enough to kill you, you are sent back to the Tavern and forced onto cooldown, which in it's own way means you can return at any point.
Archer minions are also the only minions that spawn in this version, they sit on the sides of the map, do more damage per hit than standard Archer mobs, shoot more often and are completely invincible to everything except AOO himself, but if he knocks any off with his own attacks, a new one will spawn in it's place.
While AOO doesn't give you the same AB lockouts as it's GOO variant, it does give you a complete full refill of both HP and Mana whenever you progress to the next phase, additionally the game does not try to force you into a cooldown upon returning to the feet stage.
The last main change is with the shockwaves. On the feet stage AOO doesn't perform a shockwave on a double stomp, the double stomp itself is actually a pretty rare attack to see. On the Chest and head stage, the shockwaves do occur, but they move at a fraction of the pace of any other OO fight, and while they still do considerable damage, they do not give you knockback here. This applies to both the chest and head stages.
While you are on the global timer that comes with Tavern Incursion, it is very generous and espeically in public lobbies you'll be very hard pressed to find youself short on time unless you had to go AFK for an extended period of time
The True Great Old One (Nightmare True Boss Rush final checkpoint)
This is just GOO, no?
Yes. But no. There's extra steps here but not as many as there used to be.
(This video and the one below in this section were made before the most recent changes to AB lockout on NM, but functionally is the same fight otherwise)
For the longest time since this was released, you had to deal with the same AB lockout you had on GOO, but as of patch 10.6.19, this is no longer the case, which now leaves GOO as the only version of the Old One to still leave you with an AB lockout.
I would argue this fight is still more difficult than GOO for players still learning.
Like AOO from Tavern Incursion, you are granted full mana and HP refills every time you progress from one phase to the next, however, to bring it back in line with GOO, the game will still try to force you on cooldown when you return to the feet stage. Alongside this cooldown attempt, right in the middle towards the back of the platform a Demon Lord will spawn, if he lands on you while spawning, this is considered a goomba and you will be instakilled. Killing him is technically optional, but keeping him alive will make the fight incredibly more difficult as time goes on, especially when trying to dodge TGOO's attacks and shockwaves. This Demon Lord will act like a typical Demon Lord, except that he will always stay grounded in place, and will never take flight.
The last major change to this version of the fight are the additions of Harbingers. They can appear on their own sporadically, but if you leave a Mage minions unattended for approximately 15 seconds after they spawn, they will call in a Harbinger, which if also left unattended and doesn't get knocked off by TGOO will wear you down incredibly quickly.
The Ultimate Old One (Ruthless True Boss Rush final checkpoint)
This is it, the pinnacle of the Old One, this is where the real gamers lurk
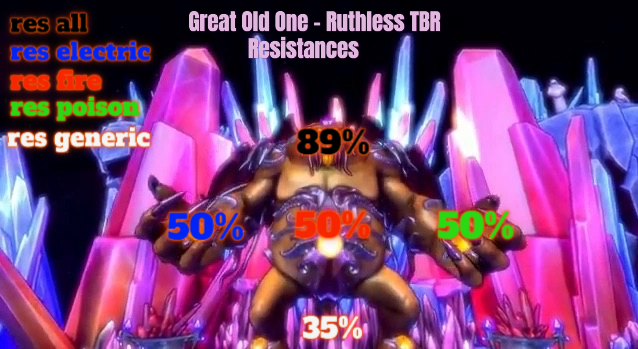
Those who are already very experienced fighting the Old One would argue this fight can be easier than the True Great Old One (Nightmare True Boss Rush), but to those who reach this fight for the first time, this will take a lot of adjustment, because of 1 reason and 1 reason only. HE FAST.
UOO attacks at a significantly faster rate than any other version of the Old One, and I don't just mean in frequency, the attacks themselves are considerably faster. They all follow the same archetypes as their GOO and TGOO counterparts (Fast shockwaves, no need to taunt or cast Meteor showers between other attacks), but you get way less time to react than the other fights.
Awesome Dungeon Defenders player HeroLand playing through the entirety of RL TBR solo
UOO doesn't give you AB lockouts, and you thankfully don't have to deal with a Demon Lord on Ruthless, but don't get it twisted, this fight is not any easier for most players.
You're still temporarily drained of mana to try and force you into a cooldown on each return to the feet stage.
After the first cycle is completed and you return to the feet stage for the first time, an invisible Wyvern will spawn above the map and for the remainder of the fight will shoot fireballs at you. When you reach the third cycle, just for the feet stage only, 6 Archers will spawn and function as they do in Tavern Incursion's AOO, remaining invincible, and shooting faster and higher damage arrows than normal.
Shoutouts and honourable mentions
Shoutouts to everyone in the DDRnG community who have played with me, supported the stream or taught me something on my on journey to conquering the Old One, including these players (In no particular order):
- Theoran
- Who
- Chiku
- Tylekrakora17
- FrozenFlame
- JoXe
- OliverSN
- Nienta
- Xyss
- Tigi
- HeroLand
- Atlas
- Teinelai
- Solarwind/Kauszyth
- DeanWHUFC
- Sunseeds
- Frostymart
- Vivi
- DDMike
- Verkty
- Kobra
- Invalid/JContentDeletedS
- Harv
- e55
- ym
- Muel
- RSH
- JarlH
- Aron/Magexd
- DDT
- Theoran
- Who
- Chiku
- Tylekrakora17
- FrozenFlame
- JoXe
- OliverSN
- Nienta
- Xyss
- Tigi
- HeroLand
- Atlas
- Teinelai
- Solarwind/Kauszyth
- DeanWHUFC
- Sunseeds
- Frostymart
- Vivi
- DDMike
- Verkty
- Kobra
- Invalid/JContentDeletedS
- Harv
- e55
- ym
- Muel
- RSH
- JarlH
- Aron/Magexd
- DDT
More Dungeon Defenders guides
- Dungeon Defenders 100% Solo Walkthrough★ 5 (564)27k views1.1k ♥87 minUpdated Mar 17, 2025
- Clear the game on Nightmare!★ 5 (727)25k views1.2k ♥27 minUpdated Jun 2, 2017
- Who is the best DPS hero on Nightmare?★ 5 (333)23k views471 ♥18 minUpdated Jun 2, 2017
- Endgame Progression★ 5 (422)21k views1.1k ♥37 minUpdated Jan 26, 2022
- Building your DPS★ 5 (236)20k views563 ♥26 minUpdated Jan 21, 2018
- Chiku's 0 to Early late-game Progression Guide (Updated as of 2026)★ 5 (539)18k views1.4k ♥49 minUpdated Jun 19


This guide was created by its original author on the Steam Community. Are you the author and want it removed? Request removal.