
Overview
New to Age of Empires II Multiplayer or been away from the game for an extended period of time and new to the Definitive Edition’s Multiplayer? In this guide the subtleties and nuances of Multiplayer will laid bare.
Introduction
Greetings Furor_Teutonicus here, leader of the AOE 2 DE FavsT Clan I’m back once again this time we are focusing on how Multiplayer works in Definitive Edition.
This guide is targeted at newer players, veterans may still learn a thing or two though for example if they are transitioning from Voobly to DE.
Getting Started On Steam
How do I create a Steam account?
Using the Steam client:
- Create a new Steam account by downloading and installing the Steam application (please follow the link below to download the application):
[link] - Click the “Create a New Account…” button from the Steam login page and follow the prompts
Using the Steam website:
- Go to the following website: [link]
- Click on Join Steam
- Fill out the form and click on Create My Account
Your SteamID and Steam Account Name can not be changed, even by Steam Support staff members. Your player name can be changed at any time however, in your Steam Community settings, under “Edit my SteamID page”. Keep this in mind when creating your account. It is relatively easy to change your username that is visible to other players, but, changing the Account Name is not possible. Changing the name that is visible to other players requires editing your profile which is pretty simple process.
Once you have installed the Steam application, you will need to login to the Steam account you have added (or will add) your game to. Your game is tied to this Steam account and cannot be re-registered to a different account.
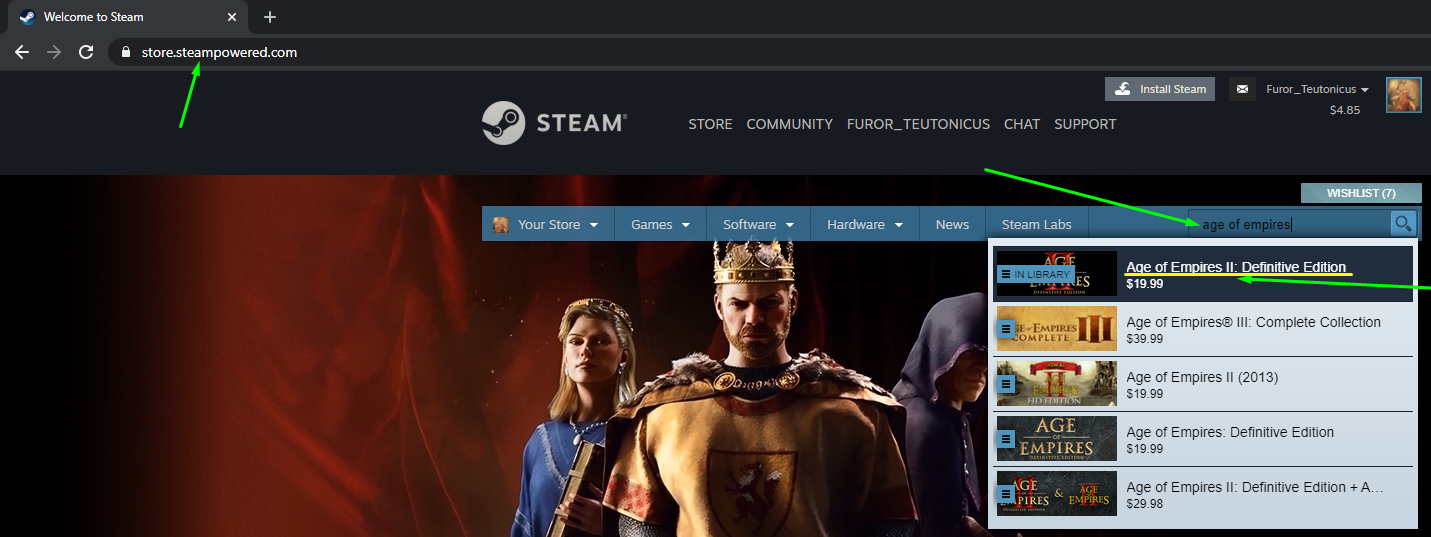
Next, we want go to the steam website or load the Steam app and find Age of Empires II Definitive Edition.

After we have purchased the game the next step is to install it.

Clicking Library in the Steam application will bring you to a listing of all games that have been registered to this Steam account. Double click any of these titles to install and run the game.
You can start the game from the Steam application.

You can also start the game from the desktop via shortcut.

How to Use Steam’s Friends List
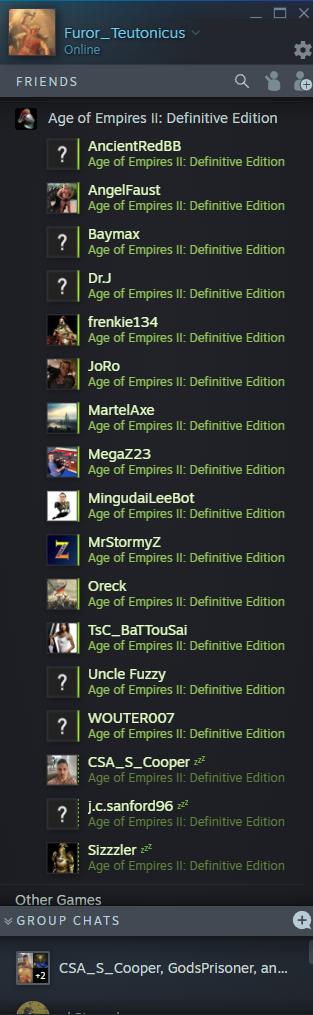
The Friends list is important since there is no way to add people to a Friends list in game, you will be relying on Steam primarily to keep track of the people you play with if you would like to stay in communication with them to arrange future games easier.
First if you start Steam and find the Friends list is currently not visible, let’s cover how to bring up the Friends list.

Click show hidden icons, right click the Steam icon, then click Friends to bring up the Friends list.
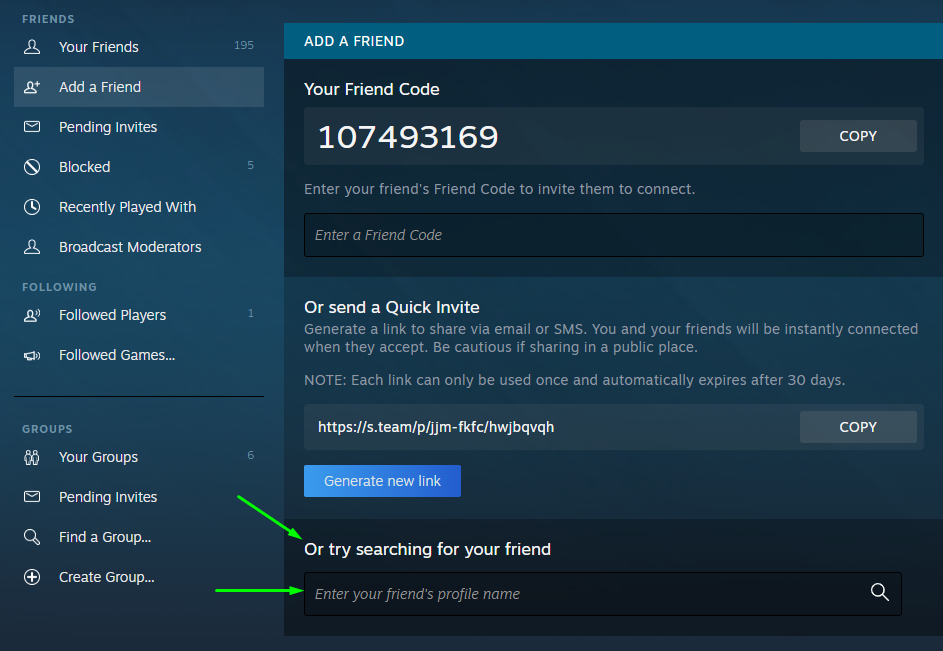
For people to add you to their Friends list you will need to know how to access your Steam Friend Code. At the top right hand corner of your Steam Friends list click “Add a friend.”

After doing this you will now have access to your Steam Friend Code, you can click the “COPY” button if you wish to copy and paste it for easier sharing. Pressing the CTRL key with the letter V, CTRL+V will paste the code into any chat box if you have clicked “COPY”

With your Steam Friend Code a person is able to send you a Friend Request, which will add both of you to each other’s Friends lists if you accept their request. You can also do the same if you have their Steam Friend Code and they accept your request.
To accept a Friend Request do the following.
Click on the incoming request notification.

Make sure to correctly click to Accept and Confirm the request if you want to become Friends on Steam.


Make sure you have clicked the orange silhouette to return to your Friends list when you have completed reviewing your notifications.
If you have received a Steam Friend Code and would like to add that person to your Friends list by sending them a request, enter the code in the field pictured below.

Click “Send Invite”

If the invite was sent and received you will see green text saying so appear underneath.

Now that you have your first friend perhaps try sending them a message by either double clicking their name or right clicking and selecting send message.

In the field that pops up you are able to type to them, press enter to send your message when it is ready to be sent.

Alternatively if you do not have a player’s Steam Friend Code you can try searching for them with their username.
This often brings back multiple results.

Most players have their most recent games played on their profiles for the public to view. Click on a players profile icon.

Scroll down through their profile and you can see their play history, this often helps with identifying if you have found the right profile.

If you believe you want to add this person to your Friends list click “Add Friend” on their profile.

Multiplayer Lobby Browser
Once in game with a computer that currently has access to the internet, from the Main Menu screen click the red and black shield to begin Multiplayer.

At the top of the screen we want to click Lobby Browser. If no games are showing up try clicking Refresh, also if you are not joining a game that a friend has setup with a password, lets click password until there is an X so that we don’t see pass worded games in the browser.

Once the list has loaded, I recommend clicking Location so the lobbies are sorted into what map each lobby has picked. This way you can easily find lobbies with the map you would like to play.

The Players column shows how many players are currently in the lobby on the left number and the right number is the rooms maximum capacity. So if a lobby is 1/6 it currently only has one player in the lobby. If it is 6/6 the Lobby is currently full.

When you find a lobby you would like to join, double click the lobby or click the “Join Lobby” button.

Once inside there are some points of interest highlighted in the images below. You can click the image to make them larger.


Creating a Lobby
Go to the Lobby Browser, select “Create Lobby”

When creating your lobby there are a few things to decide, reminder you can clock these screenshots to enlarge them.
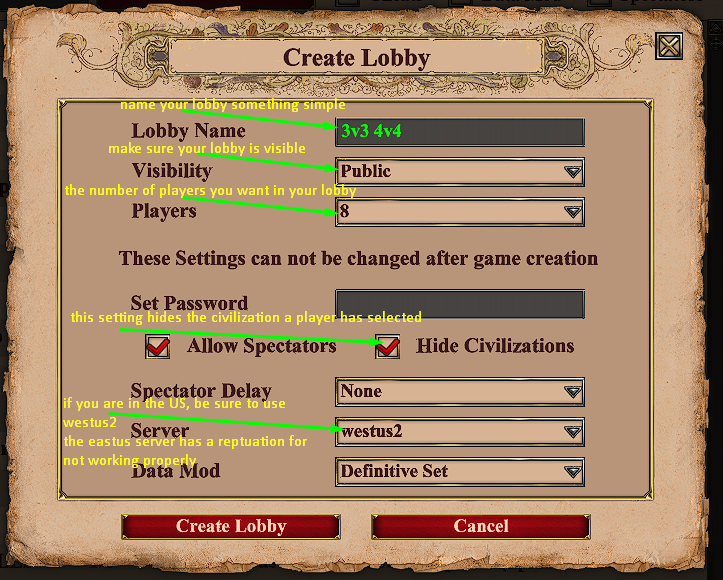

Clicking on the map you have selected will bring up a list of maps to select from.

Normal game speed is the usual game speed for most modes. Normal visibility (Reveal Map) is correct for most maps, Black Forest is usually played on Explored visibility.
If Standard is the victory condition selected Relic & Wonder victories are possible, conquest removes this from the equation and is exactly how it sounds, defeat your enemy to win.
If someone is on your Friends List you can invite them to your lobby by right clicking their name on the Steam Friends list.

You can also join their lobby this way, and it is an alternative way to start the game application.
Players with the Xbox symbol in front of their name purchased their copy of the game from the Microsoft store. You must invite these Microsoft players in game.

Steam players may be invited either in game or by using Steam Friends list.
If you are forming a party for a ranked game, you will need to invite the players for your party in game like you would if they were an Xbox player, using the “Invite to Party” button.
Microsoft and Steam owners can play in lobbies together.
Queuing for Ranked
Ranked games can be more challenging than lobby games sometimes. A great advantage to ranked games is the queue though which will automatically match you with opponents, after about 10 games the matchmaking system should have a better idea of your skill level and match you against opponents of similar skill level.
The screenshots below will walk you through the Ranked User Interface, click on a screenshot to enlarge it.
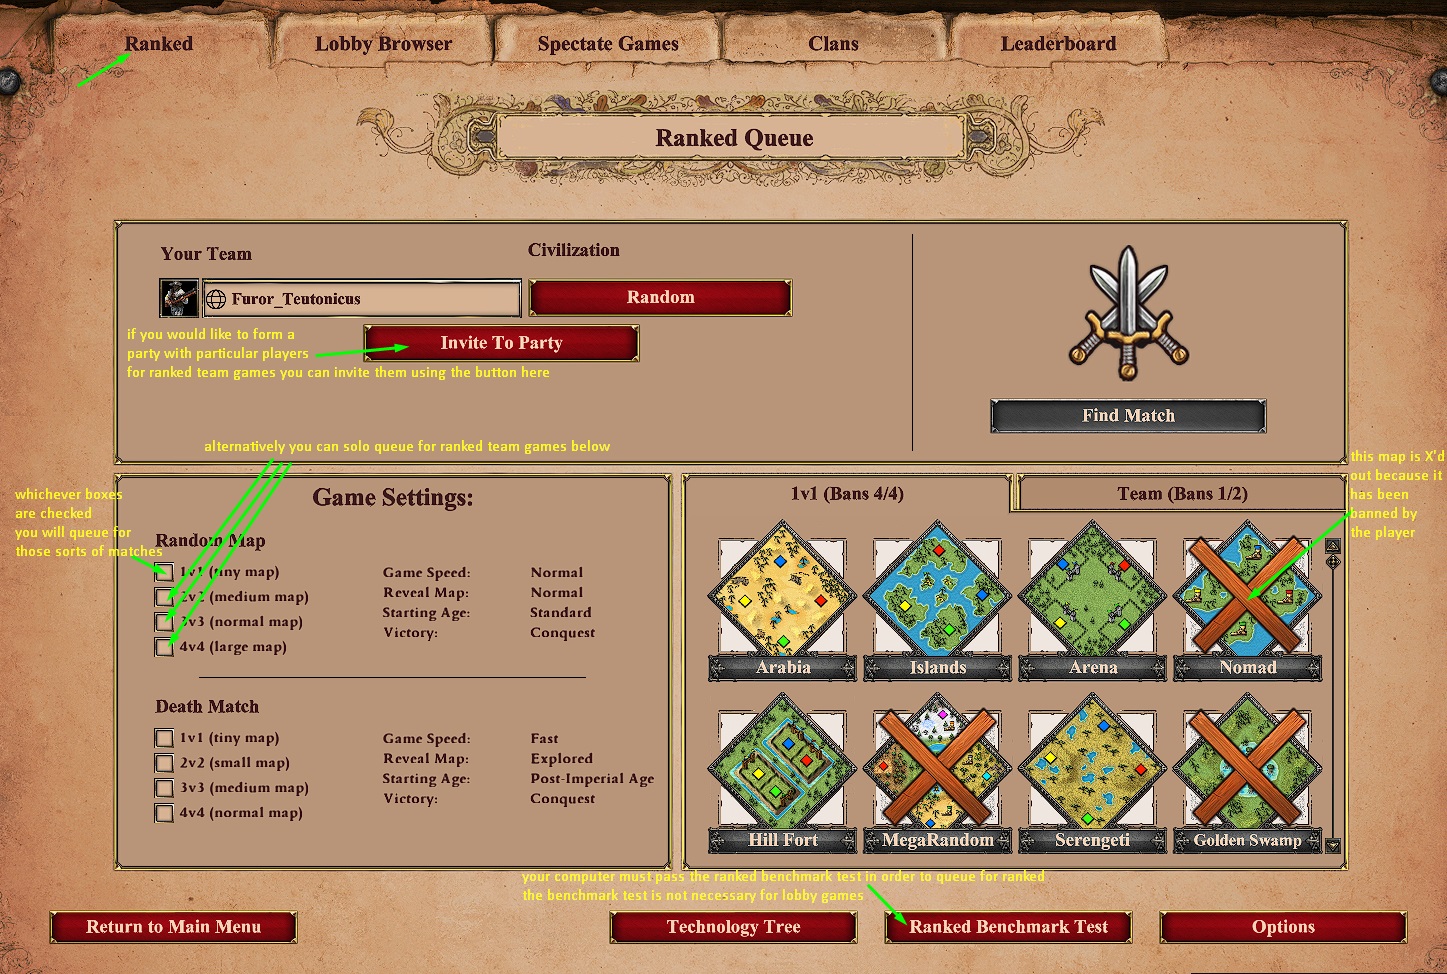

Clicking “Find Match” joins you in the queue to find a match.


When playing Ranked team games, Team Positions is always selected as the default setting.
Your color will determine your position on the map. The Pocket players are the allies furthest away from the enemy team in 3v3 and 4v4s. In 2v2 there is no Pocket player, both players are Flanks.
Your team will be either Even or Odd colors/numbers.
Odd
- The Flank positions for Odd are 1 & 7.
- The Pocket positions for odd are 3 & 5.
Even
- The Flank positions for Even are 2 & 8.
- The Pocket positions for Even are 4 & 6.
These positions are the same for lobby games *IF* Team Positions is selected.
One other note, when in a party and doing ranked, make sure the counter is going for everyone. Sometimes the counter is bugged and not working for every player. Simply ask them after you have joined the queue if they see the timer running.
Improving Your Gameplay For Multiplayer
Multiplayer is a difficult format you will need to practice and learn more about the game if you wish to win multiplayer games. Below are some various methods for beginning to improve your skill level for multiplayer games.
The Art of War is a series of tutorials that test your game knowledge while also teaching you the necessary skills to be successful in multiplayer settings.
Access the Art of War tutorials from the Main Menu.

Select the axe you would like to sharpen.

The Interactive Build Orders mod helps players learn standard build orders for multiplayer games.
Go to Mods on the Main Menu screen.
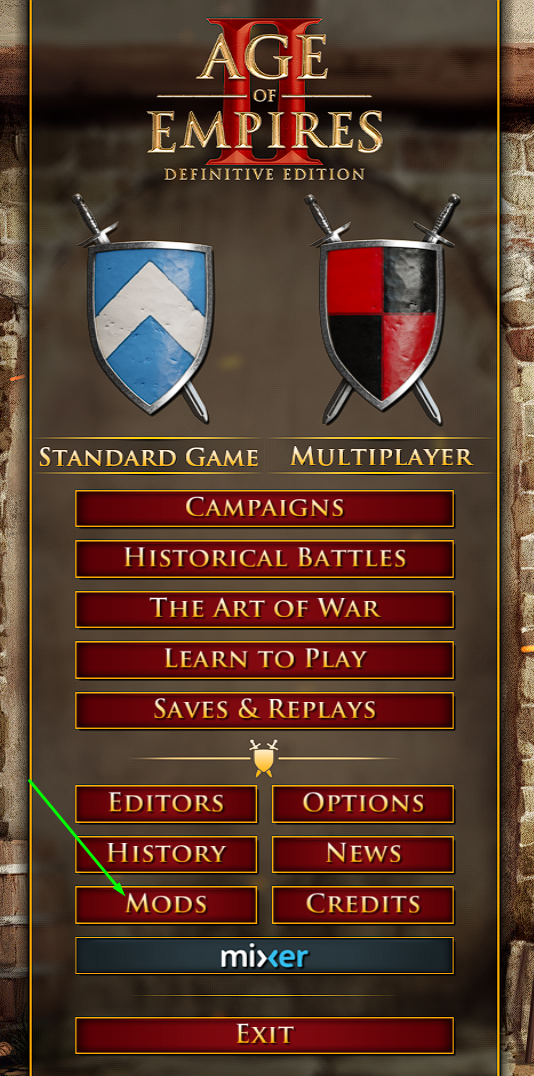
Go to Browse Mods, in the search field type “interactive” no quotes. Click on the Interactive Build Order Guide to select it. Then at the bottom of your screen click subscribe, this will download the mod to your computer.


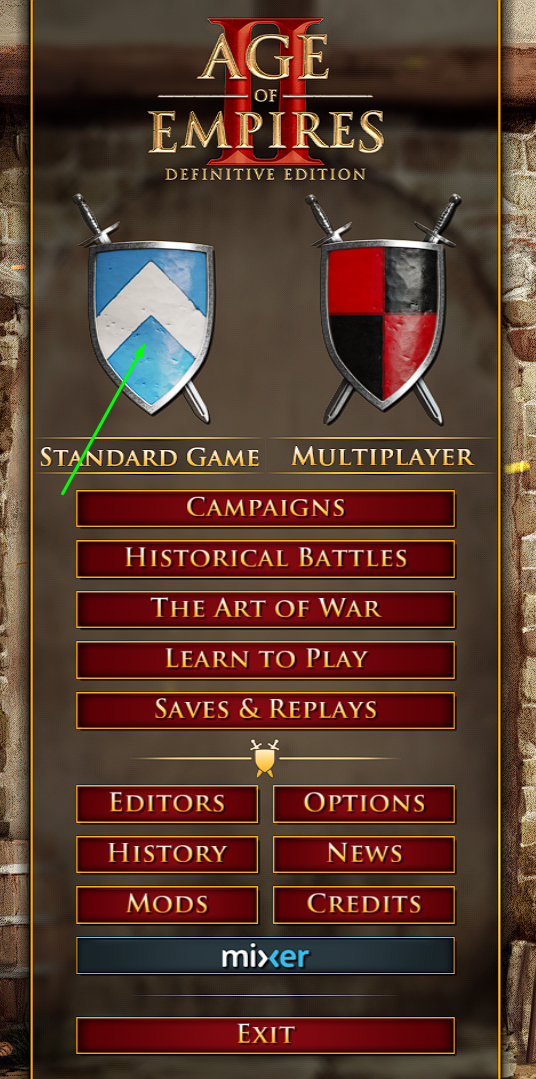
Once the mod has finished Downloading go back to the Main Menu Screen and select Standard Game.
In the upper right hand corner click on the Game Mode drop down menu and change the game mode to Custom Scenario.

Once you have selected Custom Scenario as the Game Mode, a new screen will appear.
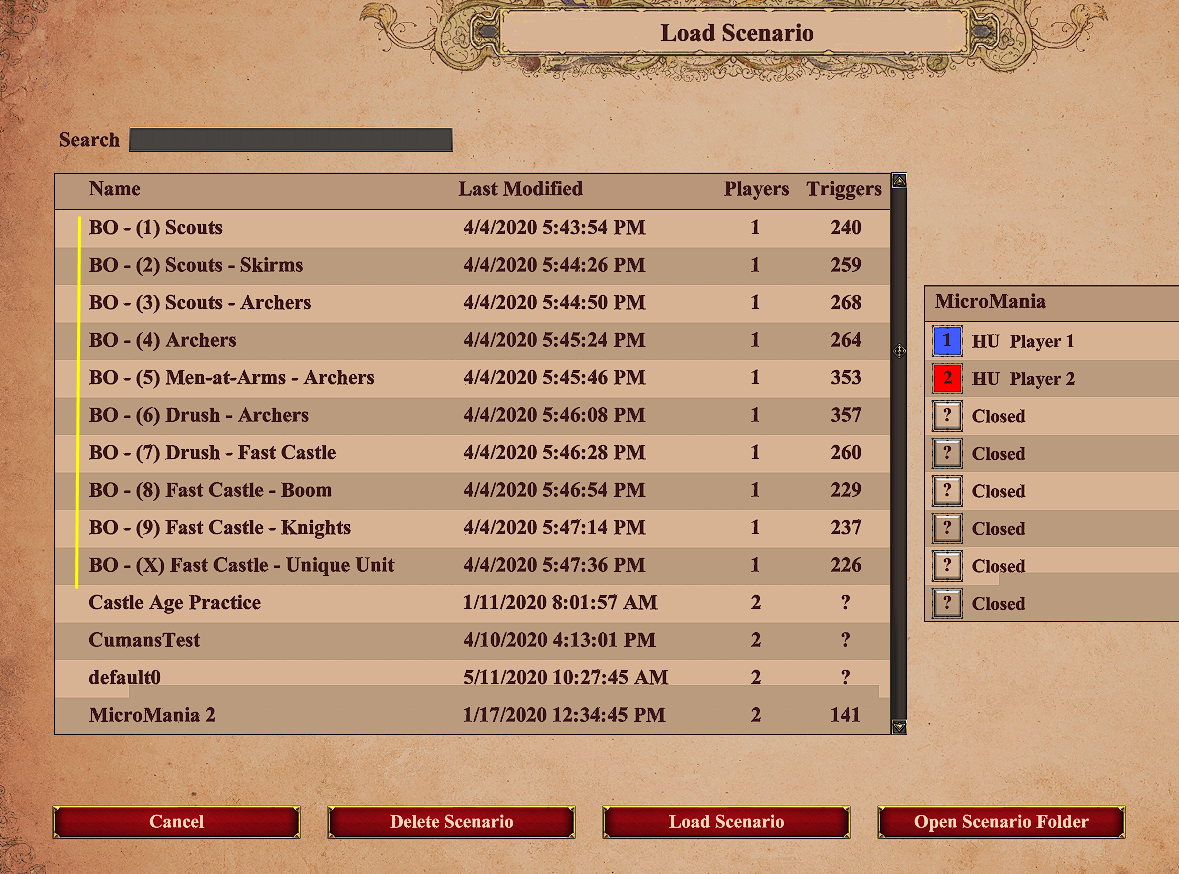
Select from the options whichever Build Order you would like to practice and click “Load Scenario” at the bottom of the screen or simply double click your desired Build Order.

Now all that is left for you to do is to press “Start Game” and then follow the on screen instructions, be sure to have your sound on as the instructions are not only visual but audible as well.

Learning hotkeys are also a crucial part to improving your skill level in multiplayer, there are various hotkey trainer mods you can search for as well, try searching for hotkey trainer in the aforementioned “Browse Mods” section.
How to Join a Clan
Clans in Age of Empires II Definitive Edition come in various shapes and sizes. Some simply exist for their Clan tag, and others such as my own play regularly with one another in team games.
To view the Clans tab you will go to Multiplayer.
Then select the Clans tab and click Clan Browser at the bottom of the screen.

You can try searching for a Clan or simply browse once it finishes loading.

Underneath “Join Clan” there is a button to join the clan, if that clan is private you will need an invite in order to join the clan.

When in a lobby with others your Clan tag is visible and so are others, simply hover over the player selected Icon and their Clan tag and ranking information will appear in the lower right hand corner.

Selecting a Player Icon
A sign that a player is probably relatively new is if their player Icon has not been changed from the default Icon. The default player Icon is a Villager. To change your Player Icon go to the Main Menu Screen.
Click on your Icon in the upper right hand corner of the sceen.

A screen will then load and you can scroll through the various Icons you have available, if you would like to know how to earn access to an Icon simply click on it. When you have your desired Icon selected, click “Select Icon”

More Guides by This Author
[link] [link] [link] [link] [link]Conclusion
If you have any questions leave a comment.