Overview
The First guide to explain how to create a Discord Bot with “Discord Bot Maker”. This guide is updated weekly. Find it useful, informative or useless, comment below!This guide will include information from the YouTube Tutorial series released by Discord Bot Maker. It will also include links to the relevent videos and in some cases external links. Please note that this guide is aimed at complete beginners, and will be updated weekly as I build my latest bots until believed to be comprehensive enough to work with all the features.This guide is still Guide Version: 0.1, this means its not complete or is a work in progress. Please be supportive while we finish writting this guide.
—- Introduction —-
The original creator, tgtgamer has been offline for a long period of time since writting this. He hopes to continue writting once he has caught up with the updates. We apologise for any inconsistencies there may be
Discord Bot Maker – What is it?
Discord Bot maker is a application which allows you to build bots without having to use a huge amount of code. This bot building software is aimed at less experienced users who want a bot which they can customise without the flashy features.
A lot of what Discord Bot Maker can do is simple, however with a bit of coding knowledge and some simple scripts, you can create a sufficticated bot for any perpose.
Help & Support?
Want more 1 to 1 support or help? You can join the following discords to get support.
Official Discord Bot Maker Discord:
[link] • This is the official DBM discord where you can find all the dev’s and support teams. Official -=WaSe=-™ Community Discord:
[link] • This is my Official Discord, You can find me & my team on here 90% of the time. Fastest Support will be availible from here.
DBM Upcoming Updates
This lists the current upcoming updates according to the official discord.
Current Priorities (in order in which they intend to complete them)
Complete Documentation (I’m want to help on this xD)
Fix more bugs
Implement more events
Implement confirmed actions
Implement confirmed editor updates
Implement music bot update
Future Actions to Implement
• Unban Member
• Find Server
• Check Member Permissions
• Check If Member Has Role
• Jump to Action
• Change Role Permissions
• Restart Bot
• Call Event/Command
• Store Time Info
• Set Member Voice Channel
• Get Multiple Parameters
Future Editor Updates
• Add ability to get developer’s ID to use for “Bot Owner Only” restriction
• Add ability to set bot shards
• Auto-refresh bot on save option
• Ability to disable case-sensitivity for commands
• Clone actions
Long Term Updates
• Rework of image editing system to allow for more dynamic image manipulation; use common font type and define font size within action itself
• Ability to have bot join voice channel, play local audio, and stream audio from internet sources including YouTube. aka.”Music Bot Update”
Prerequisite
Discord Developers Application
To use discord bot creator, your going to need to this webpage and setup a bot.
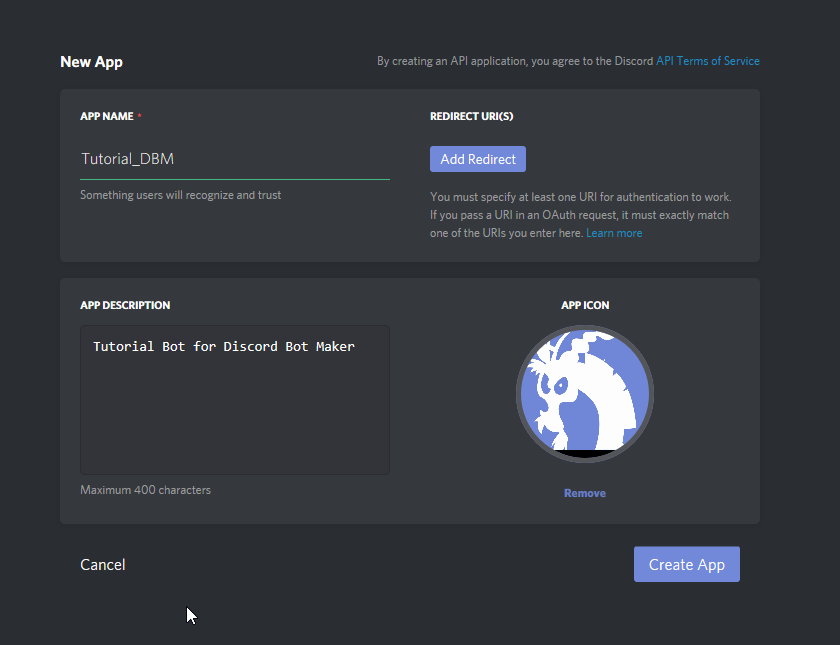
App Name
The app name is only used when inviting the bot to servers, my tutorial bot is named “Tutorial_DBM” (DBM = Discord Bot Maker).
App Description
This is additional information about the bot, which you can choose to add if you know what its going to do.
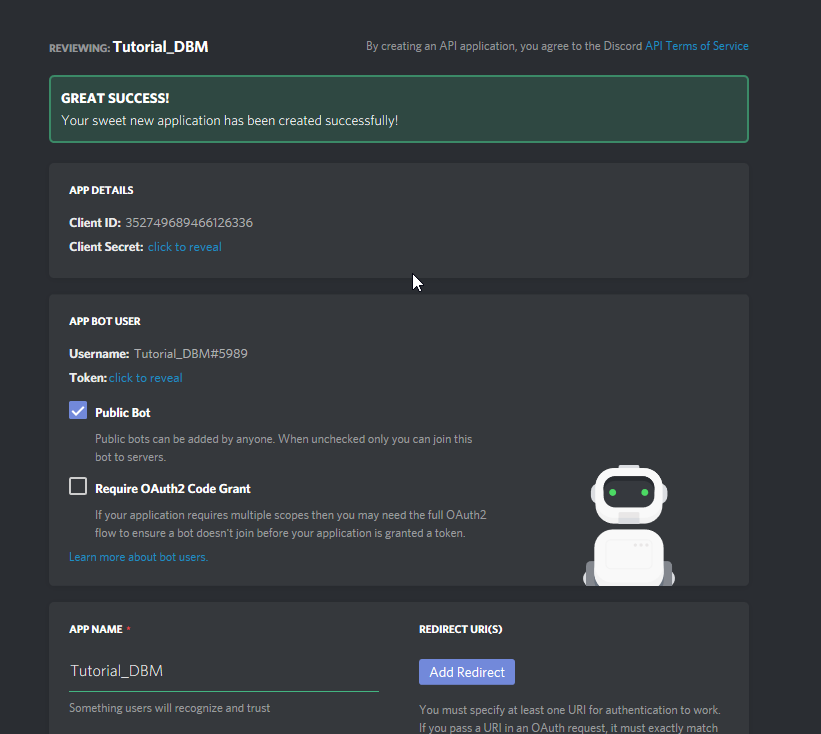
On the next your going to see some information, simply hit the “Create Bot User“. This will generate a bot for your application, which will contain the information we need.
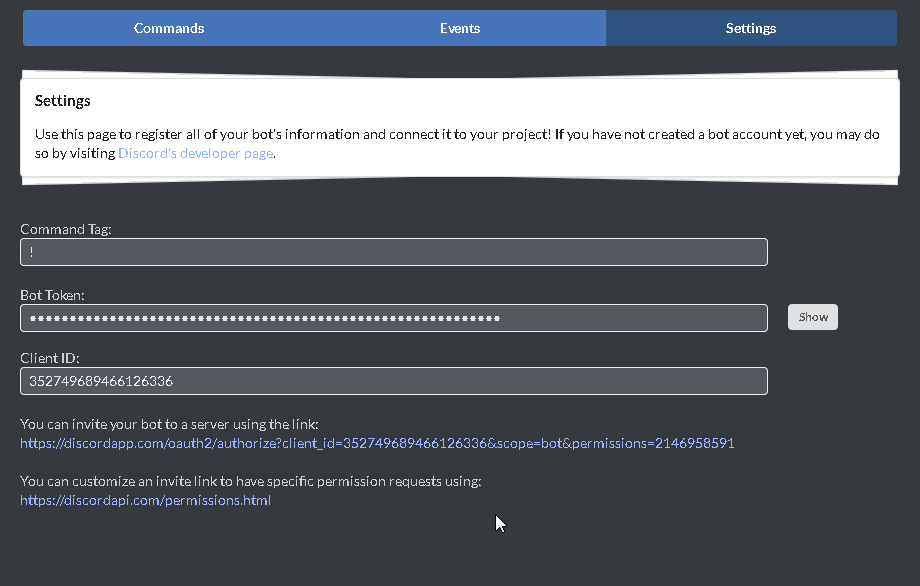
Linking bot account with Discord Bot Maker
To link the bot to discord Bot maker, your going to need to head over to the settings page. Its going to require the “Bot Token” and “client ID” from the developers website.
—- Part 1 — Creating your first bot —-
Setting up the bot
Ok, for this tutorial, We are going to setup a bot from scratch. However when you setup your bots, it is recommended that you choose one of the default templates.
We’ve named our bot “Tutorial Bot” and saved it on our desktop. You may choose to save it elsewhere, but I believe that the desktop is the best location for any code your planning on writing.
Creating your first event
On Server Join Event
Now this is where we begin to have fun with the bot. We are going to setup a on Server Join Event.
So basically, when this bot joins a server, we want it to message us something to confirm the bot is working. Then we know if this message doesnt show, we have forgotten to do something.
Setting up Event
Firstly click on the “Events” tab in DBM.
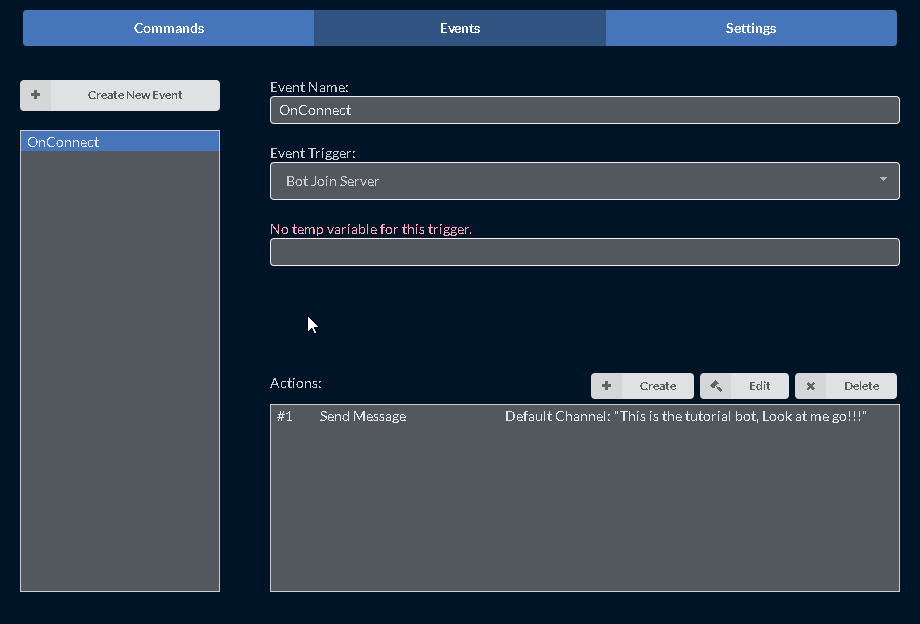
We’re going to create a new event called “OnConnect”, this is going to tell the bot what to call this event, we want it to be something quick for us to remember and recognise when we edit the bot later.
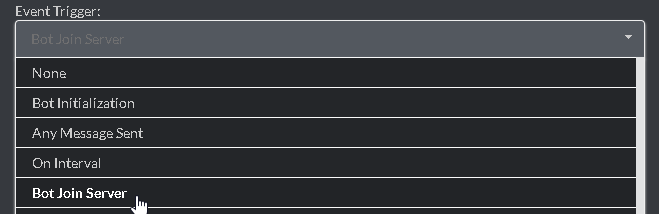
You need to select “bot join Server” from the Event Trigger list. This is going to tell the bot that when it connects to the server, it needs to do the following actions.
Adding Actions
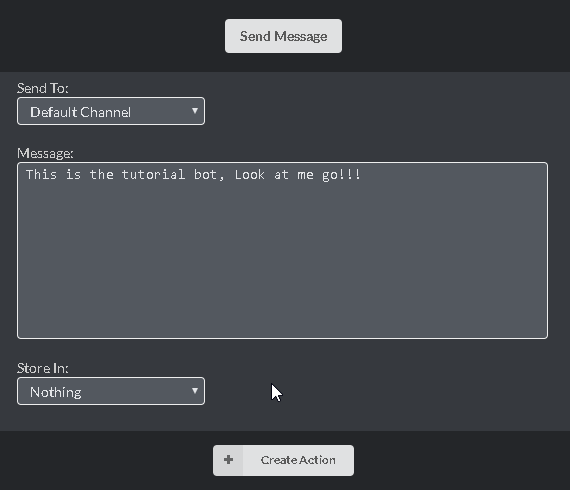
So now we are going to add a action. By defualt this is “Send Message”, so all we need to do is define the channel as the Default Channel, and insert a message.
Launching & Connecting to your discord Server
So before we can join a server, we need to launch the bot. This is a simple process, Simply here to the “project” tab and select “run project”.
Once the project has started up, your window will change colour to a blue background as seen below, If this does not happen instantly, wait a moment. It will start up eventually.
Connecting the bot to your server you will need to go back to your settings. Below the settings will be some links, the first one is a invite link which is preset to give the bot all permissions. The second is a calculator which allows you to setup custom links. (See custom invite links section for more info)
Click on the default link, and invite it to your server. You should get the message from the bot in discord.
—- Part 2 — Setting up Simple Commands —-
Moderation Commands
Kick Command
Raw Code:
{“name”:”Kick”,”permissions”:”KICK_MEMBERS”,”restriction”:”1″,”actions”:[{“condition”:”1″,”comparison”:”0″,”value”:”1″,”iftrue”:”3″,”iftrueVal”:”2″,”iffalse”:”0″,”iffalseVal”:””,”name”:”Check Parameters”},{“channel”:”0″,”varName”:””,”message”:”“`nPlease mention one user in order to kick them!n!Kick [@user] [reason]n“`”,”storage”:”0″,”varName2″:””,”name”:”Send Message”},{“name”:”End Action Sequence”},{“info”:”1″,”infoIndex”:”2″,”storage”:”1″,”varName”:”reason”,”name”:”Store Command Params”},{“member”:”0″,”varName”:””,”reason”:”${tempVars(“reason”) || “”}”,”name”:”Kick Member”}]}
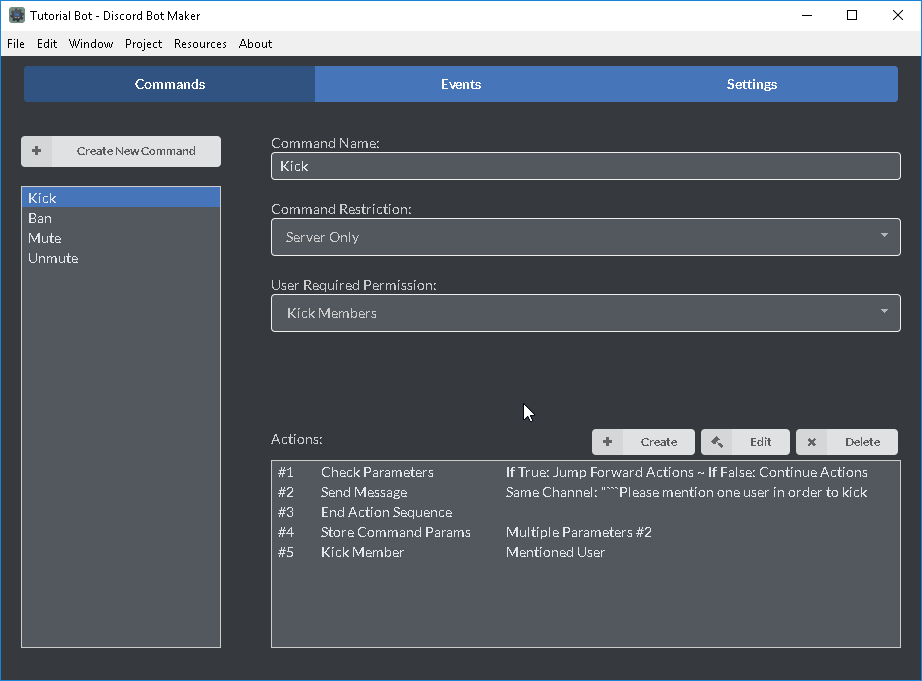
To create a kick command, firstly hit the “Create new Command” button.
Now in the command name put “kick”
You’ll want to restrict this to just the server, so in command restriction choose “Server only”
Next, to stop users abusing this command, we will need to set what permissions the user needs, I would set it to “Kick Members”
Actions
Firstly we want to check the parameters of the command, to make sure that you have at least one person mentioned.
We want to configure it to check that there is only one person mentioned. So we are going to choose under condition “number of Members Mentioned are” and set the comparison to “=” with the number at “1”.
Leave the other two fields for now as we haven’t got any more actions.
The next step is to create a message to send when the command fails. For this, we are going to use the message:
“` Please mention one user in order to kick them! !Kick [@user] [reason] “`
The next Step is to add a End Action Sequence. This can be found in the “other Stuff” panel. This is going to tell the bot that that part of the sequence has finished and doesnt need to be continued anymore.
To get the “Reason”, your going to need to store your command params. Once again this can be found in the “other Stuff” panel. We want it to store all the information after the username has been kicked. So we are going to choose;
Source Info: Multiple Parameters Starting from parameter number: 2 Store in: Temp Variable Variable Name: reason
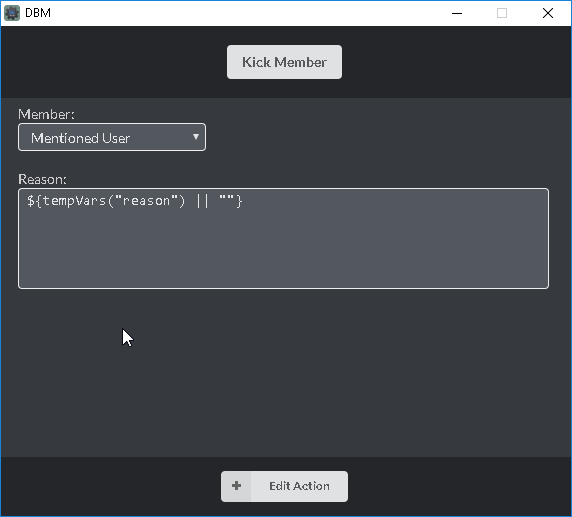
The final section of this command is to action the kick. So we are going to choose “kick Member” from the Member control Panel.
Within the kick member options, we are going to choose, mentioned user as the Member, and the reason will be set as
${tempVars(“reason”) || “”}
Ban Command
Raw Code:
{“name”:”Ban”,”permissions”:”BAN_MEMBERS”,”restriction”:”1″,”actions”:[{“condition”:”1″,”comparison”:”0″,”value”:”1″,”iftrue”:”3″,”iftrueVal”:”2″,”iffalse”:”0″,”iffalseVal”:””,”name”:”Check Parameters”},{“channel”:”0″,”varName”:””,”message”:”“`nPlease mention one user in order to ban them!n!Ban [@user] [reason]n“`”,”storage”:”0″,”varName2″:””,”name”:”Send Message”},{“name”:”End Action Sequence”},{“info”:”1″,”infoIndex”:”2″,”storage”:”1″,”varName”:”reason”,”name”:”Store Command Params”},{“member”:”0″,”varName”:””,”reason”:”${tempVars(“reason”) || “”}”,”name”:”Ban Member”}]}
To create a Ban command, firstly hit the “Create new Command” button.
Now in the command name put “ban”
You’ll want to restrict this to just the server, so in command restriction choose “Server only”
Next, to stop users abusing this command, we will need to set what permissions the user needs, I would set it to “ban Members”
Actions
Firstly we want to check the parameters of the command, to make sure that you have at least one person mentioned.
We want to configure it to check that there is only one person mentioned. So we are going to choose under condition “number of Members Mentioned are” and set the comparison to “=” with the number at “1”.
Leave the other two fields for now as we haven’t got any more actions.
The next step is to create a message to send when the command fails. For this, we are going to use the message:
“` Please mention one user in order to ban them! !ban [@user] [reason] “`
The next Step is to add a End Action Sequence. This can be found in the “other Stuff” panel. This is going to tell the bot that that part of the sequence has finished and doesnt need to be continued anymore.
To get the “Reason”, your going to need to store your command params. Once again this can be found in the “other Stuff” panel. We want it to store all the information after the username has been kicked. So we are going to choose;
Source Info: Multiple Parameters Starting from parameter number: 2 Store in: Temp Variable Variable Name: reason
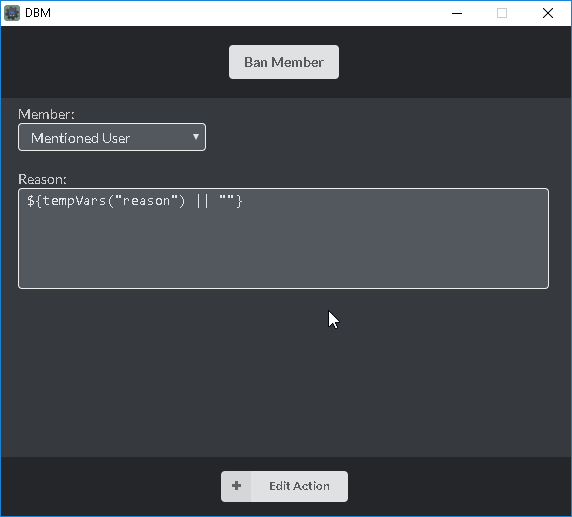
The final section of this command is to action the ban. So we are going to choose “ban Member” from the Member control Panel.
Within the ban member options, we are going to choose, mentioned user as the Member, and the reason will be set as
${tempVars(“reason”) || “”}
Mute Command
Raw Code:
{“name”:”Mute”,”permissions”:”MUTE_MEMBERS”,”restriction”:”1″,”actions”:[{“condition”:”1″,”comparison”:”0″,”value”:”1″,”iftrue”:”3″,”iftrueVal”:”2″,”iffalse”:”0″,”iffalseVal”:””,”name”:”Check Parameters”},{“channel”:”0″,”varName”:””,”message”:”“`nPlease mention one user in order to mute them!n!Mute [@user]n“`”,”storage”:”0″,”varName2″:””,”name”:”Send Message”},{“name”:”End Action Sequence”},{“member”:”0″,”varName”:””,”mute”:”0″,”name”:”Set Member Mute”}]}
Tutorial To Be Written
Unmute Command
Raw Code:
{“name”:”Unmute”,”permissions”:”MUTE_MEMBERS”,”restriction”:”1″,”actions”:[{“condition”:”1″,”comparison”:”0″,”value”:”1″,”iftrue”:”3″,”iftrueVal”:”2″,”iffalse”:”0″,”iffalseVal”:””,”name”:”Check Parameters”},{“channel”:”0″,”varName”:””,”message”:”“`nPlease mention one user in order to unmute them!n!Unmute [@user]n“`”,”storage”:”0″,”varName2″:””,”name”:”Send Message”},{“name”:”End Action Sequence”},{“member”:”0″,”varName”:””,”mute”:”1″,”name”:”Set Member Mute”}]}
Tutorial To Be Written
—- Part 3 — Customise the way your bot looks —-
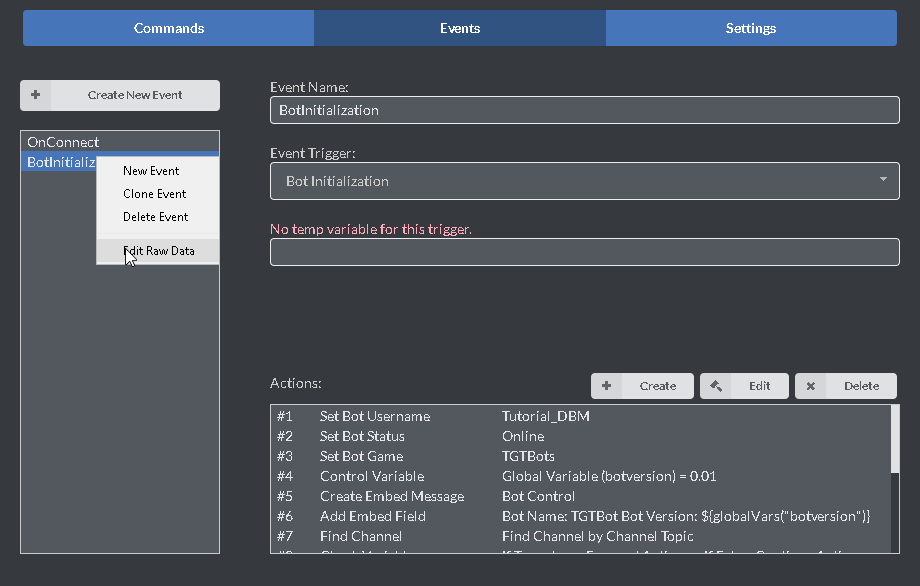
Bot Initialization
This script teaches the bot to do some awesome little things when it launches. I normally have it launch and set the bot profile status, game and username. My bots also create some channels if they don’t exist, like #bot–log.
Raw Code:
{“name”:”BotInitialization”,”temp”:””,”event-type”:”1″,”actions”:[{“username”:”Tutorial_DBM”,”name”:”Set Bot Username”},{“status”:”0″,”name”:”Set Bot Status”},{“gameName”:”TGTBots”,”gameLink”:””,”name”:”Set Bot Game”},{“storage”:”3″,”varName”:”botversion”,”changeType”:”0″,”value”:”0.01″,”name”:”Control Variable”},{“title”:”Bot Control”,”author”:”TGTGaming Bots”,”color”:”#F3FF00″,”timestamp”:”true”,”url”:””,”authorIcon”:””,”imageUrl”:””,”thumbUrl”:””,”storage”:”3″,”varName”:”botstartingembed”,”name”:”Create Embed Message”},{“storage”:”3″,”varName”:”botstartingembed”,”fieldName”:”Bot Information”,”message”:”Bot Name: TGTBotnBot Version: ${globalVars(“botversion”)}nBot Owner: TGTGamer#4947″,”inline”:”0″,”name”:”Add Embed Field”},{“info”:”2″,”find”:”The Bot Log”,”storage”:”2″,”varName”:”logchannelID”,”name”:”Find Channel”},{“storage”:”2″,”varName”:”logchannelID”,”comparison”:”0″,”value”:””,”iftrue”:”3″,”iftrueVal”:”2″,”iffalse”:”0″,”iffalseVal”:””,”name”:”Check Variable”},{“channelName”:”bot–log”,”topic”:”The Bot Log”,”position”:””,”storage”:”0″,”varName”:””,”name”:”Create Text Channel”},{“info”:”2″,”find”:”The Bot Log”,”storage”:”2″,”varName”:”logchannelID”,”name”:”Find Channel”},{“storage”:”3″,”varName”:”botstartingembed”,”fieldName”:”Specific Server Information”,”message”:”Log Channel: ${serverVars(“logchannelID”)}”,”inline”:”0″,”name”:”Add Embed Field”},{“storage”:”3″,”varName”:”botstartingembed”,”channel”:”6″,”varName2″:”logchannelID”,”name”:”Send Embed Message”}]}
Tutorial To Be Written
Custom invite link
Tutorial To Be Written
—- Advanced information — Feature Documentation —-
Please note, to use the information which follows, your need to understand how to use RAW DATA.
To use RAW DATA simple right click on the command or event and select “edit raw data” from the menu
Bot Client Control
Get Bot as Member
What does this do?
How to use it?
Set Bot AFK Status
What does this do?
How to use it?
Set Bot Avatar
What does this do?
This allows you to set your bots avatar from a URL. This saves you from having to go to the discord dev site to change your avatar.
How to use it?
You will need to use this in connection with the Store Command Params or Predefined Variables. An example use of this in a command would be !avatar urltoimage/.
Example RAW code:
{“name”:”avatar”,”permissions”:”ADMINISTRATOR”,”restriction”:”1″,”actions”:[{“info”:”0″,”infoIndex”:”1″,”storage”:”1″,”varName”:”test1″,”name”:”Store Command Params”},{“storage”:”1″,”varName”:”test1″,”name”:”Set Bot Avatar”}]}
Set Bot Game
What does this do?
This allows you to set a custom “playing” status. A lot of bots will use this space to advertise their websites or command prefix’s.
How to use it?
Example RAW code:
Set Bot Nickname
What does this do?
This allows you to change a bots nickname with a command.
How to use it?
prefix.setnickname [NICKNAME.TO.SET]
Example: !setnickname DBM
Example RAW code:
{“name”:”setnickname”,”permissions”:”NONE”,”restriction”:”2″,”actions”:[{“info”:”1″,”infoIndex”:”1″,”storage”:”1″,”varName”:”nickname.to.set”,”name”:”Store Command
Params”},{“server”:”0″,”varName”:””,”nickname”:”${tempVars(/”nickname.to.set/”)}”,”name”:”Set Bot Nickname”}]}
Set Bot Status
What does this do?
How to use it?
Example RAW code:
Set Bot Username
What does this do?
How to use it?
Example RAW code:
—- Advanced information — Feature Releases —-
Awesome Commands — Raw Data
This section will list commands the community has created as RAW code. This is the quickest way to add functions to your bot quickly.
Please read the full title and all information attached to the commands as they may require multiple steps.
Kick Command – Simple
Raw Code:
{“name”:”Kick”,”permissions”:”KICK_MEMBERS”,”restriction”:”1″,”actions”:[{“condition”:”1″,”comparison”:”0″,”value”:”1″,”iftrue”:”3″,”iftrueVal”:”2″,”iffalse”:”0″,”iffalseVal”:””,”name”:”Check Parameters”},{“channel”:”0″,”varName”:””,”message”:”“`nPlease mention one user in order to kick them!n!Kick [@user] [reason]n“`”,”storage”:”0″,”varName2″:””,”name”:”Send Message”},{“name”:”End Action Sequence”},{“info”:”1″,”infoIndex”:”2″,”storage”:”1″,”varName”:”reason”,”name”:”Store Command Params”},{“member”:”0″,”varName”:””,”reason”:”${tempVars(“reason”) || “”}”,”name”:”Kick Member”}]}
Ban Command – Simple
Raw Code:
{“name”:”Ban”,”permissions”:”BAN_MEMBERS”,”restriction”:”1″,”actions”:[{“condition”:”1″,”comparison”:”0″,”value”:”1″,”iftrue”:”3″,”iftrueVal”:”2″,”iffalse”:”0″,”iffalseVal”:””,”name”:”Check Parameters”},{“channel”:”0″,”varName”:””,”message”:”“`nPlease mention one user in order to ban them!n!Ban [@user] [reason]n“`”,”storage”:”0″,”varName2″:””,”name”:”Send Message”},{“name”:”End Action Sequence”},{“info”:”1″,”infoIndex”:”2″,”storage”:”1″,”varName”:”reason”,”name”:”Store Command Params”},{“member”:”0″,”varName”:””,”reason”:”${tempVars(“reason”) || “”}”,”name”:”Ban Member”}]}
Mute Command – Simple
Raw Code:
{“name”:”Mute”,”permissions”:”MUTE_MEMBERS”,”restriction”:”1″,”actions”:[{“condition”:”1″,”comparison”:”0″,”value”:”1″,”iftrue”:”3″,”iftrueVal”:”2″,”iffalse”:”0″,”iffalseVal”:””,”name”:”Check Parameters”},{“channel”:”0″,”varName”:””,”message”:”“`nPlease mention one user in order to mute them!n!Mute [@user]n“`”,”storage”:”0″,”varName2″:””,”name”:”Send Message”},{“name”:”End Action Sequence”},{“member”:”0″,”varName”:””,”mute”:”0″,”name”:”Set Member Mute”}]}
Unmute Command – Simple
Raw Code:
{“name”:”Unmute”,”permissions”:”MUTE_MEMBERS”,”restriction”:”1″,”actions”:[{“condition”:”1″,”comparison”:”0″,”value”:”1″,”iftrue”:”3″,”iftrueVal”:”2″,”iffalse”:”0″,”iffalseVal”:””,”name”:”Check Parameters”},{“channel”:”0″,”varName”:””,”message”:”“`nPlease mention one user in order to unmute them!n!Unmute [@user]n“`”,”storage”:”0″,”varName2″:””,”name”:”Send Message”},{“name”:”End Action Sequence”},{“member”:”0″,”varName”:””,”mute”:”1″,”name”:”Set Member Mute”}]}
Fancy Dice Command – simple
Raw Code:
{“name”:”dice”,”permissions”:”NONE”,”restriction”:”1″,”actions”:[{“storage”:”1″,”varName”:”dice”,”min”:”1″,”max”:”6″,”name”:”Generate Random
Number”},{“title”:”Dice”,”author”:”${member}”,”color”:”#00FFF0″,”timestamp”:”false”,”url”:””,”authorIcon”:””,”imageUrl”:””,”thumbUrl”:”https://cdn.pixabay.com/photo/2016/03/31/19/19/dice-1294902_960_720.png”,”storage”:”1″,”varName”:”dice.msg”,”name”:”Create Embed Message”},{“storage”:”1″,”varName”:”dice.msg”,”message”:”You rolled ${tempVars(“dice”)}!”,”name”:”Set Embed Description”},{“storage”:”1″,”varName”:”dice.msg”,”channel”:”0″,”varName2″:””,”name”:”Send Embed Message”}]}
Awesome Events — Raw Data
This section will list commands the community has created as RAW code. This is the quickest way to add functions to your bot quickly.
Please read the full title and all information attached to the commands as they may require multiple steps.
Bot Initialization – Rename bot & Create log channels
This script will require you to change information after inputting it into DBM, Please check code before you start your bot as it may change information you don’t want changing.
{“name”:”BotInitialization”,”temp”:””,”event-type”:”1″,”actions”:[{“username”:”Tutorial_DBM”,”name”:”Set Bot Username”},{“status”:”0″,”name”:”Set Bot Status”},{“gameName”:”TGTBots”,”gameLink”:””,”name”:”Set Bot Game”},{“storage”:”3″,”varName”:”botversion”,”changeType”:”0″,”value”:”0.01″,”name”:”Control Variable”},{“title”:”Bot Control”,”author”:”TGTGaming Bots”,”color”:”#F3FF00″,”timestamp”:”true”,”url”:””,”authorIcon”:””,”imageUrl”:””,”thumbUrl”:””,”storage”:”3″,”varName”:”botstartingembed”,”name”:”Create Embed Message”},{“storage”:”3″,”varName”:”botstartingembed”,”fieldName”:”Bot Information”,”message”:”Bot Name: TGTBotnBot Version: ${globalVars(“botversion”)}nBot Owner: TGTGamer#4947″,”inline”:”0″,”name”:”Add Embed Field”},{“info”:”2″,”find”:”The Bot Log”,”storage”:”2″,”varName”:”logchannelID”,”name”:”Find Channel”},{“storage”:”2″,”varName”:”logchannelID”,”comparison”:”0″,”value”:””,”iftrue”:”3″,”iftrueVal”:”2″,”iffalse”:”0″,”iffalseVal”:””,”name”:”Check Variable”},{“channelName”:”bot–log”,”topic”:”The Bot Log”,”position”:””,”storage”:”0″,”varName”:””,”name”:”Create Text Channel”},{“info”:”2″,”find”:”The Bot Log”,”storage”:”2″,”varName”:”logchannelID”,”name”:”Find Channel”},{“storage”:”3″,”varName”:”botstartingembed”,”fieldName”:”Specific Server Information”,”message”:”Log Channel: ${serverVars(“logchannelID”)}”,”inline”:”0″,”name”:”Add Embed Field”},{“storage”:”3″,”varName”:”botstartingembed”,”channel”:”6″,”varName2″:”logchannelID”,”name”:”Send Embed Message”}]}
User Requested Scripts
TGTGamer is willing to look into building scripts and code for people who ask nicely. Please check the following list for scripts he is currently working on…
Absent Script – Requested by Scarlingg
This script creates a list & assigns a role. The role is required to keep track of people who are absent when the bot restarts.
Part 1 – adding absent users.
{“name”:”absent”,”permissions”:”NONE”,”restriction”:”1″,”actions”:[{“info”:”1″,”find”:”Absent”,”storage”:”2″,”varName”:”absentRole”,”name”:”Find Role”},{“condition”:”1″,”comparison”:”0″,”value”:”1″,”iftrue”:”0″,”iftrueVal”:””,”iffalse”:”1″,”iffalseVal”:””,”name”:”Check Parameters”},{“storage”:”2″,”varName”:”absentusers”,”addType”:”0″,”position”:””,”value”:”mentionedUser”,”name”:”Add Item to List”},{“member”:”0″,”varName2″:””,”role”:”4″,”varName”:”absentRole”,”name”:”Add Member Role”},{“title”:”Absent”,”author”:””,”color”:””,”timestamp”:”true”,”url”:””,”authorIcon”:””,”imageUrl”:””,”thumbUrl”:””,”storage”:”1″,”varName”:”absentEmbed”,”name”:”Create Embed Message”},{“storage”:”1″,”varName”:”absentEmbed”,”fieldName”:”${mentionedUser}”,”message”:”You have been marked as absent.”,”inline”:”1″,”name”:”Add Embed Field”},{“storage”:”1″,”varName”:”absentEmbed”,”channel”:”0″,”varName2″:”GiveawayChannel”,”name”:”Send Embed Message”}]}
Part 2 – Recalling Absent Users
{“name”:”listabsent”,”permissions”:”NONE”,”restriction”:”1″,”actions”:[{“list”:”8″,”varName”:”absentusers”,”start”:””,”middle”:””,”end”:”\n”,”storage”:”1″,”varName2″:”absentuserstext”,”name”:”Convert List to Text”},{“title”:””,”author”:””,”color”:””,”timestamp”:”false”,”url”:””,”authorIcon”:””,”imageUrl”:””,”thumbUrl”:””,”storage”:”1″,”varName”:”absentembed”,”name”:”Create Embed Message”},{“storage”:”1″,”varName”:”absentembed”,”fieldName”:”Absent Users”,”message”:”${tempVars(“absentuserstext”)}”,”inline”:”1″,”name”:”Add Embed Field”},{“storage”:”1″,”varName”:”absentembed”,”channel”:”0″,”varName2″:””,”name”:”Send Embed Message”}]}
Warning System
This command is too large for posting here. Please see links below
Warn Users – [link]
Warnings – [link]
Ban User – With mod Log
{ “name”: “BanUser”, “permissions”: “NONE”, “restriction”: “1”, “actions”: [ { “storage”: “0”, “varName”: “”, “name”: “Delete Message” }, { “member”: “1”, “varName”: “”, “role”: “4”, “varName2”: “Admin_role”, “iftrue”: “2”, “iftrueVal”: “7”, “iffalse”: “0”, “iffalseVal”: “”, “name”: “Check If Member has Role” }, { “channel”: “0”, “varName”: “”, “message”: “${member}, You do not have permission to do this. “, “storage”: “1”, “varName2”: “fail”, “name”: “Send Message” }, { “time”: “3”, “measurement”: “1”, “name”: “Wait” }, { “storage”: “1”, “varName”: “fail”, “name”: “Delete Message” }, { “name”: “End Action Sequence” }, { “condition”: “1”, “comparison”: “0”, “value”: “1”, “iftrue”: “0”, “iftrueVal”: “”, “iffalse”: “2”, “iffalseVal”: “14”, “name”: “Check Parameters” }, { “member”: “0”, “varName”: “”, “dataName”: “Warnings”, “defaultVal”: “0”, “storage”: “1”, “varName2”: “Total-Warns”, “name”: “Store Member Data” }, { “member”: “0”, “varName”: “”, “dataName”: “WarnReasons”, “defaultVal”: “”””, “storage”: “1”, “varName2”: “Reasons”, “name”: “Store Member Data” }, { “title”: “Banned”, “author”: “”, “color”: “#daff00”, “timestamp”: “true”, “url”: “”, “authorIcon”: “”, “imageUrl”: “”, “thumbUrl”: “”, “storage”: “1”, “varName”: “Banned-User-MSG”, “name”: “Create Embed Message” }, { “storage”: “1”, “varName”: “Banned-User-MSG”, “message”: “**${member}** has banned **${mentionedUser}**”, “name”: “Set Embed Description” }, { “storage”: “1”, “varName”: “Warnings-List-MSG”, “channel”: “0”, “varName2”: “”, “name”: “Send Embed Message” }, { “name”: “End Action Sequence” }, { “channel”: “0”, “varName”: “”, “message”: “You need to mention a member!”, “storage”: “1”, “varName2”: “failed”, “name”: “Send Message” }, { “time”: “3”, “measurement”: “1”, “name”: “Wait” }, { “storage”: “1”, “varName”: “failed”, “name”: “Delete Message” } ], “_id”: “SkOVY” }
![[Beginners guide] Creating a Bot with Discord Bot Maker for Discord Bot Maker](https://steamsolo.com/wp-content/uploads/2021/07/beginners-guide-creating-a-bot-with-discord-bot-maker-discord-bot-maker.jpg)