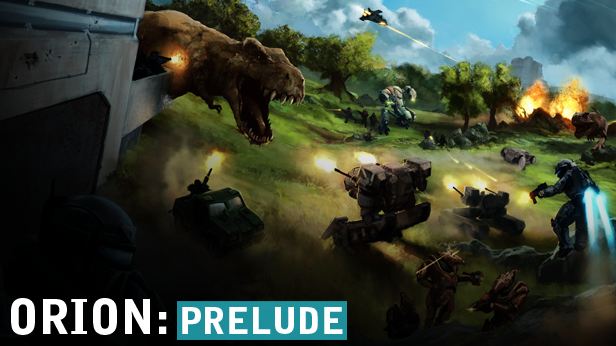
Overview
Welcome to Orion Prelude!Seeing a bunch of new players in the game, I thought of writing this guide to help them get started and enjoy this great game.
Intro
(This is not meant to be an in-depth guide: My objective is to give you a strong grasp of the game’s basics so you can play as soon as possible and let you to figure out the rest)
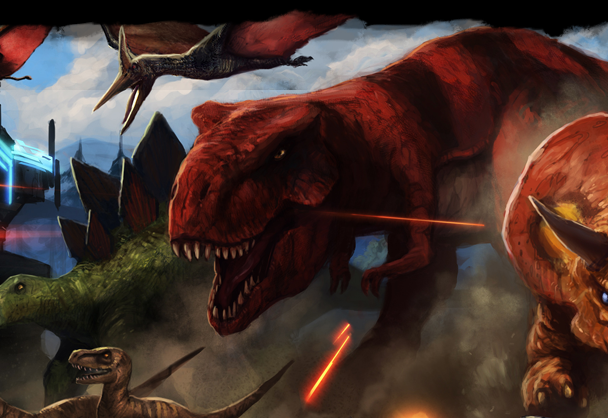
ORION: Prelude is a sci-fi, dinosaur shooter. Most of the gamemodes are all about surviving to increasing waves of enemies, with some twists here and there. There are also modes where players can fight against each other, controlling the dinos, or another survivor.
Note that this game is still being developed, and it may have bugs here and there, but this is one of the reasons why i find this game really fun to mess around with.
Through this guide we will be talking about Survival mode, being the most basic mode, and also the most played at the time of writing.
Also, examples pictures you will see are from the map “Raupi”. I recommend playing this map to get started. The shops are right next to each other and close to the generator, making it pretty handy. (And it’s also the map where i started playing myself :p )
Controls
These are the controls you need to know.
There are more, but you can check by yourself in-game.
- W, A, S, D ————– Move around
- Spacebar ————— Jump
- Left-Mouse ————- Shoot
- Right-Mouse ———– Aim down sight
- Shift ———————- Sprint
- Ctrl ———————— Use class ability
- E ————————— Interact
- R ————————— Reload
- Q ————————— Previous weapon
- V ————————— Melee
- 1 —————————- Switch Primary / Adrenaline Weapon
- 2 ————————— Secondary Weapon
- 3 ————————— Pistol
- 4 ————————— Utility Item
- 5 ————————— Teleporter (Back to base)
- TAB ———————– Player’s info
- C ————————– Crouch / Hold to roll
- G ————————– Throw grenade
- T ————————– Chat
- Y ————————– Team Chat
- Alt ————————- Voice Chat
- Z ,X ,F ——————- Priceless voice commands
The Survivors
There are three different classes in the game: The Assault, the Support and the Recon.
Each class has a special ability, three exclusive adrenaline weapons, three exclusive augmentations and a particular amount of armor. To use abilities, you need energy. You can see how much energy you have in the bar at the bottom of the screen.
Assault:
He has 150 Armor points.
His adrenaline weapons are a Grenade Launcher, a Rocket Launcher and the TREK Long Bow.
On later waves, you will easily move and fly around the map, taking down the big dinosaurs before they cause too much trouble.

The support’s main feature is his heal gun. A similar item, the ultility gun is available at the weapons shop, but the support is the only class able to heal teammates, and if you buy the engineer augmentation, you can also repair vehicules (and the generator).
He has 200 Armor points and his adrenaline weapons include a Flamethrower, a Gatling Gun and the TREK Long Bow.
The heal gun has a somewhat limited range, so you got to get close to your teammates. Aim at them and hold Left-Mouse to heal them up. Even if they are at top health, you can also replenish their armor this way. You can also use the medic gun on yourself if you hold Right-Mouse.
It’s very important to have at least one support. They can help keep the team alive, and are also capable of fixing vehicules.
Recon:
She has 100 Armor Points. Her adrenaline weapons are the Energy Carbine, the Laser Rifle and the TREK Long Bow.
With certain augmentations, you turn yourself into a real assassin and deal plenty of damage. You can also easily escape dinos or make your way to a downed teammate.
Just don’t wander off. Countless newbies go down and die unnecessarily because of that.
The Dinos
You could roughly separate the dinosaurs into three tiers:
Small Dinos

By far, the most common dino. Easy to kill, but they come in massive swarms and can overwhelm you. This guy is the least of your worries.

Ugh, this guy… They are small, they are fast, they can hide in the grass…
Shooting them down is a headache, so your best approach is to let them come at you and melee them down.

This one is more dangerous. Not only he has more health and deals more damage, he can spit acid.
It has a very long range, and leaves an acid pool that keeps dealing damage. Assaults beware.
Flying Dinos

The most common flying dino. They will ussually harass you during each wave. They are a lot of trouble to kill, but if you stand still and let them charge at you it will give you a better shot.

Look out for this one. He won’t actually attack you, he is rather going to try and grab you. Once he’s got you, he will fly up and slowly drain your life. You can easily break free with a melee attack, but be quick: All goes up, must come down, and the fall can easily kill you…
These first two tiers are the most common dinosaurs and they will spawn in swarms. However, as you thrive trough the waves, massive beasts will join the fray…
Boss Dinos:
When one of these guys spawn, his health bar will appear. They have lots of health, and unless you are a broken machine of death and pizza (or playing on a lower difficulty), you will need to gather your team to take them down.


They will mostly ram into you and send you (or whatever vehicule you’re on) flying away. Some of them are able to use ranged attacks, or can even to instantly kill you! Also, if you leave them alone, they can heal back up, or spawn more smaller dinosaurs!
These guys are by far your top priority target.
The Shops
As said before, there are two shops in each map. One sells weapons, the other one augmentations. These can be close or far away from the generator and/or each other.
Weapons:
The weapons shop has many tabs selling all kinds of different things. When you have less than a minute to take a look at the shop, you might feel lost and maybe not even buying anything. Take this chance to take a closer look at the weapons and their stats.
Pistols:
Secondary Weapons:
Primary Weapons:
*Adrenaline Weapons:
Assault:
Support:

Recon:
Grenades:
Items:
Upgrades:
*: Note that every class has their own three exclusive adrenaline weapons.


Augmentations:
The augmentation shop has many different upgrades for you character. These upgrades are separated into 3 Tiers.
Tier 1 upgrades cost 2500 Credits.
Tier 2 upgrades cost 5000 Credits
Tier 3 upgrades cost 7500 Credits
Each class also has 3 exclusive upgrades around their special abilities, which all also cost 2500.
Here’s a full list of what each augmentation does:
[link]Vehicules
Vehicules are golden in this game. They allow a player to take on swarms by himself, and makes taking down bosses eassier. However, they can’t regenerate health. This means a careless player will most likely blow himself and die.
Keep an eye on the vehicules health. If it starts runing low, ask a support to fix it up. If for some reason you need an alternative, buy an utility gun at the shop, that will also work.(Pull it out pressing 4)
In survival mode, you can find vehicules hidden around the map. You will also be rewarded with 2 vehicules after capturing an objective.
Press E to get on the vehicule. SHIFT allows some vehicules to boost. You can press C to switch seats in the vehicule.

Really fast, and really mobile. However, it’s pretty fragile, and only for 1 person. You can try runing over dinos with it, but it’s hard and risky.

Pretty fast as well, and more resilent than the dragonfly. It has room for 2 men (Pilot and Passenger).
You can either move around the map or go offensive and run over enemies. Just watch the health and don’t charge into bosses and you should be fine.

Now we are talking. This vehicule has a mounted minigun. It can bring 3 men (Pilot, Passenger and Gunner). Much more reliable for combat, and really usefull to take on bosses.

Sweet. It has only room for one, but you’re gonna completely ♥♥♥♥ wreck everything. Not only it has a minigun. If you press Right-Mouse, you shoot missiles. These missiles deal massive damage to big dinos and will make waves a breeze. Take care of it.

The tank is pretty big and slow, making maneuvers difficult. It has no machine gun, but this guy sure packs a punch. Trying to kill small dinos runing over them or trying to shoot them is a waste of time. Ignore them. Focus on the big guys.

It’s just like the Mech, but airbone. ‘Nuff said. Press Spacebar to go up, and C to go down. Make sure not to exit while in the air. You’re gonna kill yourself AND, destroy the arguably best vehicule of the game in the process
Survival Mode
1. Stay alive: The point of this mode is to survive to 10 waves of enemies. Lots of raptors and huge dinosaurs will spawn to get you. Not only you must survive the incoming enemies, you must also protect the power generator in each map.
If the generator takes too much damage, it will go offline. Then, you have 5 minutes to fix it. If you fail to do so, or if all players die, you lose.

2. Buy: Between waves, you get the chance to go to any of the two shops in each map. One sells weapons and items. The other sells many augmentations for your character, including double armor, damage bonuses, extra money, heals, and upgrades for you class’ special abilty.
At the end of most waves, you only got one minute for the next wave to start. At the start of each wave, the shops will lock down and kick you out, so be quick!
3. Conquer: At some points, you will receive objectives. There are three points in each map, and they will be in distant locations. Don’t worry for the generator for now, it will be fine.
Once there, a bunch of dinos will spawn. You must kill all of the dinos, and then stand on the point showed in the map to capture the outpost. Once you do so, you will be rewarded with two vehicules and the timer for the next wave will start, so hurry back to your base.


Conclusion
Well, after reading trough this guide you know everything you may need for a while!
There is more to learn, but you will mostly learn that by experience.
If you feel like reading some more, check these guides out:
Happy hunting!