Overview
A guide on how to set up custom controls for your gamepad using Steam Input, with separate controls for menu navigation, melee combat, and ranged combat. Comes with ready-made configurations!
Introduction
Monster Hunter: World’s default control setup is a bit clunky, often making you choose between controlling your camera or attacking. There isn’t any way to rebind gamepad controls from within the game, though. Thankfully, Steam Input makes it possible to create your own control setup.
To work around MHW’s configuration limitations, we’re going to mix gamepad and keyboard keybinds so that we can have unique control schemes for when we’re in a menu or when we’re using a melee or ranged weapon. Control sets will appear to “switch” automatically, but what we’re really doing is just sending simultaneous inputs.
This guide assumes you’re using a Steam Controller, but you can use the same techniques to customize your controls for 360, XBone, PS4, or any other controllers supported by Steam. Want to customize your controls when using Switch controllers? Go for it!
I’ll be uploading a sample configuration for 360 pads later, and most other controllers should be able to import that without any problems.
Setting up the controls
Copy the link below and paste it in a new browser tab:
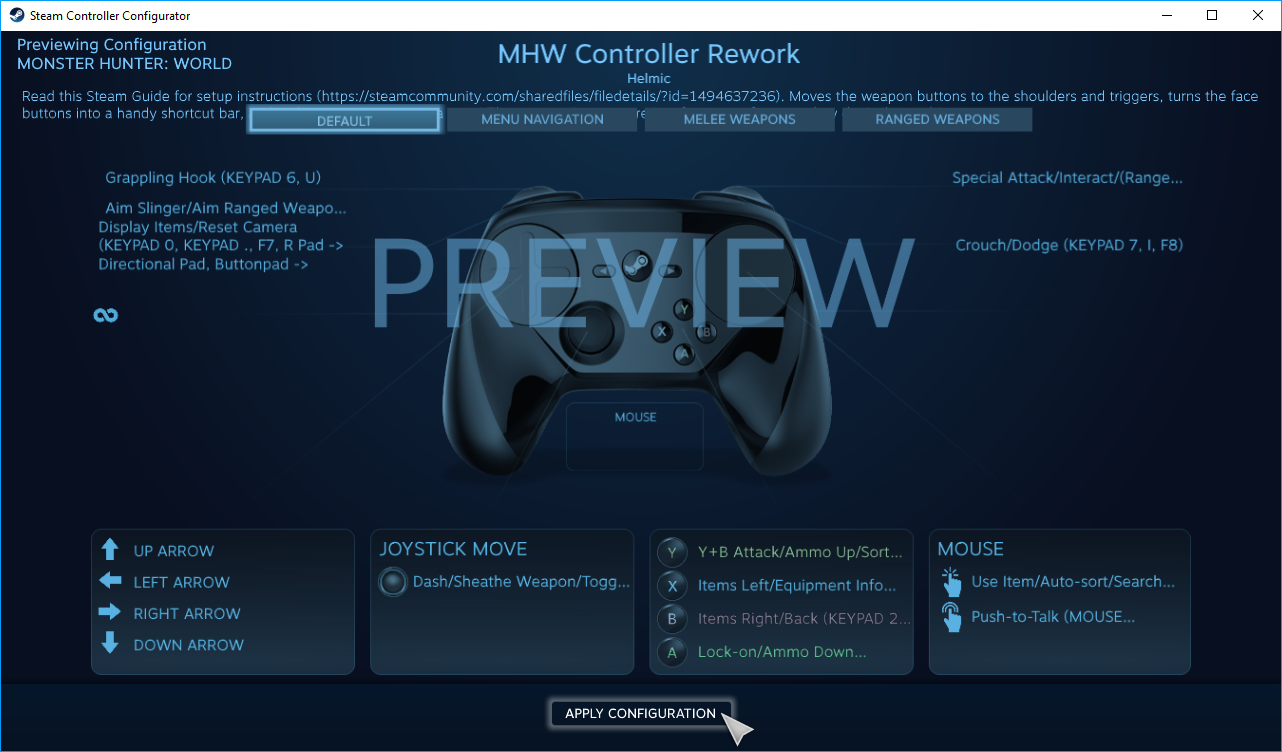
In the window that pops up either press the X button on your controller or click on “Apply Configuration.” If nothing happens when you click the link, make sure your browser has associated steam::// URL links with Steam.
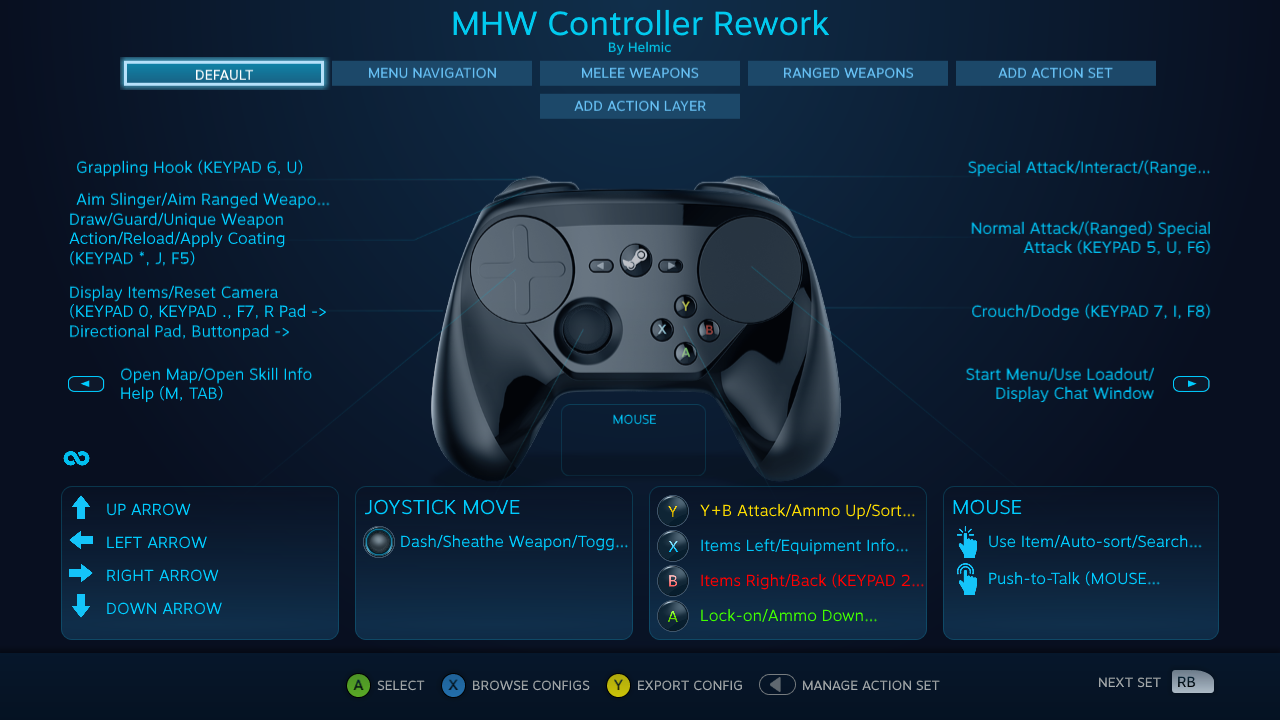
Rebind all the subkeys to match this image (click to expand). Keys with black text on a white background (instead of the usual white on black) are numpad keys. Except for the arrow keys and tab, all of the main keys can be whatever you want so long they don’t conflict with any of the subkey bindings.
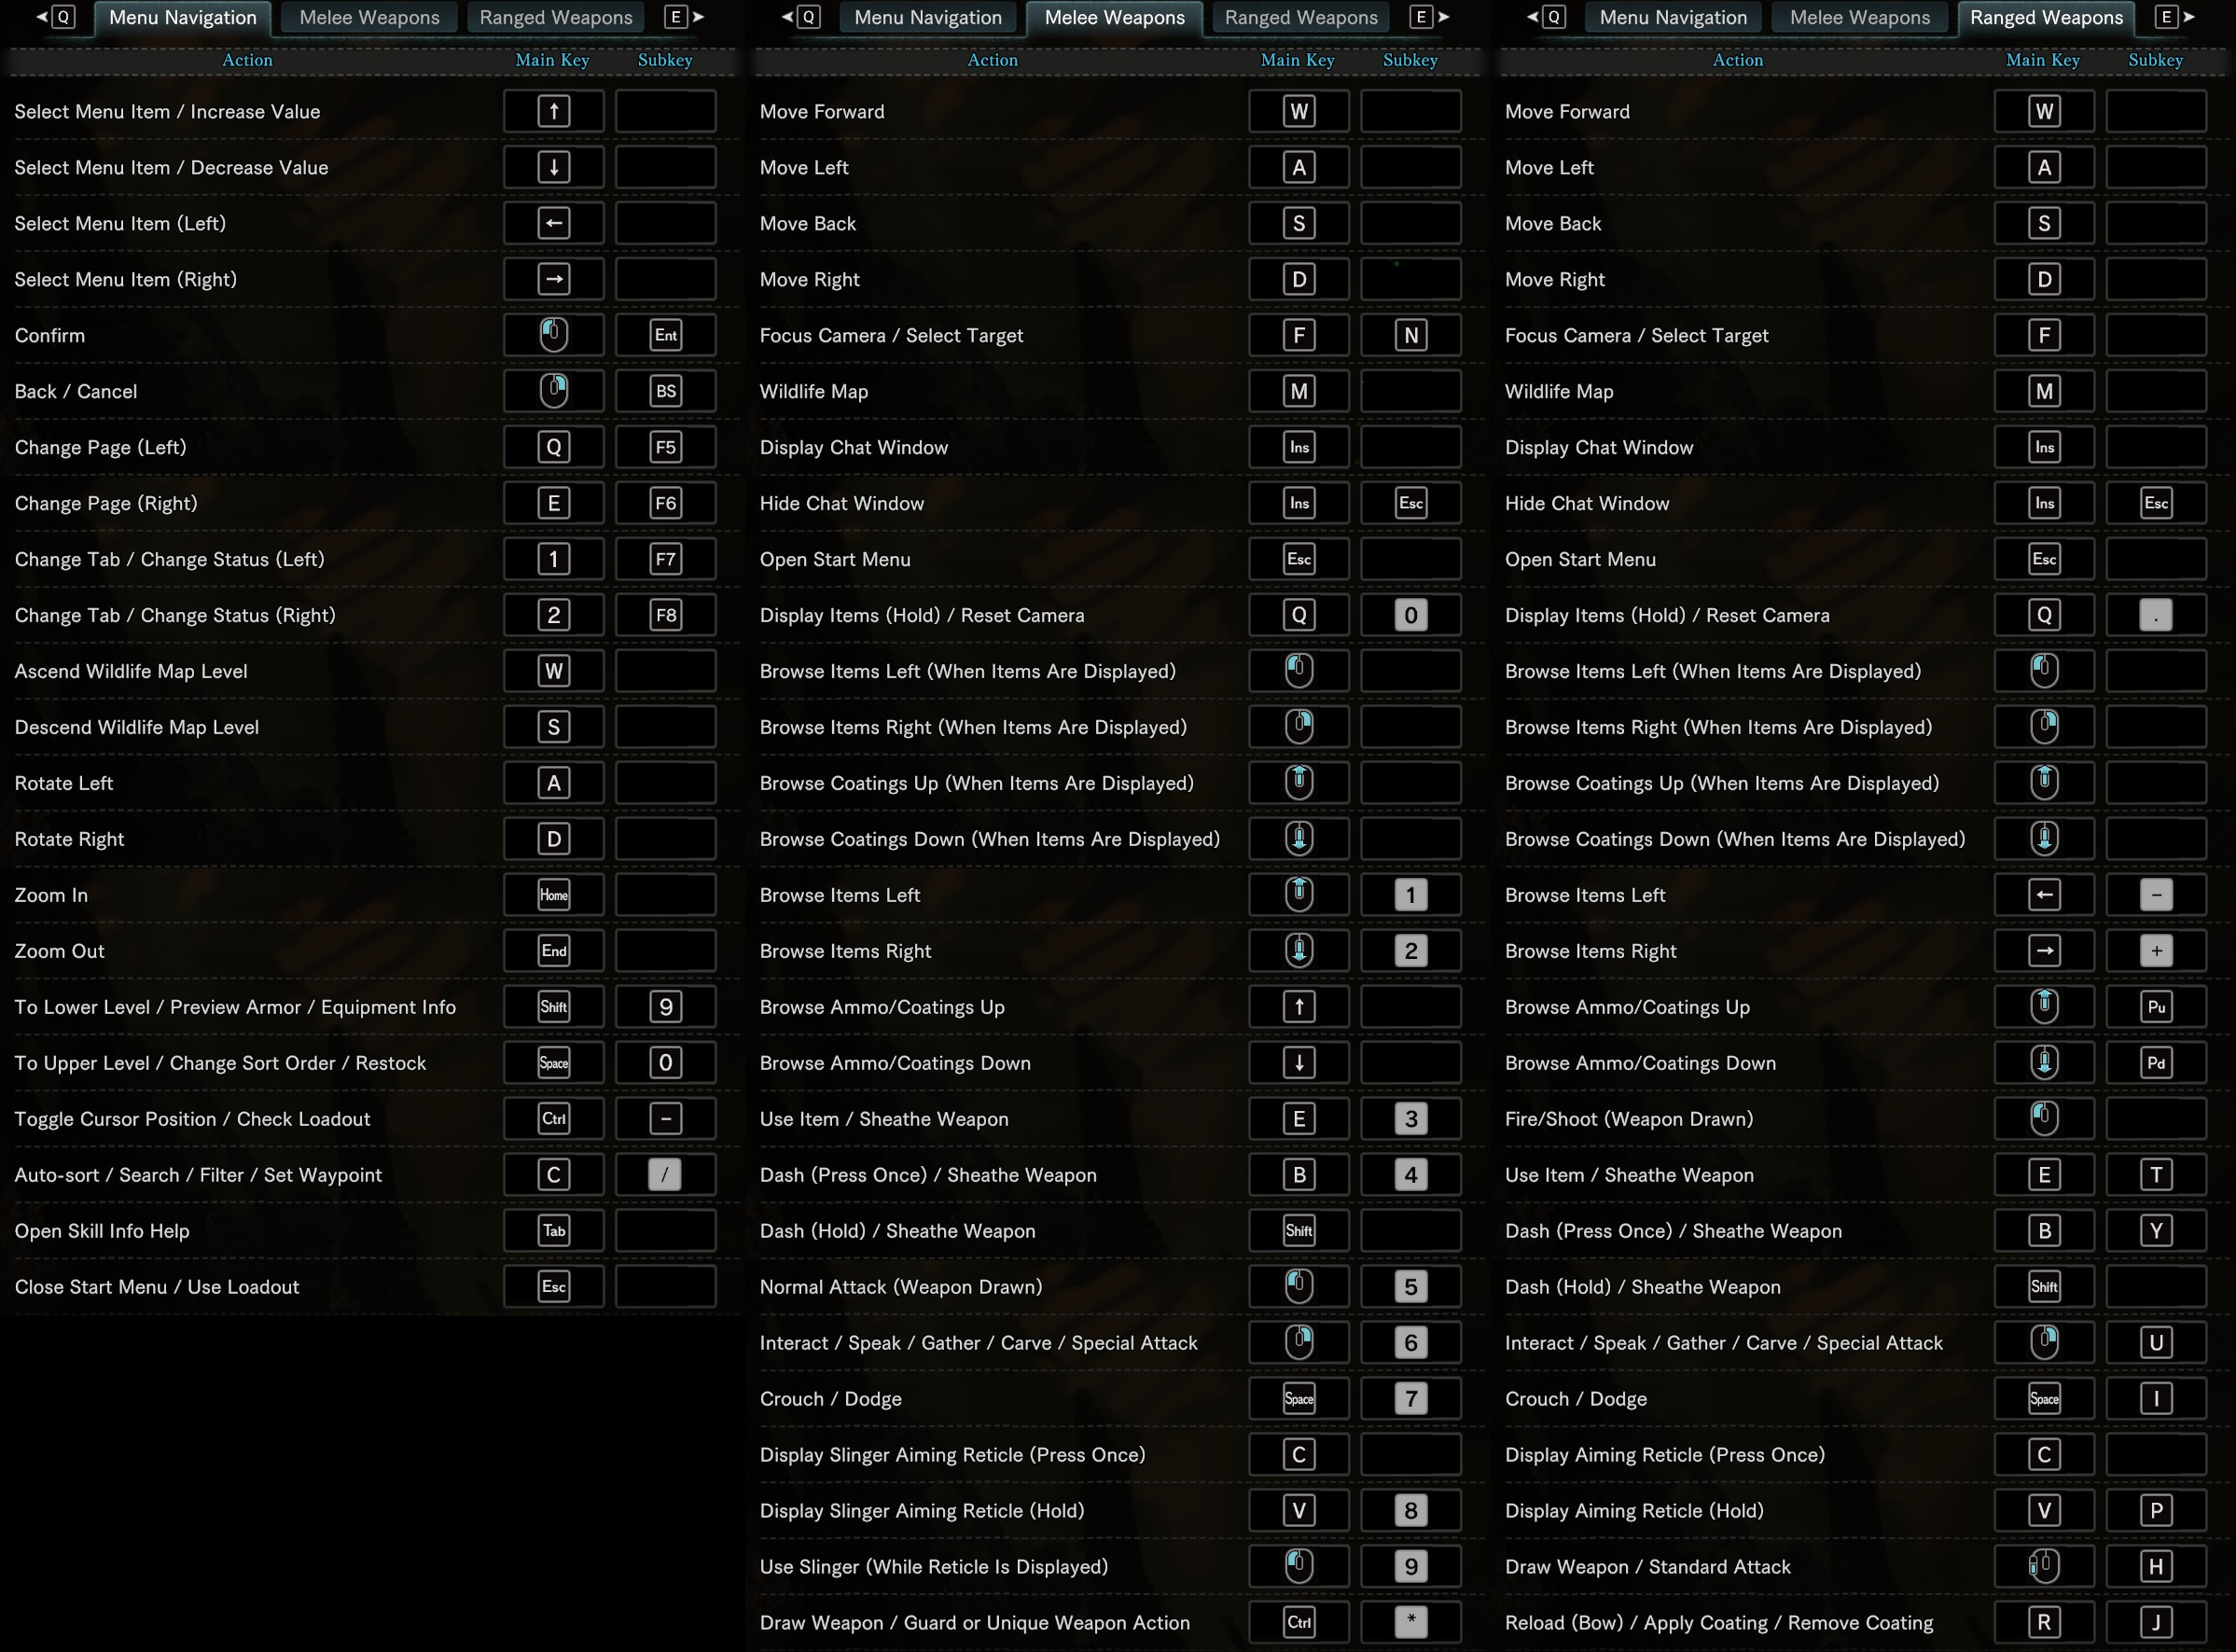
If you’re using a laptop and don’t have a numpad, most models will let you hold down the FN key and then press another key to get numpad inputs. If your laptop doesn’t have this, in Windows you can use the On-Screen Keyboard. To turn this on, hold down the Windows key + Control + tap the O button. The keyboard that pops up likely won’t have the numpad visible – to turn it on, click the Options button shown here. The keyboard will stay on top of your game until you hold down the Windows key + Control + tap the O button to toggle it back off.

Be sure to switch Radial Menu Settings to Type 2 as well (you need to actually load up a save file to configure this, you can’t do it from the main menu).

And that’s it! It’s a bit of a pain to set up, but it works around MHW’s poor gamepad rebinding support.
The new control scheme
You’ll navigate menus just like you would with the default gamepad controls, except the grips now act as the left and right triggers. The triggers themselves instead act sort of like your left and right mouse buttons, allowing you to use a mouse as a convenient way to quickly navigate menus.
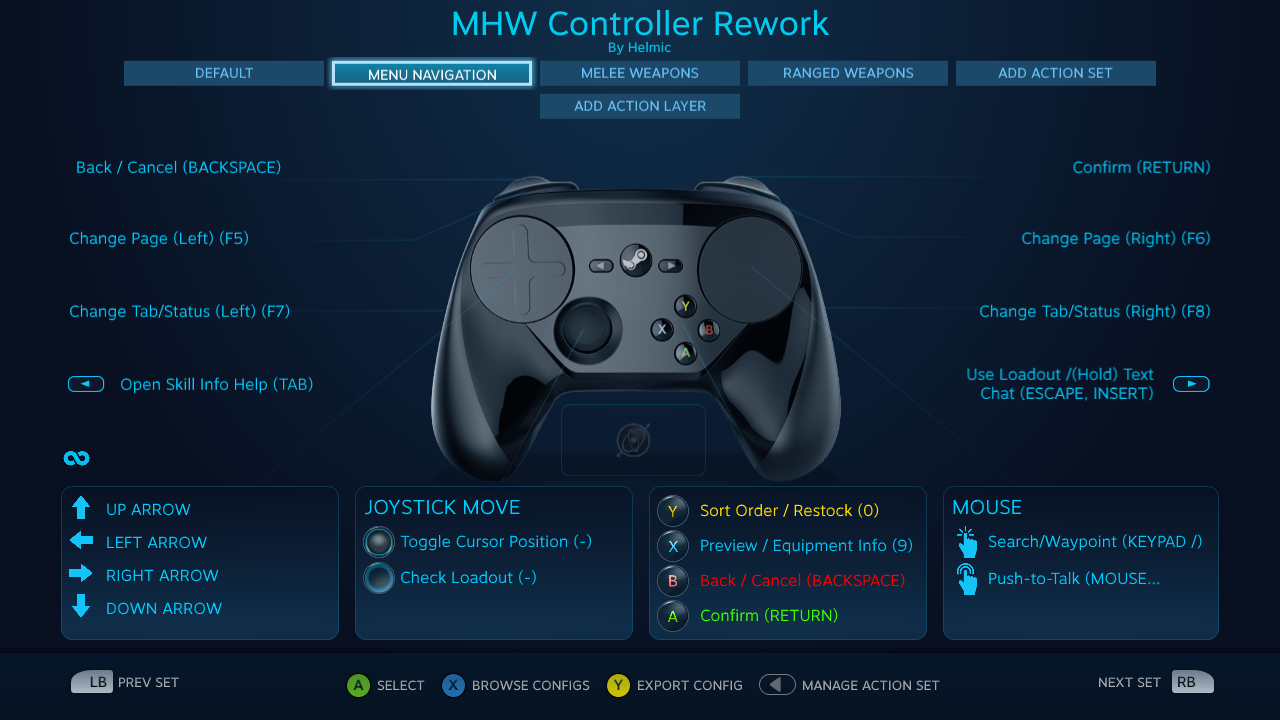
You can double tap (but not click) the right pad to activate push-to-talk. Bind it to whatever you have set in Discord or Steam or what have you (I have it set to the forward mouse button). Holding the start button will quickly bring up text chat.
If you want to rotate your character when previewing armor, hold the left grip and them use the right pad to rotate.
All your weapon attacks and guards are now on the shoulder buttons and triggers. Your right bumper is your standard attack, right trigger is a special attack, and the left bumper will draw/guard/do a unique attack. You can press the Y button to do attacks that require you to press the normal and speciall attack buttons at the same time. The A button will toggle your lock-on.

Holding the left trigger will aim your slinger and temporarily activate the gyro. Pull the right trigger to shoot, or pull the left trigger all the way until it clicks to use your grappling hook to swing from wedge beetles.
The X and B face buttons will scroll through your items. If you hold the left grip, the face buttons will instead swap through your radial menu shortcuts. You can click the right trackpad to use the current highlighted item.
Pretty much the same thing as melee weapons, except the normal and special attacks are swapped around and the Y/A buttons now change your ammo or coating type. Unfortunately your interact button is now the right shoulder which can trip up your muscle memory.
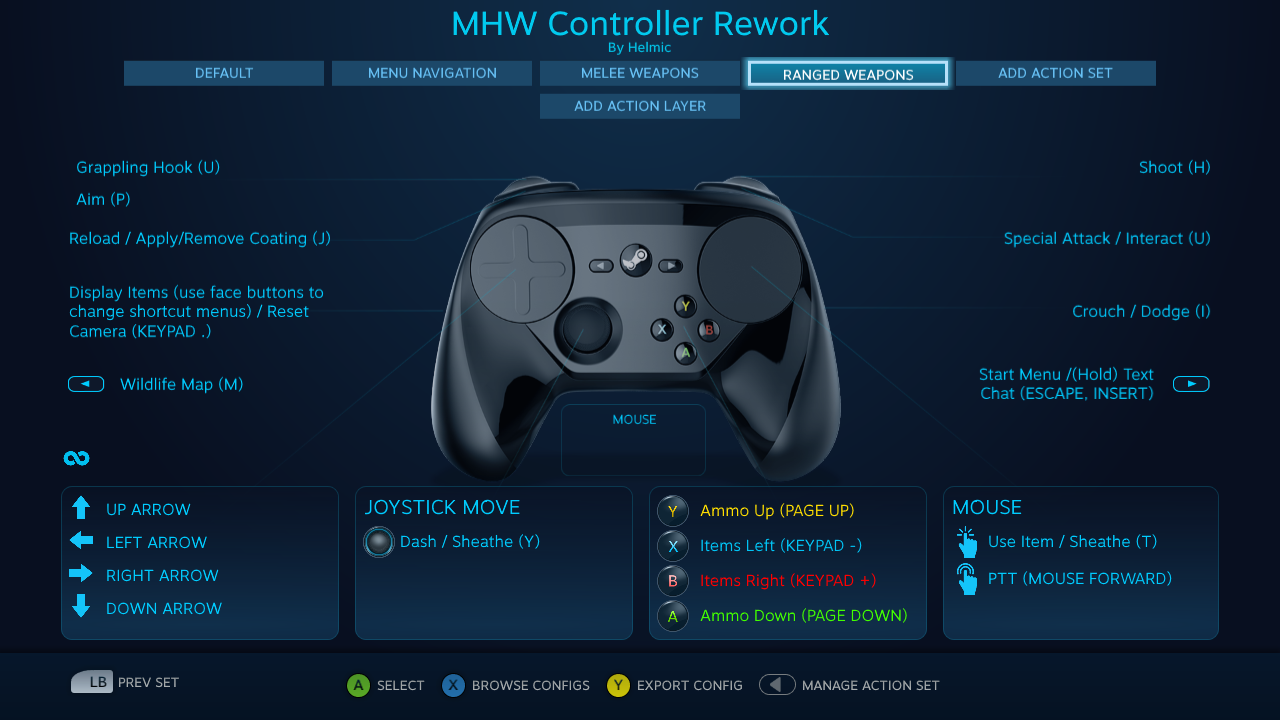
If you’re OK with having your shoot button be the right shoulder button, you can swap the U with an H in the second activator on the right bumper, the H with a U in the second activator on the right trigger soft pull, and then the H with a U in the second activator on the mode shift of the right trigger. That way your interact button will be the right trigger, the same as it is when in menus and when using melee weapons.
(Optional) Customizing the controls
The default action set is the only “real” action set. It’s the only one that the game will ever actually use and is the only one whose changes will be reflected in the game itself. The other action sets are simply visual aids to make referencing the controls easier since the Big Picture Mode interface is pretty clunky.
The other action sets are purely cosmetic – any changes in them won’t have any effect in the game itself. If you intend to share your configuration, it’s still a good idea to change them so that other users don’t have to dig through the wall of text that is the default action set to figure out what everything does.
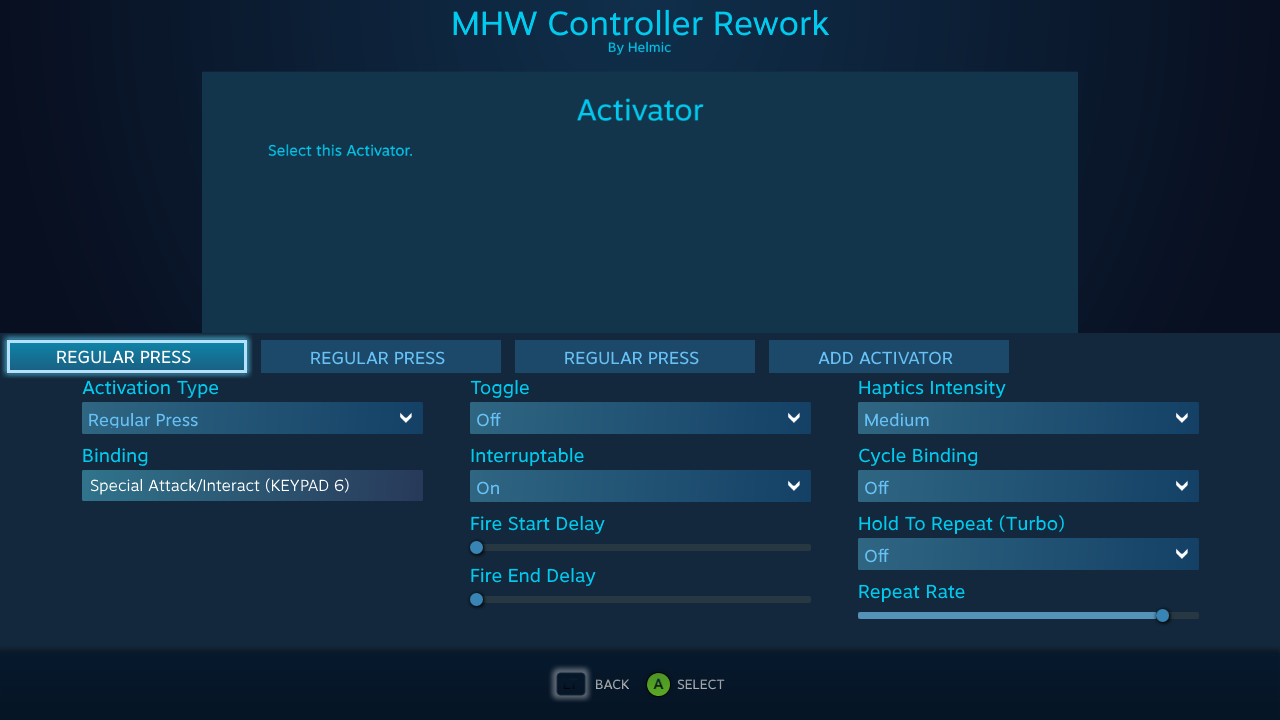
When you go to edit a button, you’ll see that it’s split up into three activators – the first is for melee weapon controls, the second is for ranged weapon controls, and the third is for menu controls. This makes it easier to go in and edit the controls for just one part of the game without affecting the others, and it makes keeping all your controls properly labelled somewhat manageable. You’ll notice that the ranged controls aren’t labelled when they do the same thing as the melee controls – this is to save space in the UI when looking at the controls at a glance.
Be sure to stick to the same keybinds shown in this cheat sheet – this makes it easier for other users to start using your configuration without first having to rebind everything a second time. I’ve made sure to use only buttons that are unlikely to be used so that people can still switch to mouse and keyboard controls if they wish, but if you *do* need to bind additional buttons keep in mind that binding the F9-F12 butttons will often conflict with other programs or minimize the game window and the O, K, L, and semicolon keys seem to be hardcoded as camera controls.
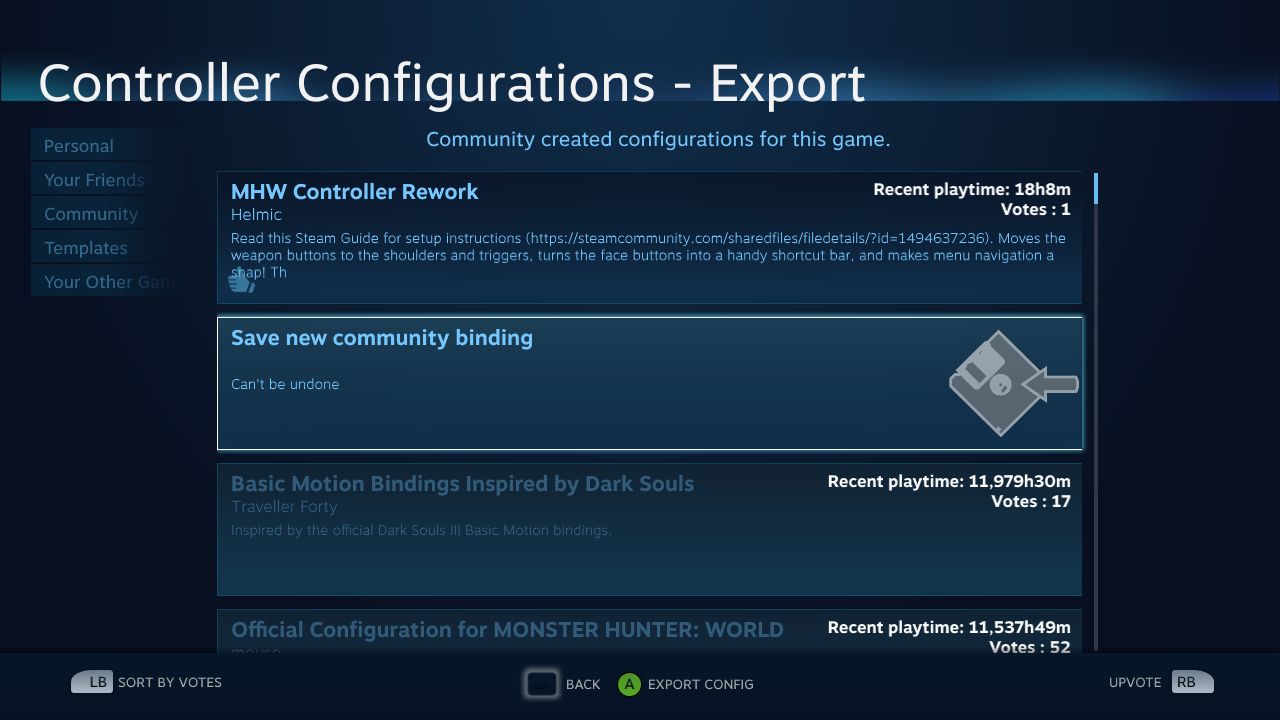
Be sure to share any configurations you’ve made in the comments! To share your controller configuration, you’ll first need to play with your configuration for five minutes. You can then go into the configurator and either press the Y button or click “Export config.” From there, move to the Community Tab and select “Save new community binding.” In the description of your config, be sure to link to this guide so users know how to bind their controls. A link will be copied to your clipboard that you can share with others to share your configuration. If you want to copy that link again, simply navigate to your configuration in the community tab and press the Start button.