
Overview
This comprehensive guide aims to inform players about the Character Big Band, as well as some of the issues concerning people who play against him and people who play him.
Introduction
Big Band has been in Skullgirls for some time now. From what I’ve seen, he seems to be a very love/hate character. The two sides seeming to be people who play him and people who do not. I decided to articulate my thoughts on playing and playing against Big Band to help others understand the character. The first two sections are dedicated to fighting Big Band. I’ve also included another section about his sliding knockdowns that I think are commonly overlooked.
I also decided to cover all of his normals, specials and supers and their uses, useful techniques, assists, team composition and matchup details.
Category list
- Fighting Big Band Part 1 – Respect, counters and the crux of it all
- Fighting Big Band Part 2 – Fighting at close range + the crucial moment
- Big Band’s sliding knockdowns + okizeme setups
- Big Band’s standing normals
- Big Band’s crouching normals
- Big Band’s jumping normals
- Special moves
- Supers
- Useful techniques, conversions, resets, chains, etc
- Assists
- Team composition
- Matchup details
This guide will not tell you exactly how to play Big Band, as there is no such thing. Playstyles are supposed to be unique to you and for you to figure out. Instead, it will help you understand the character to a greater extent, so you can improve your play and develop your own style. It will also not include any full combos but instead will offer key combo chains – in the “Useful techniques” subsection – that you can use to easily make your own full combos. This promotes creativity as well as your own understanding of Big Band’s moves.
A standard knowledge of fighting games is assumed, including fighting game jargon, fighting game move notation (s.HP, DP, QCF etc)* and frame advantage/disadvantage.
As well as all of this it assumes an open mind. You must be willing to learn and experiment as well as make an effort to win in-game.
* refer to this link for help with jargon – [link]
Throughout the guide I’ve decided to attach ‘s with embedded hyperlinks onto parts that use jargon. These links contain general information about whatever is being mentioned that some players may not have yet learned. Look out for them if you are having any confusion.
The contents of this guide are not set in stone. I have played the character a LOT, but that does not mean I understand the character fully or that my words are absolute. You should not take this guide as fact, trust your own findings above all else.
I am trying to make the information in this guide as correct as possible. If you have any disagreements with anything in the guide, please leave a comment saying so and I may update the guide after careful consideration.
Fighting Big Band – Respect, counters and the crux of it all
Big Band can control a lot of space. You may have noticed this, but it should be fully acknolwedged to understand Big Band and how to beat him.
If you overlap the three hitboxes of Brass Knuckles, A-Train and Giant Step you can get an idea to just how much space Big Band can control, somewhat safely, from a distance:
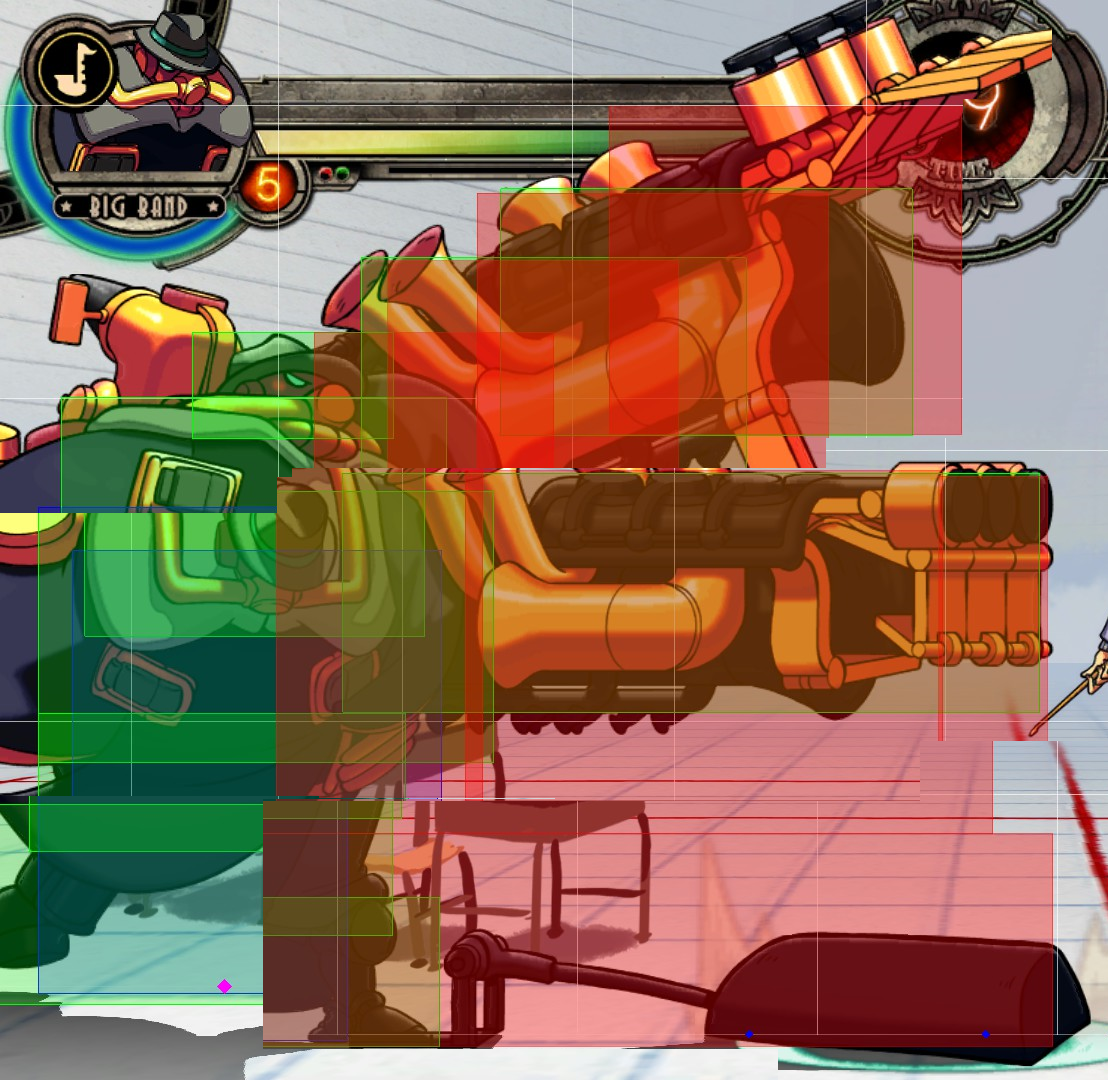
Do not forget that he also has normal moves that control large amounts of space.


Assuming you’re not a zoning character, you need to hit Big Band face to face. Any advance you make is likely going to be met by one of these moves.
You respect them, and therefore respect the space Big Band can control effectively. What do I mean by this?
Generally, it means you attack less and block more. Not respecting his moves would mean doing whatever you want, jumping a lot and throwing out moves at a range where they can be easily beaten by his own. This is what leads to getting easily caught by him. Doing nothing is actually a pretty good option vs Big Band, as it slows down the pace of the game and reduces the risk of getting caught “randomly” for large amounts of damage. His signature space control moves are not unbeatable by any means, rather, they become very risky for the opponent to do when you know how to counter them. Brass Knuckles, A-Train and Giant Step have fairly consistent counters that aren’t difficult to execute.
- Block them. All three put Big Band at frame disadvantage on block, which can mean a free punish in some cases, and reduction of Big Band’s options in others.
LP brass blocked at point blank is -6 which gives you a free low/throw that he has to block/tech, or commit to limited options like jump or HP beat extend.
MP + HP brass are punishable when blocked point blank. They are harder to punish when Big Band is further away (all three moves can be done from a distance to make them safer)
- Attack with multihit moves. Most multihit moves will hit Big Band through MP+HP Brass Knuckle’s armoured frames before he can hit you. The sooner you hit, and the faster the multihits the better. A few examples would include Painwheel’s j.MP, Filia’s j.MP, Valentine’s j.MP , j.LK and s.MP, Peacock’s j.LK, Squigly’s j.HK, etc.
- Sweep vs. MP/HP brass. Sweeps, or c.HK, break armoured moves on hit. This includes Double’s Cilia Slide, ♥♥♥♥♥’s LK Forever-A-Clone, etc. You can throw sweeps out in neutral vs Big Band and any armoured move he makes will get hit since sweeps have good range and have multiple active frames. Sweeps are also a good option vs. Brass Knuckle assist. MP+HP Brass Knuckles both have 2 hits of armour. LP brass is NOT armoured, and can be hit out of startup like any other move.
- Don’t jump. MK+HK A-Train are strictly anti-air moves that don’t hit standing opponents even when the hitboxes overlap. Both are reactable and punishable on whiff at close range. Watch out for LK A-Train which is a grounded grab that will catch you if you do this too often within
[i.imgur.com]
- Attack with multihit moves. Again, most multihit moves will hit Big Band through MK+HK A-Train’s armoured frames.
- Safejump. MK+HK A-Train will always hit when you are moving upwards in the air, and are blockable as you descend. Blocked MK+HK A-Train can be punished at closer range.
- Sweep. Again, sweeps beat armoured moves, MK and HK A-Train having 1 and 2 hits of armour respectively.
- Jump. Giant Step’s hitbox is quite low, meaning jumping will avoid the move and allow you to punish at close range. Giant Step is not like A-Train where it will only hit grounded opponents however, it can hit you in the air, but only at a low level. You must jump vs. HK Giant Step at long range as it has a secondary hit that covers the entire floor. This hit actually counts as projectile, and it can be reflected/armoured through.
- Block high. All versions of Giant Step are unsafe on block, making them situationally punishable. Otherwise you can get a free jump-in/mixup instead of a counterhit punish. Jumping completely avoids the move, but remember that Big Band can A-Train to punish jumps.
You might have noticed that some of the counters of Big Band moves conflict with other counters, such as jumping vs Giant Step and not-jumping vs MK+HK A-Train. This leads us to the crux of playing and fighting against Big Band – He is a prediction, or “read” character, who forces the opponent to guess, but also takes risks with each guess. He can hit you from nearly anywhere on the screen, meaning you are forced to stay sharp, respect his moves and make the proper guesses to win.
Fighting Big Band at close range – the crucial moment
When you are in the space above, which is shown by being outside his grab range, you are more or less in “close range” This, to me, is the critical point where you or the opponent get the hit. Brass Knuckles, A-Train and Giant Step all become more of a gamble, as they are at their riskiest at this range. On the other hand, being so close to Big Band is a gamble in of itself. Let’s take a general look at what can happen.
Jump + overhead – Beaten mainly by MK A-Train and Beat extend (DP). Can also be beat by moves with anti-air capabilities and air-to-airs.

Jump + block – Still beaten by MK A-Train, but baits and beats Beat extend, since you can block it and punish. Also beaten by jump grab.
Dash up + attack – This is when you think Big Band isn’t going to do anything, or is being hesitant with his own guess. Low, high, throw, whatever, this part is up to you.
Wait + block/crouchblock – You can do this when you think the opponent is going to be sporadic and do a move without any meaningful premonition. If the opponent does any version of Brass Knuckle, it will be blocked and the opponent is then at x minus frames depending on which version was used. MK + HK A-Train can be reacted to and whiff punished. Giant Step will hit you if you crouchblock, making this a risky option that may be reserved for choke situations – situations where both players are at low health, etc.
Walk up block, dash block, etc – This is a good option for baiting a move out of the opponent, as they may be waiting for any kind of movement as a sign to attack. This is a very good counter to MK+HK A-Train as you can punish the whiff easily. You can block Brass Knuckles and gain frame advantage. If the opponent still refuses to make a move you could take advantage of this apparent hesitation and attack.
It’s worth noting that just because you are just outside Big Band’s grab range, that does not make you impervious to being grabbed. The opponent can run up to you, close the gap and then grab you. They can also use LK A-Train – which is a grounded command grab with considerable range.
This leads us to Big Band’s major weakness – his large hurtbox. All characters can instantly overhead Big Band – even when he is crouching – by simply jumping and doing air moves instantly.These instant overheads lead to full combos if performed correctly. For the sake of completeness, here is a list of instant overheads that can lead into combos on Big Band per character:

- Eliza – IAD j.LK -> j.HP
- Squigly – Instant j.LP -> M divekick
- Ms Fortune – Instant j.HP ADC j.HP
- Peacock – Instant j.LP -> j.LK (3 hits) -> j.MP
- Painwheel – Instant j.LP xx Flight cancel j.LK
- Filia – Instant j.LP -> j.HK ADC j.HP j.HK
- Cerebella – Instant j.LP (1 hit) -> j.HP
- Valentine – Instant j.LP -> j.HP ADC j.HP
- Parasoul – Instant j.LP -> j.HP
- Double – Instant j.LP -> j.HP
- Big Band – Instant j.LK (at least 2 hits) -> j.MK
- This list is not absolute, nor are these overheads optimal. I simply found these in training mode. Feel free to experiment.
With this knowledge you should be a significant threat to any Big Band player when given the opportunity to instant overhead him. Remember that instant overheads are brilliant against Big Band, but the opponent can predict this and block high. You must mix high, low and grab in your offense to catch your opponent off guard and make them guess.
Big Band’s vulnerability to low/high mixups also feeds into player behaviour. The opponent will likely be feeling very vulnerable and scared when you are at point blank/close range. This leads to predictive reversals, mashed supers, etc. This all depends on the player. It would be wise to wait a moment before attacking, in case they go for an early reversal. You would simply block it and punish.
After getting the hit, you can play whatever game you want. You can reset him into death as you please. Resetting him the air is favourable as he has no air reversals. His air super, Timpani Drive, loses to timed air throws and trades with meaty hits at worst. Also worth noting that his best reversals, Beat Extend (DP) and SSJ (Level 1 ground super) are grounded. Combine grab resets with burst baits and low/high mixups for a safe way of killing the character. Being reversaled may mean returning to neutral, in which you carefully approach him again.
Big Band’s sliding knockdowns and okizeme setups
Big Band, in my opinion, is very powerful in the corner. I think this as he has four ways of obtaining sliding knockdowns, too many to be a coincidence. Sliding knockdowns do not allow the opponent to ground tech, making them useful for obtaining the corner and performing okizeme setups. An okizeme setup is basically attacking your opponent with lows/highs/throws just as they get up from a knockdown state. You simply dash up after getting the sliding knockdown as there is enough time before the opponent gets up.
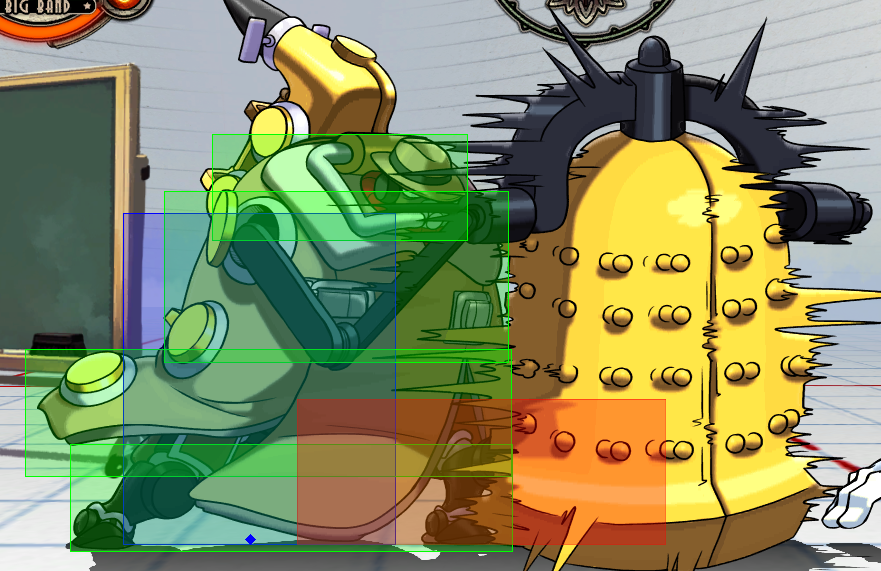
Sliding knockdowns are easily distinguished from regular knockdowns by the sliding animation produced. The colour of the bounce after the slide determines whether or not the opponent can ground tech. Purple means untechable sliding knockdown, blue means techable sliding knockdown. The first image displays the purple, untechable sliding knockdown. The second image displays a blue techable sliding knockdown. Finally, the third shows Filia ground teching forwards from the techable sliding knockdown.

Big Band can obtain sliding knockdowns by comboing into or hitting HP Brass Knuckles and all versions of A-Train, but only if OTG (off the ground hit, you only get one per combo) has not been used up in any chains beforehand. He can put the opponent in the corner from any distance, I’ve found, with extra chains necessary when further away from the corner. Here is a video demonstrating this:


You can also use side-switches, nifty chains that reverse the positions of you and your opponent. Best done near the corner, instead doing a long corner to corner combo which is time consuming and gives the opponent more meter – see meter (dubbed – “tension”) scaling here.[wiki.shoryuken.com] Check the “Useful techniques” subsection for them.
An issue with some Big Band players (that I have seen) is that they will always use up their OTG in their BNB combos (namely from using j.HK -> ground tech forwards -> OTG) and then combo into HP Brass / A-Train, allowing the opponent to ground tech out. I’ve also seen players who do not ground tech when the Big Band player combos into HP Brass / A-Train after using OTG. This happens way too much.There should be no reason not to ground tech in this situation, as it avoids having to guess on oki, and also lets you recover faster. Please do this!
There is a clear advantage when using OTG pickups and this is damage. Big Band’s most damaging chain is j.MP j.HP j.HK, ground tech forward – which is followed up by OTG hit to continue the combo. On a 1.0 ratio, the rough damage for full combos using OTG’s is 6500. Combos ending in sliding do significantly less damage because they miss out on this chain. They can reach roughly 4500 damage when using above average combo chains – shown in the previous video.
So you can make a decision – To use up OTG for extra damage or to use OTG for the sliding knockdowns given from HP Brass / A-Train and the benefits they give.
This is up to you. I personally prefer getting sliding knockdowns whenever possible to assume control of the corner as soon as I can.
Big Band has an excellent oki game, in my opinion, as he can poke from a distance with his signature moves, mix the opponent up with long range highs/lows, or go for the classic low/throw 50/50 that every character can do. Since the opponent cannot back any further into the corner, they are forced to guess on what you are going to do, and take risks to get out of the corner.
If you’re not aware of what an okizeme setup is, it’s placing the opponent into a knockdown state and doing moves that will hit them as they regain control of their character. You can get creative for okizeme setups with big band as he has mixup tools such as:
- Safejump + call assist – Gives you a safe mixup when the assist is blocked, allows jump-in pressure using j.MK and j.LK
- s.LK – two hit move that hits low
- c.LK – fast low move, good for low/throw guesses, can be done twice to bait tick throw techs/upback.
- Grab/ air grab – a necessary addition, simply used when you think the opponent is going to block. Air grab can also be done to predict a jump, can be combined with an assist for a safer setup.
- Giant step – fast overhead and can chain from a low attack for a fast mixup
- All versions of A-Train – good for predicting jumps on wakeup, give damage and reset the situation. Somewhat safer than low/throw since they can be used at a distance and MK + HK have armour.
- c.MP – long range, 2 hit chainable poke that can be chained into c.HK sweep and giant step. Good for mixing up at a safer distance.
- c.HK –
[i.imgur.com]sweep attack that will catch opponents off guard due to the sheer range. Excellent when chained into giant step for a long range mixup
- c.HP – another huge move that causes a special stun on hit, allowing you to E-Brake and confirm.
- j.MK – excellent jump-in move, has huge vertical range, somewhat safer as it dodges some reversals due to being directly over the opponent.
- Don’t forget, you can always run up and block, run up jump back + call assists, or use whatever method necessary to bait reversals.
Big Band’s standing normals
This section is going to cover all of Big Band’s standing normals. Crouching and jumping normals will be seperated into their own sections. For the sake of completeness, relevant frame data will be coupled with a picture of the move’s hitbox. The frame data has been collated myself and compared to the frame data on the shoryuken wiki page for Big Band. The hitboxes have been taken from this thread: [link] – Thanks Stuff. I have also included my own opinions on the moves and their individual uses, with some demonstrational videos linked throughout.
Big Band can chain s.LP and c.LP twice into itself and both can then chain into LK. Lights can be chained into either MP or MK, and mediums can be chained into HP or HK. Here’s an image visualising this, from the shoryuken wiki page for Big Band:[wiki.shoryuken.com]


When held down for brief period of time, you can chain normals for trumpet notes. Here is a list of button combinations that produce different notes[wiki.shoryuken.com] and a link to the The Big Band MP Song Thread on Skullheart.[skullgirls.com]
Also, the first five notes you play can be used as an attack with their own, fairly disjointed, hitbox – see below – The amount of extra attacks you can do is limited to the amount of meter you have. 5 hits is the maximum at 5 meters.


Big Band’s crouching normals
Here are all of Big Band’s crouching normals.


Big Band’s jumping normals
Finally, here are Big Band’s jumping normals.
Big Band’s jumping normals chain in different ways to his standing normals. j.LP can chain into j.LK and both chain into j.MP or j.MK. j.MP can chain into j.MK and both chain into j.HP or j.HK. j.HP can chain into j.HK. This above average amount of chainable air normals gives Big Band fairly diverse and interesting air combos. Here’s an image visualising the chains, from the shoryuken wiki page for Big Band:


That concludes Big Band’s normals. Let’s move onto some Big Band’s miscellaneous moves before looking at his specials.
Throw, air throw, snapback, parry and sound stun
This section is going to cover some of Big Band’s miscellaneous moves before moving onto his specials.


Snapbacks can be used to bring in characters that have large amounts of red health, which will fully deplete on incoming. It can also be used to perform doublesnap combos, when your opponent is hit along with his assist, snapping them both allows for . Finally, snapbacks break armour.


You can also hold forward/down to parry, effectively blocking + parrying at the same time, but the parry window is 4 frames less than the normal 17. There is a 30 frame cooldown after ever parry input, meaning you cannot spam it. Assists can be parried by pressing forward or down.
Check the shoryuken wiki description of the move for a technical description[wiki.shoryuken.com] and check this video for https://www.youtube.com/watch?v=bptNiftn3XYg. – Thanks Flotilla.
* 1. https://www.youtube.com/watch?v=jtuA5we0RZU
2.
3.

Sound stun is a feature exclusive to Big Band. It enhances c.HP, Cymbal Clash, Beat Extend and Giant Step. There is a visual cue when sound stun is consumed, an explosion of musical notes – see above. Sound stun can only be used once per combo. Here is a list of what the aforementioned moves do when sound stun is used:
- c.HP – Causes elongated stun which makes HP Brass/HK A-Train confirms very easy. Can also be converted off using Emergency-Brake – check specials section. Using this move when sound stun has been consumed gives the opponent a techable knockdown.
- Cymbal Clash – Allows you to followup, with Brass Knuckles / A-Train from a distance, and with any move in the corner. Using this move when sound stun has been consumed gives the opponent full invulnerability until they land, and also gives them an immediate ground tech.
- Beat Extend – Allows you to combo afterwards, with whatever move. Using this move when sound stun has been consumed gives the opponent full invulnerability until they land, and also gives them an immediate ground tech.
- Giant Step – Causes elongated stun on LK/MK versions of this move, allowing you to combo afterwards. HK version consumes sound stun on hit but is unaffected by it, instead causing a ground bounce towards you which can lead to a OTG pickup at close range – even after consuming sound stun. Using LK/MK giant step when sound stun has been consumed does not allow Big Band to chain his normals afterwards.
- Charged Timpani Drive – Allows you to followup in the corner.
Now that you know that using sound stun twice gives the opponent a free way out, you should consider only using one sound stun move per combo, to give the opponent no windows of opportunity. Thankfully, Big Band does decent damage without having to rely on long combos.


Big Band’s special moves
This section will cover Big Band’s special moves.

There are three versions to this move, so these three will be covered seperately. All three versions have the same hitbox as displayed above. This raises the question of how each move has its own range. Each version of Brass Knuckles moves Big Band forward, with increasing amounts for each succession of versions of the move – (LP->MP->HP)
All versions are canceable using Emergency-Brake – covered a bit later on. All versions also apply chip damage to the opponent.
Canceable using Emergency Brake
Canceable using Emergency Brake


Both versions of this move share the same hitbox. Both give sliding knockdowns on hit and when chained into, except when OTG has already been used.

A note on charging
Charge inputs require you to hold back, then input forward + a button. But what some people don’t know is that you can hold down+back, also known as crouch block, to charge. This lets you remain immobile while charging instead of having to walk back, which gives your opponent an obvious cue to anticipate a move. It also lets you retain a favourable spacing before performing brass/a-train.
Big Band’s special moves pt. 2

Big Band’s special overheads. Quite risky moves in general, as they can be jumped over and are unsafe on block, and are also easily armoured through. However they do lead into damage and sliding knockdowns on hit, making them high-risk high-reward. Also good for mixups when combined with low attacks, but be careful when doing them too much in blockstrings, as people will wise up and block them, then punish you. Combine double low attacks (c.LKx2) with lows into LK Giant Step for effective mixups.
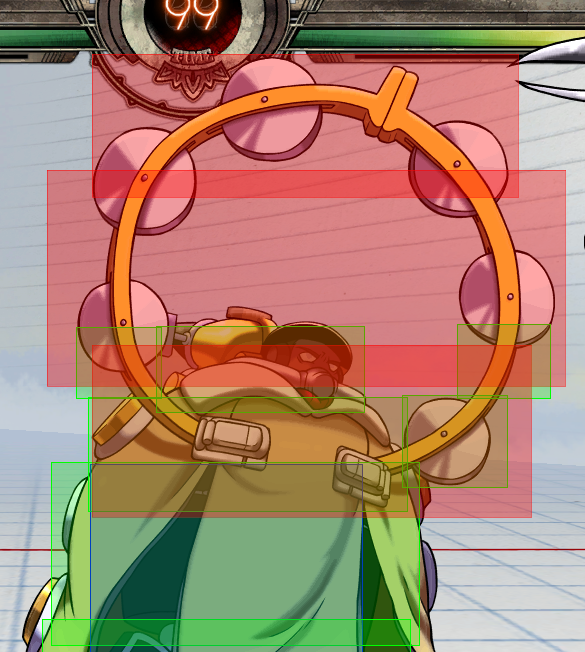
Big Band’s DP. Each version has a large circular hit which makes it an extremely good anti-air. Each version is slightly different for different situations.
Each move consumes sound stun on hit, allowing for a combo afterwards. Hitting with this move after consuming sound stun allows the opponent to drop and ground tech. All three moves have an optional multihit followup that can be performed by shaking the stick left to right rapidly or pressing LP and HP rapidly. The number of hits can be controlled. This followup is best used at max scaling for extra damage. Doing this followup early scales your damage to maximum, so is best reserved for extra damage at max scaling. The multihit followup is sometimes required for specific setups, however. All versions apply chip damage.


Big Band’s special moves pt. 3

On offense, it can be used in air blockstrings for extra pressure. You can mix these air blockstrings up with low attacks to good effect. For example:
1. jump-in j.MK delay xx Cymbal Clash – for a double overhead
2. jump-in j.MK land c.LK low – for a quick low when the opponent thinks you’re going to overhead
On defense, it can be used to predict the opponent’s offense and catch them with the large disjointed hitbox. The fact that this move easily leads into damage should make your opponent wary about challenging you in the air. However, the move hits at a downwards angle, leaving Big Band exposed to attacks above. Characters with good air mobility can avoid the hitbox and hit you, if you are not careful.
This move consumes sound stun on hit, allowing for a followup. HP Brass Knuckles and MK/HK A-Train are best suited to following up this move at midscreen range. When closer to the corner, you can easily followup with MP Brass Knuckles -> OTG pickup.
All versions of this move have the same hitbox shown above. The differences between the versions are mainly number of hits.
Big Band’s supers
This section will cover Big Band’s supers.

The main drawback is that it is heavily punishable when blocked. It can also be sweeped pre-emptively, counter grabbed and can also be beaten at range by multihit supers/moves like Peacock’s beam super or Valentine’s scalpels super.
This super can be powered up by using Bagpipe Blues taunt beforehand. This gives the super 32 hits of armour as well as a high damage finisher. Also, the charged super does not send the opponent to the other end of the screen and instead lets them ground tech in front of you. The extra hits of armour makes the super very difficult to counter, the main counters being sweeping pre-emptively or command grabbing at a distance. The armour can be used to counter things such as Eliza’s sekhmet calls, Peacock’s beam super, Valentine’s scalpel super, etc. With a safe DHC, you can hit assists with the charged super and do a tonne of damage before DHC’ing Big Band out. The hitboxes of the extra hits and finisher are below respectively.


This super can also be powered up by using Bagpipe Blues taunt beforehand. This adds an extra finisher – see below – that does huge damage and also consumes sound stun – allowing you to followup in the corner.


* Happy birthday – term used when the opponent and their assist is hit at the same time for large amounts of damage and/or a doublesnap combo afterwards.


Useful techniques, combos, conversions, hitconfirms, resets
This section is going to list some practical stuff for you to learn at your own discretion. It will also include the things already linked in the previous sections, incase you missed anything.
1. j.HK wallbounce OTG combos
j.HK causes wallbounce on hit, allowing Big Band to ground tech forwards and OTG pickup with correct spacing. This allows for high damage combos, but denies you sliding knockdowns from chaining into HP Brass or MK/HK A-Train. When close to the corner, the wallbounce caused by j.HK will send the opponent over Big Band and deny any extension. In this case you can do Timpani Drive to extend the combo into the corner and OTG pickup from that.
2. MP Brass Knuckles OTGs
MP Brass Knuckles causes knockdown on hit, and allows for OTG pickups with moves like c.MPx2 in the corner for good damage. Using OTG for a pickup is less of an issue in the corner as Big Band can simply reset or retreat safely backwards with a burst bait.
3. s.MK carry combos
When s.MK is jump cancelled on the first hit, the opponent it launched at a lower height than usual. These chains are good for carrying the opponent (and their assist) towards the corner and chaining into HP Brass or MK/HK A-Train for sliding knockdown and control of the corner. These chains only use j.LP, j.LK, j.MP and j.MK, allowing two chains with s.MK inbetween. Here is a practical combo using this technique:
s.MK j.LK j.MK s.LP s.MK j.LP j.LK j.MK c.MP s.HK xx HP Brass Knuckles
s.LP, c.LP, c.MP, c.HP and c.LK are all good for hitconfirming. You can combine these any way you wish for easy confirms. Here are a few examples.
1. s.LPx2 -> c.LK -> c.MK
2. c.LPx2 -> c.MP
3. c.MPx2 -> c.HP
4. c.HP -> HP Brass Knuckles
5. c.LK -> c.MPx2
1. s.LP -> low/high/throw mixup
2. c.LP c.LK OTG restand -> low/high/throw mixup
1. Beat Extend (any version) -> s.LP s.MK e-brake sideswitch
2. Beat Extend (any version) -> c.LP c.MK e-brake sideswitch
note: doing the shake followup makes these side switches easier
Assists
Big Band has some excellent assists to offer to your team. In fact, they are so good, that some people play him more for the assist than the character himself, which is a bit dismaying. Since his assists are so good, he is rarely played first in a team. Nevertheless, this section will cover assists that benefit Big Band as well as his own.
Big Band benefits from lockdown assists that cover horizontal space, as they benefit his neutral game and make his special moves safer. For example, calling an assist and doing MP Brass Knuckles immediately after would make the move safe, even at close range where it would be otherwise punishable on block. This can be done with A-Train, Beat Extend, Giant Step and Cymbal Clash to great effect.
- Double’s Hornet Bomber (MK/HK DP) – Lengthy lockdown assist that attacks in a very long arc, covering both horizontal and vertical space at once. Both versions allow for instant j.MK overheads in the corner by doing instant j.MK j.HK + call assist.
- Cerebella’s Lock and Load (QCF HP) – Armoured rush punch that moves forward, like a minature version of Brass Knuckles.
- Squigly’s Drag n Bite (QCF HP) – 4 hit lockdown assist that covers good horizontal space and also moves forward as it hits.
- Parasoul’s LP Napalm Shot (charge back, forward + LP) – Projectile assist that moves slowly and covers horizontal space well. Also places a tear on hit/block that will detonate after a set time, making your moves harder to punish.
Big Band also benefits from DP assists, for keeping the opponent out of his face. Any DP assist works, really.
Finally, Big Band has some specific synergies with some assists, allowing him to do quirky things:
- Cerebella’s Excellabella (LP+LK DP) – Grabs the opponent out of the air like a minature version of MK A-Train. Can give Big Band taunts mid combo by launching + calling assist, taunting and following up afterwards.
- Painwheel’s H Pinion Dash (down, down, HK) – Painwheel’s dedicated assist that dashes forward and sends the opponent flying backwards on hit. Can be used with HK Giant Step to convert from long ranges.
- Eliza’s Dive of Horus (QCF MK) – Causes ground bounce on hit. When combined with Big Band’s launchers, the ground bounce is so high that it allows Big Band to taunt and followup afterwards.
Big Band’s assists are very good. Generally people use his special moves as a custom assist:
- HP Brass Knuckles (charge back, forward + HP) – Perhaps Big Band’s most popular assist, as it covers a LOT of space, does high damage and is armoured. Excellent against zoners and good for counter calling(?). It can be converted off easily in the corner and can actually be converted off from longer ranges with certain characters e.g. Parasoul’s Egret Charge and Squigly’s charged sing -> SBO. This assist is also excellent as alpha countering* as it is armoured and easily canceled into super, but it also allows Big Band to Emergency Brake cancel, allowing for a safer way of getting Big Band in . Can be sweeped on reaction/prediction – a good tactic against this assist is to call your own assist to bait the counter call for an easy sweep.
* Alpha counter – MP+HP/HP+HK + forward while blocking or bursting. Allows you to tag in your 2nd or 3rd character by making them doing their assigned assist on entry.
(?) Counter calling – calling assist after your opponent calls theirs to hit it.
- LP Beat Extend (DP + LP) – An amazing DP assist. LP version is used as it the fastest and also has a large DP hitbox on its 1st hit, which has good horizontal and vertical range. The 2nd hit is a huge circular hitbox above Big Band that controls air space extremely well. On hit, it will effectively snatch the opponent up above Big Band, allowing for an easy conversion afterwards. Somewhat lacks in damage when compared to Brass. Good against button-happy players and counter calls.
- LK Giant Step (QCB + LK) – Big Band’s fastest version of his overhead. This assist is good for bolstering a character’s mixup power and is also for characters that lack IAD’s or standing overheads like Double – especially good w/ catheads super – and Valentine. It is questionable whether this assist holds up to Brass and Beat Extend in terms of utility, but is still good regardless.
- MK/HK A-Train (charge back, forward + MK/HK) – Used to dissuade people from jumping. MK can be used for shorter range grabs and the tracking it has. HK for longer range. Good vs people with jumping habits and also against characters that move in the air a lot, like Painwheel, Valentine and Fortune – who can avoid Brass Knuckles assist fairly easily. Also can be converted off by attacking just after Big Band launches the opponent. Generally falls flat elsewhere, as it lacks the all around utility that Brass/Beat Extend possess.
- Bagpipe Blues taunt (forward, HP, MP, LP, forward) – Somewhat of a joke assist, as his other assists completely outclass it. However, it does charge up his next super allowing for higher damage SSJ DHC, making it not completely useless.
That concludes assists for Big Band and his own – for the most part. Feel free to experiment; Skullgirls does allow you to use any special/normal/command normal as a custom assist. Be creative! We will now move onto Big Band’s team composition.
Team composition and synergies
This section will cover Big Band’s place in teams, as well as particularly popular teams and the character synergies involved. I’d like to think any character could do well in any place, but as Skullgirls has developed as a game so have team archetypes and shells, which will not be overlooked.
Playing Big Band 1st lets you get started right away, with the added benefit of assists backing him up. This is good if you particularly enjoy playing Big Band and are comfortable playing him in general. I personally play him 1st for these reasons.
You can tag him out or safe DHC, and then benefit from his own assists (but be mindful of calling his assist when he has large amounts of red health) Taunting before tagging him out also powers up his SSJ super for a very powerful DHC for only 1 meter.
The disadvantage to playing Big Band 1st is that you don’t have access to his assists from the get-go. You also miss out on his SSJ DHC which is highly damaging, at least not without tagging him out first. Finally Big Band has subpar meter build when compared to characters like Peacock, Parasoul and Fortune which can be a problem for teams that require lots of meter for 2nd/3rd characters.
Playing Big Band 1st in a duo allows him to utilise an assist, while retaining increased damage. This gives Big Band an edge whereas in a 3 man team he may have to work more for his damage. It is also a useful as a fear factor for the opponent, that is fully realised when Big Band is played solo.
Playing Big Band 2nd gives you the immediate advantage of his assists and SSJ DHC which bolsters your team in general. If you’re running Brass assist, you get immediate access to this particularly useful alpha counter – explained in the previous section. The problem with playing Big Band 2nd is that he can build up a lot of red health from having his assists used a lot. This means when your point character dies, Big Band is likely to come in and lose some amount of red health, putting you at extra disadvantage on incoming. Playing him 3rd relieves this problem by putting another character between him to recover red health.
Big Band doesn’t provide any safe DHC’s, but instead provides damage and sometimes counter DHC’s in the form of SSJ DHC – it can beat some supers.
His Brass/Beat Extend assists work well for a duo, as they have good all around utility. The added benefit of duo damage ratios vs 3 man teams and solos is a good benefit.
Playing Big Band 3rd gives you all the advantages as having him 2nd but also allows him to function as an anchor for the team. As an anchor, Big Band can get by without assists and play as normal, with the added bonus of having a lot of meter as his disposal. 5 meters can mean dealing a huge amount of damage off one guess using his level 5 or level 3 super, making him much more dangerous.He can also utilise multiple individual supers to dispose of characters one by one, and can taunt to gain an edge over the opponent. Finally his Timpani Drive air super is good for clutch situations, to chip the opponent to death.
Playing Big Band solo amps up the risk involved with his predictive play, giving you no other characters to fall back on and no assists for cover. The tradeoff is that you deal huge damage with each hit. Getting hit may mean having to deal with whatever mixup/reset the opponent has in store, or taking a gamble and doing a reversal instead. Playing wrecklessly is a viable option as taking a hit is not the end of the world. It can also make the opponent very scared of resetting or approaching you. The opponent must be quite skilled to carefully deal with solo Big Band.
- Peacock + Big Band – This combination is popular as a duo, as Big Band’s assists complement Peacock very nicely, with HP Brass covering extra space while throwing projectiles and LP Beat Extend being good for halting the opponent’s inevitable advances. Peacock also builds meter quickly, and can do things like argus super into SSJ DHC and then be tagged right back in safely. Peacock’s Lenny super can be DHC’d into SSJ for a 2 meter reversal. The superflash of Lenny super can be used to check if the opponent has pressed anything, and then can confirmed into SSJ DHC.
- Squigly + Big Band – Big Band’s HP Brass Knuckles assist gives Squigly free openings to charge her stances when the assist is blocked. Squigly can convert off HP Brass Knuckles assist using her charged QCF MP sing. Squigly and Big Band have some excellent DHC synergy as SBO and SSJ DHC into each other well. SSJ can DHC into SBO for a full combo afterwards. Finally, Squigly offers an excellent lockdown assist to Big Band – Drag ‘n’ Bite (QCF HP)
- Parasoul + Big Band – Big Band’s assists are particularly good for Parasoul as she can use both to adapt a zoning or rushdown style, making the team very flexible. Parasoul can use HK Egret Call to convert off HP Brass Knuckle assist when the two are done at the same time. Parasoul’s LP Napalm shot and Napalm Pillar assists are both good for Big Band.
- X, Y, Big Band (trio) – Big Band functions as a decent anchor, and lots of people play him this way. In this aspect he is mostly unaffected by the 1st/2nd characters, except when forcefully tagged in. Having a point character that provides Big Band with a useful assist may be a good idea, to expand your options on tags + alpha counters.
Matchup details
This section will cover Big Band’s matchups. These details are limited to my own knowledge, with added advice from other players. Matchups are tricky subjects, and I found them very difficult to cover at all.
I have added my own knowledge of the matchups and their quirks. In reality matchups are extremely in-depth subjects and these passages do not cover all of the subtleties and kinks of the matchup. Please let me know if you have anything to add.
You can add me on steam or PM me on Skullheart – my username is Alex12898. We can discuss the particular matchup(s) and ultimately change/leave the information for the betterment of the guide. There is also a skullheart thread for discussing Big Band’s matchups[skullgirls.com], though is rather barren right now. Please share your thoughts.
Filia’s IAD’s can be caught by j.LK, s.LP, MK A-Train and LP/MP Beat Extend. Big Band can also control air space well with j.LK and Cymbal Clash. This dissuades Filia from rushing down too much, or she can be easily caught. Big Band doesn’t want to be next to filia however, as her IAD’s become very hard to react to.
Filia’s sweep is actually a slide, so it is quite good for beating Brass/A-Train as it moves her forward. Her ringlet spike fireball is also decent at closer range when Big Band is less likely to do brass. Her j.MP beats all Brass/A-Train/Giant Step when IAD’d at close range, making close range extra dangerous for Big Band.
Once Filia gets a hit, she can initiate extremely fast mixups using things like IAD delay crossup j.hk, jump instant j.LK j.HK overhead, c.LK low, ground throw, etc. She can also reset Big Band in the air, using air throw/burst bait/tech punish setups. Resetting Big Band in the air is preferable as he has no air reversals.
Big Band has to reset Filia carefully also, as she can use gregor on the air or the ground. This mostly depends on whether the opponent is willing to spend a meter to escape. Using grab/burst 50/50s to bait out the gregor input would work.
This match requires a bit of care from the Big Band player to stay out of Cerebella’s grab range as he has few options against her command grabs, MGR in particular. He has a very large physical box (blue box, shown in image) allowing him to be grabbed from lengthy distances. Cerebella can actually grab Big Band with MGR at point blank range, allowing her to do easy low/throw resets in the corner.

He has limited options against grabs in general, but you cannot tech command grabs, removing another option from his already sparse amount of options: He can use HP Beat Extend’s invulnerability or level 3 super’s invulnerability to beat it or he can jump over it and punish with j.MK. Otherwise a lot of his moves will be beat by MGR, including SSJ ground super. Cerebella can also followup her grabs into a combo and a low/throw reset afterwards, making it a huge threat.
To avoid getting grabbed, you can use Brass Knuckles at a distance to keep her away, mixed with Emergency Brake to immediately close the gap, which surprises the opponent and lets you mix them up.
Cerebella’s armoured moves like her armoured run and Lock and Load rush punch are easily breakable using c.HK sweep.
Resetting Cerebella in the air is preferable for the same reason resetting Big Band in the air is preferable. Cerebella has good ground reversal tools such as Diamond Dynamo level 1 ground super, Ultimate Showstopper level 1 grab super, Devil Horns (MP DP), Ram Horns (runstop->HP), Lock and Load (QCF LP/MP/HP), etc.
MK/HK A-Train affects this matchup greatly. Painwheel can’t space herself in the air as easily as MK/HK A-Train will catch her. Painwheel can’t jump/fly at close/mid range without taking a big risk. She can start flying/jump safely at about fullscreen range and can then move in. j.MP will beat MK/HK A-Train as it will hit Big Band through armour and Painwheel can easily flight cancel to confirm off this. She can also use unfly and immediately block HK A-Train on reaction, then mix him up while he is at a disadvantage.
Painwheel’s sweep has excellent range for beating Brass + A-Train and can also be charged to soak up the initial hit of Brass. In this aspect her hatred guard moves are great for soaking Big Band’s slower moves for large amounts of counterhit damage.
Painwheel’s Death Crawl level 1 ground super beats Big Band’s SSJ level 1 ground super at close range, as it hits extremely fast. Her Buer Thresher air super will beat A-Train / Brass Knuckles also.
Delicate matchup for both players. Big Band has a hard time getting in after Peacock gets her projectile patterns going, especially when Peacock has an assist to cover extra space. However, Peacock can have trouble getting started because of Brass/A-Train. This means the matchup is primarily about spacing. Big Band wants to be in MP/HP Brass range or closer, and Peacock wants Big Band at the other end of the screen. On round start, Peacock cannot use the standard jump and dash away without risking getting caught by A-Train, which gives Big Band oki and puts Peacock at a heavy disadvantage. Peacock can just walk backwards on round start and avoid having to commit to any risky decisions.

MP/HP Brass is an excellent move vs. Peacock as it will armour through projectile patterns, move you forward and can be easily confirmed into super for extra damage. s.MK kara cancel should be used for extra range, albeit carefully, as it can be caught by a projectile before it is canceled. Peacock can use argus to beat Brass from a distance as it will rip through the armoured frames. She can also punish blocked MP/HP Brass with argus at any distance.
Peacock can use her item drops – namely MP version – to punish blocked Brass/whiffed A-Train and get a full combo from the right distance – level 2 item drop has loads of hitstun for confirming. Item drop should be prioritised over other projectiles as it can be held, defensively, to dissuade Big Band from throwing out Brass. Peacock can teleport to avoid Brass, but this can be heavily punished by SSJ ground super as it will autocorrect towards Peacock and hit her as she reappears.
Air parry can be used to approach Peacock in a safer way as it preserves air momentum whereas jumping + blocking projectiles will stop you in mid air.
Matchup details pt. 2

When Fortune takes off her head, Big Band’s level 1 SSJ ground super does more damage, as it easily hits the head and Fortune at the same time with its huge hitbox. 3812 being its base damage, it can increase to a maximum of 6035 damage, at 1.0 ratio. Taunted level 1 ground super also increases in damage, with 5286 being its base damage, increasing to a maximum of 8393. This amount of damage is massive, giving his level 1 super the potential power of a level 3, and the taunted version the potential power of a level 5. Getting a combo ending in SSJ on Fortune + her head in the corner can often mean a TOD.

With this in mind, Fortune should be VERY careful when taking off her head, or indeed deciding to take it off at all. When in headless, her “Nom” hitgrab can interrupt Brass/A-Train/Giant Step and let Fortune convert from a distance.
I think this matchup lies on the skill of the Squigly player. Lots of Squigly players like to jump to apply pressure with her divekicks. She can jump above MK/HK A-Train’s reach and use her divekicks to attack from directly above which can punish whiffed A-Trains and otherwise reduce Big Band’s options to moves like c.MK, beat extend and blocking, parrying, chicken blocking, etc.
What most Squigly players don’t know is that she has some good options on the ground compared to the air vs. Big Band.
- When she has a LP/MP/HP charge she can do charged QCF MP sing xx SBO level 1 super to catch Big Band’s lengthy normals and Brass/A-Train/Giant Step. Squigly can convert off this easily by dashing up and attacking. Be careful though, as Brass can be super canceled into level 1 super ground super vs charged MP sing xx SBO to beat it.
- Her QCF MK Silver Chord breaks armour as it is a hitgrab and will beat Brass/A-Train, and also lead to a stagger for easy conversions. This move is easily punished on block however, as Big Band can punish with MP/HP Brass at long range and punish normally at close range.
- Squigly’s sweep has excellent range and can also be stance cancelled, so you can do it over and over. This is a good option at closer range.
Some Squigly players like to start the round with SBO level 1 super, but this can be countered by SSJ level 1 super for lots of damage and better positioning.
Valentine has arguably the best air mobility in the game, and she can use this to get directly above Big Band where MK/HK A-Train would completely whiff. She can superjump -> double jump/air dash to get over and then attack with moves like j.LK, j.MP, j.HP etc. The initial jump can be caught by MK/HK A-Train at the correct range though, forcing Valentine to jump at long range or take a risk jumping at close range.
Valentine’s multihit moves will beat Big Band’s Brass/A-Train at closer range. j.MP and j.LK are good jump-in multihit moves that will break armour and lead into a conversion. s.MP and s.MK are good standing multihit moves that will also break armour and lead into a conversion.
Valentine’s Checkmate Incision (scalpels) super will break Big Band’s armour easily, excluding taunted SSJ. It’s worth noting she can do this in the air and on the ground for easy punishes also. She can use level 2 counter super (backwards DP + KK) to counter Big Band’s slower normals and specials like Brass, and it will break armour when Valentine has a vial loaded. It also does good damage.
Her Savage Bypass (QCF LK/MK/HK) is a decent way of approaching Big Band as it is difficult to react to.
Big Band’s large physical box means Valentine’s air crossups are slightly more reactable as she has to move further to get over Big Band.
I don’t have much experience in this matchup playing against Double, as hardly anyone plays her. I do however have some experience playing Double vs Big Band.
Double’s Cilia Slide (back + LK + HK) covers great distance, hits low and breaks armour. This can catch Big Band players trying to space you out, or those who only do charge moves by holding back and not down+back. On hit, it is easily converted through OTG pickup. The move is risky and is easily punished on block. However, it can be canceled into QCF KK level 2 catheads super to make it safe and start catheads pressure.
Double has some good multihit normals borrowed from the rest of the cast, her j.HP being Painwheel’s j.MP, her j.MP being Filia’s j.MP and her j.LK being Parasoul’s Spiral Flare (back + j.LK) but reversed to hit forwards. Double lacks an air dash to jump-in quickly with these moves but she can simply neutral jump or forward jump into these moves to bait + beat Brass/A-Train. She can dash up and convert after j.HP, and can convert off j.MP/j.LK with s.LP/c.LP.
Eliza has great range on some of her air normals, whereas Big Band has rather limited range on his. This means Eliza can get in a lot with stuff like j.MK and j.LK combined with air dashes for extra pressure. Big Band can catch these jump-ins with MK/HK A-Train however. The result is quite a risky game for both characters.
When Big Band has taunt, he can absolutely rip through Eliza’s Sekhmet calls, as taunted SSJ has 32 hits of armour and Sekhmet has hyper armour, meaning she will have to take all of the hits. This can mean death in some cases and simply huge damage in others. Combined with a safe DHC, Sekhmet calls can be completely suppressed.
Eliza’s defense is generally subpar, as she has a large hurtbox and has no fully invincible special – Her DP is only hit invincible and can be grabbed.
♥♥♥♥♥’s projectiles play a large role in this matchup. She can zone Big Band out with her ground/air projectiles and apply large amounts of chip damage, forcing Big Band to advance.
Her clone projectiles (QCF LK/MK/HK) are all effective vs. Big Band. LK Clone is a slide projectile which will break armour on Brass/A-Train and let ♥♥♥♥♥ convert at mid/close range. This can dissuade Big Band from approaching with Brass/A-Train. MK Clone covers a huge amount of space which is extra hard to avoid when Big Band’s hurtbox is so big. HK Clone is an overhead projectile, which can be used to mix Big Band up.
♥♥♥♥♥’s ground fireballs are easy armoured through with MP/HP Brass, but her air fireballs can be safely done outside of MK/HK A-Train range to zone Big Band out. Big Band can parry these projectiles in the air to maintain air momentum and advance a bit easier.
♥♥♥♥♥’s level 1 fireball super (QCF PP) will break armour due to the multiple hits at longer range, but will lose to MP/HP Brass at close range as it will armour through + hit ♥♥♥♥♥ (and can also be canceled into SSJ for an extra hit of armour)
Her level 1 BFF super (QCB KK) can be armoured through with Brass.
Matchup details pt. 3

Another tricky matchup. Parasoul’s pokey normals are hard to deal with without committing to risky options like MP/HP Brass or Beat Extend. Parasoul’s j.LP is an excellent move in this matchup, as it can overhead Big Band from great range and can be buffered into j.HP for an easy confirm. On top of this, j.LP stays out for a while (12 active frames) meaning Parasoul doesn’t have to particularly time the move to overhead. Combined with her good c.LK low and fwd s.LP overhead, she has great mixups vs Big Band at close range. This makes her dangerous at close range.
Big Band has very few ways of countering Parasoul’s j.LP overhead because it is so fast. j.LK will beat it air-to-air at close range. MK A-Train can also be used, but only really on prediction or reaction to dash jumps. It will armour through j.LP and catch it. MK A-Train is also already a risky move on its own, and when used to counter a jumping light attack, the risk is very high and the reward low. Chicken blocking is a safer option. This means jumping + air blocking. Blocked j.LP -> j.HP will leave Parasoul at frame disadvantage.
Parasoul’s Egret Charge is also good against Big Band as it counts as a hitgrab but moves across the screen like a projectile, and will beat Brass/A-Train before they hit. On hit, it carries you to the corner and lets Parasoul easily convert into a combo.
Generally Big Band needs to be very careful in this matchup. He can zone her out with Brass Knuckles and make the correct reads on her jump-ins with MK A-Train to shift the momentum. Big Band does NOT want to be in the corner vs. Parasoul because he will be subject to some serious mixup potential from instant j.LP buffer j.HP overheads, c.LK lows, grabs and her other dedicated mixup tools such as fs.LP overhead, fs.MP low and bs.HK high
Once you get sliding you can start to pressure her on oki. Just be careful throwing out stuff as her Napalm Pillar is very hard to dodge as Big Band. You want to reset her in the air to avoid that.
Her Napalm Shot projectiles are easy to armour through with MP/HP Brass (with s.MK kara for added range)
This matchup exposes Big Band to his own tools. The results are strange.
Round start in this matchup puts both players at an uncomfortable distance where regular ground throw will hit from the start, HP beat extend will hit, MK A-Train will catch jumps, s.LP will hit, etc. This forces both players into a guessing game of what beats what. Put simply, here are the options and what they beat/ are beat by:
- Ground throw
Beats: MK A-Train, LP/MP Beat Extend, sit + block
Beaten by: Jump -> jump-in punish, HP Beat extend, SSJ super - MK A-Train
Beats: Jumps and jump-ins
Beaten by: Throw, wait + punish - LP/MP Beat Extend
Beats: Jump-ins, ground normals
Beaten by: Throw, parry, chicken block - HP Beat Extend
Beats: Throw, ground normals
Beaten by: j.LK jump-in, parry, chicken block - SSJ super
Beats: Ground throw, MK A-Train, LP/MP/HP Beat Extend
Beaten by: Blocking + punishing
The neutral game in this mirror matchup is quite risky. MP/HP Brass armour through stuff like LP Beat Extend, all versions of Giant Step, and LP Brass easily, but both versions are heavily punishable on block. When MP/HP Brass collide, the move can be quickly super canceled into SSJ which beats all but except level 3 super counter.
Big Band’s hurtbox and physical box are both huge. This means he has a hard time avoiding his own huge move. He also gets easily caught jumping by MK/HK A-Train and can be grabbed at considerable distances by his own ground throw (which has bigger range than other regular throws) and LK A-Train.
Big Band can instant overhead in the mirror match with j.LK, and mix it with his fast c.LK low and far reaching ground throw to mix the other player up effectively on oki and in regular resets.
Afterword + special thanks
That concludes the guide for now. I’ll update it with more and more stuff as time passes and the game is updated.
I’d like to thank a few people for giving input, advice and the experience of certain matchups to me throughout the creation of the entire thing. Pombear, Slippery Lil’ Dude, Flagged for Saxual Content, Rice, Zeknife, Mr Peck, Jarlix, Isavulpes, Kuroonehalf – you’re all cool people!
Finally I’d like to thank KillJoy for making me the player I am today. (where would I be without you, man?)
Changelog/Updates
Originally I wanted to keep this section for changes but the steam guide maker can be a real pain in the ass, and keeps some kind of untracked word limit on each section. This means I can’t update the previous sections without deleting information (which I’m certainly not going to do) So instead I’ll just explain the updates here, and update the sections with information that is easily changed like frame data and general move properties.
18/04/2015
– MK/HK A-Train startup reduced by 3 frames – now 17 for MK, 21 for HK
This minor buff makes both moves slightly faster, but also makes their Emergency Brake versions slightly faster. HK A-Train is now better used for Emergency Brake as it is faster than HP Brass and Emergency Brake is a more viable movement tool.
– Updated “Big Band’s supers! you can now DHC after the final hit of taunted SSJ
Point Big Band players rejoice! You can now get the full damage off taunted SSJ and then DHC into another character for EVEN more damage! This change buffs him being 1st/2nd when he has another character to DHC into and allows for some seriously damaging combos. Obviously this makes taunt more viable than it used to be.