Overview
This is my new and improved guide for LEGO Batman 2: DC Super Heroes! In an effort to make my guides more helpful and engaging, I have decided to rework them! I would appreciate any feedback you guys have about this new format, so be sure to leave a comment or shoot me a direct message!In this guide you will find:-A rundown of Gameplay Basics-A tour of the Batcave-How to beat each level in Story Mode, as well as how to get to the next Story level in Gotham City-The locations of all 10 Canisters and the Citizen in Peril in each level in Free Play Mode-How to complete the Bonus level, including how to unlock it-A complete guide to exploring Gotham City, including the locations of every Character Gate, Citizen in Peril, Gold Brick, Red Power Brick, Vehicle and Villain Battle-Full lists of Suits, Characters, Vehicles and Extras-A full list of Cheat CodesThese guides have always been and will always be free. However, working on these guides takes considerable time and effort. If you like the guide, feel free to show your appreciation with a Steam Award! I appreciate all the points and support you guys have given me!
Gameplay Basics – Game Modes
This game has plenty of levels for you to play, with 15 story levels. There are several different game modes you can play, which I’ll describe here. I also describe how I structure the walkthroughs for each game mode.
The first time you play a story level, you will be playing Story Mode. You will only have access to the characters that the game gives you. Generally, your exploration is limited due to the characters you have, meaning you’ll have to come back in Free Play Mode to unlock the collectables you couldn’t collect in Story Mode. After completing a level in Story Mode, you can select the Replay Story option to replay the level in Story Mode.
At the top of my Story Mode walkthroughs, I list the enemies you’ll encounter and any bosses you will fight. I also list both your starting characters and any characters that are added as you progress. Finally, I list the Super Hero total for that level. Each level is split up into parts, which I sometimes call areas. Each part is a distinct area of the level, separated from other areas by a screen wipe (it will be very obvious when you enter a new area). Below each part, I explain what to do in that part to progress in the level. I do not include the locations of any collectables, even if you can collect them in the story. At the end of the walkthrough, I list any characters you unlocked. If you need to purchase these characters, I have also included their cost in studs.
After completing a level in Story Mode, you will be able to play it in Free Play Mode. In Free Play Mode, you can select any character from all the ones you’ve unlocked to take into the level. The game will then give you a selection of other characters to cover all of the abilities you have unlocked. In Free Play Mode, your goal is to find all of the collectables. At any point in Free Play Mode, you can save and exit to return to Gotham City without having to complete the level.
My Free Play Mode walkthroughs are also divided into parts, as I believe this makes them easier to navigate. At the top of the walkthrough will be a list of the abilities you’ll need to collect all of the collectables in that level. Free Play Mode walkthroughs contain the locations of all 10 Canisters and the Citizen in Peril, even if they can be collected in Story Mode. Screenshots are also included to add clarity to the walkthrough.
Gameplay Basics – Collectables
To get 100%, you gotta collect everything. There are lots of things to collect, so it’s important to know what you are looking for! You can check your overall collectable progress from the pause menu or in the bottom left corner of the map.
Studs
 These are the most important things you can collect. Studs act as the game’s currency, so you’ll want to be picking up as many as you can find. The silver studs are worth 10, the gold studs 100, the blue studs 1,000, and the purple studs 10,000. You’ll use studs to purchase things in the hub, so you’ll want to be collecting as many as you can.
Super Hero
Collecting studs is essential if you want to reach Super Hero status. Collecting studs in a level will reveal a stud bar in the top center of the screen. As you collect studs, the stud bar will gradually turn yellow. Once you fill the stud bar, you will achieve Super Hero status. Once you achieve Super Hero in a level, you cannot lose it. Even if you lose all the studs in a level after achieving Super Hero, you will not lose it. Achieving Super Hero in a level will net you a Gold Brick.
Gold Bricks
 Gold Bricks are exactly what they sound like, and they can be found in many different ways. They can be earned by completing certain tasks, and they can also be found as collectables in Gotham City. There are 250 Gold Bricks in total, and the amount of Gold Bricks you have is a good way to estimate your overall percentage in the game.
You can earn Gold Bricks by:
- Completing Story levels (15 total)
- Earning Super Hero in Story levels (15 total)
- Collecting all 10 Canisters in Story levels (15 total)
- Rescuing the Citizen in Peril in Story levels (15 total)
- Rescuing the Citizens in Peril in Gotham City (35 total)
- Collecting them in Gotham City (154 total)
- Completing LEGO Gotham City (1 total)
Canisters
 Most of your time in Free Play Mode will be spent going after these. Canisters are black cylinders that you can collect. Collect all 10 Canisters in a level to receive a Gold Brick. You will also complete a Minikit Vehicle, which you can use in Gotham City.
Red Power Bricks
 Found throughout Gotham City, these allow you to unlock and purchase Extras. These can change your gameplay experience in various ways, from making studs worth more to increasing your ability in combat. Check out the “Red Power Brick Extras” section for more information on what each Extra does.
Citizens in Peril
 Throughout Gotham City and in Story levels, you will find various citizens who have gotten themselves into trouble. Help them escape their predicament and you will have rescued them.
Villain Battles
 While flying around the city, you will notice red lights that shoot up into the sky.
 Land on the ground and you’ll find a Remote Terminal. Activate the Remote Terminal and you’ll clear up a portion of the map. A villain will also appear in the area, itching for a fight.
 Approach the villain and you’ll start a boss fight. Defeat the villain and they’ll surrender, allowing you to purchase them. If you can’t afford the villain, you won’t have to fight them again. You’ll just have to walk up to them and they’ll surrender right away.
Vehicles
 Perhaps the simplest collectable to collect, vehicles are exactly what you’d expect them to be. They all are just sitting out in the open, waiting for you to walk up and purchase them. They appear as small images of themselves on the map.
Character Gates
 These appear on the map as small images of themselves, and each require a different number of Gold Bricks to build. Once you assemble the door, a character will pop out, allowing you to purchase them.
Gameplay Basics – Character Abilities
As you play through the levels, you will notice many things that you can do. However, not all characters will be able to do them! This is because each character has certain abilities, and in order to collect all the Canisters, Citizens in Peril and Red Power Bricks, you’ll need to make use of their abilities to unlock new areas of the levels to explore.
Here is a quick rundown of all the abilities characters can have. For detailed information on who has these abilities, see the “Characters” and “Suits” sections towards the bottom of this guide.
Agility
 An ability unique to Robin’s Acrobat Suit, this ability allows him to climb blue-and-white poles. Simply walk up to the pole to grab onto it.
 This ability also allows him to hop up blue-and-white walls. Hop onto one of the walls, then hop back and forth between them to climb up.
Ball
 This ability is exclusive to Robin’s Acrobat Suit, and allows the wearer to turn into a ball. Press the “special” button while wearing the suit to turn into a ball, allowing you to use ball sockets. Roll into the ball socket, then use the d-pad to roll the ball, allowing you to interact with the environment.
Chemical Spray
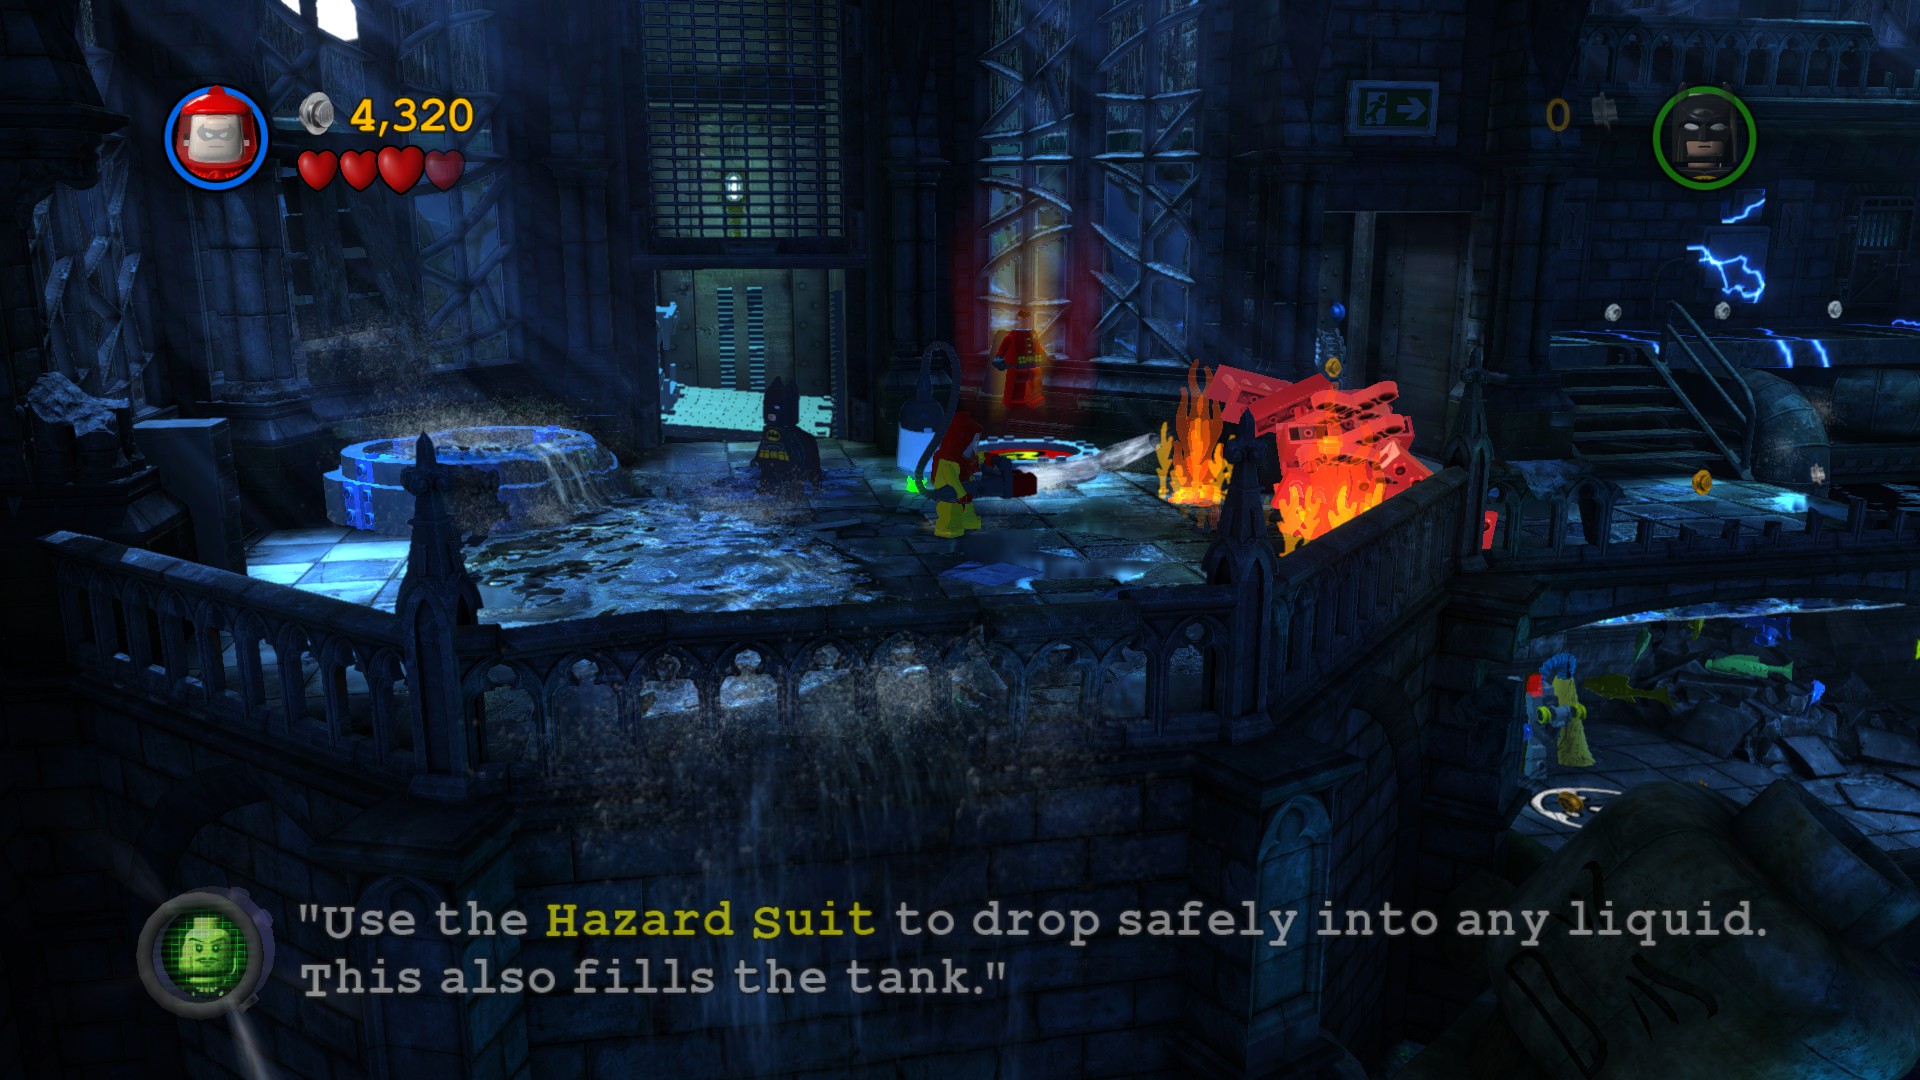
 An ability unique to Robin’s Hazard Suit, this ability allows him to spray toxic waste. Stand in toxic goo and the hazard tank will fill up with that color toxic goo. Even standing in the smallest puddle of toxic goo will fill up your hazard tank.
 Once you have some toxic waste in your hazard tank, hold the “special” button to spray it in front of you. You can also hold the “attack” button to aim. You can spray toxic waste into special vats marked with colored circles. There are three colors of toxic waste: green, purple and orange. You can also spray toxic waste into a container if it’s the same color as the circle.
Deconstructor
 An ability unique to Lex Luthor, this allows him to use his deconstructor to destroy shiny black objects. Black objects with blue sparks on them can be deconstructed. Hold the “attack” button to use the deconstructor, then target a black object for a few seconds to deconstruct it.
Dive
 This ability allows a character to sink to the bottom of water. This allows them to interact with objects underwater, such as levers, as well as collect underwater items. While underwater, hold the “jump” button to return to the surface.
Electric
 Characters with this ability can take/remove charges from generators. Stand in front of a generator with electricity flowing through it and press the “special” button to remove the charge, shutting off the generator.
 Stand in front of a generator without electricity flowing through ti and press the “special” button to insert a charge, turning the generator on.
Electric Immunity
 An ability unique to Batman’s Electricity Suit, this ability allows you to walk through areas that are charged with electricity. Characters without this ability will be shocked and unable to move while in the electricity.
Explosive
 Characters with this ability can destroy silver objects. Press the “special” button to launch an explosive, which will detonate after a few seconds. Hold the “special” button if you want to detonate the explosive sooner. Only Batman’s Power Suit can destroy silver objects that are off the ground.
Flight
 Characters with this ability possess the power of flight. Double jump to start flying, and hold the “jump” button to go up. Hover in the air and release the “jump” button to descend. This ability allows characters to bypass puzzles that you would normally need other abilities to solve.
Freeze
 Characters with this ability can freeze LEGO water. You can recognize LEGO water because it looks just like regular water, except there are studs occasionally flowing through it. Fire ice blasts at water to freeze it. You can also hold the “special” button to fire a short-range ice beam. Characters with this ability can also put out LEGO fires.
 Characters with this ability can also shoot and activate ice switches, which appear as white circles with a snowflake in them. Hold the “attack” button to aim, then select the ice switch and release to fire at it. This will usually activate an ice jet, which will interact with the environment in some way.
Freeze Immunity
 Characters with this ability can walk through freeze jets. Characters without this ability will be frozen into a block of ice if they get too close.
Glide
 Characters with this ability can glide across gaps that are too wide to jump across. Press and hold the “jump” button to glide across the gap.
Gameplay Basics – Character Abilities cont.
Grapple
 Characters with this ability can use grapple points to reach new ledges or areas. Hold down the “attack” button, then target the grapple point to latch onto it. Press up on the d-pad to move up the cable, then press the “jump” button to hop onto the ledge.
 Characters with this ability can also use pull handles. Hold down the “attack” button, then target the pull handle to latch onto it.
Heat Vision
 Characters with this ability can destroy gold objects. Hold the “attack” button to activate heat vision, then hover a gold object to destroy it. You’ll have to keep the laser on the object for a few seconds to destroy it.
 Characters with this ability can also cut shapes out of gold panels. Hold the “attack” button to activate heat vision, then target the gold panel. Use the d-pad to cut out the shape.
Joker
 An ability unique to The Joker, this allows him to open special Joker Boxes. A Joker Box is, as you might expect, a box with a bunch of images of The Joker on it. Stand in front of the box and press the “special” button to open it.
Lantern
 Characters with this ability can build lantern LEGO pieces. Lantern LEGO pieces are similar to normal LEGO pieces, except they are made of either green or yellow translucent LEGO bricks (the color depends on the character you are playing as). Hold the “special” button to build the LEGO pieces, then continue to hold the “special” button to interact with the object you made.
Magnet
 Characters with this ability can interact with blue metal objects. While near a metal object, hold the “special” button to pull on the object.
 Characters with this ability can also walk up magnet walls. Walk up to a wall and press the “special” button to hop onto it. While climbing up the wall, you can hop off at any time.
Penguin Bomb
 An ability unique to The Penguin, this allows him to send his Penguin Bombs through special igloos. Stand in front of the igloo and press the “special” button to launch a Penguin Bomb. The penguin should go through the igloo, reappearing out of another nearby igloo. You can then hold the “special” button to detonate the bomb, allowing you to destroy silver objects that you can’t normally reach.
Plant Travel
 An ability unique to Poison Ivy, this allows her to travel between special flower beds. Stand on the flower bed and press the “special” button to travel through it.
Pole
 This ability is exclusive to Robin’s Acrobat Suit. Hold the “attack” button, then target a blue-and-white circular slot to throw your pole into it. You can then hop onto the pole and swing up any other nearby poles. You can use this ability to reach new ledges.
Riddler
 An ability unique to The Riddler, this allows him to open special Riddler Boxes. A Riddler Box is, as you might expect, a box with a bunch of “?” icons on it. Stand in front of the box and press the “special” button to open it.
Gameplay Basics – Character Abilities cont.
Sharp Shoot
 Characters with this ability can use a long-range weapon (whether it be a Batarang, a gun, or a blast attack) to hit objects from a distance. Hold the “attack” button, then target any objects you want to hit.
Sonic
 Characters with this ability can destroy glass objects. Glass objects are light-blue, see through, and will often flash. Glass objects can be destroyed by repeatedly attacking them with sonic attacks. You can also press the “special” button to unleash a sonic wave that will shatter any nearby glass objects.
Stealth
 This ability is unique to Batman’s Sensor Suit, and allows him to sneak past security cameras. Security cameras sense movement, and if you get too close the light will turn red! This will usually close a door or block an opening. While wearing the Sensor Suit, press the “special” button to turn invisible, allowing you to walk past the camera.
Super Speed
 An ability unique to The Flash, this allows him to rebuild deconstructed LEGO objects. Stand next to a pile of black LEGO pieces with red-and-yellow sparks shooting off them and hold the “special” button to rebuild the object.
Super Strength
 Characters with this ability can use super strength handles, which are simply orange handles that appear on objects in the environment. Walk up to a super strength handle and repeatedly tap the “special” button to pull on it.
Toxic Immunity
 Characters with this ability can walk/swim through toxic waste without being harmed. Characters without this ability will take damage from touching the toxic waste.
Water Spray
 Characters with this ability can spray water. Hold down the “special” button to spray in front of you, or hold the “attack” button to aim. You can use water to put out LEGO fires.
 Characters with this ability can also spray water into special containers. Spray water at blue circles to fill them up with water.
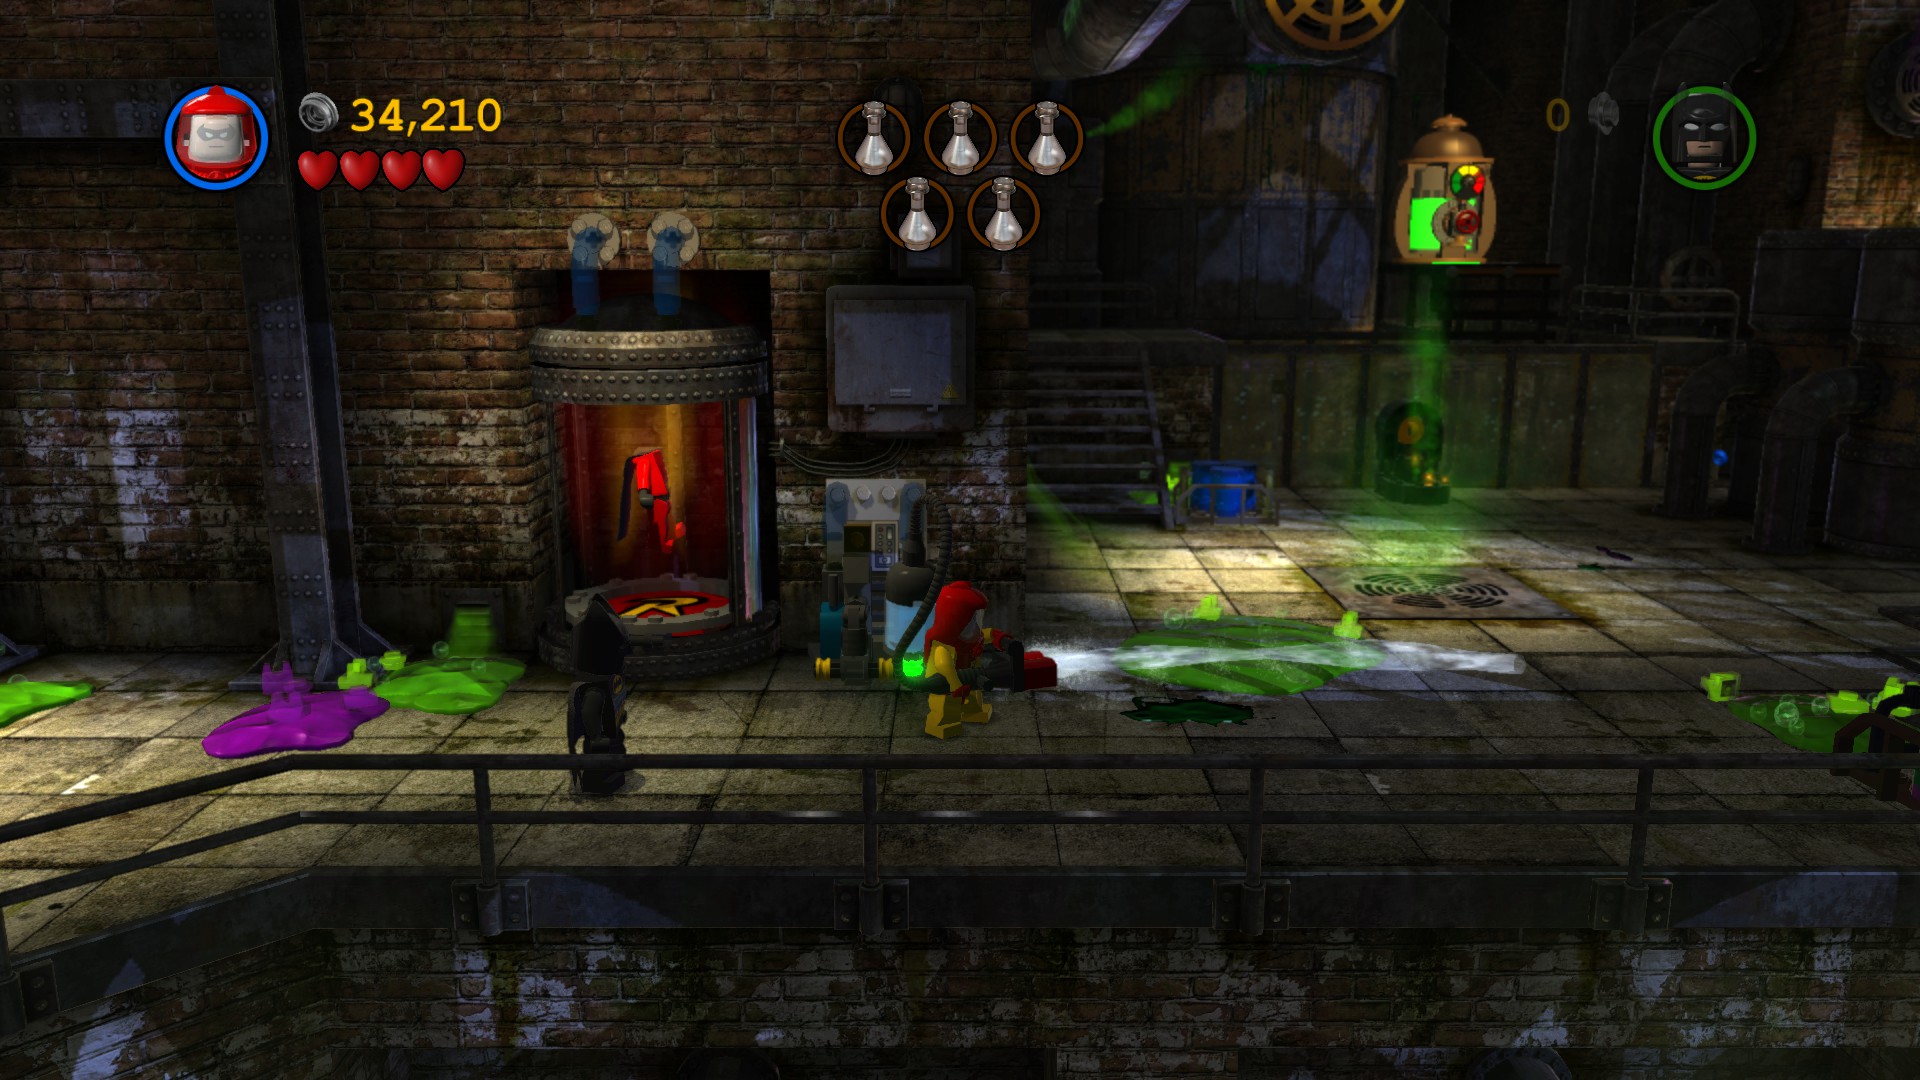 Water can also be used to clean up puddles of toxic waste on the ground.
 Robin’s Hazard Suit will need to stand in water before using this ability. Stand in any body of water to fill the tank on the back of the suit.
X-Ray Vision
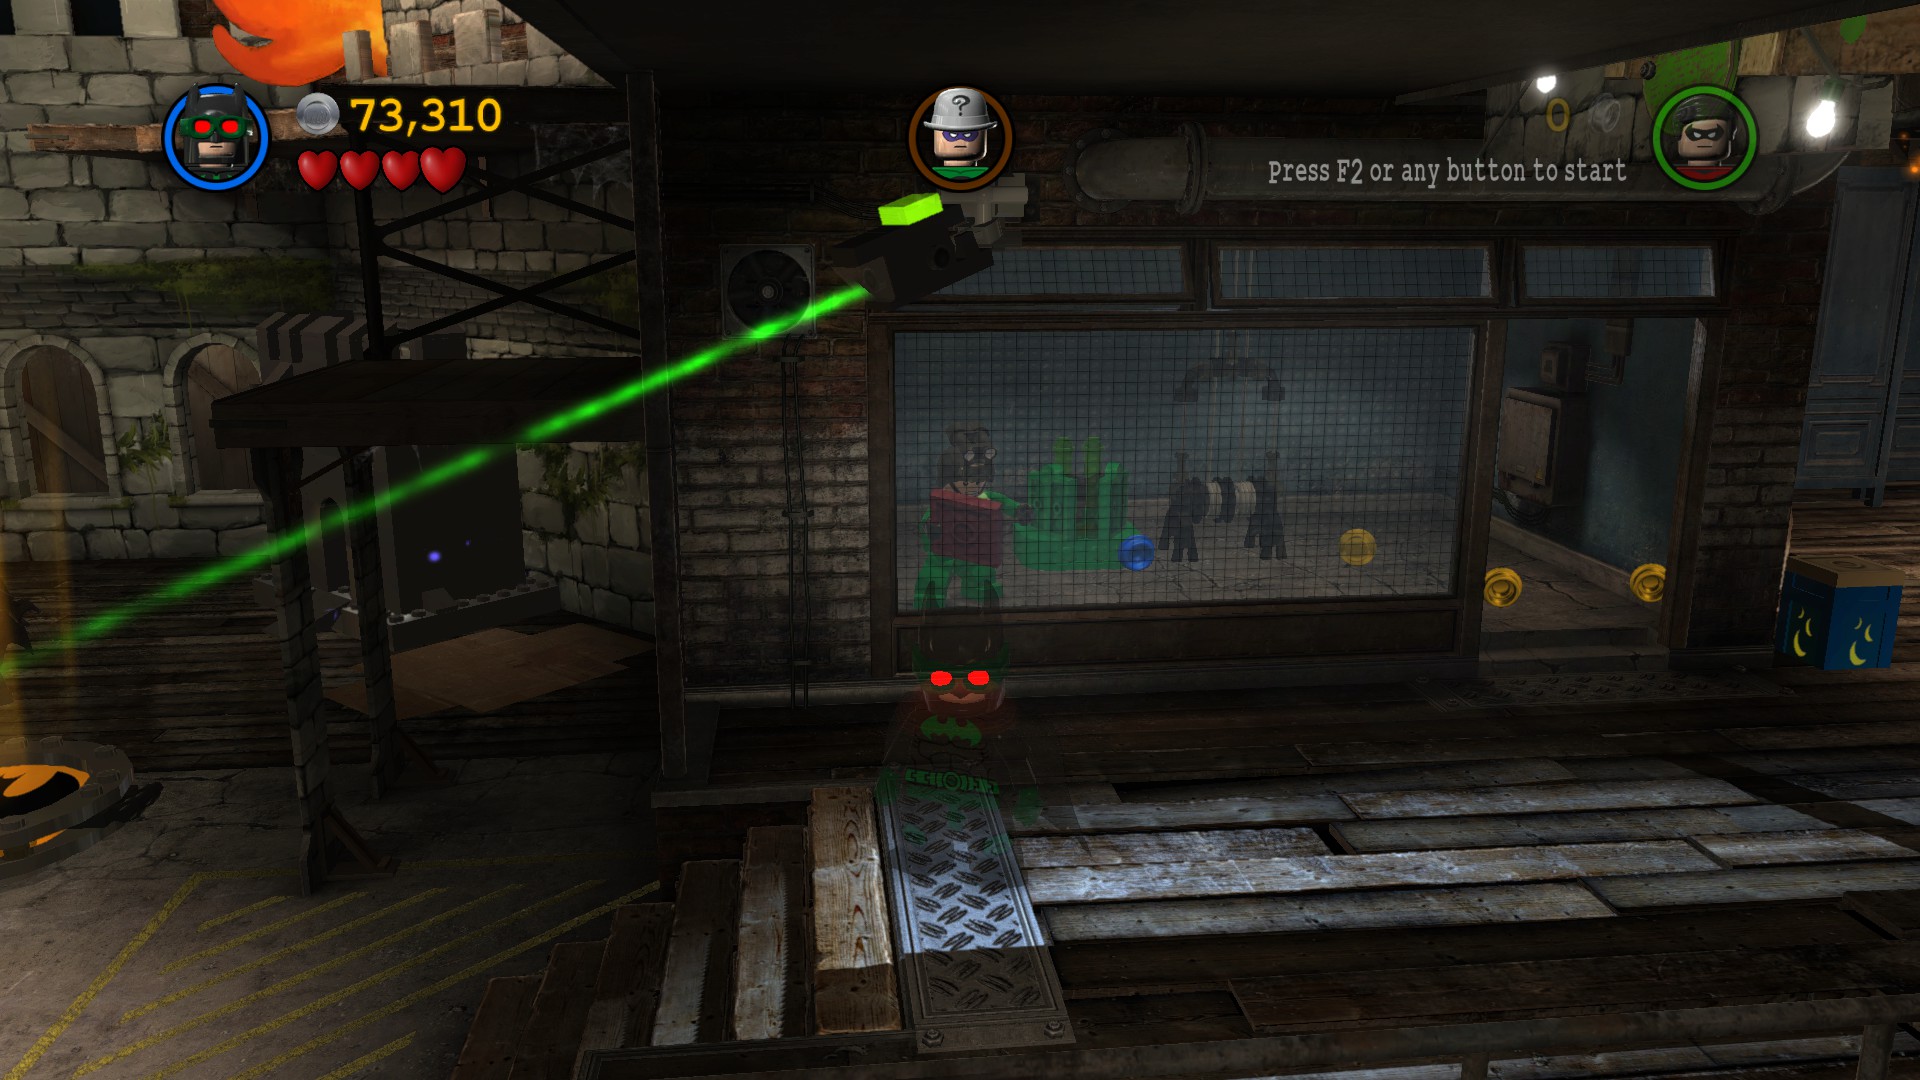
 Characters with this ability can look through green x-ray walls. Stand in the white circle in front of the wall and press the “special” button to look inside. You’ll need to press the “attack” button to interact with objects inside the wall, usually connecting pipes or wires. Press the “special” button again to stop looking in the wall.
Tour of the Batcave
While Gotham City itself acts as the main hub of the game, there are still important things you can do in the Batcave. So, let’s take a tour!
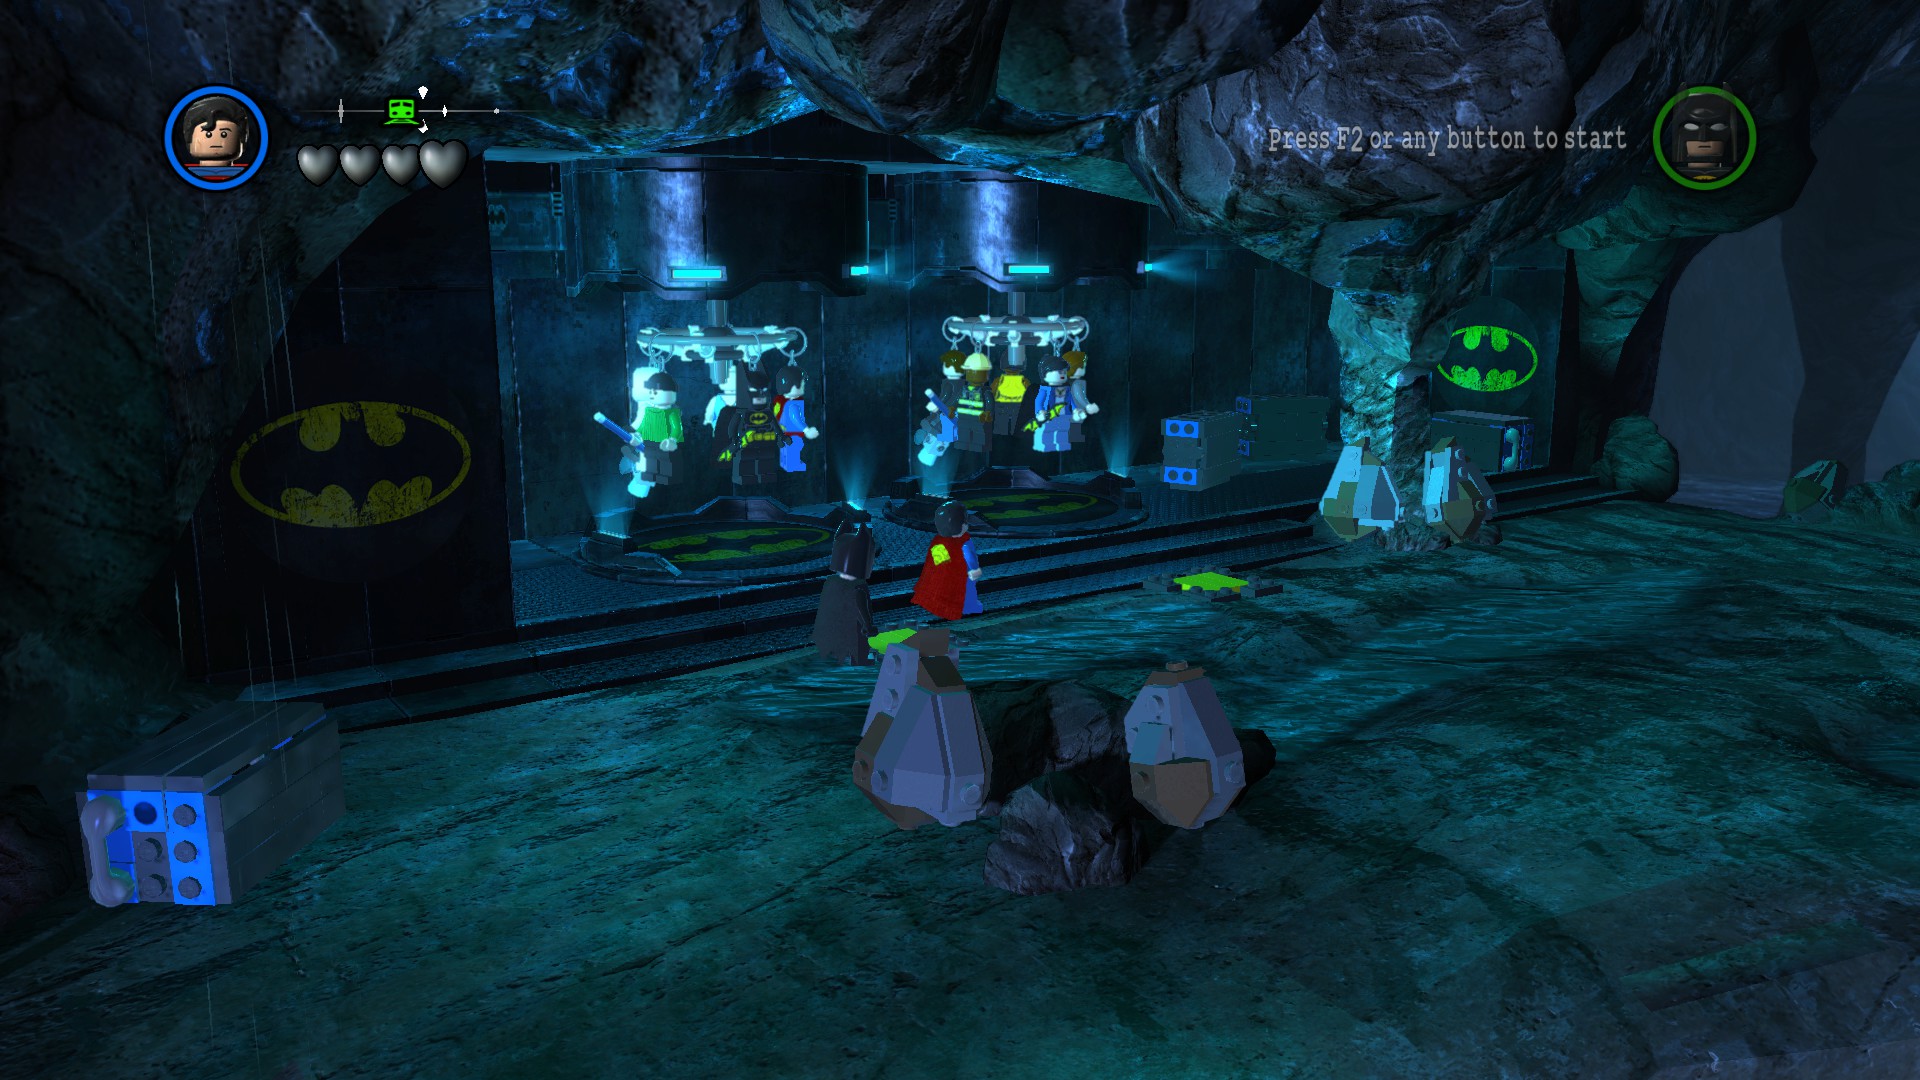
 In the center of the Batcave is the Batcomputer. Press the “special” button in front of it to activate it.
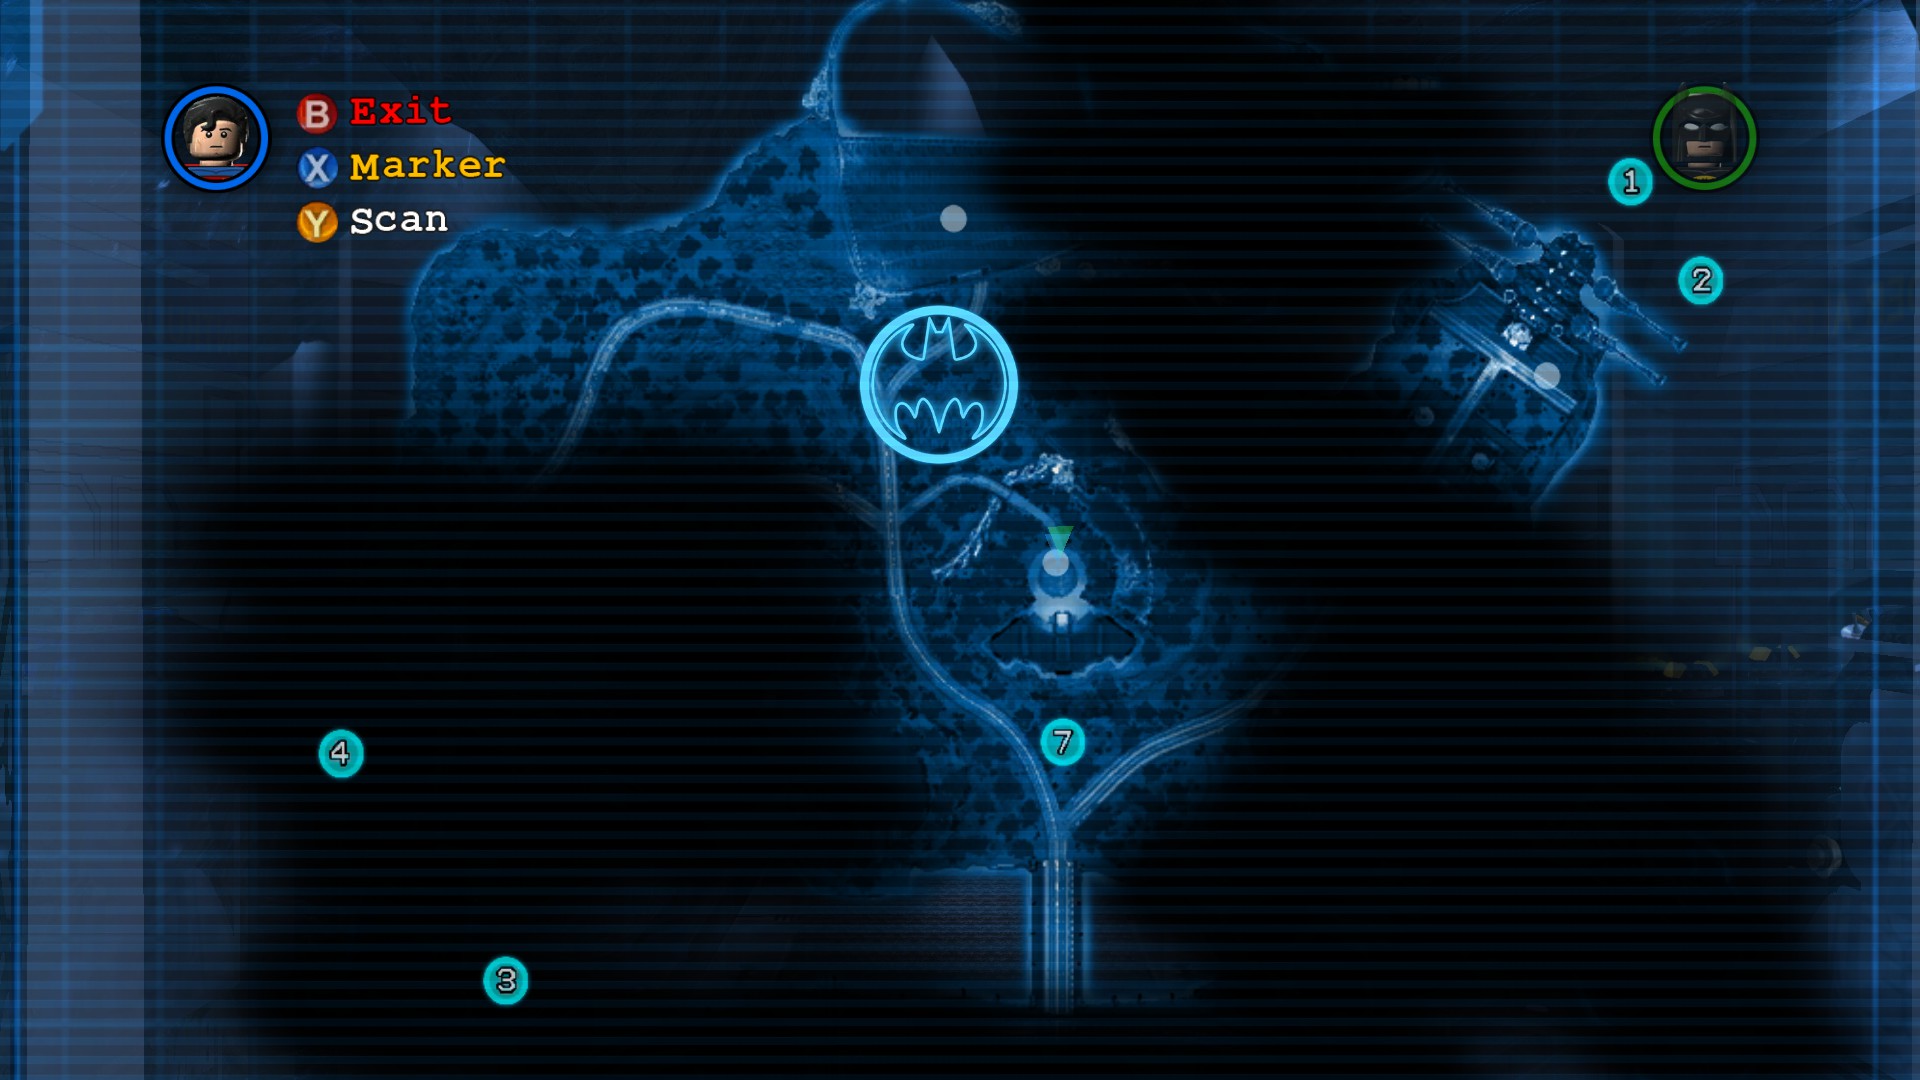 This will pull up a map of Gotham City. Small blue and green triangles indicate where you and your partner are on the map. Until you activate the remote terminals, large sections of the map will be blacked out. Once you activate a remote terminal, that section of the map will become visible. Remote terminals are present on the map as white dots.
 The map also allows you to replay Story levels. Each numbered blue dot corresponds to one of the 15 Story levels. Hover over that dot and you’ll be able to see the number of Canisters you’ve collected and whether of not you’ve achieved Super Hero or rescued the Citizen in Peril. Select the level to either replay Story Mode or play Free Play Mode.
 In the very bottom left corner of the map, you’ll be able to find tallies of how many villains you’ve defeated, as well as how many Gold and Red Bricks you’ve unlocked. You’ll also be able to see how many Citizens in Peril you have rescued.
 If you want to mark a certain location on the map, press the “attack” button. This will activate a red exclamation point. Move it around the map and press the “jump” button to place it on the map. This will place a red exclamation point on your compass that you can use to navigate to a particular spot.
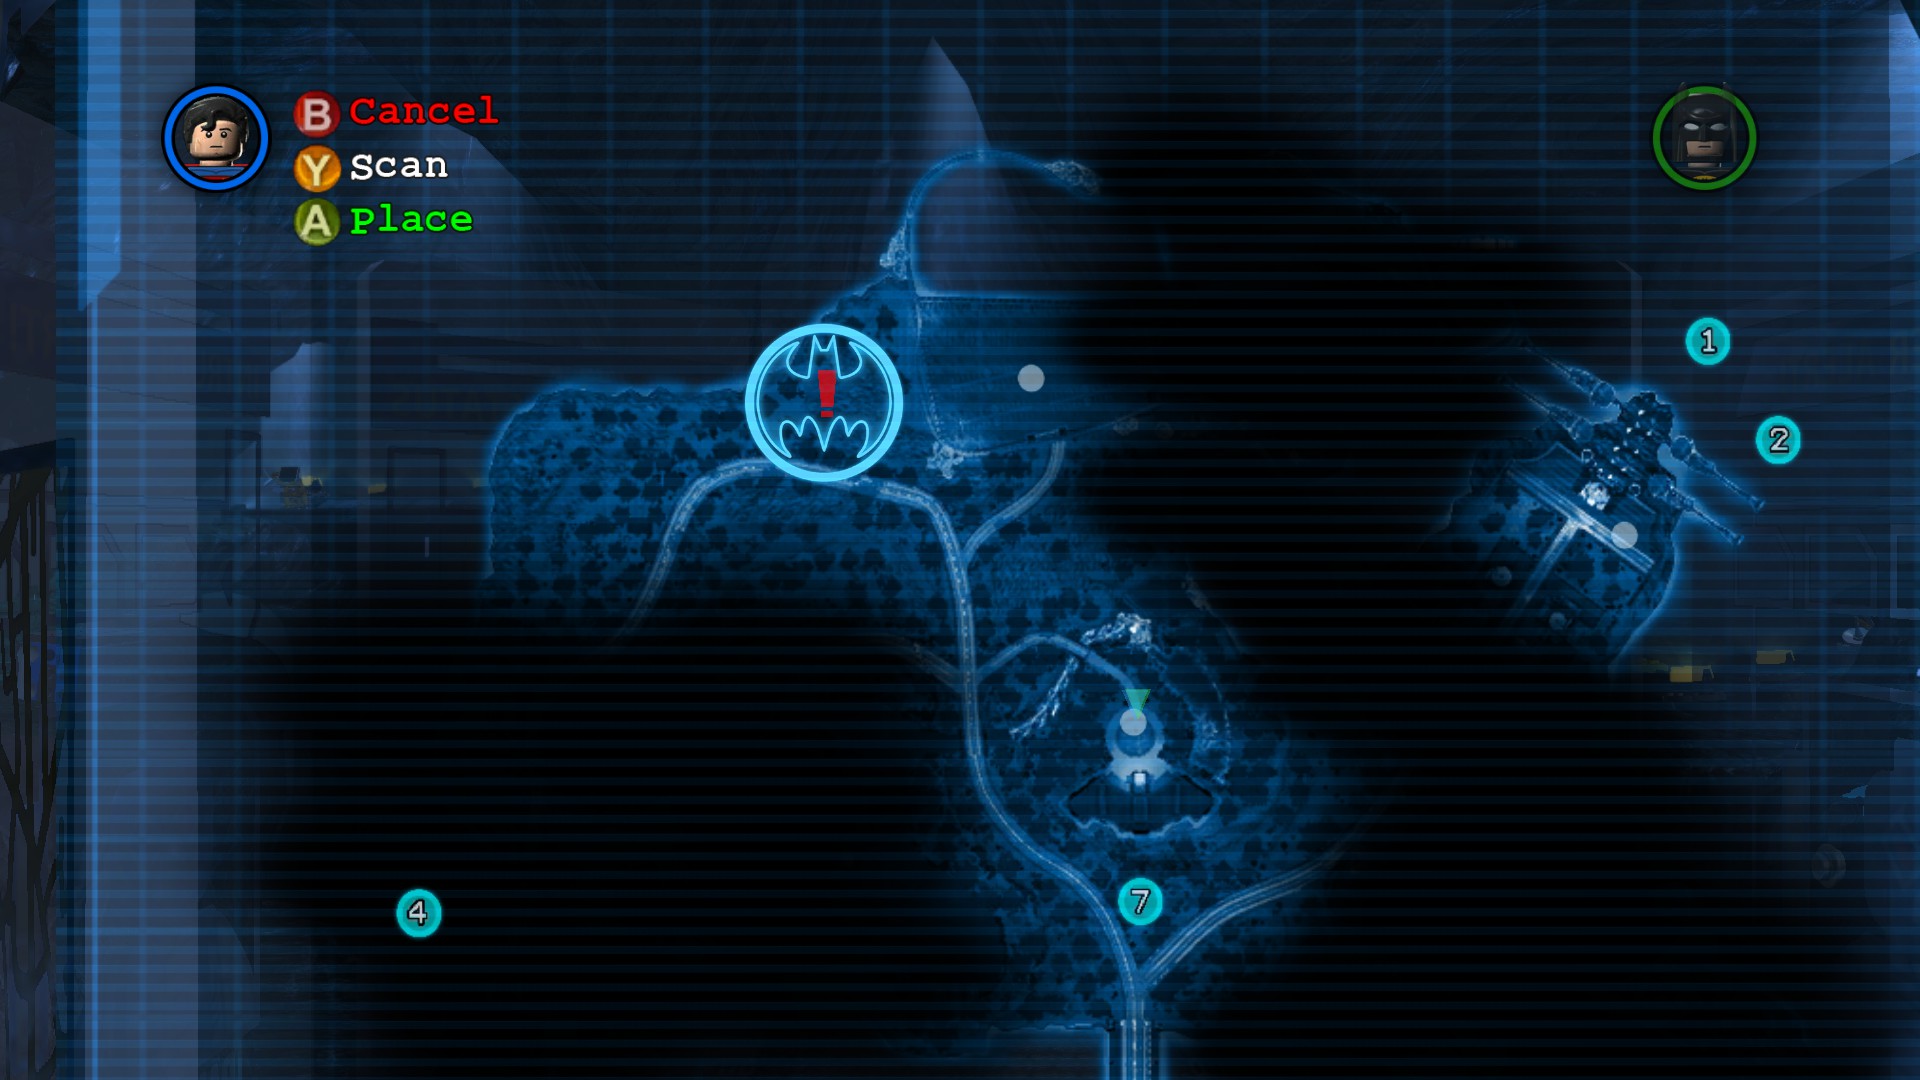
 You can also press the “tag” button to scan the map, which will reveal the locations of any nearby collectables. Villains will be marked by an image of their face (and will appear on the map without needing to be scanned). Vehicles and character gates will also appear as a small image of themselves. The rest of the collectables will appear as dots, with gold, red and purple dots representing Gold Bricks, Red Power Bricks, and Citizens in Peril respectively. Once you collect or purchase a collectable, it will disappear from the map. As you can see from the screenshot, scanning is only effective in areas of the map that you have revealed.
 From the Batcave, you can also call in vehicles. The remote terminal in the center of the Batcave will call in ground vehicles.
 The remote terminal on the left will call in air vehicles, while the one on the right will call in water vehicles. You’ll have to unlock these remote terminals by destroying the gold locks on them.
 After completing the Story, you’ll be able to access the Character Customizer on the left side of the Batcave, allowing you to create up to 10 custom characters.
Theatrical Pursuits – Story Mode
“Fans of billionaire industrialists are in for a treat tonight, as front-runners Bruce Wayne and Lex Luthor face off in the annual Man of the Year awards ceremony. Yes it’s Gotham’s very own playboy philanthropist versus some bald guy from Metropolis. Here at Gotham City News, we’re rooting for the home team. Go Bruce!”
Lex Luthor continues to trail in Presidential race…
The Joker uses “mind-controlling gas” in hilarious bakery heist…
Wayne Enterprises announces new range of sleek black kitchen utensils, promotes “stealthy eating”…
Enemies: Clown Goon, Mime Goon, Riddler Goon, Two-Face Goon, Penguin Goon
Boss: Harley Quinn, The Riddler, Two-Face, The Joker
Starting Characters: Batman, Robin
Super Hero: 125,000
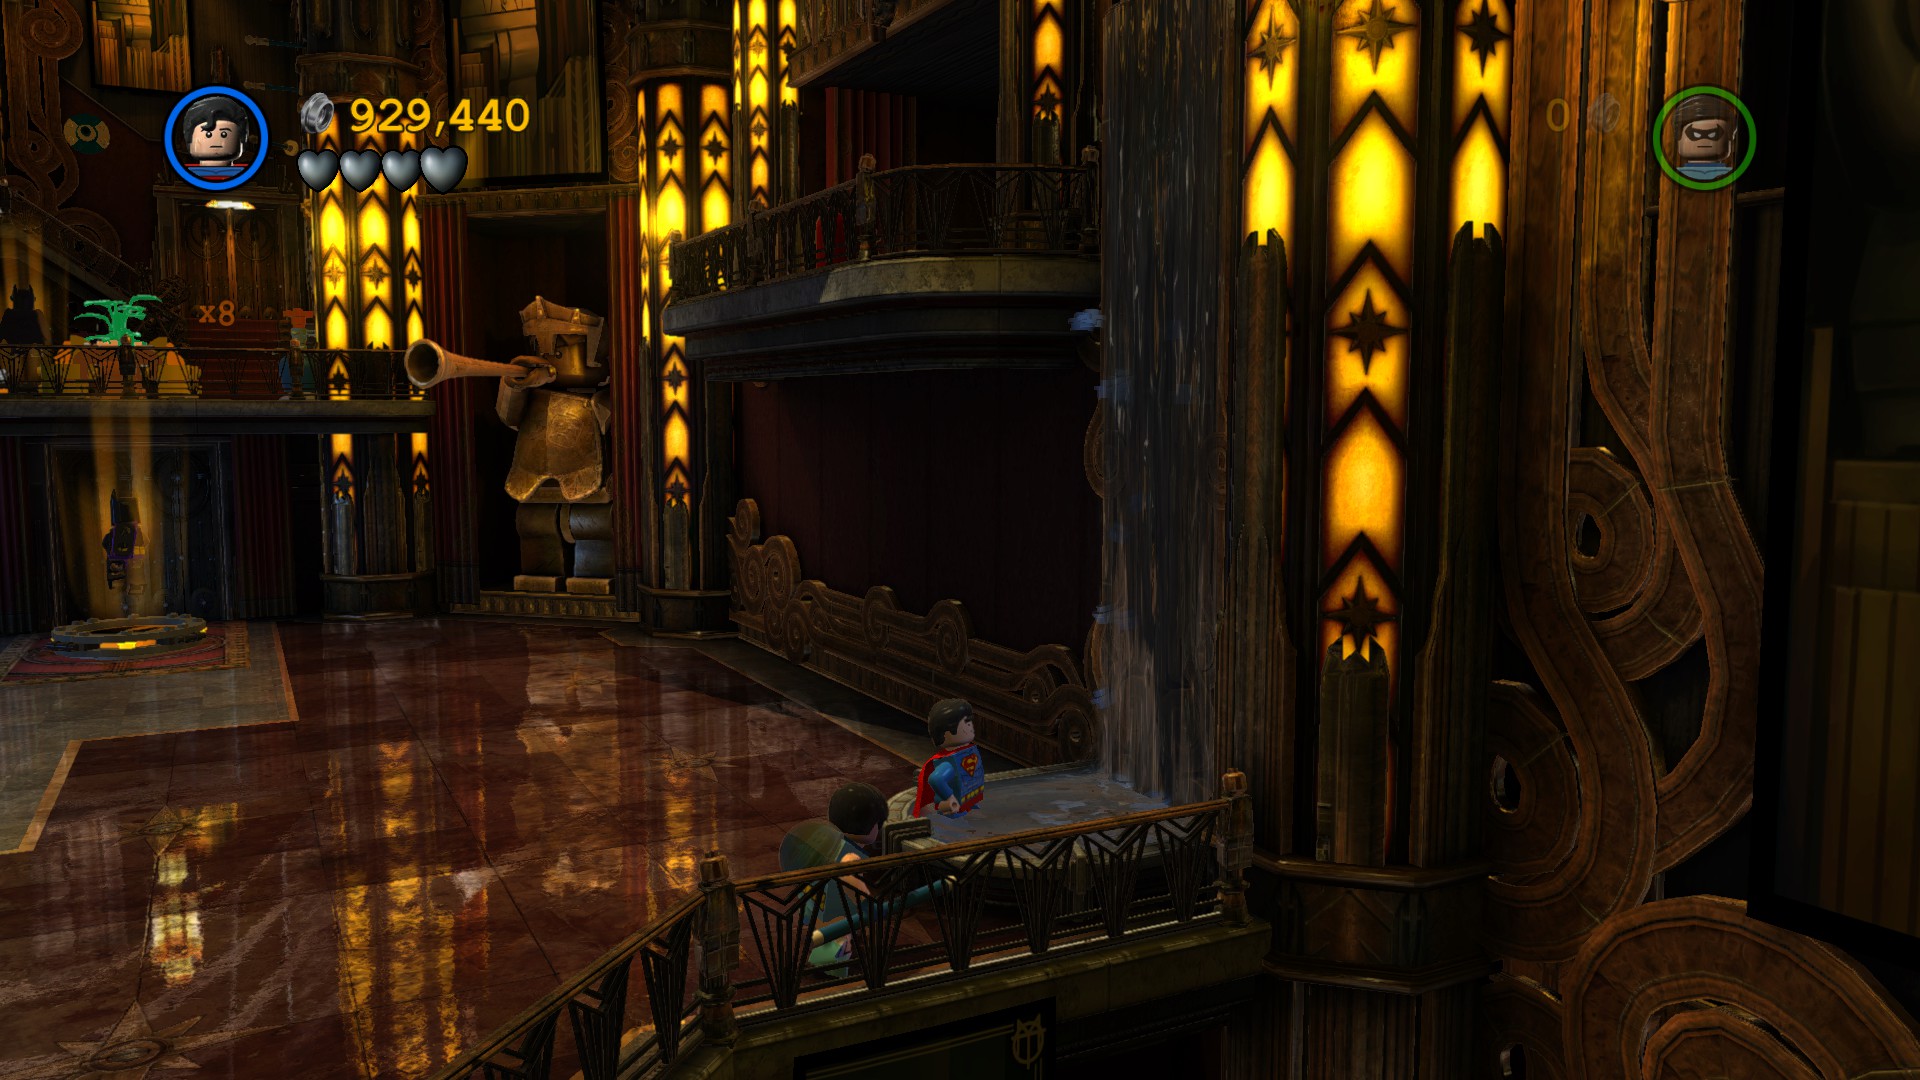
Part 1 – Theater
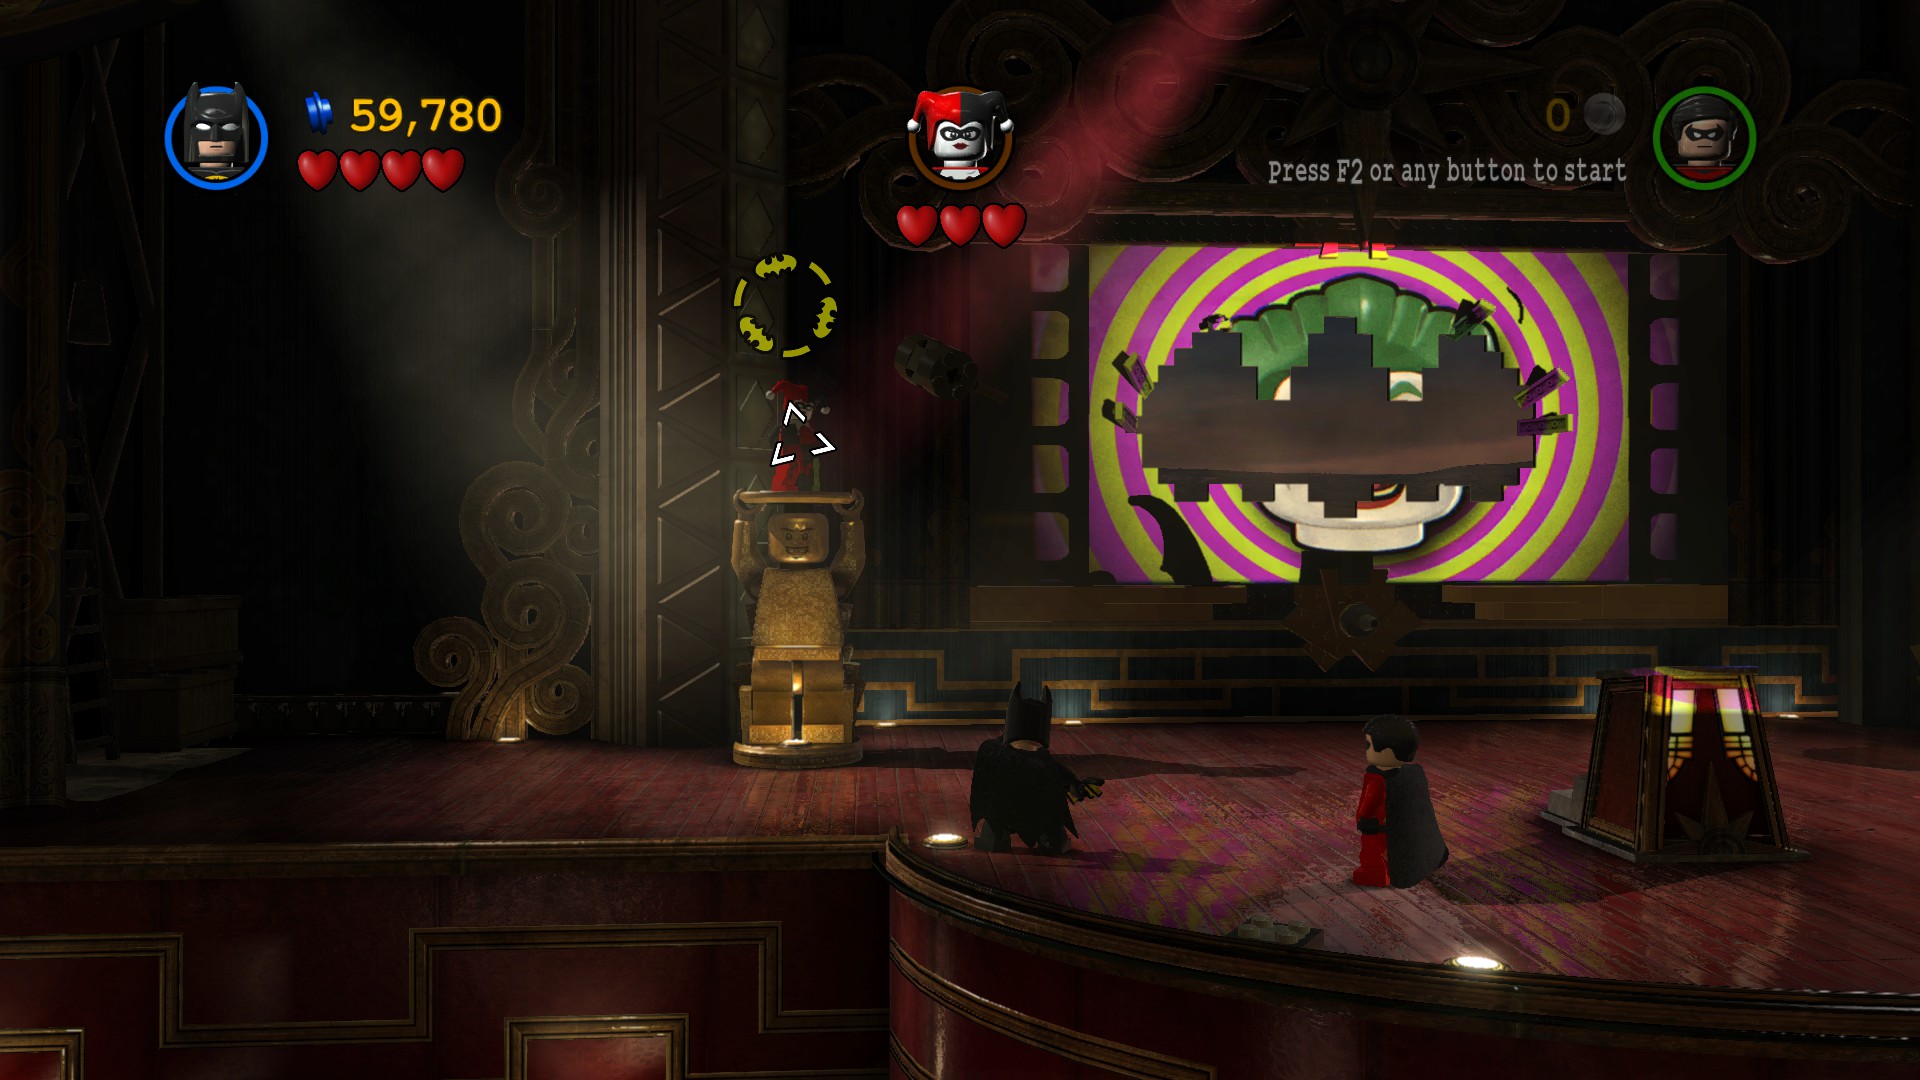
We’ve got four villains to take down, and we’re starting with Harley Quinn. Head over to the right side of the stage and build the LEGO pieces into stairs. Walk up and you’ll start the boss fight. Harley will hop on top of one of the statues on the stage. Use your Batarang to hit her, taking off one heart. She will then hop on top of another statue. Hit her with your Batarang again and she will stand on top of the podium. Hit her one more time with your Batarang and she will fall through the trap door. Drop down after her.
Part 2 – Storage Room
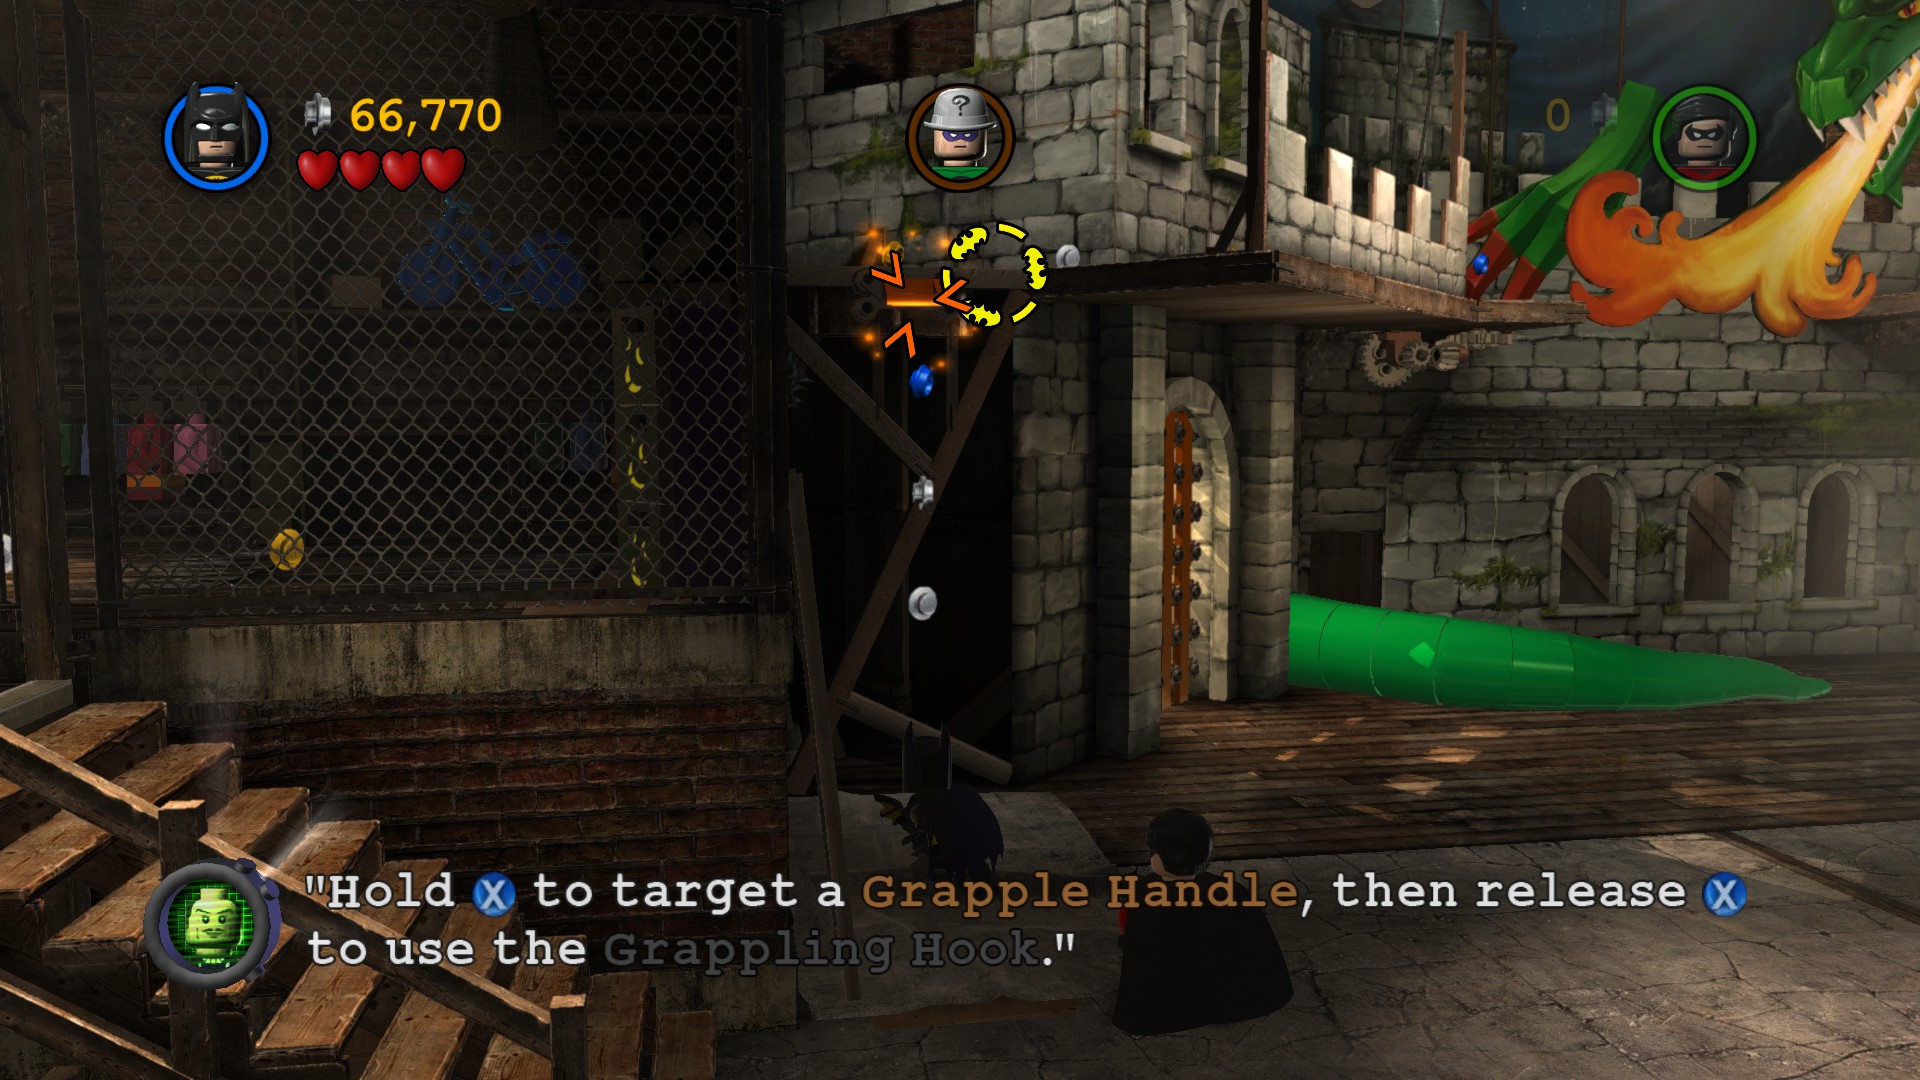
You’ll find a Save Switch next to you. Press the “special” button to activate it, then select “Save and Continue”. This will raise the gate behind you. We’re looking for the Riddler, and fortunately for us, he’s not very well hidden. You’ll find a large horn on the left side of the room. Smack it and the Riddler will move around. Keep smacking the horn and he’ll reveal himself, clearing the path ahead. Continue to the right and you’ll find a security camera. If you try to walk past it, the guard will see you and lower a barrier. We’ll need to find a way to sneak by him. Head back to the left side of the castle set and you’ll find a grapple point above you. Grapple onto it to reach the ledge, then head to the right. Grapple onto the grapple point above you to raise up the dragon, revealing another grapple point. Switch to your partner and use the grapple point to reach the other side of the gap. Head down the path and push the box off the ledge to reveal LEGO pieces. Build them into a Suit Swapper, then hop in as Batman to receive the Sensor Suit. Press the “special” button to enter stealth mode, then head to the right and sneak past the camera. Head inside the room and defeat the Riddler Goon inside, then destroy the green object. This will shut off the security camera, allowing Robin to join you.
Continue to the right and you’ll find two more grapple points. Grapple onto one, then switch to your partner and grapple onto the other one. This will open the gate, allowing you to continue up the path. Walk up the x-ray wall and use the Sensor Suit to look inside it. Look around until you see the Riddler. Press the “attack” button to drop a weight on him. Repeat this process two more times and he’ll come out and fight you. Smack him to take out his hearts. Once he’s defeated, the x-ray wall will explode. Build the LEGO pieces left behind into a lift, then head inside.
Part 3 – Lobby
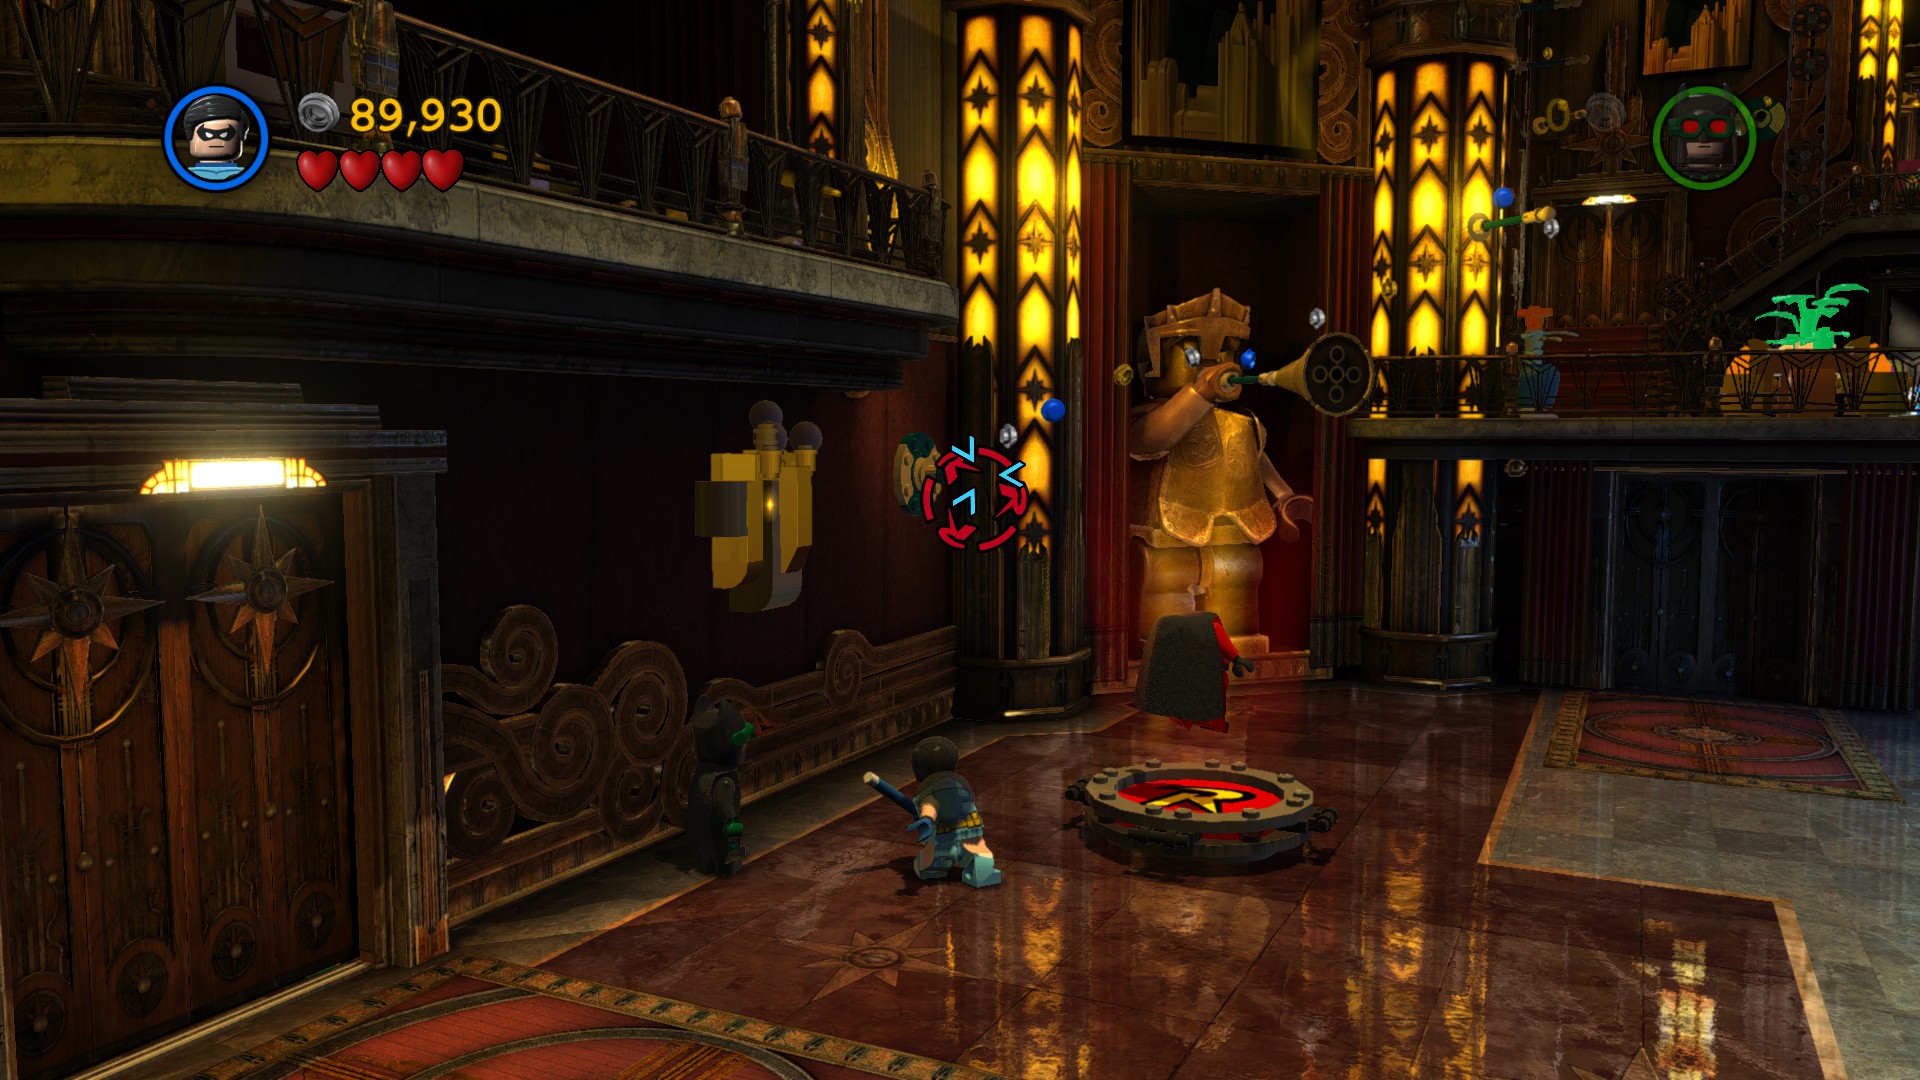
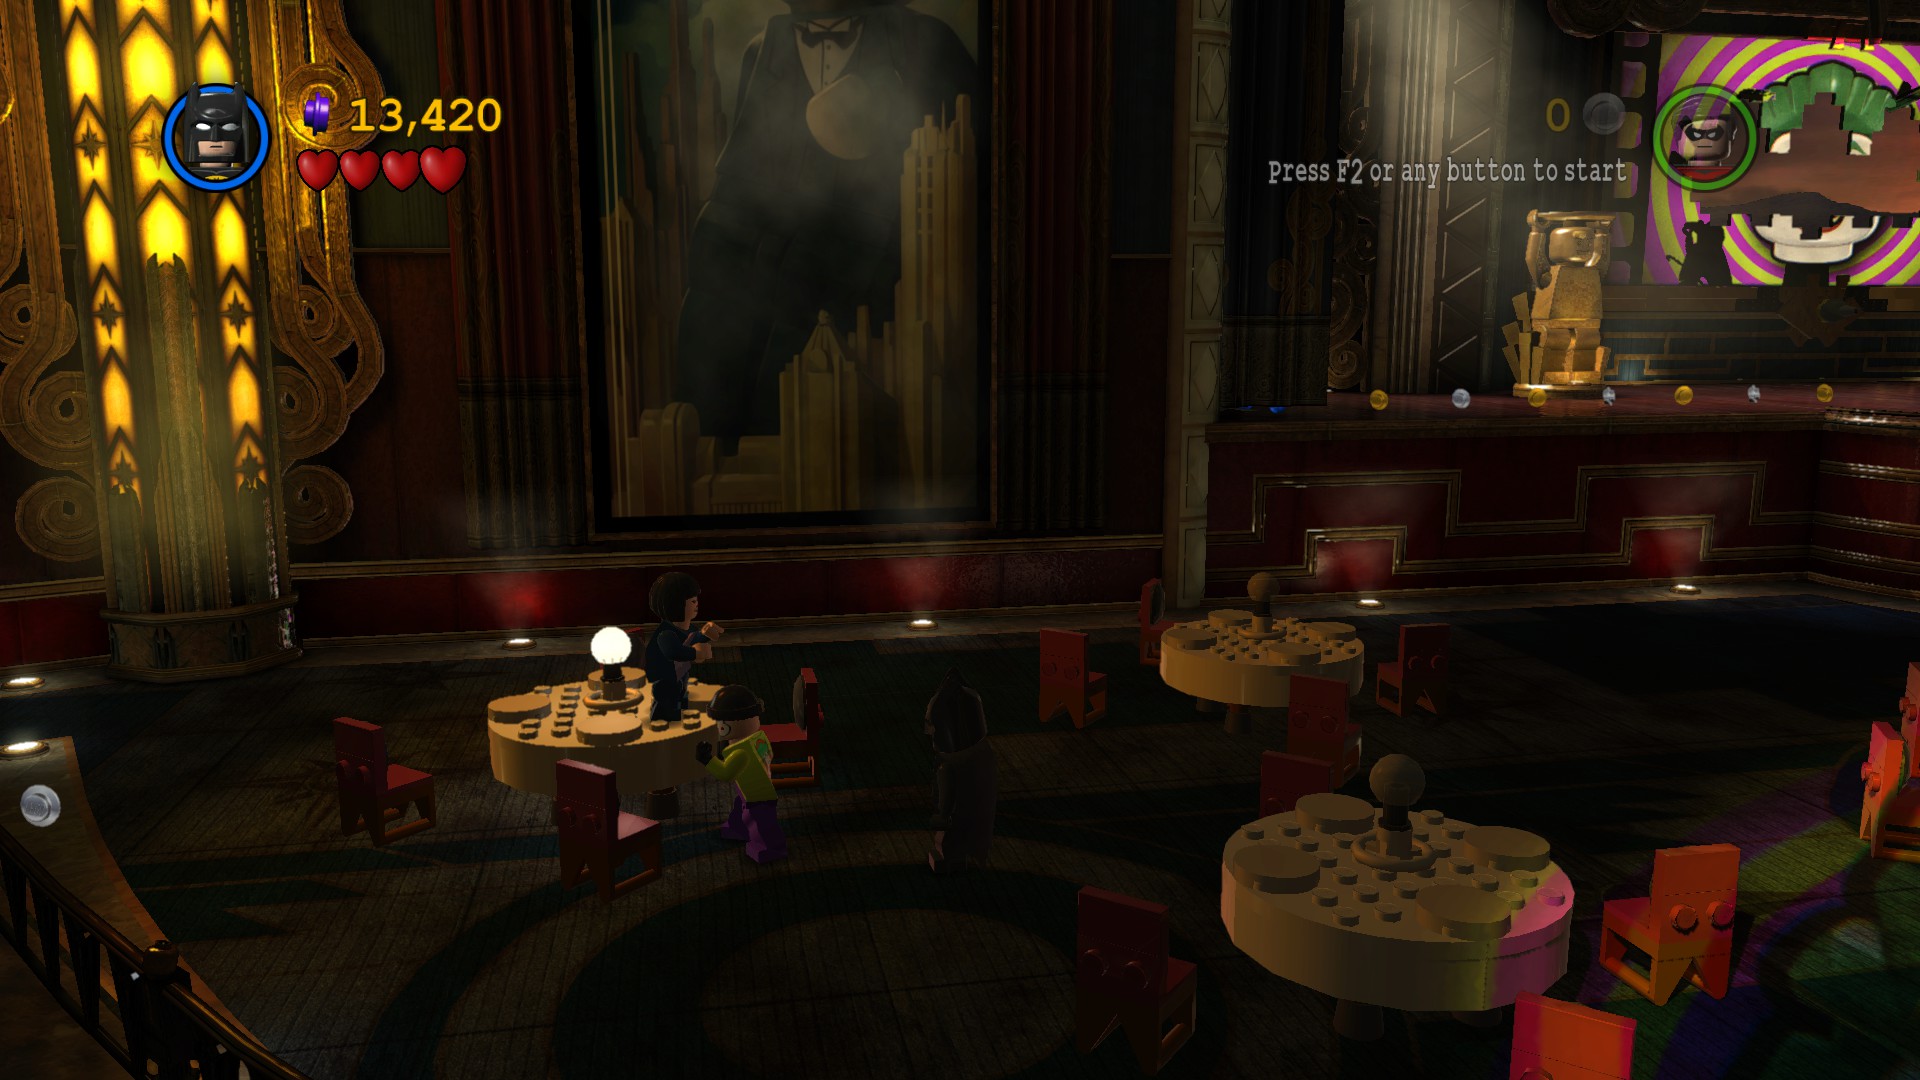
We need to get to the upper ledges. Destroy the vendor cart near you to reveal LEGO pieces, then build them into a Suit Swapper. Hop in as Robin to receive the Acrobat Suit. Toss your pole into the slot on the wall on the left, then swing up the poles to reach the upper ledge. Head to the right and Two-Face will appear. Unfortunately, people will also come streaming out of the theater, preventing you from walking up the stairs. We’ll have to find another way to reach Two-Face. Destroy the glowing plant next to you to reveal LEGO pieces. Build them into a grapple point, allowing Batman to join you. Head to the back of the ledge and use the Sensor Suit to sneak past the cameras onto the balcony. Destroy the chairs to reveal LEGO pieces, then build them into a ball socket. Use the Acrobat Suit to turn into a ball, then move towards the screen to lower the chandelier. The chandelier will explode, knocking Two-Face to the ground. Smack him to take out his hearts, defeating him. Once he’s stunned, the people will stop streaming out of the theater. Head up the stairs and into the elevator.
Part 4 – Projector Room
Time to take on the man himself. Joker will walk up to you and Joy Buzz you. Switch to your partner and smack him to take off one heart. He will then retreat to the right. Chase after him and he will Joy Buzz you again. Switch to your partner and take off another heart. He’ll then head back to the left, so follow him again and repeat the process to take out another heart. He’ll then hop on the large projector in the center of the room, revealing an x-ray wall. Head to the right and look through it. You need to realign the wire. Press the “attack” button over the red pieces to rotate them. Once the wire is complete, the projector will crash into the wall, launching the Joker back onto the stage. Build the LEGO pieces left behind into a tightrope, then slide down it to complete the level.
Unlocked Suits: Sensor Suit, Acrobat Suit
Unlocked Characters: Batman, Robin
Theatrical Pursuits – Free Play Mode
Required Abilities: Deconstructor, Electric, Explosive, Freeze, Heat Vision, Magnet, Pole, Sonic
Part 1 – Theater
Suits Available: Power Suit, Acrobat Suit
Citizen in Peril
 Head to the left side of the stage and you’ll find a poor woman trapped on a table by a Joker Goon. Defeat the Goon to rescue her.
Canister 1
 While destroying the tables, you’ll notice 3 that have silver bases. Destroy each of the bases to receive this Canister. The first is directly to the left of the Batboat.
 The second is to the right of the stairs leading to the stage.
 The third is underneath one of the tables in the near right corner. Destroy all 3 silver bases to reveal this Canister.
Canister 2
 Use the Deconstructor on the front part of the Batboat to reveal this Canister.
Canister 3
 Toss your pole into the socket to the right of the stage, then hop onto the pole.
 Swing up the poles to reach this Canister. This Canister will only appear once you start swinging on the poles.
Part 2 – Storage Room
Suits Available: Electricity Suit, Sensor Suit, Bat Suit
Canister 4
 Destroy the gold lock to open the door to the closet, then head inside.
 Head to the right and you’ll find a metal bicycle on the shelf. Pull on it to create a hole in the ground.
 Drop down inside, then head all the way to the left to find a ladder.
 Climb up to reach the new room, then shatter the glass on the ground.
 This will reveal colored buttons. Head towards the cage on the left and the door will open, revealing a generator.
 Place a charge in it to power up the organ. Step on the buttons in the order of the colored music notes above the organ (red, green, yellow, blue, green, red, blue) to reveal this Canister.
Canister 5
 After the Riddler Goons break through the stained-glass windows in the back of the castle set, you’ll be able to hop inside the room, where you’ll find this Canister.
Canister 6
 Use the Deconstructor to destroy the black object to the right of the green tail, revealing a generator.
 Place a charge in it to reveal a jousting game.
 Hop on the horse to reveal this Canister.
Part 3 – Lobby
Suits Available: Acrobat Suit, Bat Suit, Sensor Suit
Canister 7
 Shatter the glass on the popcorn machine in the back to reveal the gold popcorn.
 Destroy it to reveal this Canister.
Canister 8
 Freeze the waterfall in the near right corner, then climb up to reach the ledge.
 Destroy the fire extinguisher to reveal LEGO pieces.
 Build them into a zipline, then slide down it to reach this Canister on the opposite ledge.
Canister 9
 Toss your pole into the socket to the right of the elevator.
 Swing up the poles to reach this Canister.
Part 4 – Projector Room
Suits Available: Sensor Suit
Canister 10
 There are 3 sets of green blinds you need to destroy. The first two are on the left side of the room.
 The third is on the right. Destroy all 3 to reveal this.
Minikit Vehicle: Harley Quinn’s Monster Truck (Minikit)
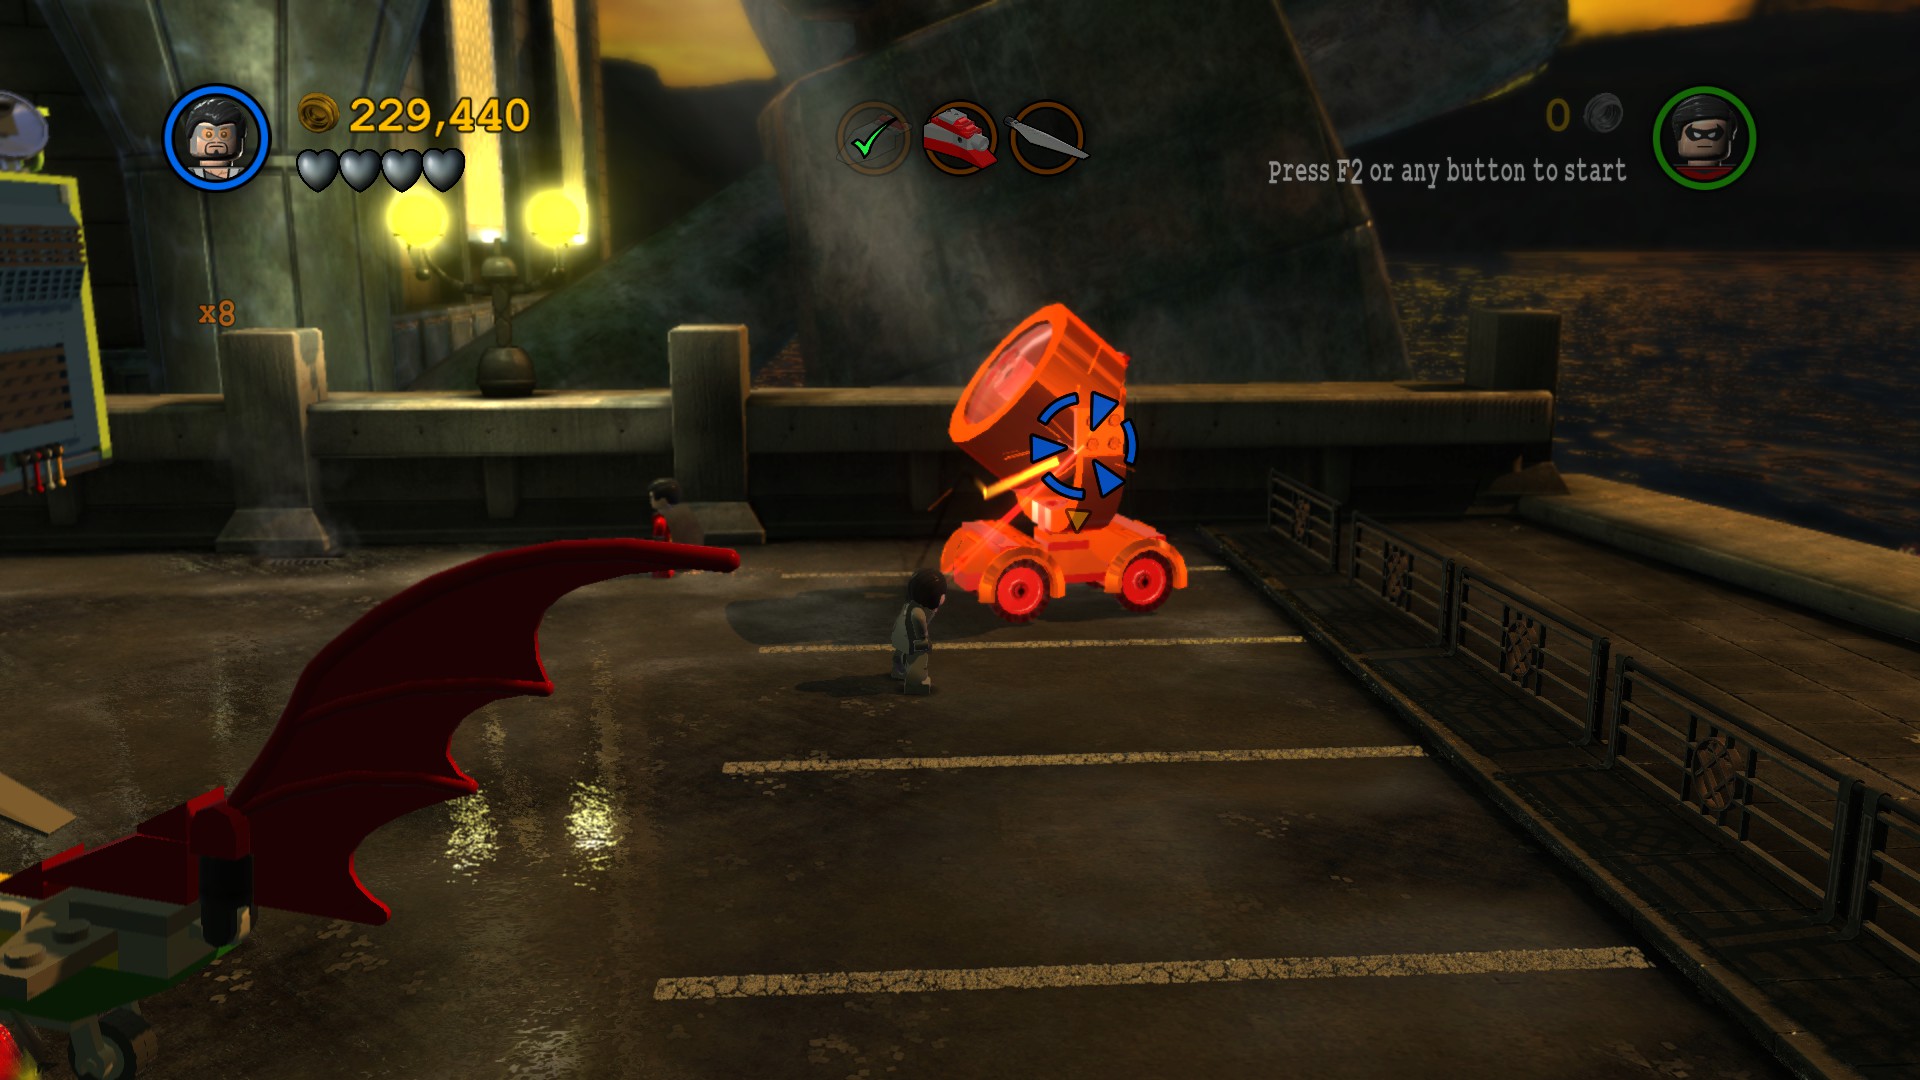
Gotham City Interlude – Stop the Joker
Characters: Batman, Robin
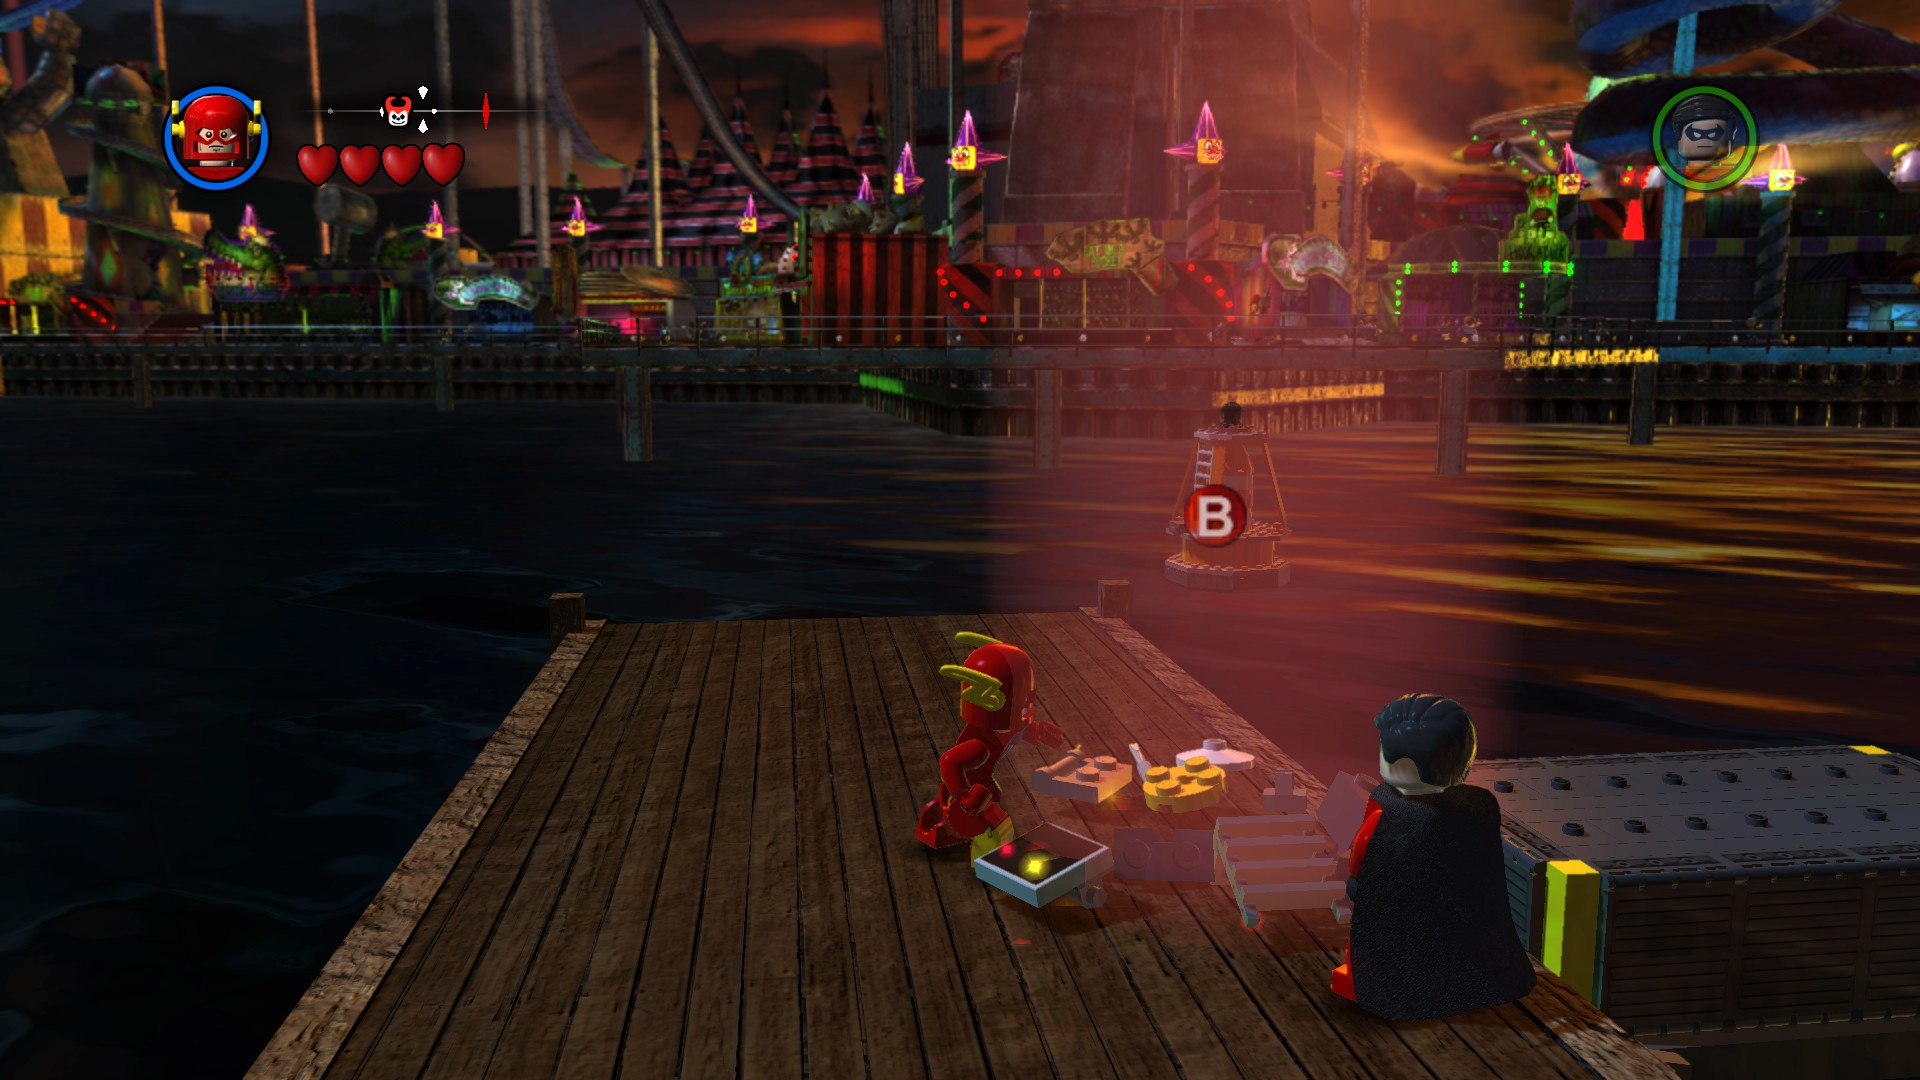
The Joker is getting away in a speedboat, and we need to stop him! You’ll start on top of the Harborside Theater, so jump off the roof to land on the street. While you are currently in the Gotham City hub, you can’t go past the roadblock, so follow the ghost studs to the left to reach a Terminal. Destroy the glowing objects on it to reveal LEGO pieces. Build them into a Suit Swapper, then hop in as Batman to receive the Sensor Suit. Head over to the x-ray wall by the water and look inside it, then destroy the hatches to reveal more LEGO pieces. Build them into a Suit Swapper, then hop in as Robin to receive the Acrobat Suit. Turn into a ball and hop in the nearby ball socket, then move to the left to reveal some LEGO pieces. Build them onto the Terminal, then stand in the white circle and press the “special” button to activate it. Select Robin’s Helicopter to call it to the pad. Hop inside to start the next level.
Harboring a Criminal – Story Mode
“Scenes of chaos tonight at the Gotham City Theater, where criminals, some apparently armed with giant hammers, have interrupted the prestigious Man of the Year awards. This was the fifth annual Man of the Year Ceremony to be held in Gotham, but only the second to be brought to a premature end by a rampaging gang of costumed villains.”
Lex Luthor promises to outlaw “dangerous” giant hammers if voted President…
Many of Gotham’s richest citizens “too fat to flee”…
Huge bat-shaped hole in the wall suggests Batman may be on the scene…

Enemies: Clown Goon, Two-Face Goon, Mime Goon
Boss: The Joker’s Speedboat, The Joker
Starting Characters: Batman, Robin
Super Hero: 90,000
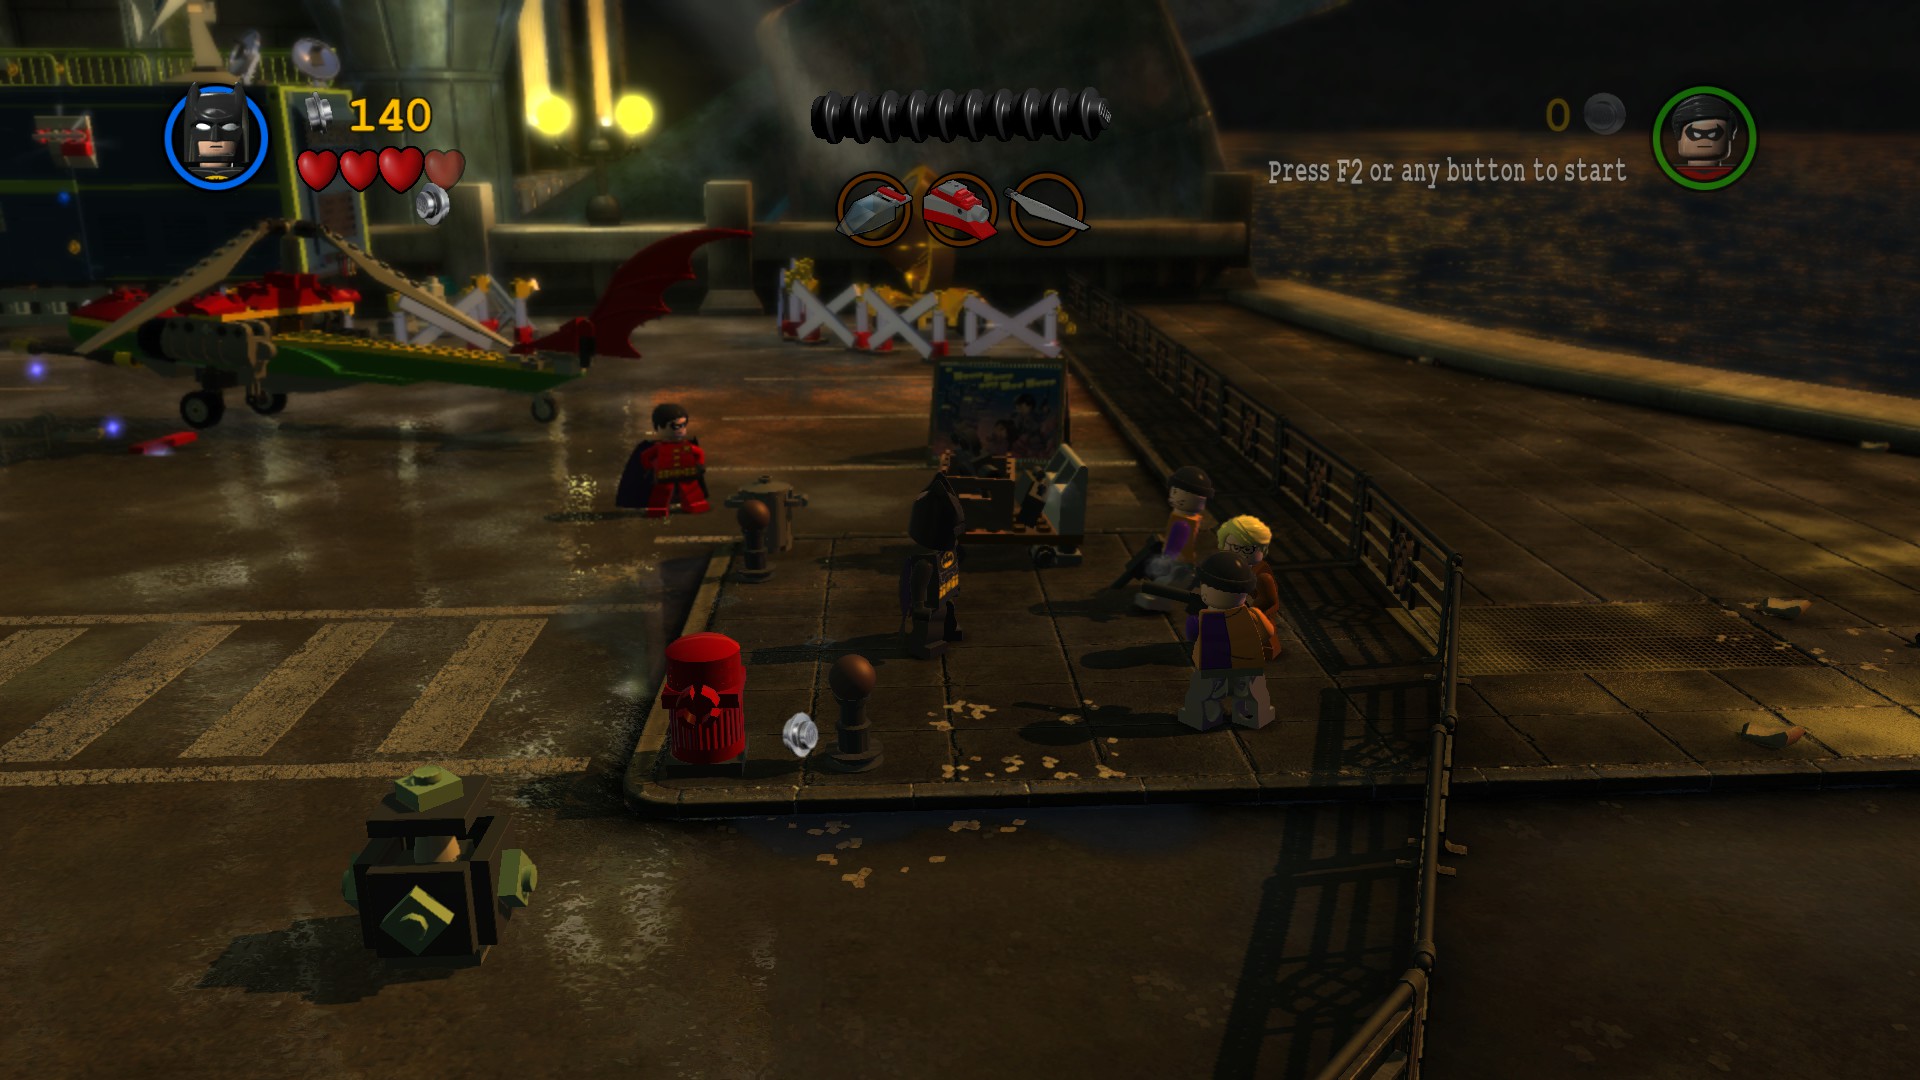
Part 1 – Helicopter Repair
Robin has crashed his helicopter, and we need to repair it. There are three piles of LEGO pieces we need to find and build onto the chopper. The first is right next to the helicopter, so build it onto the chopper. We’re going to have to do some work to find the other two groups of pieces.
You’ll notice a news van behind and to the left of the helicopter. Use your Batarang to destroy the two glowing red objects, opening the van. Head inside and destroy the glowing computer to reveal LEGO pieces. Build them into a Suit Swapper, then hop in as Batman to receive the Power Suit. Head to the left to find a silver light. Destroy it to reveal LEGO pieces, then build them into a Suit Swapper. Hop in as Robin to receive the Magnet Suit. Pull on the nearby metal pipes to reveal a magnet wall, then climb up. Hop onto the ledge, then head to the left. You’ll find a grapple point above you. Latch onto it and you’ll ride it up a bit. Once you stop, hop onto the bar on the left, then hop up onto the ledge. Grab onto the next bar and you’ll be able to reach the ledge above you. Pull on the large metal object to the right to lower it, allowing you to walk up it. Continue to the right and drop down onto the ledge, then pull on the metal object to lower a lift to the ground. On the lift was a box of LEGO pieces, which are now next to the helicopter. Drop back down the street and build the second set of LEGO pieces onto the helicopter.
Now it’s time to get that last piece. Stand in the lift to be raised up to the ledge. Pull on the super strength handle to tear off the gate, then pull on the metal ball to lower the ladder. Climb up and head to the back of the ledge, then destroy the silver object across the gap to reveal a metal disc. Pull on it to lower a beam, then walk across it. Pull on the metal hatch above you to reveal a grapple point, then latch onto it to reach the ledge above you. Head to the left and destroy the silver object to reveal LEGO pieces, then build them into a tightrope. Slide down it to reach the pillar on the left side of the theater. Latch onto the grapple point to reach the upper ledge, then head all the way to the right. Pull on the metal object to reveal another grapple point, then latch onto it to reach the top of the pillar on the right side of the theater. Pull on the super strength handle to pull out the LEGO pieces. Drop back down to the street and build the LEGO pieces onto the helicopter. Once the helicopter has been repaired, hop in.
Part 2 – Speedboat Pursuit
We’re now chasing the Joker in his speedboat, and it’s a fairly simple pursuit. Shoot at his speedboat until the orange health bar is depleted to take off a heart. Joker will then send in some enemy vehicles to attack you. Defeat them and you’ll be able to target Joker again. Repeat this process three more times to take out his hearts.
Part 3 – I Think They’re Going to Like You!
Now that Joker is grounded, it’s time to defeat him. He’ll start by launching missiles at you, so watch out for those. Head to the left and you’ll find a digger. Destroy the silver object on it to reveal some LEGO pieces, then build them into a cannon. Turn the rotary handle to rotate the cannon into position, then pull on the super strength handle to launch it at the Joker, damaging him.
After the cutscene, Joker will start throwing pies at you as well. Once these hit the ground, they will deal damage to you if are too close, so watch out! Head to the back right corner and you’ll find some LEGO pieces. Build them onto the Joker face. You’ll notice that some of the teeth are silver. Destroy them to reveal LEGO pieces, then build them into a magnet wall. Climb up and hop onto the top ledge, then destroy the object by the large green circle to reveal metal pins. Pull on them to drop the sign on the Joker, damaging him.
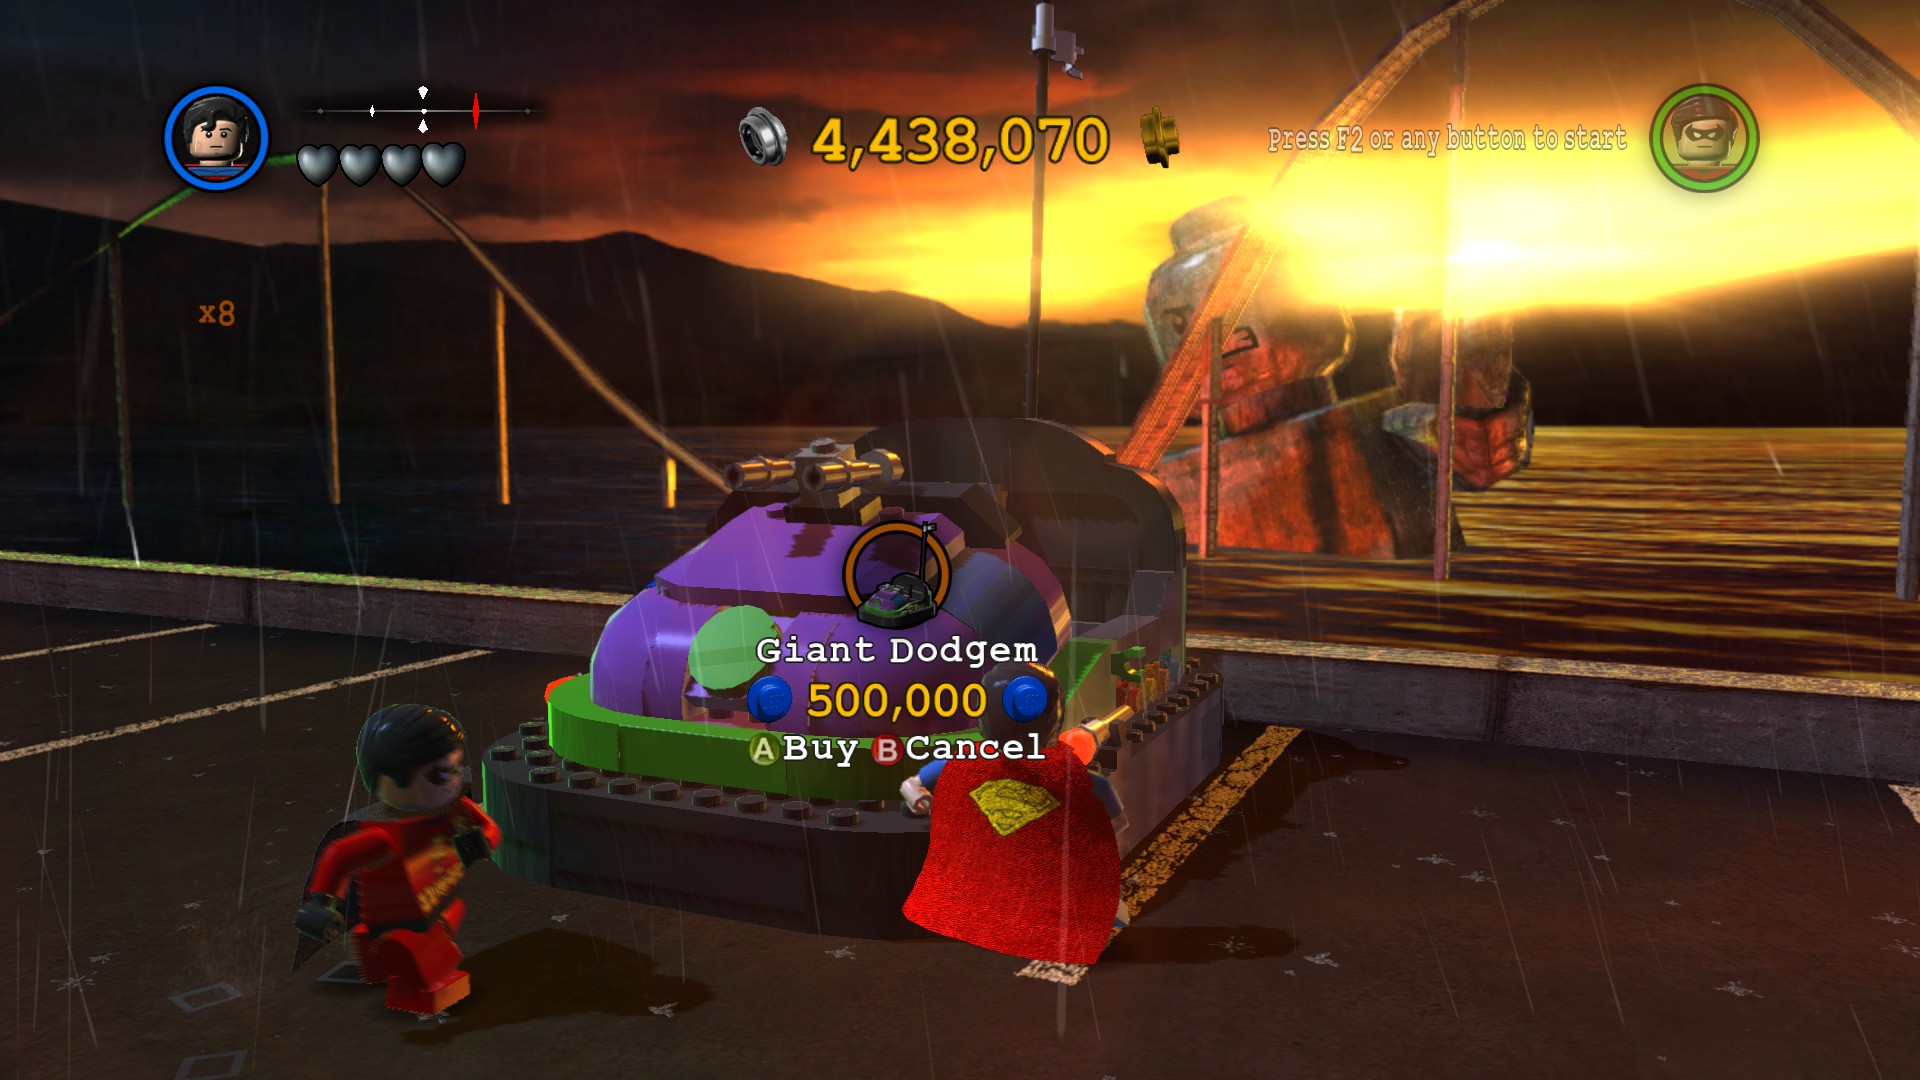
One more heart to go! Joker has sent out a giant dodgem, and we need to take it down. Use your Batarang to take out the glowing turret, then pull on each of the metal hatches. This will reveal the silver interior, so destroy it to destroy the dodgem. Build the LEGO pieces left behind into a giant hammer, then pull on the super strength handle to smash Joker with it, defeating him and ending the level.
Unlocked Suits: Power Suit, Magnet Suit
Harboring a Criminal – Free Play Mode
Required Abilities: Explosive, Heat Vision, Magnet
Part 1 – Helicopter Repair
Suits Available: Power Suit
Canister 1
 Destroy the large gold spotlight in the back right corner to reveal this Canister.
Citizen in Peril
 Head to the far right side of the area and you’ll find a man being harassed by two Two-Face Goons. Defeat the goons to rescue him.
Canister 2
 There are 5 movie posters you need to destroy. The first is on the far right side of the area.
 The second can be found to the left of the theater doors.
 The third can be found in the back of the alley to the left of the theater.
 The fourth can be found in the near left corner of the area.
 The fifth can be found after revealing the magnet wall on the right side of the theater. After destroying the metal pipes, some LEGO pieces will be left behind.
 Build them into the fifth poster. Destroy all 5 to reveal this Canister.
Canister 3
 Destroy the silver light to the left of the theater to reveal LEGO pieces.
 Build them into a bicycle, then hop on.
Follow the stud trail to the right to reveal this.
Canister 4
 Destroy the silver pipes on the left side of the theater to reveal this.
Canister 5
 After sliding down the tightrope onto the left pillar, climb down the ladder to reach the lower level.
 Walk around the left side of the pillar to reach this hidden Canister.
Canister 6
 While on top of the right pillar, hop onto the top ledge and walk around to the back to find this hidden Canister.
Part 2 – Speedboat Pursuit
Canister 7
 There are 2 green rollercoaster cars you need to destroy. The first can be found on the right side of the screen, as you approach the fairground.
 The second appears on the left side of the screen, when you pass over the tracks. Destroy both cars to receive this Canister.
Part 3 – I Think They’re Going to Like You!
Suits Available: Power Suit, Magnet Suit
Canister 8
 There are 4 broken cars you need to destroy. The first is in the near left corner, by the rubble.
 The second is in the near center part of the area.
 The third is in the back right corner.
 The fourth is in the back left corner. Destroy all 4 to reveal this.
Canister 9
 There is a black bumper car in the near left corner.
 Hop in and ride it to the right to reveal this Canister.
Canister 10
 After taking out the Joker’s first heart, the supports by the digger will turn gold. Destroy them, then hop in the digger and drive to the near right corner.
 You’ll find some LEGO pieces by the trailer. Build them into a ramp, then drive the digger onto the trailer to reveal this Canister.
Minikit Vehicle: Joker’s Speedboat (Minikit)
Gotham City Interlude – To the Batcave
Characters: Batman, Robin
Time to get to the Batcave! Head up to the Remote Terminal and use it to call in a vehicle of your choice. Hop inside and Alfred will ask you to test out the weapons systems. Drive around and press the “special” button to fire missiles, allowing you to destroy the five silver statues. Once all of the statues have been destroyed, the barrier trapping you in the parking lot will be lowered. Follow the ghost studs until you reach a bat-symbol on the ground. Hop out of your vehicle and a terminal will appear by the yellow arrow. Activate it to trigger a cutscene.
After the cutscene, you’ll be inside the Batcave. Head to the left and step into the elevator.

After that lengthy cutscene, you’ll be in control of Bruce Wayne and Di ck Grayson. Head to the right and the Batcomputer will appear. Activate it to trigger yet another cutscene.
We’ve just gotten word of the Arkham breakout! Activate the Batcomputer again and you’ll reveal a map of Gotham City. The areas you have already been will appear on the map, with the rest colored in black. Press the “tag” button to scan the area around the “!”, then select it.

After the cutscene, you’ll find yourself in the Batmobile. Follow the ghost studs to reach Arkham Asylum. You’ll find that the bridge is down (don’t drive into the water like I sometimes do!). Hop out of your vehicle and head over to the yellow arrow, then activate the terminal that appears to raise the bridge. Head into the bat-symbol to start the next level.
Arkham Asylum Antics – Story Mode
“Reports are coming in of strange blue glows spotted tonight around Arkham Asylum. Is this evidence of yet another mass breakout from the facility, or one of the Warden’s infamous parties in full swing? Either way, the sounds of breaking glass and screaming are sure to follow, as we go live to Gotham’s favorite water-logged penitentiary.”
Gotham Funland visitors wowed by ultra-realistic “Batman vs Joker” show…
Theater prepares red carpet, gold water bowls for “Dog of the Year” awards…
Latest votes: Krypto the Superdog: 48%; Ace the Bat-Hound: 47%; Stretch-O-Mutt: 5%…

Enemies: Arkham Inmate
Boss: Catwoman’s Motorbike, Two-Face’s Truck, Bane’s Mole Machine
Starting Characters: Batman, Robin
Super Hero: 40,000
Part 1 – Arkham Maze
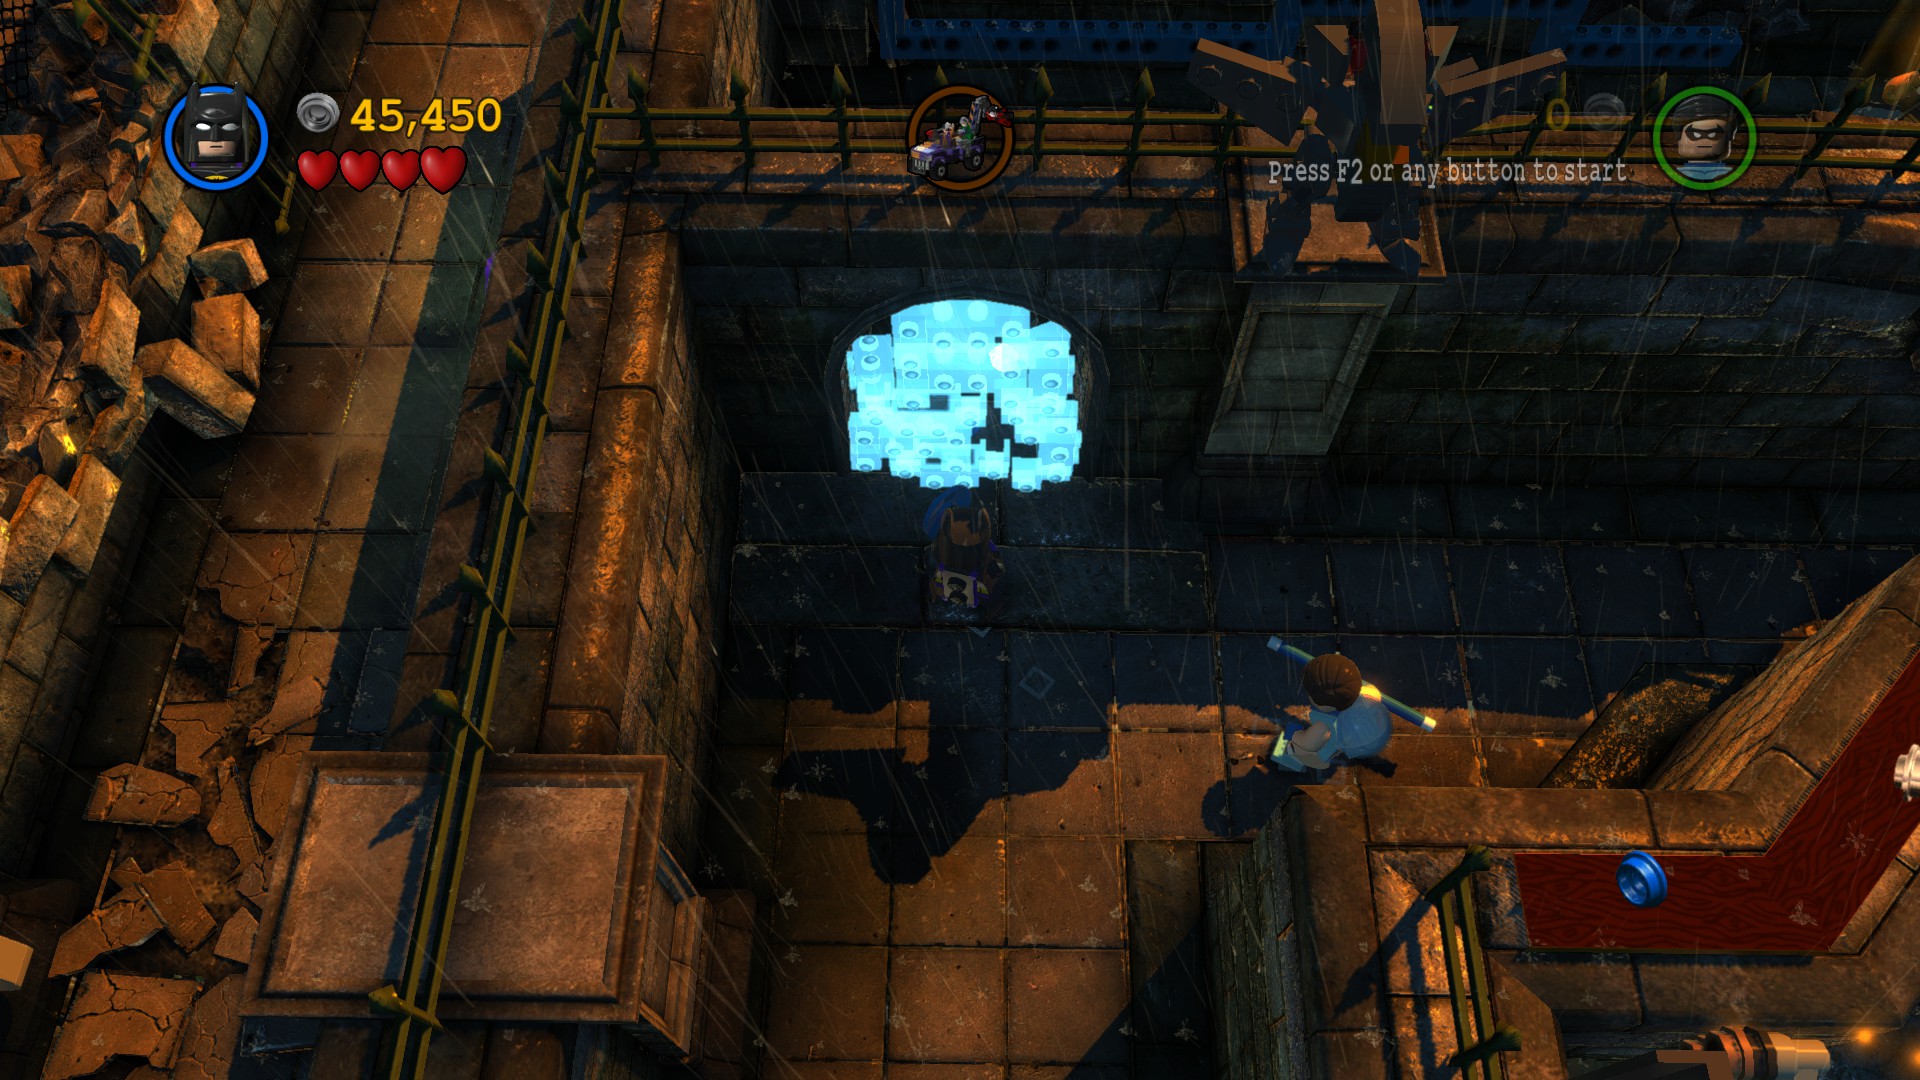
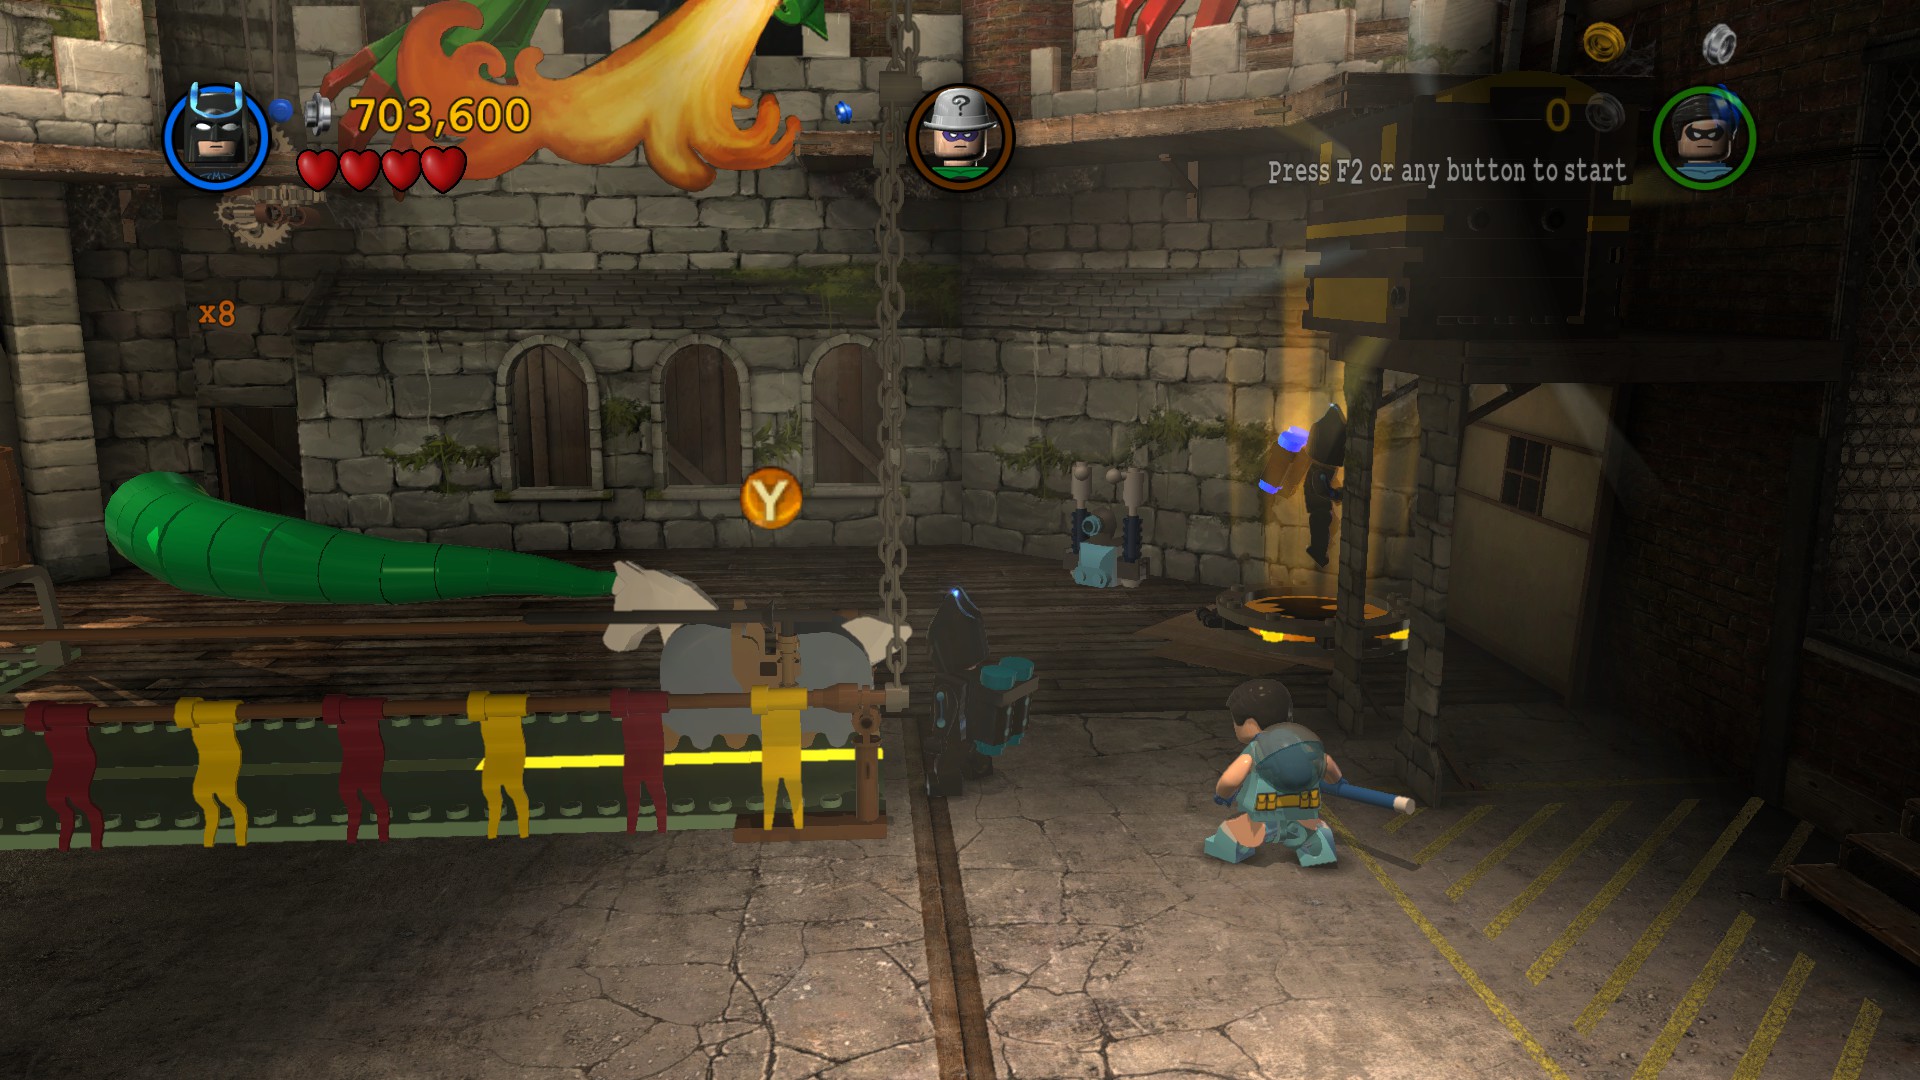
We need to stop the villains from escaping! First up is Catwoman, and she’s riding her motorcycle. She’s riding in a lap around the maze, so watch out for her or she’ll run you over! Head to the right and you’ll find your path blocked by toxic goo. You’ll find a fountain to the left with some LEGO pieces inside. Destroy the green cylinders on either side of it to shut off the water, revealing the LEGO pieces. Build them into a pull handle, then grapple onto it to reveal a Suit Swapper. Hop in as Robin to receive the Acrobat Suit, then head back to the toxic goo. Toss your pole into the socket, then swing across the gap. Continue down the maze and you’ll find a wooden beam on the left. Walk up it and build the two sets of LEGO pieces into grapple points, allowing Batman to join you. Drop back down and you’ll find a large silver statue holding a bar. Double jump onto the bar to knock it down, revealing LEGO pieces. Build them into a Suit Swapper, then hop in as Batman to receive the Power Suit. Head down the path and you’ll find a silver gate on the right. Destroy it to clear the path, then climb up the wall to reach the wooden beam. Walk across it to reach the silver statue, then destroy it to block the path. Once Catwoman drives by, she will crash.
Continue through the maze past Catwoman and Two-Face’s Truck will appear. Follow it down the maze and to the left. You’ll find a silver panel on the wall. Destroy it, as well as the silver statue on the left. Destroying the silver statue left some LEGO pieces behind, so build them into a ball socket. Hop in and move to the right to move the Suit Swapper out of the wall. Hop in as Batman to receive the Bat Suit. Head to the right and shatter the glass arches to knock some rubble into the maze. Two-Face will drive into it, crashing.
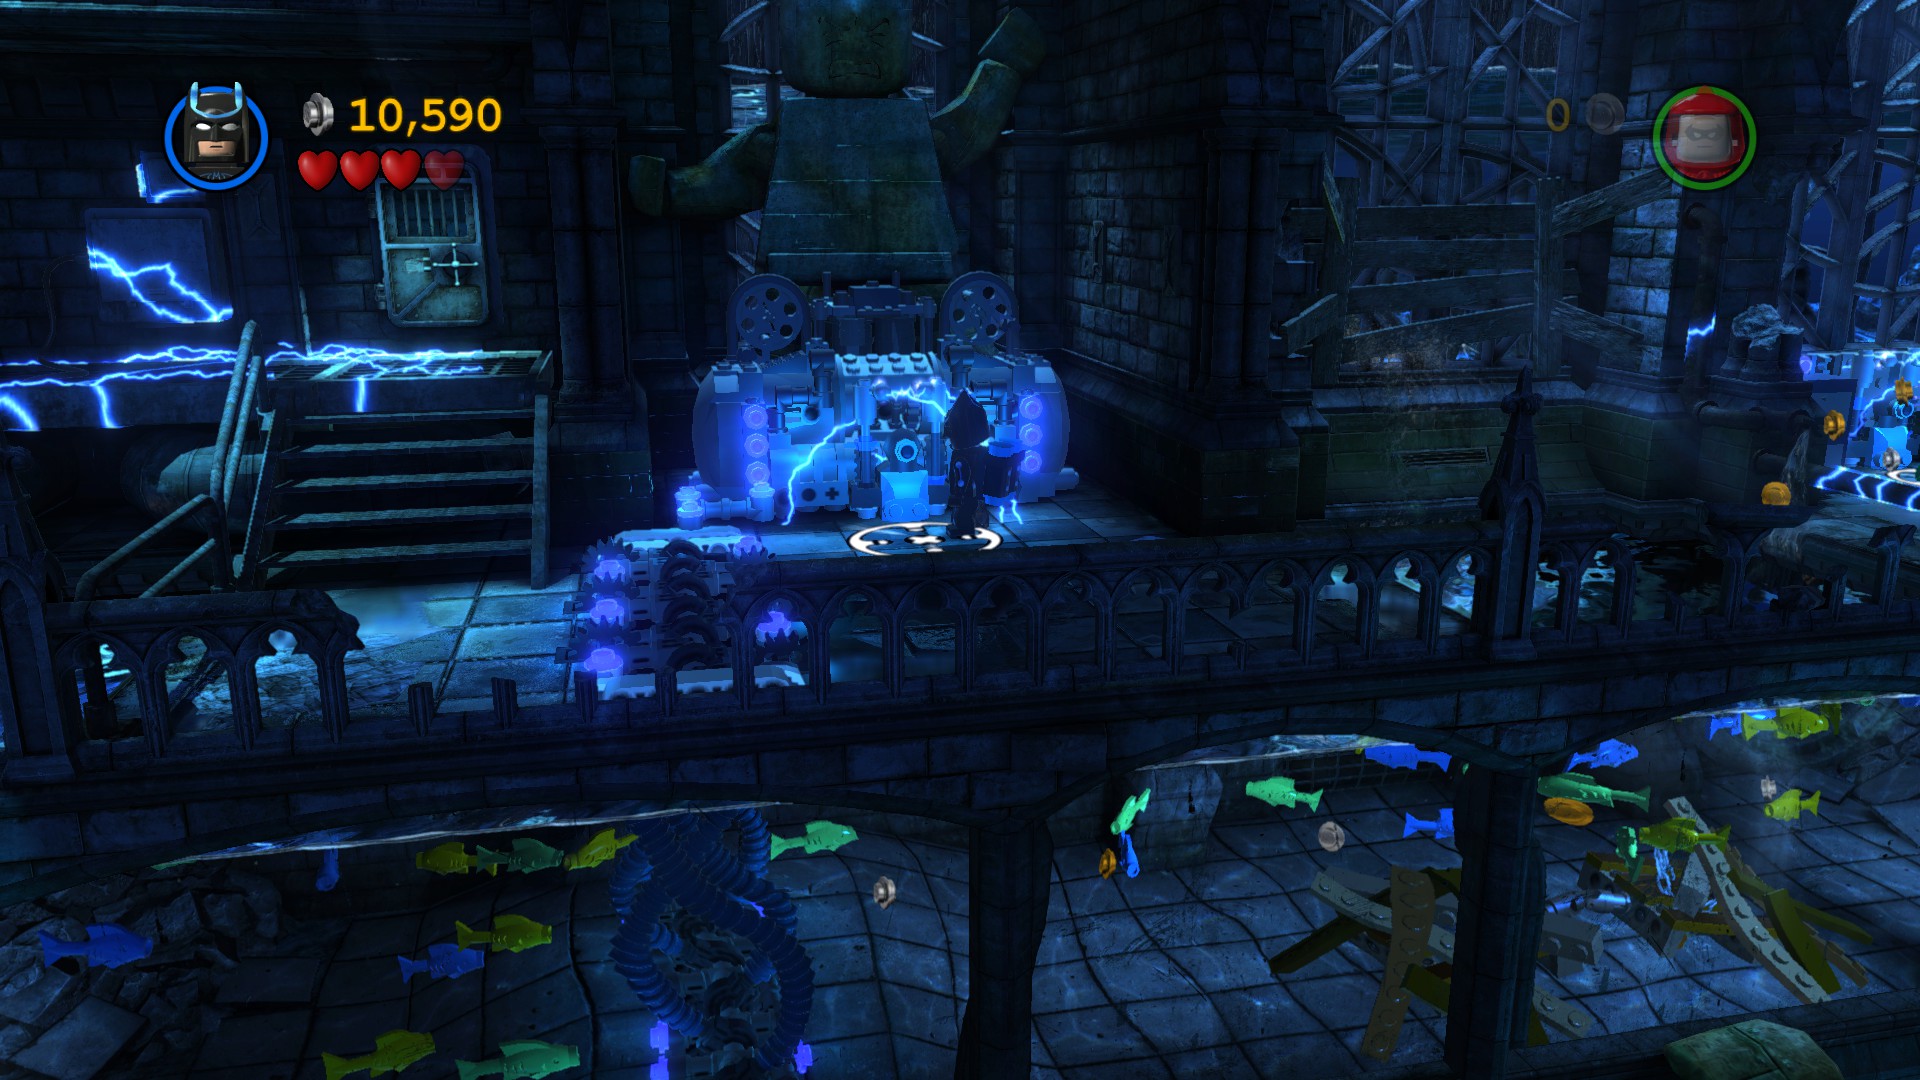
Two-Face’s crash will knock down a gate to the right, so head inside and Bane’s Mole Machine will appear. Follow it down the path and you’ll find some glowing rocks. Destroy them to reveal LEGO pieces, then build them into a Suit Swapper. Before hopping in, continue down the path and you’ll find a glass panel on the ground. Shatter it, then head back to the Suit Swapper you built. Hop in as Batman to receive the Power Suit. Head back to the left and destroy the silver statue to reveal a jet of water. We need to find a way to freeze it. Continue down the path and you’ll find two grapple points on the left. Grapple onto one, then switch to your partner and grapple onto the other one. This will reveal a Suit Swapper. Hop in as Robin to receive the Ice Suit. Head back down the path and freeze the water jet. When Bane drives into it, he will crash, ending the level.
Unlocked Suits: Bat Suit, Ice Suit
Arkham Asylum Antics – Free Play Mode
Required Abilities: Deconstructor, Dive, Electric, Explosive, Flight, Freeze, Heat Vision, Lantern, Magnet, Plant Travel, Pole, Sonic, Super Strength
Part 1 – Arkham Maze
Suits Available: Acrobat Suit, Power Suit, Bat Suit, Ice Suit
Canister 1
 As soon as you enter the maze, head to the left and use the Deconstructor to destroy the black barrier.
 Destroy the gold panels inside and you’ll reveal lantern LEGO pieces.
 Build them into a hand and a bowling ball, which will knock over the pins on the left and reveal this Canister.
Canister 2
 As soon as you enter the maze, head to the right and use the Deconstructor to destroy the black barrier.
Head inside and you’ll find a flower bed.
 Travel through it, then remove the charge from the generator. This will shut off the electricity around the Canister.
 Travel back through the flower bed, then pull on the super strength handle to tear the cage off this Canister, allowing you to collect it.
Canister 3
 Destroy the silver statue to the left of the Power Suit Swapper to reveal this.
Citizen in Peril
 To the right of the gate that Catwoman crashes through, you’ll find a pit of toxic gas and dangerous plants. Fly over it and you reach another part of the maze.
 Continue along the path and you’ll reach a point where the path splits.
 Head down and to the right to find a prison guard being attacked by two inmates. Defeat the inmates to rescue the guard.
Canister 4
 After rescuing the Citizen in Peril, head back up the path to the intersection. Head left on the upper path to find some water. Toss your pole into the socket, then swing up the poles to reach the ledge. (You can’t normally get Acrobat Suit Robin over here. If you make your partner Acrobat Suit Robin, and then fly over here, Robin will magically turn up. You can also just fly up to the ledge).
 Turn the rotary handle on the ledge to open the gate below you.
 Dive underwater and head inside to grab this Canister.
Canister 5
 After collecting Canister 4, head back to the intersection, then head left on the bottom path. You’ll find a spike pit. Climb across the wall to cross the spike pit, then continue down the path.
 You’ll reach another intersection. Head to the left and you’ll find some gold flowers in the water.
 Destroy the flowers, then dive underwater and pass underneath the vines.
 Hop onto the ledge, then destroy the gold statues to reveal LEGO pieces.
 Build them into buttons, then step on them to rotate the maze.
 Once the seed reaches the pot, a plant will grow. Destroy it to reveal this Canister.
Arkham Asylum Antics – Free Play Mode cont.
Canister 6
 After collecting Canister 5, head back to the intersection, then continue down the path. You’ll find two levers hanging from the wall.
 Grab onto both of them to open two gates under the grating. Head under the grating and pull the metal box out of the way, allowing you to head back in and grab the Canister.
Canister 7
 There are 5 small spouts of water you need to freeze to make bat statues. Once they’re frozen, punch them to register them. The first is in the very top right corner of the maze.
 The second is on the far left side of the maze, just south of the intersection leading to Canister 5.
 The third is right at the intersection leading to Canister 9.
 The fourth is in the center of the maze, by the silver statue you destroy to reveal the water spout.
 The fifth is south of the grapple points you latch onto to reveal the Ice Suit. Freeze and smack all 5 to receive this Canister.
Canister 8
Head south from the Bat Suit Swapper, then take a left to find this Canister encased behind some glass. Shatter the glass and you’ll be able to collect it.
Canister 9
 After collecting Canister 8, head south to find another pit of toxic gas and deadly plants. Fly over it, then continue down the path until you reach another intersection.
 Head down the south path and you’ll find a spike pit.
 Glide or fly across it, then use the Deconstructor to destroy the black statue.
 Build the LEGO pieces that appear into a lever, then pull it.
 This will lower a platform above the spike pit. Hop on it, then shatter the glass to reveal this Canister.
Canister 10
 Follow Bane’s Mole Machine as it drives around and you’ll find a super strength handle. Pull on it to tear off the gate, revealing this.
Minikit Vehicle: Two-Face’s Truck (Minikit)
Gotham City Interlude – Courtyard Clean-Up
Characters: Batman, Robin
With most of the villains stopped, head over to Commissioner Gordon and press the “special” button to talk to him. This will start the next level.
Asylum Assignment – Story Mode
“Confirmation tonight that the inmates of Arkham Asylum are on the rampage once again, and this reporter has to ask: ‘Is it really such a great idea to house all these super-villains together in one place?’ Hey, at least the mayor’s plan to let them loose in some vast, walled-off area in the heart of the city got put on hold. Now that would never have ended well.”
“We have everything under control”: Arkham Warden reassures citizens from emergency bunker…
Unidentified object seen flying over the city: has Kite-Man returned to Gotham?…
Yacht Club opens, catering for “both rich and super-rich”…

Enemies: Arkham Inmate, Freeze Goon
Boss: Scarecrow
Starting Characters: Batman, Robin
Super Hero: 105,000
Part 1 – Beware of Croc
The way ahead is blocked by a fire, and we’ll need to find a way to put it out. Destroy the glowing parts of the elevator to reveal LEGO pieces, then build them into a Suit Swapper. Hop in as Robin to receive the Hazard Suit. Hop in the pool of water on the left to fill the tank, then spray the water at the fires on the right to put them out. Once the fires are out, smash through the rubble and continue to the right. Drop down into the water and use the Hazard Suit to sink to the bottom. Pull the lever on the left to raise up the Suit Swapper. Hop in as Batman to receive the Electricity Suit. You can use the suit to safely pass through the electricity on the right, so do so. Remove the charge from the generator to lower a barrier underwater, then switch to Robin. Continue to the right underwater, then destroy the rubble to raise up two platforms, allowing Batman to continue to the right. Switch back to Batman and hop across the platforms, then hop over the electrified pipe. Remove the charge from the generator to shut off the fan blade underwater. Switch back to Robin and head behind the fan blade (you may have to destroy it first) and into the tunnel. Head to the right and past the second fan blade, then pull the lever to reveal a generator above you. Switch back to Batman and place a charge in the generator to cook a turkey. This will lure Killer Croc out of the water, opening the gate by Robin. Switch back to Robin and continue to the right, then destroy the generator to shut off the fan above you. Switch back to Batman and smash through the fan, then continue to the right. Destroy the desk to reveal LEGO pieces, then build them into a rotary handle. Turn it to rotate the cage underwater (Robin should be standing inside). Switch back to Robin and continue to the right, then head to the surface and hop back onto land. Fill up the switch with water to lower the stairs, then head up.
Pull the lever to turn on the ice jets, freezing the waterfall. Climb up, then head to the right. Destroy the glowing rubble to reveal LEGO pieces, then build them into a Suit Swapper. Hop in as Robin to receive the Ice Suit, then freeze the waterfall in the back. Attack the two hatches to reveal water spouts, then freeze both of them. Climb up the waterfall and follow the path around, then hop across the frozen water spouts to reach the ledge on the right. Use the Ice Suit to pass through the freeze jet, then turn the rotary handle to shut it off, allowing Batman to join you. Continue up the stairs and climb up the electrified wall on the left, then remove the charge from the generator, allowing Robin to join you. Use Robin to cross the frozen wall to the right, then drop down inside the hatch. Pull the lever to reveal a rotary handle, then turn it to shut off the freeze jets. Climb back up the wall on the left and freeze the water, allowing both characters to cross to the right. Remove the charge from the generator to open the elevator, then head inside. Step on one of the buttons and your partner will step on the other.
Part 2 – Scarecrow Pursuit
Time to chase after Scarecrow! If you get too close to the cameras, they’ll dispense some fear gas, so we need to find a way to sneak past. Head to the right and place a charge in the generator to the left of the large screens, revealing a ball socket. Hop in the nearby Suit Swapper as Robin to receive the Acrobat Suit, then turn into a ball. Hop in the ball socket and use it to move the ball through the maze. This will reveal a large box. Grapple onto the pull handle to open the box, revealing LEGO pieces. Build them into a Suit Swapper, then hop in as Batman to receive the Sensor Suit. Hop back in the Suit Swapper to the left as Robin to receive the Ice Suit, then head back to the cameras. Use the Sensor Suit to sneak past the cameras, then pull the lever to shut them off. Use the Ice Suit to put out the fires, then continue down the path and to the right. Once you reach the end of the path, an x-ray wall will appear. Look through it and manipulate the batteries until they turn green, extending a bridge to the right. Cross it, then freeze the waterfall on the right. Climb up and pull the lever to extend another bridge, then cross it.
Continue down the path and Scarecrow will appear behind the door. Defeat the goons he sends at you, then head to the left to find an x-ray wall. Look through it, then look in the top left corner. Drop the battery, then interact with the blocks to send the battery down the ramp. Once it’s in the lift, interact with the lift to raise it up. Interact with the blocks on the right to move the battery into the slot in the lower right corner, opening the door. Head up the stairs and follow Scarecrow down the hallway. At the end of the hallway, grab the bar on the left to reveal a lever. Switch to your partner and pull it to shut off the fear gas.
Head into the room to start the fight with Scarecrow. He’ll send some goons to fight you. Once they’re defeated, Scarecrow himself will hop in. Attack him to take out three hearts, causing him to retreat. Repeat this process to take off three more hearts. Scarecrow will then send a third wave of goons at you. Once they’re defeated, two sets of LEGO pieces will appear by the fear gas. Build them into a wheel, then turn it to lower the nearby bar. Grab on, then switch to your partner. Turn the wheel to raise the bar back up, then switch back to your partner. Hop onto the ledge, then pull the lever to turn on the fan, diluting some of the fear gas. Do the same on the other side to vent out the fear gas. Scarecrow will then come over to fight you again. Smack him to take out his last three hearts, completing the level.
Unlocked Suits: Electricity Suit, Hazard Suit
Asylum Assignment – Free Play Mode
Required Abilities: Agility, Deconstructor, Dive, Explosive, Joker, Lantern, Magnet, Penguin Bomb, Plant Travel, Pole, Super Strength, Water Spray
Part 1 – Beware of Croc
Suits Available: Hazard Suit, Electricity Suit, Ice Suit
Canister 1
 After passing through the first fan blade underwater, head to the left to reach this Canister.
Canister 2
 While underwater underneath Killer Croc’s cell, head to the back right corner.
 Swim to the surface and you’ll be able to hop inside his cell. You’ll find this Canister on the left.
Canister 3
 Just before hopping out of the water, pull on the super strength handle on the right to tear off the gate, allowing you to collect this.
Canister 4
 Instead of climbing up the first frozen waterfall, drop down off the right side of the ledge. You’ll find a Joker Box.
 Open it and you’ll reveal some LEGO pieces.
 Build them into a bar, then grab onto it to reveal a Joker mural, as well as this Canister.
Canister 5
 After climbing up the small frozen waterfall, head to the right and you’ll find a metal lock on the door.
 Pull on it to reveal some lantern LEGO pieces.
 Build them into a pair of fists, which will punch a hole in the floor. Drop down inside to reach this Canister.
Canister 6
On the right side of the area with Mr. Freeze’s cell, you’ll find an igloo. Send a Penguin Bomb inside and detonate it when it is near the shiny wall on the right side of the cage.
 This will blow a hole in the wall, allowing you to enter Mr. Freeze’s cell. Hop on top of his bed to collect this Canister.
Part 2 – Scarecrow Pursuit
Suits Available: Electricity Suit, Ice Suit, Acrobat Suit, Sensor Suit, Power Suit
Canister 7
 Hop onto the pole to the left side of the computer screens, then continue swinging to the right.
 You’ll eventually swing into this Canister.
Canister 8
 There are 5 pieces of Joker graffiti that you need to clean up. The first is on the left side of the large computer screens.
 The second can be found right as you enter the x-ray tunnel.
 The third can be found by destroying the silver bars on one of the cells to the right of the ramp.
 The final two can be found on either side of the ramp. Clean up all 5 to receive this Canister.
Canister 9
 Drop down onto the ledge in front of the x-ray wall and you’ll find a black door.
 Use the Deconstructor to destroy it, then head inside the room to reach this Canister.
Canister 10
 Hop onto the greenhouse to the left of the ramp and you’ll find a flower bed on top.
 Travel through it to reach the inside of the greenhouse. You’ll find this Canister on the right.
Citizen in Peril
 This poor lady is trapped in a cell to the right of the ramp. Destroy the silver bars, then defeat the inmates bothering her (if the explosion doesn’t take them out) to rescue her.
Minikit Vehicle: Scarecrow’s Biplane (Minikit)
Gotham City Interlude – Race to Ace
Characters: Batman, Robin
Alfred has activated the Remote Terminals all throughout Gotham City. Walk up to a Remote Terminal and activate it to be able to call in vehicles from that location (as well as reveal that area’s Villain). Remote Terminals that you have activated will be marked by a blue skylight, while Remote Terminals that you haven’t activated will be marked by a red skylight.
While you can activate a few Remote Terminals now, we have more pressing issues to deal with. There’s been a break-in at Ace Chemicals, and we need to get over there! Hop in one of the vehicles and follow the ghost studs to reach the bridge to the Central Island. Unfortunately, the barrier is raised up, preventing you from crossing. Hop out of your vehicle and head to the left. Hop in the Suit Swapper as Batman to receive the Electricity Suit, then use it to remove the charge from the generator. This will lower the barrier, allowing you to cross the bridge. Hop back in your vehicle and follow the ghost studs to reach Ace Chemicals. Step into the bat-symbol on the ground to start the next level.
Chemical Crisis – Story Mode
“It’s another crazy night in Gotham, with Arkham escapees flooding through the city. We’ve got goons in the streets, thugs in the park, and Poison Ivy in the Botanic Gardens. Even, um, Killer Moth, who’s apparently tearing up the Power Station. Killer Moth? For real? Wow! Killer Moth, who knew! Oh, and some kind of break in at Ace Chemicals. Be careful out there people.”
Confirmed escapees: The Joker; Harley Quinn; The Riddler; Two-Face; The Penguin; Bane; Scarecrow; Poison Ivy…
Many others feared to be at large…
Even more than last time…
Killer Moth “is no joke”, claims snig gering Police Commissioner…

Enemies: Clown Goon
Starting Characters: Batman, Robin
Added Characters: Superman
Super Hero: 313,000
Part 1 – Vats and Vials
We need to find five vats of chemicals and collect samples for analysis. Head to the right and you’ll find a Suit Swapper behind some glass. Destroy the nearby blue vials to reveal LEGO pieces, then build them into a lever. Pull it to rotate the glass, allowing you to hop in the Suit Swapper. Hop in as Robin to receive the Hazard Suit, then head to the right. Climb the stairs in the back and hop in the water, then pull the lever to raise up the first vat of chemicals. Swim back to the surface and hop onto the bar underneath the vat to reach the ledge, then press the “special” button to take a sample.
With one chemical down, the gate on the right will open. Continue to the right and cross the catwalk over the chemical vats. An elevator will then crash to the ground and become electrified. Destroy the four nearby glowing red lights, then turn the valve to reveal a puddle of toxic waste. Hop in the nearby water to fill up the hazard tank, then clean off the toxic waste to reveal a Suit Swapper. Hop in as Batman to receive the Electricity Suit, then climb up the electrified ladder on the left. Remove the charge from the generator to shut off the electricity, allowing Robin to join you. Head across the catwalk to the left to reach the second vat of chemicals, then press the “special” button in front of it to take a sample.
After taking the second sample, a hatch to the right will open. Drop inside and sink to the bottom of the water, then head to the right. Pull the lever to drain the water, allowing Batman to join you and opening the gate on the right. Continue to the right and head down the stairs. You’ll find some glowing LEGO pieces under puddles of toxic waste. Clean off the toxic waste (there is some water in the near right corner if you need it), then build the LEGO pieces into a Suit Swapper. Hop in as Robin to receive the Magnet Suit, then climb up to the upper ledge (either by climbing the metal wall or the electrified ladder). Pull on the metal object on the left to reveal a generator, then place a charge in it to reveal the third chemical vat. Press the “special” button in front of it to take a sample.
After taking the third sample, cross the bridge that appears and pull on the metal object to lower a ladder. Climb up and the bridge ahead of you will explode, revealing LEGO pieces. Build them into a platform, then hop across it and continue down the path. Cross the gaps on the moving barrels, then pull on the metal barrels in the toxic waste to create steps. Hop up them and you’ll reach the fourth chemical vat. Stand in front of it and press the “special” button to take a sample.
One more sample to go! A new set of moving barrels will appear on the right, so hop across them to cross the gap. Continue to the right and you’ll find a generator. Remove the charge from it to un-electrify the Suit Swapper, then hop in as Robin to receive the Hazard Suit. Stand in one of the pools of toxic waste to fill up the hazard tank, then spray the toxic waste into the correct colored circles to fill up the vats in the back. Fill up each of the three vats to turn the big pool of toxic waste on the right into water, allowing Batman to swim across. Hop in and swim to the right, then hop up the electrified pipe to reach the opposite ledge. Remove the charge from the generator to shut off the electricity, allowing Robin to join you. Clean off the toxic waste on the lever, then pull it to open the gate. Continue to the right and you’ll see a glowing object on the left side of the ledge. Use your Batarang to hit it, lowering a ladder. Climb up and pull the lever to open the hatch, then drop back down. Continue to the right and hop up the pipes in the back, then grab onto the electrified bar above you. Hop up the bars to reach the ledge, then pull the lever to open the nearby hatch. Once both hatches are open, head back to the hatch on the left and drop down inside. Sink to the bottom of the water, then head inside the vat. Swim up and pull the lever to drain the water, then drop back down. Press the “special” button in front of the vat to take the final sample.
Part 2 – Chemical Reaction
Head to the right and walk through the toxic waste, then destroy the large vat on the left to reveal LEGO pieces. Build them into a water tank, which will fill the nearby pool with water. Stand in it to fill up the hazard tank, then spray water to clean up all the toxic waste, allowing Batman to join you. Put out the fires in the back left corner, then build the LEGO pieces into a Suit Swapper. Hop in as Robin to receive the Acrobat Suit, then toss your pole into the socket on the right. Swing across the poles to the right, then turn into a ball. Hop into the ball socket, then move to the left to extend a bridge, allowing Batman to join you. Remove the charge from the generator on the left, then place it in the middle generator to open the hatch, revealing LEGO pieces. Build them into a Suit Swapper, then hop in as Batman to receive the Power Suit. Head to the right and pull on the super strength handle to destroy the gate, then continue down the path. Destroy the silver object on the left to reveal a pole, then climb up as Robin. Build the LEGO pieces into a grapple point so Batman can join you, then head to the right. Pull on the super strength handle to tear off the gate, then hop up the wall as Robin. Destroy the glowing object at the top to lower a ladder, allowing Batman to join you.
Continue down the path and destroy the silver part of the pillar to knock it down, then cross the beam to the right. Continue to the right and a pillar will collapse in your path. Destroy the silver object to clear the way, then continue to the right. You’ll find a large computer screen. Destroy the consoles on either side of it to reveal LEGO pieces, then build them into a ball socket. Turn into a ball and hop inside, then move the cursor around the screen. When you reach a pipe icon, press the “attack” button to shut it off. Once both pipes have been turned off, head back up the stairs on the left and continue down the path to the right. Pull on the super strength handle to tear off the gate, then hop up the wall. Turn into a ball, then hop in the ball socket. Lower the platform down so Batman hops on, then move it to the right. Once Batman is across the gap, hop back out of the ball socket. Toss your pole into the socket above you, then swing across the poles to the right. Hop in the Suit Swapper as Batman to receive the Electricity Suit, then use the grapple point to reach the upper ledge. Remove the charge from the generator to open the gate, then continue to the right. Toss your pole into the socket on the wall, then swing up them to the right. Pull the lever to close the boxes of toxic waste, allowing Batman to join you. Place a charge in the generator to move the box on the right into position, then stand on the vat to your right. When the lid raises up, hop onto the box.
Chemical Crisis – Story Mode cont.
Part 3 – An Unwanted Rescue
Superman has arrived to save the day! Fly onto the ledge in the back, then pull on the super strength handle to reveal some water. Use Superman’s freeze breath to freeze it, allowing Batman and Robin to join you. Head to the right and destroy the glowing lockers to reveal some LEGO pieces. Build them into a Suit Swapper, then hop in as Batman to receive the Power Suit. Destroy the silver barrier to the right to reveal another Suit Swapper, then hop in as Robin to receive the Hazard Suit. Continue to the right and use Superman’s x-ray vision to look through the x-ray wall. Interact with each of the valves to open hatches on the ledge below you. We’ll need to fill each of the vats with the correct color of toxic waste. The orange toxic waste can be found right in front of the hatches, while the green and purple toxic waste can be found on the ledge to the right. Once all three vats are full, the orange toxic waste spouting from the pipes on the right will turn into water. Freeze them to create platforms, but before hopping up, head back to the left. Hop in the Suit Swapper as Batman to receive the Electricity Suit, then hop up the frozen platforms and pass through the electricity. Remove the charge from the generator to shut off the electricity, allowing Robin and Superman to join you. Continue down the path and fly onto the ledge above you, then cut the shape out of the gold panel. This will put out the large fire, allowing Batman and Robin to grapple onto the ledge with you. Continue to the right and you’ll find another gold panel up on the water tower. Cut the shape out of it to reveal a waterfall, then freeze it. Climb up and continue to the right, then place a charge in the generator to open the elevator. Step inside.
Part 4 – Rooftop
Almost done! Head to the right and the ACE Chemicals sign will collapse, electrifying the Suit Swapper. Have both Superman and Batman cross the gap (Superman by flying, Batman by walking across the electrified beams), then destroy the gold objects to reveal LEGO pieces. Build them into a ladder, then climb up onto the ledge. Remove the charge from the generator to shut off the electricity. Walk back across the beams, then hop in the Suit Swapper as Batman to receive the Power Suit. Head back across the beams and destroy the silver supports under the water tower to complete the level.
Chemical Crisis – Free Play Mode
Required Abilities: Ball, Deconstructor, Electric, Explosive, Flight, Grapple, Heat Vision, Lantern, Magnet, Plant Travel, Sharp Shoot, Sonic, Super Strength, Water Spray
Part 1 – Vats and Vials
Suits Available: Hazard Suit, Electricity Suit, Magnet Suit, Power Suit
Canister 1
 Fly above the location of the first chemical vat and you’ll find a gold panel. Destroy it to reveal this Canister.
Canister 2
 Destroy the silver object by the second chemical vat to reveal a lever.
 Pull it to reveal a fan to the right, allowing you to ride up the air current to this Canister.
Canister 3
 Use the Deconstructor on the black object to the left of the Magnet Suit Swapper to reveal LEGO pieces.
 Build them into a super strength handle, then pull on it to reveal this Canister.
Canister 4
 Destroy the silver object to the left of the fourth chemical vat to shut off the lasers, allowing you to collect this Canister.
Part 2 – Chemical Reaction
Suits Available: Hazard Suit, Electricity Suit, Acrobat Suit, Power Suit
Canister 5
 There are 3 purple-and-green presents you need to destroy. The first can be found by using the Deconstructor to destroy the black panel to the left of the Acrobat Suit Swapper.
 Destroying the panel will reveal the first present.
 The second present can be found by placing a charge in the generator on the right.
 This will open the hatch, revealing the second present.
 To find the third present, place a charge into the generator to the right of the large computer screen.
 This will create a third option in the bottom left corner of the screen.
 Use the ball socket to select it, causing this present to appear to the right. Destroy all 3 presents to receive this Canister.
Canister 6
 Destroy the large gold object on top of a chemical vat to reveal a puddle of toxic goo.
 Some lantern pieces will then appear. Build them into a plunger, which will reveal this Canister.
Chemical Crisis – Free Play Mode cont.
Part 3 – An Unwanted Rescue
Suits Available: Electricity Suit, Power Suit, Hazard Suit, Bat Suit
Canister 7
 There are 5 fires you need to put out. The first is to the left of your starting point.
 The second is on the ledge by the Power Suit Swapper.
 The third is to the right of the pools of water and orange toxic waste.
 The fourth is to the right of the gold wall on the first water tower.
 The fifth is to the right of the exit. Put out all 5 fires to reveal this.
Canister 8
 Pull on the metal hatch to the right of your starting point to reveal a maze.
 Build the LEGO pieces into a red button, then step on it to move the ball forward.
 Step on the blue valve to move the ball along the path, then step on the green valve when the ball is in front of the green tiles to move it to the center of the maze.
 When the ball is in the yellow circle, step on the yellow valve to knock the ball out of the maze. Destroy the ball to reveal this Canister.
Citizen in Peril
 Grapple onto the ledge above the Bat Suit Swapper, then head to the right.
 Shatter the glass to reveal three wheels.
 Quickly hit all three of them to put out the fires in the room, rescuing this Citizen.
Canister 9
 Travel through the flower bed behind the large current of electricity and you’ll reach the alcove with this Canister inside.
Part 4 – Rooftop
Suits Available: Electricity Suit, Power Suit
Canister 10
 There are 5 gold vents you need to destroy. The first is to the left of your starting point.
 The second is to the right of your starting point, by the Power Suit Swapper.
 The third is up on the wall on the left. You’ll need to fly up to reach it.
 The fourth is to the left of the large water tower.
 The fifth is to the right of the large water tower. Destroy all 5 to receive this.
Minikit Vehicle: Joker’s Helicopter (Minikit)
Gotham City Interlude – The Juggernaut
Characters: Batman, Robin
That LexCorp Juggernaut is driving laps around Central Park. Hop in a vehicle and follow the ghost studs to chase after it. Once you reach the bat-symbol behind it, drive in it for a few seconds to start the next level.
Chemical Signature – Story Mode
“With chaos on the streets and super-villains running wild, the last thing Gotham citizens needed tonight was a massive fire at the Ace Chemicals plant. Unfortunately, that’s exactly what we got, with explosions which rocked nearby apartment blocks, dramatically lowering residential property prices in the area. Superman was on hand to deal with the fire, but police remain baffled as to the motive behind what looks like a deliberate act of sabotage.”
Unpredictable effects of chemical factory fire likely to have created at least four new super-villains…
Boss of Ace Chemicals promises factory will be “Up to 30% less deadly” after renovation…
Large grey truck spotted in the area immediately before explosions – where is it now?…

Enemies: LexBot, LexCorp Scientist
Boss: LexCorp Juggernaut
Starting Characters: Batman, Robin
Super Hero: 90,000
Part 1 – Juggernaut Chase
This part is fairly simple. Shoot at the part of the juggernaut with the orange health bar above it to destroy it. This will take out a heart, and the juggernaut will drive out of range. You will then be attacked by various goon vehicles. Defeat them and the juggernaut will drive back into range, allowing you to target and destroy another part of it. Once you’ve taken out all the juggernaut’s hearts, a cutscene will play.
Part 2 – Boarding Party
After the cutscene, you’ll find yourself inside the juggernaut. Destroy the glowing boxes on the right to reveal LEGO pieces. Build them into a Suit Swapper, then hop in as Robin to receive the Magnet Suit. Pull on the metal hatch on the right to lower the ball into the maze in the floor. Use the Magnet Suit to pull the metal ball through the maze to the left, revealing a metal wall. Climb up it, then turn the wheel to lower a ladder, allowing Batman to join you. Head to the right and pull on the metal hatch to reveal two boxes, then destroy them to reveal LEGO pieces. Build them into a Suit Swapper, then hop in as Batman to receive the Sensor Suit. Use the suit to sneak past the camera, climbing up the ladder.
Destroy the blue generator on top of the juggernaut to shut off the camera, allowing Robin to join you. Pull on the metal clasp to close the vents, allowing you to continue to the right. Destroy the glowing blue clamps to reveal an x-ray wall, then look inside it. Align the gears, then interact with one of the red valves to close the vent on the right. Continue to the right and two micro VTOLs will appear. Use your Batarang to destroy them, revealing LEGO pieces. Build them into a Suit Swapper, then hop in as Batman to receive the Bat Suit. Continue to the right and pull on the metal clasp to raise up a ramp. Switch to Batman and glide across the gap, then destroy the blue generators to shut off the electricity, allowing Robin to join you. Continue to the right and shatter the glass to reveal a metal satellite dish. Pull on it to reveal LEGO pieces, then build them into a Remote Terminal. Use it to call in the Batwing, which will blast a hole in the juggernaut.
Head to the right and head back inside the juggernaut, then head to the left. Pull on the metal clasp to open the door, then continue to the left. We need to remove the shield around the kryptonite. Pull the lever on the left to reveal one of the generators, then destroy it. Climb the metal wall on the left, then pull on the metal clasp to reveal the second generator. Build the LEGO pieces it left behind into a grapple point, allowing Batman to join you on the ledge. Grapple onto the rotating grapple point to the right, then hop onto the ledge on the right. Shatter the glass, then pull the lever to reveal the final generator. Destroy it to complete the level.
Chemical Signature – Free Play Mode
Required Abilities: Deconstructor, Flight, Heat Vision, Magnet, Plant Travel
Part 1 – Juggernaut Chase
Canister 1
 Destroy a Lex Luthor campaign poster. The poster appears in the top part of the screen after you make the first turn to the right.
Canister 2
 There are 3 taxi cabs you need to destroy. The first is on the left side of the street.
 The second is on the right side of the street after the Lex Luthor poster.
 The third is on the left side of the street, just before the movie poster (see Canister 3). Destroy all 3 to receive this.
Canister 3
 Destroy a movie poster. The poster appears in the top right corner of the screen.
Part 2 – Boarding Party
Suits Available: Magnet Suit, Sensor Suit, Bat Suit
Canister 4
 After moving the metal ball through the floor maze, head to the right and you’ll find this Canister.
 Pull on the metal hatch to lower the Canister into the maze, then pull it through the maze in the floor. Once it reaches the end, you’ll be able to collect it.
Canister 5
 After moving the metal ball through the maze, a gold “L” will appear on the wall on the left. Destroy it to open the door, revealing this Canister.
Canister 6
 You’ll find a flower bed to the right of the Sensor Suit Swapper.
 Travel through it and you’ll reach a LexBot dance party. Defeat the three LexBots inside to reveal this Canister.
Citizen in Peril
Once you’re on the top of the juggernaut, head all the way to the left to find this citizen being harassed by some LexBots. Defeat both of them to rescue him.
Canister 7
 After rescuing the Citizen in Peril, use the Deconstructor to destroy the nearby black panel, revealing this Canister.
Canister 8
 Head to the far right side of the Juggernaut, then destroy the gold panel to reveal this Canister.
Canister 9
 Head to the far right side of the Juggernaut, then drop down the bars to reach this.
Canister 10
 You’ll see this Canister inside a dome as you make your way across the Juggernaut.
 To collect it, fly straight up through the gap in between the rotating grapple points.
Minikit Vehicle: LexCorp Juggernaut (Minikit)
Gotham City Interlude – Detective Work
Characters: Batman, Robin
With some kryptonite recovered from the juggernaut, it’s time to head to the Batcave to investigate. Follow the ghost studs over to the Batcave, then head inside. Use the Batcomputer to start the next level.
Unwelcome Guests – Story Mode
“In a special report later tonight, Gotham City News asks: Where is the Joker? The most notorious of Arkham’s recent escapees, he’ll be up to some clownish master plan with deadly consequences. But what could it be? We’ll have an exclusive interview with the Gotham City police officer who says he saw a giant version of Joker’s face in the fire at Ace Chemicals, and speculating wildly about all the horrible ways the green-haired ghoul might destroy us all. Don’t miss it!”
The Joker holds world records both for the greatest number of times imprisoned (280), and for the greatest number of times escaped (281)…
His skin was whitened by an accident in a chemical factory…
His hair was made green by an accident in a hair salon…
His teeth were yellowed by bad dental hygiene…

Enemies: LexBot, Clown Goon, Mime Goon
Boss: Lex and Joker
Starting Characters: Batman, Robin
Added Characters: Superman
Super Hero: 85,000
Part 1 – Welcome Party
This isn’t good. If you try to head to the left or right, your path will be blocked. Instead, head down the path towards Lex and hop into the Bat-Bike. Shoot Lex a bunch of times to damage him. He will then deconstruct the Bat-Bike, leaving some LEGO pieces behind. Build them into a Suit Swapper, then hop in as Batman to receive the Electricity Suit. Head down the path to the left. If you haven’t already tried to go this way, part of the path will become electrified. Walk through the electricity and remove the charge from the generator, allowing Robin to join you. Continue to the left and a bridge will collapse. Place a charge in the nearby generator to reveal a Suit Swapper. Hop in as Batman to receive the Bat Suit, then shatter the nearby glass dome to reveal another Suit Swapper. Hop in as Robin to receive the Acrobat Suit, then head to the left. Build the LEGO pieces into a pole socket, then toss your pole into it. Swing up the pole to reach the ledge, then destroy the glowing box to reveal LEGO pieces. Build them into a bat, allowing Batman to join you. Hop in the Batwing, then shoot at Lex a bunch to damage him. He will then deconstruct the Batwing, revealing LEGO pieces. Build them into a Suit Swapper, then hop into it as Batman to receive the Power Suit. Hop back down, then head all the way to the right. If you haven’t gone this way already, part of the path will collapse. Destroy the silver rubble left behind to clear the path, then cross the beams to the right. Stand on one of the buttons at the end and your partner will stand on the other one, revealing the Batboat. Hop in and shoot Lex some more to damage him.
Part 2 – Batcave Escape
We need to reach the top of the elevator shaft. Cut through the gold panel to create an opening, then grapple/fly up to the next ledge. Climb up the wall on the left, then put out the fires on the ledge. Destroy the box to reveal LEGO pieces, then build them into a bar. Fly up to the ledge on the right, then put out the fires. Destroy the box to reveal more LEGO pieces, then build them into another bar, allowing Batman and Robin to join you. Fly/grapple up to the next ledge, then toss your pole into the socket on the left. Swing up the poles to knock down a rock, revealing a waterfall. Freeze it, then climb up to reach the top ledge. Destroy the silver wheel on the wall to reveal an x-ray wall, then look through it. Complete the bat symbol to open the door.
Continue into the room and most of the floor will collapse. Walk across the beams to the left to reach the ledge, then hop in the Suit Swapper as Robin to receive the Magnet Suit. Fly up onto the ledge on the left and put out the fires, allowing Robin to grapple up to you. Cross the gap by using the metal wall, then head to the right. Grapple onto the pull handle to tear off the door to the room, then head inside. Destroy the gold object to reveal LEGO pieces on the ledge on the right. Build them into a tightrope, allowing Batman to reach the back ledge. Once everyone is on the back ledge, destroy the silver objects in the center to reveal LEGO pieces. Build them into a ball socket. We’ll need to head back across the room to reach the Suit Swapper with the Acrobat Suit. Climb back up the metal wall and head back across the gap, then hop in the Suit Swapper as Robin to receive the Acrobat Suit. Cross the beams to the right and grapple onto the ledge, then slide down the tightrope. Hop in the ball socket and move to the left to rotate the T. rex around, revealing a grapple point. Batman and Robin can use this to reach the upper ledge. Head onto the upper ledge and destroy the silver stalactite to bust a hole in the ceiling, then ride the fan’s air current up and out to complete the level.
Unlocked Vehicles: Whirly-Bat
Unwelcome Guests – Free Play Mode
Required Abilities: Deconstructor, Explosive, Flight, Heat Vision, Riddler, Sonic, Water Spray
Part 1 – Welcome Party
Suits Available: Electricity Suit, Bat Suit, Acrobat Suit, Power Suit
Canister 1
 Use the Deconstructor to destroy the Batcomputer, revealing this Canister.
Canister 2
 There are 3 Joker boxes you need to shoot down. One will appear in each vehicle you hop in. While in the Bat-Bike, the first box appears right above the path.
 The second Joker box appears when you hop in the Batwing. It also appears above the path.
 The third Joker box appears when you hop in the Batboat. It appears on the left side of the path. Destroy all 3 to receive this Canister.
Canister 3
 After crossing the bridge to the left, put out the fires on the far left to reveal this.
Canister 4
 After grabbing the Acrobat Suit from the Suit Swapper, it will explode, revealing a gold panel. Destroy the gold panel to reveal an opening, then drop down inside to collect this.
Canister 5
 Fly up above the Batwing to find this Canister.
Part 2 – Batcave Escape
Suits Available: Acrobat Suit, Power Suit, Magnet Suit, Bat Suit
Canister 6
 There are 3 Joker playing cards you need to destroy. The first is on the right side of the top ledge, just after you climb up the waterfall.
 The second can be found on the ledge on the left side of the large room. Destroy the silver rock wall to reveal this.
 The third can be found inside the room in the back right corner. Destroy all 3 to reveal this Canister.
Canister 7
 Fly onto the ledge on the right side of the large room and destroy the gold rock to reveal this.
Citizen in Peril
 You’ll find Alfred trapped behind some fires to the left of the T. rex. Put out the fires to rescue him.
Canister 8
 Use the Deconstructor to destroy the door to the room left of the T.rex, then fly inside.
 Shatter the glass around this Canister, allowing you to collect it.
Canister 9
 After rotating the T. rex around, destroy the gold egg underneath it to reveal this.
Canister 10
 Smash some rocks to the right of the exit to reveal a Riddler Box.
 Open it to reveal this Canister.
Minikit Vehicle: Batwing (Minikit)
Gotham City Interlude – Sky Chase
Characters: Batman, Superman
We now find ourselves outside Wayne Manor. You can drop down the giant hole in the ground to take a shortcut to the Batcave, but for now, you can enjoy flying around Gotham City as Superman. If you want, this is a good time to activate the Remote Terminals, as you can activate most of them with Superman. When you’re ready to move on, fly over to the large LexCorp aircraft hovering over the beach on the Central Island.
Destination Metropolis – Story Mode
“Thick black smoke is rising from Bruce Wayne’s garden with unconfirmed reports of loud bangs and a weird kind of aircraft seen in the nearby sky. Wayne spokesman Alfred Pennyworth says they’re ‘just burning leaves’, but visitors to Wayne Manor are being turned away, and tonight’s planned reception in aid of the Gotham City Zoo has been cancelled. With the city in the grip of a crime wave, even the animals can’t catch a break.”
Billionaire Bruce Wayne is well known for his charity work…
Wayne has supported many causes, including: Gotham City Hospital (new treatment unit for serious injuries); Gotham City Theater (refurbishment following various super-villain incidents); Gotham City Zoo (new Bat habitat)…

Enemies: LexCorp VTOL, LexBot, Clown Goon, Mime Goon
Starting Characters: Superman, Batman
Super Hero: 120,000
Part 1 – Aircraft Chase
We’re chasing after Lex’s aircraft as it heads to Metropolis. Take down the VTOLs that attack you and you’ll fly closer to the aircraft. Take out all the parts of the aircraft with orange health bars over them (you’ll have to use Superman for the gold structures), as well as the VTOLs, and you’ll fly to a different side of the aircraft. Once you reach the back of the aircraft, defeat the VTOLs attacking you.
Part 2 – Inside the Aircraft
Time to get inside this thing! First, we need to lower that shield. There are two pull handles on either side of the ramp. Grapple onto them to reveal gold panels. Destroy both of them, then fly up and destroy the other two gold panels. This will deactivate the shield, allowing you to head inside. Once inside, a pilot will hop in a VTOL. Latch onto the pull handle on the front of it to pull off the glass on the cockpit, then take out the pilot with a Batarang or heat vision. This will crash the VTOL, revealing an x-ray wall. Look through it and move the wires into place, shutting off the electricity on the Suit Swapper. Hop in as Batman to receive the Electricity Suit, then remove the charge from the generator on the left. Place the charge in the generator on the right to lower the lift, then hop on to reach the upper ledge. Grab onto one of the bars, then switch to your partner and grab the other. This will lift up the curtain, revealing a gold panel. Cut the shape out of it, then continue into the next room. This room is full of Kryptonite. If Superman gets too close to Kryptonite, he will back away. Because of this, he can’t cross to the other side. Have Batman break the four glowing locks on the lockers to reveal LEGO pieces. Build them over the Kryptonite, allowing Superman to join you. Pull on the super strength handle to clear the path, then head into the next room.
There are two pilots flying around in Micro VTOLs. Use a Batarang to take them out, then hop in one. Destroy the silver boxes towards the center of the room to reveal LEGO pieces (you can also destroy the silver boxes in the back corners to reveal LEGO pieces, allowing you to stop the flow of LexBots). You’ll build two robotic arms and two super strength handles. Pull on the super strength handles to move the robotic arms into position, revealing a missile. Destroy the gold panel on the back of it to launch it into the door, clearing the path. Put out the fires and head up the stairs. You’ll find Joker and Lex in the cockpit, protected by another shield. Fly up through the hole in the ceiling, then pull on the super strength handle to reveal some LEGO pieces. Drop back down and build them into a Suit Swapper, then hop in as Batman to receive the Bat Suit. Shatter the glass on either side of the shield to reveal an air current, then hop in to be blown up to the top ledge. Shatter the glass panel, then drop down to complete the level.
Unlocked Characters: Superman
Destination Metropolis – Free Play Mode
Required Abilities: Ball, Deconstructor, Flight, Heat Vision, Joker, Lantern, Magnet, Sharp Shoot, Sonic, Super Strength, Water Spray
Part 1 – Aircraft Chase
Canister 1
 There are 2 gold panels on the front side of the aircraft. Destroy them both to receive this.
Part 2 – Inside the Aircraft
Suits Available: Electricity Suit, Bat Suit, Hazard Suit, Acrobat Suit
Canister 2
 Once inside the aircraft, destroy the two green chests on the right to reveal LEGO pieces.
 Build them into a lever, then pull it to reveal this Canister.
Canister 3
 There are two black panels in the back part of the first room. Use the Deconstructor to destroy either one, revealing an opening.
 Head inside and use the Deconstructor to destroy the two black domes, revealing buttons.
 Step on one and your partner will step on the other, opening the hatch in front of this Canister. Fly up to it to collect it.
Canister 4
 There are 3 containers of kryptonite that you need to destroy. The first can be found on the ledge you reach after riding up the lift.
 The second can be found by heading to the right after collecting Canister 6.
 The third can be found in the same room as Canisters 7 and 8. Destroy all 3 to receive this Canister.
Canister 5
 In the room with the kryptonite that you have to cover up, fly onto the ledge above you to find a glass window on the left. Shatter it to reveal this Canister.
Canister 6
 Open the Joker box on the left side of the room with the Micro-VTOLs to open the door.
 Head inside, then head to the right to find a lever covered with toxic waste.
 Clean it off, then pull it to reveal a ball socket.
 Hop inside, then use it to take control of the Batwing on the screen. Destroy 10 VTOLs to receive this Canister.
Canister 7
 Use the Deconstructor to destroy the black lock on the right side of the room with the Micro-VTOLs, opening the door.
 Head inside, then destroy the objects on the right side of the room to reveal LEGO pieces.
 Build them into a vehicle, then hop in and drive it to the left side of the room to find this Canister.
Canister 8
 After collecting Canister 7, quickly hit the five red targets along the back wall.
 This will open the cage around this Canister in the center of the room, allowing you to fly over to it.
Canister 9
 Use the Deconstructor to destroy the black box on the right side of the room with the Micro-VTOLs.
 This will reveal lantern LEGO pieces. Build them into a hammer, which will smash the nearby VTOL and reveal this Canister.
Canister 10
 Use the Deconstructor to destroy the black panel to the left of the cockpit, revealing a super strength handle.
 Pull on it to reveal this Canister.
Citizen in Peril
 While on top of the cockpit, you’ll notice this poor woman trapped on a metal pole. Pull it towards you to rescue her.
Minikit Vehicle: LexCorp VTOL (Minikit)
Gotham City Interlude – Mr. Luthor is Expecting You
Characters: Batman, Superman
Off to Metropolis! Simply hop in the air and fly over to the city in the background to start the next level.
Research and Development – Story Mode
“There’s frustration tonight at the ongoing mayhem in our streets. Notorious bad guys like The Riddler and The Joker are still at large, with the Gotham City Police Department apparently helpless. Presidential candidate Lex Luthor is due in town tomorrow, when he’ll hold a rally at City Hall. What message will he have for the hard-pressed people of Gotham? Will the city still be standing?”
Downtown banks “all out of money” following repeated heists…
Thefts of Police Department equipment and vehicles continue…
Entire fleet of patrol cars and vans now missing…
Commissioner Gordon appeals for calm and bicycles…

Enemies: LexBot, LexCorp Scientist, LexCorp Guard
Boss: Evil Receptionist, LexCorp Prototype Robot
Starting Characters: Batman, Superman
Super Hero: 100,000
Part 1 – LexCorp Lobby
Turns out Batman was right, the receptionist is evil! We can’t harm her (it?) without some explosives, so we need to find some. Fly up into the air and you’ll find the Evil Receptionist sitting on a large “L”. Destroy all the gold borders around it to reveal some LEGO pieces. Build them into a Suit Swapper, then hop in as Batman to receive the Power Suit. Now we can damage the Evil Receptionist. She is now back in the center of the room, shooting laser blasts wildly. Eventually, she will wear herself out and stop spinning. When she does this, launch an explosive at her and detonate it to damage her. She will then hop onto a ledge, sending some LexBots at you. Defeat them and the Evil Receptionist will hop down again. Wait for her to tire herself out, then launch and detonate another explosive to damage her again. She’ll then hop off yet again, so repeat this process one more time to defeat her.
Defeating her will send her crashing into the wall in the back, revealing an x-ray wall. Look through it and connect the wires to reverse the direction of the escalators, allowing Batman to reach the upper ledge. Destroy the silver objects in the center of the ledge to reveal LEGO pieces, then build them onto the computer on the left. This will reveal a lever. Pull it to reveal an elevator. Head inside and step on one of the buttons. Your partner will step on the other, lifting you up.
Part 2 – Second Floor
That shield on the right is made of kryptonite, meaning Superman can’t walk inside. We need to shut it down. Destroy the silver and gold objects on the right to reveal LEGO pieces, then build them into a Suit Swapper. Hop in as Batman to receive the Electricity Suit, then head through the electrified area to the right. Remove the charge from the generator to shut off the electricity, as well as the shield, allowing Superman to join you. Continue to the right and you’ll find another kryptonite shield. Destroy the gold object to reveal a generator, then place a charge inside it to activate the conveyor belts on the wall. Head back to the left and hop in the Suit Swapper to receive the Power Suit, then head back to the right and destroy the silver panel on the wall. This will expose part of the conveyor belt. Fire a missile at the conveyor belt and it will stick onto it. Wait until it reaches the silver wires, then detonate it to destroy them. This will shut off the kryptonite, allowing you to continue. Continue to the right and cut the shape out of the gold panel to reveal a pull handle. Grapple onto it to open the elevator, then head inside and step on one of the buttons. Your partner will step on the other button, raising you up.
Part 3 – Testing Chamber
Once you enter, you’ll spook a scientist, who will activate a security camera. We’ll need to sneak past it to turn that wheel. Destroy the gold hatch on the left to reveal LEGO pieces, then build them into a Suit Swapper. Hop in as Batman to receive the Sensor Suit, then use its stealth to sneak past the camera. Turn the wheel to reveal a black bike. This will reveal a button underneath the kryptonite shield on the right. Step on it to deconstruct the bike, then turn the wheel to reveal a model of the Batmobile. Step on the button to deconstruct it, then turn the wheel again to reveal a dancing LexBot. Step on the button to deconstruct the black wall in the background. Some LexBots will then jump out of the testing chamber, shattering the glass. Hop inside and ride up the air current in the back.
Part 4 – Fourth Floor
Head to the right and you’ll find some kryptonite gas, which not even Batman can pass through. Fly up and destroy the rotating gold cylinders to shut off the gas, then fly onto the ledge on the right. Pull the super strength handle to reveal some wires, then smash them to shut off the gas below you, revealing LEGO pieces. Build them into a lever, then pull it to reveal a grapple point to the right. Latch onto it to reach the ledge in the kryptonite shield, then continue to the right and drop down. Destroy the glowing boxes to reveal LEGO pieces, then build them into a Suit Swapper. Hop into it to receive the Bat Suit, then grapple back onto the ledge. Shatter the glass case to shut off the kryptonite, allowing Superman to join you. Continue to the right and destroy a gold panel on the rotating “L” statue to reveal a button. Step on it as Superman to raise up a ramp on the right, then switch to Batman and glide across the gap. Shatter the glass door, then head inside the room. Pull the lever to shut off the kryptonite, allowing Superman to join you. Continue to the right (if you fall into the pit in the center as Batman, destroy the objects in the center to reveal the LEGO pieces for some bars) and cut through the gold panel to reveal an opening. Climb the ladder and head inside.
Part 5 – Weapons Development
Head to the right and up the stairs, then look through the x-ray wall. Move all the gears into position to open the door, then continue into the next room. Destroy the object in the center of the room to reveal LEGO pieces, then build them into chairs. Hop into a chair to take control of a robot. Walk to the right and you’ll be faced with a LexCorp Prototype Robot. It will charge at you, so avoid its charge and it will slam into the wall. This will make it vulnerable, so hit it to damage it. Repeat this process to take out its hearts, defeating it. This will open up the doors on each side of the room, allowing you to cross to the right. Shatter the glass panels on the right, then destroy the panels behind them to reveal a gold panel. Destroy it to reveal an elevator, then step on one of the buttons. Your partner will step on the other button, raising you up and completing the level.
Research and Development – Free Play Mode
Required Abilities: Deconstructor, Electric, Explosive, Flight, Grapple, Heat Vision, Joker, Lantern, Magnet, Sharp Shoot, Sonic, Super Speed, Water Spray
Part 1 – LexCorp Lobby
Suits Available: Power Suit
Canister 1
 You’ll find this Canister inside a case on the left side of the lobby. Destroy the gold hatch to open the case, allowing you to collect this.
Canister 2
 Use the Deconstructor to destroy the top of the case on the right side of the lobby, revealing LEGO pieces.
 Build them into a Micro-VTOL, revealing this Canister.
Citizen in Peril
 Fly or grapple to the top ledge, then head to the left to find this citizen trapped by some toxic goo. Clean it up to rescue him.
Canister 3
 After rescuing the Citizen in Peril, head to the right side of the ledge and you’ll find a silver hatch.
 Destroy it to reveal a bar, then hop on it to open the nearby door.
 Destroy the objects inside to reveal lantern LEGO pieces, then build them into a floor waxer. It will crash into the wall on the left, revealing this Canister.
Part 2 – Second Floor
Suits Available: Power Suit, Electricity Suit
Canister 4
 Pull on the metal hatch by the conveyor belts to reveal a valve.
 Turn it to rotate the direction the conveyor belts move.
 Fire a missile at the conveyor belt, then detonate it when it gets close to this Canister to collect it.
Canister 5
 There are 5 consoles with images of Lex Luthor campaign ads that you need to destroy. The first one is to the left of the exit.
Part 3 – Testing Chamber
Suits Available: Sensor Suit
Canister 5 cont.
 The second console is to the left of your starting point.
Canister 6
 Shatter the glass box on the right side of the room to reveal a lever.
 Pull it to open the nearby box, revealing a Joker box.
 Open it to reveal this Canister.
Part 4 – Fourth Floor
Suits Available: Bat Suit
Canister 5 cont.
 The third console is to the left of your starting point.
 The fourth console is by the Suit Swapper that gives you the Bat Suit.
 The fifth console is to the left of the large gold panel. Destroy all 5 to receive this Canister.
Canister 7
 While on the ledge with the super strength handle, walk around behind the structure in the center to collect this.
Canister 8
 You’ll find a puddle of toxic waste near the exit.
 Clean it up to reveal a metal panel. Pull on it to reveal this Canister.
Part 5 – Weapons Development
Suits Available: Bat Suit
Canister 9
 This Canister is floating up in the air in the back of the room. Fly up to it to reach it.
Canister 10
 Clean up the toxic waste in the near right corner to reveal LEGO pieces.
 Build them into a generator, then place a charge in it to reveal four buttons on the floor.
 Quickly step on all four of them to reveal Deconstructed LEGO pieces.
 Reassemble them to build speakers, revealing this Canister.
Minikit Vehicle: Police Car (Minikit)
Gotham City Interlude – Robot Takedown
Characters: Batman, Superman
We once again find ourselves chasing Lex and the Joker. Fly over to the robot to start the next level.
Down to Earth – Story Mode
“In its hour of need, Gotham looks to Batman. As super villains run amok, it’s time for our very own super hero to save the day, and yet the caped crusader is nowhere to be seen. Batman, if you’re listening, this is a bad time for a vacation! Gotham City needs you! We’ve got creeps on every corner, Clayface, Two-Face, all these dudes with weird faces. They’re out, and they’re causing trouble, and we need you to stop them! Come on, get back here!”
Arkham escapees continue to wreak havoc…
Scenes of devastation across the city…
Bad guys run amok…
Citizens flee in panic…
Hey, it could be worse…
Remember the time Black Adam teamed up with Black Manta? Or when Gorilla Grodd got together with Brainiac? That was pretty bad…

Enemies: LexBot
Boss: Joker Robot
Starting Characters: Superman, Batman
Super Hero: 50,000
Part 1 – Sky Chase
Defeat the enemy vehicles that attack you and the robot will come into range. Switch to Batman and use his VTOL to destroy the silver panels on one of the feet. This will reveal a gold panel, so switch to Superman and destroy it. The robot will then fly away again, sending more enemies after you. Defeat them and the robot will fly closer. Destroy the silver panels on the other foot, then the gold panel behind it. More enemies will then appear, so defeat them. You’ll then fly closer to the robot. Wait a few seconds and a cutscene will play.
Part 2 – Engine Sabotage
We’ve now landed on the robot, and we need to take out two of its engines. Move over to the left side of the robot and a VTOL will appear. Latch onto the pull handle on the front of it, exposing the pilot. Defeat him and the VTOL will crash, revealing some LEGO pieces. Put out the fires around them, then build them into a Suit Swapper. Hop in as Batman to receive the Power Suit. Destroy the silver vent to the right, revealing gold panels. Destroy them to reveal a super strength handle, then pull it to shut off one of the engines. This will reveal more silver vents on the right, so destroy them, as well as the gold panels behind them. This will reveal another super strength handle, so pull on it to destroy the other engine, completing the level.
Unlocked Vehicles: LexCorp Mini-VTOL
Down to Earth – Free Play Mode
Required Abilities: Deconstructor, Heat Vision, Magnet, Sharp Shoot
Part 1 – Sky Chase
Citizen in Peril
 As soon as you start the level, a helicopter will fly by, being chased by a VTOL. Destroy the VTOL to rescue this citizen. The VTOL will fly by multiple times, so don’t worry about getting it the first time.
Canister 1
 Shoot down the Joker box on the left to receive this. This will fly by multiple times, so don’t worry about getting it the first time.
Canister 2
 Shoot down the Joker box on the right to receive this. This will fly by multiple times, so don’t worry about getting it the first time.
Canister 3
 After destroying one gold panel on the robot’s feet, three more Joker boxes will appear. Shoot down the one in the bottom left corner to receive this. This will fly by multiple times, so don’t worry about getting it the first time.
Canister 4
 After collecting Canister 3, shoot down the Joker box in the top left corner to receive this. This will fly by multiple times, so don’t worry about getting it the first time.
Canister 5
 After collecting Canister 4, shoot down the Joker box in the top right corner to receive this. This will fly by multiple times, so don’t worry about getting it the first time.
Part 2 – Engine Sabotage
Suits Available: Power Suit
Canister 6
 Destroy the gold panel on the robot’s right foot to reveal LEGO pieces.
 Build them into a missile turret, which will shoot down a helicopter, giving you this Canister.
Canister 7
 Use the Deconstructor to destroy the black panel on the center of the robot, revealing this Canister.
Canister 8
 Use the Deconstructor to destroy the black panel on the robot’s left leg, revealing this Canister.
Canister 9
 After building the Power Suit Swapper, pull on the metal panel on the robot’s left leg to reveal LEGO pieces.
 Build them into a turret, then hop inside.
 Shoot down all 5 targets to receive this.
Canister 10
 After destroying the first engine, 3 turrets will appear. The first is right in front of the engines.
 The other two are up on top. Destroy all 3 to reveal this.
Minikit Vehicle: Police Boat (Minikit)
Gotham City Interlude – Crash Landing
Characters: Batman, Superman
We’ve succeeded in taking down the robot, and it’s now hanging out on the South Island. Unfortunately, that kryptonite has taken a toll on Superman, and he’s no longer able to fly. Follow the ghost studs and you’ll reach a barrier in the road blocking the way to the South Island. Head to the right side of it and destroy the gold lock to lower the barrier, then continue to follow the ghost studs to reach the robot. Stand in the bat-symbol in front of it to start the next level.
Underground Retreat – Story Mode
“The streets may seethe with criminals, Arkham’s most dangerous inmates may have taken residence in our cherished landmarks, but it’s business as usual for many citizens. Demonstrating the resilience and can-do attitude which has seen Gotham City safely through similar crises in the past, commuters have abandoned their cars, and headed for the metro system, a reliable refuge from the – what? Oh. I’m sorry, we’re just getting news of a big explosion at the midtown metro station. Citizens are advised to make alternative travel arrangements.”
Reports of “flying giant robot” dismissed by Mayor…
“Giant robots I can believe – but a flying giant robot? That’s just ridiculous”…
Gotham residents “not at all satisfied” with city-wide chaos, according to survey…

Enemies: Clown Goon, LexBot, Mime Goon, DrillBot
Starting Characters: Superman, Batman
Super Hero: 110,000
Part 1 – Metro Tunnel
Superman still can’t fly, so we’ll need to make it through this level on foot. Head to the right and the giant robot will collapse some rubble, blocking the tunnel ahead. Pull on the super strength handle on the right side of the rubble to lift the plug out of the water, removing the electricity. Build the LEGO pieces into a Suit Swapper, then hop in as Batman to receive the Electricity Suit. Remove the charge from the generator on the right, then pull on the super strength handle in the center to clear the path. Continue down the tunnel and put out all the fires, then smash through the rubble. Continue down the tunnel and the robot will smash through the ceiling, blocking the path. Build the LEGO pieces on the right into a Suit Swapper, then hop in as Batman to receive the Power Suit. Head to the left and destroy the silver object to reveal a generator. Hop back in the Suit Swapper as Batman to receive the Electricity Suit, then head back to the left and place the charge in the generator. This will electrify the water, clearing the path ahead. Hop back in the Suit Swapper on the right to grab the Power Suit, then continue through the puddle of water. Destroy the silver rubble, then head down the train car. At the end, you’ll find some gold rocks. Destroy them, then head through the opening.
Part 2 – Metro Junction
Head to the left and destroy the silver boxes to reveal LEGO pieces. Build them into a lever, then pull it to reveal some LEGO pieces. Build them into a Suit Swapper, then hop in as Batman to receive the Bat Suit. Head to the right and shatter the glass pipes to reveal a waterfall. Freeze it, then climb up and glide to the right. Shatter the glass object on the ledge to lower a ladder (in case you fall down) then pull the lever to raise up a panel on the left, revealing a gold fan. Destroy it to reveal LEGO pieces, then build them into a super strength handle. Pull on it to move the train car down the tracks. The robot will then pick up the train car and toss it aside, clearing the path. Continue down the tracks and the path will split, with the tracks on the right being electrified. We need to get onto the ledge on the right. Head to the left and put out the fires, then climb up the ladder to reach the ledge. Glide to the right to reach the ledge in the center, then glide to the right again to reach the ledge on the right. Shatter the glass object to lower a ladder, allowing Superman to join you. Look through the x-ray wall and interact with the wheels to shut off the electricity, revealing a super strength handle. Drop down and pull on it to clear the path, then continue down the tracks.
Part 3 – Station Battle
Press the “special” button to free yourself from the robot’s grip, then continue to the right. The robot will then appear again. Destroy the gold panels on its hand and a train car will open up. Head inside.
Part 4 – Moving Train
Head to the right and you’ll find a pull handle. Grapple onto it to open the train car, then head inside. Continue to the right and the robot will deconstruct the sides of the car. Climb up the ladder that appeared, then continue to the right. Hop across the train cars and cross the beam. The robot will then deconstruct that train car. Continue to the right and put out the fires, then destroy the rocks to clear the path. Continue to the right and the robot will deconstruct more of the train, electrifying it. Destroy the glowing boxes to reveal LEGO pieces, then build them into a Suit Swapper. Hop in as Batman to receive the Electricity Suit, then head to the right through the electricity. Remove the charge from the generator to remove the electricity, allowing Superman to join you. Continue to the right and pull on the super strength handle to open the next train car. Continue to the right and the robot will deconstruct the side of the train car. Head to the right and place the charge in the generator to speed up the train, ending the level.
Underground Retreat – Free Play Mode
Required Abilities: Deconstructor, Explosive, Flight, Magnet, Plant Travel, Riddler, Stealth, Super Strength, Water Spray
Part 1 – Metro Tunnel
Suits Available: Electricity Suit, Power Suit
Canister 1
 Destroy the silver rocks on the starting platform to reveal a lever.
 Pull it to reveal this Canister.
Canister 2
 Use the Deconstructor to destroy the black gate on the left side of the room with the generator, revealing an opening.
 Head along the ledge to reach this Canister.
Canister 3
 After collecting Canister 2, drop down to the ground and you’ll find a Riddler Box. Open it to reveal this Canister.
Part 2 – Metro Junction
Suits Available: Power Suit, Bat Suit, Sensor Suit
Canister 4
 Travel through the flower bed on the right side of the tracks to reach a new area.
 Use stealth to sneak by the security camera, then pull the lever to raise the bars around this Canister.
Canister 5
 There are 7 patches of graffiti you need to clean up. The first is an image of Two-Face, and can be found to the left of Canister 4.
 The second is an image of a “?” and can be found on the ledge on the right side of the tracks.
 The third is an image of Two-Face, and can be found on the left side of the center ledge in the second part of the area.
 The fourth is an image of the Joker, and it appears above the center ledge in the second part of the area.
Canister 6
 While heading to the second part of the area, fly onto the ledge on the left to reach this.
Citizen in Peril
 In the second part of the area, use the Deconstructor to destroy the black rocks on the left, revealing a super strength handle.
 Pull on it to clear the path, revealing a trapped paramedic. Walk up to her to rescue her.
Canister 7
 After rescuing the Citizen in Peril, pull on the metal door to open the train car, allowing you to collect this.
Part 3 – Station Battle
Canister 5 cont.
 The fifth is an image of Two-Face, and can be found on the left side of the area.
 The sixth and seventh are images of a “?” and the Joker, and can be found on the back wall on the left side of the station. Clean up all 7 to receive this Canister.
Canister 8
 Use the Deconstructor to destroy the two black boxes on the right, revealing LEGO pieces.
 Build them into a rotary handle, then push it to move the cart along the tracks. The robot will pick up the train car and crush it, revealing this Canister.
Part 4 – Moving Train
Suits Available: Electricity Suit
Canister 9
 Pull open the metal hatch on the roof of a train car, then drop down inside, where you’ll find this Canister.
Canister 10
 Fly on top of the final train car to reach this.
Minikit Vehicle: Penguin’s Submarine (Minikit)
Gotham City Interlude – City Hall Rally
Characters: Batman, Superman
That robot is looking a little too comfortable outside City Hall. Follow the ghost studs all the way to City Hall and step into the bat-symbol to start the next level.
The Next President – Story Mode
“There are confused reports tonight of disruption on the city’s metro lines. The Mayor’s office has released a brief statement citing ‘technical difficulties’, including issues relating to the rampage of a giant robot. Shocked commuters have sighted both Batman and Superman, and all metro lines remain shut at this time. Meanwhile, citizens gather at City Hall for the Lex Luthor rally, full of questions for the presidential candidate. But will he have the answers?”
Mayor advises citizens to “take reasonable precautions” when travelling around the city…
“Unless absolutely necessary, avoid the Park, the Beach, the East Side shopping district, Gotham Funland, all of the Southern island, poorly-lit sidewalks, well-lit sidewalks – in fact, everywhere…”

Enemies: LexBot, Clown Goon
Starting Characters: Superman, Batman
Super Hero: 55,000
Part 1 – Campaign Rally
We need to stop that robot. Head to the left and you’ll find some glowing speakers hanging from the ledge above you. Use your Batarang or heat vision to destroy them, revealing LEGO pieces. Build them into a Suit Swapper, then hop in as Batman to receive the Power Suit. Head to the right and cut the shape out of the gold panel, revealing some silver pipes. Destroy them to reveal some water, then freeze it. Climb up, then head to the right. Destroy the gold panels to knock some LEGO pieces onto the ground. Build them into a Suit Swapper, then hop in as Batman to receive the Electricity Suit. Climb back up the ice, then climb up the electrified wall. Remove the charge from the generator to remove the electricity, allowing Superman to join you. Pull on the super strength handle to knock down the tower, then walk up the beam. Grapple onto the pull handle to reveal a ladder, then climb up. Step on one of the buttons and your partner will step on the other. This will reveal a gold panel on the robot’s flower. Destroy it.
Part 2 – Rooftop Showdown
Looks like blinding the robot is the way to go. Build the LEGO pieces on the right into a police helicopter, then grapple onto it and hop inside. Move the helicopter so the light is shining in the robot’s face. Do this until the orange health bar disappears. The robot will then knock down the helicopter, revealing some LEGO pieces on the ledge to the right. Head to the left and walk up the stairs, then cut the shape out of the gold panel to clear the path. Continue up the path, then hop in the Suit Swapper as Batman to receive the Bat Suit. Glide across the gap to the right, then shatter the glass object to reveal LEGO pieces. Build them into a ramp, allowing Superman to join you. Build the LEGO pieces on the ledge into a light and a generator. Head back to the Suit Swapper on the left and hop in as Batman to receive the Electricity Suit, then return to the ledge on the right. Place the charge in the generator to turn on the light, then hop in. Move the light into the robot’s face until the orange health bar disappears. The robot will then slam the roof, revealing a super strength handle on its flower. Pull on it to complete the level.
The Next President – Free Play Mode
Required Abilities: Ball, Deconstructor, Explosive, Flight, Lantern, Magnet, Sharp Shoot, Sonic, Stealth, Water Spray
Part 1 – Campaign Rally
Suits Available: Sensor Suit, Bat Suit, Power Suit, Electricity Suit
Canister 1
 There are 5 posters of Lex Luthor you need to destroy. The first is on the left side of City Hall.
 The second is on the far right side of City Hall.
 The third is quite large, and is hanging in the center of City Hall.
 The fourth can be found hanging up on the large statue on the left side of City Hall.
 The fifth is hanging on the large statue on the right side of City Hall. Destroy all 5 to receive this.
Canister 2
 Use stealth to sneak by the security camera in the near left corner, allowing you to head through the gate and reach this Canister.
Canister 3
 There are 3 glass panels you need to destroy. The first two are on the left side of City Hall.
 The third is on the right side. Shatter all 3 to receive this Canister.
Canister 4
 Use the Deconstructor to destroy the black panel on the back of the news van in the near right corner.
 This will reveal lantern LEGO pieces. Build them into rockets, which will carry the news van away and reveal this Canister.
Canister 5
 After climbing the frozen waterfall, head between the legs of the statue by the man holding the sign to collect this well-hidden Canister.
Canister 6
 Destroy the black column in the center of City Hall to reveal this Canister. Fly up to it to collect it.
Canister 7
 Fly up to the clock on City Hall, then pull on the metal hands. This will cause the clock to be destroyed by lightning, revealing this Canister.
Part 2 – Rooftop Showdown
Suits Available: Power Suit, Acrobat Suit, Hazard Suit, Bat Suit
Canister 8
 Use the ball socket in the near left corner to rotate the satellite dish, revealing this Canister.
Canister 9
 There are 3 puddles of toxic waste that you need to clean up. The first is in the near left corner.
 The second is in the back left corner, by the Power Suit Swapper.
 The third is in the near right corner. Clean up all 3 to receive this Canister.
Citizen in Peril
 Head to the top of the building on the left, then pull on the metal pole to rescue this trapped pilot.
Canister 10
 Destroy the small silver water tower to reveal this Canister.
Minikit Vehicle: Mister Freeze’s Iceberg (Minikit)
Gotham City Interlude – A Desperate Plan
Characters: Batman, Robin
Robin has finally rejoined us! Hop in a vehicle and follow the ghost studs to reach the giant robot. Drive into the bat-symbol to start the next level.
Core Instability – Story Mode
“Lex Luthor’s presidential ambitions received a major setback today, as a bizarre vote-rigging master plan was uncovered thanks to the intervention of Batman and Superman. It seems that the secretive billionaire intended to secure his votes using mind-altering gas dispensed from a giant robot, a strategy which was specifically outlawed by local ordinance following last year’s disastrous mayoral campaign. More on this story later.”
LexCorp spokesperson holds press conference to defend CEO’s actions…
“Once again Lex Luthor is persecuted for nothing more than his daring and creative leadership style”…
“LexCorp is in no way evil”…
LexCorp spokesperson casts off human shape and transforms into spinning, laser-firing robot…

Starting Characters: Batman, Robin
Super Hero: 90,000
Part 1 – Robot Chase
You’ll spend the entirety of this level in your vehicle, weakening the giant robot. As you drive, you’ll pass by three large statues. Each of these statues has a silver base. Destroy the base and the statue will collapse onto the robot, weakening it. You will then be able to attack the core in the middle. Fire at it until the orange health bar is depleted to damage the robot. Repeat this process two more times to complete the level. Seriously, it’s that easy!
Unlocked Vehicles: Multi-Colored Batmobile
Core Instability – Free Play Mode
***NOTE*** I consider the starting point for this level to be the hospital (the building on the right side of the road with the large red lights). This is the building that you start the level next to. After each cutscene, you will pick up where you left off, which means that some collectables might not appear in the right order. This shouldn’t throw you off too much, but I suggest you wait until passing the hospital before you start to follow my guide. It’ll make it a lot easier for you.
Part 1 – Robot Chase
Canister 1
 There are 10 large spotlights that you need to destroy. The first is on the right side of the road.
 The second is also on the right side of the road, right before the first statue.
 The third is on the left side of the road, after the first statue.
 The fourth is on the left side of the road, shortly after turning a corner.
 The fifth is also on the left side of the road, right after the second statue.
 The sixth is on the right side of the road.
 The seventh is on the left side of the road.
 The eighth is on the right side of the road.
 The ninth is on the right side of the road, shortly after turning a corner.
 The tenth is on the left side of the road, after the Lex Luthor campaign poster. Destroy all 10 to receive this.
Canister 2
 Shortly after starting the level, Two-Face’s truck will start driving behind you. Destroy it to receive this. Once it drives away, it won’t appear again, so make sure to destroy it quickly.
Citizen in Peril
 Shortly after passing the third spotlight (see Canister 1 above), you’ll find a man dangling from a tree on the right side of the road. Destroy the tree to rescue him.
Canister 3
 Destroy a movie poster hanging from a building on the right to receive this.
Canister 4
 Shortly after passing the second statue, a Clown Goon will appear driving Two-Face’s truck. Destroy it to receive this. Once it drives away, it won’t appear again, so make sure to destroy it quickly.
Canister 5
 After passing the second statue, you’ll find a broken yellow taxi on the left side of the road. Destroy it to receive this.
Canister 6
 One of the statues in the background (shortly after the second statue you can knock down) is holding a large silver key. Destroy it to receive this Canister.
Canister 7
 Destroy a Lex Luthor campaign poster hanging from a building on the left to receive this.
Canister 8
 In order to complete the level, you’ll need to topple statues into the Joker robot. You’ll need to topple the three different statues into the robot. You can topple the same statue into the robot more than once, so you’ll have to pay attention and knock down a different one each time. The first is on the right side of the road.
 The second is on the right side of the road.
 The third is on the left side of the road.
Canister 9
 After the first cutscene plays, 5 large barrels will appear for you to destroy. The first is on the left side of the road.
 The second is on the right side of the road, shortly after the first statue.
 The third is on the right side of the road.
 The fourth is also on the right side of the road.
 The fifth is also on the right side of the road. Destroy all 5 to receive this.
Canister 10
 After the second cutscene plays, a police helicopter will be flying above the right side of the bridge (the one you drive over after the second statue). Destroy it to receive this.
Minikit Vehicle: Batmobile (Minikit)
Gotham City Interlude – Wayne Tower Showdown
Characters: Batman, Robin
Looks like the robot has a bone to pick with Wayne Tower! Follow the ghost studs to reach the base of Wayne Tower, then step into the bat-symbol to start the next level.
Tower Defiance – Story Mode
“Further details are emerging of Lex Luthor’s attempted election fraud, with confirmation that the mind-controlling gas used at his rallies was supplied and distributed by none other than The Joker. Gotham police deny that the giant white face, green hair and broad grin of Luthor’s robot accomplice should have alerted them sooner to The Joker’s involvement, claiming that exposure to the mind-control gas made them inattentive and forgetful. Yeah, that was the gas. Definitely the gas.”
Giant robot smashes through Gotham streets in pursuit of Batman and Robin…
Leaking Kryptonite trail paints huge Joker face across the City…
Justice League spots image from orbiting watchtower…
Amazing battle ahead…
Superheroics likely…
Wow!… Just… Wow!…
Awesome tie-in movie greenlit…

Enemies: Clown Goon, LexBot, Mime Goon
Boss: Joker Robot, The Joker
Starting Characters: Batman, Robin, Green Lantern, Cyborg
Super Hero: 52,000
Part 1 – Going Up
Finally some new heroes! Head to the right and you’ll find your path blocked by a large hole in the floor. You’ll find a large metal object hanging from the ceiling. Use Cyborg to pull it down, then destroy the gold gear to reveal some lantern LEGO pieces. Build them into a hand, which will lift up some beams. Walk across them to the right, then pull on the super strength handle as Cyborg. Destroy the rest of the rubble to reveal lantern LEGO pieces, then build them into a giant hammer. This will break down the door on the right, revealing LEGO pieces. Build them into a Suit Swapper, then hop in as Robin to receive the Ice Suit. Freeze the nearby waterfall, then climb up. Hop up the bars to reach the next floor, then head to the left.
Cut the shape out of the gold wall to create an opening, then continue to the left. A giant mess will then be made, with the left side of the area collapsing. Hit the two ice switches on the wall to reveal a pull handle, then grapple onto it to reveal a metal wall. Climb up it, then destroy the gold boxes on the ledge to reveal some lantern LEGO pieces. Build them into a spider, which will clear up the rubble on the left. This will also reveal some LEGO pieces, so build them into a Suit Swapper. Hop in as Batman to receive the Power Suit, then climb up the path on the left. Destroy the silver door, then head into the elevator shaft. Put out the fires, then hit the ice switch to reveal a pull handle. Grapple onto it to reveal a fan, then ride the air current up.
Part 2 – Rooftop Approach
Hit the ice switch on the wall to rotate the glass, allowing you to reach the Suit Swapper. Hop in as Batman to receive the Electricity Suit, then head to the right through the electricity. Remove the charge from the generator to shut off the electricity, allowing your party to join you. Continue to the right up the rubble, then place the charge in the generator at the top to reveal some lantern LEGO pieces. Build them into some airplanes, which will crash through the fan. Head inside.
Part 3 – Rooftop Showdown
Time to take care of business. Smash the large AC units to reveal lantern LEGO pieces. Build them into a truck, which you’ll launch into the robot. This will move it over to the left, freeing up the gold panel. Cut the shape out of it, then head into the electricity and remove the charge from the generator. This will shut off the electricity, allowing you access to the Suit Swapper. Hop in as Robin to receive the Hazard Suit, then head back to the left. Smash the barrels and clean up the toxic waste to reveal LEGO pieces, then build them into a super strength handle. Pull on it to lower the helicopter into the gap, allowing you to cross the gap on its rotors. Cross the gap to the left, then put out the fires by the robot to reveal a generator. Place a charge in it to spook the robot, moving it further to the left. Continue to the left, then smash the AC units to reveal some LEGO pieces. Build them into an explosive launcher, then hop inside. Launch explosives at the Joker robot and hit it three times. This will reveal some lantern LEGO pieces. Build them into a train, then toss it at the robot.
Part 4 – A Long Way Down
Move around and avoid the large chunks of building that the robot knocks loose. Once you reach the robot, you’ll land on it and face off with The Joker. Defeat the goons he sends at you, then wait as he moves between hatches on the robot. When he pops out and taunts you (“Come and get me!”), head over to him and smack him to take out a heart. You’ll then be knocked off the robot and will have to maneuver back down to it. Repeat this process two more times to complete the level.
Unlocked Characters: Cyborg, Green Lantern
Tower Defiance – Free Play Mode
Required Abilities: Deconstructor, Flight, Heat Vision, Plant Travel, Super Speed, Water Spray
Part 1 – Going Up
Suits Available: Ice Suit, Power Suit
Canister 1
 Use the Deconstructor to destroy the large black rock to the left of your starting point.
 Reassemble the pieces to create a model of Wayne Manor, revealing this Canister.
Canister 2
 Destroy the gold box by your starting point to reveal this.
Canister 3
 There are 5 graffiti paintings that you need to clean up. The first is an image of the Joker, and is on the right side of the first floor.
 The second is an image of the Joker, and can be found as soon as you cut through the gold panel on the second floor.
 The third is also an image of the Joker, and can be found after climbing up the metal wall.
Canister 4
 Destroy the black door on the right side of the second floor to create an opening, then head inside.
 Use the Deconstructor on the Batwing to destroy it, allowing you to collect this Canister.
Canister 5
 Hop in the Batboat ride on the second floor and ride it for a few seconds. It will then spit out some studs, revealing this Canister.
Part 2 – Rooftop Approach
Suits Available: Electricity Suit
Canister 6
 Head behind the Suit Swapper that gives you the Electricity Suit to reach this hidden Canister.
Canister 7
 Travel through the flower bed by the electrified floor to reach a new area.
 Once inside, smash the 4 pink balls to reveal this Canister.
Canister 3 cont.
 The fourth patch of graffiti is an image of the Joker, and can be found in the same area as Canister 7.
 The fifth is also an image of the Joker, and can be found on the right side of the large generator. Clean up all 5 to receive this Canister.
Part 3 – Rooftop Showdown
Suits Available: Electricity Suit, Ice Suit, Hazard Suit
Canister 8
 Spray water into the blue panel on the side of the tank in the bottom right corner.
 This will fill up a container on the second section of the roof, allowing you to fly up to this.
Canister 9
 Destroy the black panel on the right side of the final part of the roof to reveal an opening, then head inside to collect this Canister.
Canister 10
 In the third section of the roof, you’ll find a bunch of ledges on the left. Fly onto the ledge in the center and destroy the AC unit to reveal this.
Citizen in Peril
 After collecting Canister 10, fly onto the ledge above you to find this citizen being held hostage by two mime goons. Defeat them to rescue the citizen.
Minikit Vehicle: Batboat (Minkiit)
Gotham City Interlude – The Final Battle
Characters: Batman, Robin
Time to end this! Head on over to the robot and step into the bat-symbol to start the final level.
Heroes Unite – Story Mode
“In a specially extended bulletin tonight: Chaos on the streets of Gotham! Green Lantern, The Flash and Cyborg battle Joker on a giant robot, while falling from the top of Wayne Tower! Superman and Wonder Woman struggle to support the collapsing building! Batman and Robin battle bad guys high above the city! Lex Luthor’s presidential bid dismissed! But first, the weather – rainy.”
Lex Luthor still missing following giant robot battle with Batman and Superman…
Citizens in Peril call for greater awareness of their plight…
Super-villains still at large in the city…
Gold brick spotted on rooftop…

Enemies: LexBot, Mime Goon
Boss: The Joker, Power Armor Lex
Starting Characters: Batman, Robin, Cyborg, Green Lantern, The Flash, Wonder Woman
Super Hero: 40,000
Part 1 – Wrecking the Robot
Time to finish this. We’ve got the full Justice League, except Superman (who is taking some much needed rest). Head to the right and destroy the gold box to reveal LEGO pieces, then build them into a Suit Swapper. Hop in as Batman to receive the Electricity Suit. You’ll notice a generator in the robot’s hand. When it opens its hand, hop in and remove the charge from the generator. This will knock loose part of the robot’s arm, revealing two pull handles. Grapple onto them to pull out some wires, revealing a super strength handle up on a platform. Fly up to the platform and pull the super strength handle to reveal some lantern LEGO pieces on the left. Build them into a plunger, which will reveal a gold panel on the robot. Cut the shape out of it to reveal two more pull handles. Grapple onto them to reveal metal hatches. Pull them out of the robot and the rocks in the near left corner will be deconstructed, revealing LEGO pieces. Build them into a Suit Swapper, then hop in as Robin to receive the Acrobat Suit. Toss your pole into the socket on the robot’s arm, then swing on it to reveal some lantern LEGO pieces. Build them into a hammer, which will smack the robot’s head and reveal The Joker.
Walk up to Joker and he’ll joy buzz you. Switch to someone else and smack Joker to take off one heart. Some LexBots will then appear to attack you. Defeat the LexBots and Joker will hop back down. Repeat this process four more times to trigger a cutscene.
After the cutscene, Power Armor Lex has appeared. In order to damage him, we need to help Martian Manhunter target the watchtower’s laser. Avoid Lex’s attacks until he starts to use the Deconstructor. When he does this, stand behind one of the black boxes so he deconstructs that instead, revealing LEGO pieces. Once all three boxes have been deconstructed, build them into a ball socket, then turn into a ball as Robin and hop in. Use the ball socket to move the targeting reticle over Lex, then hold the “attack” button to fire the laser at Lex. Take out his orange health bar to take out one heart. Repeat this process three more times and he’ll collapse. Stand in front of the mech as Batman and press the “special” button a bunch to complete the level.
Unlocked Characters: The Flash, Wonder Woman
Heroes Unite – Free Play Mode
Required Abilities: Electric, Explosive, Flight, Grapple, Heat Vision, Joker, Riddler, Sonic, Super Strength, Water Spray
Part 1 – Wrecking the Robot
Suits Available: Electricity Suit, Acrobat Suit
Canister 1
 Pull on the super strength handle on the box in the near left corner to reveal this.
Canister 2
 There are 5 fires for you to put out. The first is in the near left corner.
 The second is in the back left corner.
 The third is to the left of the robot’s face.
 The fourth is in the near right corner.
 The fifth is on the right side of the area. Put out all 5 fires to reveal this Canister.
Citizen in Peril
 Shatter the glass on the car in the near left corner to rescue this Citizen.
Canister 3
 Put out the fires on the left side of the area to reveal LEGO pieces.
 Build them into a grapple point, then use it to open the container, revealing this Canister.
Canister 4
 There is a Joker Box in the back left corner. Open it to reveal this Canister.
Canister 5
 You’ll find some toxic waste to the right of the robot.
 Clean it up, then open the Riddler Box to reveal this Canister.
Canister 6
 Destroy the silver box in the near right corner to reveal LEGO pieces.
 Build them into a remote terminal, then activate it to call in a turret.
 Hop in and destroy 10 Advanced LexBots to reveal this Canister.
Canister 7
 Place a charge in the generator on the right side of the area to reveal this Canister.
Canister 8
 Destroy the gold panel above the robot’s head to reveal this Canister.
Canister 9
 Fly above the robot and you’ll find a helicopter. Destroy the gold panel on it to reveal this Canister.
Canister 10
 After pulling on the super strength handle on the right side of the robot, some toxic waste will spill out of the robot. Clean it up to reveal this Canister.
Minikit Vehicle: Wonder Woman’s Invisible Jet (Minikit)
LEGO Gotham City
“The great Gotham cleanup continues. Batman, Robin and other superheroes have been working alongside the Gotham City Police Department following the defeat of Lex Luthor and The Joker, and many of Arkham’s most dangerous escapees are now back where they belong. With luck, everything will be back to normal soon, just in time for the next catastrophe. And you’ll see it here first, on Gotham City News”
Gotham City returns to normal…
Citizens praise Batman, Robin and the Justice League following heroic defeat of super-villains: “Those guys are awesome”…
“I just wish they hadn’t made so much mess,” says Mayor…
 Once you collect 175 Gold Bricks, head to the fountain square in the center of Gotham Park. This location is marked by a Gold Brick on the map.
 There, you’ll find some LEGO pieces on the ground.
 Build them and you’ll create a portal. Step inside to start this bonus level.
Starting Characters: Batman, Robin, Clark Kent
Added Characters: The Penguin, Superman
The goal of this level is to collect one million studs. You are in a small model of Gotham City, and just like the hub, it is split up into three islands. You start on the left side, so let’s collect some studs!
Worth mentioning is that Clark Kent has all the powers of Superman, except he can’t fly. Until you turn him into Superman, you’re grounded.
The best way to collect studs is to destroy everything that you can see. There are a few other things you can do for studs as well. I’ll outline those below.
Grow flowers
 Any time you see a brown stud on the ground, walk over it to reveal some flowers, which you can then destroy for more studs.
Dumpster dive
 There are several dumpsters throughout the area that have grapple points on them. Latch onto them to open them, revealing a small amount of studs.
Ride the roller coaster
 Head to the far left side of the area and you’ll find a roller coaster. Hop on and enjoy the ride to collect some studs.
Reveal a Hazard Suit Swapper
 The first suit you can grab is the Hazard Suit, and to find it, you need to head to the near left corner of the left island. Push the rotary handle to start the ride moving to your left.
 Destroy it (it’s easiest to do this with Batarangs) to reveal the Suit Swapper.
Clean up some toxic waste
 Now that you have the Hazard Suit, we can clean up some toxic waste! Head to the left and clean up the toxic waste to reveal a generator. We’ll come back here later.
 There is also a puddle of purple toxic waste in the center of the island.
Water some venus flytraps
 You can also use the Hazard Suit to water the venus flytraps in the near right corner of the island. Water the plants to open them, then hop inside and they will try to chomp you! Make sure you destroy them as well for the extra studs.
Reach the Center Island
 We’ve done all we can on the Left Island, so let’s get to a new island. Head to the right side of the island and you’ll find a valve. Turn it to lower the bridge, allowing you to reach the Center Island.
Grab the Bat Suit
 First thing to do is to head to the center of the island and grab the Bat Suit from the Suit Swapper.
Shatter the glass
 Now that we have the Bat Suit, head back to the Left Island and shatter the glass in the near right corner for some more studs.
Ace Chemicals
 With that taken care of, head back to the Center Island and go to the bottom part to find Ace Chemicals. Clean up all the toxic waste and put out the fires. We’ll come back here later.
Recruit the Penguin
 Continue to the right and you’ll find two penguin statues. Smash them and Penguin will join you.
Free the animals
 Now that you have The Penguin, you can destroy the silver fences around the lion and gorilla.
 Once free, hop on the lion and follow the stud trail that appears to grab more studs.
Destroy the globe
 Send a Penguin Bomb through the igloo to loosen up the globe, allowing you to destroy most of it.
Clean up more toxic waste
 There is some more toxic waste by the bridge leading to the Right Island. Clean it up so you can get over there.
Reveal a Magnet Suit Swapper
 Before you go to the Right Island, head back to where the zoo used to be and destroy the palm tree to reveal a Magnet Suit Swapper. Hop in to receive the Magnet Suit.
LEGO Gotham City cont.
Get Batman the Sensor Suit
 Head back to the bridge leading to the Left Island and climb up the metal wall.
 Pull on the metal object to reveal a zipline, then slide down it.
 Build the LEGO pieces into a grapple point, allowing Batman to grab the Sensor Suit.
Ride the subway
 With the Sensor Suit, head back to the Left Island and use stealth to sneak by the camera. Head inside the gate and you’ll find yourself on a subway.
 Head to the right and pull the lever to open the doors, allowing you to grab the studs outside the train car. Don’t forget to destroy the objects inside the subway for some more studs.
Connect the Right Island
 After riding the subway, you’ll find yourself on the Right Island. Head back to the left and build the LEGO pieces to create a bridge leading to the Center Island.
Change clothes
 Head over to the phone booth and press the “special” button in front of it as Clark Kent to turn into Superman! Now that you can fly, make sure to grab the studs on top of the bridge supports.
Destroy the cathedral
 Gotham Cathedral can be entirely destroyed, so make sure you do so.
Ride the Batmobile
 Head over to the bridge leading to the Left Island and turn the valve on the right to create a ramp.
 The Batmobile can be found on the right side of the Right Island. Hop in and drive it to the left and over the ramp to collect a nice amount of studs.
Reveal the Joker Robot
 Fly to the top of Ace Chemicals and destroy the gold object to reveal a red button. Step on it to fill up the chemical vat on the ground.
 Turn the valve that appears to reveal the Joker Robot.
Raise Wayne Tower
 Once you have the Joker Robot, hop inside.
 Head to the far right side of the Right Island, then use the robot’s Deconstructor to destroy the black bat.
 Build the LEGO pieces into a lever, then pull it to reveal Wayne Tower.
 Build the LEGO pieces onto the tower, then pull on the super strength handle to raise up Wayne Tower. Make sure to fly to the top to grab more studs.
LEGO Gotham City cont.
Grab the Electricity Suit
 With that taken care of, it’s time to do something about all of these generators. Head to the top part of the Right Island and destroy the broken car to reveal a Suit Swapper. Hop in as Batman to receive the Electricity Suit.
Reveal a Power Suit Swapper
 Before we open up the Power Station, we need to reveal another Suit Swapper. Head over to the bridge leading to the Center Island and climb the ladder.
 Build the LEGO pieces into a zipline, then slide down to reach a generator.
 Remove the charge from it, then head to the bottom part of the Right Island to find a crane. Place the charge in the generator nearby to raise up a Power Suit Swapper.
Open the Power Station
 With that taken care of, remove the charge from the generator, then head to the top part of the Center Island.
 You’ll find a group of three generators. We need to place a charge into each of the generators. Place your charge into any of the generators, then head to the near left corner of the island.
 You’ll find another generator. Remove the charge from it, then place it in another generator by the Power Station.
 The third generator can be found on the far left side of the Left Island. Remove the charge from it, then place it in the final generator by the Power Station. Once all three generators are charged, the door to the Power Station will open, allowing you to collect the studs inside.
Spell “LEGO”
 Once the Power Station has been opened, turn the rotary handle inside all the way to the right, then let it move back to the left. This will send power through the wire on the right, knocking down the signs.
 Destroy them to reveal LEGO pieces, then build them into an “L”.
 Turn the valves to make the “E” and “O”, then step on the button when the “G” is fully lit up. Spell “LEGO” to receive a whole bunch of studs.
Build a bumper car
 After removing the charge from the generator on the Left Island, you can build the LEGO pieces inside the cage into a bumper car. Hop in to reveal a stud trail that you can follow.
Destroy the hospital
 Grab the Power Suit from the Suit Swapper on the Right Island, then head to the hospital. Turn the rotary handle to raise up the hospital, revealing silver columns.
 Destroy them, then smash up the hospital to reveal an Acrobat Suit Swapper for Robin.
At this point, you should have 1 million studs. If not, make sure to destroy everything that you can, including the top part of the Power Station.
Exploring Gotham City
 After completing the final Story level, you’ll have access to Gotham City Free Play. This means that you’ll be able to explore the city with whatever characters you currently have unlocked. Hold the “tag” button and you’ll pull up the character menu, allowing you to select whichever characters you want.
With your entire character roster now open to you, you’ll be able to unlock a lot more of the collectables hidden throughout Gotham City. Gotham City is split into three large islands, and I have divided the exploration sections by island. At the beginning of each section of the walkthrough, I have included various maps of that island. Each map contains the locations of each of a certain type of collectable. There is one map showing Gold Bricks, another map showing Citizens in Peril, another map showing Red Bricks, etc. I did this because it allows me to more clearly label the map.
There are many Gold Bricks in the game, and they’re listed as Gold Brick 1, Gold Brick 2, etc. in the walkthrough (this also applies to other collectables). As such, having a map showing nothing but yellow dots really doesn’t tell you much. If you know which yellow dot you are having trouble with, how are you supposed to know which Gold Brick it is? To help solve this problem, I have labelled the dots on the map with the same numbers that correspond to the collectables in the sections below. For example, the yellow dot labelled #1 corresponds to Gold Brick 1 in the walkthrough. I have tried to make the numbers flow in a logical way (you won’t find Gold Bricks 1 and 2 on opposite sides of the island).
Keep in mind that I will not be super specific about precise locations. For example, I won’t say “starting at the Batcave, take a right until you reach the…”. The maps are there for a reason, and the labels should be enough to tell you where you need to go. If you are having trouble finding something specific, feel free to let me know and I’ll clarify in the guide.
 On another note, if you’re short on studs, a great way to get a bunch really quickly is to build the lantern LEGO pieces that you can find throughout the streets. Each will build a rocket or a hammer, which will crash into the ground and leave about 20,000 studs behind. If you’re a few studs short of something you want to unlock, consider doing this to get over the threshold.
Maps of the North Island
Character Gates

Citizens in Peril

Gold Bricks

Red Power Bricks

Vehicles

Villain Battles

Exploring the North Island – Character Gates
Required Abilities: Agility, Grapple, Magnet, Stealth, X-Ray
Di ck Grayson
 There is a grapple point on the side of the Harborside Theater.
 Use it to reach the ledge above you, then hop up the bars to reach another ledge.
 You’ll find another grapple point.
 Use it to reach another ledge, then hop up the platforms and bars to reach another ledge.
 You’ll find this Character Gate on the ledge. It requires 40 Gold Bricks to build.
 Build it and you’ll be able to purchase him.
Lois Lane
 You’ll run into this Character Gate while on your way to Gold Brick 8. It can be found on the right side of the second x-ray wall you encounter.
It requires 25 Gold Bricks to build. Build it and you’ll be able to purchase her.
Huntress
 You’ll run into this Character Gate while on your way to Gold Brick 17. It can be found right before grabbing the Acrobat Suit from the Suit Swapper.
 It requires 50 Gold Bricks to build. Build it and you’ll be able to purchase her.
Alfred
 This Character Gate can be found on the front door of Wayne Manor.
 It requires 35 Gold Bricks to build. Build it and you’ll be able to purchase him.
Policeman
 This Character Gate can be found on the guard shack by the bridge to Arkham Asylum.
 It requires 15 Gold Bricks to build. Build it and you’ll be able to purchase him.
Black Canary
 You’ll run into this Character Gate on your way to collect Gold Brick 15. You’ll find it shortly after sliding down a zipline.
 It requires 150 Gold Bricks to build. Build it and you’ll be able to purchase her.
Exploring the North Island – Citizens in Peril
Required Abilities: Freeze, Heat Vision, Sharp Shoot
Citizen in Peril 1
 You’ll find a man frozen in a block of ice on the side of the Harborside Theater. Use heat vision to melt the ice, rescuing him.
Citizen in Peril 2
 Across the street from the Metro Station, you’ll find a man stuck in some water spouting from a fire hydrant. Freeze the water to rescue him.
Citizen in Peril 3
 You’ll find a man in the Amusement Mile being held hostage by two penguin goons. Defeat both of them to rescue the citizen.
Citizen in Peril 4
 You’ll find this citizen in the mouth of a giant plant, located near a small abandoned building by the water. Destroy the three buds on the plant and it’ll spit out this citizen.
Citizen in Peril 5
 This citizen is also in the mouth of a giant plant, located just outside the parking lot to the Botanic Gardens. Destroy the three buds on the plant and it’ll spit out the citizen.
Citizen in Peril 6
 Yet another giant plant has eaten a citizen just outside the gate to Arkham Asylum. Destroy the three buds and the plant will spit out this citizen.
Citizen in Peril 7
 Another giant plant has swallowed a citizen, this time on the ledge behind the Botanic Gardens overlooking the Central Island. Destroy the three buds and the plant will spit this guy out.
Exploring the North Island – Gold Bricks
Required Abilities: Agility, Ball, Electric, Electric Immunity, Explosive, Flight, Glide, Grapple, Heat Vision, Magnet, Pole, Sharp Shoot, Sonic, Stealth, Water Spray, X-Ray
Gold Brick 1
 There is a statue blowing a horn on the northwest corner of the Harborside Theater. Fly up to the bell of the horn and you’ll find a gold panel at the end.
 Destroy it to reveal this.
Gold Brick 2
 There is a statue blowing a horn on the southwest corner of the Harborside Theater. Fly up to the bell of the horn and you’ll find a gold panel at the end.
 Destroy it to reveal this.
Gold Brick 3
 There is a statue blowing a horn on the northeast corner of the Harborside Theater. Fly up to the bell of the horn and you’ll find a gold panel at the end.
 Destroy it to reveal this.
Gold Brick 4
 There is a statue blowing a horn on the southeast corner of the Harborside Theater. Fly up to the bell of the horn and you’ll find a gold panel at the end.
 Destroy it to reveal this.
Gold Brick 5
 There is a group of 6 fire hydrants on the side of the Harborside Theater. Quickly destroy all 6 of them (each takes two hits to destroy) to reveal this.
Gold Brick 6
This Gold Brick can be found in a gold cage on top of the Harborside Theater. Fly up to it and destroy the cage, allowing you to collect the Gold Brick.
Gold Brick 7
 Call in a vehicle from the Yacht Club Remote Terminal, then hop inside. Follow the stud trail and drive through the first set of buoys to start a race. Complete the race to receive this Gold Brick.
Gold Brick 8
 To collect this Gold Brick, head to where the green dot is on the map.
 Start by hopping in the Suit Swapper as Batman to receive the Sensor Suit.
 Follow the stud trail around the side of the building and you’ll find a security camera guarding a wall. Use stealth mode to sneak past the camera, climbing up the wall.
 Grab onto the bar above you, then hop onto the platform to find a grapple point.
 Use it, then hop onto the platform and continue following the stud trail.
 You’ll find an x-ray wall. Look through it and open the clasps to reveal a lever.
 Pull it to lower the barrier on the right, revealing a wall.
 Climb up and you’ll find another security camera. Use stealth to sneak past it, walking across the beam.
 Look through the x-ray wall and open the clasps to reveal a lever. Pull it to raise up a wall.
 Head to the left and climb up the walls and beams to reach the next roof.
 You’ll find this Gold Brick guarded by a security camera. If you get too close, the Gold Brick will be covered up. Use stealth and you’ll be able to collect it.
Exploring the North Island – Gold Bricks cont.
Gold Brick 9
 To collect this Gold Brick, head to where the green dot is on the map.
 Start by hopping in the Suit Swapper as Robin to receive the Acrobat Suit.
 Follow the stud trail along the side of the building and you’ll find a pole.
 Climb up it, then grab onto the bar above you. Hop onto the platform to find a grapple point.
 Use it to reach another ledge, then follow the stud trail to reach a wall.
 Hop up, then climb the small wall on the left to reach the ledge. Hop onto the pole, then swing up the poles to reach the ledge on the right.
 Hop in the ball socket, then use it to open the container with this Gold Brick inside.
Gold Brick 10
 In a small fountain courtyard, you’ll find 4 round trees in pots surrounding the fountain. Quickly destroy all 4 of them (they take three hits to destroy) to reveal this Gold Brick in the fountain.
Gold Brick 11
 To collect this Gold Brick, head to where the green dot is on the map.
 Start by hopping in the Suit Swapper as Batman to receive the Power Suit.
 Follow the stud trail down the alley and you’ll find some silver barriers in your way.
 Destroy them to clear the path, then continue along the stud trail, destroying silver barriers as you go.
 Eventually, you’ll reach a wall. Destroy the silver discs on it, then climb up.
 Hop up the bars, then climb the next set of walls to reach the roof of the building.
 Continue following the studs, then climb up the wall to reach the ledge. Destroy the silver barriers, then jump onto the next roof.
 Climb up the next wall, then destroy the silver boxes to clear the platform.
 Climb onto the platform, then jump onto the bar across the gap to reach the next ledge.
 Destroy the silver disc on the wall, then use the grapple point to hop onto it.
 Climb up onto the next platform, then destroy the silver barriers above you.
 Grapple up onto the ledge, then follow the stud trail to reach another wall.
 Climb up and you’ll reach the top of the building, where you’ll find this Gold Brick in a silver cage. Destroy it and you’ll be able to collect the Gold Brick.
Exploring the North Island – Gold Bricks cont.
Gold Brick 12
 To collect this Gold Brick, head to where the green dot is on the map.
 Start by hopping in the Suit Swapper as Batman to receive the Sensor Suit.
 Follow the studs into the alley and you’ll find a wall guarded by a security camera. Use stealth to sneak past it, allowing you to climb up.
 Once you reach the top, hop onto the ledge on your left, then continue following the stud trail.
 You’ll find another small wall, so climb up.
 You’ll find another security camera here. You might think you need to turn invisible, but if you jump towards the camera, a platform will extend below you, allowing you to hop onto the next roof. If you’re invisible, the camera won’t see you and the platform won’t be extended.
 Once you’re on the next roof, use stealth to sneak past the next camera. Pull the lever to activate the Suit Swapper on the left.
 Hop in as Batman to receive the Electricity Suit.
 Hop over the pipes and remove the charge from the generator, then climb up the electrified wall on the right.
 Follow the studs and you’ll find another security camera. If you approach it, it’ll close up the opening, preventing you from reaching the wall.
 To get around the camera, grab onto the bar and shimmy to the right, allowing you to hop into the alcove with the camera, bypassing the barrier.
 Climb the wall and place the charge in the generator to activate another Suit Swapper.
 Hop in as Batman to receive the Sensor Suit.
 Head to the left and you’ll find this Gold Brick guarded by a security camera. Get too close and a container will close over it, so use stealth to sneak past the camera and collect this Gold Brick.
Gold Brick 13
 Grab an air vehicle from the Remote Terminal on the left side of the Batcave, then hop inside.
 As you leave, you’ll spot a green gate to your left. Fly through it to start a race. Complete it to receive this Gold Brick.
Gold Brick 14
 There is a group of 4 trees by the water near the Water Works. Quickly destroy all 4 of them (they each take 3 hits to destroy) to receive this Gold Brick.
Gold Brick 15
 To collect this Gold Brick, head to where the green dot is on the map.
 Start by hopping in the Suit Swapper as Robin to receive the Acrobat Suit.
 Follow the stud trail and you’ll find a wall.
 Hop up it and you’ll reach the roof of the building. Climb up the small wall and follow the stud trail to the right.
 Hop up the bars, then swing up the poles to reach the next roof.
 Climb up the walls and follow the stud trail to reach the very top of the building.
 Slide down the zipline to reach the next roof, then follow the stud trail to the right.
 When you reach the end of the roof, jump across the gap to reach the next roof. Climb the wall, cross the beam, and swing up the poles to reach the top of the building.
 Head to the left, then toss your pole into the socket.
 Swing up the poles to reach the zipline, allowing you to reach the next roof.
 You’ll find this Gold Brick in a container. Turn into a ball, then use the ball socket to open the container, allowing you to collect the Gold Brick.
Exploring the North Island – Gold Bricks cont.
Gold Brick 16
 To collect this Gold Brick, head to where the green dot is on the map.
 Start by hopping in the Suit Swapper as Batman to receive the Bat Suit.
 Follow the stud trail and you’ll find a glass barrier covering a wall. Shatter it, then climb up the wall to reach a platform.
 Hop up the bars to reach the roof.
 Climb up the small wall to reach the ledge, then glide across the gap to reach the other ledge.
 Shatter the glass around the lever, then pull it to activate a nearby Suit Swapper.
 Hop in as Batman to receive the Power Suit, then destroy the silver discs on the left.
 Climb up the wall, then follow the stud trail to reach another Suit Swapper. Destroy the silver disc on it, then hop in as Batman to receive the Bat Suit.
 Follow the stud trail, then climb up the small wall to reach the ledge. Glide across the gap to reach the roof of the building across the street.
 Follow the stud trail and you’ll find this Gold Brick covered with glass. Shatter the glass and you’ll be able to collect it.
Gold Brick 17
 To collect this Gold Brick, head to where the green dot is on the map.
 Start by hopping in the Suit Swapper as Robin to receive the Magnet Suit.
 Follow the stud trail to reach a metal wall. Climb up it, then climb up the next wall to reach a ledge.
 Hop up the bars to reach another metal wall.
 Climb up it and you’ll reach another bar.
 Hop onto the bar, then climb the next wall to reach a zipline.
 Slide down the zipline to reach another ledge. Grab onto the bar and climb the metal wall to reach the roof.
 Climb up the next metal wall to reach another roof.
 Follow the stud trail to find a Suit Swapper. Pull off the metal casing on it, then hop in as Robin to receive the Acrobat Suit.
 Hop up the nearby wall to reach the next roof.
 Climb up the pole to reach the zipline, allowing you to reach the opposite ledge.
 Hop onto the nearby wall, then climb up onto the ledge. Swing on the pole to reach the next wall, then climb up onto the roof.
 You’ll find this Gold Brick in a container. Use the nearby ball socket to open it, allowing you to collect the Gold Brick.
Exploring the North Island – Gold Bricks cont.
Gold Brick 18
 To collect this Gold Brick, head to where the green dot is on the map.
 Start by hopping in the Suit Swapper as Batman to receive the Electricity Suit.
 Follow the stud trail to the left and you’ll find an electrically-charged wall.
 Climb up, then climb up the next electrically-charged wall. Hop onto the bar above you, then hop onto the next wall.
 Climb up the wall to reach a ledge, then use the grapple point to reach the roof.
 Follow the stud trail, then remove the charge from the generator.
 Climb up the electrically-charged wall on the left to reach a zipline, then slide down it to reach a ledge.
 Place the charge in the generator to activate the Suit Swapper below you.
 Hop in as Batman to receive the Power Suit, then follow the stud trail to reach some silver discs.
 Destroy them, then climb up the wall to reach the ledge. Climb the next wall, then grab onto the bar and hop onto the roof.
 Destroy the silver barriers on the right, then continue onto the next roof.
 Follow the stud trail to reach a Suit Swapper, then destroy the silver disc on top of it.
 Hop in as Batman to receive the Electricity Suit, then remove the charge from the nearby generator.
 Follow the stud trail around the building, passing through the electricity.
 At the end, you’ll reach a wall. Climb up, then hop onto the roof.
 Place the charge in the generator to open the container, revealing this Gold Brick.
Gold Brick 19
 There are 4 bushes surrounding a small fountain at the edge of the peninsula by the Water Works. Quickly destroy all 4 of them (they each take 3 hits to destroy) to reveal this Gold Brick.
Gold Brick 20
 There are 9 traffic cones in the parking lot of the Amusement Mile. Quickly destroy all 9 of them (they each take 1 hit to destroy) to reveal this Gold Brick.
Gold Brick 21
 Complete a game of “Hook a Duck” in the Amusement Mile. Step on the button to start moving the fishing pole. Step on the button again when the hook is over a duck to grab it. Grab all three ducks to reveal this Gold Brick.
Gold Brick 22
 Complete a game of “Bat in a Bucket” in the Amusement Mile. Toss your Batarang at the four buckets to reveal this Gold Brick.
Gold Brick 23
 Complete a game of “Hook a Duck” in the Amusement Mile. Step on the button to start moving the fishing pole. Step on the button again when the hook is over a duck to grab it. Grab all three ducks to reveal this Gold Brick.
Gold Brick 24
 Complete a game of “Bat in a Bucket” in the Amusement Mile. Toss your Batarang at the four buckets to reveal this Gold Brick.
Exploring the North Island – Gold Bricks cont.
Gold Brick 25
 Complete a game of “Sock a Croc” in the Amusement Mile. Step on the buttons when the croc is under the hammer to destroy them. Destroy both crocs to reveal this Gold Brick.
Gold Brick 26
 Hop in one of the roller coaster cars and enjoy the ride (you can press the “attack” button to move faster along the tracks if you want). Once you reach the end, you’ll find this Gold Brick to the left of the cars.
Gold Brick 27
 Hop in the Ferris Wheel and enjoy the ride to reveal this Gold Brick.
Gold Brick 28
 Complete a game of “Sock a Croc” in the Amusement Mile. Step on the buttons when the croc is under the hammer to destroy them. Destroy both crocs to reveal this Gold Brick.
Gold Brick 29
 Hop in the chair underneath the spiral slide to reach the top.
 Slide down the slide and you’ll receive this Gold Brick at the bottom.
Gold Brick 30
 Complete a game of “Bat in a Bucket” in the Amusement Mile. Toss your Batarang at the four buckets to reveal this Gold Brick.
Gold Brick 31
 Complete a game of “Sock a Croc” in the Amusement Mile. Step on the buttons when the croc is under the hammer to destroy them. Destroy both crocs to reveal this Gold Brick.
Gold Brick 32
 Complete a game of “Clown Spray” in the Amusement Mile. Hop in the Suit Swapper as Robin to receive the Hazard Suit, then spray water into the mouths of all three clowns until their nose falls off. If you need some more water, you can hop into the pool of water on the right. Knock off all three clown noses to reveal this Gold Brick.
Gold Brick 33
 Complete a game of “Clown Spray” in the Amusement Mile. Hop in the Suit Swapper as Robin to receive the Hazard Suit, then spray water into the mouths of all three clowns until their nose falls off. If you need some more water, you can hop into the pool of water on the right. Knock off all three clown noses to reveal this Gold Brick.
Gold Brick 34
 Hop in one of the teacups and enjoy the ride! Eventually, this Gold Brick will appear nearby.
Gold Brick 35
 Hop in one of the bumper cars, then ram your partner’s car until it explodes, revealing this Gold Brick.
Gold Brick 36
 Hop on the rocket ship ride and ride it around. Eventually, this Gold Brick will appear.
Gold Brick 37
 Complete a game of “Bat in a Bucket” in the Amusement Mile. Toss your Batarang at the four buckets to reveal this Gold Brick.
Gold Brick 38
 Complete a game of “Hook a Duck” in the Amusement Mile. Step on the button to start moving the fishing pole. Step on the button again when the hook is over a duck to grab it. Grab all three ducks to reveal this Gold Brick.
Gold Brick 39
 Complete a game of “Clown Spray” in the Amusement Mile. Hop in the Suit Swapper as Robin to receive the Hazard Suit, then spray water into the mouths of all three clowns until their nose falls off. If you need some more water, you can hop into the pool of water on the right. Knock off all three clown noses to reveal this Gold Brick.
Gold Brick 40
 Complete a game of “Bat in a Bucket” in the Amusement Mile. Toss your Batarang at the four buckets to reveal this Gold Brick.
Gold Brick 41
 You’ll find 5 trees on the side of a road leading up to a hilltop. Quickly destroy all 5 (they each take 3 hits to destroy) to reveal this Gold Brick.
Gold Brick 42
 You’ll find 5 bushes in a circle next to the road leading to Arkham Asylum. Quickly destroy all 5 (each takes 3 hits to destroy) to reveal this Gold Brick.
Gold Brick 43
 There are 2 rocks on a hill by the parking lot of the Botanic Gardens. Quickly destroy both of them (they each take 3 hits to destroy) to reveal this Gold Brick.
Gold Brick 44
 There are 5 bushes in a circle on the side of the Botanic Gardens. Quickly destroy all 5 of them (they each take 3 hits to destroy) to reveal this Gold Brick.
Gold Brick 45
 There are 5 bushes by a small cave on the side of the road leading to Arkham Asylum. Quickly destroy all 5 of them (they each take 3 hits to destroy) to reveal this Gold Brick.
Exploring the North Island – Gold Bricks cont.
Gold Brick 46
 To collect this Gold Brick, head to where the green dot is on the map.
 Start by hopping in the Suit Swapper as Batman to receive the Electricity Suit.
 Use the nearby grapple point to reach the ledge above you.
 Follow the studs and head up the electrified arch.
 Continue following the studs and you’ll find a generator. Head through the electricity and remove the charge from it.
 Follow the studs around the tower and past the cameras. You’ll eventually find a generator.
 Place the charge in it to activate the Suit Swapper, then hop in as Batman to receive the Sensor Suit.
 Head back over to the security cameras, then use stealth to sneak past them, allowing you to collect this Gold Brick.
Gold Brick 47
 Hop in the Suit Swapper by the Arkham maze as Batman to receive the Electricity Suit.
 Pass through the electricity to enter the maze, then head to the right to find another Suit Swapper. Hop in as Batman to receive the Power Suit.
 Head over to the left side of the maze and you’ll find a silver barrier.
 Destroy it, then head on down the path to find another Suit Swapper. Destroy the silver disc on it, then hop in as Batman to receive the Bat Suit.
 Head to the right side of the maze and you’ll find an arch with a glass barrier blocking it. Shatter the glass, then head on through.
 Head south on the path and you’ll find another glass barrier, right by the Suit Swapper that gives you the Power Suit.
 Shatter it, then head down the path to find another Suit Swapper. Shatter the glass disc on it, then hop in as Batman to receive the Electricity Suit.
 Head to the north side of the maze and you’ll find some electricity blocking your path.
 Continue down the path and you’ll reach a generator.
 Remove the charge from it, then head over to the generator in the center of the maze. Place the charge in the generator to open the container, revealing this Gold Brick.
Gold Brick 48
 Grab a water vehicle from the Remote Terminal on the right side of the Batcave, then hop inside.
 Once you exit the Batcave, look to the right and you’ll see some buoys. Drive between them to start a race. Complete the race to receive this Gold Brick.
Exploring the North Island – Red Power Bricks
Required Abilities: Deconstructor, Flight, Joker, Riddler
Attract Studs
 Fly to the near right corner of the Batcave and you’ll find a ledge.
On that ledge, you’ll find a black box by a small rock pillar.
 Deconstruct it to reveal this.
Beep Beep
 You’ll find a Joker Box by a pillar in Amusement Mile.
 Open it to reveal this.
Fall Rescue
You’ll find a Joker Box on the side of the Harborside Theater.
 Open it to reveal this.
Studs x8
 You’ll find a black box next to the side of a building near the Water Works.
Deconstruct it to reveal this.
Regenerate Hearts
You’ll find a Riddler Box in a cave by the Botanic Gardens.
 Open it to reveal this.
Disguises
 There is a ledge on Arkham Asylum that runs parallel to the bridge. It has some security cameras on it. You’ll reach this ledge while collecting Gold Bricks, but for the purposes of this Red Brick, it’s better to just fly to it.
 Across from the cameras, you’ll find a Joker Box.
 Open it to reveal this.
Exploring the North Island – Vehicles
Giant Dodgem
This can be found in the parking lot of the Amusement Mile. Walk up to it and you’ll be able to purchase it.
Harley Quinn’s Monster Truck
 This can also be found in the parking lot of the Amusement Mile. Walk up to it and you’ll be able to purchase it.
LexCorp Limousine
 This can be found in the parking lot of the Yacht Club. Walk up to it and you’ll be able to purchase it.
Bat Dodgem
 This can be found in an alley behind a building near the water. Walk up to it and you’ll be able to purchase it.
Pumpkin Car
 This can be found in a small fountain courtyard at the end of the peninsula in the southeast part of the island. Walk up to it and you’ll be able to purchase it.
Exploring the North Island – Villain Battles
Required Abilities: Flight, Heat Vision, Sharp Shoot, Super Speed, Water Spray
Mad Hatter
Activate the Remote Terminal by the Harborside Theater and Mad Hatter will appear.
 You’ll find him in front of the Theater. Walk up to him to start the boss fight.
His fight is rather simple. He will disappear, sending some asylum patients to attack you. Defeat the wave of enemies and Mad Hatter himself will appear. Smack him and you’ll take out one heart. Repeat this process two more times and you’ll be able to purchase him.
Ra’s Al Ghul
 Activate the Remote Terminal by Metro Station (North) and Ra’s Al Ghul will appear.
 You’ll find him on a rooftop just north of the Remote Terminal (Ra’s appears on the left side of the screenshot, with the blue light from the Remote Terminal on the right). Fly up to him to start the boss fight.
 His fight is very easy. He’ll run right up to you and start attacking, so just smack him three times to defeat him. You’ll then be able to purchase him.
Lex Luthor
The Remote Terminal by the Yacht Club has been deconstructed. You’ll need to use The Flash to reassemble it. Once it’s rebuilt, activate it and Lex will appear.
 You’ll find him on top of the large yacht. Walk up to him to start the boss fight.
 He’ll fire his deconstructor at you, which is only a problem if you’re Batman. Otherwise, simply smack him three times to take out his hearts, allowing you to purchase him.
Harley Quinn
 Activate the Remote Terminal in the Gotham Funland Entrance and Harley Quinn will appear.
 She appears right in the entrance to the amusement park. Walk up to her to start the boss fight.
 As soon as the fight starts, she’ll start doing back handsprings away from you. Get too close to her and she’ll smack the ground with her hammer. To damage her, wait for her to stop moving around, then toss a Batarang at her. This will take out one heart. Repeat this process two more times to defeat her, allowing you to purchase her.
Scarecrow
 The Remote Terminal in Amusement Mile is blocked by a gold lock. Destroy the gold lock and you’ll be able to activate the Remote Terminal, causing Scarecrow to appear.
 He appears in the large pumpkin on the boardwalk, on the way to the ferris wheel. Walk up to him to start the boss fight.
 In the background are several hoses filling the area with fear gas. This makes Scarecrow appear larger, and while he’s like this, you can’t damage him. Use your Batarang to take out all of the hoses, returning Scarecrow to his normal size. He is now vulnerable, so smack him to take out his hearts, allowing you to purchase him.
Poison Ivy
 Activate the Remote Terminal in the parking lot of the Botanic Gardens and Poison Ivy will appear inside.
 Unfortunately, the way inside is blocked by some toxic waste. Hop in the nearby Suit Swapper as Robin to receive the Hazard Suit, then use it to clean up the toxic waste. If you need more water, you can jump in the small pool on the left.
 Cleaning up the toxic waste will open the door, and you’ll find Poison Ivy inside. Walk up to her to start the boss fight.
 As soon as the fight starts, Poison Ivy will teleport to one of the rooms inside the gardens. Use the arrow on the screen to help you locate her. Once you reach her, smack her to take off a heart. She will then teleport to another room. Repeat this process two more times to defeat her, allowing you to purchase her.
Captain Boomerang
 Activate the Remote Terminal outside Arkham Asylum and Captain Boomerang will appear.
 He can be found inside the courtyard, by the maze.
 His fight is very simple. If you get too close to him, he’ll jump away, so you’ll have to use Batarangs to defeat him. Take out his hearts and you’ll be able to purchase him.
Maps of the Central Island
Character Gates

Citizens in Peril

Gold Bricks

Red Power Bricks

Vehicles

Villain Battles

Exploring the Central Island – Character Gates
Required Abilities: Agility, Explosive, Freeze, Freeze Immunity, Grapple, Water Spray
Aquaman
 You’ll find this Character Gate on the way to Gold Brick 5.
 It requires 70 Gold Bricks to construct. Build it and you’ll be able to purchase him.
Hawkgirl
 You’ll find this Character Gate on the way to Gold Brick 16.
 It requires 55 Gold Bricks to construct. Build it and you’ll be able to purchase her.
Hawkman
 You’ll find this Character Gate on the way to Gold Brick 52.
 It requires 60 Gold Bricks to construct. Build it and you’ll be able to purchase him.
Batgirl
 You’ll find this Character Gate on the way to Gold Brick 60.
 It requires 65 Gold Bricks to construct. Build it and you’ll be able to purchase her.
Martian Manhunter
 You’ll find this Character Gate on the way to Gold Brick 25. Before hopping up the final wall that leads to the very top of the building, run around to the other side of the ledge to find this.
 It requires 175 Gold Bricks to construct. Build it and you’ll be able to purchase him.
Supergirl
 You’ll find this Character Gate on the way to Gold Brick 17. It can be found right before gliding across Gotham Park.
 It requires 250 Gold Bricks to construct. Build it and you’ll be able to purchase her.
Exploring the Central Island – Citizens in Peril
Required Abilities: Freeze, Heat Vision, Sharp Shoot
Citizen in Peril 1
 This poor man is being held hostage by a Penguin Goon behind a building near the water. Defeat the Penguin Goon to rescue the man.
Citizen in Peril 2
 This poor citizen is stuck in the spout from a fire hydrant north of Gotham Park. Freeze the water spout to rescue him.
Citizen in Peril 3
 This citizen is trapped in the mouth of a giant plant in a small grassy courtyard near Ace Chemicals. Destroy the three buds on the plant and it will spit out this citizen.
Citizen in Peril 4
 You’ll find this citizen trapped in a block of ice in an alley west of Gotham Park. Melt the ice to rescue him.
Citizen in Peril 5
 This citizen can also be found trapped in an ice block. He can be found in an alley southwest of Gotham Park. Melt the ice to rescue him.
Citizen in Peril 6
 This citizen can be found trapped in the mouth of a giant plant by the water near the South Island. Destroy the three buds on the plant and it will spit him out.
Citizen in Peril 7
 This man can be found in a water spout coming out of a fire hydrant near the bridge leading to the North Island. Freeze the water to rescue him.
Citizen in Peril 8
 This man can be found frozen in a block of ice by a building near the Water Works. Melt the ice to rescue him.
Citizen in Peril 9
 This man can be found in a block of ice on the side of the road east of Gotham Park. Melt the ice to rescue him.
Citizen in Peril 10
 This citizen can be found stuck in the water spout from a fire hydrant. Freeze the water to rescue him.
Citizen in Peril 11
 This man can be found stuck in a water spout on the east side of the island. Freeze the water to rescue him.
Citizen in Peril 12
 This man can be found stuck in a water spout in a small grass field east of Gotham Park. Freeze the water to rescue him.
Citizen in Peril 13
 This poor citizen is being held hostage by a Penguin Goon in a courtyard near the Power Station. Defeat the Penguin Goon to rescue the citizen.
Citizen in Peril 14
 This citizen is also being held hostage by a Penguin Goon, in front of a building southeast of Gotham Park. Defeat the Penguin Goon to rescue the citizen.
Citizen in Peril 15
 This man is stuck in a water spout near the Power Station. Freeze the water to rescue him.
Citizen in Peril 16
 This citizen is stuck in the mouth of a giant plant near a small cathedral by the South Island. Destroy the three buds on the plant and it will spit out this citizen.
Exploring the Central Island – Gold Bricks
Required Abilities: Agility, Ball, Chemical Spray, Deconstructor, Dive, Electric, Electric Immunity, Explosive, Flight, Freeze, Freeze Immunity, Glide, Grapple, Heat Vision, Magnet, Sonic, Stealth, Water Spray, X-Ray Vision
Gold Brick 1
 This Gold Brick can be found in a gold cage on top of a building. Fly up to it and destroy the cage, allowing you to collect this Gold Brick.
Gold Brick 2
 Call in a water vehicle at the Remote Terminal on Gotham Beach, then hop in. Drive through the nearby buoys to start a race. Complete the race to receive this Gold Brick.
Gold Brick 3
 To collect this Gold Brick, head to where the green dot is on the map.
 Start by hopping in the Suit Swapper as Robin to receive the Magnet Suit.
 Climb up the metal wall to reach the ledge.
 You’ll find a Suit Swapper covered by a metal disc. Pull the disc off, then hop in the Suit Swapper as Robin to receive the Acrobat Suit.
 Hop up the nearby wall, then swing across the poles to reach the opposite ledge.
 Follow the stud trail, then hop up the next wall.
 Swing up the poles to reach another ledge.
 Climb up the pole, then swing up the poles and hop up the ledges to reach the roof.
 You’ll reach a ball socket. Turn into a ball and use it to lower the barrier on the slide.
 Stay in your ball and roll down the slide to reach another roof.
 Continue following the studs and hop across the gap.
 You’ll find this Gold Brick inside a container. Hop in the ball socket and use it to open the container, allowing you to collect this.
Gold Brick 4
 A statue near Gotham Beach has a gold panel on its head. Fly up and destroy the gold panel to reveal this Gold Brick.
Gold Brick 5
 To collect this Gold Brick, head to where the green dot is on the map.
 Start by hopping into the Suit Swapper as Robin to receive the Ice Suit.
 Freeze the two nearby water spouts, then hop up them to reach the wall on the right.
 Climb up onto the ledge, then follow the studs to reach a grapple point.
 Grapple up, then freeze the nearby water spouts. Walk up the ramp, then hop across the frozen platforms to reach the wall.
 Climb up to reach the next ledge, then follow the studs. Pass through the freeze jets, then climb the next wall.
 You’ll reach the roof, where you’ll find this Gold Brick. Shoot the ice switch above it to destroy the cage around it, allowing you to collect it.
Gold Brick 6
 This Gold Brick can be found inside a gold cage on top of a church. Fly up and destroy the cage, allowing you to collect this.
Gold Brick 7
 A statue by Ace Chemicals has a gold panel on its head. Destroy the panel and you’ll be able to collect this Gold Brick.
Exploring the Central Island – Gold Bricks cont.
Gold Brick 8
 To collect this Gold Brick, head to where the green dot is on the map.
 Start by hopping in the Suit Swapper as Batman to receive the Bat Suit.
 Shatter the glass container nearby to reveal a grapple point, then use it to reach the ledge above you.
 Shatter the glass to reveal a wall, then climb up.
 Follow the studs around the roof and you’ll find some more walls. Climb up.
 At the top, glide across the gap to land on the opposite ledge, then climb the wall.
 Shatter the glass container to reveal a button, then step on it to reveal a wall.
 Climb up and you’ll find this Gold Brick. Shatter the glass container around it and you’ll be able to collect it.
Gold Brick 9
 After purchasing Joker’s Helicopter, hop inside and fly through the green gate in front of you to start a race. Complete the race to receive this Gold Brick.
Gold Brick 10
 This Gold Brick can be found in a gold cage on top of a building. Fly up to it and destroy the cage, allowing you to collect this Gold Brick.
Gold Brick 11
 To collect this Gold Brick, head to where the green dot is on the map.
 Start by hopping in the Suit Swapper as Robin to receive the Hazard Suit.
 Spray water into the slot on the right to reveal a wall.
 Climb up, then clean up the toxic goo to reveal a grapple point.
 Use it to reach the next ledge, then slide down the zipline.
 Head to the right and slide down the next zipline.
 Hop in the pool of orange toxic goo to fill up your tank, then spray it at the slot on the right. This will destroy the glass, allowing you to walk to the other side of the wall.
 Fill your tank with water from the pool, then clean up the toxic goo.
 Spray water into the slot to reveal another wall.
 Climb up and slide down the zipline to reach the opposite ledge, then use the grapple point.
 Climb up the wall to reach the top of a pipe.
 Carefully walk across the pipe to reach another wall, then climb up.
 Put out the fires, then walk to the other end of the pipe.
 Use the grapple point at the end to reach a ledge.
 Follow the studs to the left and you’ll find this Gold Brick in a container. Hop in the pool of purple toxic waste to fill your tank, then spray it into the slot on the container to open it, allowing you to collect the Gold Brick.
Exploring the Central Island – Gold Bricks cont.
Gold Brick 12
 To collect this Gold Brick, head to where the green dot is on the map.
 Start by hopping in the Suit Swapper as Batman to receive the Electricity Suit.
 Climb up the wall, passing through the electricity, to reach a ledge.
 Use the grapple point to reach the next ledge, then look to the right.
 You’ll find another wall. Climb up it to reach the roof.
 Follow the studs and slide down the zipline.
 Climb up the electrified wall, then slide down the next zipline.
 Follow the studs around the side of the roof to reach two generators. Take the charge from the generator on the left, then place it in the generator in front of you.
 This will activate the nearby Suit Swapper. Hop in as Batman to receive the Power Suit.
 Destroy the silver disc on the wall, then climb up.
 On the next ledge, destroy the silver disc, then climb up the next wall.
 At the top, you’ll find this Gold Brick in a silver cage. Climb up the wall to reach it, then destroy the cage, allowing you to collect this Gold Brick.
Gold Brick 13
 There is a set of 5 yellow dumpsters on the side of the road by Gotham Park. Quickly destroy all 5 of them (they each take 3 hits to destroy) to reveal this Gold Brick.
Gold Brick 14
 There is a statue by Ace Chemicals that has a gold panel on its head. Destroy the panel to reveal this Gold Brick.
Gold Brick 15
 To collect this Gold Brick, head to where the green dot is on the map.
 Start by hopping into the Suit Swapper as Robin to receive the Acrobat Suit.
 Hop up the wall to reach the roof.
 Swing up the poles to reach a ledge.
 Climb up the wall to reach another ledge, then climb up the next wall.
 Follow the studs across the rooftops, then walk up the beam.
 You’ll find this Gold Brick in a container. Turn into a ball and use the ball socket to open the container, allowing you to collect this Gold Brick.
Exploring the Central Island – Gold Bricks cont.
Gold Brick 16
 To collect this Gold Brick, head to where the green dot is on the map.
 Start by hopping in the Suit Swapper as Robin to receive the Hazard Suit.
 Clean the toxic goo off the nearby wall, then climb up.
 Climb up the next wall to reach another ledge.
 Clean off the toxic goo on the ramp, then walk up and climb the wall.
 Once you reach the top, slide down the zipline, then climb to the right on the wall to reach the roof.
 Follow the studs around the roof and you’ll find some green toxic goo on the ground.
 Clean it up to reveal a grapple point, then use it to reach the ledge above you.
 Follow the studs and climb up the next set of walls to reach the roof.
 There are four containers that we need to fill up. The water container can be found on the right.
 A pool of orange toxic goo can be found nearby. Hop inside and use it to fill up the orange container on the left.
 Walk along the tiles by the orange container and you’ll find a wall. Climb down to reach a pool of green toxic goo.
 Hop in and use it to fill the green container on the right.
 Walk along the tiles by the green container and you’ll find a wall. Climb down to reach a pool of purple toxic goo.
 Hop in and use it to fill the purple container on the left.
 Filling all four containers will reveal this Gold Brick up on the ledge by the lights.
Gold Brick 17
 To collect this Gold Brick, head to where the green dot is on the map.
 Start by using the grapple point to reach the ledge above you.
 Hop up the bars, then climb the wall to reach another ledge.
 Hop in the Suit Swapper as Batman to receive the Power Suit, then destroy the nearby silver object to reveal a grapple point.
 Use it to grab onto the bar, then climb up the wall.
 Destroy the silver disc and barriers on the right, then climb up the wall onto the ledge.
 Use the grapple point to reach the ledge above you.
 Use the next grapple point to reach the roof.
 Destroy the silver disc to reveal a Suit Swapper, then hop in as Batman to receive the Bat Suit.
 Walk onto the beam, then glide all the way across Gotham Park to reach the opposite building.
 Climb up the wall to find this Gold Brick encased in a glass container. Shatter the glass and you’ll be able to collect it.
Gold Brick 18
 A statue to the left of the Gotham City Zoo has a gold panel on its head. Fly up to it and destroy the gold panel to reveal this Gold Brick.
Gold Brick 19
 After purchasing Brainiac’s UFO, hop inside and fly through the green gate in front of you to start a race. Complete the race to receive this Gold Brick.
Gold Brick 20
 A statue by the bridge leading to the North Island has a gold panel on its head. Fly up to it and destroy the gold panel to reveal this Gold Brick.
Exploring the Central Island – Gold Bricks cont.
Gold Brick 21
 To collect this Gold Brick, head to where the green dot is on the map.
 Start by hopping in the Suit Swapper as Batman to receive the Power Suit.
 You’ll find a silver object on a wall to the left.
 Destroy it and you’ll reveal a grapple point.
 Grapple onto it, then climb up the wall. You’ll find another wall, so climb up that as well.
 You’ll then be on top of the pipe. Destroy the silver disc on the wall, then climb up.
 Continue along the wall to reach the roof of the opposite building.
 Follow the studs and you’ll find another wall.
 Climb up and you’ll find this Gold Brick in a silver cage. Destroy the cage and you’ll be able to collect it.
Gold Brick 22
 To collect this Gold Brick, head to where the green dot is on the map.
 You’ll find a wall on the side of a building.
 Hop in the Suit Swapper as Batman to receive the Power Suit, then destroy the nearby silver object to reveal a grapple point.
 Grapple onto it, then grab onto the bar above you and climb up the wall.
 Continue along the ledge, then destroy the silver barriers to clear the path.
 Continue along the path and you’ll reach another wall.
 Climb up, then grab onto the zipline to reach another ledge.
 Head to the right and destroy the silver disc to reveal a Suit Swapper. Hop in as Batman to receive the Electricity Suit.
 Climb the electrified wall, then use the grapple point to reach the roof.
 Follow the studs to the left, then climb up the small wall.
 Walk through the electricity and remove the charge from the generator to reveal a zipline.
 Grab onto it to reach the roof of another building.
 Place the charge in the generator to open the container, revealing this Gold Brick.
Gold Brick 23
 On the side of a building are 4 bicycle racks. Quickly destroy all 4 (each takes 3 hits to destroy) to reveal this Gold Brick.
Gold Brick 24
 One of the statues by the bridge leading to the North Island has a gold panel on its head. Destroy it to reveal this Gold Brick.
Exploring the Central Island – Gold Bricks cont.
Gold Brick 25
 To collect this Gold Brick, head to where the green dot is on the map.
 Start by hopping in the Suit Swapper as Robin to receive the Acrobat Suit.
 Hop up the walls to reach a ledge.
 Climb up the next wall to reach the roof.
 Head to the left and you’ll find another wall. Climb up, then slide down the zipline to reach another roof.
 Climb up the next two walls and you’ll find some poles.
 Swing up the poles and you’ll eventually reach the roof of the building.
 You’ll find another set of walls.
 Hop up them, then climb the smaller wall at the top to reach the very top of the building.
 You’ll find this Gold Brick in a container. Hop in the ball socket, then use it to open the container, allowing you to collect this Gold Brick.
Gold Brick 26
 One of the statues by a building north of Gotham Park has a gold panel on its head. Destroy the panel to reveal this Gold Brick.
Gold Brick 27
 To collect this Gold Brick, head to where the green dot is on the map.
 You’ll find a grapple point on the side of a building.
 Use it to reach the nearby ledge, then hop in the Suit Swapper as Batman to receive the Bat Suit.
 Head up the ramp on the right and you’ll find some glass.
 Shatter it to reveal a wall, then climb up.
 Glide across the street to land on the roof of the building on the other side.
 You’ll find this Gold Brick inside a glass cage. Shatter the glass and you’ll be able to collect it.
Gold Brick 28
 While on your way to collect Gold Brick 22, you’ll find 4 chimneys on the roof of a building. Quickly destroy all 4 of them (each takes 3 hits to destroy) to reveal this Gold Brick.
Gold Brick 29
 You’ll find a group of 5 fire hydrants on the side of a building. Quickly destroy all 5 of them (each takes 2 hits to destroy) to reveal this Gold Brick.
Gold Brick 30
 Dive underwater in the top left corner of the lake in Gotham Park and you’ll find this Gold Brick at the bottom.
Gold Brick 31
 Dive underwater in the top right corner of the lake in Gotham Park and you’ll find this Gold Brick at the bottom.
Gold Brick 32
 After purchasing the News Helicopter, hop inside and fly through the green gate in front of you to start a race. Complete the race to receive this Gold Brick.
Gold Brick 33
 You’ll find a group of 6 streetlights on the side of the road east of Gotham Park. Quickly destroy all 6 (each takes 3 hits to destroy) to reveal this Gold Brick.
Gold Brick 34
 Hop in one of the swan rides in the lake in Gotham Park, then drive it through the nearby buoys to start a race. Complete the race to receive this Gold Brick.
Gold Brick 35
 You’ll find a cluster of 6 large trees in Gotham Park. Quickly destroy all 6 of them (each takes 3 hits to destroy) to reveal this Gold Brick.
Gold Brick 36
 To collect this Gold Brick, head to where the green dot is on the map.
 Start by hopping in the Suit Swapper as Robin to receive the Magnet Suit.
 Walk up the metal wall to the left to reach the roof of the building.
 Pull open the metal container to reveal this Gold Brick.
Exploring the Central Island – Gold Bricks cont.
Gold Brick 37
 You’ll find a group of 7 trees to the east of Gotham Park. Quickly destroy all 7 of them (each takes 3 hits to destroy) to reveal this Gold Brick.
Gold Brick 38
 As soon as you enter the maze in Gotham Park, head to the right to find a black box. Use the Deconstructor to destroy it, revealing this Gold Brick.
Gold Brick 39
 To collect this Gold Brick, head to where the green dot is on the map.
 Start by hopping in the Suit Swapper as Batman to receive the Power Suit.
 Head down the path to the left, then continue along the path until you reach a silver barrier.
 Destroy it to clear the path, then continue along to reach another silver barrier.
 Destroy it, then continue along the path to reach the center of the maze, where you’ll find this Gold Brick in a silver cage. Destroy the cage and you’ll be able to collect this Gold Brick.
Gold Brick 40
 You’ll find a cluster of 5 rocks in Gotham Park. Quickly destroy all 5 of them (each takes 3 hits to destroy) to reveal this Gold Brick.
Gold Brick 41
 There are 6 streetlights around a fountain in Gotham Park. Quickly destroy all 6 of them (each takes 3 hits to destroy) to reveal this Gold Brick.
Gold Brick 42
 In the Gotham City Zoo, pull one of the levers to open the enclosure.
 Head inside and you’ll find some giraffes.
 Hop on one, then follow the stud trail to reach this Gold Brick.
Gold Brick 43
 Fly to the top of a building at the south end of Gotham Park to find this Gold Brick inside a gold cage. Destroy the cage and you’ll be able to collect this Gold Brick.
Gold Brick 44
 You’ll find a black box underneath a statue at the south end of Gotham Park. Use the Deconstructor to destroy the box, revealing this Gold Brick.
Gold Brick 45
 In the Gotham City Zoo, pull one of the levers to open the enclosure.
 Head inside and you’ll find some lions.
 Hop on one, then follow the stud trail to reach this Gold Brick.
Gold Brick 46
 In the Gotham City Zoo, pull one of the levers to open the enclosure.
 Head inside and you’ll find some gorillas.
 Hop on one, then follow the stud trail to reach this Gold Brick.
Gold Brick 47
 You’ll find polar bears in one of the exhibits in the Gotham Zoo.
 Hop on one and follow the stud trail that appears to reach this Gold Brick.
Exploring the Central Island – Gold Bricks cont.
Gold Brick 48
 To collect this Gold Brick, head to where the green dot is on the map.
 Start by hopping in the Suit Swapper as Batman to receive the Power Suit.
 Destroy the nearby silver object to reveal a grapple point.
 Climb up the small wall and grapple onto it, then hop onto the bar above you and climb the next wall.
 Walk across the beam, destroying the silver rubble in your way.
 You’ll reach a platform with a wall. Destroy the silver disc to clear the wall, then climb up.
 You’ll reach the roof, where you’ll find this Gold Brick in a silver cage. Destroy the cage and you’ll be able to collect this Gold Brick.
Gold Brick 49
 After purchasing the LexCorp Micro-VTOL, hop inside and fly through the green gate in front of you to start a race. Complete the race to receive this Gold Brick.
Gold Brick 50
 You’ll find a group of 5 green leafy plants by the Water Works. Quickly destroy all 5 of them (each takes 3 hits to destroy) to reveal this Gold Brick.
Gold Brick 51
 You’ll find a group of 5 flowerbeds on the side of a building. Quickly destroy all 5 (each takes 2 hits to destroy) to reveal this Gold Brick.
Gold Brick 52
 To collect this Gold Brick, head to where the green dot is on the map.
 Start by hopping in the Suit Swapper as Robin to receive the Acrobat Suit.
 Hop onto the nearby pole and start swinging up the side of the building.
 You’ll land on a platform. Hop onto the next pole and keep swinging.
 Once you reach the roof, follow the studs to reach a wall.
 Hop up, then jump up the platforms to reach the next roof.
 Hop off the next wall to reach the ledge above you.
 Climb up the small wall, then slide down the zipline.
 You’ll find this Gold Brick in a container. Use the ball socket to open the container, allowing you to collect this Gold Brick.
Gold Brick 53
 There is a statue holding a pipe right above the Metro Station that has a gold panel on its head. Destroy the panel to reveal this Gold Brick.
Exploring the Central Island – Gold Bricks cont.
Gold Brick 54
 To collect this Gold Brick, head to where the green dot is on the map.
 Start by hopping in the Suit Swapper as Batman to receive the Sensor Suit.
 Use stealth to sneak by the security camera and climb the wall.
 Once you reach the top, use the grapple point on the right to reach the roof.
 Follow the studs, then use stealth to sneak by the next security camera and climb up the wall.
 Use the grapple point on your left to reach the roof.
 Slide down the zipline to reach the roof of the opposite building.
 Follow the studs to the right to reach an x-ray wall.
 Look through it, then destroy the clasps to reveal a button.
 Step on the button to raise up the wall on the left, then climb up.
 Once you reach the top, climb up the next wall to reach the Gold Brick.
 Use stealth to sneak by the camera and grab it. If the camera sees you, the container around the Gold Brick will close, preventing you from collecting it.
Gold Brick 55
 Fly to the top of a building and you’ll find 4 water towers. Quickly destroy all 4 of them (each takes 4 hits to destroy) to reveal this Gold Brick.
Gold Brick 56
 To collect this Gold Brick, head to where the green dot is on the map.
 Start by hopping in the Suit Swapper as Robin to receive the Magnet Suit.
 Climb up the metal wall to reach the ledge above you.
 Follow the studs and climb the next metal wall.
 Follow the studs and climb the next metal wall to reach the roof.
 Slide down the zipline to reach the roof of the opposite building.
 Climb up the next metal wall to reach the roof.
 You’ll find a maze. Drag the metal ball over all four orange panels to reveal this Gold Brick.
Gold Brick 57
 One of the statues on the side of a skyscraper has a gold panel on its head. Destroy the panel to reveal this Gold Brick.
Gold Brick 58
 You’ll find this Gold Brick inside a gold cage on top of a building. Destroy the cage and you’ll be able to collect this Gold Brick.
Gold Brick 59
 To collect this Gold Brick, head to where the green dot is on the map.
 Start by hopping in the Suit Swapper as Robin to receive the Acrobat Suit.
 Climb up the wall to the north, then grab onto the bar above you.
 Continue to hop up the bars, then climb up the pole. Slide down the zipline to reach the roof of a nearby building.
 Hop up the wall to reach a ledge.
 Follow the studs to the left, then climb up the pole to reach another ledge.
 Hop in the ball socket and use it to open the nearby container, revealing a Suit Swapper. Hop in as Robin to receive the Magnet Suit.
 Climb up the nearby metal wall to reach the roof, where you’ll find a maze.
 Drag the metal ball over all four orange panels to reveal this Gold Brick.
Exploring the Central Island – Gold Bricks cont.
Gold Brick 60
 To collect this Gold Brick, head to where the green dot is on the map.
 Start by hopping in the Suit Swapper as Robin to receive the Hazard Suit.
 Head to the right and spray water at the opening to raise up a wall.
 Climb it to reach a ledge, then walk across the beam.
 Climb up the next wall to reach another ledge.
 Walk across the beam, then clean up the toxic goo on the wall.
 Climb up to reach the roof, then slide down the zipline.
 Head to the left to find a puddle of green toxic waste. Fill your hazard tank with it, then spray it into the container to open it, allowing you to collect this Gold Brick.
Gold Brick 61
 After purchasing the Speedboat, hop in and drive through the nearby buoys to start a race. Complete the race to receive this Gold Brick.
Gold Brick 62
 After purchasing the Police Helicopter, hop in and fly through the green gate in front of you to start a race. Complete the race to receive this Gold Brick.
Gold Brick 63
 One of the statues near the Power Station has a gold panel on its head. Destroy the panel to reveal this Gold Brick.
Gold Brick 64
 One of the statues by the bridge leading to the South Island has a gold panel on its head. Destroy the panel to reveal this Gold Brick.
Gold Brick 65
 One of the buildings near the bridge to the South Island has a gold cage on top of it. Fly up to it and destroy it and you’ll be able to collect this Gold Brick.
Gold Brick 66
 To collect this Gold Brick, head to where the green dot is on the map.
 Start by hopping in the Suit Swapper as Robin to receive the Acrobat Suit.
 Climb up the wall to the south to reach a ledge.
 Hop onto the pole and swing up to reach another ledge.
 Cross the beam and climb up the wall, then slide down the zipline to reach the roof of a nearby building.
 Hop onto the ledge, then follow the studs to reach a ball socket.
 Use it to lower the gate, then roll down the slide.
 Follow the studs, then hop up the wall to reach the next ledge.
 Continue along the roof and slide down the zipline to reach the next roof.
 Hop in the ball socket and use it to open the nearby container, allowing you to collect this Gold Brick.
Gold Brick 67
 To collect this Gold Brick, head to where the green dot is on the map.
 Start by hopping in the Suit Swapper as Batman to receive the Bat Suit.
 Shatter the nearby glass to reveal a wall, then climb up.
 Walk across the beam, then shatter the glass to reveal another wall.
 Climb up and you’ll reach the roof, where you’ll find this Gold Brick inside a glass container. Shatter the glass and you’ll be able to collect it.
Gold Brick 68
 After purchasing the Sports Fishing Boat, drive through the nearby buoys to start a race. Complete the race to receive this Gold Brick.
Exploring the Central Island – Red Power Bricks
Required Abilities: Deconstructor, Joker, Riddler
Vine Grapples
 You’ll find a Joker box behind Ace Chemicals, near the water.
 Open it and you’ll be able to purchase this Power Brick.
Gold Brick Finder
 You’ll find a Riddler Box on a ledge by Gotham Beach.
 Open it and you’ll be able to purchase this Power Brick.
Minikit Piece Finder
 In Gotham Park, you’ll find a dock near the lake with some consoles on it.
 Stand in front of one of the consoles and press the “special” button to activate it. You’ll take control of one of the boats in the water. Shoot and destroy the waves of yellow submarines that attack you.
 Defeat all three waves and this Power Brick will appear.
Character Studs
 You’ll find a Riddler Box on the side of the steps leading down to the Metro Station.
 Open it and you’ll be able to purchase this Power Brick.
Studs x6
 You’ll find a black box between a fence and a building.
 Deconstruct the box and you’ll be able to purchase this Power Brick.
Studs x2
 You’ll find two consoles in the parking lot of the Power Station.
 Stand in front of one of them and press the “special” button to take control of one of the cars. Use the hammer on the car to smash the red cars that drive around.
 Destroy all the cars and this Power Brick will appear.
Super Build
 You’ll find a Riddler Box on the side of the statue courtyard.
 Open it and you’ll be able to purchase this Power Brick.
Extra Toggle
 You’ll find a Riddler Box in the Gotham Zoo by the Arctic World globe, near the South Island.
 Open it and you’ll be able to purchase this Power Brick.
Exploring the Central Island – Vehicles
Required Abilities: Flight
Bane’s Mole Machine
 This can be found by the side of the road near the bridge to the North Island. Walk up to it and you’ll be able to purchase it.
Joker’s Speedboat
 This can be found in the water by Gotham Beach. Walk up to it and you’ll be able to purchase it.
Joker Digger
 This can be found by the Remote Terminal at Ace Chemicals. Walk up to it and you’ll be able to purchase it.
Joker’s Helicopter
 This can be found on the roof of a building. Fly up to it and you’ll be able to purchase it.
News Reporter Van
 This appears in an alley behind a building west of Gotham Park. Walk up to it and you’ll be able to purchase it.
Brainiac’s UFO
 This can be found on the roof of a building across from the Arctic World globe. Fly up to it and you’ll be able to purchase it.
LexCorp Micro-VTOL
 This can be found on the roof of a building near the Water Works. Fly up to it and you’ll be able to purchase it.
Killer Croc’s Speedboat
 This can be found in the water by the Water Works. Walk up to it and you’ll be able to purchase it.
News Helicopter
 This can be found on the roof of a building. Fly up to it and you’ll be able to purchase it.
Speedboat
 This can be found in the water by the Power Station. Walk up to it and you’ll be able to purchase it.
Catwoman’s Motorbike
 This can be found in an alley east of Gotham Park. Walk up to it and you’ll be able to purchase it.
Police Helicopter
 This can be found on the roof of a building. Fly up to it and you’ll be able to purchase it.
Sports Fishing Boat
 This can be found in the water near the South Island. Walk up to it and you’ll be able to purchase it.
Exploring the Central Island – Villain Battles
Required Abilities: Flight, Heat Vision, Super Speed, Water Spray
Killer Croc
 Activate the Remote Terminal by the Water Works and Killer Croc will appear.
 Before we can fight him however, we’ll need to clean up the toxic waste. Hop in the nearby Suit Swapper as Robin to receive the Hazard Suit.
 Climb down the wall to reach the foundation of the building.
 Clean up all the toxic waste and Killer Croc will appear. Walk up to him to start the boss fight.
 Simply smack him three times to take out his hearts, allowing you to purchase him.
Killer Moth
 Activate the Remote Terminal by the Power Station and Killer Moth will appear.
 You can find him on the roof of the power station, directly across the street from the Remote Terminal. Fly up to him to start the boss fight.
 In order to damage Killer Moth, you’ll need to shut off the lightbulb. You can do this by turning the valve on the right side of the roof.
 Once the lightbulb has turned off, Killer Moth will fall to the ground, allowing you to hit him. Smack him to take out one heart. The lightbulb will then turn on again, so repeat this process two more times to defeat him, allowing you to purchase him.
Sinestro
 Activate the Remote Terminal by Metro Station (Central) and Sinestro will appear.
 He appears on the roof of the building across the street from the Remote Terminal (you can see him on the left in the screenshot). Fly up to him to start the boss fight.
 Simply smack him three times to defeat him, allowing you to purchase him.
Brainiac
 The Remote Terminal in Gotham Park is blocked by a gold lock. Destroy the lock and you’ll be able to activate the Remote Terminal.
 This will cause Brainiac to appear. He shows up right next to the Remote Terminal.
 Walk up to him to start the boss fight. You’ll need to use Superman to damage him, since his hearts are silver (they’ll turn red once you are controlling someone who can damage him). Simply smack him three times and you’ll defeat him, allowing you to purchase him.
The Penguin
 Activate the Remote Terminal by the Gotham Zoo and Penguin will appear.
 He can be found on the platform inside the large globe with the words “Arctic World” on the side. Fly up to him to start the boss fight.
 When the fight starts, he’ll disappear and send some Penguin Minions after you. Defeat the penguins and The Penguin himself will appear, allowing you to smack him. Hit him to take off one heart, causing him to retreat again. Repeat this process two more times to defeat him, allowing you to purchase him.
The Joker
 The Remote Terminal by Ace Chemicals has been deconstructed. You’ll need to use The Flash to repair it.
 Once it’s rebuilt, activate it and Joker will appear. He appears on the roof of ACE Chemicals, to the right of the big red sign. Fly up to him to start the boss fight.
 You’ll fight him like you do in the Story. Walk up to him and he’ll joy buzz you. Switch to your partner and smack him to take out one heart. Repeat this process to more times to defeat him, allowing you to purchase him.
Bane
 The Remote Terminal on Gotham Beach is blocked by a gold lock. Destroy the lock and you’ll be able to activate the Remote Terminal.
 This will cause Bane to appear. He appears on the beach away from the Remote Terminal. Walk up to him to start the boss fight.
 Simply smack him to take out his hearts, allowing you to purchase him.
Maps of the South Island
Character Gates

Citizens in Peril

Gold Bricks

Red Power Bricks

Vehicles

Villain Battles

Exploring the South Island – Character Gates
Required Abilities: Explosive, Flight, Glide, Grapple, Sonic, Water Spray
Clark Kent
 This Character Gate can be found on the way to Gold Brick 3. You’ll find it after sliding down the zipline past the silver barriers.
 It requires 100 Gold Bricks to construct. Build it and you’ll be able to purchase him.
Bruce Wayne
 This Character Gate can be found on the roof of Wayne Manor.
 It requires 45 Gold Bricks to construct. Build it and you’ll be able to purchase him.
Commissioner Gordon
 This Character Gate can be found in front of the door to the Police Station.
 It requires 30 Gold Bricks to construct. Build it and you’ll be able to purchase him.
Vicki Vale
 This Character Gate can be found on your way to Gold Brick 34, to the left of the first metal wall you climb up.
 It requires 20 Gold Bricks to construct. Build it and you’ll be able to purchase her.
Exploring the South Island – Citizens in Peril
Required Abilities: Freeze, Heat Vision, Sharp Shoot
Citizen in Peril 1
 You’ll find this citizen being held hostage by a Penguin Goon. Defeat the penguin to rescue the citizen.
Citizen in Peril 2
 You’ll find this citizen frozen in a block of ice. Melt the ice to rescue him.
Citizen in Peril 3
 You’ll find this citizen being held hostage by a Penguin Goon. Defeat the penguin to rescue the citizen.
Citizen in Peril 4
 This citizen has been swallowed by a giant plant. Destroy the three buds and the plant will spit him out.
Citizen in Peril 5
 You’ll find this citizen being held hostage by a Penguin Goon. Defeat the penguin to rescue the citizen.
Citizen in Peril 6
 This citizen is frozen in a block of ice by the water. Melt the ice to rescue him.
Citizen in Peril 7
 This citizen has been swallowed by a giant plant. Destroy the three buds and the plant will spit him out.
Citizen in Peril 8
 This citizen is frozen in a block of ice by the water near the Central Island. Melt the ice to rescue him.
Citizen in Peril 9
 You’ll find this citizen being held hostage by a Penguin Goon. Defeat the penguin to rescue the citizen.
Citizen in Peril 10
 This citizen has been swallowed by a giant plant. Destroy the three buds and the plant will spit him out.
Citizen in Peril 11
 This citizen is frozen in a block of ice. Melt the ice to rescue him.
Citizen in Peril 12
 This citizen is stuck in some water spouting from a fire hydrant. Freeze the water to rescue him.
Exploring the South Island – Gold Bricks
Required Abilities: Agility, Ball, Chemical Spray, Deconstructor, Electric, Electric Immunity, Explosive, Flight, Freeze, Freeze Immunity, Glide, Grapple, Heat Vision, Magnet, Pole, Riddler, Sonic, Stealth, Super Strength, Water Spray
Gold Brick 1
 This Gold Brick can be found in a gold cage on top of a building. Fly up to it and destroy the cage, allowing you to collect this.
Gold Brick 2
 To collect this Gold Brick, head to where the green dot is on the map.
 Start by hopping in the Suit Swapper as Robin to receive the Magnet Suit.
 Climb up the metal wall to reach the roof of the building.
 Follow the studs to the zipline, then slide down to reach the opposite ledge.
 Pull on the metal disc to reveal a Suit Swapper, then hop in as Robin to receive the Hazard Suit.
 Clean up the toxic waste, then climb up the wall to reach a bar.
 Shimmy along the bars, then hop onto the next wall and climb up.
 Hop up the bars to reach the roof, then clean up the toxic waste to reveal a Suit Swapper.
 Hop in as Robin to receive the Magnet Suit, then climb up the wall on the right.
 Pull on the metal disc to reveal a puddle of green toxic waste, then drop back down.
 Pull on the metal disc to reveal another Suit Swapper, then hop in as Robin to receive the Hazard Suit.
 Climb back up the wall and fill the hazard tank with green toxic waste.
 Drop back down and spray it into the container on the right to open it up, allowing you to collect this Gold Brick.
Exploring the South Island – Gold Bricks cont.
Gold Brick 3
 To collect this Gold Brick, head to where the green dot is on the map.
 Start by hopping in the Suit Swapper as Batman to receive the Bat Suit.
 Shatter the nearby glass container to reveal a grapple point, then grapple up to reach the ledge.
 Walk up the ramp on the right and cross the beams, then continue following the studs.
 Glide across the gap to reach the wall, then climb up to reach the ledge.
 Shatter the glass, then climb up the next wall.
 Shatter the glass container to reveal a Suit Swapper, then hop in as Batman to receive the Power Suit.
 Destroy the silver barriers, then cross the beams.
 Destroy the silver barriers on the other side, then continue following the studs.
 Slide down the zipline to reach the opposite rooftop.
 Follow the studs around the rooftop, then destroy the silver disc to reveal a Suit Swapper. Hop in as Batman to receive the Electricity Suit.
 Walk across the beam to the left, then hop into the electricity and climb the wall.
 Climb up the next electrically-charged wall.
 Remove the charge from the generator on the right, then place it in the generator on the left to reveal a Suit Swapper. Hop in as Batman to receive the Bat Suit.
 Shatter the glass on the wall, then climb up and hop up the bars.
 Follow the studs and glide across the gap to reach the wall, then climb up.
 Shatter the glass container to reveal a Suit Swapper, then hop in as Batman to receive the Sensor Suit.
 Use stealth to sneak by the security camera, then climb up the wall.
 Hop up the bars, then climb the next wall to reach the roof.
 Carefully walk around the electricity, then use stealth to sneak by the security camera and claim this Gold Brick.
Gold Brick 4
 To collect this Gold Brick, head to where the green dot is on the map.
 Start by hopping in the Suit Swapper as Robin to receive the Magnet Suit.
 Climb the metal wall to reach the ledge.
 Pull on the metal disc to reveal a Suit Swapper, then hop in as Robin to receive the Acrobat Suit.
 Hop onto the poles, then swing on them to reach a ball socket.
 Use it to open the container on the ground, allowing you to collect this Gold Brick.
Gold Brick 5
 After purchasing the Clown Goon Boat, drive through the nearby buoys to start a race. Complete the race to receive this Gold Brick.
Exploring the South Island – Gold Bricks cont.
Gold Brick 6
 To collect this Gold Brick, head to where the green dot is on the map.
 Start by hopping in the Suit Swapper as Batman to receive the Bat Suit.
 Shatter the glass panel, then climb up the wall.
 Follow the studs and shatter the next glass panel, then climb up the wall.
 Follow the studs and climb up the small wall.
 Shatter the glass container to reveal a Suit Swapper, then hop in as Batman to receive the Power Suit.
 Destroy the silver disc, then climb up the wall.
 Follow the studs and walk across the beams on the statue.
 Destroy the silver boxes at the end to reveal a grapple point, then grapple up to reach the ledge above you.
 Slide down the zipline to reach a ledge.
 Climb up the wall to reach the roof.
 You’ll find this Gold Brick in a silver cage. Destroy it and you’ll be able to collect this Gold Brick.
Gold Brick 7
 You’ll find three containers in the park area by City Hall. Hop in the Suit Swapper as Robin to receive the Hazard Suit, then fill each container with the correct color of toxic waste.
 Once each container has been filled, step on the button inside. Step on all three buttons to open the container in the center, revealing this Gold Brick.
Gold Brick 8
 You’ll find a group of 5 light-green bushes in the park area by City Hall. Quickly destroy all 5 of them (each takes 3 hits to destroy) to reveal this Gold Brick.
Gold Brick 9
 To collect this Gold Brick, head to where the green dot is on the map.
 Start by hopping in the Suit Swapper as Robin to receive the Magnet Suit.
 Climb the metal wall to reach the ledge above you.
 Head to the left, then climb the next metal wall.
 Shimmy across the wall to the right, then follow the studs.
 Slide down the zipline to reach the opposite ledge.
 Pull on the metal disc to reveal a Suit Swapper, then hop in as Robin to receive the Acrobat Suit.
 Climb up the nearby pole, then hop up the bars.
 Climb up the wall, then grab onto the pole.
 Swing up the poles to reach a ledge.
 Follow the studs and toss your pole into the socket, then swing up them to reach the roof.
 You’ll find this Gold Brick in a container. Use the nearby ball socket to open the container, allowing you to collect it.
Exploring the South Island – Gold Bricks cont.
Gold Brick 10
 To collect this Gold Brick, head to where the green dot is on the map.
 Start by hopping in the Suit Swapper as Batman to receive the Sensor Suit.
 Use stealth to sneak by the security camera, then climb the wall.
 Hop up the bar to reach the roof of the hospital.
 Use stealth to sneak by the security camera, stepping on the button.
 This will activate the Suit Swapper on the left. Hop in as Batman to receive the Electricity Suit.
 Remove the charge from the generator on the right.
 Place it in the generator on the left, opening the container and revealing this Gold Brick.
Gold Brick 11
 This Gold Brick is inside a Riddler Box. Open it to reveal this Gold Brick.
Gold Brick 12
 To collect this Gold Brick, head to where the green dot is on the map.
 Start by hopping in the Suit Swapper as Batman to receive the Electricity Suit.
 Climb up the electrified walls to reach the ledge above you.
 Climb up the next electrified wall to reach a generator.
 Remove the charge from it, then drop down and place the charge in the other generator to activate the nearby Suit Swapper.
 Hop in as Batman to receive the Power Suit, then destroy the silver barriers.
 Climb the wall to reach the roof.
 Destroy the silver disc to reveal a Suit Swapper, then hop in as Batman to receive the Bat Suit.
 Glide across the next two gaps to reach another roof.
 Climb the wall to reach another ledge.
 Shatter the glass container to reveal a Suit Swapper, then hop in as Batman to receive the Sensor Suit.
 Use stealth to sneak by the security camera, then walk across the beams and climb up the wall at the end.
 You’ll find this Gold Brick being guarded by a security camera. Use stealth to sneak by it, allowing you to collect it.
Exploring the South Island – Gold Bricks cont.
Gold Brick 13
 To collect this Gold Brick, head to where the green dot is on the map.
 Start by hopping in the Suit Swapper as Robin to receive the Acrobat Suit.
 Climb up the pole, then hop onto the walls and climb up.
 Hop onto the bar, then shimmy to the right. Hop onto the next wall, then climb up.
 Follow the studs, then hop onto the pole and swing onto the zipline to reach a ledge.
 Hop onto the pole, then swing up to reach another ledge.
 Climb the pole to reach another ledge.
 Use the ball socket on the right to open the container, revealing a Suit Swapper.
 Hop in as Robin to receive the Magnet Suit, then head to the left and climb the metal wall to reach a ledge.
 Grapple up to reach another ledge.
 Hop up the bars to reach another ledge.
 Climb up the metal wall to reach the roof.
 Pull on the metal disc to reveal a Suit Swapper. Hop in as Robin to receive the Hazard Suit.
 Head to the other side of the roof to find a container of orange toxic waste. Fill your hazard tank with it, then spray it into the container to open it, allowing you to collect this Gold Brick.
Gold Brick 14
 To collect this Gold Brick, head to where the green dot is on the map.
 Start by hopping in the Suit Swapper as Robin to receive the Acrobat Suit.
 Hop up the nearby wall to reach a ledge.
 Climb up the wall, then hop on the poles and swing up them to reach a ledge.
 Grapple up to reach the roof.
 Walk up to the zipline, then slide down it to reach the roof of the opposite building.
 Follow the studs, then toss your pole into the socket. Swing on it to reach the zipline, then slide down it.
 Hop up the wall to reach a ledge.
 Use the grapple point to reach the roof.
 Use the ball socket to open the container, revealing a Suit Swapper. Hop in as Robin to receive the Hazard Suit.
 Clean up the toxic waste to reveal another Suit Swapper, then hop in as Robin to receive the Ice Suit.
 Hop through the freezing air, then climb up the wall.
 Shoot the freeze point to destroy the case around this Gold Brick.
Exploring the South Island – Gold Bricks cont.
Gold Brick 15
 To collect this Gold Brick, head to where the green dot is on the map.
 Start by hopping in the Suit Swapper as Robin to receive the Magnet Suit.
 Climb the metal wall to reach a ledge.
 Climb the next metal wall to reach another ledge.
 Use the grapple point to reach the rooftop.
 Climb up the wall, then walk across the beams to reach a zipline. Slide down it to reach the opposite roof.
 Pull on the metal disc to reveal a Suit Swapper, then hop in as Robin to receive the Hazard Suit.
 Hop up the bars to reach a wall.
 Climb up, then hop onto the next wall and continue climbing to reach another ledge.
 Clean up the toxic waste to reveal a Suit Swapper, then hop in as Robin to receive the Acrobat Suit.
 Hop up the wall, then climb up the next wall to reach the roof.
 Use the ball socket to open the container, allowing you to collect this Gold Brick.
Gold Brick 16
 To collect this Gold Brick, head to where the green dot is on the map.
 Start by hopping in the Suit Swapper as Batman to receive the Bat Suit.
 Shatter the glass container to reveal a grapple point, then use it to reach the ledge above you.
 Follow the studs, then use the next grapple point to reach another ledge.
 Head to the right, then glide across the gap.
 Walk across the beam, then shatter the glass disc to reveal a Suit Swapper.
 Hop in as Batman to receive the Power Suit, then destroy the silver disc on the right.
 Climb up the wall, then slide down the zipline to reach the opposite roof.
 Grab onto the bar, then shimmy to the left to reach the ledge.
 Destroy the silver disc to reveal a Suit Swapper, then hop in as Batman to receive the Electricity Suit.
 Remove the charge from the generator on the right, then place it in the generator on the left to open the container, revealing this Gold Brick.
Exploring the South Island – Gold Bricks cont.
Gold Brick 17
 To collect this Gold Brick, head to where the green dot is on the map.
 Start by hopping in the Suit Swapper as Batman to receive the Bat Suit.
 Shatter the glass barrier, then climb up the wall.
 Grab onto the bar, then shimmy onto the ledge. Use the grapple point to reach the ledge above you.
 Walk up the pipe, then climb the wall.
 Shatter the glass container to reveal a Suit Swapper, then hop in as Batman to receive the Power Suit.
 Destroy the silver disc on the wall, then hop on and climb up.
 Slide down the zipline to reach the ledge.
 Walk across the beam, then climb the wall.
 Slide down the zipline to reach another roof.
 Climb up the walls to reach a ledge.
 Head to the right, then destroy the silver disc on the wall. Climb up to reach the roof.
 You’ll find this Gold Brick in a silver cage. Destroy the cage and you’ll be able to collect this.
Gold Brick 18
 You’ll find a group of 5 bright-green bushes by Gotham Cathedral. Quickly destroy all 5 of them (each takes 3 hits to destroy) to reveal this Gold Brick.
Gold Brick 19
 You’ll find a group of 5 green bushes by Gotham Cathedral. Quickly destroy all 5 of them (each takes 3 hits to destroy) to reveal this Gold Brick.
Gold Brick 20
 To collect this Gold Brick, head to where the green dot is on the map.
 Fly onto the ledge on the building and you’ll find a gold cage. Destroy it to reveal a Suit Swapper, then hop in as Batman to receive the Power Suit.
 Climb up the walls to reach the roof.
 You’ll find this Gold Brick in a silver cage. Destroy the cage and you’ll be able to collect it.
Gold Brick 21
 There is a gold panel on the west side of Wayne Tower. Destroy it to reveal this Gold Brick.
Gold Brick 22
 Call in a vehicle from the Remote Terminal on top of Wayne Tower, then hop in. Fly through the green gate in front of you to start a race. Complete the race to receive this Gold Brick.
Gold Brick 23
 Hop in the Suit Swapper underneath Wayne Tower as Batman to receive the Power Suit.
 Destroy the silver barriers to reveal a generator, then destroy the silver cage to reveal a Suit Swapper. Hop in as Batman to receive the Electricity Suit.
 Remove the charge from the generator, then head to the other side of the courtyard.
 Place the charge in the generator to open the container, revealing a Suit Swapper. Hop in as Batman to receive the Bat Suit.
 Destroy the glass container to reveal another Suit Swapper. Hop in as Batman to receive the Sensor Suit.
 Use stealth to sneak past the security camera, allowing you to grab the Gold Brick in the center of the courtyard.
Gold Brick 24
 There is a gold panel on the east side of Wayne Tower. Destroy it to reveal this Gold Brick.
Gold Brick 25
 This Gold Brick can be found inside a gold cage on the roof of a building. Destroy the cage and you’ll be able to collect this.
Exploring the South Island – Gold Bricks cont.
Gold Brick 26
 To collect this Gold Brick, head to where the green dot is on the map.
 Start by hopping in the Suit Swapper as Robin to receive the Ice Suit.
 Climb up the wall to reach the ledge.
 Climb up the wall in front of you to reach another ledge.
 Freeze the water spouts from the fire hydrants to create platforms, then climb up the wall on the left.
 Hop across the ice platforms, then climb the next wall.
 Freeze the water spouts from the fire hydrants to create more platforms.
 Head back and climb up the wall, then hop across the ice platforms to reach the wall in the back.
 Climb up to reach the ledge above you.
 Follow the studs, then walk across the beam to avoid the electricity.
 Slide down the zipline to reach the opposite building.
 Climb up the wall to reach the roof.
 Shoot the freeze point to reveal a button.
 Step on it to activate the Suit Swapper. Hop in as Robin to receive the Hazard Suit.
 Climb the wall and hop in the puddle of toxic waste to fill your hazard tank.
 Drop back down and fill the container with toxic waste to open it, allowing you to collect this Gold Brick.
Gold Brick 27
 Pull on the super strength handle on the box in the parking lot of the Police Station to open it, revealing this Gold Brick.
Gold Brick 28
 You’ll find a group of 5 payphones on the side of a building. Quickly destroy all 5 of them (each takes 3 hits to destroy) to reveal this Gold Brick.
Gold Brick 29
 After purchasing Penguin’s Submarine, hop in and drive it through the buoys in front of you to start a race. Complete the race to receive this Gold Brick.
Gold Brick 30
 To collect this Gold Brick, head to where the green dot is on the map.
 Start by hopping in the Suit Swapper as Robin to receive the Acrobat Suit.
 Climb up the nearby pole, then swing on the poles to reach a ledge.
 Climb up the wall, then use the grapple point to reach the roof.
 Hop in the ball socket, then use it to lower the nearby gate.
 Roll down the chute to reach another ledge.
 Hop up the wall to reach a ledge.
 Climb the pole, then hop onto the next pole and climb up.
 Grab onto the bar, then hop onto the wall and climb up.
 Hop in the ball socket and use it to open the container, allowing you to collect this Gold Brick. Climb up the pole and hop over the electricity to reach it.
Exploring the South Island – Gold Bricks cont.
Gold Brick 31
 To collect this Gold Brick, head to where the green dot is on the map.
 Start by hopping in the Suit Swapper as Robin to receive the Magnet Suit.
 Climb the metal wall to reach the ledge above you.
 Pull on the metal disc to reveal a Suit Swapper. Hop in as Robin to receive the Acrobat Suit.
 Head to the right and climb up the pole to reach the roof.
 Toss your pole into the socket, then swing up them to reach the platform.
 Use the grapple point to reach another ledge.
 Hop up the wall to reach the roof.
 Slide down the zipline to reach a pole.
 Swing up the poles to reach a platform.
 Use the grapple point to reach the roof.
 Use the ball socket to open the container, revealing a Suit Swapper. Hop in as Robin to receive the Hazard Suit.
 Clean up the toxic waste on the wall, then climb up.
 Hop in the pool of purple toxic waste to fill up your hazard tank, then fill up the container to open it, allowing you to collect this Gold Brick.
Gold Brick 32
 To collect this Gold Brick, head to where the green dot is on the map.
 Start by hopping in the Suit Swapper as Batman to receive the Power Suit.
 Destroy the silver barriers, then climb up the wall.
 Once on the roof, destroy the silver barriers, as well as the silver disc, to reveal a Suit Swapper. Hop in as Batman to receive the Bat Suit.
 Shatter the glass barrier, then climb up the wall.
 Hop up the bars to reach the roof.
 Glide across the gap to reach the wall, then climb up.
 Shatter the glass disc to reveal a Suit Swapper, then hop in as Batman to receive the Power Suit.
 Follow the studs and destroy the silver disc, then slide down the zipline.
 You’ll find this Gold Brick inside a silver cage. Destroy it and you’ll be able to collect it.
Exploring the South Island – Gold Bricks cont.
Gold Brick 33
 To collect this Gold Brick, head to where the green dot is on the map.
 Start by hopping in the Suit Swapper as Batman to receive the Bat Suit.
 Shatter the glass container to reveal a grapple point, then use it to reach the ledge above you.
 Climb up the wall, then walk to the left across the beams.
 Shatter the glass container to reveal a Suit Swapper, then hop in as Batman to receive the Electricity Suit.
 Walk across the beams, then climb the electrified wall.
 Remove the charge from the generator, then pass through the electricity to the left.
 Place the charge in the generator to open the container, revealing a button. Step on it to activate a Suit Swapper to the right.
 Hop in the Suit Swapper as Batman to receive the Power Suit, then destroy the silver disc and climb up the wall.
 Climb up the next walls to reach the zipline, then slide down it.
 Destroy the silver disc to reveal a Suit Swapper, then hop in as Batman to receive the Bat Suit.
 Shatter the glass barrier, then glide across the gap.
 You’ll find this Gold Brick in a glass container. Shatter the glass and you’ll be able to collect it.
Gold Brick 34
 To collect this Gold Brick, head to where the green dot is on the map.
 Start by hopping in the Suit Swapper as Robin to receive the Hazard Suit.
 Clean up the toxic waste, then use the grapple point to reach the ledge above you.
 Clean up the toxic waste to reveal a Suit Swapper, then hop in as Robin to receive the Magnet Suit.
 Climb up the nearby metal wall to reach the ledge above you.
 Climb up the next metal wall to reach the roof.
 Pull on the metal box to open it, revealing this Gold Brick.
Gold Brick 35
 To collect this Gold Brick, head to where the green dot is on the map.
 Start by hopping in the Suit Swapper as Robin to receive the Acrobat Suit.
 Climb up the pole, then climb up the wall to reach the ledge.
 Swing up the poles to reach the next ledge.
 Follow the studs, then hop up the wall.
 Use the ball socket to open the container, revealing a Suit Swapper. Hop in as Robin to receive the Magnet Suit.
 Climb up the metal wall to reach the ledge above you.
 Climb up the next metal wall to reach the roof.
 Pull on the metal disc to reveal a Suit Swapper, then hop in as Robin to receive the Ice Suit.
 Freeze the water spouting from the fire hydrants, then hop up the bars to reach the ice platforms.
 Hop across them to reach the zipline, then slide down it.
 Shoot the freeze point to destroy the dome around this Gold Brick, allowing you to collect it.
Exploring the South Island – Gold Bricks cont.
Gold Brick 36
 Call in a vehicle from the Remote Terminal at the Gotham Observatory, then hop in and drive it through the buoys in front of you to start a race. Complete the race to receive this Gold Brick.
Gold Brick 37
 Use the Deconstructor to destroy the black box on the dock by the Gotham Observatory, revealing this Gold Brick.
Gold Brick 38
 The statue on the Gotham Observatory is holding a telescope. At the end of the telescope is a gold panel. Destroy it to reveal this Gold Brick.
Exploring the South Island – Red Power Bricks
Required Abilities: Deconstructor, Flight, Riddler
Red Brick Finder
 You’ll find two consoles on one of the docks on the west side of the island.
 Stand in front of one and press the “special” button to take control of a boat in the water.
 Destroy all of the yellow submarines that attack you to reveal this Power Brick.
Extra Hearts
 Head up the steps of City Hall to find a Riddler Box.
 Open it to reveal this Power Brick.
Studs x4
 You’ll find two consoles in the parking lot of the Police Station.
 Stand in front of one and press the “special” button to take control of a hammer car.
 Destroy all of the red cars driving around to reveal this Power Brick.
Invincibility
 You’ll find a Riddler Box on the roof of Wayne Tower.
 Open it to reveal this Power Brick.
Peril Finder
 You’ll find a Riddler Box on the side of Gotham Cathedral.
 Open it to reveal this Power Brick.
Studs x10
 You’ll find a black box near the water.
 Use the Deconstructor to destroy it, revealing this Power Brick.
Exploring the South Island – Vehicles
Two-Face’s Truck
 You’ll find this parked right in front of City Hall. Walk up to it and you’ll be able to purchase it.
Clown Goon Boat
 You’ll find this at a dock on the west side of the island. Walk up to it and you’ll be able to purchase it.
Ambulance
 You’ll find this in the parking lot of the hospital. Walk up to it and you’ll be able to purchase it.
Fire Engine
 You’ll find this vehicle parked in an alley. Walk up to it and you’ll be able to purchase it.
LexCorp Juggernaut
 You’ll find this vehicle in an alley behind the Gotham Bank. Walk up to it and you’ll be able to purchase it.
Police Riot Truck
 You’ll find this vehicle in an alley. Walk up to it and you’ll be able to purchase it.
Police Car
 You’ll find this vehicle parked near the water on the east side of the island. Walk up to it and you’ll be able to purchase it.
Penguin’s Submarine
 You’ll find this vehicle at a dock on the south side of the island. Walk up to it and you’ll be able to purchase it.
Exploring the South Island – Villain Battles
Required Abilities: Flight, Heat Vision
Two-Face
 Activate the Remote Terminal by City Hall and Two-Face will appear.
 He’ll appear on the roof of City Hall. Fly up to him to start the boss fight.
 As soon as the fight starts, he’ll disappear and send some goons to fight you. Defeat the goons and Two-Face himself will appear. Hit him to take out one heart, causing him to disappear again. Repeat this process two more times to defeat him, allowing you to purchase him.
Hush
 Activate the Remote Terminal by Gotham Hospital and Hush will appear.
 He can be found on the very top of the hospital. Fly up to him to start the boss fight.
 Simply smack him three times to take out his hearts, allowing you to purchase him.
The Riddler
 The Remote Terminal at the very top of Wayne Tower is blocked by a gold lock. Destroy the lock and you’ll be able to activate the Remote Terminal.
 Doing so will reveal The Riddler. He appears right behind you on the roof. Walk up to him to start the boss fight.
 As soon as the fight starts, he will disappear and send some goons after you. Defeat the goons and The Riddler himself will appear. Hit him to take out one heart, causing him to disappear again. Repeat this process two more times to defeat him, allowing you to purchase him.
Catwoman
 Activate the Remote Terminal outside the Police Station and Catwoman will appear.
 You can find her on the roof of the police station, by the helipad. Fly up to her to start the boss fight.
 Simply smack her three times to take out her hearts, allowing you to purchase her.
Man-Bat
 Activate the Remote Terminal across the street from the Gotham Cathedral and Man-Bat will appear.
 Fly up to the nearby steeple, then destroy the gold bell to reveal Man-Bat.
 Simply smack him three times to take out his hearts, allowing you to purchase him.
Clayface
 Activate the Remote Terminal by Gotham Bank and Clayface will appear.
 You can find him in the alley behind the bank. Walk up to him to start the boss fight.
 Simply smack him three times to take out his hearts, allowing you to purchase him.
General Zod
 Activate the Remote Terminal by Metro Station (South) and General Zod will appear.
 You can find him on the roof of the building directly north of the Remote Terminal. Fly up to him to start the boss fight.
 You’ll need to use Superman to damage him, but all you need to do is smack him to take out his hearts. Once he’s defeated, you’ll be able to purchase him.
Mister Freeze
 The Remote Terminal by the Gotham Observatory is blocked by a gold lock. Destroy the lock and you’ll be able to activate the Remote Terminal.
 Doing so will cause Mister Freeze to appear. He can be found on the roof of the observatory. Fly up to him to start the boss fight.
 As soon as the fight starts, he will disappear and send some goons after you. Defeat them and Mister Freeze himself will appear. Smack him to take out one heart, causing him to disappear again. Repeat this process two more times to defeat him, allowing you to purchase him.
Suits
Batman is known for his wide array of gadgets, and him and Robin have plenty of them in this game. These gadgets are in the form of Suits. Suits can be unlocked for Free Play by completing Story levels. Each Suit will grant your hero a new ability, and many Suits have abilities unique to them!
Once you unlock a Suit, it will be available to use in Free Play Mode. In each area of a level, certain Suits will be available in Suit Swappers. If you switch characters while wearing a Suit, that Suit will disappear. You can always go back to the Suit Swapper and grab it again, but if you can’t go back to that area, you might be out of luck. This is only really a problem if you don’t have a lot of characters unlocked, as many villains have the same abilities as certain Suits. For this reason, I have listed the Suits that you can grab in each area of my Free Play Mode walkthroughs. This should help you plan ahead to see if you’ll need to hang on to any Suits between areas.
Below I’ll list each Suit, including who can wear it, the abilities that each Suit grants your heroes and how to unlock them for Free Play.
Bat Suit

For: Batman
Abilities: Glide, Grapple, Sharp Shoot, Sonic
How To Unlock: Complete Arkham Asylum Antics
Electricity Suit

For: Batman
Abilities: Electric, Electric Immunity, Grapple, Sharp Shoot
How To Unlock: Complete Asylum Assignment
Power Suit

For: Batman
Abilities: Explosive, Grapple, Sharp Shoot, Super Strength
How To Unlock: Complete Harboring a Criminal
Sensor Suit

For: Batman
Abilities: Grapple, Sharp Shoot, Stealth, X-Ray Vision
How To Unlock: Complete Theatrical Pursuits
Acrobat Suit

For: Robin
Abilities: Agility, Ball, Grapple, Pole, Sharp Shoot
How To Unlock: Complete Theatrical Pursuits
Hazard Suit

For: Robin
Abilities: Chemical Spray, Dive, Grapple, Sharp Shoot, Toxic Immunity, Water Spray
How To Unlock: Complete Asylum Assignment
Ice Suit

For: Robin
Abilities: Freeze, Freeze Immunity, Grapple, Sharp Shoot
How To Unlock: Complete Arkham Asylum Antics
Magnet Suit

For: Robin
Abilities: Grapple, Magnet, Sharp Shoot
How To Unlock: Complete Harboring a Criminal
Characters
There are a grand total of 50 characters (not including the 10 custom characters) that you can play as in this game. I have listed them all below in the order that they appear on the character selection screen. Next to each character I list their weapon and abilities. I also list how to unlock them and any other interesting things about them.

Batman


Weapon: Melee, Batarangs
Abilities: Grapple, Sharp Shoot
How To Unlock: Complete Theatrical Pursuits
Robin


Weapon: Melee, Batarangs
Abilities: Grapple, Sharp Shoot
How To Unlock: Complete Theatrical Pursuits
Superman


Weapon: Melee
Abilities: Flight, Freeze, Heat Vision, Super Strength, X-Ray Vision
How To Unlock: Complete Destination Metropolis
As a Kryptonian, Superman will also have the effects of the following Extras active, regardless of whether or not you’ve unlocked them: Invincibility, Super Build
Green Lantern


Weapon: Melee
Abilities: Flight, Lantern
How To Unlock: Complete Tower Defiance
Cyborg


Weapon: Melee
Abilities: Heat Vision, Magnet, Super Strength
How To Unlock: Complete Tower Defiance
The Flash


Weapon: Melee
Abilities: Super Speed
How To Unlock: Complete Heroes Unite
Wonder Woman


Weapon: Melee, Boomerang Tiara
Abilities: Flight, Grapple (pulling only), Sharp Shoot, Super Strength
How To Unlock: Complete Heroes Unite
As an Amazon, Wonder Woman will also have the effects of the following Extras active, regardless of whether or not you’ve unlocked them: Invincibility
Martian Manhunter


Weapon: Melee
Abilities: Flight, Heat Vision, Super Strength
How To Unlock: Build his Character Gate and purchase him on the Central Island
Aquaman


Weapon: Trident
Abilities: Dive, Super Strength, Water Spray
How To Unlock: Build his Character Gate and purchase him on the Central Island
Hawkman


Weapon: Mace
Abilities: Flight, Super Strength
How To Unlock: Build his Character Gate and purchase him on the Central Island
Hawkgirl


Weapon: Mace
Abilities: Flight, Super Strength
How To Unlock: Build her Character Gate and purchase her on the Central Island
Huntress


Weapon: Crossbow, Melee
Abilities: Sharp Shoot
How To Unlock: Build her Character Gate and purchase her on the North Island
Batgirl


Weapon: Melee, Batarang
Abilities: Grapple, Sharp Shoot
How To Unlock: Build her Character Gate and purchase her on the Central Island
Batgirl cannot use any of Batman’s Suits
Supergirl


Weapon: Melee
Abilities: Flight, Freeze, Heat Vision, Super Strength, X-Ray Vision
How To Unlock: Build her Character Gate and purchase her on the Central Island
As a Kryptonian, Supergirl will also have the effects of the following Extras active, regardless of whether or not you’ve unlocked them: Invincibility, Super Build
Black Canary


Weapon: Melee, Sonic Blasts
Abilities: Sonic
How To Unlock: Build her Character Gate and purchase her on the North Island
Lex Luthor


Weapon: Melee, Deconstructor
Abilities: Deconstructor
How To Unlock: Complete his Villain Battle and purchase him on the North Island
The Joker


Weapon: Machine Gun, Melee
Abilities: Electric, Joker, Sharp Shoot, Toxic Immunity
How To Unlock: Complete his Villain Battle and purchase him on the Central Island
Harley Quinn


Weapon: Melee, Hammer
Abilities: Agility (pole swinging only), Sharp Shoot
How To Unlock: Complete her Villain Battle and purchase her on the North Island
The Riddler


Weapon: Cane
Abilities: Riddler
How To Unlock: Complete his Villain Battle and purchase him on the South Island
Two-Face


Weapon: Pistols, Melee
Abilities: Sharp Shoot
How To Unlock: Complete his Villain Battle and purchase him on the South Island
The Penguin


Weapon: Umbrella Gun, Umbrella
Abilities: Explosive, Glide, Penguin Bomb, Sharp Shoot
How To Unlock: Complete his Villain Battle and purchase him on the Central Island
Poison Ivy


Weapon: Melee
Abilities: Agility (pole swinging only), Plant Travel, Toxic Immunity
How To Unlock: Complete her Villain Battle and purchase her on the North Island
Catwoman


Weapon: Melee
Abilities: Agility (pole swinging only)
How To Unlock: Complete her Villain Battle and purchase her on the South Island
Characters cont.
Bane


Weapon: Melee
Abilities: Super Strength
How To Unlock: Complete his Villain Battle and purchase him on the Central Island
Killer Croc


Weapon: Melee
Abilities: Dive, Super Strength, Toxic Immunity
How To Unlock: Complete his Villain Battle and purchase him on the Central Island
Mister Freeze


Weapon: Freeze Blasts, Melee
Abilities: Freeze, Freeze Immunity, Sharp Shoot, Super Strength
How To Unlock: Complete his Villain Battle and purchase him on the South Island
Scarecrow


Weapon: Melee
Abilities: None
How To Unlock: Complete his Villain Battle and purchase him on the North Island
Captain Boomerang


Weapon: Melee, Boomerangs
Abilities: Sharp Shoot
How To Unlock: Complete his Villain Battle and purchase him on the North Island
Sinestro


Weapon: Melee
Abilities: Flight
How To Unlock: Complete his Villain Battle and purchase him on the Central Island
Mad Hatter


Weapon: Melee
Abilities: None
How To Unlock: Complete his Villain Battle and purchase him on the North Island
Killer Moth


Weapon: Pistol, Melee
Abilities: Flight, Sharp Shoot
How To Unlock: Complete his Villain Battle and purchase him on the Central Island
Man-Bat


Weapon: Melee, Sonic Blasts
Abilities: Flight, Sonic, Super Strength
How To Unlock: Complete his Villain Battle and purchase him on the South Island
Clayface


Weapon: Melee
Abilities: Super Strength
How To Unlock: Complete his Villain Battle and purchase him on the South Island
Hush


Weapon: Pistols, Melee
Abilities: Sharp Shoot
How To Unlock: Complete his Villain Battle and purchase him on the South Island
Ra’s Al Ghul


Weapon: Sword
Abilities: None
How To Unlock: Complete his Villain Battle and purchase him on the North Island
General Zod


Weapon: Melee
Abilities: Flight, Freeze, Heat Vision, Super Strength, X-Ray Vision
How To Unlock: Complete his Villain Battle and purchase him on the South Island
As a Kryptonian, General Zod will also have the effects of the following Extras active, regardless of whether or not you’ve unlocked them: Invincibility, Super Build
Brainiac


Weapon: Melee
Abilities: Flight, Magnet, Super Strength
How To Unlock: Complete his Villain Battle and purchase him on the Central Island
Brainiac will also have the effects of the following Extras active, regardless of whether or not you’ve unlocked them: Invincibility
Bruce Wayne


Weapon: Melee
Abilities: None
How To Unlock: Build his Character Gate and purchase him on the South Island
Di ck Grayson


Weapon: Melee
Abilities: None
How To Unlock: Build his Character Gate and purchase him on the North Island
Clark Kent


Weapon: Melee
Abilities: Freeze, Heat Vision, Super Strength, X-Ray Vision
How To Unlock: Build his Character Gate and purchase him on the South Island
As a Kryptonian, Clark Kent will also have the effects of the following Extras active, regardless of whether or not you’ve unlocked them: Invincibility, Super Build
Alfred


Weapon: Serving Tray
Abilities: Sharp Shoot
How To Unlock: Build his Character Gate and purchase him on the North Island
Commissioner Gordon


Weapon: Melee
Abilities: None
How To Unlock: Build his Character Gate and purchase him on the South Island
Lois Lane


Weapon: Melee
Abilities: None
How To Unlock: Build her Character Gate and purchase her on the North Island
Vicki Vale


Weapon: Melee
Abilities: None
How To Unlock: Build her Character Gate and purchase her on the South Island
Characters cont.
Policeman


Weapon: Pistol
Abilities: Sharp Shoot
How To Unlock: Build his Character Gate and purchase him on the North Island
Clown Goon


Weapon: Melee
Abilities: None
How To Unlock: As you walk around Gotham City, you’ll occasionally be harassed by a group of these guys. Defeat enough of them and one will surrender, allowing you to purchase him
Mime Goon


Weapon: Melee
Abilities: None
How To Unlock: As you walk around Gotham City, you’ll occasionally be harassed by a group of these guys. Defeat enough of them and one will surrender, allowing you to purchase him
Riddler Goon


Weapon: Melee
Abilities: None
How To Unlock: As you walk around Gotham City, you’ll occasionally be harassed by a group of these guys. Defeat enough of them and one will surrender, allowing you to purchase him
Two-Face Goon


Weapon: Melee
Abilities: None
How To Unlock: As you walk around Gotham City, you’ll occasionally be harassed by a group of these guys. Defeat enough of them and one will surrender, allowing you to purchase him
LexBot


Weapon: Pistols, Melee
Abilities: Sharp Shoot
How To Unlock: As you walk around Gotham City, you’ll occasionally be harassed by a group of these guys. Defeat enough of them and one will surrender, allowing you to purchase him
Extra Toggle Characters
While playing Story levels in Free Play Mode with Extra Toggle turned on, you will have access to several new characters. You can only play as these characters in the levels they are available in, and you cannot play as them in any other levels or in Gotham City. Similar to the Characters section, I will list their weapons/abilities if they have any, as well as the levels you can play them in.
Penguin Goon

 Weapon: Pistol
Abilities: Sharp Shoot
Levels Available: Theatrical Pursuits, LEGO Gotham City
Mayor


Weapon: Melee
Abilities: None
Levels Available: Theatrical Pursuits, The Next President
Joker Goon


Weapon: Melee
Abilities: None
Levels Available: Harboring a Criminal, Chemical Crisis, Unwelcome Guests, Destination Metropolis, Underground Retreat, Tower Defiance
Ivy Goon


Weapon: Melee
Abilities: None
Levels Available: Arkham Asylum Antics, LEGO Gotham City
Madman


Weapon: Melee
Abilities: None
Levels Available: Arkham Asylum Antics, Asylum Assignment
Arkham Goon (Hat)


Weapon: Melee
Abilities: None
Levels Available: Arkham Asylum Antics
Arkham Goon


Weapon: Melee
Abilities: None
Levels Available: Arkham Asylum Antics
Arkham Goon (Black Eye)


Weapon: Melee
Abilities: None
Levels Available: Arkham Asylum Antics, Asylum Assignment, Underground Retreat
Freeze Goon


Weapon: Melee
Abilities: None
Levels Available: Asylum Assignment, LEGO Gotham City
LexCorp Pilot


Weapon: Melee
Abilities: None
Levels Available: Chemical Signature, Destination Metropolis, Down to Earth
LexCorp Scientist


Weapon: Melee
Abilities: None
Levels Available: Chemical Signature, Research and Development
Advanced LexBot


Weapon: Blasts
Abilities: Sharp Shoot
Levels Available: Unwelcome Guests, Heroes Unite
DrillBot


Weapons: Energy Pistols
Abilities: Sharp Shoot
Levels Available: Unwelcome Guests, Underground Retreat, The Next President, Tower Defiance, Heroes Unite
LexCorp Guard


Weapon: Melee
Abilities: None
Levels Available: Destination Metropolis, Research and Development
LexCorp Secretary


Weapon: Melee
Abilities: Agility
Levels Available: Research and Development
Paramedic


Weapon: Melee
Abilities: None
Levels Available: Underground Retreat
Old Lady


Weapon: Melee
Abilities: None
Levels Available: Underground Retreat
DLC Characters
These characters were originally released as DLC for the console version of the game. Fortunately, you can play as these characters by adding mods to your game. While you might think that sounds complicated, there is a wonderful guide available on Steam called “Troubleshoot: Installing Mods And Stuff” by tsuna moo and XzibitusaK. Follow that guide and you’ll be able to play as these 10 characters. Much like the “Characters” sections above, I list each character’s weapon and abilities below their name.
Robin (Damian Wayne)


Weapon: Melee, Batarangs
Abilities: Grapple, Sharp Shoot
Nightwing


Weapon: Batons, Batarangs
Abilities: Grapple, Sharp Shoot
Shazam


Weapon: Melee
Abilities: Electric Immunity, Flight, Heat Vision, Super Strength
Katana


Weapon: Sword
Abilities: Agility
Zatanna


Weapon: Melee
Abilities: Flight
Bizarro


Weapon: Melee
Abilities: Flight, Freeze, Heat Vision, Super Strength, X-Ray Vision
Black Adam


Weapon: Melee
Abilities: Electric Immunity, Flight, Heat Vision, Super Strength
Captain Cold


Weapon: Freeze Gun, Melee
Abilities: Freeze, Freeze Immunity, Sharp Shoot
Gorilla Grodd


Weapon: Melee
Abilities: Super Strength
Black Manta


Weapon: Fish
Abilities: Dive, Heat Vision, Super Strength
Ground Vehicles
There are a grand total of 25 ground vehicles that you can play as in this game. I have listed them all below in the order that they appear on the vehicle selection screen.

Batmobile
 Weapons: Guns, Missiles
How To Unlock: Create a new game
Bat Bike
 Weapons: Guns, Missiles
How To Unlock: Create a new game
Robin’s Motorbike
 Weapons: Guns, Missiles
How To Unlock: Create a new game
Multi-Colored Batmobile
 Weapons: Guns, Missiles
How To Unlock: Complete Core Instability
Catwoman’s Motorbike
 Weapons: Guns
How To Unlock: Find and purchase it on the Central Island
Two-Face’s Truck
 Weapons: Guns, Missiles
How To Unlock: Find and purchase it on the South Island
Bane’s Mole Machine
 Weapons: Missiles
How To Unlock: Find and purchase it on the Central Island
LexCorp Juggernaut
 Weapons: None
How To Unlock: Find and purchase it on the South Island
LexCorp Limousine
 Weapons: None
How To Unlock: Find and purchase it on the North Island
Giant Dodgem
 Weapons: Guns, Missiles
How To Unlock: Find and purchase it on the North Island
Harley Quinn’s Monster Truck
 Weapons: Hammer, Missiles
How To Unlock: Find and purchase it on the North Island
Joker Digger
 Weapons: None
How To Unlock: Find and purchase it on the Central Island
News Reporter Van
 Weapons: None
How To Unlock: Find and purchase it on the Central Island
Ambulance
 Weapons: None
How To Unlock: Find and purchase it on the South Island
Police Riot Truck
 Weapons: None
How To Unlock: Find and purchase it on the South Island
Bat Dodgem
 Weapons: Guns
How To Unlock: Find and purchase it on the North Island
Pumpkin Car
 Weapons: None
How To Unlock: Find and purchase it on the North Island
Fire Engine
 Weapons: Water Jet
How To Unlock: Find and purchase it on the South Island
Police Car
 Weapons: None
How To Unlock: Find and purchase it on the South Island
Harley Quinn’s Motorbike
 Weapons: Guns, Missiles
How To Unlock: Achieve 100% completion (thanks to KorbenTheFireX for helping clear this up)
Harley Quinn’s Monster Truck (Minikit)
 Weapons: Guns
How To Unlock: Collect all 10 Canisters in Theatrical Pursuits
Two-Face’s Truck (Minikit)
 Weapons: None
How To Unlock: Collect all 10 Canisters in Arkham Asylum Antics
LexCorp Juggernaut (Minikit)
 Weapons: None
How To Unlock: Collect all 10 Canisters in Chemical Signature
Police Car (Minikit)
 Weapons: None
How To Unlock: Collect all 10 Canisters in Research and Development
Batmobile (Minikit)
 Weapons: Guns
How To Unlock: Collect all 10 Canisters in Core Instability
Water Vehicles
There are a grand total of 15 water vehicles that you can play as in this game. I have listed them all below in the order that they appear on the vehicle selection screen.

Batboat
 Weapons: Guns
How To Unlock: Create a new game
Robin’s Watercraft
 Weapons: Guns
How To Unlock: Create a new game
Batman’s Watercraft
 Weapons: Guns
How To Unlock: Create a new game
Robin’s Submarine
 Weapons: Guns
How To Unlock: Create a new game
Joker’s Speedboat
 Weapons: Guns
How To Unlock: Find and purchase it on the Central Island
Killer Croc’s Speedboat
 Weapons: Guns, Missiles
How To Unlock: Find and purchase it on the Central Island
Penguin’s Submarine
 Weapons: Guns, Missiles
How To Unlock: Find and purchase it on the South Island
Clown Goon Boat
 Weapons: Guns
How To Unlock: Find and purchase it on the South Island
Speedboat
 Weapons: None
How To Unlock: Find and purchase it on the Central Island
Sports Fishing Boat
 Weapons: None
How To Unlock: Find and purchase it on the Central Island
Joker’s Speedboat (Minikit)
 Weapons: Guns
How To Unlock: Collect all 10 Canisters in Harboring a Criminal
Police Boat (Minikit)
 Weapons: Guns
How To Unlock: Collect all 10 Canisters in Down to Earth
Penguin’s Submarine (Minikit)
 Weapons: Guns
How To Unlock: Collect all 10 Canisters in Underground Retreat
Batboat (Minikit)
 Weapons: Guns
How To Unlock: Collect all 10 Canisters in Tower Defiance
Mister Freeze’s Iceberg (Minikit)
 Weapons: None
How To Unlock: Collect all 10 Canisters in The Next President
Air Vehicles
There are a grand total of 15 air vehicles that you can play as in this game. I have listed them all below in the order that they appear on the vehicle selection screen.

Robin’s Helicopter
 Weapons: Guns, Missiles
How To Unlock: Create a new game
Batwing
 Weapons: Guns
How To Unlock: Create a new game
Bat-Copter
 Weapons: Guns, Missiles
How To Unlock: Create a new game
Whirly-Bat
 Weapons: None
How To Unlock: Complete Unwelcome Guests
LexCorp Mini-VTOL
 Weapons: Guns
How To Unlock: Complete Down to Earth
LexCorp Micro-VTOL
 Weapons: Missiles
How To Unlock: Find and purchase it on the Central Island
Brainiac’s UFO
 Weapons: Guns
How To Unlock: Find and purchase it on the Central Island
Joker’s Helicopter
 Weapons: Guns
How To Unlock: Find and purchase it on the Central Island
Police Helicopter
 Weapons: Guns
How To Unlock: Find and purchase it on the Central Island
News Helicopter
 Weapons: Guns
How To Unlock: Find and purchase it on the Central Island
Scarecrow’s Biplane (Minikit)
 Weapons: Guns
How To Unlock: Collect all 10 Canisters in Asylum Assignment
Joker’s Helicopter (Minikit)
 Weapons: Guns
How To Unlock: Collect all 10 Canisters in Chemical Crisis
Batwing (Minikit)
 Weapons: Guns
How To Unlock: Collect all 10 Canisters in Unwelcome Guests
LexCorp VTOL (Minikit)
 Weapons: Guns
How To Unlock: Collect all 10 Canisters in Destination Metropolis
Wonder Woman’s Invisible Jet (Minikit)
 Weapons: Guns
How To Unlock: Collect all 10 Canisters in Heroes Unite
Red Power Brick Extras
There are a total of 21 Extras available in the game. The first is unlocked automatically, and the other 20 can be found all throughout Gotham City. Below I’ve listed each Extra in the order they appear in the menu. I’ve also listed what they do, as well as how to unlock them.
Friend Grab
How To Unlock: Available from the beginning
What It Does: This allows you to grab your partner by pressing the “special” button. You can then press the “attack” button to defeat them, like you would an enemy goon
Disguises
How To Unlock: Find and purchase it on the North Island
What It Does: This gives all characters fake noses, glasses, and moustaches
Vine Grapples
How To Unlock: Find and purchase it on the Central Island
What It Does: This turns your grapple cable into a vine
Extra Toggle
How To Unlock: Find and purchase it on the Central Island
What It Does: While playing levels in Free Play Mode, this will give you a few extra characters in your party that aren’t available from the character menu. See the “Extra Toggle Characters” section for more info on these characters
Beep Beep
How To Unlock: Find and purchase it on the North Island
What It Does: Press the “character toggle” button (LB on a controller) while in some vehicles and they will will honk their horn!
Character Studs
How To Unlock: Find and purchase it on the Central Island
What It Does: This causes defeated enemies to drop a small amount of studs
Attract Studs
How To Unlock: Find and purchase it on the North Island
What It Does: This increases the radius at which you pick up studs, allowing you to collect them from farther away
Studs x2
How To Unlock: Find and purchase it on the Central Island
What It Does: Multiplies the value of all studs collected by 2. This stacks with other stud multipliers
Studs x4
How To Unlock: Find and purchase it on the South Island
What It Does: Multiplies the value of all studs collected by 4. This stacks with other stud multipliers
Studs x6
How To Unlock: Find and purchase it on the Central Island
What It Does: Multiplies the value of all studs collected by 6. This stacks with other stud multipliers
Studs x8
How To Unlock: Find and purchase it on the North Island
What It Does: Multiplies the value of all studs collected by 8. This stacks with other stud multipliers
Studs x10
How To Unlock: Find and purchase it on the South Island
What It Does: Multiplies the value of all studs collected by 10. This stacks with other stud multipliers
Super Build
How To Unlock: Find and purchase it on the Central Island
What It Does: This dramatically increases your build speed, causing you to build LEGO pieces super fast
Fall Rescue
How To Unlock: Find and purchase it on the North Island
What It Does: If you are about to fall off a ledge to your death, you will be tossed back onto the ledge. This will not save you from a long fall in Gotham City, so be careful when you’re high up!
Minikit Piece Finder
How To Unlock: Find and purchase it on the Central Island
What It Does: While playing Story levels, arrows will point to the locations of Canisters. This will not tell you HOW to collect them, just WHERE they appear
Peril Finder
How To Unlock: Find and purchase it on the South Island
What It Does: While playing Story levels or while in Gotham City, arrows will point to the locations of Citizens in Peril. This will not tell you HOW to rescue them, just WHERE they are
Red Brick Finder
How To Unlock: Find and purchase it on the South Island
What It Does: While in Gotham City, arrows will point to the locations of Red Power Bricks. This will not tell you HOW to get them, just WHERE they are
Gold Brick Finder
How To Unlock: Find and purchase it on the Central Island
What It Does: While in Gotham City, arrows will point to the locations of Gold Bricks. This will not tell you HOW to collect them, just WHERE they appear
Regenerate Hearts
How To Unlock: Find and purchase it on the North Island
What It Does: If you are missing any hearts, you will regenerate one every few seconds
Extra Hearts
How To Unlock: Find and purchase it on the South Island
What It Does: This gives you 6 hearts instead of the usual 4
Invincibility
How To Unlock: Find and purchase it on the South Island
What It Does: This makes you immune to damage from all enemies and objects in the environment. You will still die from falling though
Cheat Codes
This is a list of the Cheat Codes available to use in the game. I have personally checked all of these codes and I can vouch for their authenticity. If you have any other Cheat Codes that you wish to share, please message me and I will check them. If they work, I will add them to this list and give credit to you.
Characters
9ZZZBP – Clown Goon
W49CSJ – LexBot
ZQA8MK – Mime Goon
V9SAGT – Policeman
Q285LK – Riddler Goon
95KPYJ – Two Face Goon
Vehicles
C79LVH – Harley Quinn’s Motorbike
Extras
MNZER6 – Attract Studs
ZHAXFH – Beep Beep
TPJ37T – Character Studs
BWQ2MS – Disguises
4LGJ7T – Extra Hearts
7TXH5K – Extra Toggle
TPGPG2 – Fall Rescue
MBXW7V – Gold Brick Finder
LRJAG8 – Minikit Piece Finder
RYD3SJ – Peril Finder
5KKQ6G – Red Brick Finder
ZXEX5D – Regenerate Hearts
74EZUT – Studs x2
JN2J6V – Super Build
JXN7FJ – Vine Grapples