Overview
This guide shall give an overview of the different bosses of “Our Darker Purpose” explaining their general behaviour and movement patterns. This may help players to get a better understanding and help in defeating them. Additionally, I will mention notable Hard Mode changes as I have noticed them. Due to a lot of pictures and text this guide has become kind of massive.
1. Introduction
Fighting bosses the first time (or even the tenth time) in Our Darker Purpose can be pretty hard and unforgiving. This may often depend on bad luck but also on missing knowledge. This guide shall give information about all the bosses in Our Darker Purpose like their general movement patterns (red arrows) and the attacks they are using (blue arrows and circles). Or maybe you just want to take a look at the challenges yet to come. You can encounter the following bosses:
– Floors 1-3: Frothy the Dragon, Some Harmless Marking, The Box of Nice Things, Cauldron of Yesterdayers, Sudsy the Inanimate, Candelabra of Longing, The Obsolete Operator, The Frozen Few
– Floor 4: Goneril and the Woundworts Fortress
– Floor 5 and 6: The Disciplined King, Cyndar’s Timekeeper, The Friendly Foot Stools, The Virtuoso
– Floor 7: Regan, leader of the Capulets
– Floor 8 and 9: The Winged Overseer, A Leafy Oversight, The Brick Pile, a Buoyant Double
– Floor 10: The Malady Ward, Dr. Bloodfather, Better Cordy, the Imaginaries
– Floor 11: The Administrators
– Floor 12: His Natural Defense
I am not 100 % sure if the list is correct so tell me if you have noticed otherwise. Also I will occasionally talk from chapter one, two … bosses. Those do not correspond with the floors you encounter them but rather with their entry in the game lore.
In addition I will mention changes for the bosses in Hard Mode as far as I have noted them. Note that I have rather scarce information for the Hard Mode Changes after the Regan fight (Chapter 3+) because I did not play it too often.
This guide is complete but not done. I will check occassionally for typos and mistakes in the descriptions and pictures. I will appreciate every kind of help by doing the same. Also I will complement the missing information if I get my hands on it. I hope this guide may help you on clearing the Edgewood Home for Lost Children.
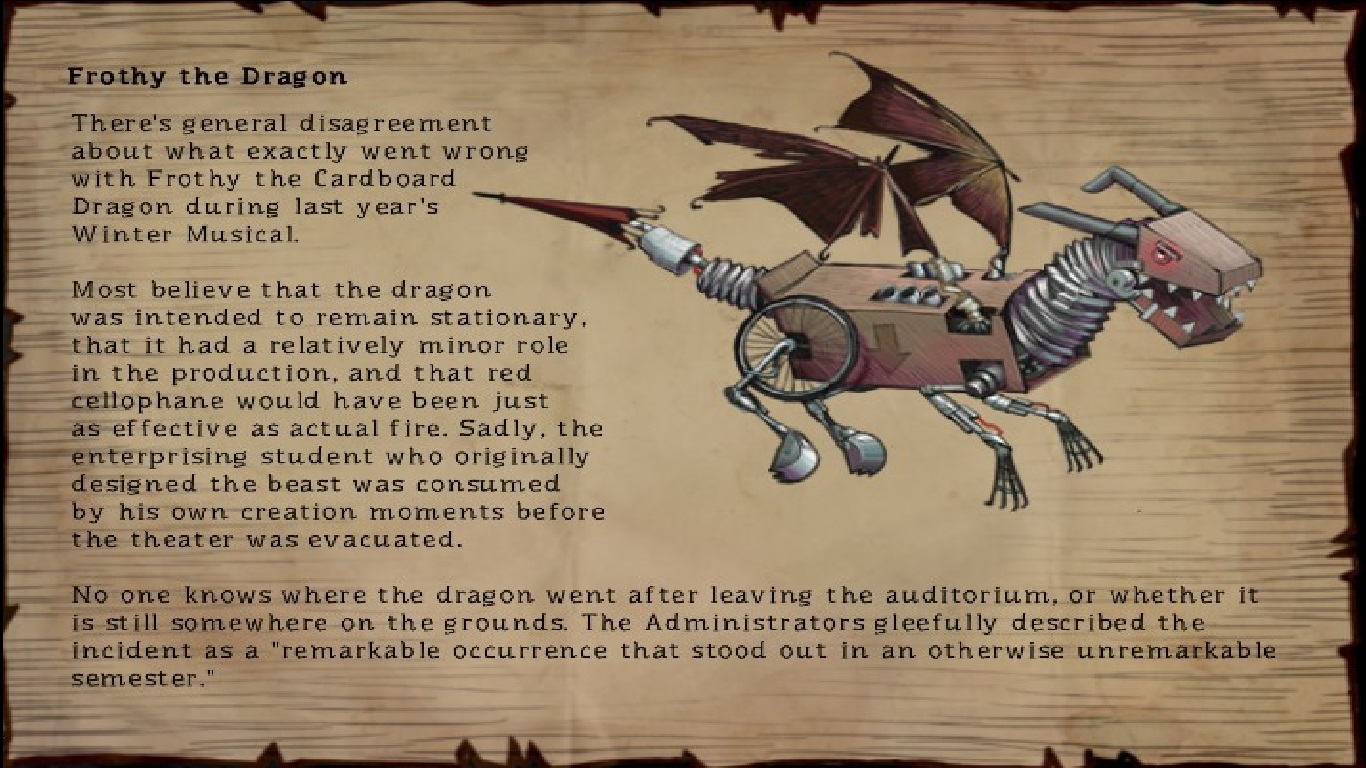
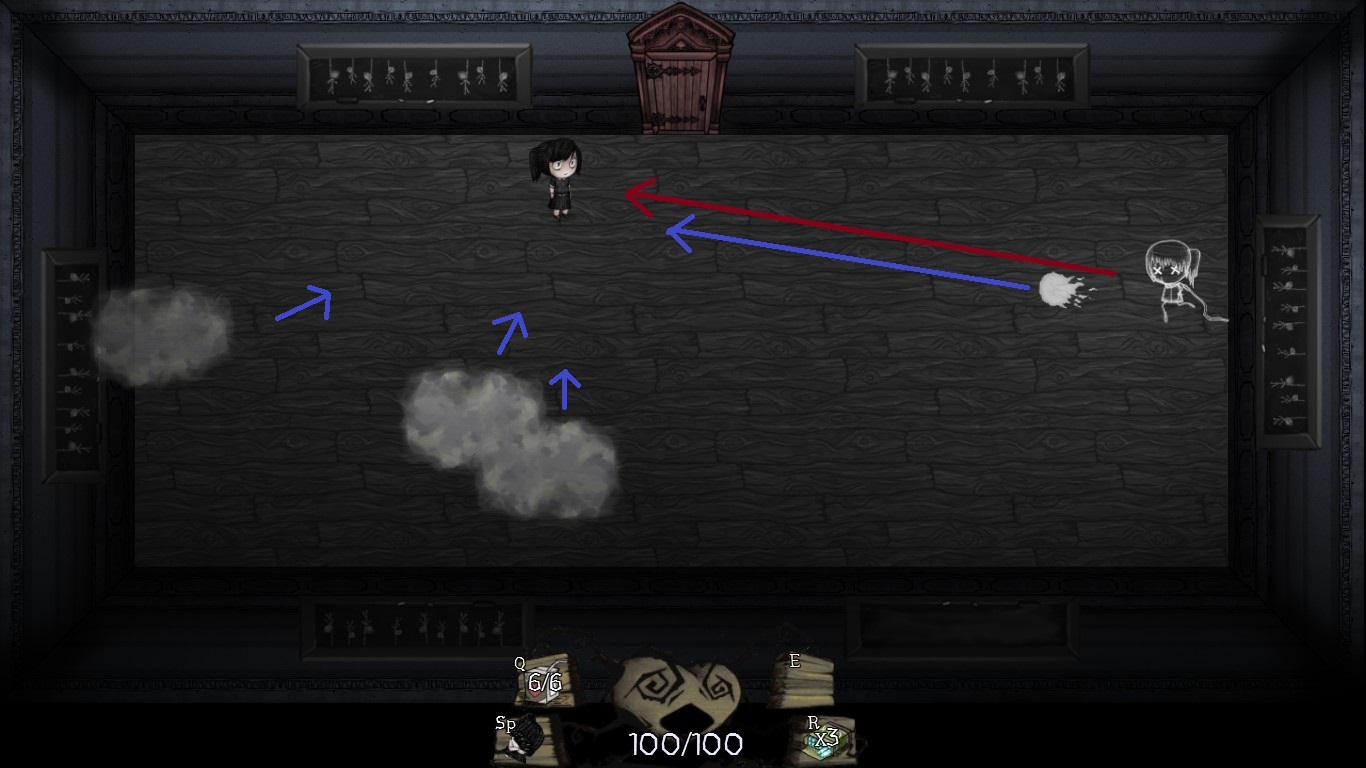
2. Frothy the Dragon
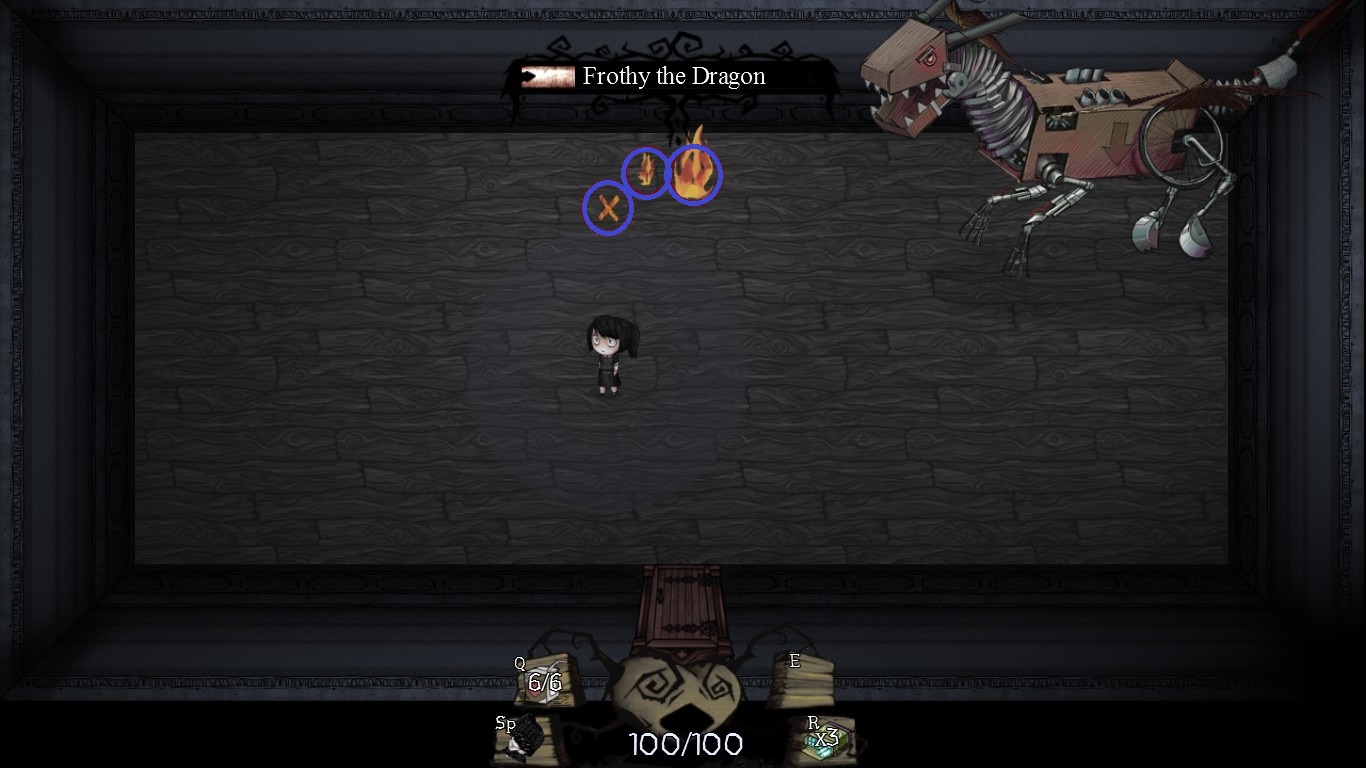
Frothy the Dragon is a rather easy boss even the first time you are fighting him. He has only two movement patterns, two attacks and not too much hitpoints. You can divide the fight in two alternating phases. In phase 1 Frothy is moving up and down. In this state he will summon a Homing fire which keeps following you (similar to the ones spawned by the oven traps). The starting point of this fire is right under you so you should also be in motion. It begins as a small orange x. In this short state it does not harm you so take that moment to move away.
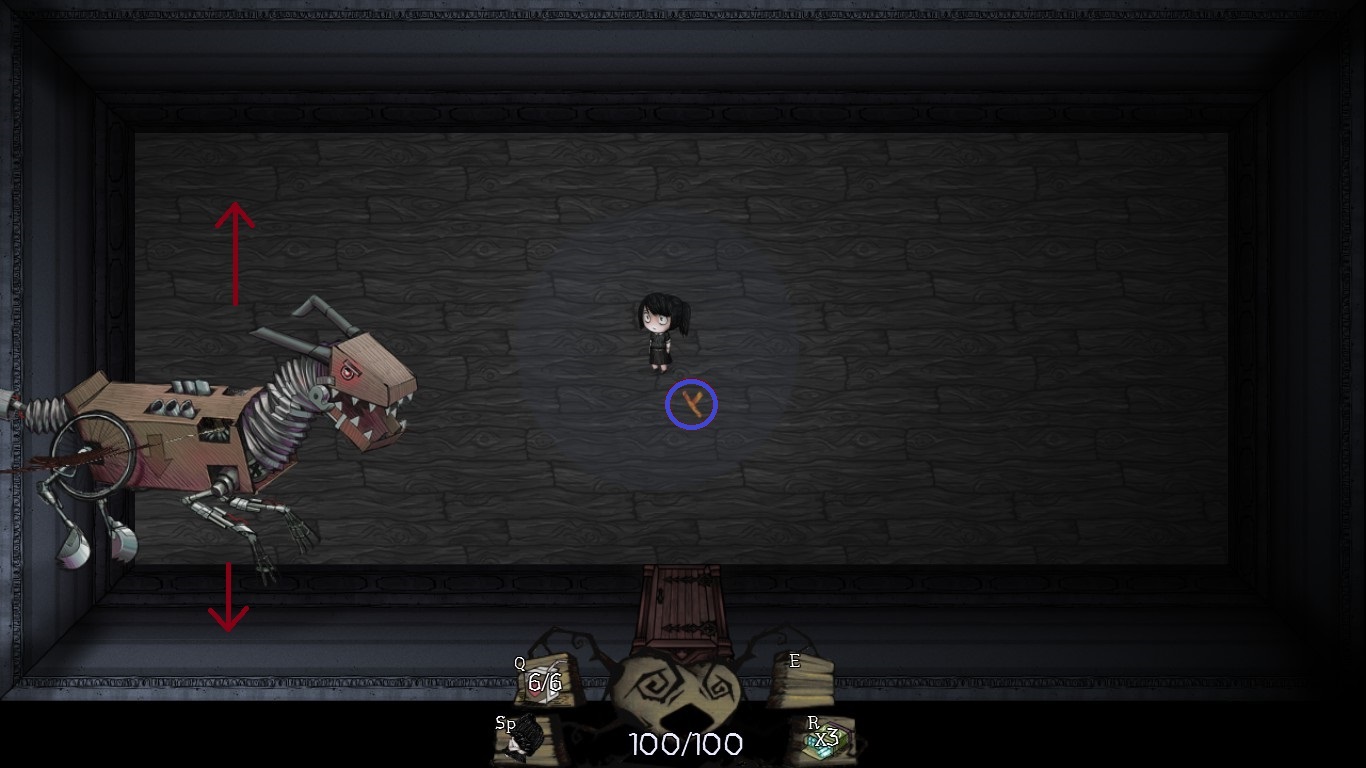
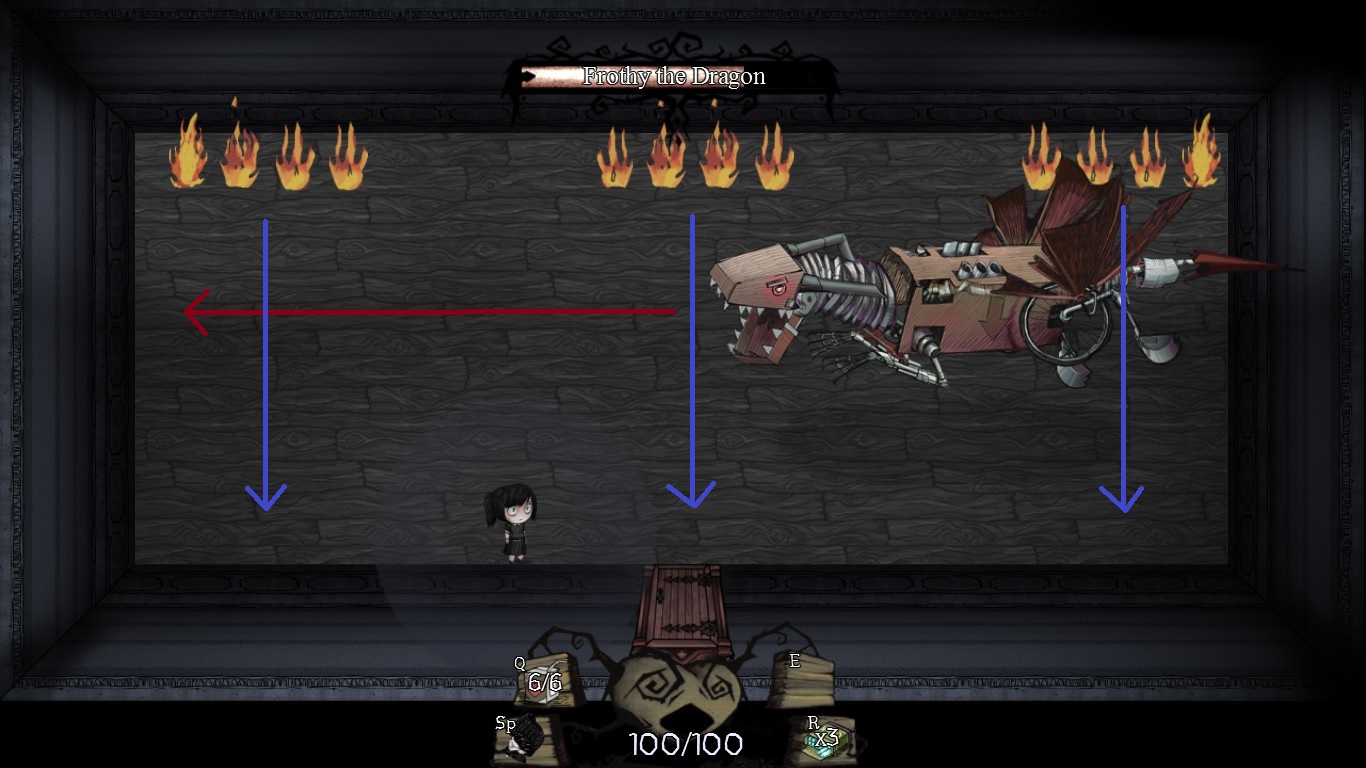
 After a while the Homing Fire disappears and Frothy summons multiple fires either on the top or the bottom of the screen. This is the beginning of phase 2 and indicates that the dragon will charge to the other screen side in a straight horizontally line. At the same time the summoned fires will go from the top to the bottom (or the other direction depending on where they started). This means, as soon as you see the fire appearing on the top or bottom of the screen you have a second or two to move yourself to the gap in the fire column and also out of Frothy’s way. And so the second phase ends and it starts with the first phase again. After loosing a third of his health Frothy will summon two Homing Fires instead of one and after loosing another third of his health he will summon three of them. All in all the fight should not be that hard.
 Notable Hard Mode Changes: The only difference I spotted is that the Homing Fires are moving faster, a LOT faster. Avoid standing still.
3. Some Harmless Marking
Some Harmless Markings are another of the Chapter One bosses. Most of the time you can stand still and nothing will happen to you. At the beginning of the fight there are six chalk boards on the wall. With increasing time you see the picture of a Smiley Sun appearing on them. As soon as this picture is completed a white chalk ball will shoot in a straight line across the screen. So just place yourself out of those lines and you are safe for the moment.
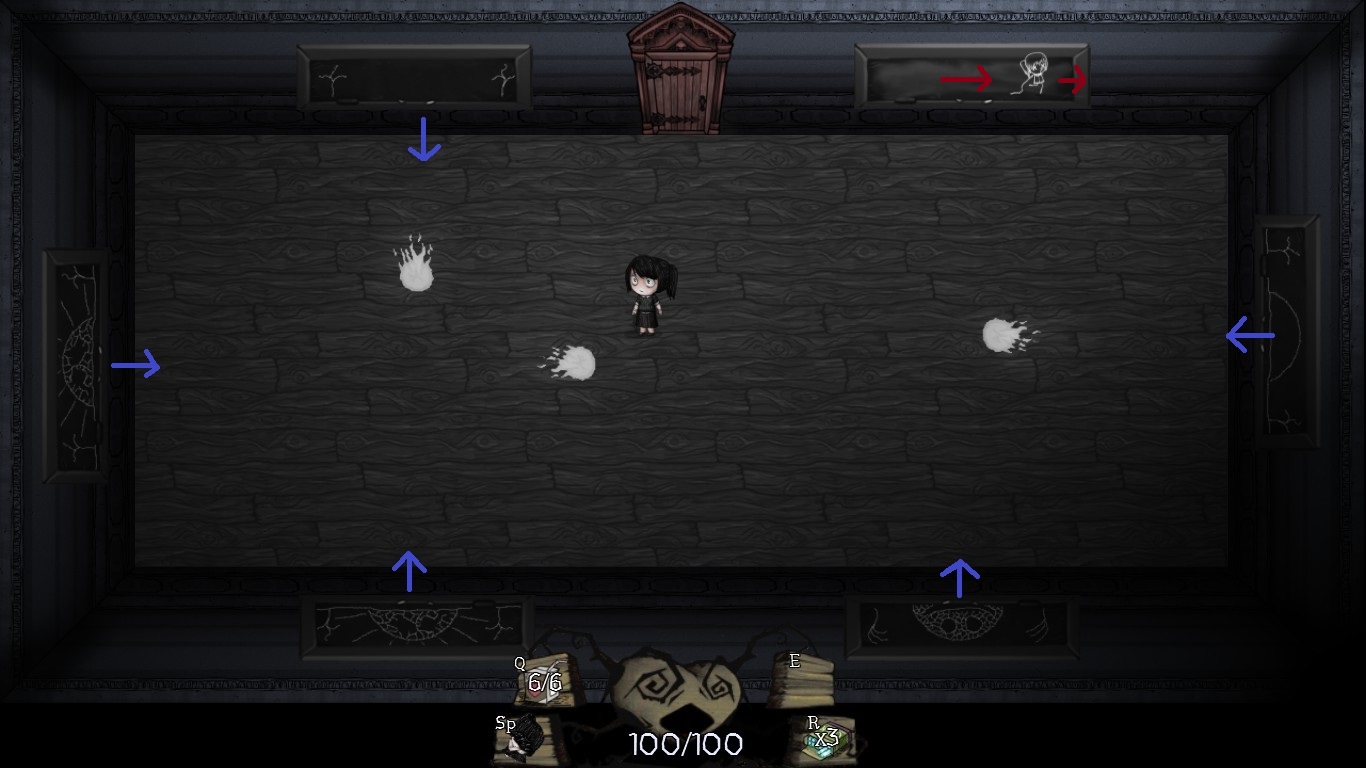
 But since this would be to easy the chalk boards have a second attack. From time to time one of the boards will start blinking and spawn a chalk cloud which starts following you. Keep distance to them and avoid running into the chalk balls. After a while the actual boss will come out of one boards and the boards themselves will stop attacking you/spawning new chalk clouds (as you see by the changed picture on them). Some Harmless Markings will float towards you and also shoot some chalk balls in your direction (in contrast to the boards). Keep an eye on the chalk clouds which haven’t vanished so far and attack Some Harmless Markings yourself. This is the only time where you can damage the boss (actually you can damage the markings if you hit them the moment they are moving on the chalkboards but it is way harder to get a hit) before it disappears again and the process is starting anew. This fight is also pretty easy. After all Some Harmless Markings are actually pretty harmless.

 Notable Hard Mode Changes: The chalk boards are spawning more clouds instead of shooting a chalk ball. Two or three times the number than before. So standing still and chilling will not work out here.
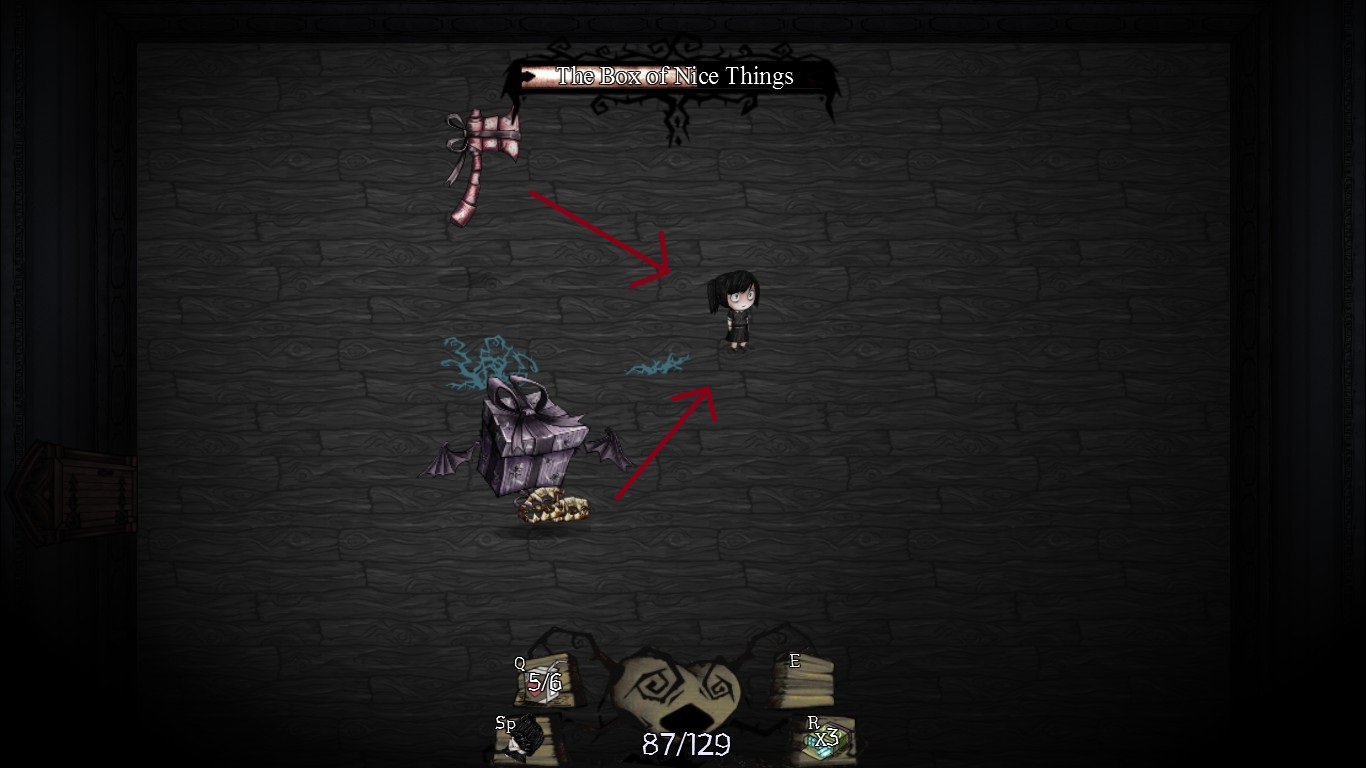
4. The Box of Nice Things
The Box of Nice Things is a giant present box flying up and down in a curved manner while slowly drifting into your direction. So at one point you have to cross its path or it will corner you (which isn’t so much of a problem as it seems that the box herself can not hurt you). Additionally to flying up and down, the Box of Nice Things summons her first presents in form of little teeth-like creatures which will run towards you in a direct line. As they don’t move too fast at the beginning you can ignore them or kill them. If you don’t kill them, the little teeth will vanish themselves after some time. As far as I remember, there are never more than two of them on the screen.
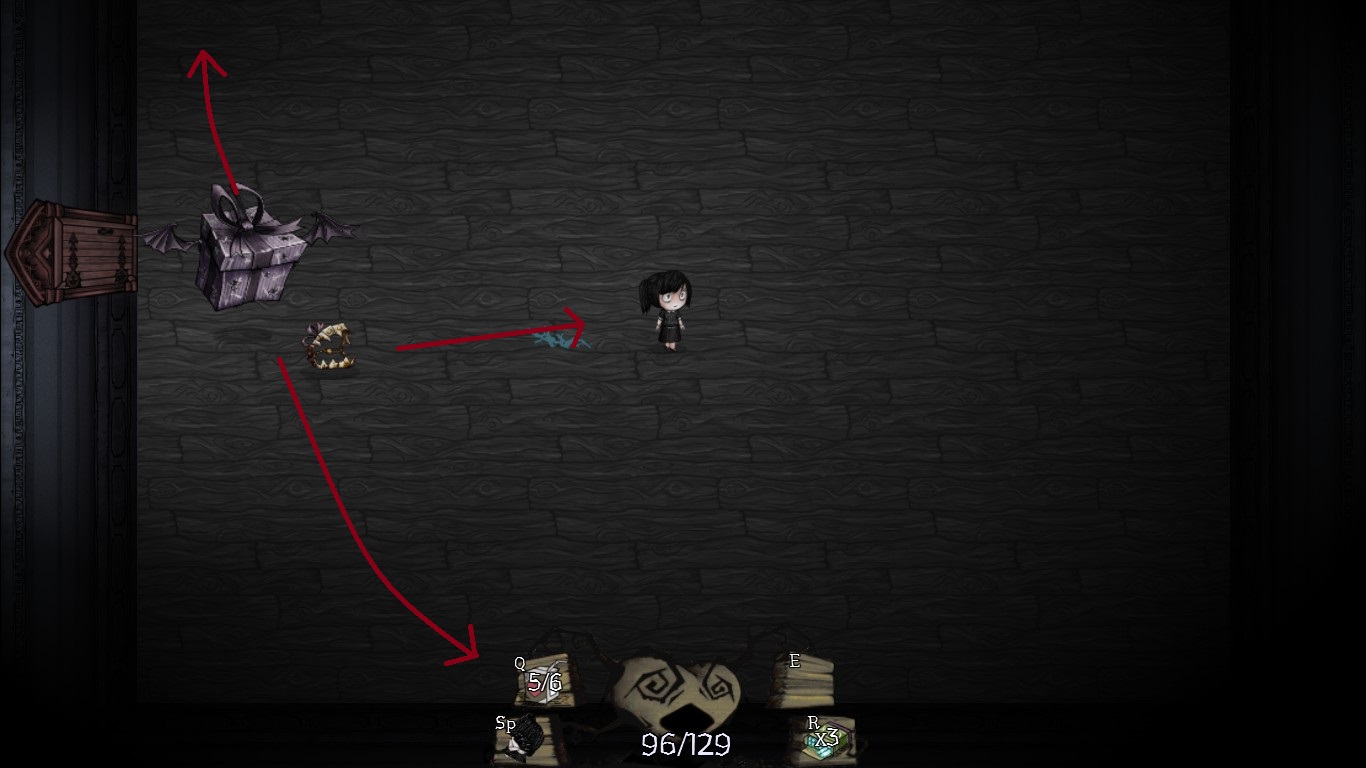
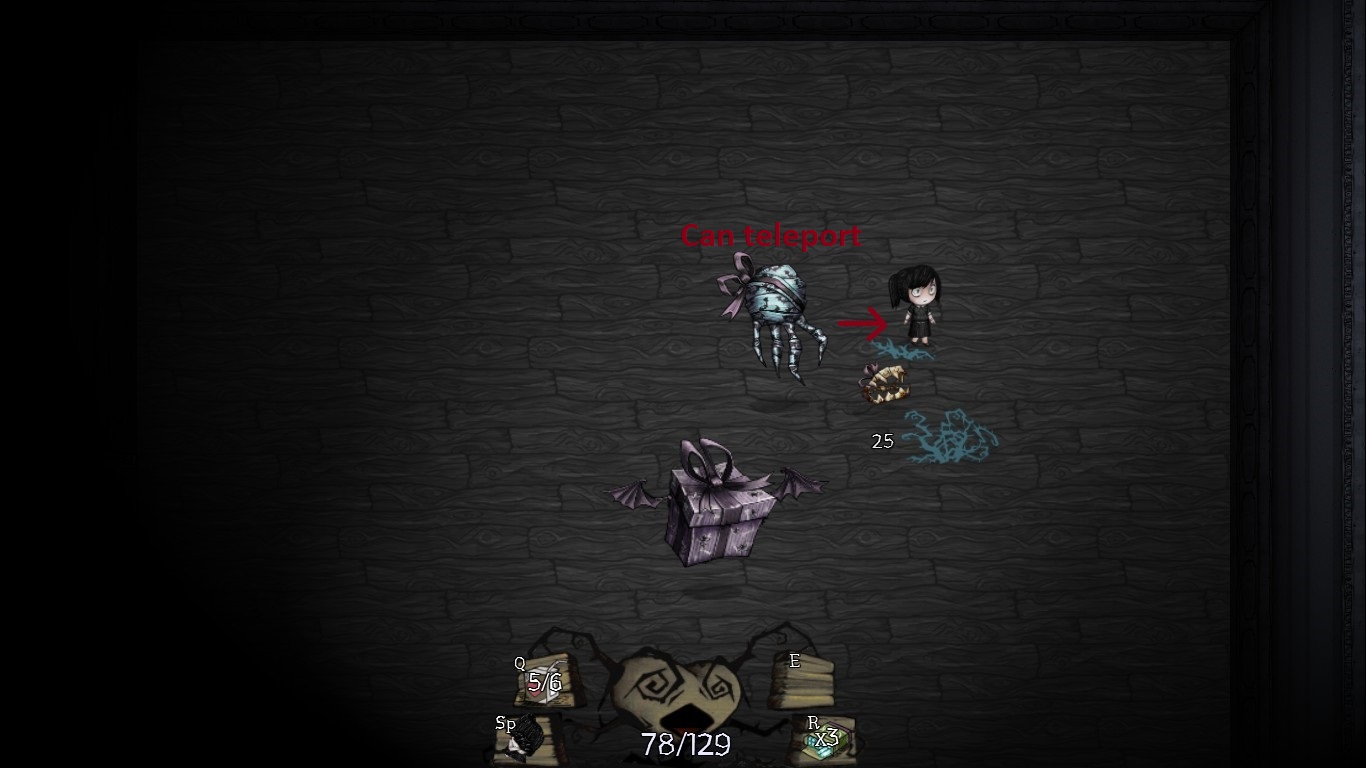
 After loosing a third of his health the boss will summon his first special present: The Celebrity Chopper,a giant rosa-coloured axe, which will also fly towards you. Every now and then it will do a rotating attack which is basically just faster movement. In order to end this boss fight, you also need to kill the chopper (it will still be there even after destroying the box) so better do it earlier than later. After loosing another third of his hitpoints, the boss summons the Congratulator, a handlike creature. As the other two it will fly towards you. Furthermore, as a special trick this one can teleport so pay attention to where you are dodging. In addition, it will create six small projectiles at the place it teleports to. So you have a lot of stuff to avoid. Like the Chopper you have to kill the Congratulator separately to the Box of Nice Things (Note: If the Chopper or the Congratulator appears first is random). Also since fighting and dodging the special presents is not annoying enough the Box of Nice Things AND the teeth-like creatures are moving faster the less health the boss has. Keep rolling (and shooting) and you’ll win this fight.
 Notable Hard Mode Changes: Instead of summoning only one special present at 66 % and 33 % hitpoints left, the Box of Nice Things will summon both of them. So in total you have to kill one Box, two axes and two Congratulators. At least you get a lot of experience points this way.
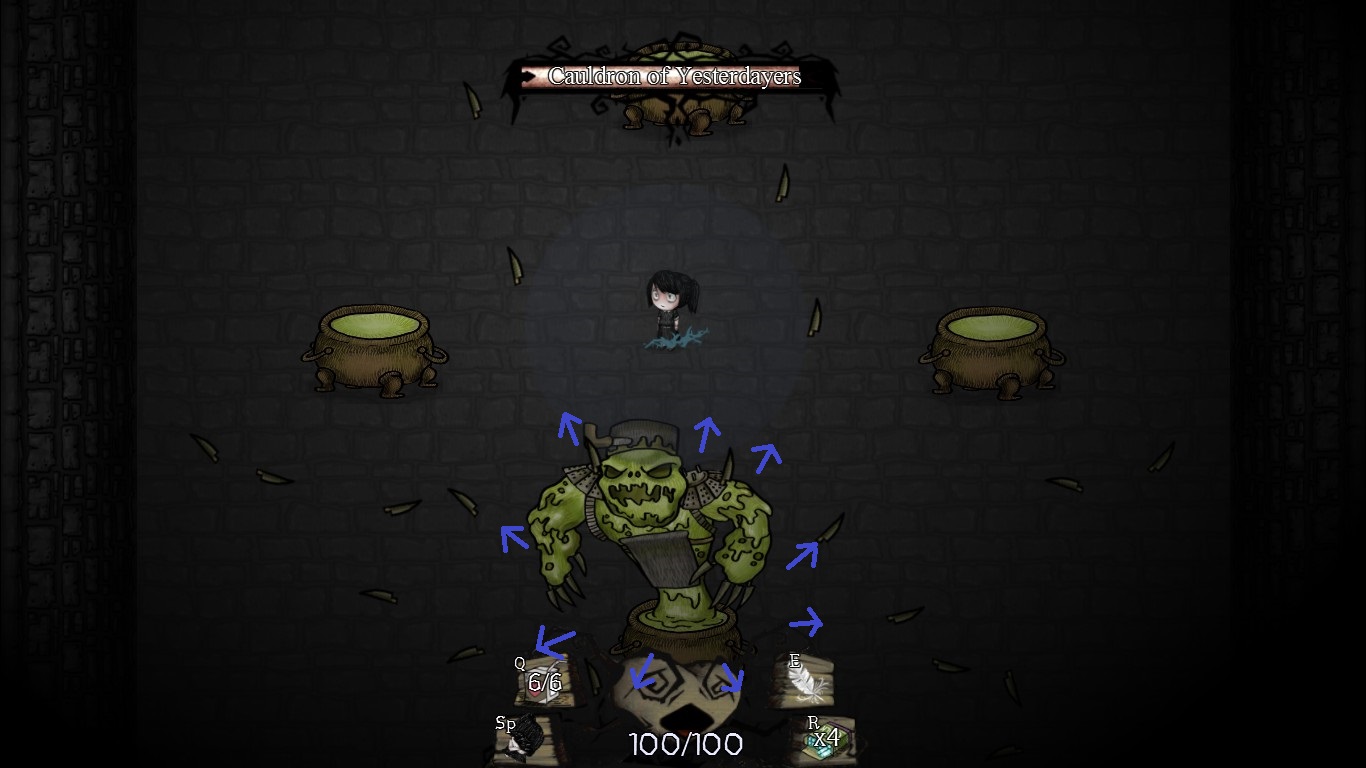
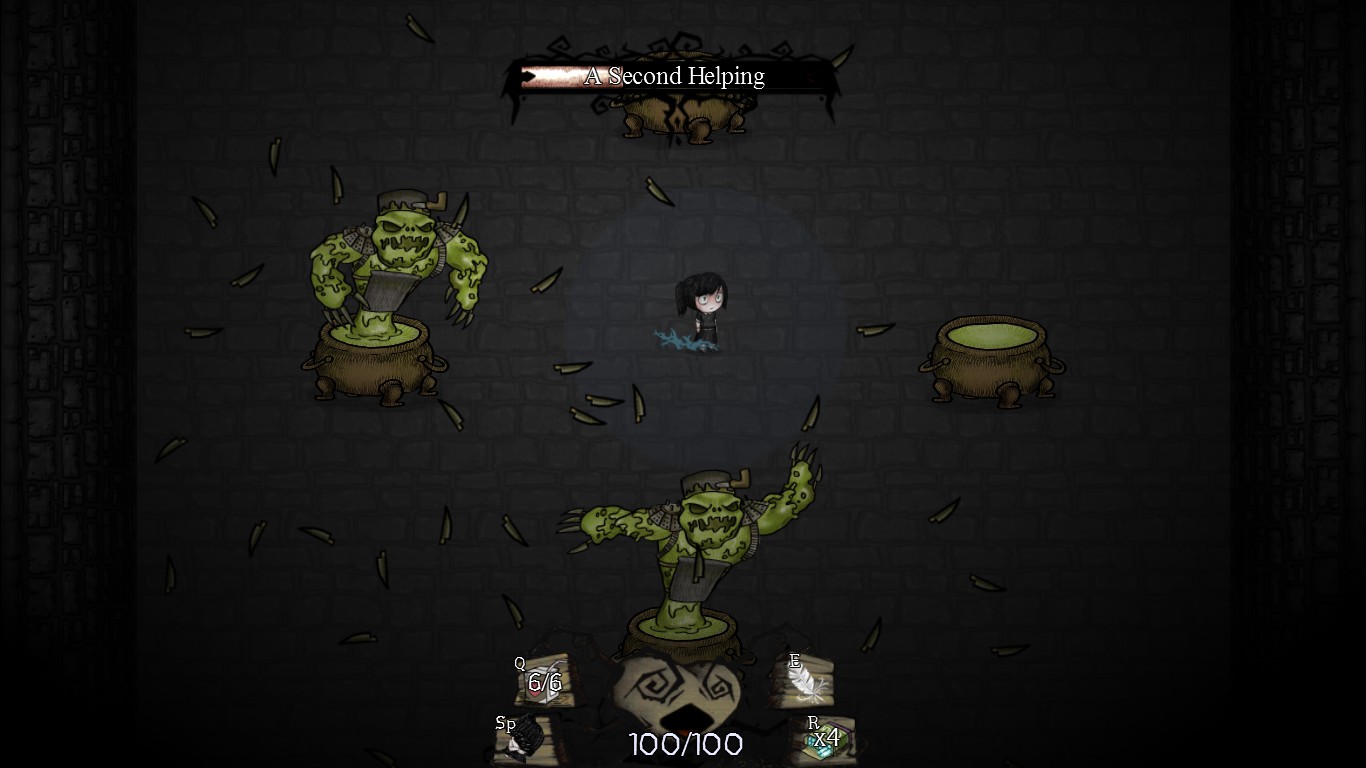
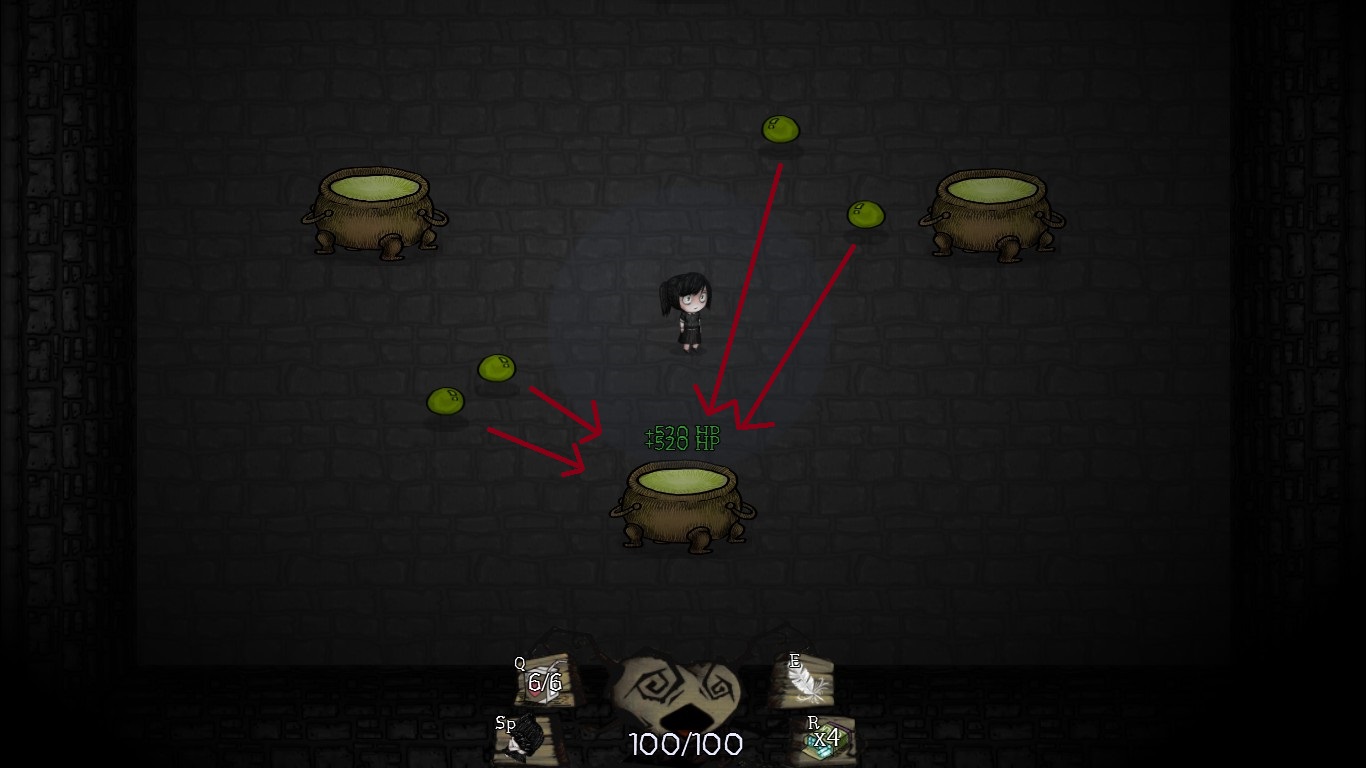
5. Cauldron of Yesterdayers
The Cauldron of Yesterdayers is one of the more difficult Chapter One bosses. Actually he has only one attack but this one attack is pretty effective. The Cauldron will appear randomly in one of the four pots. In order to hit him more often I would recommand standing in the middle of the four pots and to move as few as possible. Just aim in the direction he is appearing. As soon as he starts to attack he will stay in that soup pot longer which gives us the chance to do damage. You will notice that he is shooting a lot of projectiles but still try to stay in the middle all the time and just make minimal movements to avoid.
 After loosing a fourth of his health the screen will shake, the Cauldron disappears and some soup blobs will be spawned. Those blobs are moving towards the last pot the boss has been in. If they reach it the boss well regain a significant amount of his health for every blob so kill them before. After killing/absorbing all blobs the Cauldron reappears and the fight continues. He will summon new soup blobs at 50 % and 25 % of his health. The most difficult part is after he has lost half his hitpoints. After reappearing there will be a Second Helping (looking exactly like the boss) which has fewer hitpoints then the Cauldron but does the same attack (two times the dodging fun). At this point you have to be concentrated to avoid hits (while still staying in the middle). Since the Second Helping has fewer hitpoints so unless you are going for the achievement you should kill it first in order to decrease the number of projectiles on the screen. But since the fight ends with the defeat of the Cauldron of Yesterdayers you can more or less ignore the Second Helping (apparently you have to kill the Second Helping after beating the Cauldron, maybe I got it wrong in my head) . Stay concentrated and keep your calm and this boss will die aswell.
 Notable Hard Mode Changes: As in the boss fights mentioned before there is only a single change here aswell. After loosing half his hitpoints, instead of spawning the Second Helping, he spawns a Second AND a Third Helping (three times the dodging fun).
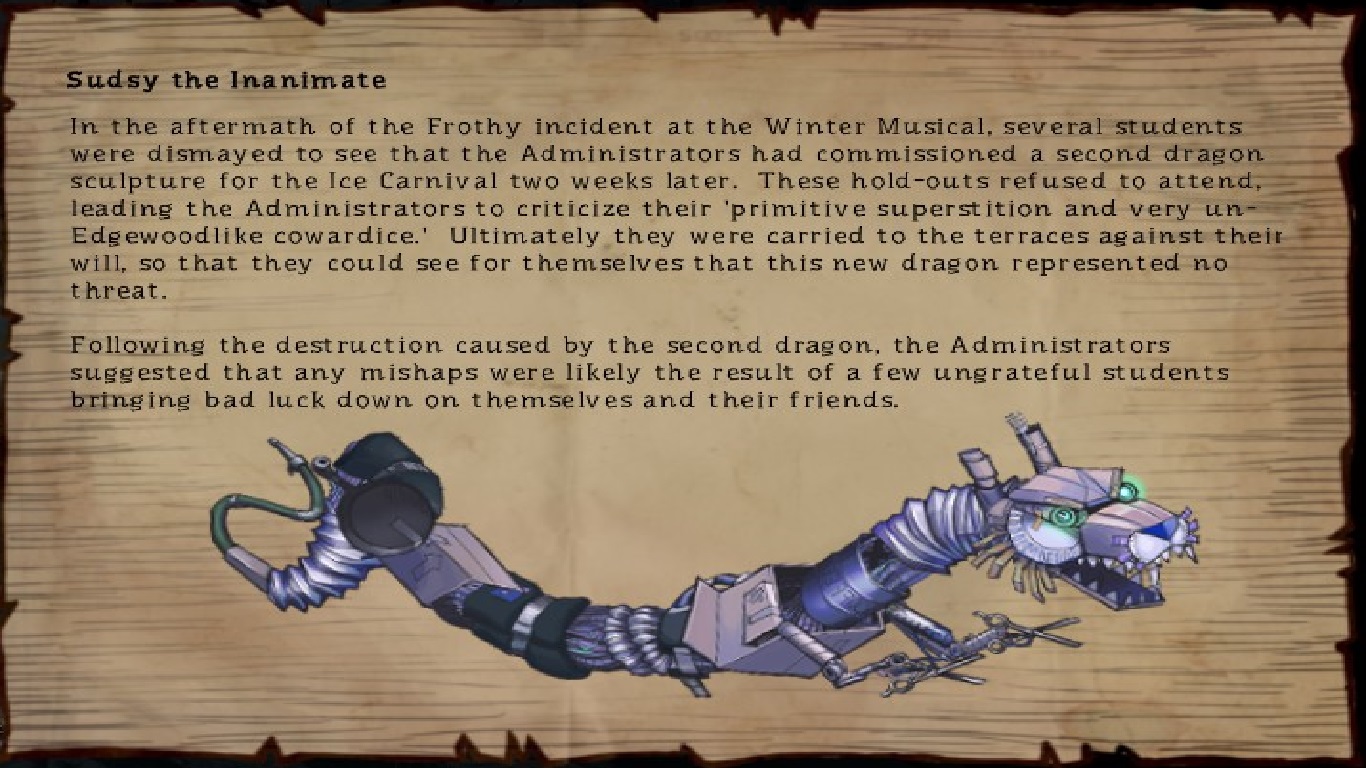
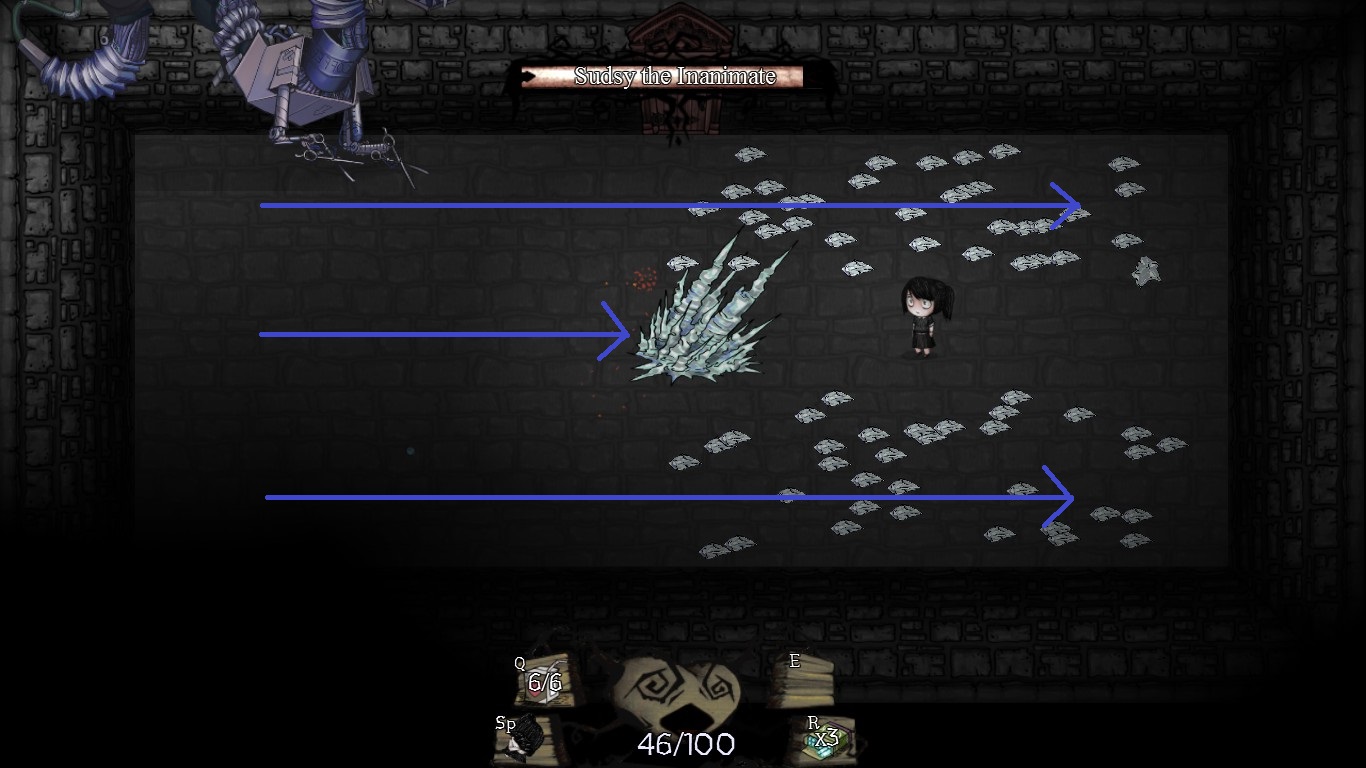
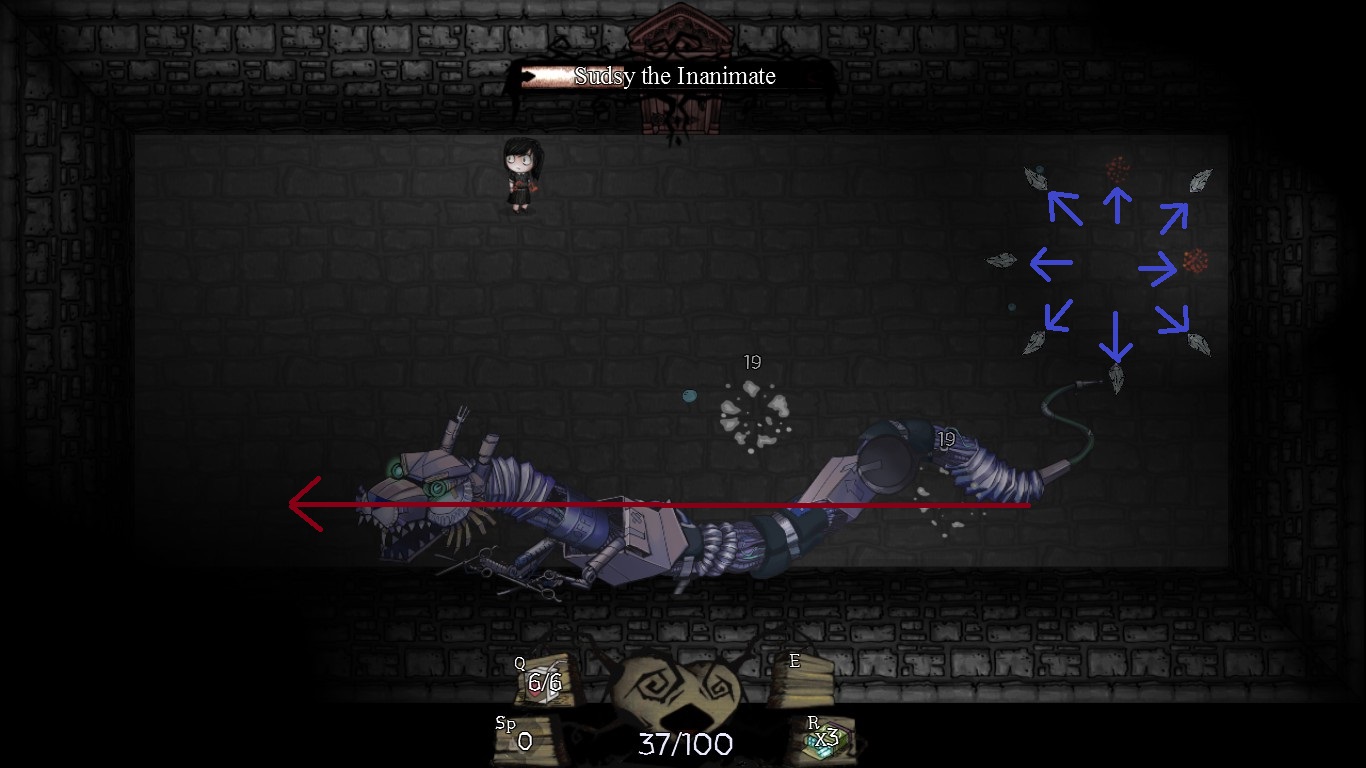
6. Sudsy the Inanimate
Sudsy the Inanimate is pretty similar to Frothy the Dragon although a tiny bit more difficult. Sudsy will move up and down on one of the screen sides. After a short while he will spawn an ice block on the place you are standing so keep moving. If possible try to let this block be spawned above or under Sudsy because he will get damage for everytime he is hitting it. In addition to the ice block the boss summons an ice ball bouncing off the walls and the ice block.
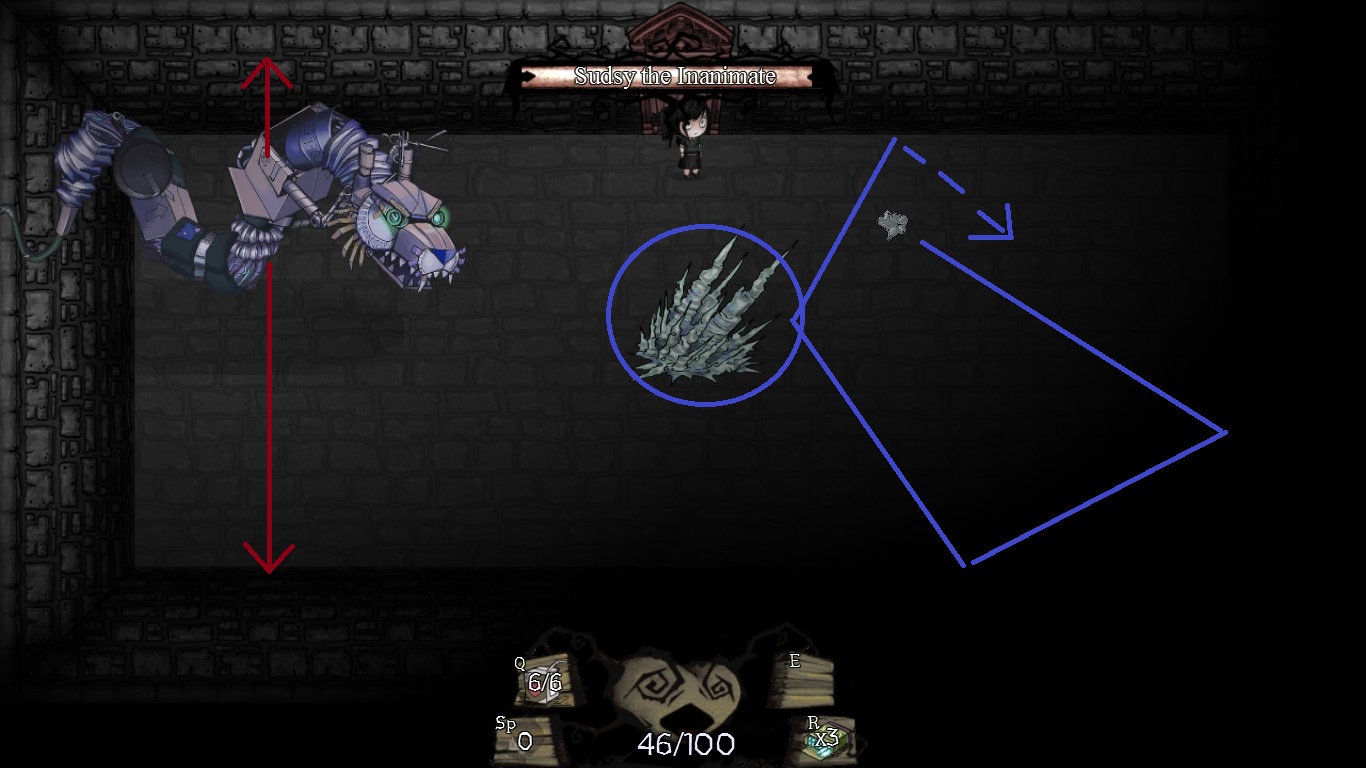 After some seconds the Inanimate will spawn a blizzard which will fly from the left to the right (or vice versa) damaging everything in his way. Since their is no natural gap you have to take cover behind the previously summoned ice block. After this third attack Sudsy (similar to Frothy) charges to the other side of the screen in a straight horizontal line. Simultaneous to his charge the bouncing ice ball will explode creating eight ice shards flying off in eight different directions. Dodging Sudsy and those ice shards at the same time can be tricky. Unlike previous (and following) bosses the Inanimate does not become stronger/more difficult with decreasing hitpoints and so another boss will be put to rest by your hands.
 Notable Hard Mode Changes: Sudsy has two changes for the Hard Mode. The first one is actually a good thing. Since he spawns two ice blocks instead of one you have a larger cover area for the blizzard attack and if you manage you have two blocks damaging Sudsy. The second change is the summoning of a second ice ball (great surprise I know) which is less helpful and more annoying.
7. Candelabra of Longing
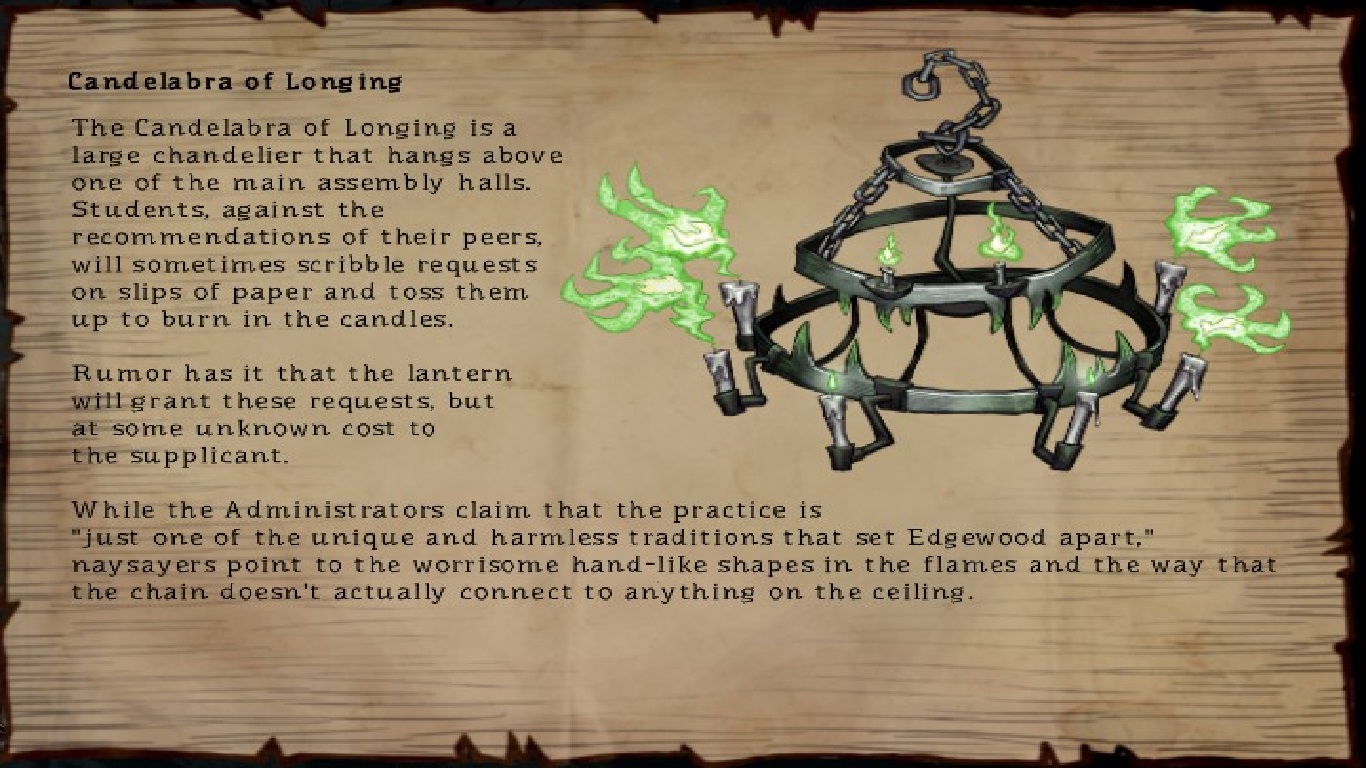 The Candelabra of Longing is a strange fight. The boss has only one attack and a rather simple movement pattern. He is circling up and down the screen in a kind of elliptic way. Every circle differs from the one before but overall you will always have a good grasp as how the Candelabra is moving. While in his constant moving he is shooting up to four small green flames in your general direction. This means that they aren’t flying directly towards you but also left and right of you to make dodging harder. The real difficulty in this fight though rise from two other facts. The first is that the floor is filled with caltrops so you have to pay attention where you are moving to. The second more troubling problem is that most time the room will be pitch black and only the area around the boss will be lightened. This leaves you with two possibilites: Staying close to the Candelabra, matching his movement while dodging the green flames and caltrops on short note or keeping your distance but loosing the constant information of the exact position of the caltrops. You can memorize the position of the caltrops for a small area but with the permanent barrage of green flames precise moving and dodging is difficult. In addition the Candelabra has one of the highest amount of hitpoints of the early bosses which makes this one of the more difficult chapter one encounters.
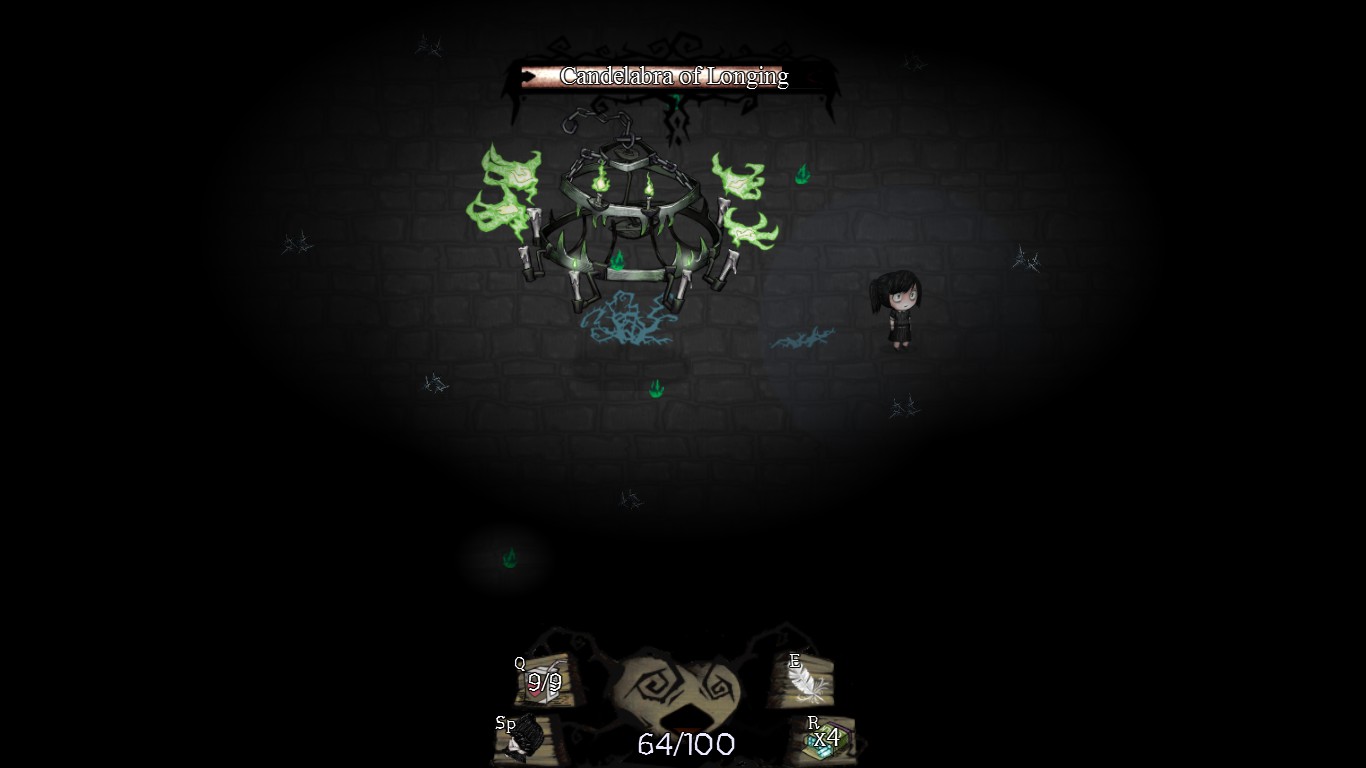
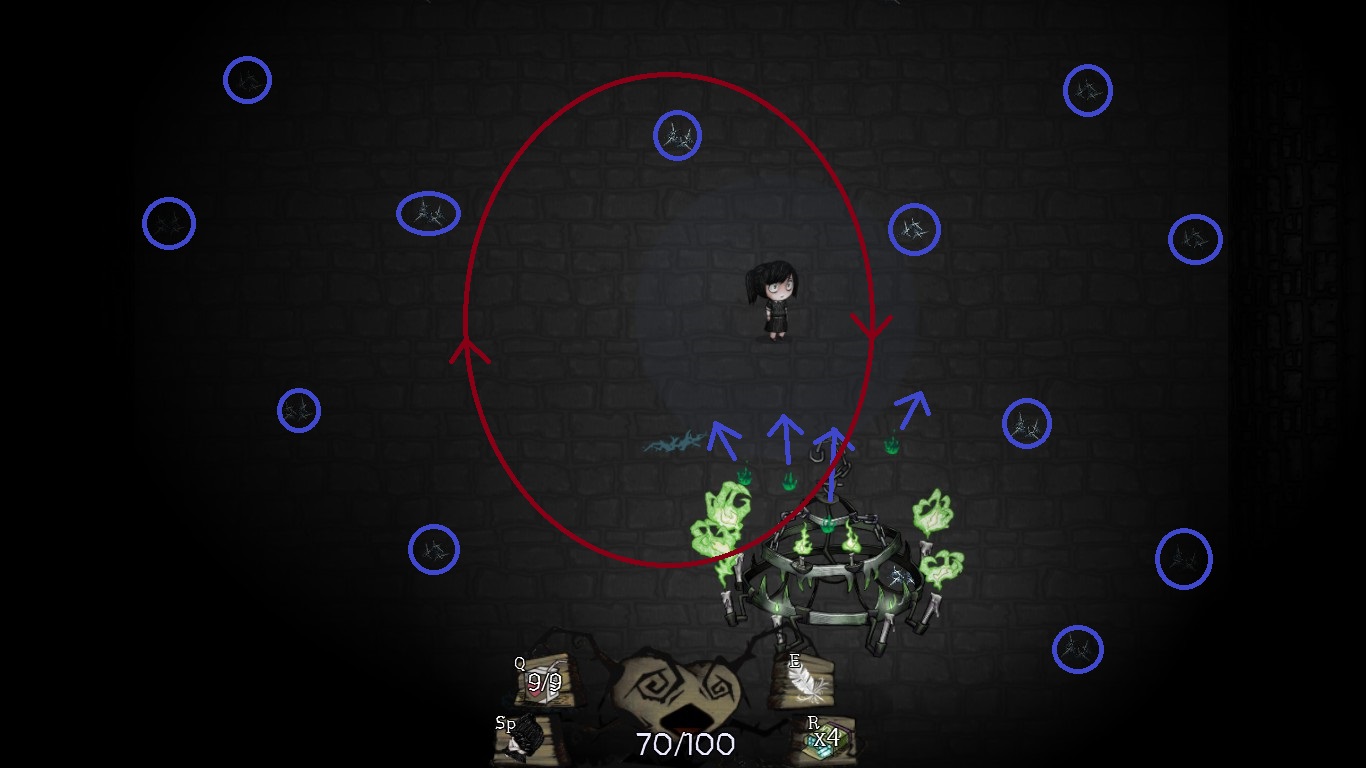 Notable Hard Mode Changes: The Candelabra of Longing will summon in regular intervals a blue caltrops dropper which moves around and throws additional spikes on the floor. This makes moving in the darkness even more dangerous. On a good note, you can kill those caltrops dropper just like normal enemies although the summoning rate is pretty high giving you less time to fight the actual boss.
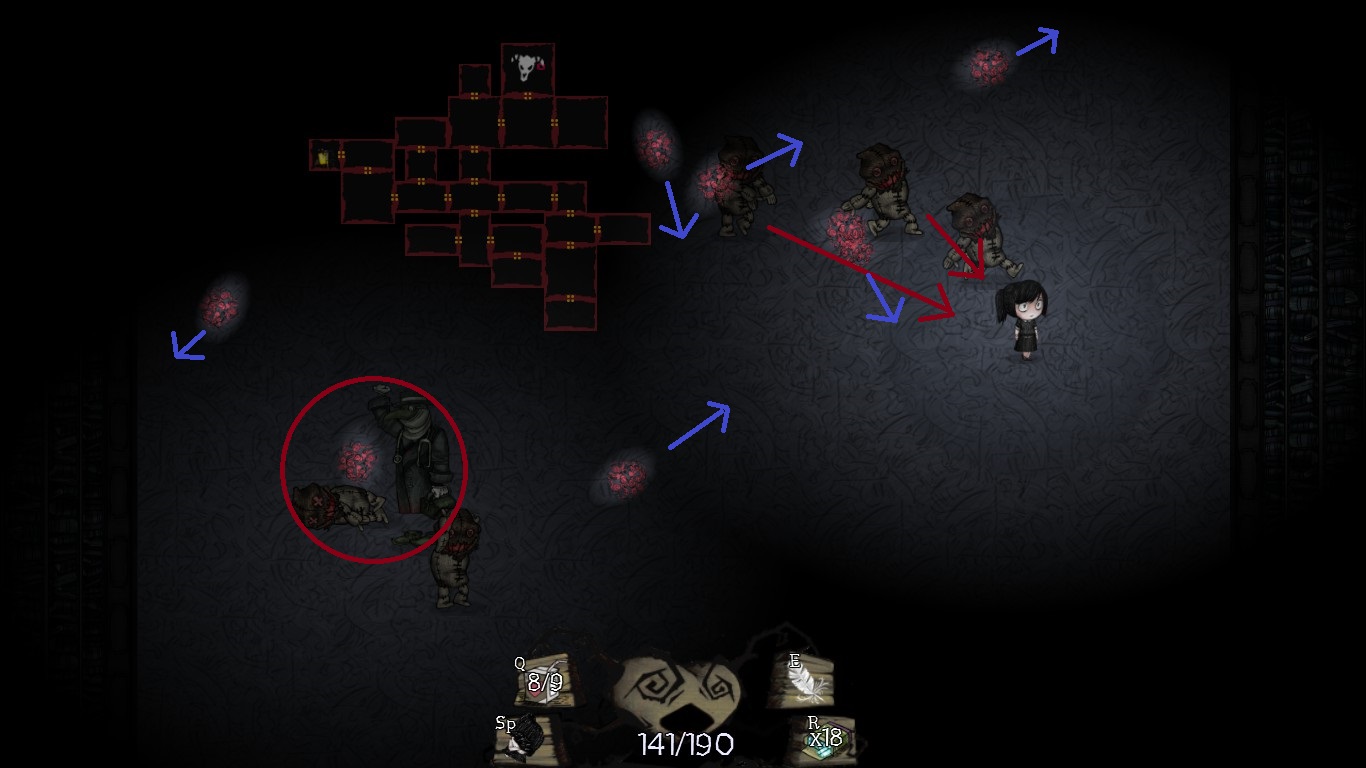
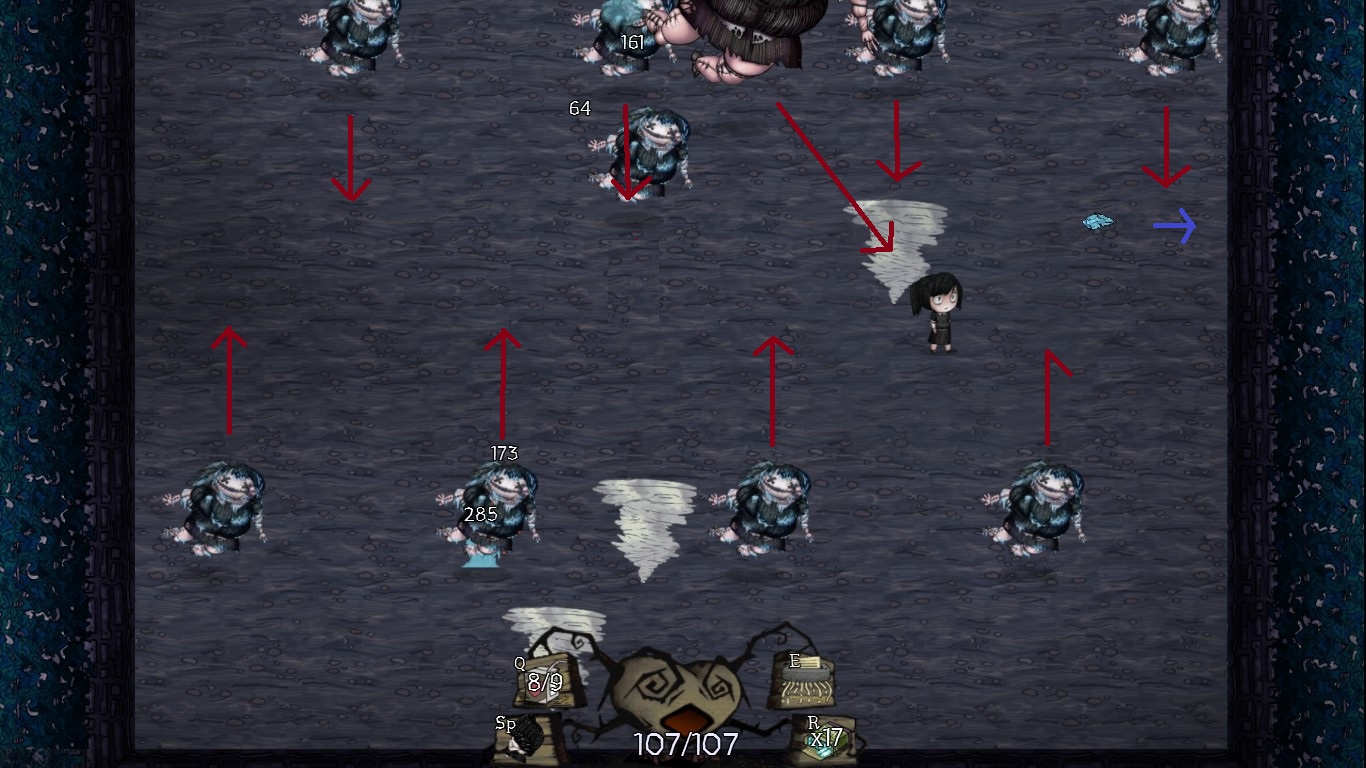
8. Goneril and the Woundwort’s Fortress
If you want to say so this fight is the first Story encounter in the game. No matter what on floor 4 of the Edgewood Home for Lost Children you’ll have to fight Goneril. Since the Woundworts are known for their strength and bravery they spent most of the fight in the buildings throwing stones at you. Since all the stones are flying in a straight line to your current position you can avoid most of them by careful movement. The good thing is that you can destroy every single building (although you don’t have to). For conveniece sake you should accustom yourself to destroy the building in the upper right corner first AND fast. From time to time, it shoots balls into your direction and is less annoying in normal mode but will be in Hard Mode.

 On the bottom side of the room you have three identical cabins which will (beside throwing stones at you) spawn chalk clouds going after you. If you manage to destroy the cabins each one of them will spawn two clouds which will move randomly on the lower part of the room and will not disappear until the end of the fight (see last picture). In the upper left corner is another cabin wich will occasionally spawn a collared Brogg. Upon destroying this one two more collared Brogg’s will spawn.
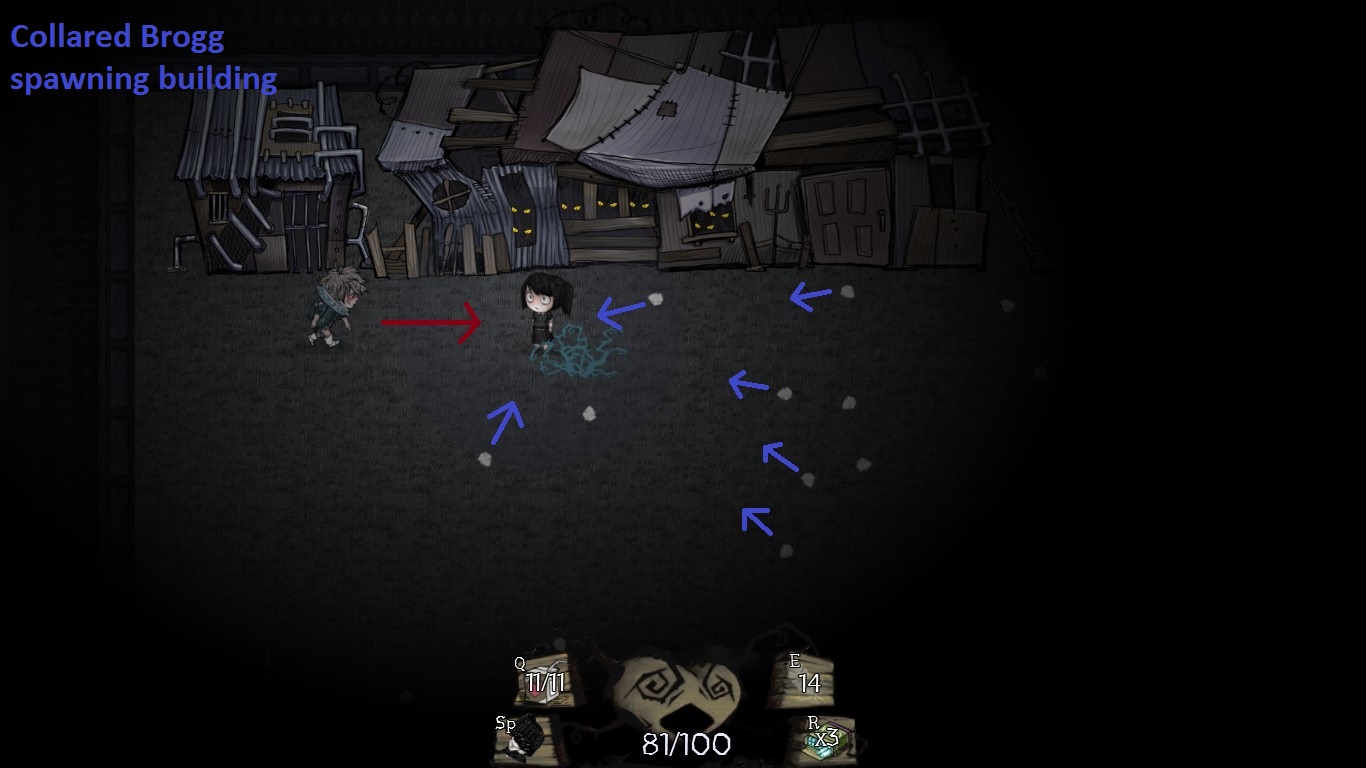
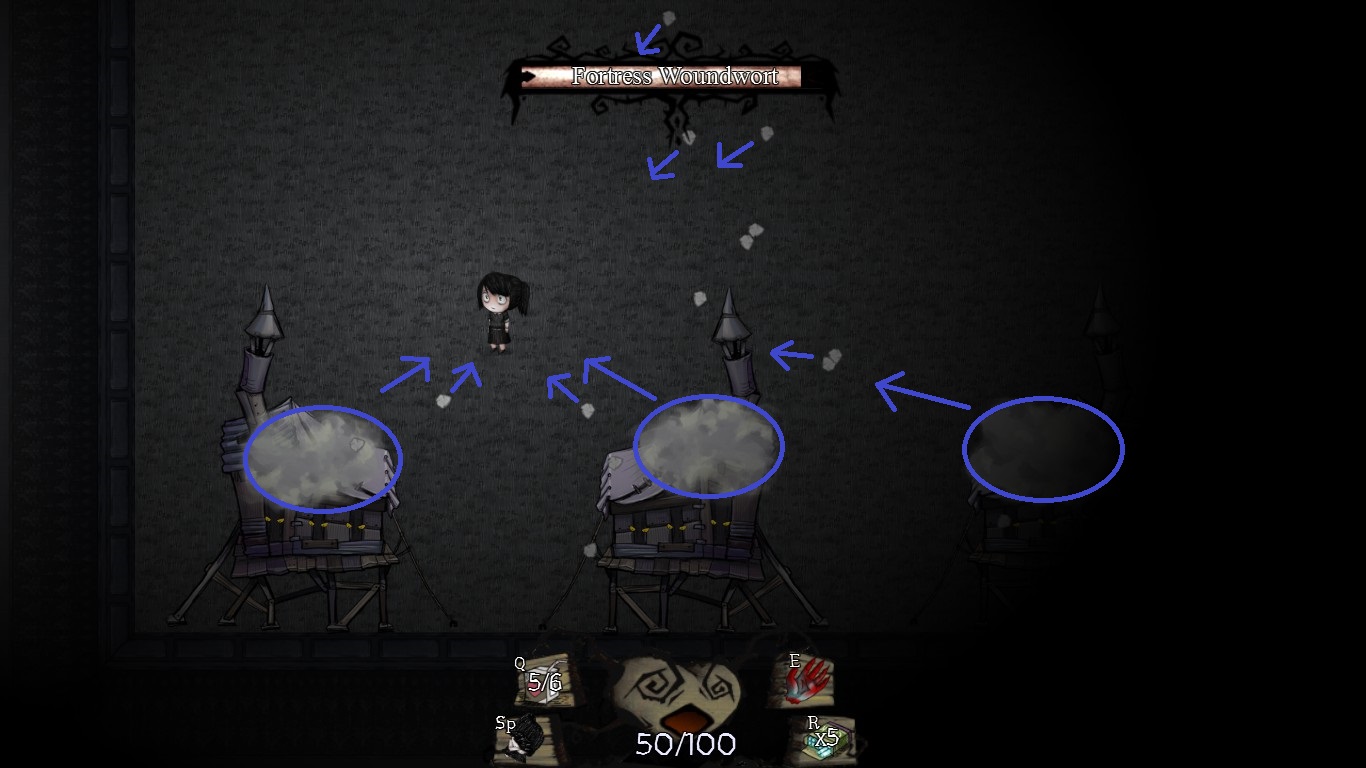 Like the cabin in the upper left corner the main building, the fortress, will spawn occasionally a Woundwort. At 25 % health however Goneril will leave the fortress and start attacking you. After this you should destroy the building so you only need to concentrate on Goneril (and the clouds at the bottom). Goneril has three attack patterns. In the first one she is moving in a straight line into your direction and keeps this direction until she changes into her Tornado form. Use this to position yourself and to win distance if necessary. In her Tornado Form she will chase after you and match every movement you make. For her last attack she is jumping high (out of screen) and will land a few seconds later on the spot you’ve been the moment she started jumping (so keep moving away from there). Upon landing she will create a circle of sparks flying in all directions. Also Goneril keeps increasing in size the more damage she takes. As the first story fight there are a lot of things to pay attention to and most people will probably feel overwhelmed the first time they get here. The good thing is that the fight is getting easier with the time since there is less stuff cluttering the screen with every building you destroy (and you should do this unless you are going for the achievement). And there goes Goneril, the leader of the Woundworts. Next three floors are your way to Regan.
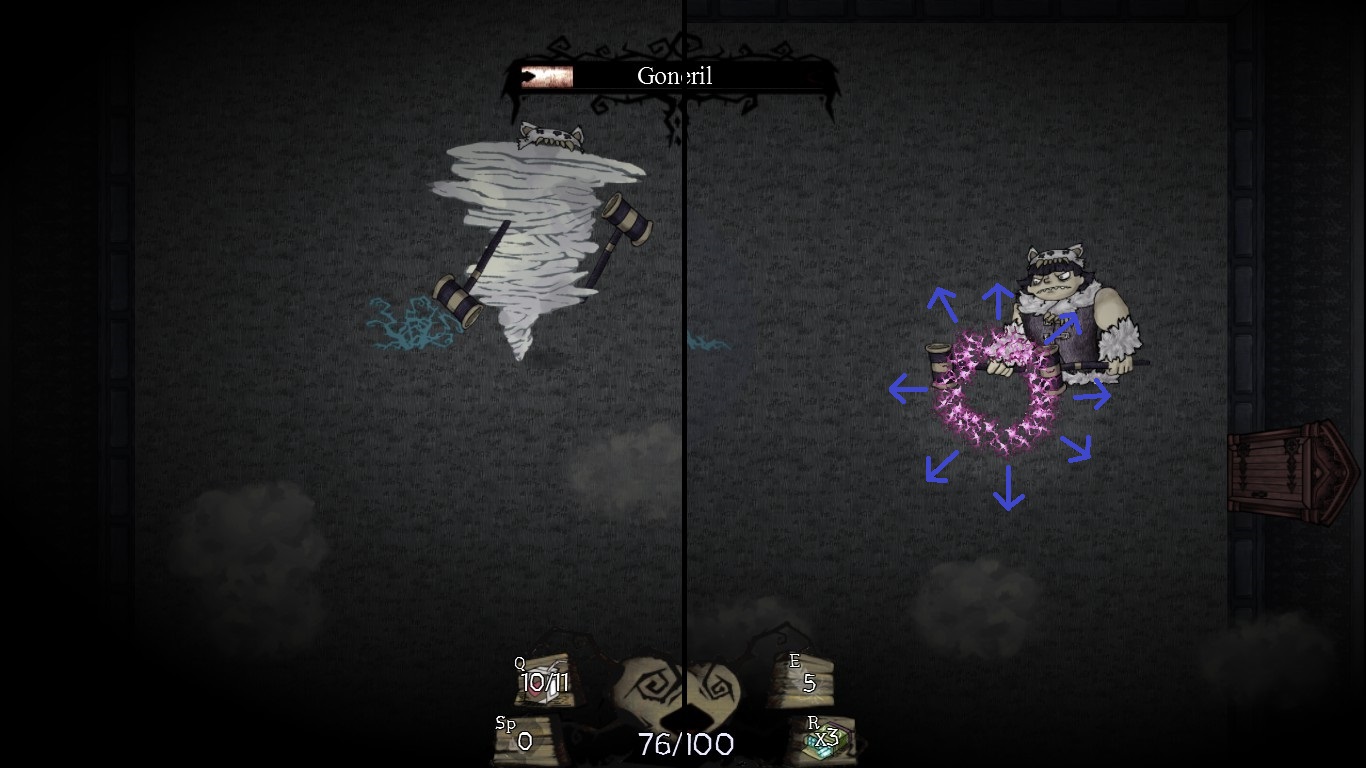
 Notable Hard Mode Changes: Most notable change is that instead of the small one time balls the building in the upper right corner shoots spiked balls at you. Those will NOT disappear. The longer you need to destroy the building the more balls will be there so destroy it fast. If you manage to smash it before it is shooting the first one it will still spawn two spiked balls on destruction because it would be to easy otherwise. The second change is that the cabins on the bottom side not only spawn normal cloud chalks but green ones aswell which are faster and can confuse you. Also upon destroying those cabins they will spawn another Woundwort for you to kill. As a last change Goneril will pull you in to her for a short time after she lands which makes evading the sparks harder.
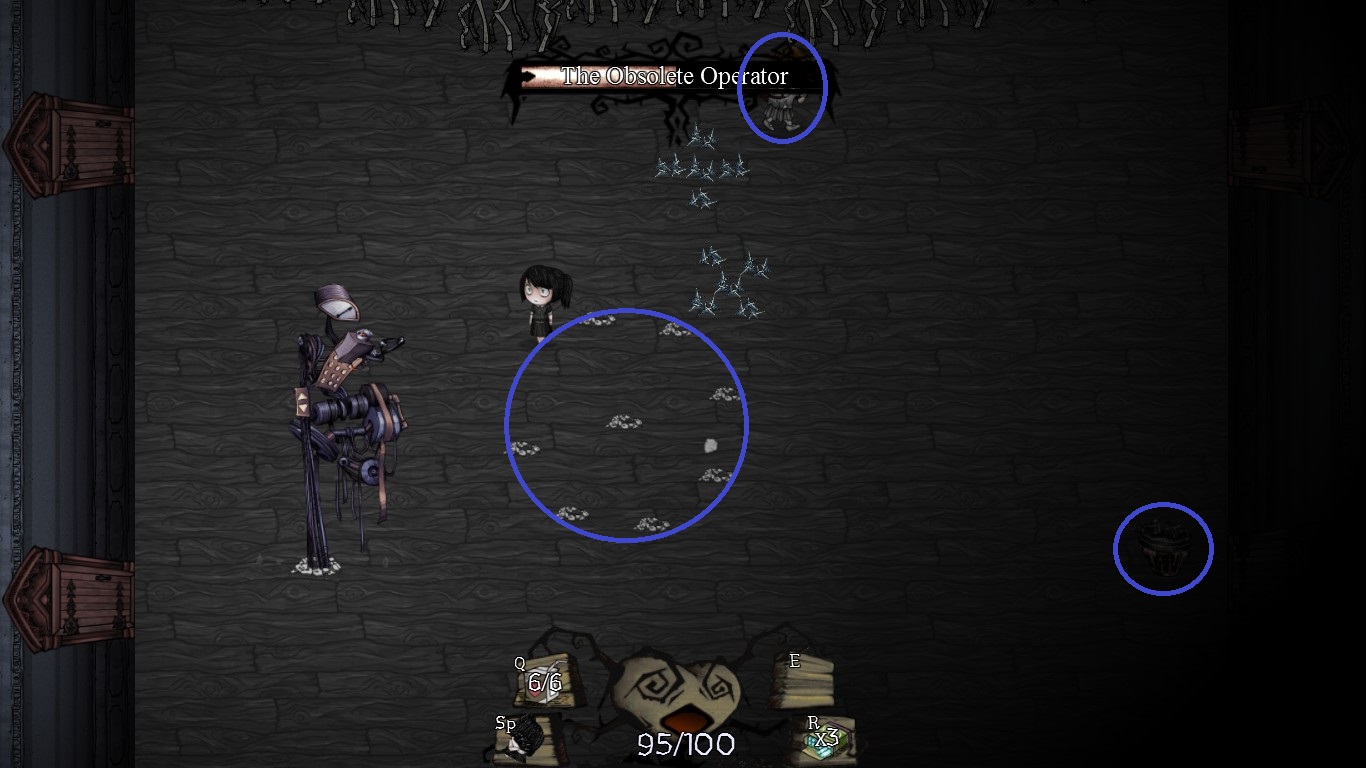
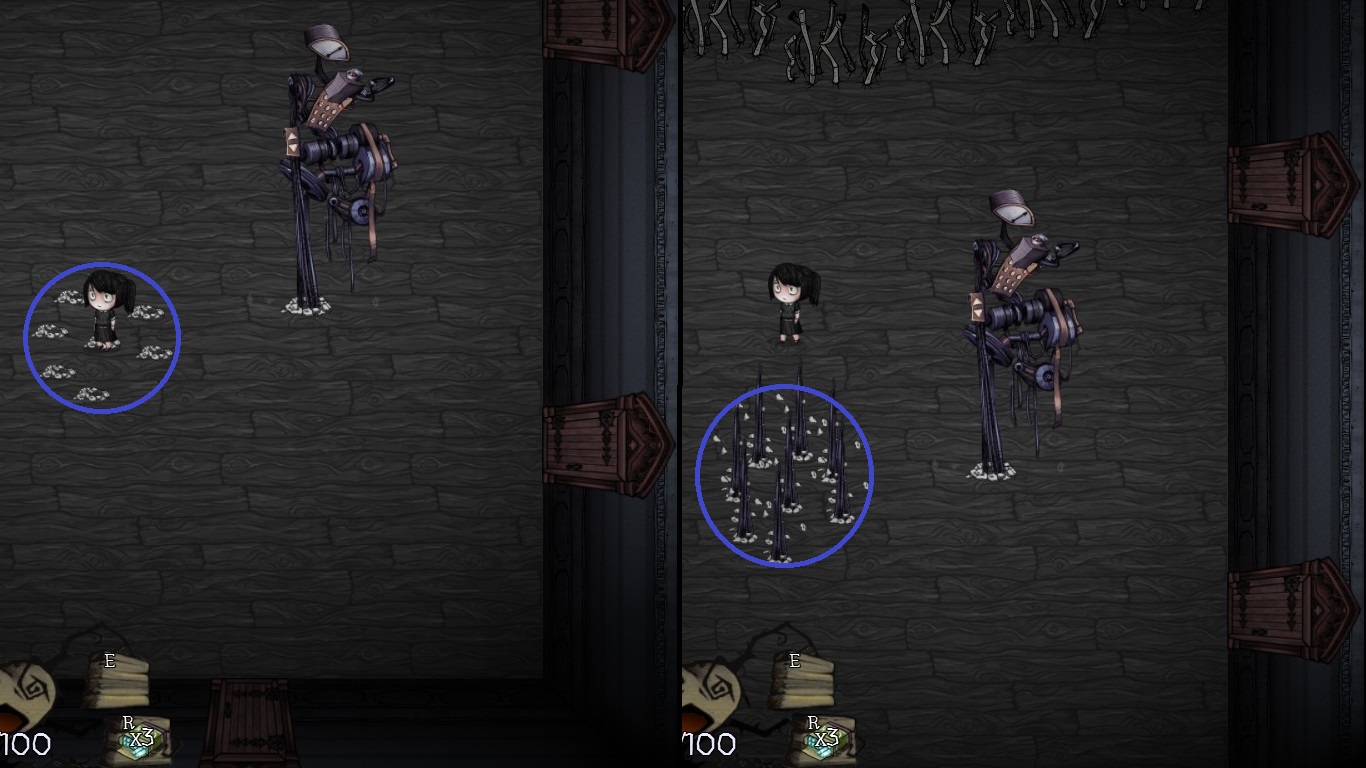
9. The Obsolete Operator
Although the Obsolete Operator is one of the chapter two bosses you will only encounter him on the floors 1-3. But only after beating Goneril at least once. This isn’t much of a problem since he is also one of the easier bosses in the game. He doesn’t move too fast so you can keep a good distance for damaging him without getting hit yourself. At the beginning of the fight he is alone but with time passing he will summon random Broggs through the doors. The number and the type of Broggs is absolutely random and can range from one to five. As fas as I can tell he will summon his minions at least twice (at two third and one third remaining health). Other than that he seems to summon more if you take your sweet time (correct me on this one, not sure anymore).
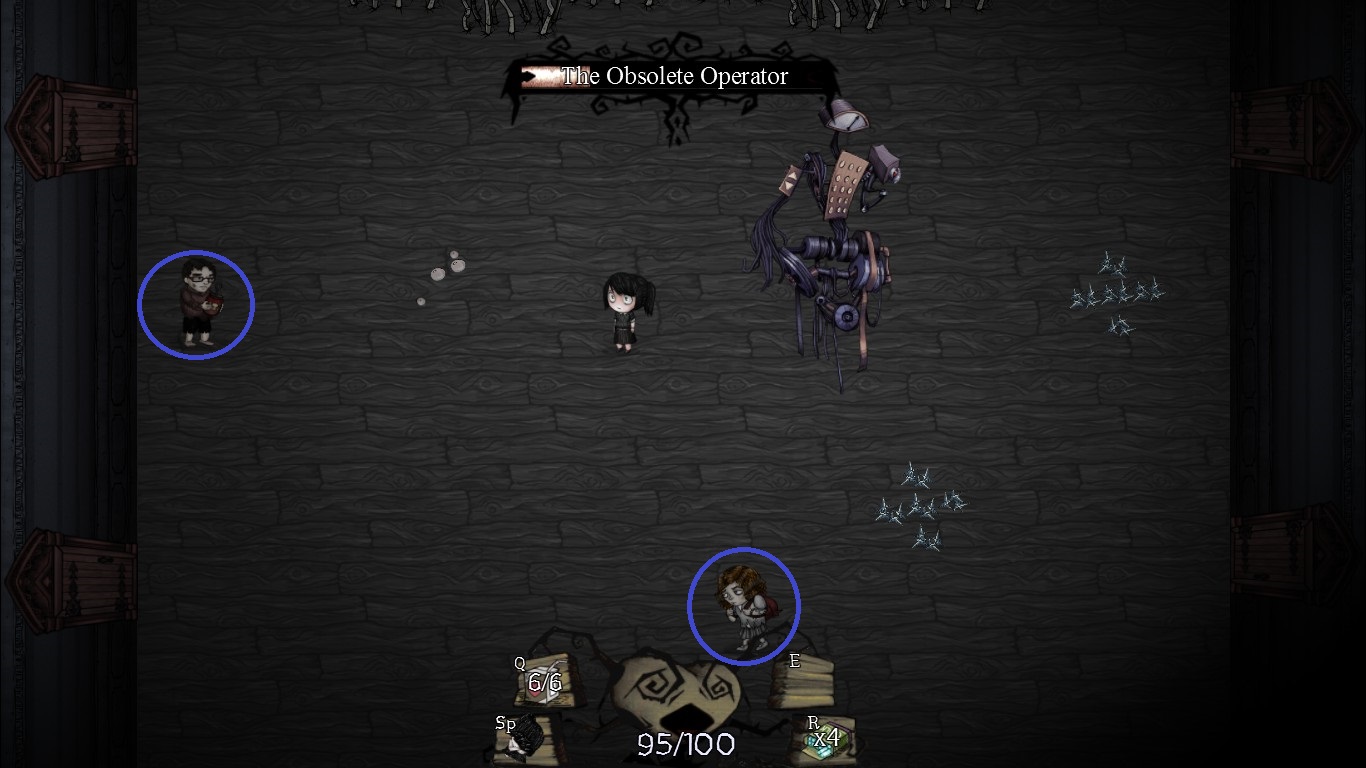
 Other than calling for help he has just one attack which renders him unmovable. He will drill his wires in the ground which then will appear under you. First you see some white dots which then raise up to damage you. So if you see them just move to a safe spot and keep repeating this. He has different formations (differing in their range) of this attack but they are all pretty easy to dodge. Combined with the low summoning rate of him this is really an easy fight.
 Notable Hard Mode Changes: Not too much change here. The Operator will now be able to summon certain Woundworts, Capulets and even Gifted Ones. It may be irritating the first time you see it other than that even on Hard Mode this fight remains easy.
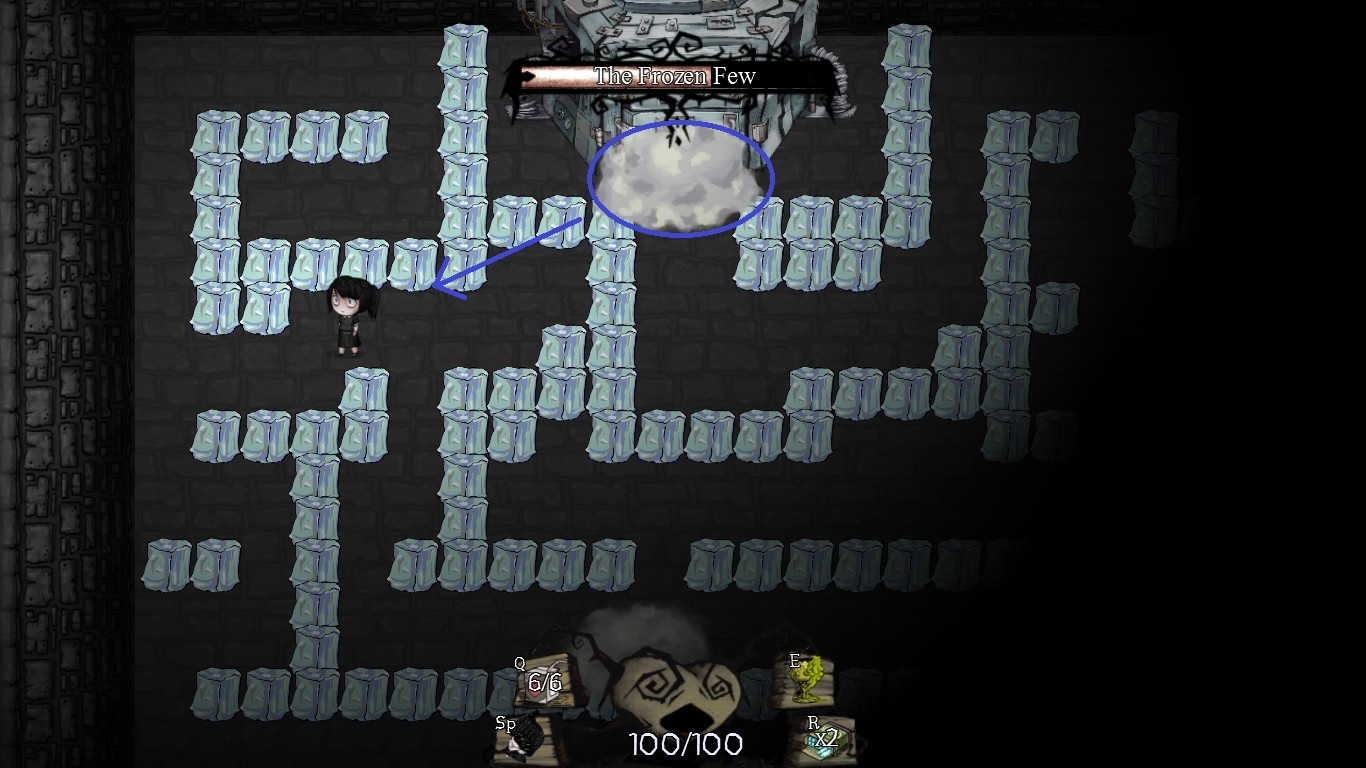
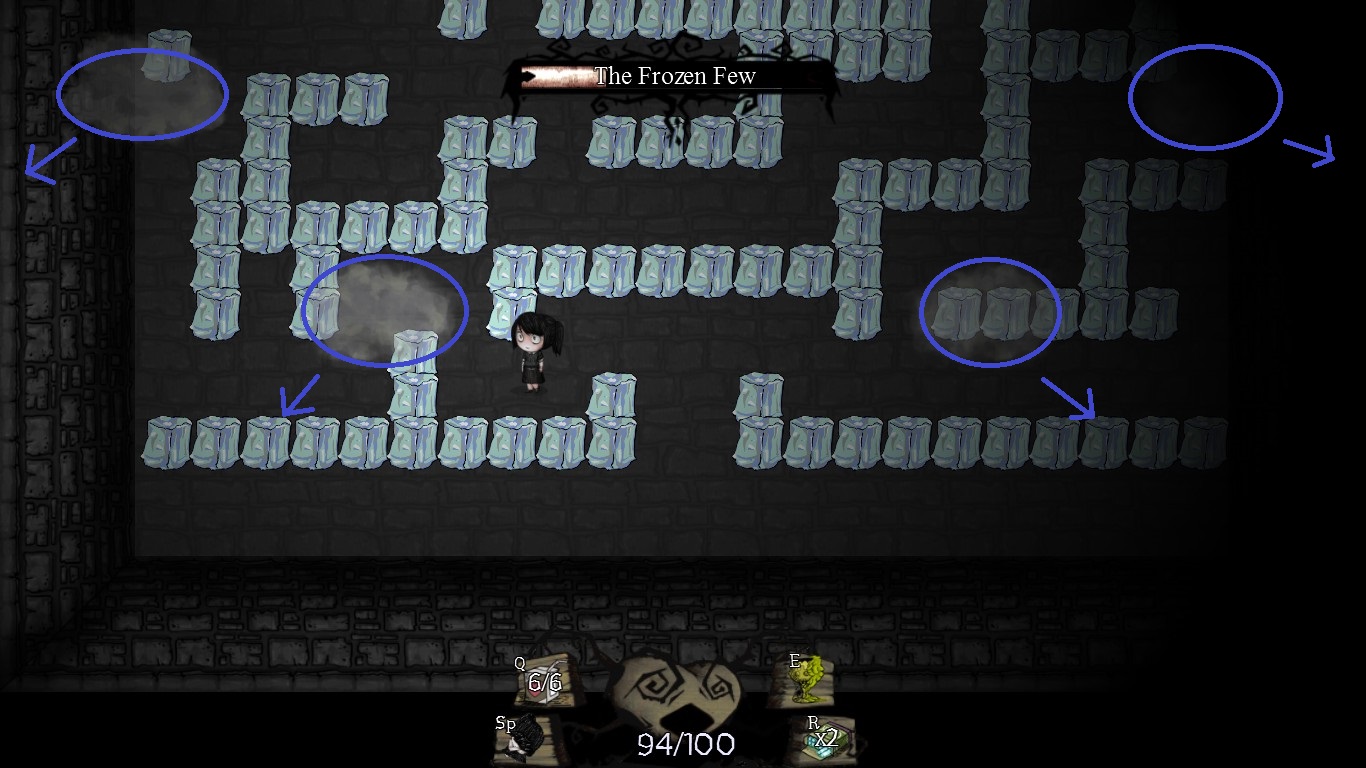
10. The Frozen Few
Similar to the Obsolete Operator the Frozen Few will start appearing as a boss on the floors 1-3 after beating Goneril the first time. And this is (so far) the first boss which doesn’t move for the whole fight always standing at the top of the screen. The Frozen Few has two different phases. In the first phase you have a more open field (there are different variations) and you can attack him freely. For his defense he will shoot two ice balls which are bouncing off on all the edges and corners of the field and find their way back to you. The less health the boss has the more ice balls he will shoot up to a total of six (in pairs of two).

 After some time the Frozen Few will create a pressure wave (and several clouds) shoving you to the bottom of the room. In the same breath he will create a maze out of ice blocks. In the meantime you need to navigate through the maze getting in front of him (the nearer you get the harder the dodging will be) and hit him. For this second phase he will keep attacking you with a cloud which flys in a straight line from his position to you. As soon as you hit him once (primary attack only) it will end the second phase and he shoves you back again while shooting clouds in the lower directions. The fight continues with phase one so just keep repeating and the Frozen Few will fall soon. As implied by the boss achievement this second phase is probably timed and you may fail reaching him before time runs out. Since it never happened to me there may be some kind of penalty if you don’t manage it in time (someone knows this?).
 Notable Hard Mode Changes: During the fight the Frozen Few will actually freeze you. This means you get slower the longer the fight takes as you will loose 15 movement all few seconds. So dodging and navigating the maze will get harder with a prolonging fight. I assume that as soon as you reach a movement of 0 the fight ends directly and you die. Otherwise you are an easy target and he will kill you anyway.
11. The Disciplined King
The Disciplined King is one of the more hated bosses in Our Darker Purposes. This is interesting because from an objective standpoint he should not be that hard. But he is in some regards one of the most unusual encounters in the game. It all starts fairly easy. The moment you enter you will see the whole room. There is nothing more than this. In the middle is the solitary Disciplined King. As the fight is designed in analogy to chess the King can only move one space either horizontally, vertically or diagonally while throwing stones at you (two at a time with a small or larger spread). Although the King can move in all eight directions he will almost everytime move in one of the directions away from you and as such he is the ONLY enemy in the whole game (as far as I remember) which moves actively AWAY from you.

 After loosing around a sixth of his health the boss will summon his first minion, a tower figure. Still in analogy to chess the figure can only move horizontal or vertical but as far as necessary. Normally it moves the moment you cross it possible ways trying to hit you by moving into you. If you avoid to cross them for to long the figure will position itself anew. After loosing a third of his health the Disciplined King summons his second minion, a bishop figure which can only move diagonally with the same behaviour as the tower figure. And this is all. You see everything there is to see at one glance and you always have a pretty good grasp at who is moving how. But with the King always keeping his distance around your basic shooting range limit (range upgrades and the ricochet upgrade are helping a lot), the small space and the figures being able to block your projectiles this makes an awful combination. As long as you stay away you get nearly no damage, as soon as you approach it can hurt a lot. More than most fights in the game this is a battle of patience. In a certain sense it is like playing chess. If this has been the intention behind the Disciplined King than I have to say that he is a design masterpiece.
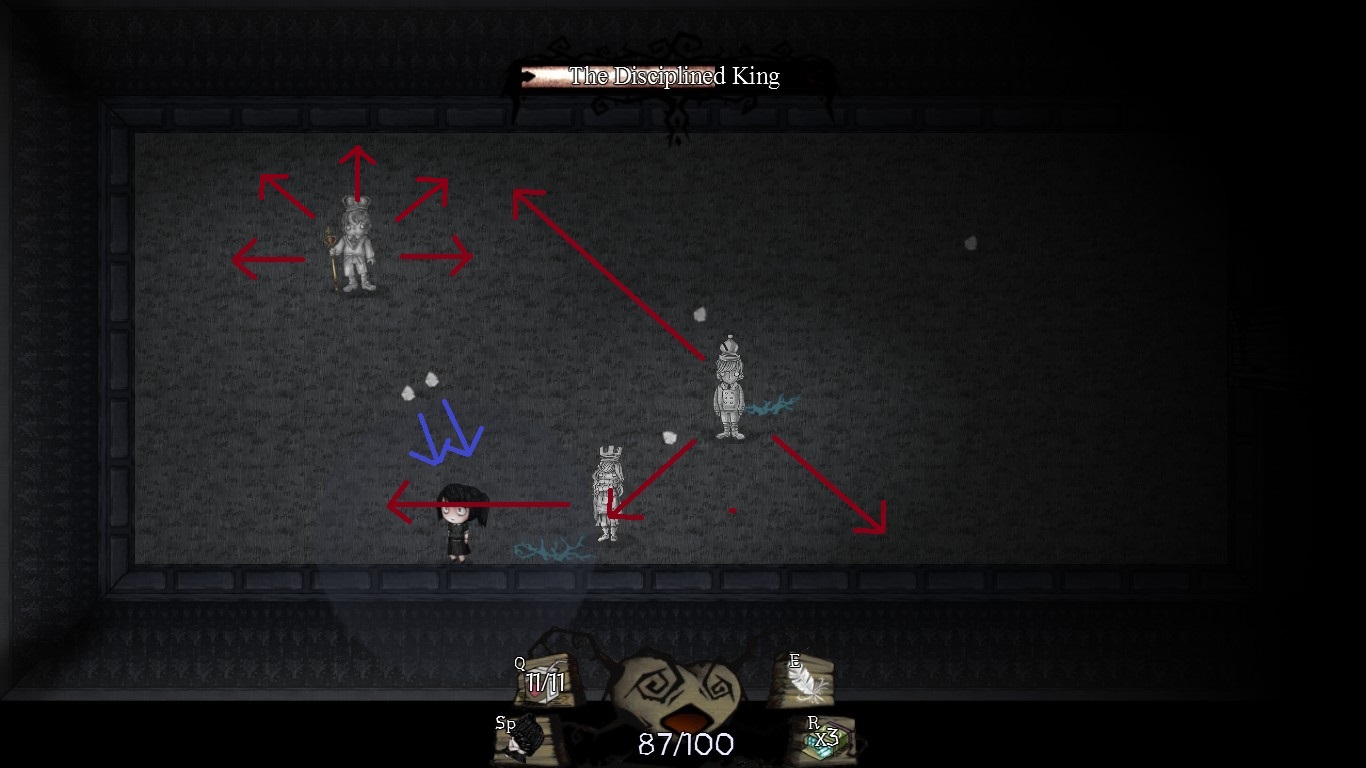
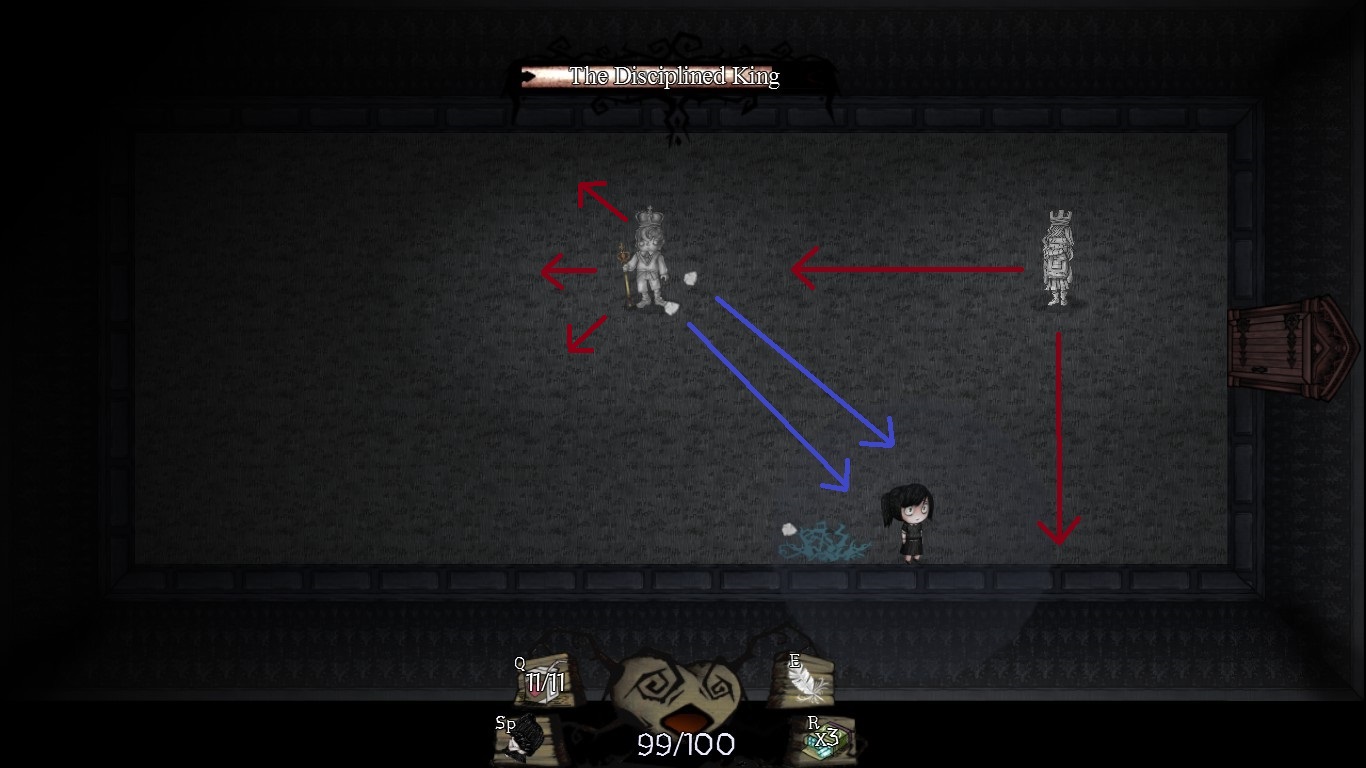 Notable Hard Mode Changes: Instead of summoning two minions he will summon a total of four minions (an additional bishop and tower). He only summons one at a time but he will have summoned all before he has lost half his health. This makes this fight even more cramped with 5 versus Queen Cordy.
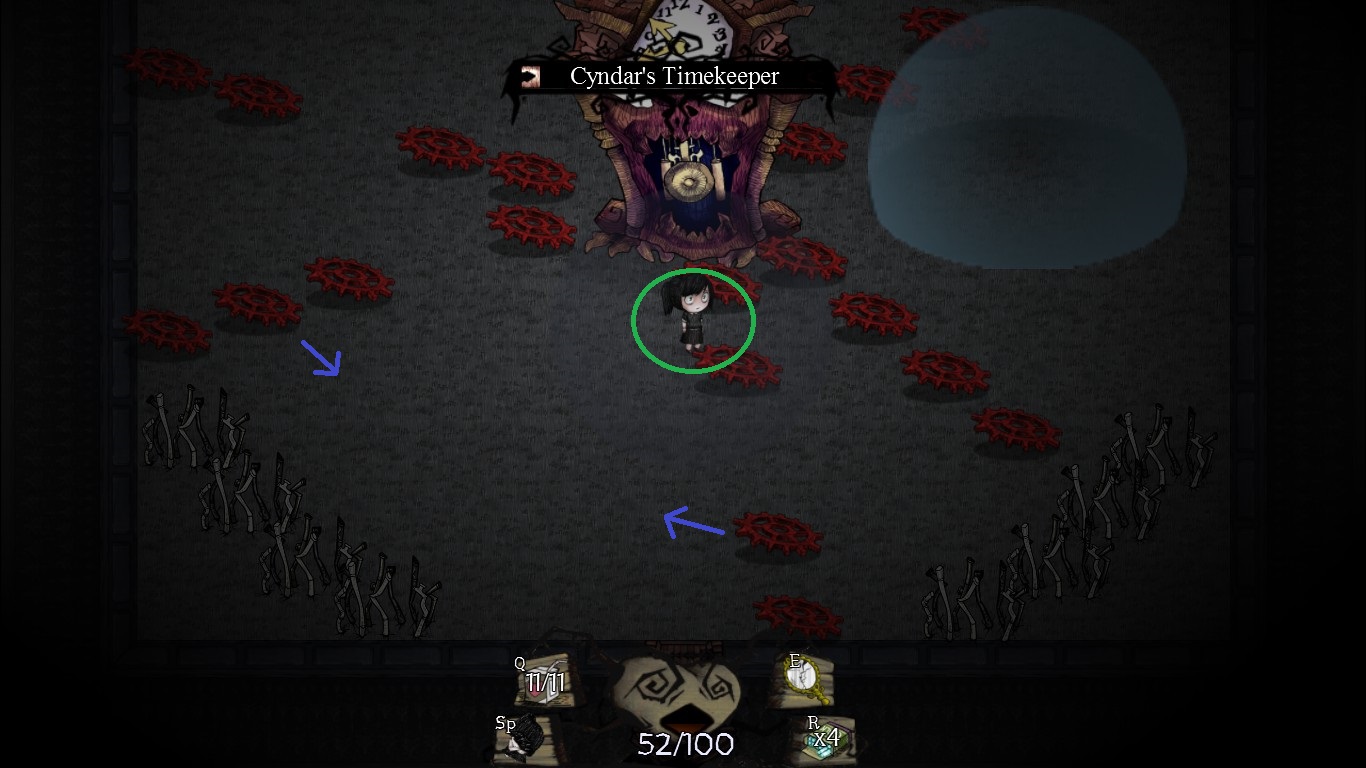
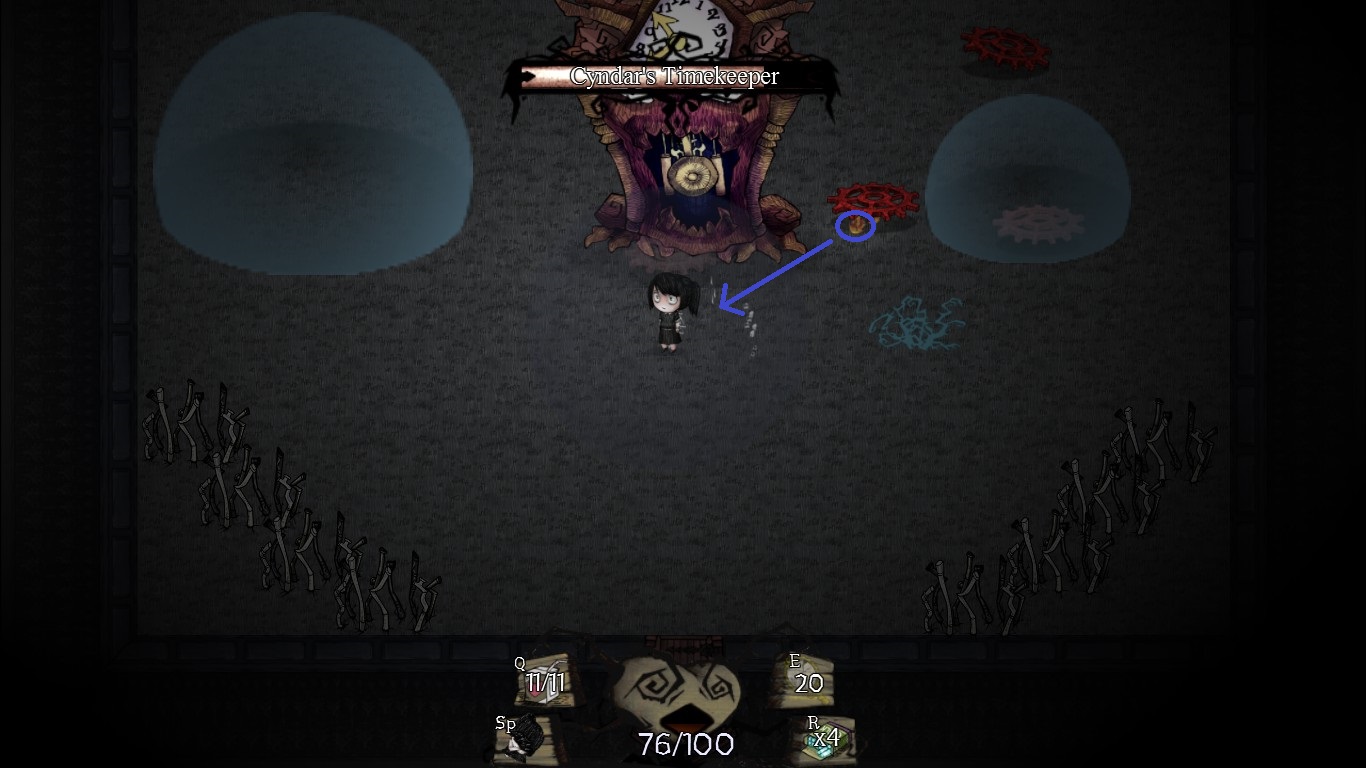
12. Cyndar’s Timekeeper
With Cyndar’s Timekeeper we have the second boss which doesn’t move an inch for the complete fight and in difference to the Frozen Few he is approachable the whole time. The reason he can do this is because he has a lot of health like really a lot. If you have a weak damage build this encounter can take a lot of time. After a few entry seconds the Timekeeper will spawn three straight lines of red gears which rotate clockwise around him. In those lines is always missing one gear which is the position for you to take to avoid damage. Other than the red gears there appear for some time big blue bubbles. While standing in those you will move and attack faster so use them well.
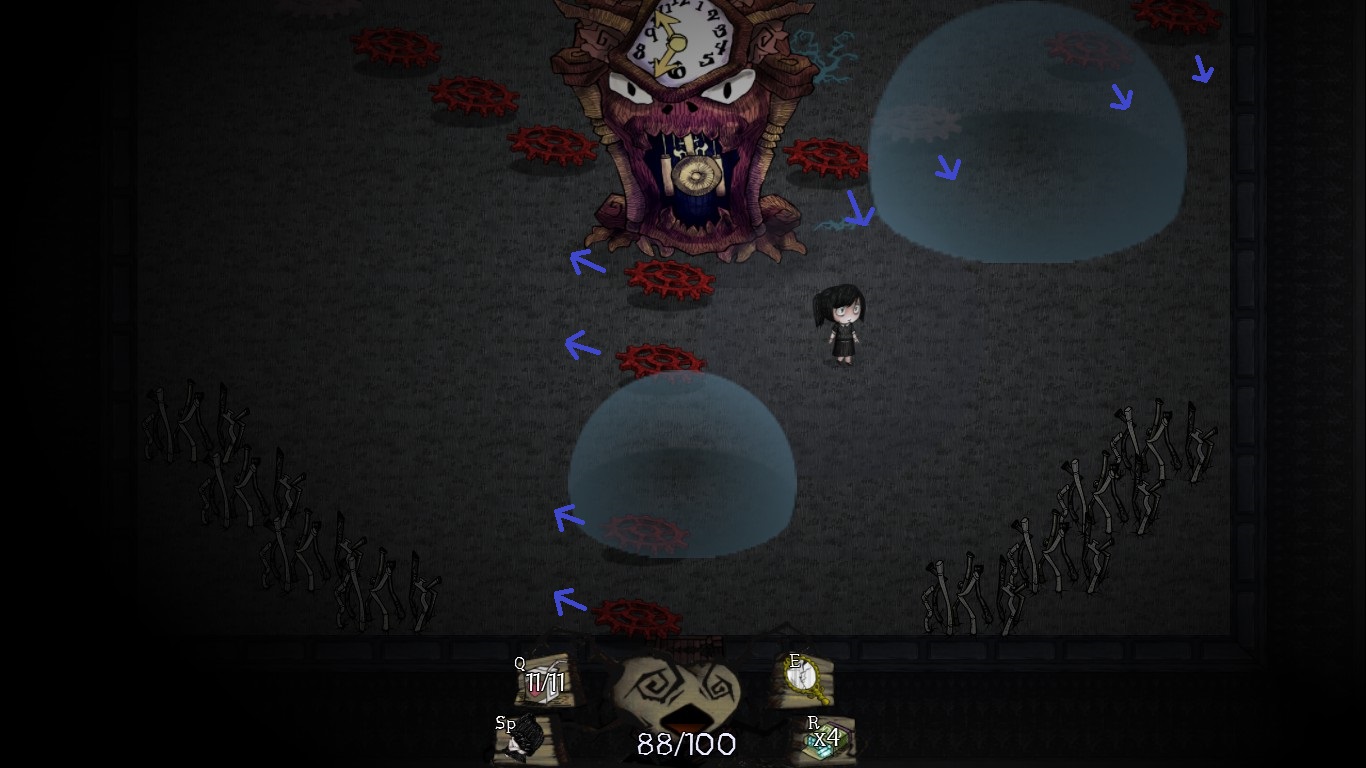
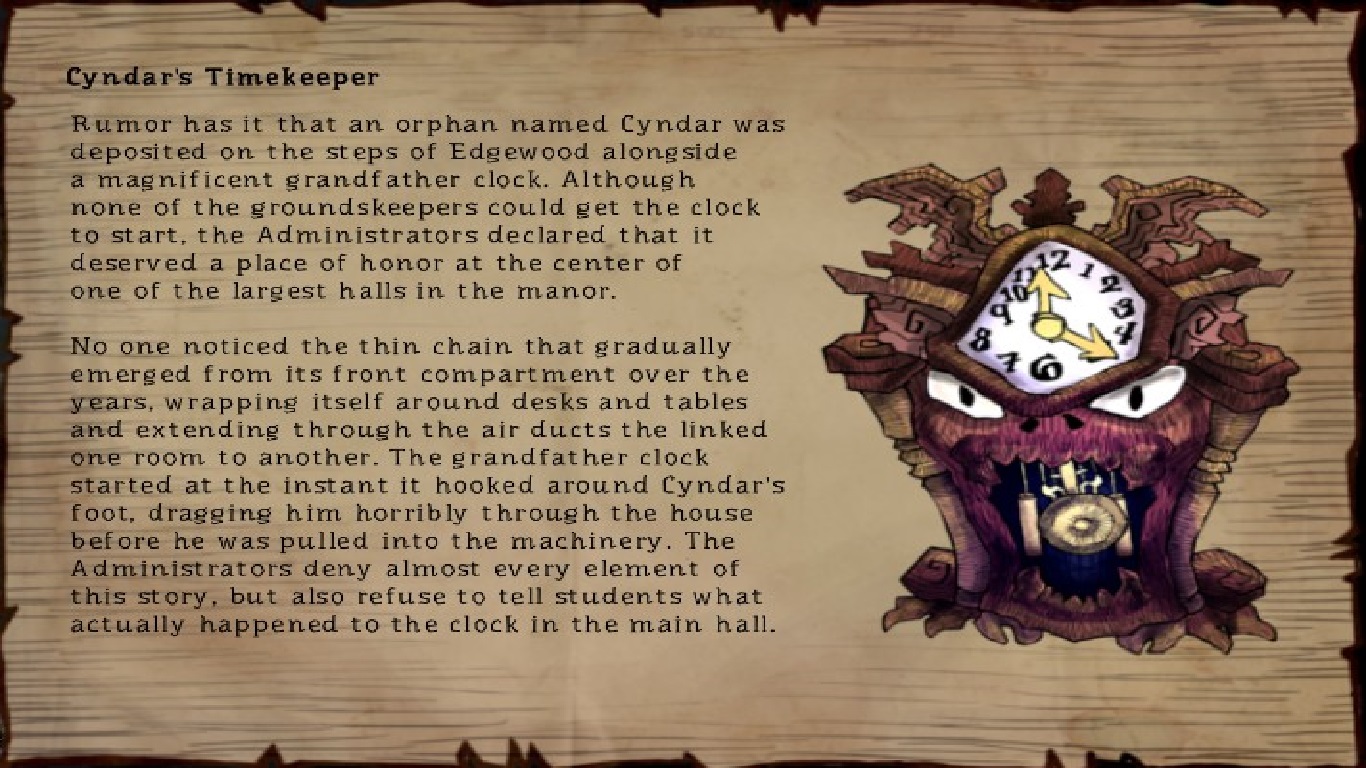 Other than the rotating gears the boss has an attack phase where he spawns single gears on your position (so keep moving away from them) which then proceed to shoot fire balls in a straight line in your direction. But as long as you don’t stand still this phase is rather easy. He will alternate two times between his two attack patterns and after he has lost around 75 % of his health he will spawn two sets of rotating gears, one clockwise one counter clockwise. Although they normally have a hole in their formation there is the possibilty you can’t dodge the attack if two lines reach your position at the same time. Ignore the green circle in the picture. It belonged to an invincible spot which was patched out. Still with a bit of coordination Cyndar’s Timekeeper shouldn’t worry you too much.
 Notable Hard Mode Changes: You remember those big blue bubbles making you faster? Now they slow you down, at least they are smaller than before most of the time.
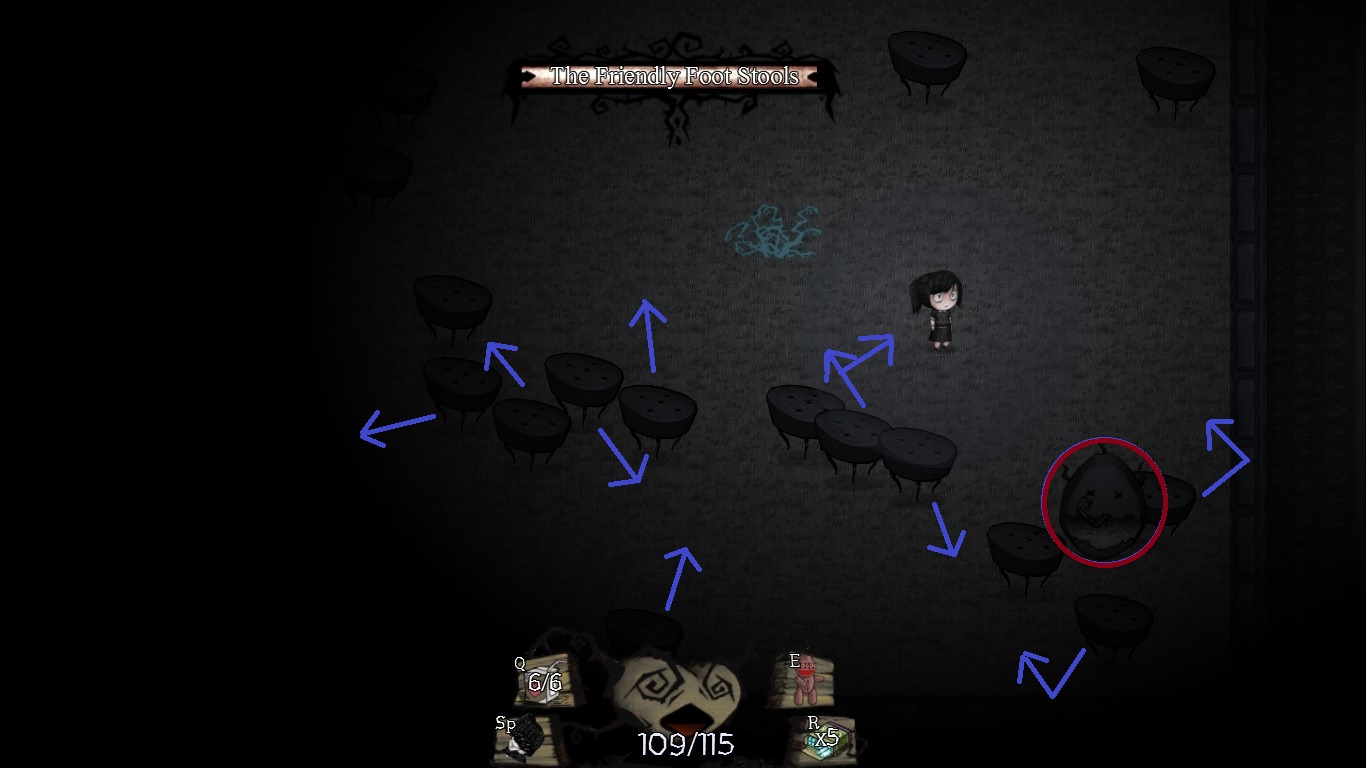
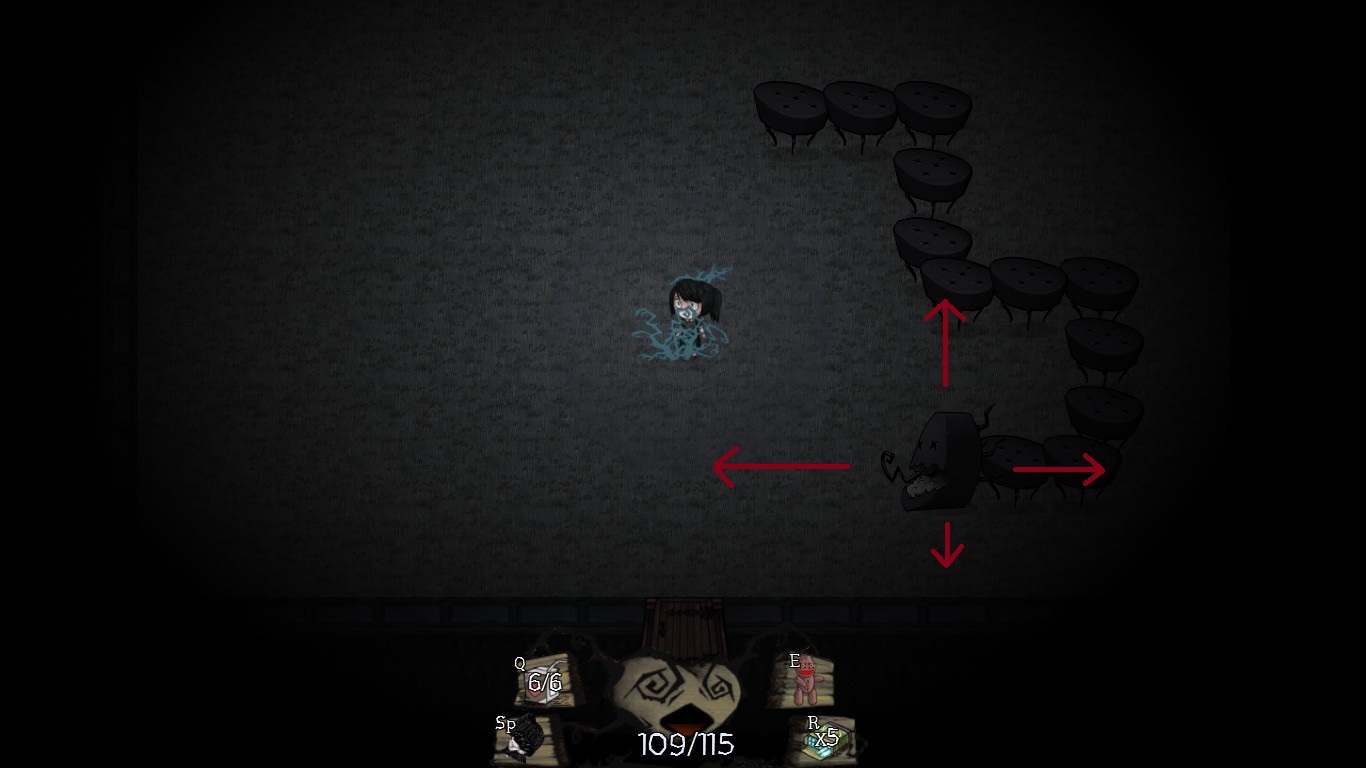
13. The Friendly Foot Stools
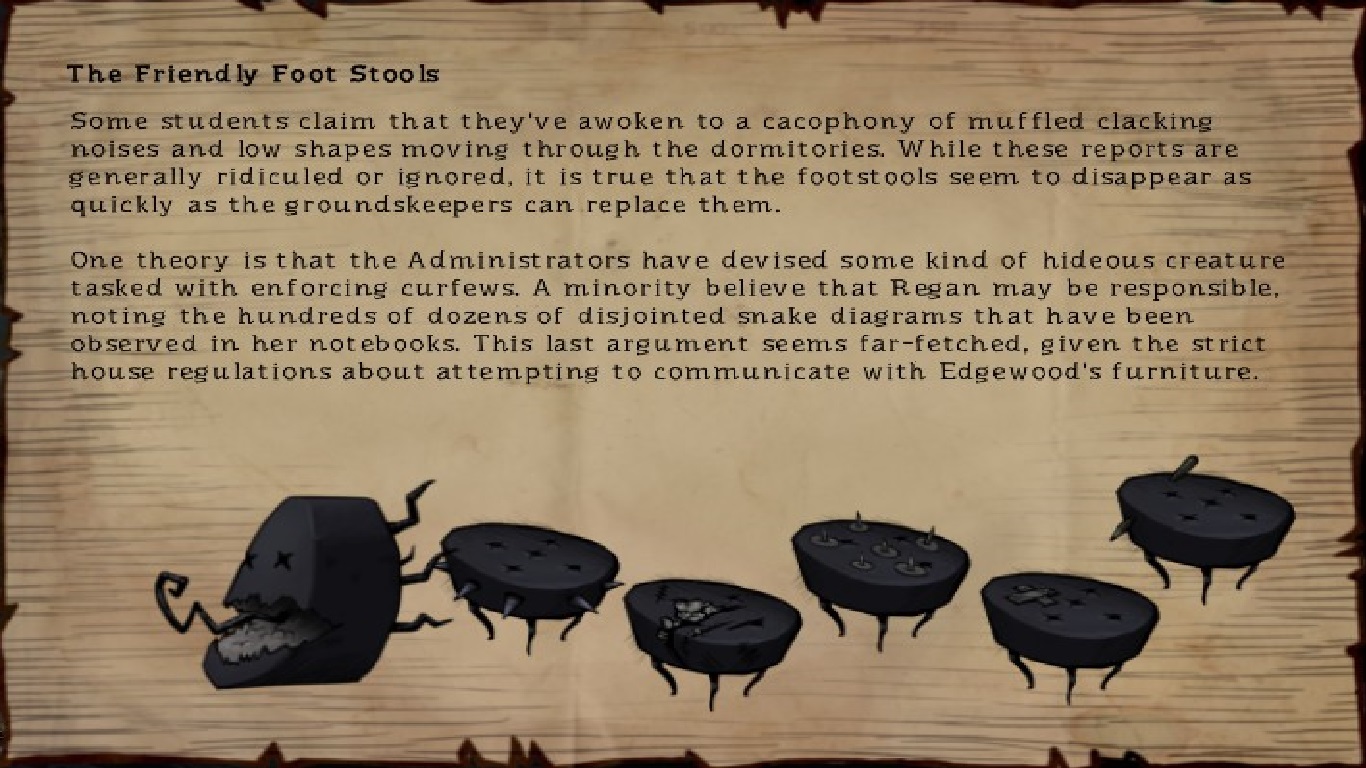 The Friendly Foot Stools are not as friendly as their name suggests. The fight against this centipede-like boss takes place in a rather big room. Like so often there are two alternating phases. In phase one the centipede is moving as a whole. In this state the footstools can only move in four different directions (up, down, left, right). The movement of the head is not hindered by the footstools following it so the boss can cross them or even make a 180 ° turnaround. In which direction he moves and how long he moves in this direction are completely random so just shoot in the direction and hope you hit. Take note the footstools can only be harmed at the head. Then in the second phase the head will stop moving but therefore every single footstool previously following him will fly through the room in all possible directions. Those footstools will move in one direction until they hit one of the walls and then bounce off similar to the ice balls discussed before. Since the head does not move in this phase it is your chance to get close and damage it. After some time the footstools will rearrange in their previous formation and the head will start moving again. And this is all to this fight. Okay, one little information is missing. The less health the Friendly Foot Stools have the faster they move. Actually that is important ^^. Defeat him fast otherwise this battle may turn out ugly.
 Notable Hard Mode Changes: The change for this fight is a logic conclusion and actually you think it wouldn’t make such a large difference. But for me this is the battle which has the largest leap in difficulty from Normal to Hard Mode. All that is different is the head no longer sitting still in the second phase meaning he keeps moving around. Especially at lower health points the footstools and the head are moving so fast that hitting them appears kind of lucky.
14. Regan, leader of the Capulets
The second story encounter and as such the second fight you have to do in order to complete the game. Regan, the leader of the Capulets is your enemy on floor 7. It is starting really harmless. In the middle of the big room Regan is floating around. She is floating rather randomly but not too fast that you can’t hit her. Generally, she flies from one point to another and stands still for one or two seconds. Normally she uses this time to cast an attack.

 Regan has three basic attacks: A triplet of violet electric sparks flying in a curved line towards you, a triplet of ice balls which create three ice shards each on contact with the wall and a double fire ring which spreads in all directions. Each of these attacks has a slight spread meaning the farer you are away from the origin the more space is between the parts. After she has lost a fourth of her health Regan will split in a total of three. One keeps the appearance of the original, the other are blue and purple. Unlike before each Regan has only one attack at her disposal: The original uses the double fire ring, the blue one the ice balls and the purple one the sparks. While knowing which Regan attacks you how is nice, it doesn’t really help since from this moment the screen is spammed with projectiles. To make it worse only the original can be harmed and she is the hardest one to approach since the fire attack has a 360 ° radius. But do not fear, Regan can still become worse.
 Actually it depends, I find her last phase in some regards easier than the one before. After loosing around two thirds of her health points she will change her attack patterns. The purple Regan is shooting big spark balls which keep following around everywhere. They can make sudden direction changes even up to 180 ° but have a slight delay. If you dodge them near the wall they will hit it and release some small sparks. You should try to let them hit the wall at the start because the longer they fly around the faster they move. The blue Regan creates ice blizzards flying from left to right or vice versa and make moving vertically more dangerous and the screen even more loaded. The original Regan creates fire spots. They are chosen randomly and appear as a red x on the battlefield and then burst into a fire. The fire does (for a change) NOT move and as such this attack is less dangerous then the fire rings since it is now a lot easier to approach the original Regan. It may be difficult but keep your eyes open in the fight and try to pay attention to every information and you can win this fight. Although the first time I fought her I thought as well: You must be kidding, right?

 Notable Hard Mode Changes: How could you make this fight possibly harder? Right, one more Regan, a white one (white?). This one summons little tornados charging through the room and they are rather fast. So yea, more stuff to dodge. Have fun. EDIT: She also seems to move faster and in a wider area which makes hitting her even harder. Yea, Regan is just pure fun ^^
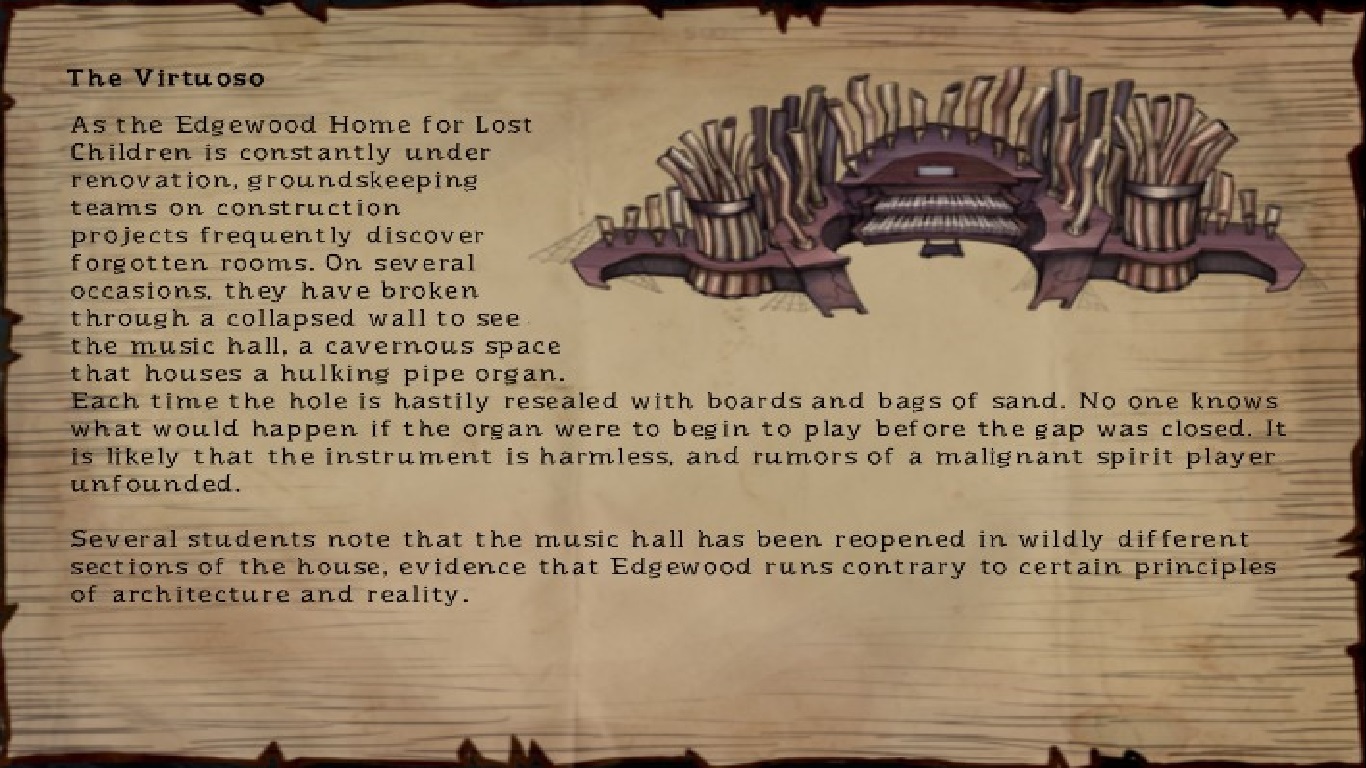
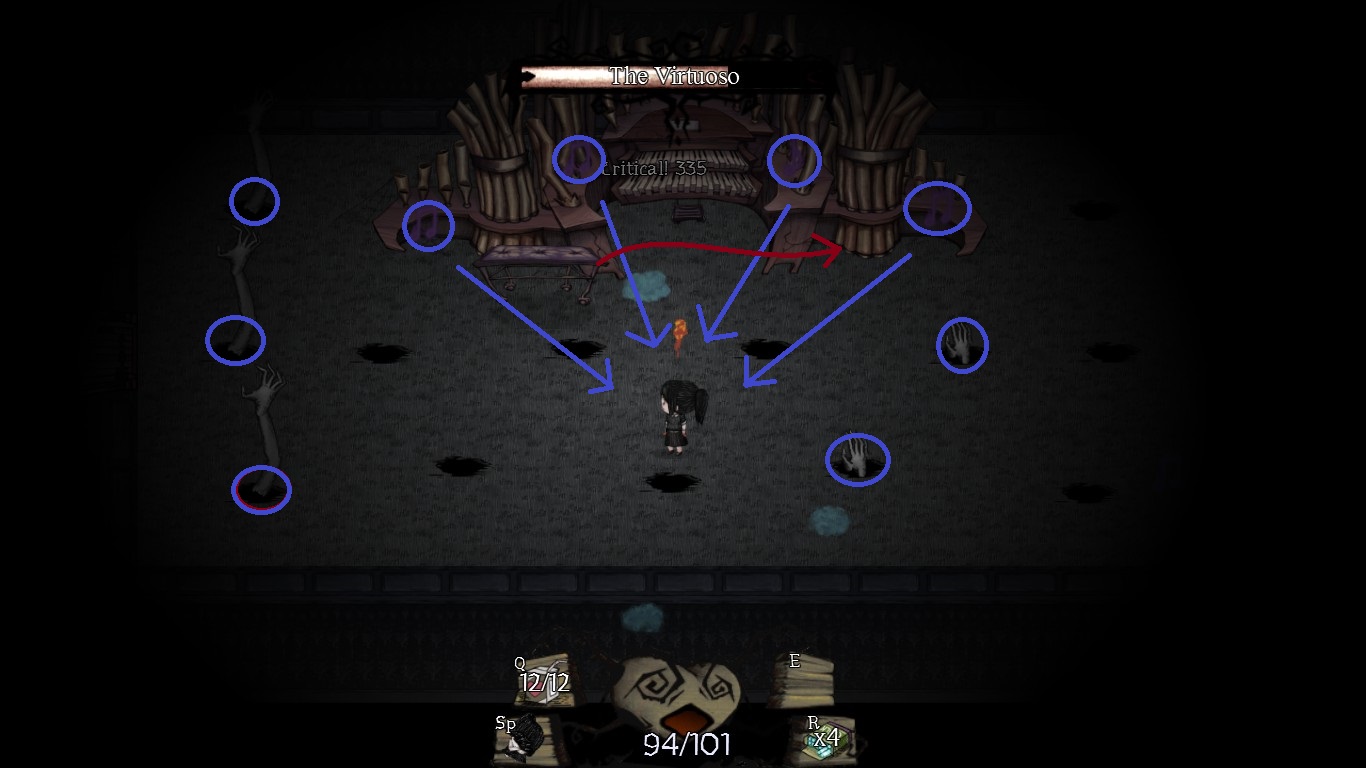
15. The Virtuoso
For most people, fighting the Virtuoso will be a reason to celebrate since he is one of the easiest bosses and with a little bit concentration beatable without getting harmed yourself. As you enter the room you will see the complete room the boss taking a large part of it on the upper side.
 The boss has only two attacks, one being purple notes flying in your direction (they don’t damage you but they will confuse you, so you should still avoid them). These are pretty slow and if you stay at the bottom side they will normally not reach you. Although combined with his second attack they may be annoying. On the ground there are many holes. Out of those holes are coming hands to grab you. But in contrast to the ones in the floors these follow a sequence and the sequence will always be telegraphed to you. You will always now one or two second in advance where they will appear so use this time. There are two patterns:
– Wave-like from the left to the right or vice versa
– Block-like either left side or right side or both.
After loosing a fourth of his health the chair in front of the boss will start moving left and right and block your attack. This is a problem since you can damage the Virtuoso only at his central part. So you bring either a lot of patience with you or if you can spare some chalk go close up to the flying chair and use it as the cloud will destroy the chair on contact and leave the boss defenseless.

 Notable Hard Mode Changes: Additionally to the single purple notes he will attack with note clouds which are bigger. So you have to dodge a bit more and adapt the timing of your movement. Still one of the easiest bosses even in Hard Mode.
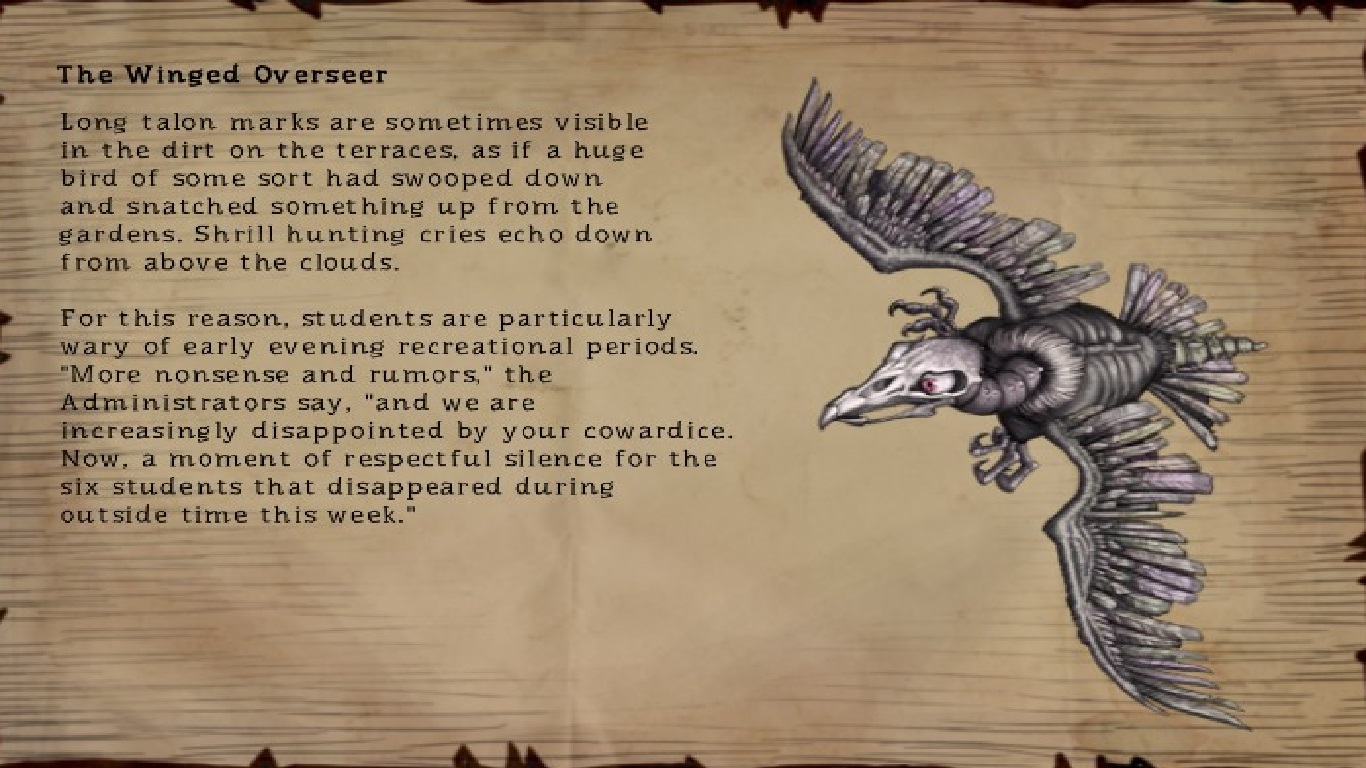
16. The Winged Overseer
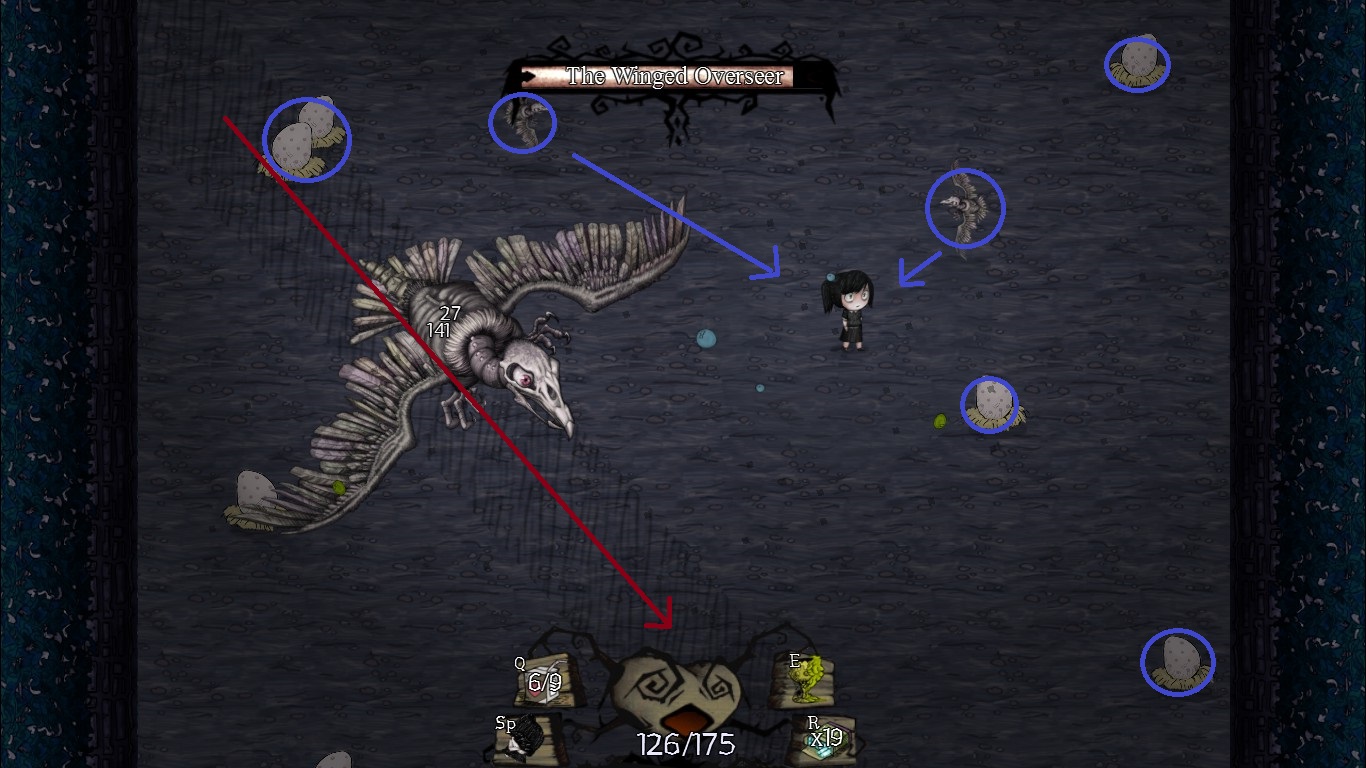
This is one of the few boss battles in the game where you (or at least I) feel the benefit of a fast movement. As soon as the fight with the Winged Overseer starts there are two things you will notice. First, there is an everchanging wind in the room disturbing your exact movement. Second, there are a lot of eggs in the room which will spawn small white birds as soon as the Winged Overseer, you or one of your attacks touch them. The eggs themselves will respawn occasionally. The Winged Overseer will hover over one spot in the room and send a triplet of red birds at you, the one in the middle in a straight line to your position, the other two above and under it. You can either keep distance and try to get through the gap or better stay close to the boss and roll around all three of them.
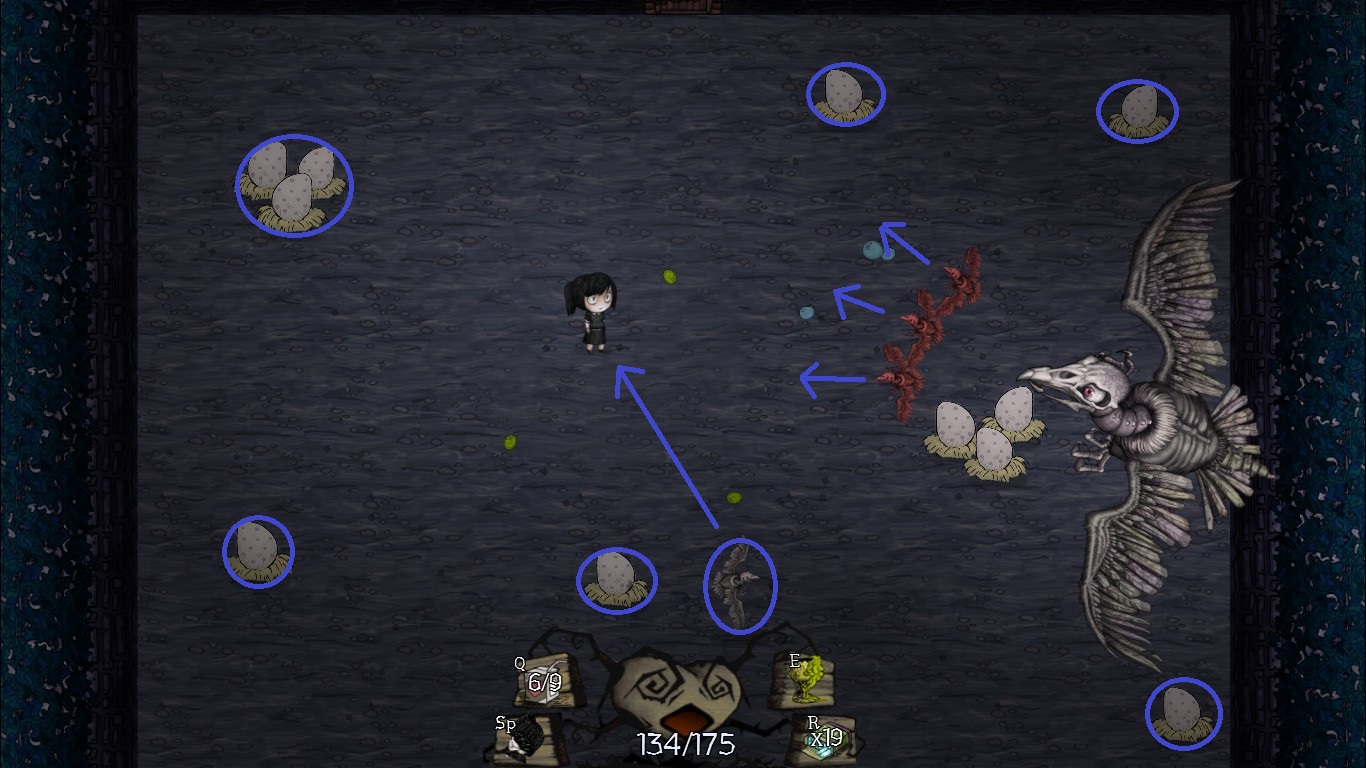
 Note that the Winged Overseer will always turn face in your direction so that the middle red bird always flies straight at you. After four or five triplets of red birds the Overseer will leave the room while flying in your direction. You can use this to position yourself so he will take the long route and damage him in this phase (but on contact he will harm you so better be fast). After he has left the border of the room there will appear a marked line on the ground and the boss will charge over it damaging everything in his way (like Cordy and the eggs). He will do this from 1-3 times and then he will begin with the first phase again. Important for the charge attack is that the span of the Overseer is larger than the markings on the ground. So you can still be harmed if you are to close to them. Also during the charging phase their will be no wind so you can move normally. The Winged Overseer is usually of normal difficulty. But if you are missing some kind of area attack or the roll items the white birds can become annoying til deadly. Other than that: Happy Bird Hunting.
 Notable Hard Mode Changes: I have to think if I ever fought the Winged Overseer in Hard Mode and I can’t remember it. At least no notable changes. If you read this and you know some please tell me. It may be that he shoots not three red birds but five but can’t say for sure. Another possible change may be that the little birds have more health which makes killing them more difficult as before.
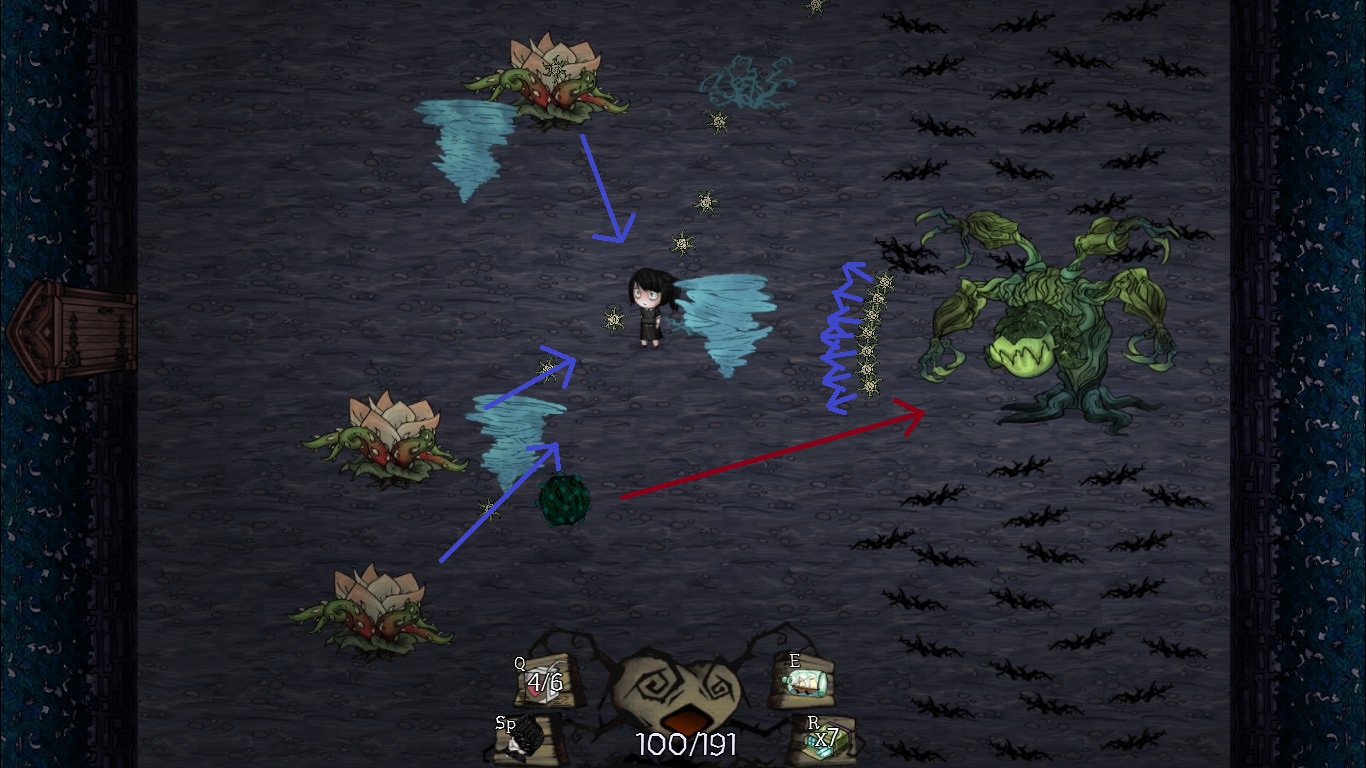
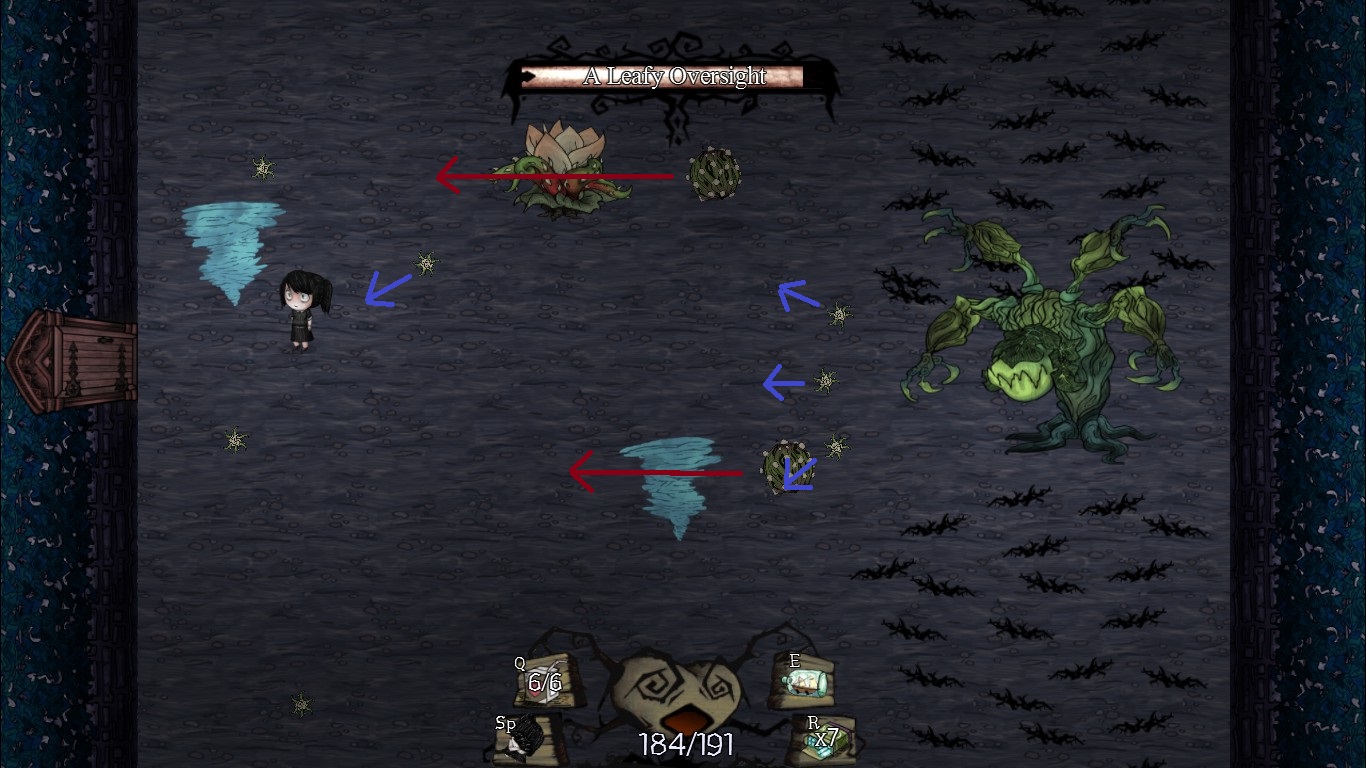
17. A Leafy Oversight
After the Frozen Few, Cyndar’s Timekeeper and the Virtuoso we have our fourth boss not moving an inch for the whole time. As often it begins quite easy with a Leafy Oversight on the right side of the room. He shoots something I will call spiked spores at you, three at a time similiar to the Winged Overseer. In contrast the spread of the triplet is slightly larger so that you can stay in attack range of the boss and still dodge the spores well. Like before the middle one of the triplet will fly straight at you. Additionally to the spores he will spawn flower seeds which will slowly drift to the left side of the screen.
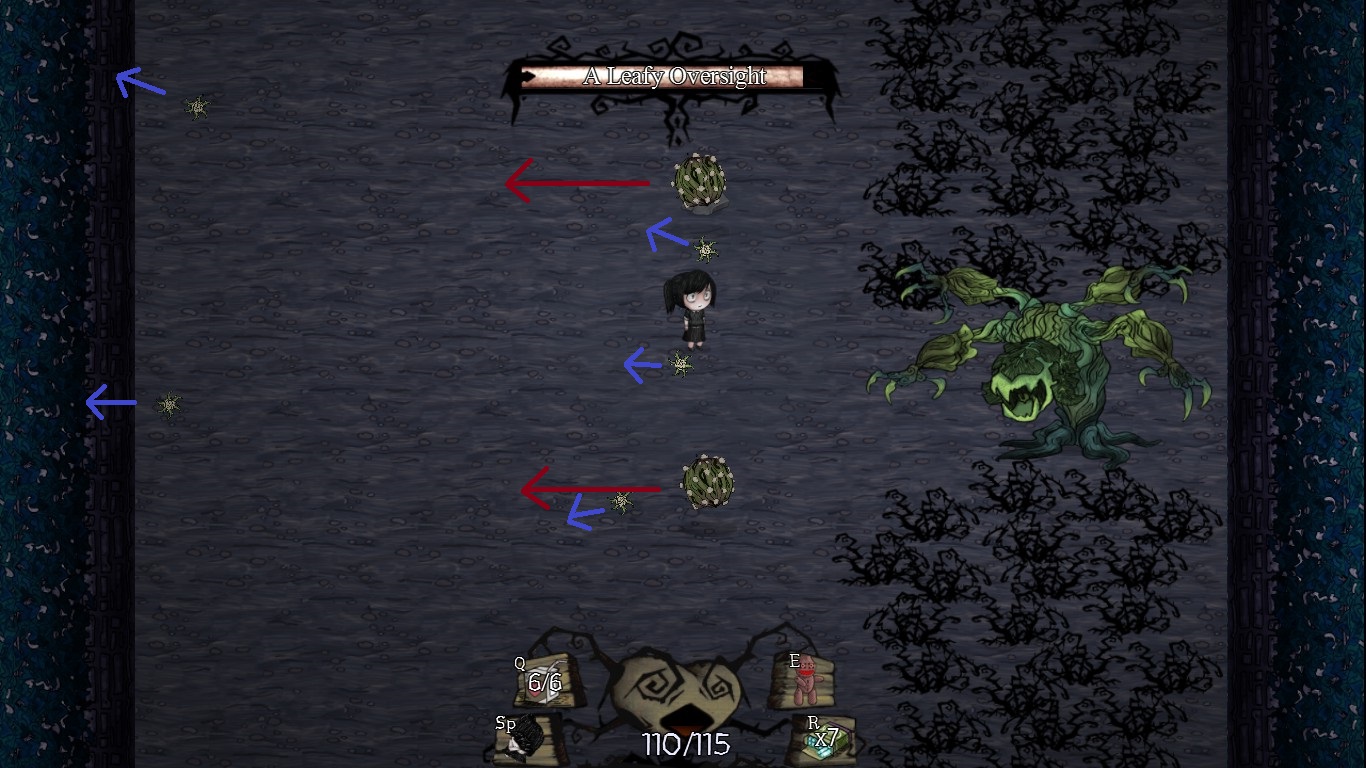
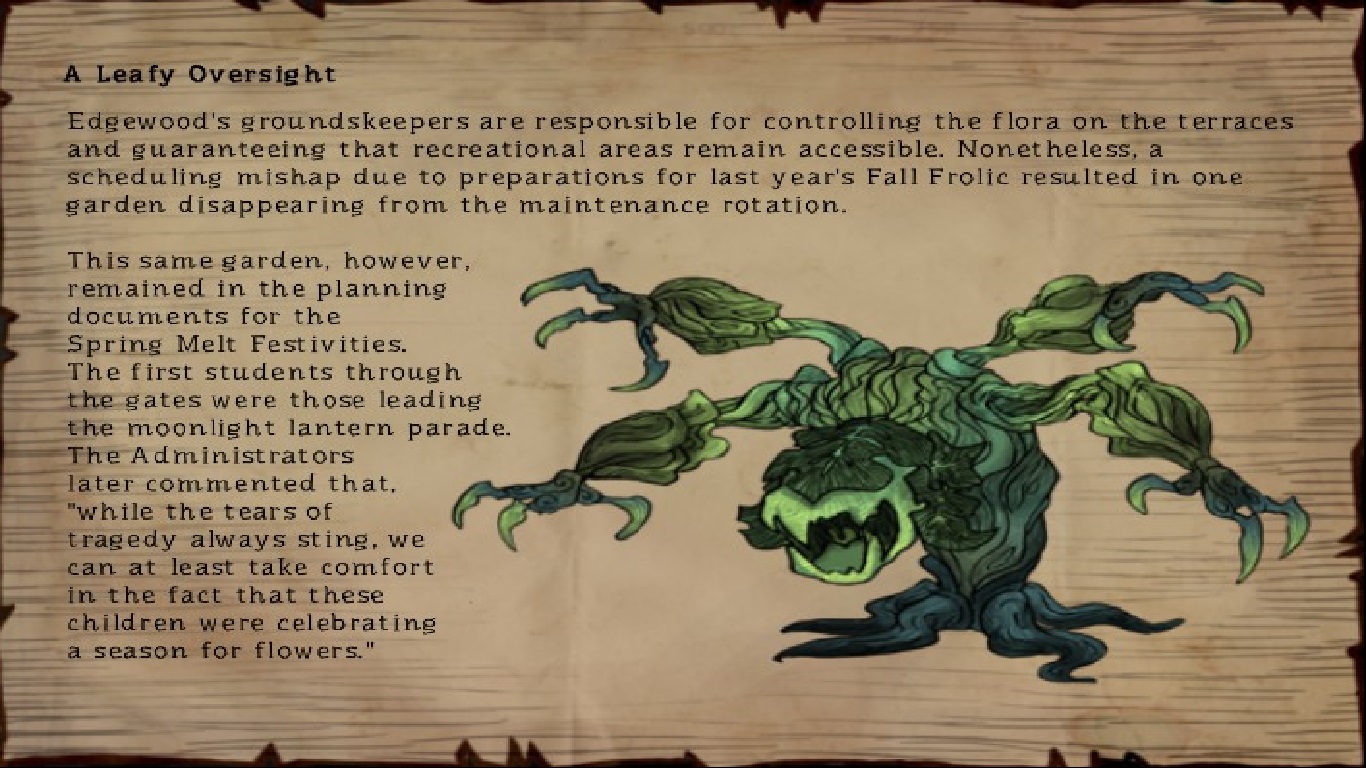 You can and you should destroy those seeds because after they have drifted far enough they will plant themselves in the ground and a flower will grow which will start attacking you with more spores. The more flowers there are the harder the dodging gets and you won’t find the time to attack the Oversight. To ramp up the difficulty the boss will spawn more flower seeds the less health he has up to six at a time. So destroying them all and still find time to fight the Oversight can be tricky. The real danger although appears if you can’t kill the flowers fast enough. They will turn back to a flower seed (with a slightly different colour) and drift back to the boss. In this phase you can’t destroy them anymore. As they reach a Leafy Oversight, it will absorb them which makes his attack not only faster but will also increase the number of spores (in the last picture there are 7, don’t know if more are possible) and narrow the gaps so you can’t dodge through anymore. To make it worse the boss has a rather high health. Without a certain damage output this fight will be near impossible to win and it is one of my more hated bosses of Our Darker Purpose. On the good side: If you have enough chalk and can spare it get in front of a Leafy Oversight (if it is low on health) and attack with the chalk. The clouds will block the spores and damage the boss while you will stay unharmed. Finding the right time between healthpoints left and having enough chalk to take the Oversight down can be difficult. Also, ignore the tornados on the pictures, they are from me. EDIT: Other players have reported that you can destroy the flower seeds by walking into them and they will only confuse you. I have never tried out so do it at your own risk. It will make the fight a bit easier.
 Notable Hard Mode Changes: I have really troubles remembering changes for the later bosses. He obviously has more health and I think he also moves faster and takes the flower seeds back to himself a lot faster. Also the movement speed of the flower seeds to and from the Oversight is faster.
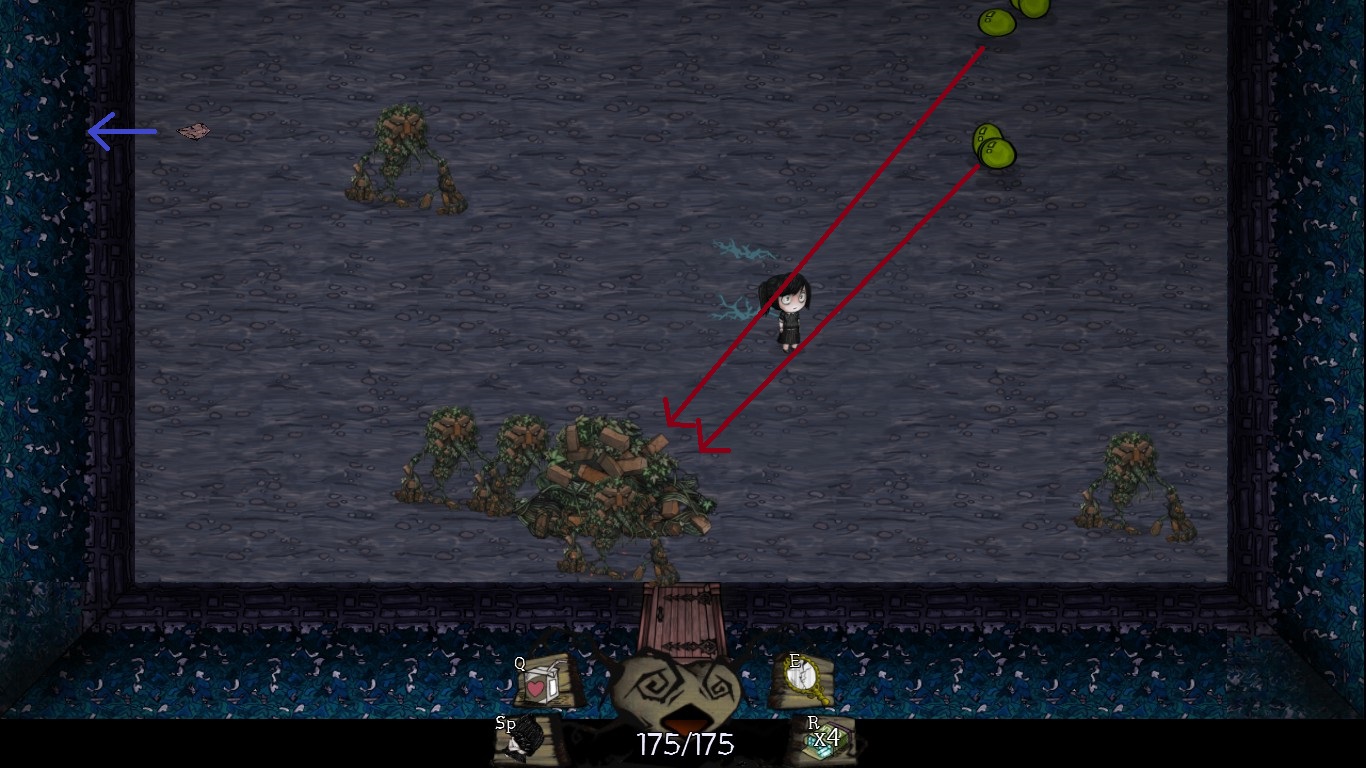
18. The Brick Pile
The Brick Pile is part of the easier boss group. It is a bit luck dependent but generally you can win this fight with only some minor scratches or no damage at all. As soon as the fight begins the Brick Pile will chase after you. Inbetween he makes some short stops and throws some bricks at you (in pairs of two). These bricks will shatter into little stone shards on contact with the wall and fly in three different directions (in straight lines) depending on the impact angle. To reduce the risk of backfiring shards try always to have a sufficient amount of free space in your back.

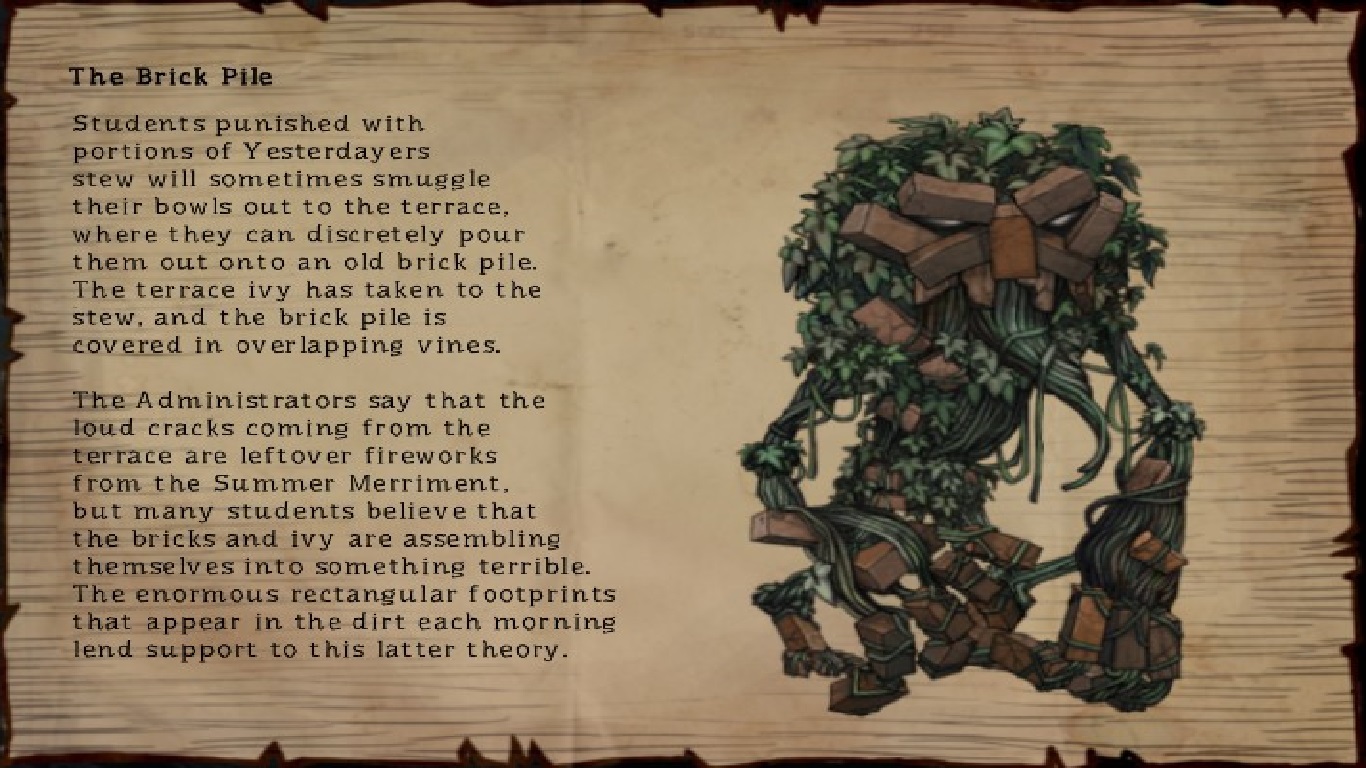 After loosing 25 %, 50 % and 75 % of his health the Brick Pile will crumble down and spawn mini-versions of him. The less health he has the more mini-versions he spawns up to 8(?) at 75 %. Those mini piles will run around randomly in the room and after a while they’ll explode. In doing so they will create eight stone shards flying in eight directions and they will spawn three green blobs. Since the movement of the mini-versions and the time before they explode are random this is the most tricky part of the fight. With so many mini-piles they can corner you pretty quick and if they explode close to each other you have 20-30 projectiles on the screen. So you need a bit luck to get no damage. But if you try to keep your distance rarely something will happen. Back to the green blobs: Similiar to the Cauldron of Yesterdayers the blobs will move towards the Brick Pile and heal him upon reaching him. In contrast to the Cauldron the amount he gets healed for is not that significant. So better take less risk and let some of them reach him. But still it is better if you kill them off. After all mini-versions and green blobs are gone he will start anew with chasing you. Like I said before the Brick Pile is not a hard boss but he is rather annoying.
 Notable Hard Mode Changes: I fought him in Hard Mode definetely. But here aswell I can’t remember any notable changes. If you have some please post them in the discussions.
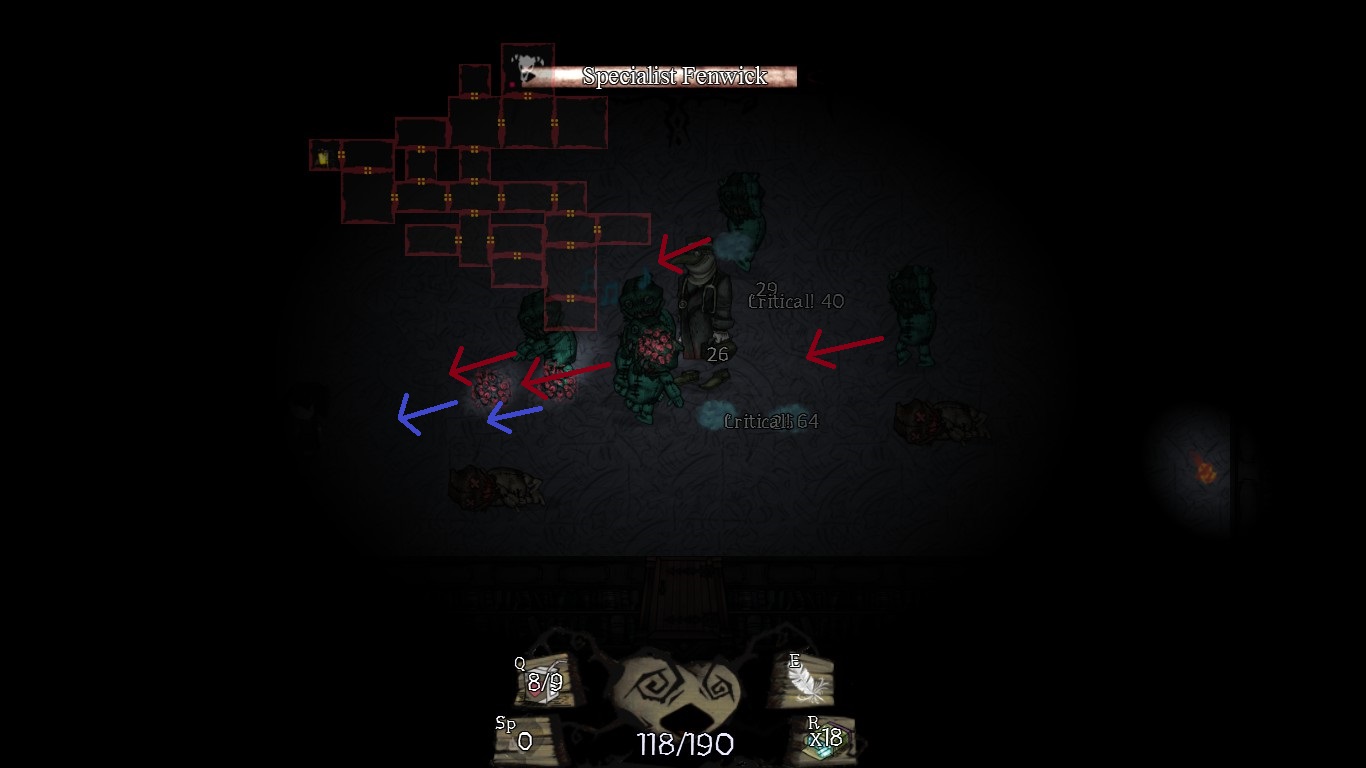
19. The Malady Ward
The Malady Ward also called Specialist Fenwick is a strange boss in a sense that he doesn’t really care for you. He does not follow you or really attacking you. I’m not sure if he can even hurt you. Also he can’t be hurt all the time. So how does the fight work actually? Well, beside the Malady Ward there are numerous puppets on the screen. Those are chasing you and throwing red fire like attacks in your general direction although not in a straight line and since they are reflecting from the walls they are kind of everywhere anyway. Also note that the fight takes place in the dark. The only two spots that are enlightened are you and the boss.

 Those puppets are the ones damaging you and you can damage them to. If you have hurt them enough they will become unconscious and Specialist Fenwich will run towards them to heal them. In the process of healing you can also deal damage to the actual boss. Otherwise this is not possible in this phase of the fight. So take out the puppets as fast as possible and as much as possible and then attack the boss while he is healing them. After a while the phase will change. All puppets will drop down unconscious and their ghost bodies will rise and doing the same as before. But there are some changes: First, the only enlightend spot will be the boss. Second, you can not hurt the puppets in this phase. Third and most important, you can damage Fenwick all the time. So this is the phase to actually battle and beat the Malady Ward. Although the screen is mostly dark and there is a lot happening the fight isn’t that hard. Since the room is rather large, just roll around and avoid the attacks until the second phase. Here you try getting close and killing the boss.
 Notable Hard Mode Changes: The same as before. If you have information provide them to me please. Added from another user it seems they Malady Ward can heal all downed puppets at the same time.
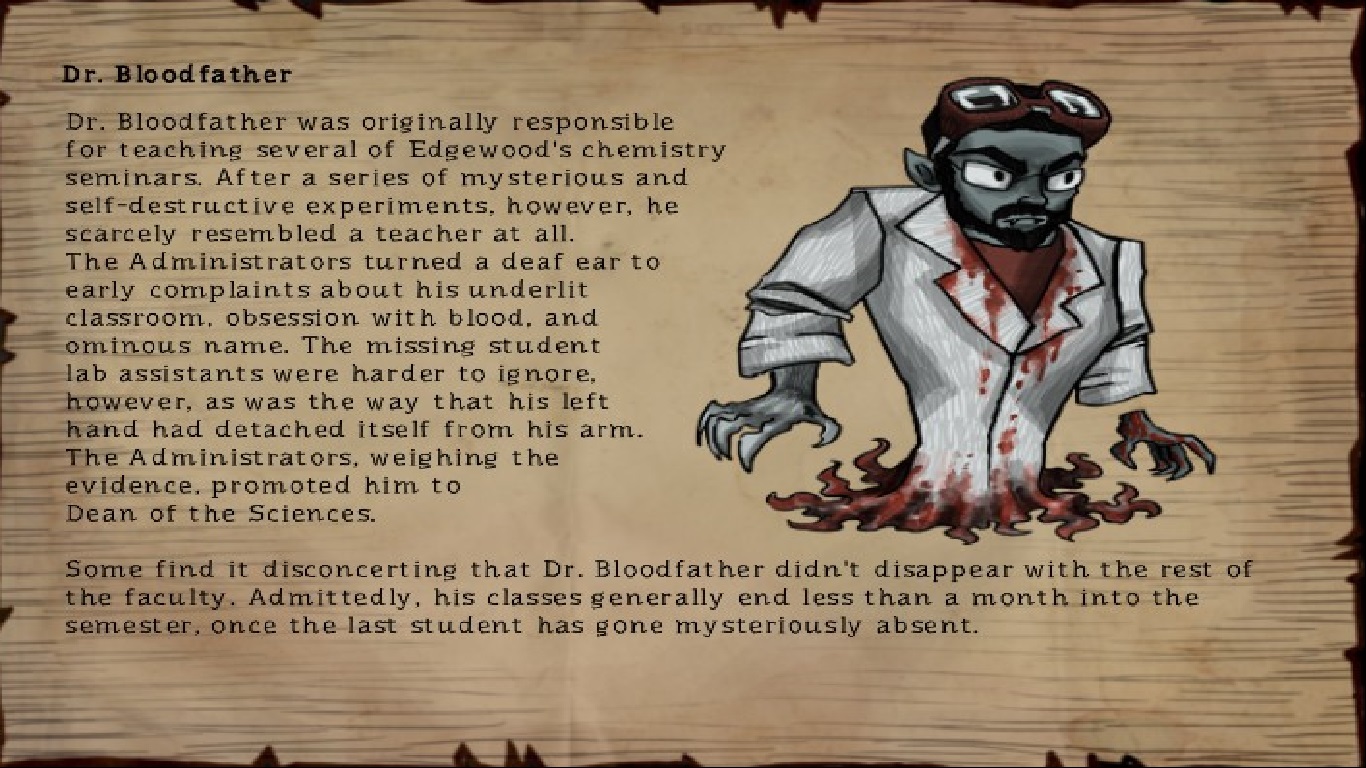
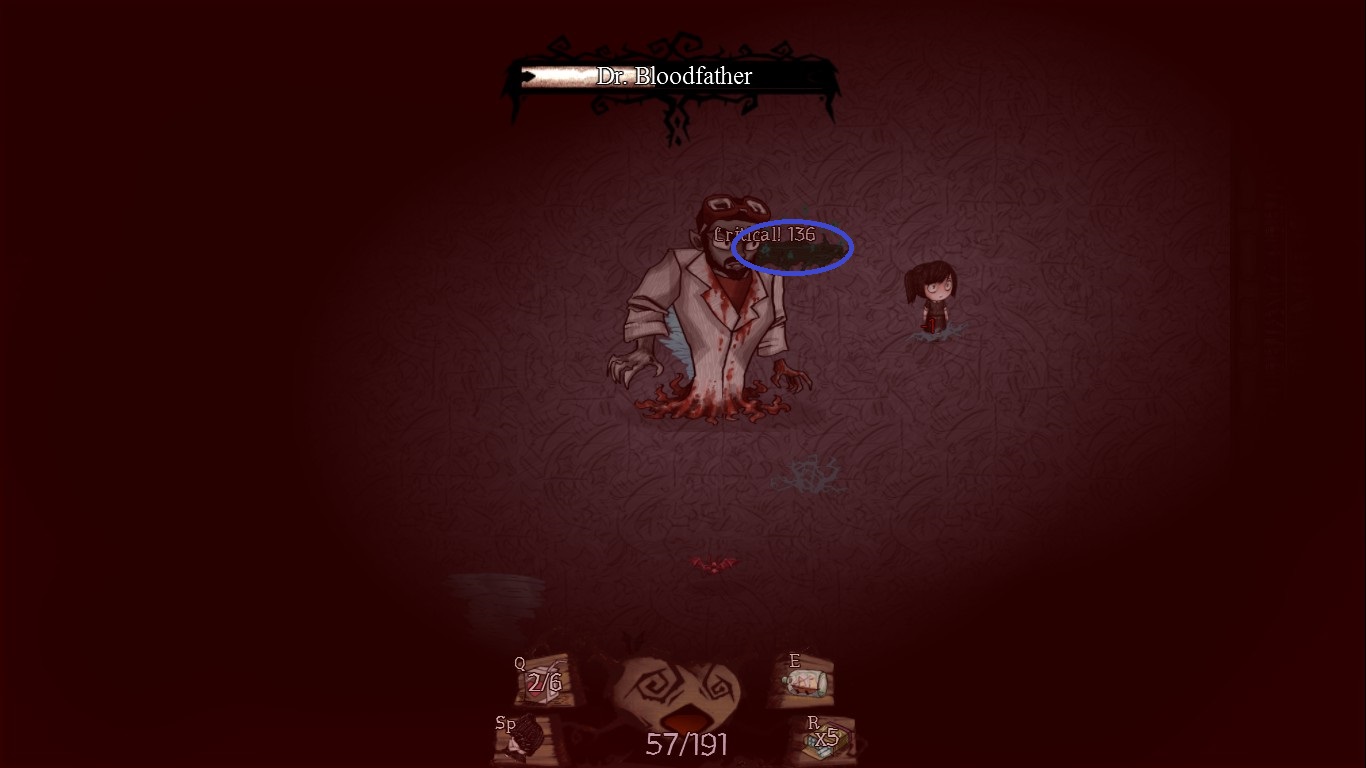
20. Dr. Bloodfather
From the library bosses the most worrysome and hardest is probably Dr. Bloodfather. In addition to him there are some green coloured puddles on the screen. Occasionally those will spawn a bat and sent in straight at you. Just roll out of the way. Dr. Bloodfather himself will transform into a red coloured puddle and chase you for a few seconds. The moment he stops he will transform back and attack you with a LOT of bats. They have a large spread and there are no gaps in between. So you can not avoid this attack by rolling back. Also a larger distance is not recommanded here since the large attack spread will make it more likely to be hit. It is better to be close and the moment he starts the attack you dodge it to the side. So get your timing right.
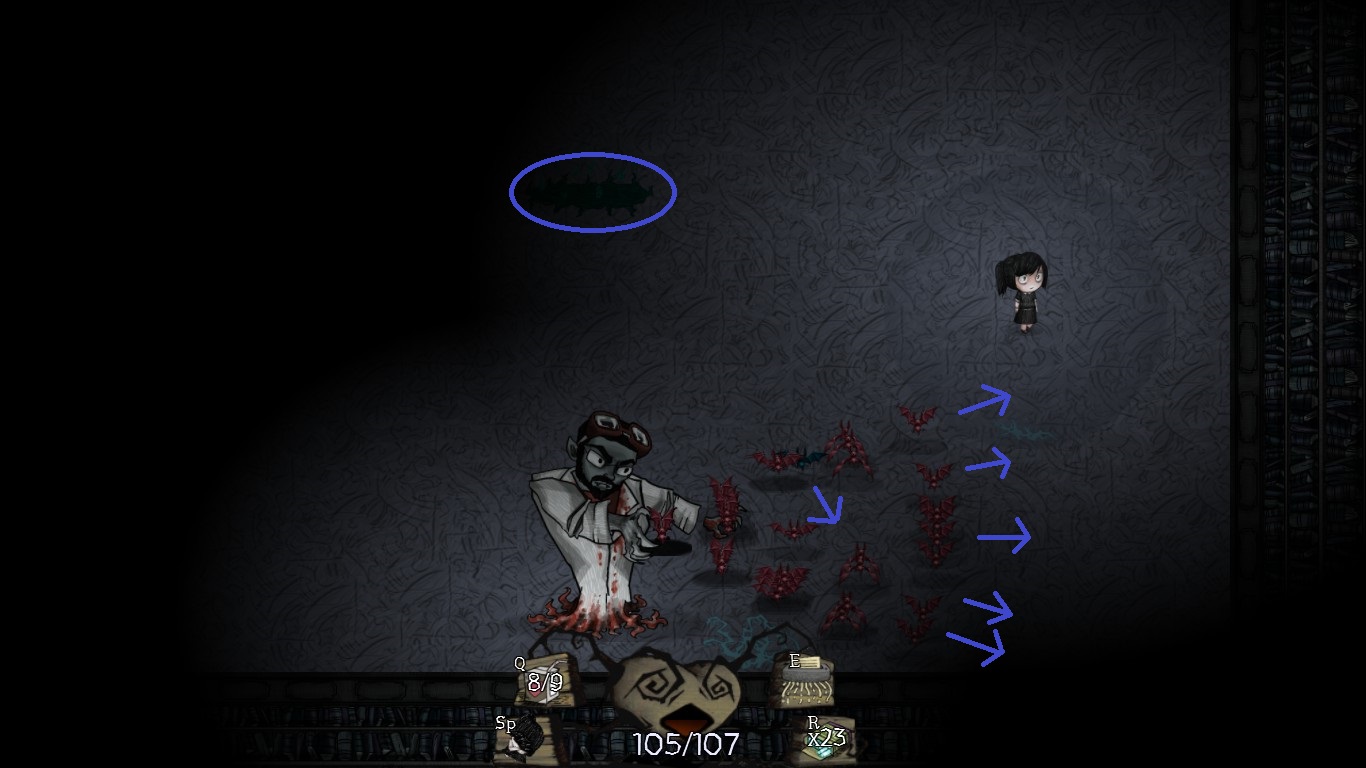
 Additionally to the puddle and his normal mode he can also transform into a giant bat with a lot of small bats around him. In contrast to the bats before these can and have to be killed. While the giant boss bat is chasing you he will sent out the small bats in all directions and upon contact the hurt you and they do a lot of damage. Having an area of effect attack or the ice shards make this phase pretty easy. The phase will only end after all the small bats are killed. Also you can’t damage the boss while he is in his giant bat form (not sure at the moment if the puddle form can be damaged). So yea, the amount of bats and large area of attack from the boss make this fight pretty difficult. Oh, nearly forgot, after he has lost half of his health the screen will turn red and you start losing hitpoints even he doesn’t hit you.
 Notable Hard Mode Changes: Can’t remember any, so please provide them if you have noticed some.
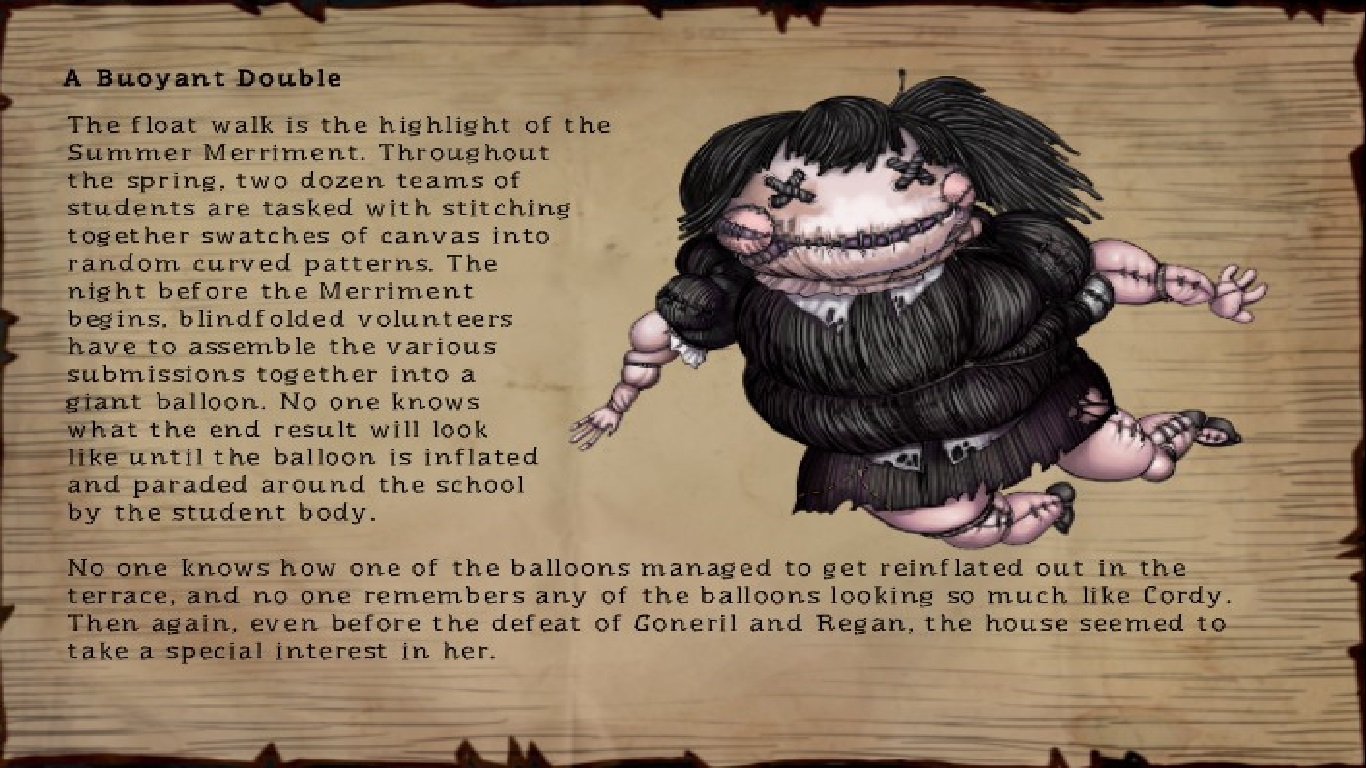
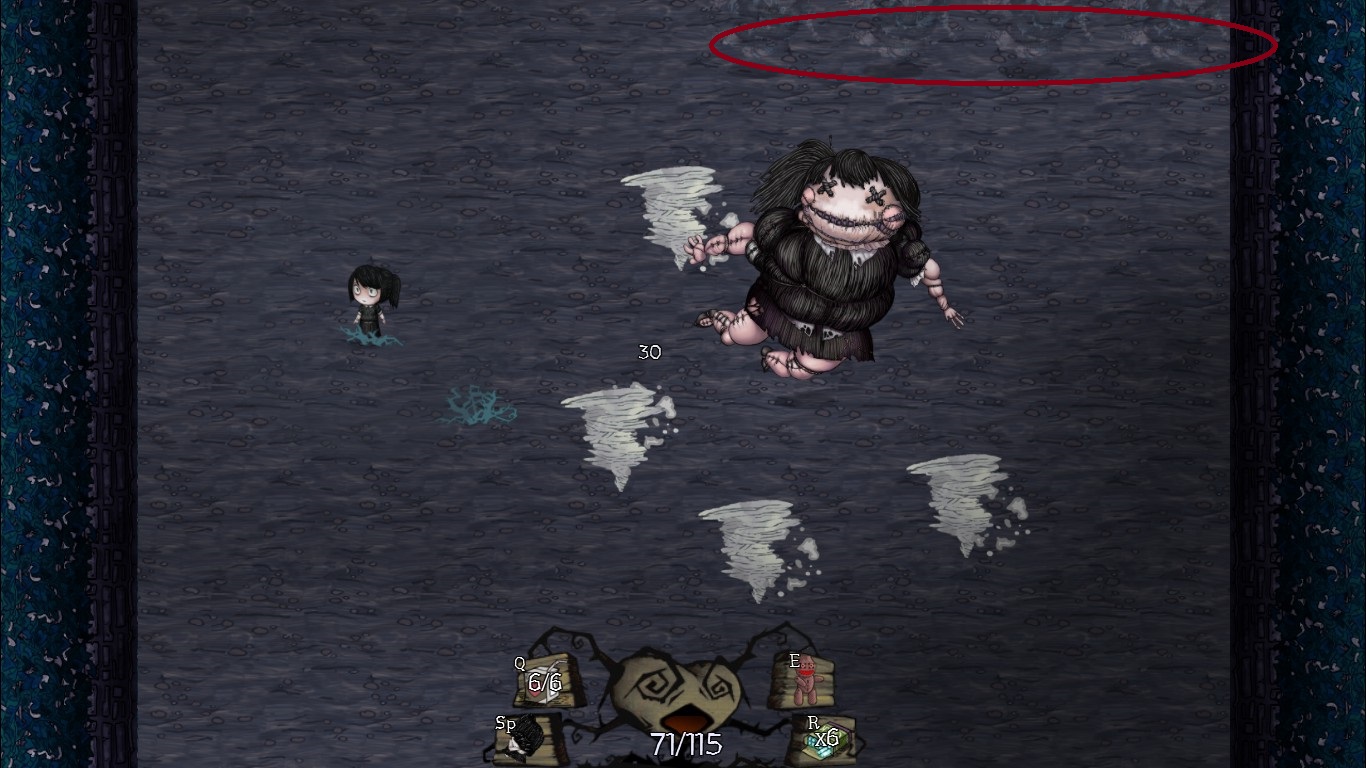
21. A Buoyant Double
A Buoyant Double is like a giant balloon in Cordy-form. And like a balloon her whole movement is floaty. She is moving rather slow has no sharp cuts and behaves inertant. At the beginning of the fight she will summon four mini-versions of her which appear and rotate around her while she is chasing after you. If you destroy one of the mini-doubles they will explode and spawn eight ice shards flying into eight directions in a straight line.
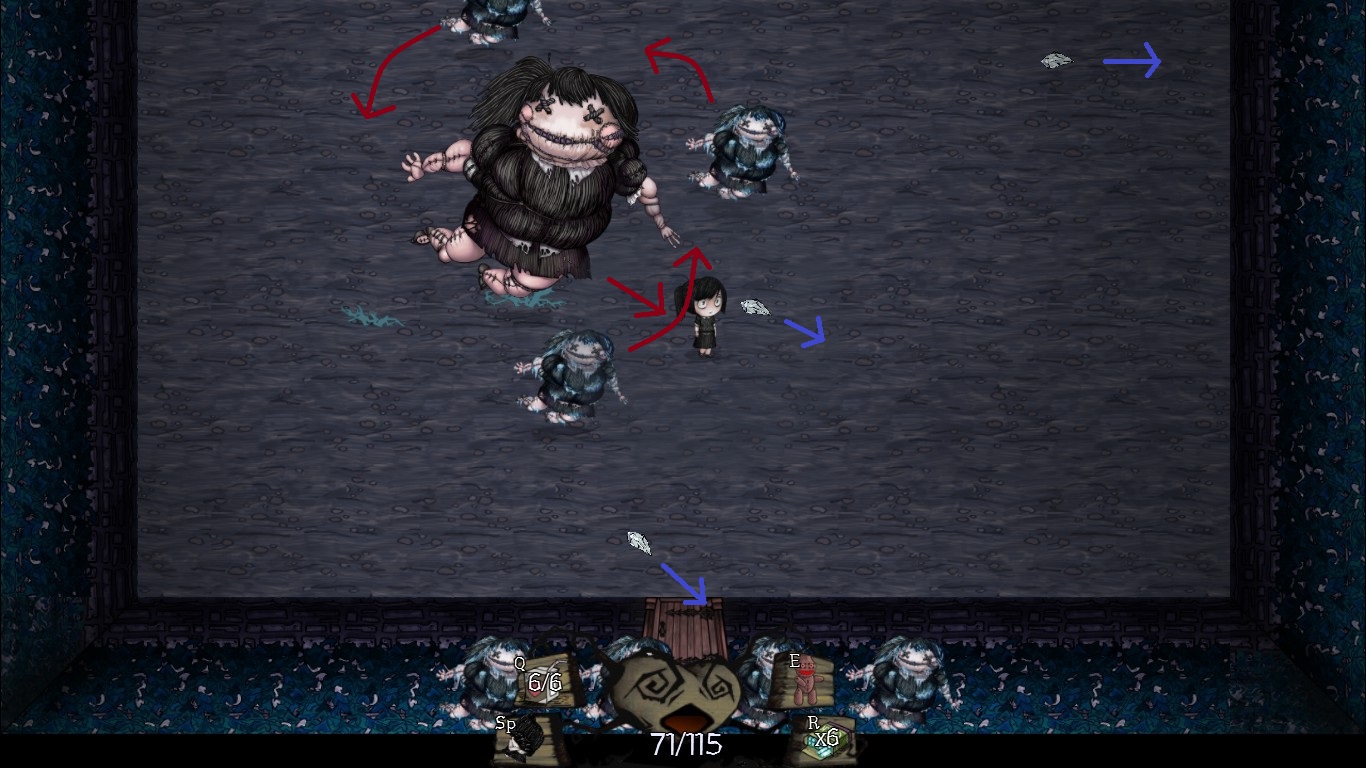
 After a short while she will transform every mini-double you did not destroy into a small whirlwind. Those are moving randomly and rather fast and can be hard to dodge. While the whirlwinds are still around she will summon again four mini-versions rotating around her and additionally she will summon a total of eight double which appear either at the top or the bottom of the room. There are several different formations for this. The one at the top then start moving down while the ones at the bottom are doing the other way around. If they reach the middle they will form one complete line. So you have to dodge them before and after they reach there otherwise you will run out of space for a moment. Or you just destroy one or two of them. Those eight mini-doubles will then vanish and the Buoyant Double will transform the ones rotating around her into whirlwinds. Since all of the doubles are moving kind of slow this fight is not that difficult if you plan your movement up ahead. Problematic are only the randomly moving tornados.
 Notable Hard Mode Changes: Need information here, since I didn’t note any changes. If you have information please provide it, so it can be added.
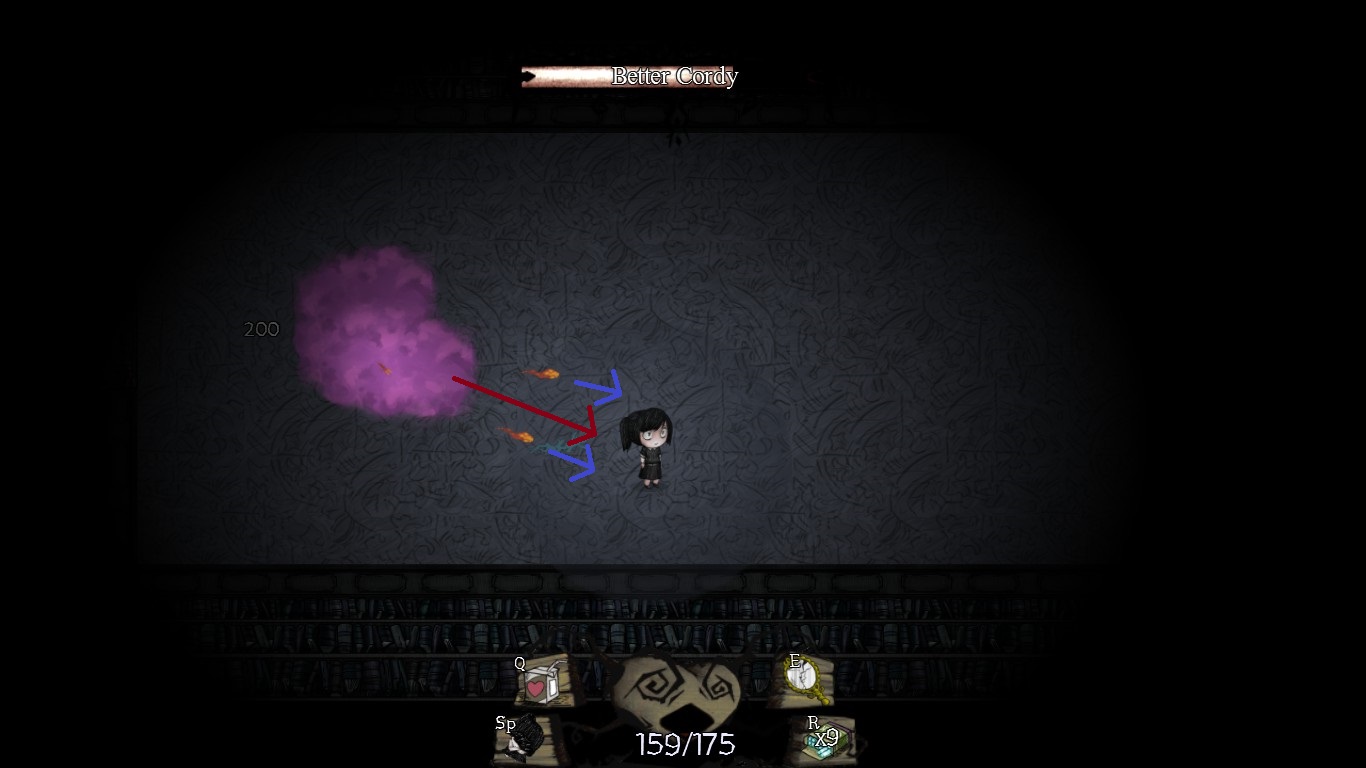
22. Better Cordy
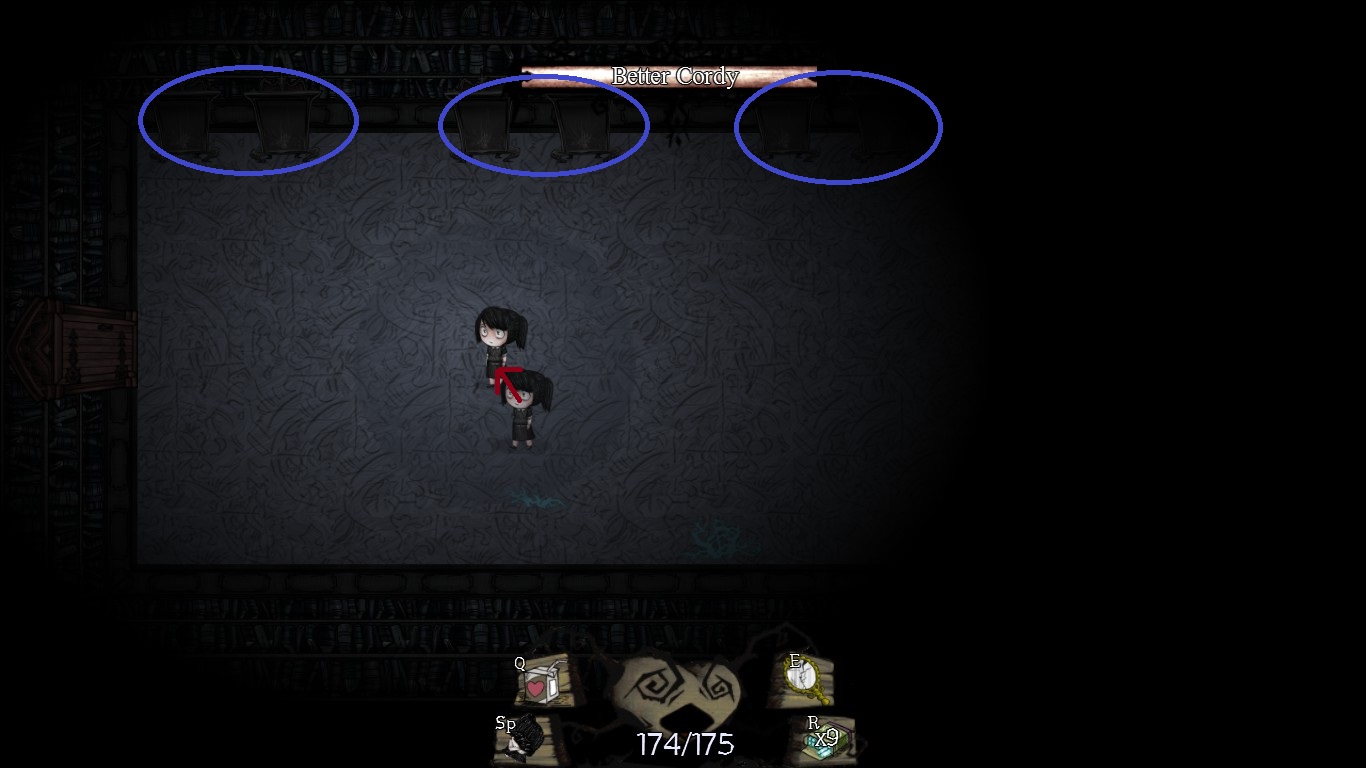
This fight can be quite familiar because Better Cordy is like you …. just better. Although it depends on your build. As you can see rather fast the room is pretty small which is normally an instrument to make sure that the attacks of the boss connect. The second thing you will notice are the hearths at the top of the room. Those are identical to the ones on the lower floors and as such shoot a triplet of green flames with a slight spread. Do not be irritated that they are missing in the later pictures, I destroyed them (you need a special lesson or perk for this).
 Better Cordy will chase you through the room while shooting two projectiles at you at the same time (something you will never learn). Combined with the 20-30 green flames from the hearth this makes a lot of projectiles to dodge. Other than that she can also create purple chalk clouds in contrast to your blue ones (and other enemies white and green ones). Although I never noticed it myself she can also use a juice box to heal herself (apparently up to three times). And this is basically everything. The difficulty in this fight comes from the small room combined with all the projectiles. Just keep your distance, dodge and attack yourself. At this point in the game you should have a more powerful build than Better Cordy.
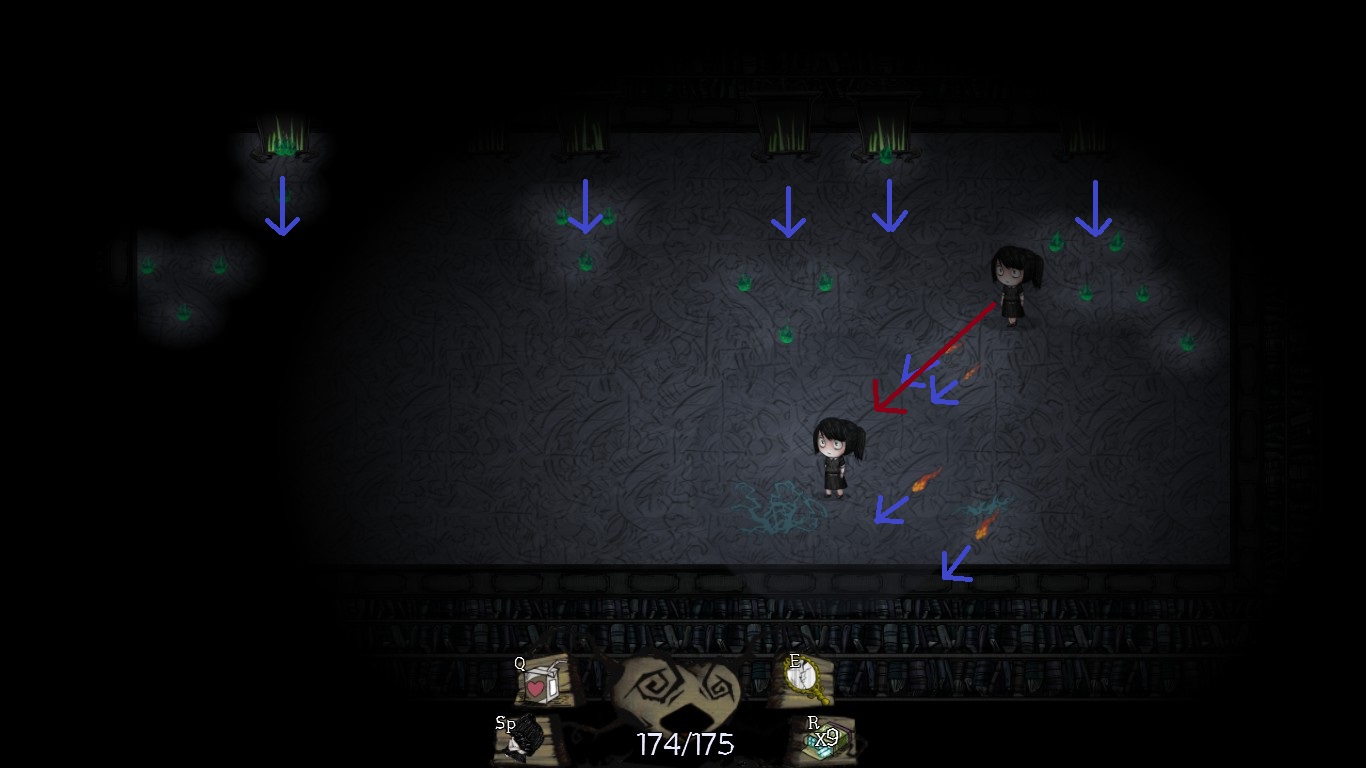 Notable Hard Mode Changes: You remember that awesome item which lets you spawn fire while rolling around? Now Better Cordy has it restraining your movement in the small room even more.
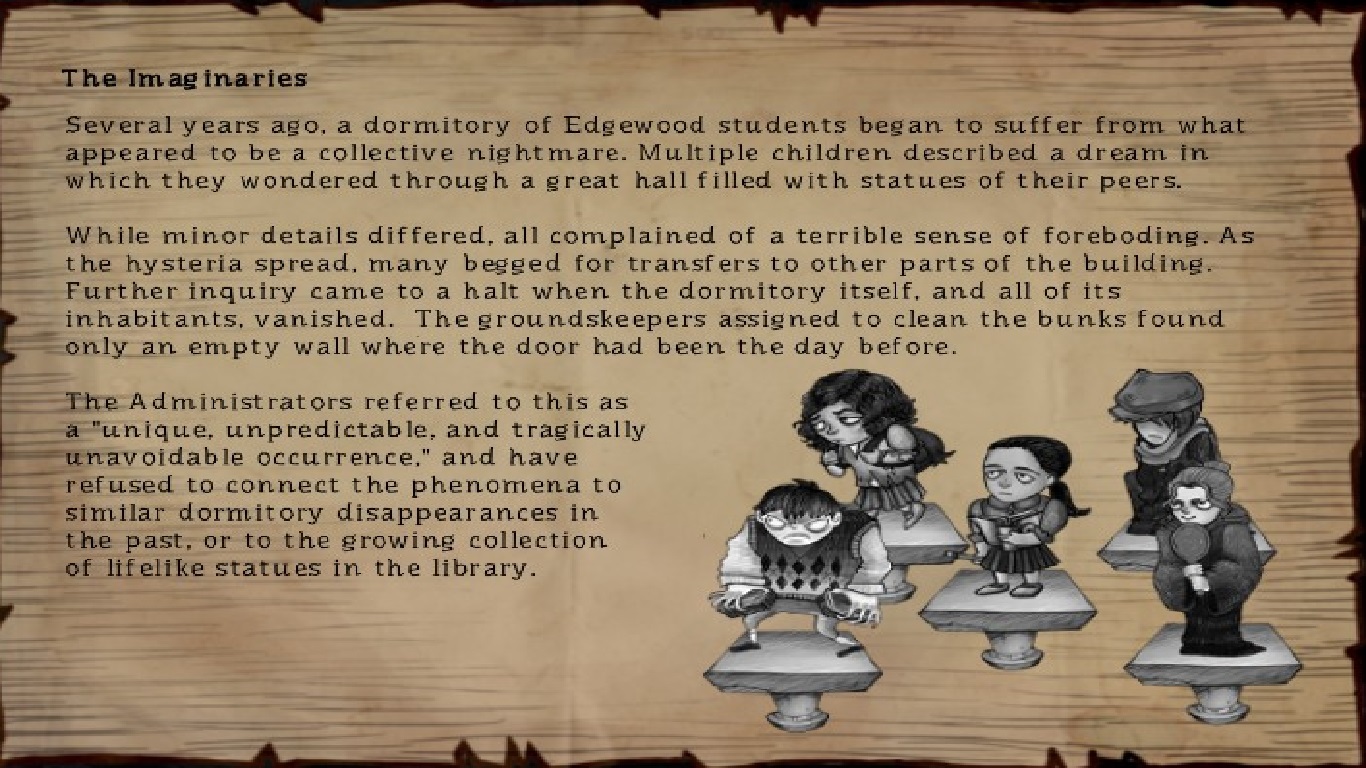
23. The Imaginaries
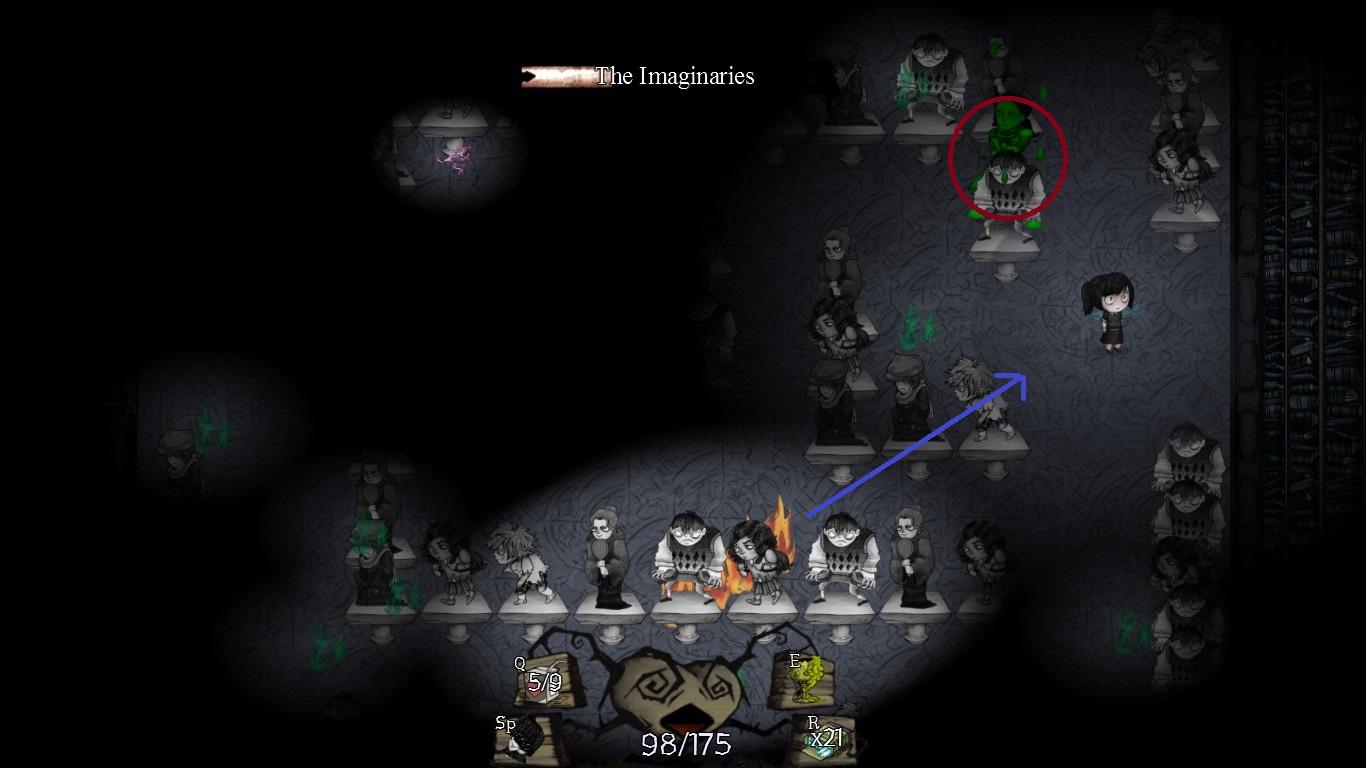
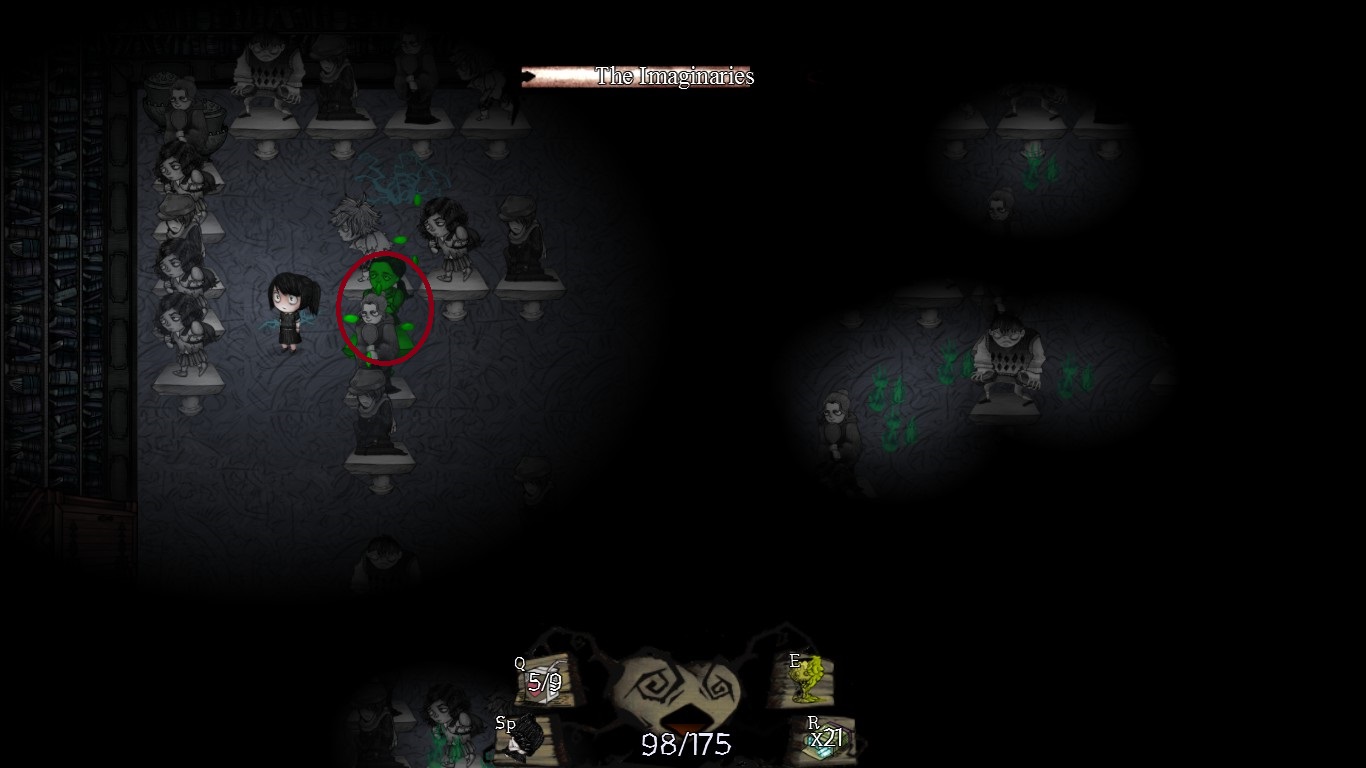
The Imaginaries are an interesting concept for a boss fight although they end up to easy. But making them only a bit more powerful would probably make them a major annoyance and overpowered. The basic idea is that you do not get any damage in this fight. Instead you will loose movement if you get a hit. The moment you enter the room you’ll see a lot of stone statues. The layout of the room will always be the same and the only light sources will be yourself and the flame attacks of the boss. Those green flames will move in straight lines to a spot, stop there and then move in a straight line to another spot and so on. The direction in which they will move after their stop is hereby random. Like mentioned if they hit you, you’ll loose 15 movement. I have never experienced it but if you reach 0 movement the game will probably be over or you are forced to quit yourself because you can’t move anymore.
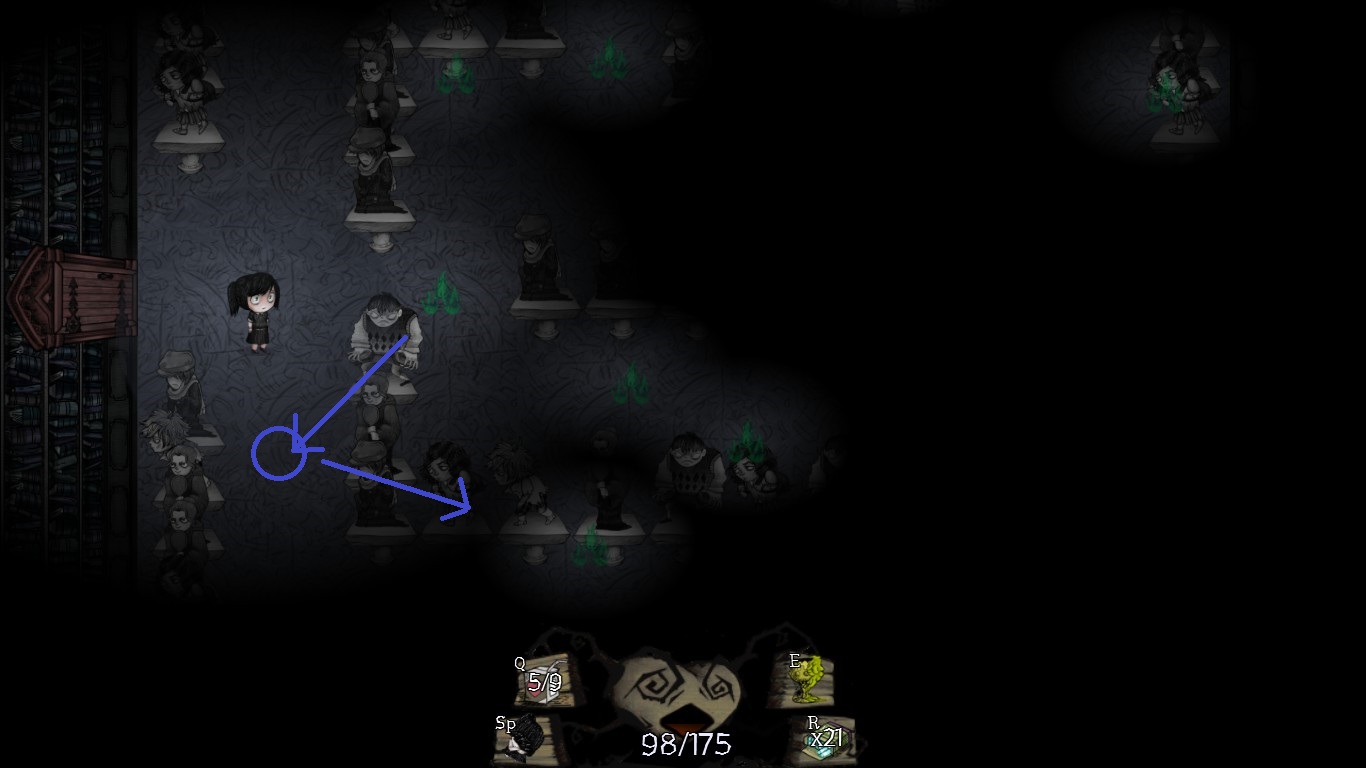
 Your task in this fight is to find the stone statue which is green. Because this is the only one to actually hurt the boss. After a few seconds the position of the green statue will change and you have to search it anew. After loosing half his health the Imaginaries will use a new attack which works the same as the fire from Frothy. It will spawn under you and then follow you slowly. Normally, this fight is really easy and has the huge benefit that you won’t waste any juice boxes or health in general. The only time I had a hard time against this boss has been as I got hitten several times before finding the green staute the first time. Because the slower you get the harder it is to reach the next position.
 Notable Hard Mode Changes: I did not note any changes. If you have experienced otherwise please provide me with information.
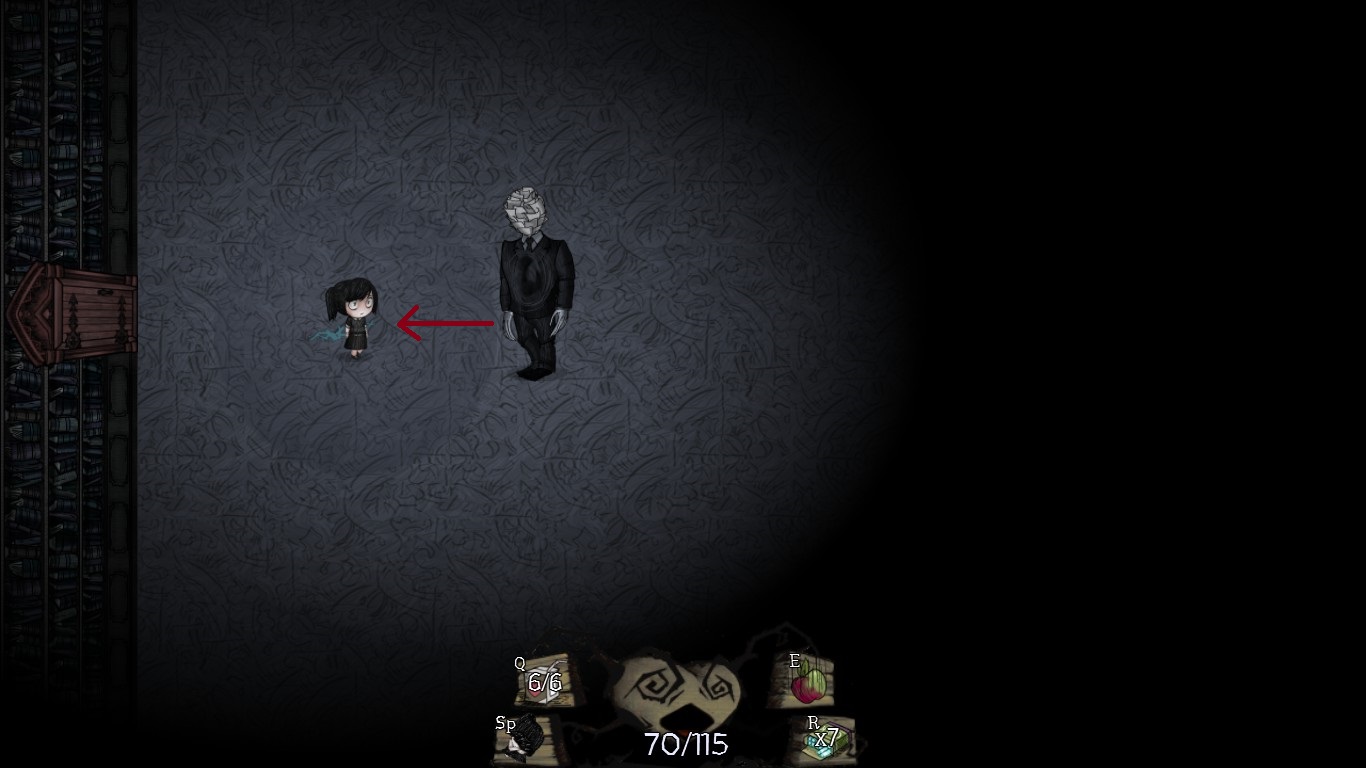
24. The Administrators
We are getting closer to the final. On Floor 11 you have to battle the third Story boss. The Administrators are a giant human-like paper creature which as soon as the fight begins start chasing you. Inbetween he will shortly stop to create a red portal. This red portal is attacking you with red coloured paper sheets. The Administrator will keep chasing you and spawn a second portal. Then he will disappear and the second phase of the fight starts.

 The annoying thing is that the administrator can not be damaged in this second phase since he is nowhere to be found on the screen. Instead there will spawn a number of black portals depending on his health (the lower the health the more portals ranging from 4-8). To end this phase you have to destroy all portals. But you can only destroy one at a time; the one attacking you with the red paper sheet. Since it is dark you have to use the trajectory to determine the right portal. The other portals will also attack you with random attack of all the enemies in the game. Also avoid mindless shooting. If you hit the wrong portal it will summon an additional enemy cluttering the room even more alhtough every portal can only summon one additional foe. After you have destroyed the right portal the red sheet attack will hop to the next. After a while and a lot of dodging you’ll have destroyed all black portals and the Administrator will appear again. Use this time to damage and kill him and you can continue to the final challenge.
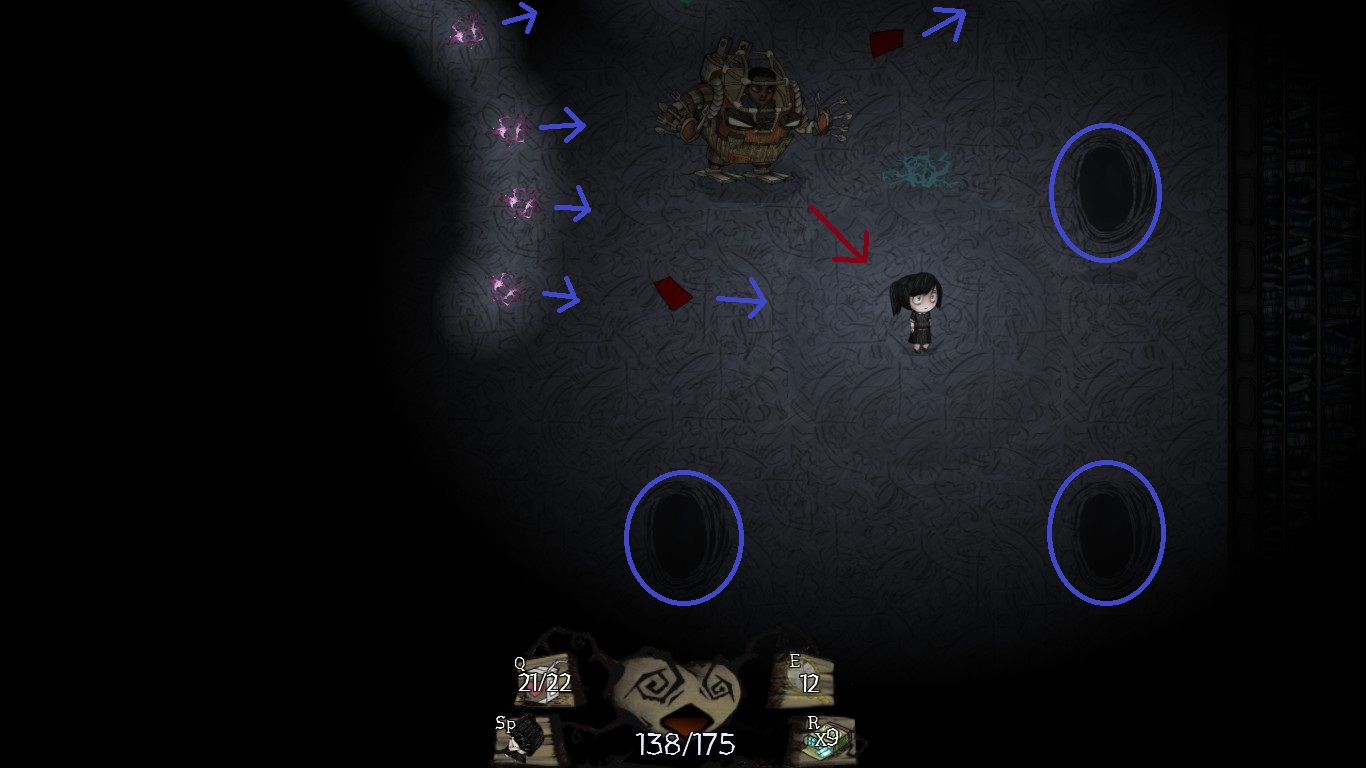
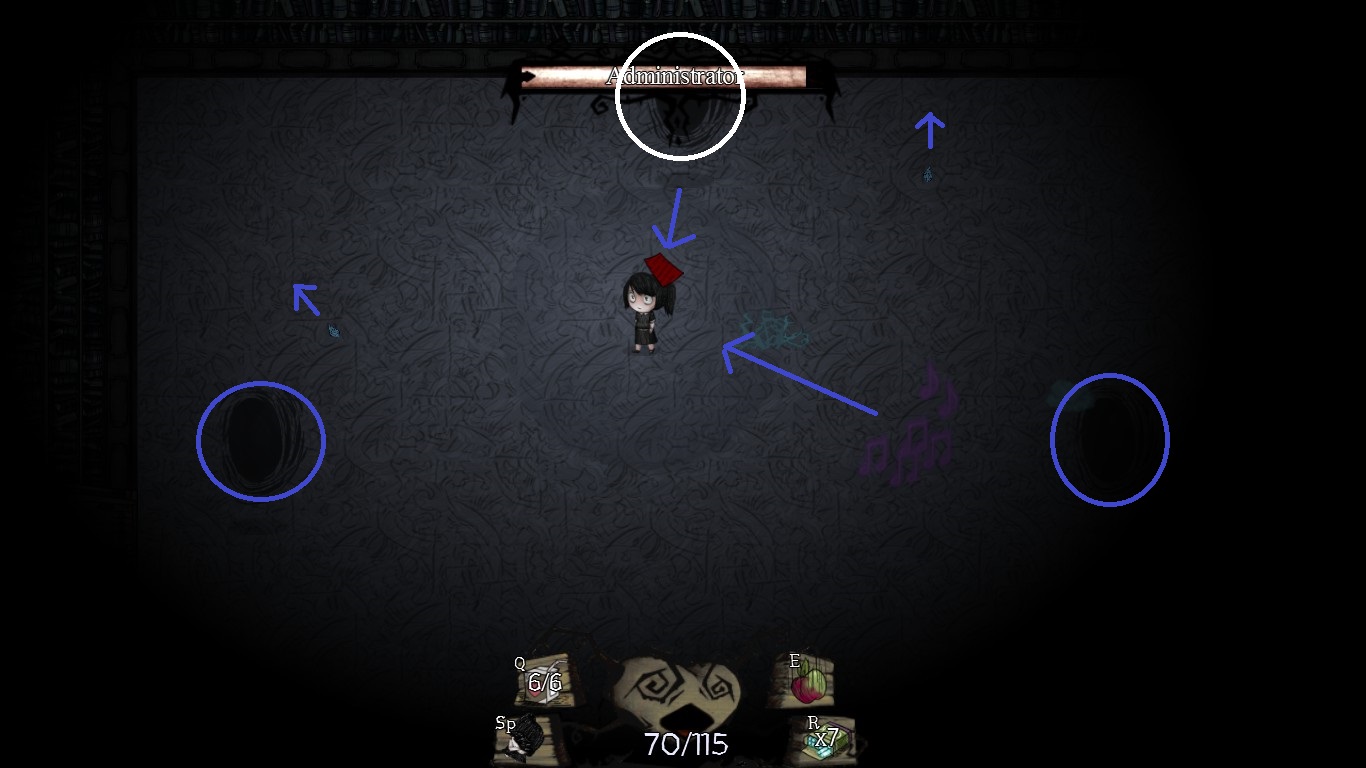 Notable Hard Mode Challenges: Ocassionally, there appear additional four Administrators in the formation of a Rhombus. They can not be damaged and their only purpose is to create a paper storm attack which spawns some white coloured paper sheets flying over the screen.
25. His Natural Defense
DO NOT STOP MOVING. Ahem, on floor 12 you will fight His Natural Defense, the final encounter of the game (the final known encounter). The boss is a giant squid-like paper monster. More than any other battle in the game stopping will lead to failing. His Natural Defense will chase you and attack you with a lot of red paper sheets. This attack is pretty fast and dodging to back will only increase your distance to the boss so try circling him. Beside moving towards you directly he can also teleport on short distances appearing left, right or anywhere he wishes. So be prepared for some sharp cuts. If he is not teleporting he will create three paper sheet rings around him confining your movement. Staying inside those rings will make it near impossible to dodge the red paper sheets. Keeping outside means you are too far away to damage him (in most cases).
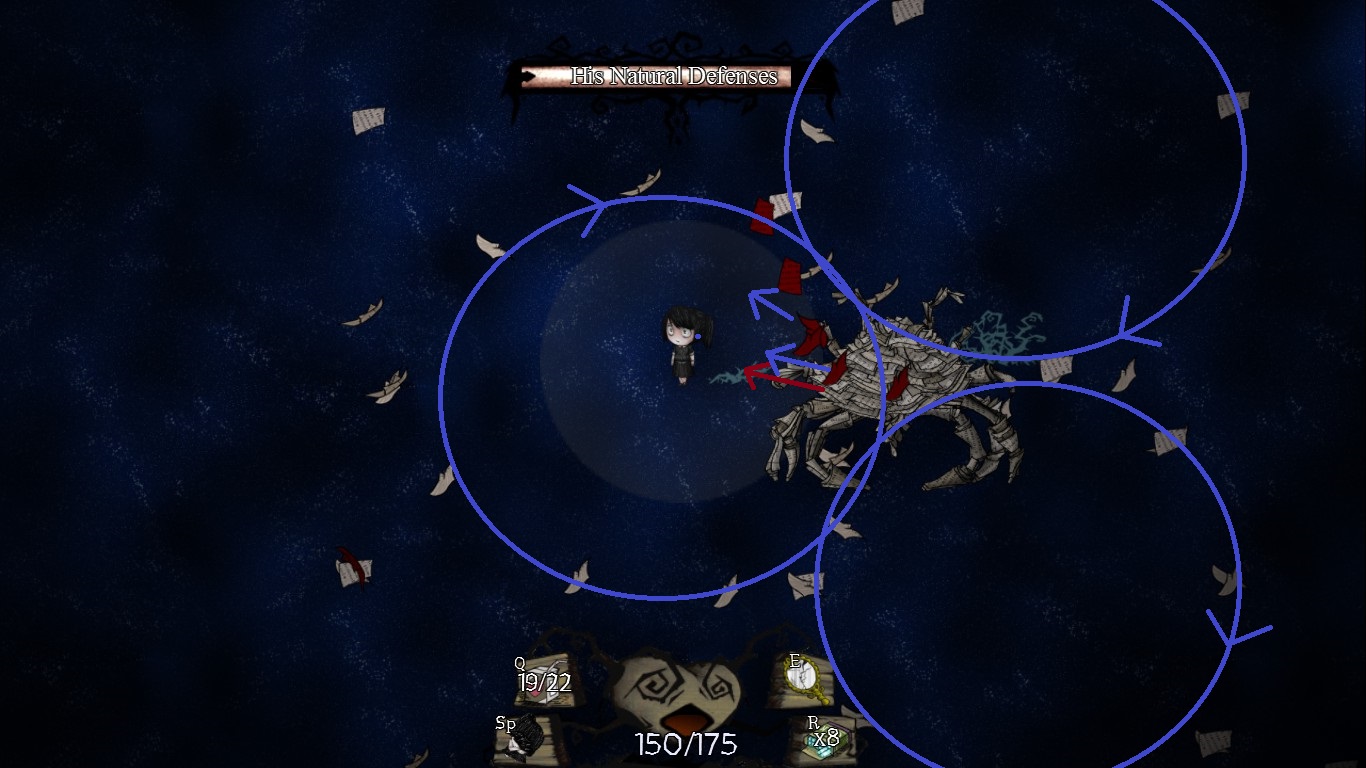
 To make the fight more fun His Natural Defense can summon all kind of enemies (they behave like their counterparts on the floors) directly under you. There is no sign of it so keep moving or he will just let them appear directly on you. After loosing half of his health points there will appear paper waves. They are fast, move wave-like from one side of the screen to the other and are pretty long. They can damage you a lot and more problematic cut off your escape routes. Since the room is really large (not endless but you will rarely see the limitations) it is possible that you loose track and sight of the boss. In this case His Natural Defense can also reset the room and teleport you to the middle and appear shortly after himself. Not the hardest boss in history and also compared to other in the game he is probably of normal difficulty. But his attacks are versatile and have a high chance of hitting you. In this regard: DO NOT STOP MOVING.
 Notable Hard Mode Changes: Well, not that you have much time to notice any changes and one would think that the increased damage of Hard Mode should make this already enough (especially for a No Juice Run). Addtionally to this His Natural Defense has a higher teleportation rate making his movement even more unpredictable. Combined with a higher minion spawn rate results in you running around. A lot.
26. Final Remarks
6. Final Remarks
And here ends my fourth guide. I encourage you to tell me how to formulate some phrases better. I think some of them sound strange. If you find any mistakes (spelling, grammar, content) make a comment so I can correct them. This took longer than I thought initially. Who the hell created 24 freaking boss battles?
So as final words:
Thank you for reading
PS: If you are motivated enough you can check out my other guides and reviews.
