Overview
How to create a BRINK dedicated server config that satisfy your wishes.
Foreword
BRINK went with this announcement free 2 play. Thanks!
[link] The server config guide is okay, but some usefull informations are missing.
With my guide i try to help you to configurate your BRINK dedicated server for your wishes.
What is needed
- A Windows OS to run the BRINK server.
There is also a guide how to install BRINK server on Linux[wiiare.in]. But i don’t know if it works.
- Steam client or SteamCMD + Steam account
For SteamCMD anonymous login doesn’t work!
- Microsoft Visual C++ 2008
You can find it also in the BRINK folder SteamSteamAppscommonBRINKmsvc2008sp1vcredist_x86.exe
For 64bit system use also vcredist_x64(2008)[www.microsoft.com]
Install it from the Steam client -> Library -> Tools -> BRINK Dedicated Server
Or open an explorer window and paste this in the navigation bar:
steam://install/72780
For public server you need as well:
If not already set, then 2 incomming rules for BRINK Dedicated Server.
One for UDP and the other for TCP.
and 2 outgoing rules for BRINK Dedicated Server.
One for UDP and the other for TCP.
- Portforwarding on your router.
For the net_serverPort (default 27015) = game traffic
net_serverPortMaster (default 27016) = server list and ping
net_serverPortAuth (default 8766) = authenticate with Steam
Without portforwarding the server is running only local in your LAN.
You can play then alone or with friends via VPN or Hamachi.
When BRINK Dedicated Server is installed:
You can run the predefined brink_ded1.bat and then execute a predefined config
exec server_ //TAB to chose a config. 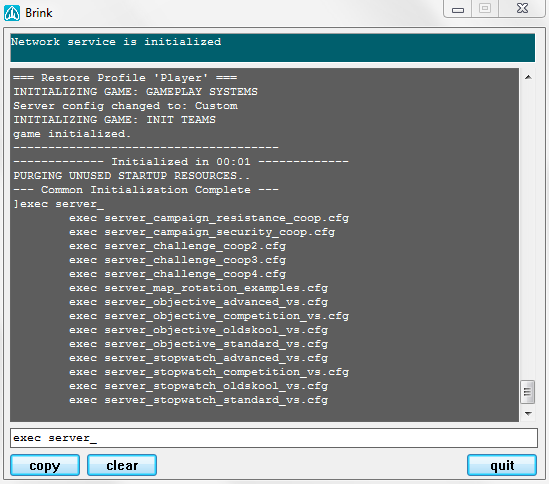
and spawn the server with:
- spawnServer mp/aquarium.entities
- spawnServer mp/ccity.entities
- spawnServer mp/reactor.entities
- spawnServer mp/refuel.entities
- spawnServer mp/resort.entities
- spawnServer mp/sectow.entities
- spawnServer mp/shipyard.entities
- spawnServer mp/terminal.entities
- spawnServer sp/challenge_01.entities
- spawnServer sp/challenge_03.entities
- spawnServer sp/challenge_05.entities
- spawnServer sp/challenge_06.entities
To play BRINK on the same machine where the server is running please add this command to the BRINK launch options in steam
+set win_allowMultipleInstances 1
____________________________________________________________________________
Or you create your custom server config.
This is for what the guide is for:
Two files are needed inside this folder:
SteamSteamAppscommonBRINK Dedicated Server
- brink_dedi_server1.bat to run the BRINK server
Create a brink_dedi_server1.bat or copy the brink_ded1.bat file and paste this inside:
@Echo off start brink.exe +set net_serverDedicated 1 +set exec_maxThreads 1 +set net_serverPort 27015 +set net_serverPortMaster 27016 +set net_serverPortAuth 8766 +exec myserver.cfg
If you spawn more then one server the net_serverPort and net_serverPortMaster need to be different from the other server.
For more understanding check also the predefined brink_ded1.bat
and the *.cfg files in the base folder out.
Create a myserver.cfg in the same folder and fill it with the commands below you need.
Lines starting with // are a comment or a disabled command. Remove the // to activate the command.
Server Banner
You can use colored text and symbols for you server name and info.
Check out my other guide for how to use colors and symbols:
[link]
// Server info and server name si_name “^5BRINK ^7full of ^6FUN ^7[ ^3Sponsored by ^5B.A.G.U. ^7]” si_website “^p `i” //Line 1 // placeholder si_adminName “” //Line 2 si_email “” //Line 3 si_irc “” //Line 4 si_motd_1 “^fWelcome to ^5B.A.G.U. BRINK ^fServer ^7`i ^5`i ^6`i” si_motd_2 “^1Server Admins ^7: ^3Be Happy ^7| ^2NitoxotiN ^7| ^f+ chosen ones..” si_motd_3 “^1Don’t flame, because it is the last ^f24/7 ^1visible server! ^fHave fun =)” si_motd_4 “^fSupport ^5BRINK! ^7http://steamcommunity.com/groups/BAGU” si_serverURL “”
This is how the join screen will looks like.

Server Mode
//Server Configuration //Standard | Advanced | Competition | Old Skool | Custom applyServerConfig “Custom” //Game Rules //si_rules sdGameRulesStopWatch // = Play Stopwatch //si_rules sdGameRulesObjective // = Play Objective //si_rules sdGameRulesChallenge // = Play the challenges //si_rules sdGameRulesCampaign // = Play the Campaign //campaign set campaign_resistance // Resistance campaign //campaign set campaign_security // Security campaign si_rules sdGameRulesObjective //Server time limit si_timelimit 30 //Set the play mode //0 = solo | 1 = Co-op | 2 = versus si_playmode 2 //Allow server to be borrowed by players who are using matchmaking service? //This will allow the match making service to use your server when it is empy! net_serverAllowHijacking 0 // 0 = Disabled, 1 = Enabled //Server sleeps when no humans are playing. bot_sleepWhenServerEmpty 1 //Bots stop thinking. Save CPU g_emptyServerRestartMap 1 //No player on the server = Map will restart and wait for players. //Password for your server? //0 = No //1 = Yes si_needpass 0 //Password for your server – si_needpass NEEDS to be set to 1! g_password “mylongpassword” //Server LogFile if you need. logFileName “logs/console_$Y-$M-$D_$h.$m.$s.log” logTimeStamps “1” logfile “2”
Admin Settings
//Admin password net_serverRemoteConsolePassword yourlongpasswordhere
If the server RCON password is set, the admin can manage the server from the ingame console.
If you don’t want authenticate you every time ingame, you can set the credentials in the autoexec.cfg
// Ingame Admin autologin | Fot the autoexec.cfg seta net_clientRemoteConsolePassword yourlongpasswordhere seta net_clientRemoteConsoleAddress your.server.ip.here:port
How to use autoexec.cfg and for more admin commands please read my other guide:
[link]
Join Settings
//Set who can join your server //0 = SOLO //1 = INVITE ONLY //2 = FRIENDS & INVITES //3 = EVERYONE si_onlineMode 3 //Enable rank restrictons //0 = Off //1 = On si_rankRestricted 0 //Restrict player ranks //si_maxRank 0 = Rank 1 players only //si_maxRank 1 = Rank 1 and 2 players only //si_maxRank 2 = Rank 1, 2 and 3 players only //si_maxRank 3 = Rank 1, 2, 3 and 4 players only //si_maxRank 4 = All player ranks can join si_maxRank 4 //Reserved Slots //If you have 16 player server, 14 slots are public and 2 are private. //Join only possible with g_privatePassword “vippassword”. For fast join copy it in the autoexec.cfg //si_privateClients “2” //g_privatePassword “vippassword”
Player | Bot Settings
//Max players // 2 until 16 si_maxPlayers 16 //Max players per team si_maxTeamSize 8 //Max HUMAN players si_maxPlayersHuman 16 // Enable or disable bots bot_enable 1 //How much bots should be on the server? -1 disabled | 16 full bot_minclients 16 //Bot Difficulty + Aim //-1 = ANY //0 = EASY //1 = NORMAL //2 = HARD si_botDifficulty 2 bot_aimSkill 3
Match Settings
//Allow players to spawn and play during warm-up period //0 = Off //1 = On si_warmupSpawn 1 // Damage enabled or disabled while warm-up spawn g_warmupDamage 0 //Percentage of players that need to ready up to start a match si_readyPercent “50” // si_minPlayers 1 //Amount of players required to be on the server, to start a match //Voting for kick a player? //0 = On //1 = Off si_disableVoting 0 seta g_minAutoVotePlayers 4 // How much votes are need until it will valid. //Friendly fire //0 = Off //1 = On si_teamDamage 0 //Enable spectating //-1 = Off // 1 = On g_spectatorMode 1 g_spectateFreeFly 1 //Set if players can only join the smaller size team //0 = Off //1 = On si_teamForceBalance 1 g_teamSwitchDelay 1 //How long wait until you can change the team. In secs. //Rim lighting tints on enemies //0 = Off //1 = On si_enemyTintEnabled 0 //VOIP si_teamVoipEnabled 1 //Team VOIP si_globalVoipEnabled 0 // Global VOIP
Maprotation
//////////////////////////////////////// ///////// //ONLY ENABLE ONE MAP ROTATION – FIXED OR VOTE!// //////////////////////////////////////// ///////// //Maprotation – FIXED! //The server will run the below maps in the order listed. //g_mapRotationFixed “mp/aquarium,mp/ccity,mp/reactor,mp/refuel,mp/resort,mp/sectow,mp/shipyard,mp/terminal” //Maprotation – VOTE! //Server will allow the players to vote which map to play at the end of each round! They can ONLY choose from the maps listed below! g_mapRotationVote “mp/aquarium,mp/ccity,mp/reactor,mp/refuel,mp/resort,mp/sectow,mp/shipyard, mp/terminal” //With DLC maps. //g_mapRotationVote “mp/aquarium,mp/ccity,mp/reactor,mp/refuel,mp/resort,mp/sectow,mp/shipyard,mp/terminal,mp/lab,mp/founders”
Spawn Server
spawnServer mp/aquarium.entities
or other maps:
- spawnServer mp/aquarium.entities
- spawnServer mp/ccity.entities
- spawnServer mp/reactor.entities
- spawnServer mp/refuel.entities
- spawnServer mp/resort.entities
- spawnServer mp/sectow.entities
- spawnServer mp/shipyard.entities
- spawnServer mp/terminal.entities
- spawnServer mp/lab.entities // DLC
- spawnServer mp/founders.entities //DLC
- spawnServer sp/challenge_01.entities
- spawnServer sp/challenge_03.entities
- spawnServer sp/challenge_05.entities
- spawnServer sp/challenge_06.entities
Outro
There are sure more commands to configure the server, but this are the important ones.
So if you want help to update this guide or have questions, please write a comment.
For more BRINK stuff visit B.A.G.U. Have fun and play more BRINK!