Overview
A guide on how to use Mapster32 to make maps for Duke Nukem
Welcome to Build
Getting Started
(TUTORED.MAP is the map that goes along with this guide. You can find it in the Workshop)
All official maps for Duke Nukem 3D were made using a tool called Build.exe. While it may technically still be possible to make maps using Build.exe, I recommend using a community created tool called “mapster32”. It is almost identical to Build.exe, and you don’t have to fiddle with an MSDOS emulator or a Windwos 98 VM to get it to work on a modern system.
The Steam version of Duke3d comes with a copy of Mapster32. You can get the latest version here: [link]
If for some reason you are trying to use the original build.exe with the original DN dos install stuff, you have to copy all the files from the build directory to the root of the Duke Nukem directory or it won’t work properly. (I don’t know who would want to do it this way… but this is how you fix that puke screen when you go into 3D mode with Build.exe.)
To start Maptser32 using Steam choose “Level Editor” after you click “Play”. A launcher will come up and ask you to set the video mode. Choose a video mode that is a notch below your desktop resolution and uncheck fullscreen. Mapster32 doesn’t do well in full screen in my experience. Toggling between 2d and 3d mode often breaks it. Besides, you will want to have easy access to references while making maps.
If for some reason the Steam Launcher won’t start it (has happened to me) the direct .exe is located here: “steamappscommonDuke Nukem 3Dgamerootmapster32.exe”
Once mapster32 starts you should see a black and white grid with a white arrow and a brown crosshair. This is 2D mode. You are now ready to begin.
At this point if you want to quit, save or load just hit “esc” and a menu will appear on the bottom.
Getting Started in 2D Mode
What is 2D Mode
2D Mode is the schematic view of the level. All of the geometry of the level is drawn first in 2D mode.
Vertex, Wall, Sector
All build maps are made of vertices (fancy word for “point”), Walls and Sectors. These things are drawn in 2D Mode. Walls are made by drawing a line between two verticies and sectors are 3 or more walls that connected by verticies in a closed shape (like a triangle or a square).
Don’t worry, it sounds more confusing than it is, it will be 2nd nature in no time.
Creating your first sector
Move the brown crosshair to the lower left hand corner a few grid squares away from the white arrow on your Build screen.
Press Spacebar to create a vertex.
You should now have a white line connected to your crosshair. Move the white line to the top left corner. Allow the line to snap to the grid to make it a perfectly straight line and hit spacebar again.
Do the same for the top right corner and the bottom right corner and finally close the square by putting the crosshair over the first vertex and pressing spacebar.
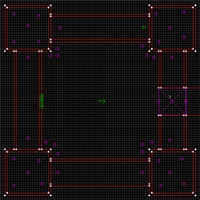
The shape should close and your line should go away leaving a white square with a white arrow in it. “Sector 0 created” should have flashed briefly in the lower corner of the screen.

It should look something like the above. The white circles are the verticies, the white walls are the boundaries of the sector and the white arrow is the camera. If you press “Scroll Lock” on your keyboard it will put a green arrow underneath your white arrow. This is the starting position and direction in a single player game.
White walls, red walls and purple walls
There are three kinds of walls in DN.
White walls are boundary walls. They represent the boundaries of the world. Beyond a white wall nothing exists. It is the void. If you were to use a clipping cheat on a white wall in game the game would glitch because there is nothing beyond for the renderer to draw.
Red walls are inner walls. They are mostly used as inner sectors. Their lines divide the map into parts. Sector Effectors go inside them to create sector based effects. The player can pass through a red wall if they share the same level and there is not a physical barrier deliberately blocking them and by default red walls do not have any texture (They are invisible unless otherwise desired).
Purple walls are basically red walls that block the player. The player can see beyond the wall but can not cross.
Lets make a red wall sector
Using the above technique create a box inside the box you previously created.

You should now have a white box inside of a white box. What you have just done is created what is basically a square donut. Your white arrow is inside the void right now! The level is the inner space between the two squares. If you were to try to go inside 3D mode right now you would get an error saying that your camera is not inside a sector.
That isn’t what we want though. We want a square room with a square we can walk in in the middle. Move the crosshair inside the inner square. Press “Alt+S” on your keyboard. The white inner square should turn red.
Now what we have is a large square room with a small square sector inside of it.

It should look like the above.
Splitting sectors
What if we wanted to make another room off of this one? We would need to create an opening in the wall and a hallway to another room right? You will be unable to use spacebar to create a new vertex or wall on top of either the red or white sector because there is already a wall there. If you want more geometry to work with you will need to add more verticies.
Move your crosshair over to the middle of the northern top wall. It should start flashing when you get close to it. Move two grid squares to the left away from the middle and press “I” on your keyboard. You should get a vertex on that spot. Now move 5 grid squares to the right and press “I” again. You should now have two new verticies with five grid squares between them.
If you need to you can use the crosshair to move a vertex. Just click and drag. The grid snap, which is on by default, will snap the vertex to the grid.

It should look like the above. The wall is now split into 3 walls.
Making the hallway and next room
We are now going to make a hallway and a 2nd room. Move the crosshair to the inner left vertex, one of the two you just created. It should start flashing. Hit the “spacebar” to create a wall off of that vertex. Move the line north a ways until you get the side of a short rectangle. Then hit “spacebar” to create a new vertex. Then move over 5 grid squares and hit “spacebar” again. Then move back down to the inner right vertex on the first room and hit spacebar again. Then close the shape by moving back to the inner left vertex, crossing your line over the existing white wall.

You want something like that.
By now you should know how the spacebar works. Hover a point, hit space, drag the wall, hit space and so-forth until you get back to where you started from. Remember all sectors must be closed shapes. Somehow getting a not closed shape (which can happen… welcome to the 90s!) means you have a corrupt map!
Using your knowledge of wall drawing make another square room off of the hallway we just created.
You can right click on the grid to move your white arrow if you need to.
Make it look like so-

Moving On!
That is pretty much the basics of 2D mode. It CAN do more, and a lot of the stuff in 3D mode can also sort of be done in 2D mode as well. Some of the other things that 2D mode can do include the ability to copy and paste sprites and textures, you can place and delete sprites and move them on the grid in 2D mode, there is a half circle tool and a few other things. I prefer to do my Sector Effector tagging in 2D mode (more on that later). But this page is the absolute basics.
You should be able to draw the 2D geometry of a level now.
All the keyboard commands can be found here:
[link]
Getting Started in 3D mode
Editing the Z coordinate
2D mode is used to edit the length and width of a level. 3D mode is used to edit the height.
It is also used to edit textures and to help place sprites and things in the world.
Just like 2D mode, it sounds more complicated than it is.
Getting Started
You should have already read and followed along with the previous section.
Make sure your white arrow is inside a valid sector and press the “enter” key on your NUM pad.
You should see something like this-

You can now use the arrow keys to move your white camera arrow around the world. Make sure you are using the arrow keys and not WASD to move. Pressing random buttons can cause… unexpected things to happen.
If you press the NUM “enter” again it will take you back to 2D mode. You can use this as a map or schematic to help reference where you are in the world when you are in 3D mode.
Texturing
Go into 3D mode.
Looking around you will see that everything is textured with that weird cinderblocky-bricky texture. This is texture ID 0, and as such it is the default texture. It’s ugly, lets get rid of it!
Move into the sector that is not the sector with the red inner square (the north most room, use 2D mode to find it if you can’t tell which is which)
Move the mouse crosshair to point at the floor of the room.
Press the “V” key on the keyboard. This shows you all the textures you have used. They are sorted by the number of walls, ceilings or floors that have that texture. So the more often you use a texture, the closer to the top they get.
Press the “V” key again. This will show you ALL textures. They are sorted by their ID number.
Use the arrow keys to pick a different texture for the floor and press “Enter” (the main enter key, not the NUM enter key). (Or I suppose you can use the mouse. Move the mouse to pick a texture and left click to select. Use the scrollwheel to scroll down the list of textures)
I picked texture ID 183. Pressing “G” while in the texture picker will allow you to enter a texture ID number. You can choose any texture you want, however, avoid picking any textures that have that purple background. The purple background means that the texture has transparency on it Most of them are sprites, some of them are for masked walls (more on that later). This will not work as a wall or ceiling or floor texture. There are also animated textures, like water. In order to get the animated texture to animate correctly you must choose the first texture in the sequence. It is whatever the lowest number is. A pool of water, for example, is texture IDs 336, 337, 338. In order to get it to animate you must choose texture ID 336.
Now lets texture the floor of the hallway that leads back into the room with the red square inside of it.
We could hover over the sector and press “V”, but there is a short cut. Since we are going to use the same floor texture we can copypaste the texture to another floor. Hover your mouse crosshair over the newly textured floor. Press “Tab”. This will “copy” the texture to mapster32’s clipboard. Now move the mouse to the floor of the hallway between the north and south rooms and press “Enter” (Always assume the main “enter” unless I say NUM “enter”). This will “paste” the texture in the clipboard onto that surface.
Now do the floor just inside the hallway of the south room. Press “Enter” again to paste the texture. You should see the texture cover the floor of the outer square. The inner square should still have the cinderblocky-bricky texture on it.

For now, leave that inner square alone.
Now lets texture the walls.
Go back to the North room and point at a wall. Press “V” twice to get into the texture picker and choose a wall texture. I picked ID 288. Go ahead and do the entire North room and the two walls in the hallway leading to the South room with ID 288. Don’t texture the walls in the South room yet.
Now do the same for the ceiling. Do the ceiling in the South room also. Do both the ceiling of the inner and outer square. I used ID 211 for the ceilings.
You should have something like this-

Now go into the South room and give the walls a different texture than the North room and hallway. Lets use something plumming related. Go into the South room and face the hallway. On the right hand side of the hallway change that wall to texture ID 186. Then change the wall to the right of it (The East wall) to ID 187. Make the southernmost wall ID 189 and the remaining 2 walls ID 191. The textures won’t look right, that is OK for now.
Height
These rooms are a little short. Lets make the ceiling higher. The height of the walls is controlled with the “Page Up” and “Page Down” keys. Go back to the North room and point the mouse at the ceiling. Press “Page Up” 15 times to raise the ceiling. Each time you press “Page Up” it will move the ceiling a little. Make sure you keep the crosshair on the ceiling. You will also see the wall right above the hallway has the ID 0 texture on it. Change it to match the North Room wall texture.
Make it look like this-

Now go do the same in the South room for both the inner and outer sector. Page up 15 times. Leave the hallway height alone, but change the ID0 texture to the bathroom tile texture.

Modifying a texture
As we can see from the above picture the texture on the East wall in the South room is not tiled properly. Not all textures evenly tile and you will need to take that into consideration when building rooms if you want a specific visual.
In the event that a texture does not quite fit, or you want to stretch or squeeze it, you can use the NUM pad arrow keys (4,8,6,2).
Move your mouse over the East wall and press the “4” key on the NUM pad 20 times. This will stretch the texture so that the pipes all line up.
You can also pan textures. Panning a texture moves it without scaling it. Hold down “Left Alt” and then the NUM Pad arrow key in the directon you want to pan the texture. Pan the texture on the tile texture above the corridor to line it up a little better. It is often difficult to get it “perfect”. Don’t obsess over it.
You can also change the shade, and therefore the lighting of a texture. Go into the hallway and move your mouse over the ceiling. Press the NUM pad “-” 10 times to decrease the shade. Do the same for the floor and walls in the hallway. Alternatively NUM pad “+” will increase the shade.
If you want to revert a wall back to the default texture settings hover over it and press “/”.
Digging a pit
Go back into the South room. Point your mouse at the Bricky ID 0 texture of the floor if the inner sector. Press the “Page Down” key 4 times. Set the texture of the floor to 336 (water). Set the 4 edges of the pit to texture ID 260. Use the panstretch keys to get the edge texture to look correct.
By default your camera is in zero gravity mode. If you press “Caps Lock” it will toggle to gravity mode. in zero gravity mode, “A” and “Z” will allow you to fly up and down. In gravity mode you will walk on the floor and fall down pits and ledges just like in game. A and Z will somewhat simulate jumping and crouching, sort of.
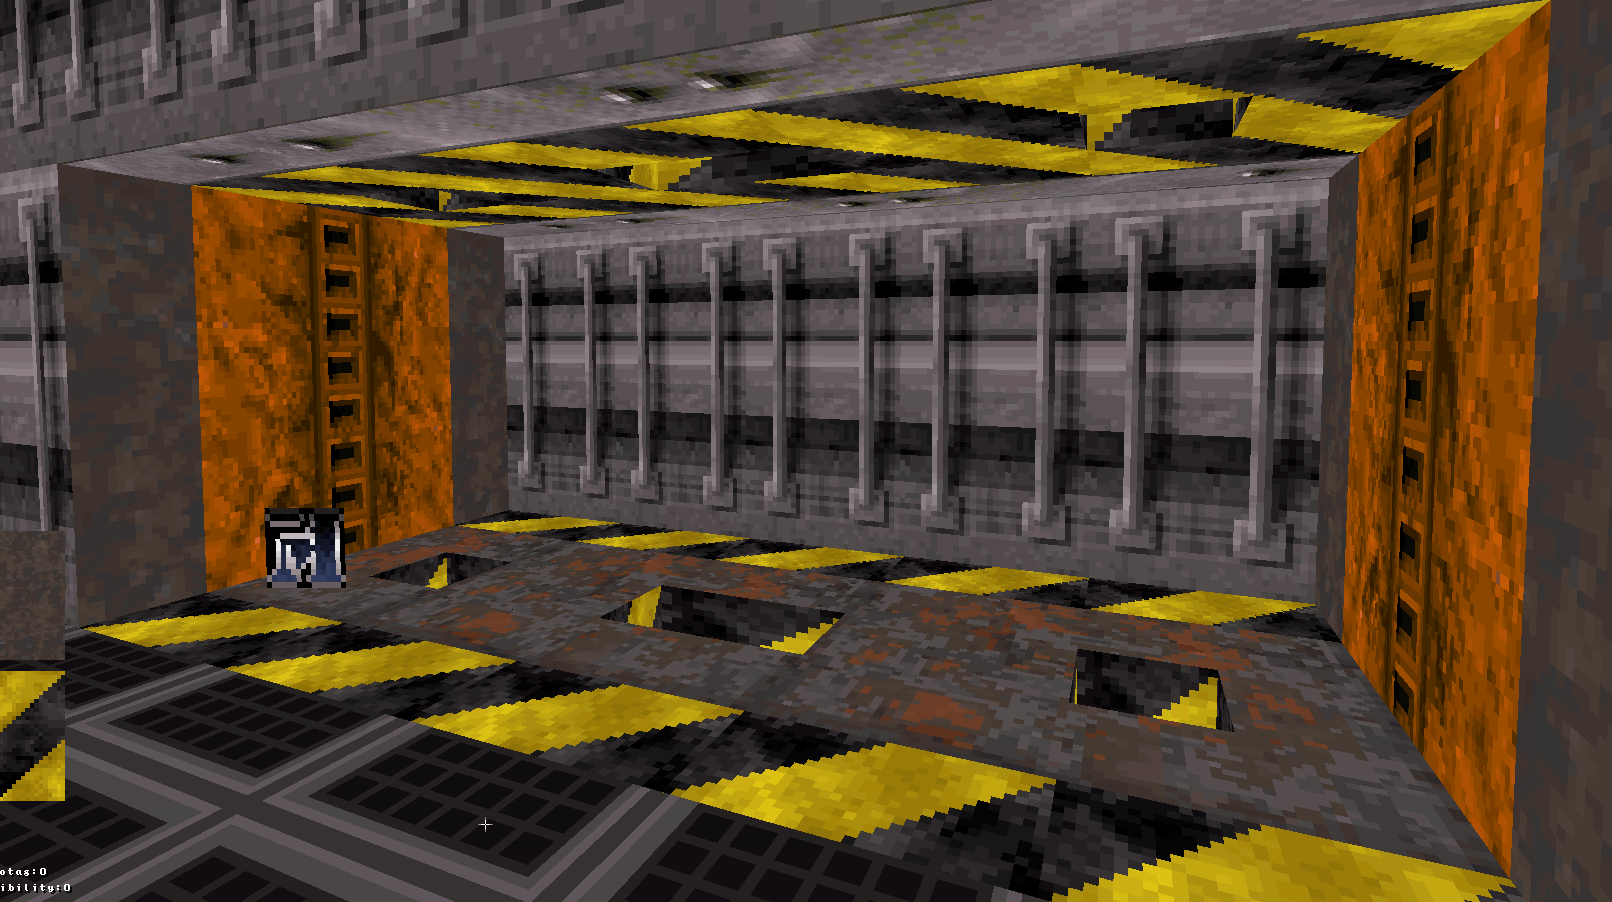
Your level should now look like this-

Feel free to stretch or pan the textures around a bit to make them line up a bit better if you wish.
Press NUM Enter to go back to 2D mode. Press “Esc” and press “S” and press “Enter” to save the map.
Play Testing the Map
Play Testing the Map
You should be able to press “P+Ctrl” in 2D mode to get the game to launch but for some reason it isn’t working in the Steam version. Just hit the window key to minimize the map editor.
You have to make sure your map is in the “maps” folder. By default mapster32 puts the files in it’s root. Located here: steamappscommonDuke Nukem 3Dgameroot
Inside the gameroot folder is another folder called “maps”. put your map in here. It should be named newboard.map.
Launch Duke3d Megaton edition from the Steam launch. Select user maps from the menu. Go down and select “newboard.map”.
You should now be able to play the map you have been working on.
Making things happen: Sector Tags
What is a Sector Tag
(Note: that if you are wanting to learn how to build Shadow Warrior maps, most of the information in the next sections will be invalid. Shadow Warrior uses the ST1 sprite system and few sector tags. Duke Nukem uses Sector Tags and Sector Effectors and several others. The following information applies ONLY to Duke Nukem.)
Sector Tags tell a sector what they are and sometimes what they do.
When you launched your playtest of the map did you notice that the water square in the South Room did not behave like a pool of water? That is because the water texture is just a texture! We need to tell the game that that sector is meant to be a puddle of water.
Go into 2D mode and put your mouse cursor in the middle of the red inner sector. Press “T”.
You will see on the botton left corner Mapster is asking you for a sector “lo-tag”. Enter “1” and press “enter”. There should now be a white box that says “0,1 WATER (SE 7)” on it. What that means is the sector is tagged as “hi-tag 0”, “lo-tag 1”. The game recognizes “lo-tag 1” as “WATER” and it is telling you that it will affect or be affected by “Sector Effector 7”. Don’t worry about “Sector Effectors” just now.

Now if you save the map, move the file and play the map, that square should be more like water.
There is a file called “_ST.txt” located in the “gamerootclassic” folder. Open it in Notepad++. This is the original reference with all the Sector Tags, which Sector Effectors work with them and what they do. You have to open it in Notepad++, regular notepad won’t format it correctly. There is also a “_ST.map” which is a playable and editable map that shows an example of every sector tag! So if you want to know how to do something you can look up the tag on this map. There is also one for the Sector Effectors.
Doom Doors
“Doom doors” are doors that move from floor to ceiling to open. They are named after the doors in id Softwares “Doom” in which all the doors opened in this way. They are the simplest doors to make and they require only a sector tag for basic operation.
Go in to 2D mode. Go to the South room and face the hallway.
Go one grid square in and insert a vertex on the left side. Then do the same on the right side. Then add a vertex right above that one on both sides.
Then use the spacebar to connect each pair of vertices horizontally.
It should look like this-

Now put your mouse crosshair inside the new sector.
Press “T”. It will ask for a lo-tag. Enter 20. It will say “0,20 CEILING DOOR”. This will cause the ceiling to come down to the floor and back to the top of the ceiling of the adjoining sector when going back up.
Go into 3D mode. put your mouse cursor over the ceiling and press “Page Down” to find the ceiling that will come down. You will notice that the texture on the walls moves with the door. Point at the walls that are the door frame and press “O”. This will prevent the textures from moving with the door. Change the texture of the wall of the door frames to ID 161. Change the texture of the floor underneath the door to ID 355. Give the underside of the door (the ceiling of the sector) a texture ID of 400. Press “F” to flip the texture 90 degrees if it is facing the wrong way.
Move your mouse so that you can lower the ceiling. Hold down the left mouse button to “lock” the sector. This will let you modify the sector without having to have the mouse cursor on it unitl you let go of the left mouse key. Use “Page Down” to bring the door all the way down to the floor.
Change the texture to ID 150. It may be all stretched out. Press “/” to reset it and then use the NUM arrows to resize the texture to fit the door. When done, point at the door, press “Tab” then walk through the door (the camera can go through red walls, so you can leave the door down). Point at the other side of the door and press “Enter”. It should copy the texture and the size to the other side of the door.

Go back to 2D mode, hit “Esc”, Save the map, move the file and play test it. Go up to the door and hit “E” (action key) and watch it open! Then press “E” again to close it. Your water pool should also make your character sink a bit and it should make water noises and splashy noises. When you get out of the pool you should leave water footprints around when you walk.
Other things
There are a lot of other things Sector Tags can do. Sector Tags are needed to make sliding doors, subways and elevators. You can also tag secret areas, they can trigger some sounds and they can tag an “exit” area. We will go over some of the others later.
Sprites
What are sprites
In the context of Build, sprites are anything and everything that isn’t a wall, sector or vertex. Sprites are all of the objects that aren’t made of sectors in 2D mode. Guns, enemies, special effects and some special commands are all sprites. A great many sprites are decorations. Some sprites are special and are used to modify Sector Tags among other things. Some sprites are switches which can trigger Sector Tags and Sector Effectors.
Sprites are created by pointing at where you want them and pressing the “S” key. In 2D mode go move the cursor to the top left hand corner of the South room. Move to the lower right hand corner of the 2×2 grid in that corner and press “S”. A purple circle with a line pointing up will appear. The line is the direction the sprite faces, which is not always relevant. The fact that it is purple means that it will block the player (the player can’t move through it). Hover the mouse over it and press “B” and it will turn green. This means that it will not block the player.
Go into 3D mode and look at the sprite. you will notice that it has that ugly brick texture on it. It looks like a little wall. The little wall should always move to face the camera. This is the default mode for the sprite, but you can change it. If you point at the sprite and press “R” it will change to vertical mode. It will act like a wall and will always face the angle of the sprite. This is that little line that you see in 2D mode. You can change the angle with the “<” and “>” keys. Pressing “R” again will put the sprite on the floor. Pressing it again will put it back to always facing the player.
Also note that sprites that are in a fixed mode can be 1 or 2 sided. Simply point at the sprite and press “1” to change it to single sided. Go around to the visible side of the sprite and press “1” again to make it double sided again.
Changing Sprites and making a scuba tank
Go into 3D mode.
Make sure your brick sprite texture is in “Face the player” mode. look at it and press “V” twice.
Note that ANY texture can be a sprite. The purple color will be invisible on a sprite.
Set the sprite to texture 56. The bricks should now be a scuba tank.

More Sprites
Some sprites are animated. Like the atomic health or the dancers. For animated sprites the correct texture to use is the first one in the order. The one with the lowest number in the set.
Go back to 2D mode and put another sprite in the same spot on the right hand side of the South room. Go back to 3D mode, It will default to the scuba suit. Press “V” twice on it and choose ID 100. This will change it to an animated atomic health. If it is moving then you chose the right one.
Create two more sprites. One on the lower left and one on the lower right in the same place as the other two sprites. Set their textures to ID 1680. You now have two enemies in the level. They should be walking in place if you chose the correct sprite.
Your South room should look like this-


Now go into the North room.
Create a shotgun (ID 28) and some ammo sprites (ID 49).

Face the door and backpedal to the back wall. Go in to 2D mode and press “Scroll Lock”. This will move the start location to the North Room and it will be facing the door.
Modifying sprites
Sprites can be squeezed and stretched just like wall textures can. Though some sprites like enemies and pickups will revert back to their default size in game.
Sprites can also be moved up and down using “Page Up” and “Page Down” and they can be made solid using the “B” key.
Ornaments
An “Ornament” is basically just a sprite that is stuck on the wall. If you point at the wall and press “S” it will place the sprite on the wall. Press “O” to get to stick, if it’s not already stuck. Go into the hallway and look at the wall. Press “S”. Change the sprite to a sign texture. Then point at it and press “O”. It will now stick to the wall.

Play test the map. You can now pickup a shotgun, an atomic health, a scuba tank and you can kill 2 enemies.
Making things Happen Pt2: Special Sprites (Sector Effectors)
Hi and Lo Tags
Hi-Tags and Lo-Tags are special codes that are used to change the behavior of special tags.
Mostly, with SE sprites, Hi-Tags are IDs that are used to chan the SE sprites together and Lo-Tags tell the SE sprite what they are. For example, If I give a Sector Effector sprite a Lo-Tag of 7 it will behave like a teleporter. The Hi-Tag tells the sprite which sector to teleport the player to. So you have two SE tags, each in a different sector, they are both Lo-Tag 7, which means they are both teleporters. Then you set them both to the same unique “Hi-Tag”. Then entering one sector will teleport you to the other sector!
Other special sprites often use Lo-Tags as match tags. When one Lo-Tag is triggered, it will activate (or be activated) all other sprites with the same Lo-Tag.
If this all doesn’t make sense, don’t worry. We will do some. Just remember that whenever you use a “match” Id, whether it is a Hi-tag or a Lo-tag, it needs to be unique to the effect you are trying to do. So, if you use match ID 1 to link a switch to a door, you have to use ID 2 for the next one and then 3 and then 4 and so on.
Special Sprites
Some sprites are special. They aren’t visible themselves but they cause some kind of effect. Usually they modify Sector Tags.
The primary special tags are the sprites with texture IDs 1-10.
ID 1 is the “Sector Effector”. This is the primary “special” sprite. Look at _SE.txt for a complete list of the Sector Effectors and what they are for. Also _SE.map will give you a demo of each Sector Effector.
ID 2 is the “Activator”. The activator is used to “activate” any sector effectors when it’s match tag (lo-tag) is called. Primarily it is used to open and close doors using a switch.
ID 3 is the “Touchplate”. Touchplates trigger activators and masterswitches when a player enters a sector. Basically it turns a sector into a “switch”. By setting a “Hi-Tag” you can control how many times the player can trigger the touchplate.
ID 4 is the “Activator Locked”. Activator locked will prevent a door from opening unless a switch “unlocks” it. The switch does not open the door, it allows it to be opened by use of the “E” key in game. This is a toggle, so the door can be locked or unlocked with the switch.
ID 5 is the Music and SFX sprite. It triggers sound effects, echos and music effects.
ID 6 is the locator sprite. it is used primarily to make subways. You can also make paths for Pig Cop recon cars.
ID 7 is the Cycler. It is used to cycle brightness on the floors, walls and ceiling.
ID 8 is the MasterSwitch. The MasterSwitch is a timer. When the timer expires (the Hi-Tag) it will trigger whatever sector effector or sector tag that shares the sector the MasterSwitch is in. This can only be activated by a touchplate. Mach their Lo-Tags.
ID 9 is the Respawn tag. It causes enemies and sprites to spawn in. Set the Hi-Tag to the ID of the sprite you want to spawn. The Lo-Tag is the match. I believe you can only respawn “named” sprites with this.
ID 10 is the GPSPEED sprite. It sets the rate of movement for Sector Tags and some Sector Effectors. Use this to override the default speed of a door. Set the Lo-Tag to the rate.
Other Special Sprites
The following sprites are also “special”. They aren’t as powerful as the 1-10 sprites, but they are still special in that they do not behave as simple static objects.
ID 132 (and any other “switch”) – Switches are “truefalse” devices. They are used to turn an activator or an activatorlocked on or off. They can trigger other things too. Usually, an event is triggered when the switch goes from its “off” state to its “on” state. An activator that matches the switches “Lo-Tag” will activate the Sector Effectors they are paired with.
ID 142 is the NUKEBUTTON. It is used to end the level. That is all it can do, it can’t be used as a normal switch.
ID 146 is the MULTISWITCH. It activates 4 ACTIVATORS in a sequence. I have never used one, but I believe it works by taking the Lo-Tag of the first activator and then increasing the activator activated Lo-Tag by +1.
ID 150 (and other door tiles) can be placed on the wall and when a player attempts to open the door it will trigger an Activators matched Lo-Tag
ID 162 is the DIPSWITCH button. The dipswitch is both a shootable button and it is used to make a combination lock. The lo-tag matches to an activator and all other dipswitches that are part of the combination. The Hi-Tag is set to either 0 for off or 1 for on. When all of the dip switches that are matched to the activator are set to their appropriate state by the player it will activate the matched Activator.
ID 502 is the viewscreen. It looks through cameras whoes lo-tags share the viewscreens Hi-Tag.
ID 546 (and all other cracks) Cracks activate Sector Effector 13.
ID 560 is the mirror. Mirrors are… strange. You can’t just plop down a mirror sprite, you have to set them up a special way with special geometry. In a nut shell you have to build an area behind the mirror that is the same size as the room that you want to reflect.
ID 621 are the security cameras. Set the lo-tag to the Hi-Tag of a viewscreen. The shade of the camera sprite will angle the camera down. The angle is the direction the camera points and the Hi-Tag is how much it turns.
ID’s 1232, 4580, 4582 are CANWITHSOMETHING sprites. Set their lo-tag to any “named” sprite ID and they will spawn them when broken. (Trash cans)
ID 1405 is the APLAYER sprite. They are used to set respawn points in a dukematch map. Dukematch maps have the default single player startting location (the green arrow) and each 1405 sprite. So if you wanted to make an 8 player map you would need to put 7 of these in the map.
Next Steps
The following sections will describe how to use Sector tags and special sprites to make some common things happen.
UnderwaterDiveable sectors
Diving into water
This section will explain how diveable water works. Diveable water is an area of water that Duke can swim down into.
How does it work?
The Duke Nukem version of Build is not capable of putting two rooms on top of each other and having interaction between the two rooms (sector over sector IS possible, but not room over room, not without mods or hacks anyway). So in order to have a room “below” another room that can be reached from the above room you have to use a trick.
The trick for an underwater sector is to build the underwater sector somewhere else and silently teleport the player (or anything else that falls in the water) somewhere else. From the players perspective he has gone “down” into a pool of water, but in reality he has been teleported away!
Lets do it!
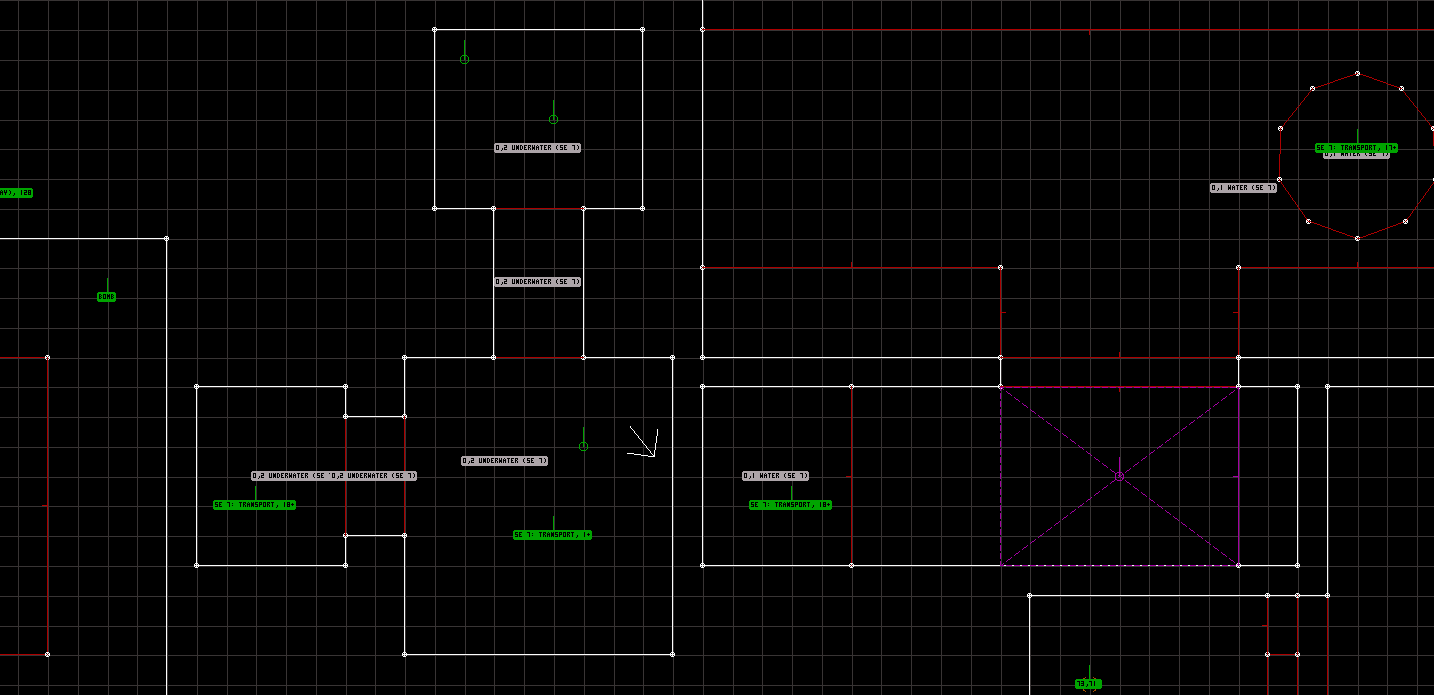
The first thing you need to do is go into 2D Mode. Find our water pool, the inner red sector in the South room. We need to know its exact size. Mine is 9 wide x10 tall grid squares (or if you prefer, you can left mouse hold on a vertex and it will tell you the size in units. 2304×2560)
Now we have to make a new sector somewhere that is EXACTLY the same size and dimensions as the water pool. It must be exact. The shapes don’t have to be square, as they are in this tutorial, they can be any shape, as long as both sectors are exactly the same shape and size.
Once you have created the new sector, put the mouse in the new sector and press “T”. Give it a lo-tag of “2”. This means that this sector is underwater and will operate with underwater physics. The player will float and will need a scuba tank to breathe.

So we now have a red “Water” sector and a white “Underwater” sector. put the mouse crosshair in the new white underwater sector and right click to move the camera arrow into it.
Go into 3D mode. You will see the texture ID 0 on the floors, walls and ceiling and everything should have a blue-green tint.
Lower the floor with the “Page Down” key about 21 times. You can use the right mouse button to rotate the camera to look up or down. You can also press “Caps Lock” to turn off gravity and fly with “A” and “Z”
Set the texture of the ceiling to ID 336 so that it looks like water. Use ID 191 for the walls. ID 352 for the floor.

Now create a sprite and set it to ID 1 (The big blue S). Make sure the sprite is sitting on the ground.

Go into 2D mode.
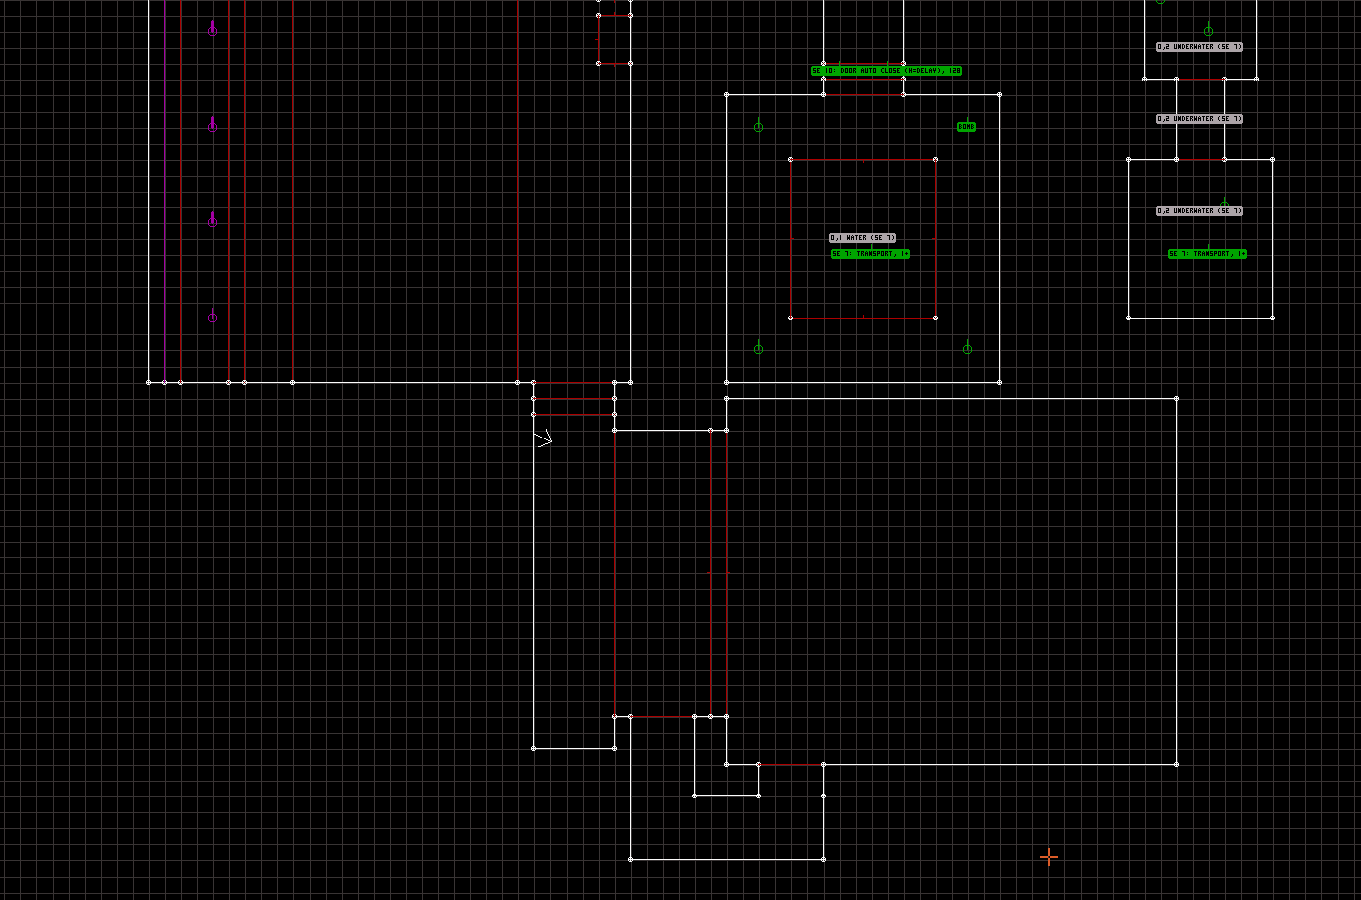
Hover the mouse over the sprite and give it a Lo-Tag (Alt-T) of “7” and a Hi-Tag (Alt-H) of “1” (I never use ID 0 for a match, personal preference). The sprite should now say “SE 7: Transport ,1”
Put another SE Sprite in the same place on the red sector with the pool of water. Give it the same Lo-Tag (7) and the same Hi-Tag (1).
Lo-Tag 7 means “This is a teleporter sector” Hi-Tag 1 means “teleport to the other sector that has a Sector Effector with a Hi-Tag of 1.” The Hi-Tag is the unique ID for this specific instance of the effect. The next one for this map will be ID 2, then 3, then 4 .etc.
It should look like the below-

Save the map and play test it. You should now be able to dive into the pool of water in the south room.
Closing thoughts
The source and destination sectors have to be the same shape and size. You can however, create paths off of the underwater sector. Any sector that is tagged with a Lo-Tag of “2” will act as an underwater sector.


This is fine, just so long as the destination and source sectors themselves are the same size. You can branch off the destination sector, you can add other sprites, enemies, textures whatever. Just so long as they are both the same 2D size.
Fun with Doors
Doors
There are several ways to make doors in Build.
The easiest we have already done, the “Doom Door” or “Ceiling door” as the documentation calls it.
There is also a “Floor door” which does the same thing as the ceiling door, except it goes up from the floor instead of down from the ceiling.
Advanced Doom Doors
Lets look again at the Doom Door that we created in the last section. You may have noticed that the door does not make a door open sound when it is opened. It also stays open forever until the player closes it. Lets fix that.
Making the door make sound
Place an MUSICANDSFX sprite (ID 5) inside the sector with the door. in 2D mode, press “L” to turn off the grid snap so you can drag the sprite into the middle of the sector. (or you can use “G” to change the grid size, but change it back when you are done. Turn the grid snap back on when you are done.
Give the MUSICANDSFX sprite a Lo-Tag of 256 (SPACE_DOOR1)
You can get yourself a list of all the sound tags here: http://dukeworld.duke4.net/classic%20dukeworld/other/docsfaqs/sfxlst20.zip
Making the door close itself
Place a Sector Effector inside the sector with the door. Give it a Lo-Tag of 10. The Hi-Tag is the amount of time before the door closes. A value of 32 is one second. So take the number of seconds you want and multiply it by 32. I will set my door to 128 (4 seconds).
It should look like this-

Swinging Doors
A Swinging door is a sector that rotates around a pivot. Think of a bedroom door or a locker door. In fact, it is probably the most common door IRL…
They are easy enough to make.
First make the room that you want the door to swing open into


Now create the “door” sector. Feel free to turn the grid down using “G”.
The door sector is not part of the opening in the wall. Put the cursor in the middle of the door sector and give it a lo-tag of 23 (Swing Door)

Now turn off the grid lock with “L” and move the door sector as close as you can to the wall. Do not allow the red line of the door sector to enter into the opening in the wall.
You must turn off the grid lock when you move the lower verticies. Otherwise they will snap to the opening and it will join the sectors together, which is not what we want.
It should look like this

Now we need the hinge for the door. The “Hinge” is Sector Effector 11. Create a Sector Effector Sprite, give it a Lotag of 11. If there is going to be more than one swinging door in the level, each “hinge” must have a unique Hi-Tag.
Make sure that the lines of the swinging door sector don’t cross into the opening. Also make sure that the Sector Effector (11) is inside of the swinging door sector.
The SE 11 is the pivot point, the hinge that the sector will rotate around. The door sector will rotate 90 degrees around the SE sprite. The angle of the sprite determines whether it will rotate 90 degrees clockwise or 90 degrees counter clockwise. The line that comes out of the sprite in 2D mode is the angle. When the line points North this door will open outward. If you were to rotate the line (using “<” or “>”) down to point South the door will open Inward. We want the door to open Outward so leave the default.

Note that even though it looks like the door sector is connected to the wall IT IS NOT. The door sector was created away from the wall and then the lower two verticies were moved on top of the points with the grid lock turned off (“L”). Also note that the Sector Effector is INSIDE the door sector. Just barely away from the lower left hand vertex.
We can finish off this door by putting a MUSICANDSFX sprite inside the door sector. Give it a lo-tag of 165 (DOOR_OPERATE2)
Go ahead and test it, you should hear the door open and it should swing open just fine. It will also stay open.
Teeth Doors
A so-called “Teeth Door” is a door that has one or more prongs that go into the ground and retract while the door opens.
Step one we are going to create a nice big door way in the West wall in the North room. I added verticies four grid squares away from the corners of each wall.
We are going to go out to the West 5 grid boxes. Then come back and close the shape. Then we are going to go in one grid square and insert a vertex on all four sides. Then we will add red walls between each pair of vertexes vertically.
Now create in the middle of the 3 wide sector two 1×1 sectors, one on each side one away from the white wall. Then create a 2×1 sector in the middle of the 3 wide sector. Press “Alt+S” in each of the small boxes to turn them red.
It should look like this:

Now tag the big sector with lo-tag 29, Hi-Tag 2 (29 is Teeth Door, 2 is the match.
In each one of the 3 inner boxes put a Sector Effector with a Lo-Tag of 22 and a Hi-Tag of 2
Also add a MUSICANDSOUNDEFFECTS Sprite with a Lo-Tag of 256 (Hydrolic Door Thick)
Here is what it looks like with all the tag sprites

Now it is time to texture and setup the door in 3D mode.
Bring the outer edges down to make a door frame. Push the “teeth” holes down using “Page Down” several notches. The further down, the longer it will take to open the door. Bring the roof of the door down to level with the door frame and push the “teeth” holes up using “Page Up”
“Close” the teeth by clicking and holding on the tooth and holding page down until they stop.
Do the same for the main door
Texture the door.
Put a switch in the OFF position on the right hand wall.
Give the switch a Lotag of 3. Then put an Activator (ID 2) sprite inside of the main door section of the Tooth door. Give the Activator a Lotag of 3.
The door will require the switch to open it. The Activator and Switch are matched with Tag ID 3. The Activator is triggered when the switch is turned on and the activator in turn triggers the door sector which then triggers all the teeth which are tagged with a 2, the same as the door sector.
You can play test it. The door opens very quickly. I don’t know about you but I think a big, heavy door like that should open nice and slowly. Create a GPSPEED sprite (10) and give it a Lo-Tag of 16. The Lo-Tag is the speed. Put the GPSPEED sprite inside the main door sector. Then do the same for each tooth. Now try it again. It should be nice and slow to open.
Outdoor Areas
Outdoor Areas
The primary purpose of this section is to introduce skies.
We will build a small area outside of the large Teeth door we made in the last section.
Lets build out a small street area outside.
Feel free to add a 2nd switch for the Tooth door on the other side as well. Give it the same Lo-Tag as the Activator (3). This way the door can be opened on either side.
Make it like this

There is a sidewalk on each side, a curb, a street and a wall. There is also a gap between the wall and the white boundary wall.

Set all of the ceilings to texture ID: 99
Point at the ceiling and press “P”. This will “parallex” the ceiling and make it look like a red sky!
Now if you will notice there is a wall and then a space between the wall and the boundary wall. After you parallex the sky in that skinny area grab the ceiling with the left mouse button and use “Page Down” to drag the sky down to the floor. It will look like the wall is short and there is sky going horizontally away from it.

Go back in to 2D mode and highlight the first red wall to the right of the far West white wall and press “B” This will “block” the player from going past the short wall. The red wall will turn purple in the editor.
Go ahead and decorate the outside area a bit. Put a fire hydrant in, maybe a few weapons.
Now lets go create a little room on the south wall.
Conveyor Belts
Conveyor Belts
This guide will show how to make a conveyor belt. A conveyor belt will move players and sprites.
We will use a conveyor belt to build a shooting gallery.
Create a room at the end of the street.

This is a the room that we will put the conveyor belt in.

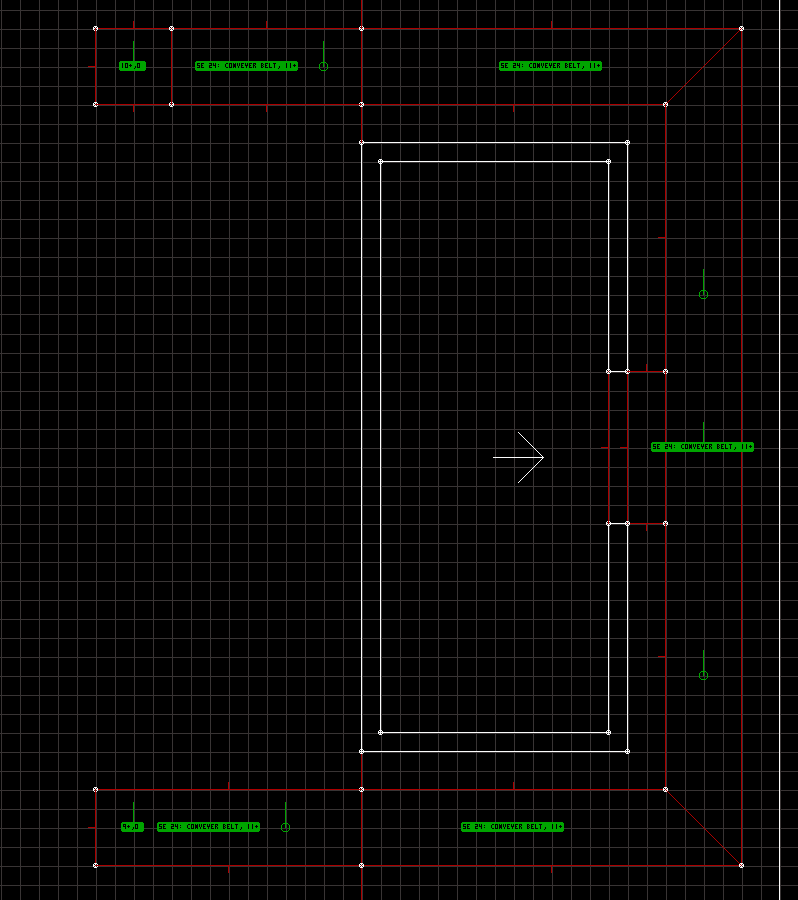
Build the device in the center. Note the angled red lines, this helps pass the items from one belt to the other. Make it one quarter at a time. All four trapezoids come together to make the pillar in the middle.
Put one Sector Effector with a Lo-Tag of 24 and a Hi-Tag of 4 in each of the four sections. Use “<” and “>” in 2D mode to set the angle, the line that comes out of the middle of the sprite, in the proper direction. The line points in the directon that the belt moves. In 3D mode, point at the floor of the conveyor belt and press “R” on each segment.
Add a switch that is in the ON position to the wall and give the switch a lo-tag of 4. The conveyor belt will turn on and off when you flip the switch.
Put some bottle sprites on the conveyor belt.

Play test the map and shoot at the bottles!
Exploding Cracks
How to blow Holes in the wall
One of the staples of the Build Engine is the ability to shoot holes in the wall with the rocket launcher.
These holes can be created as pot holes in the ground or holes in the walls. They can cover secret passages rooms and they can bridge two sectors together.
The trick is done with the “C-9 Explosive” Sector Effector (13)
C-9 SEs can only be activated by specific sprites and MASTERSWITCH special sprites. MASTERSWITCH sprites will set the C-9 off on a timer. The other special sprites are Cracks (ID 546, 547,548, 549), The SEENINE Sprite (ID 1247) and the OOZCAN (ID 1079) (_Sprite.txt says OOZCAN is 1879, I am pretty sure that is a typo as sprite 1879 is blank)
The SEENINE sprite is used to open holes in the wall. But it can also be used to make explosive effects. Use the Lo-Tag to give the explosion a delay and the Hi-Tag as a match to SE 13. When the SE 13 is triggered it will trigger the SEENINE sprite explosion. You can use the Lo-Tag to cause a delay. This can be used to create secondary explosions. The SEENINE is the yellow explosive cannister, and if you are making explosives scenes you probably don’t want the player to see the cans. If you shrink the can all the way down along it’s X axis using the NUM keys the cannister sprite itself will not show in the game, but the explosion will still go off when the sprite is triggered.
Cracks and C-9
Creating an explodable hole in the wall is relatively easy.
First go into the shooting range in 2D mode. If you have been following along with this guide there should be a 1 gridspace gap between the shooting range and the south room with the water pool in it.
Create a hole in the wall about 4 grid spaces in length in about the middle of the wall from the pools perspective.

Go in to 3D mode and modify the wall so that it looks like this. Don’t forget to fix the textures. Point at the wall with the upside down texture and press “O” to change it’s orination to the floor. Do this on both sides or the texture will not look right.

A brief word on slopes
The slope of the floor and ceiling is made by pointing at the surface and pressing “[” or “]”. One slopes up and the other slopes down. Slopes can be tricky to get just right. They angle on what Build considers to be the “first” wall in a sector. In this case that should be one of the two new white lines that were created when the hole was made in the wall. If not, the slope will go the wrong way, it will slope in towards the room, instead of parallel to the room. This can be fixed by going into 2D mode, pointing at one of the left or right walls and pressing “Alt-F”. This will designate that wall as the “first wall” and the slope will go in the correct direction.
Setting up the effect
Now we need to set up the Sector Effector to close the hole.
Create a Sector Effector and give it a Lo-Tag of 13 and a Hi-Tag of 5. (Lo-Tag 13 is the C-9 effect, Hi-Tag 5 is the next unique ID for match). Place the SE inside the sector.
Make sure the angle of the sprite (the line coming from the center in 2D mode) is pointing North. The angle pointing North means “Pull the ceiling and floor together”. If the angle was instead pointing South it would mean “Pull either the ceiling or the floor to me, whichever is closest.”
Now create a crack sprite (ID 546, 547,548, 549). Point at the adjacent wall and press “S” The crack should stick to this wall (Allso called ornamenting). Give the crack sprite a Hi-Tag of 5 to match the SE that it is going to trigger. Then in 2D mode move the crack over the hole. Make sure it stays on the wall.
At runtime the Build Engine will see that SE 13 is sitting there in that Sector and it will know that we want the ceiling and floor to come together. Once the SE 13 is triggered the hole will open to the way we have it in the editor.

Play test the map. Go to the shooting gallery and look at the wall. You should see a closed wall with a crack on it. Shoot the crack with any explosive and the wall will open. You can put a single pipe bomb (ID 26) on the ground next to it if you wish.
2 Way Trains
Making Sectors Move
A 2 way train is a sector that moves from point A to point B along a straight track.
It is easier than it sounds to do, but there are some rules that have to be followed.
The track has to all be one sector. The “car” can not cross a red or white line.
Your car and all the sectors that are inside your car must have a sector lo-tag of 31 And in most cases you will need a couple of switches to move your car.
Lets do some prepwork on our map to get ready.
Here is the 2D of the extention. The 2 way car will go on the “street” part.


We have a raised up platform, two doors, one at either side of the track and a step to get over to the car (The step is also there to make a sort of door frame. Though you could shrink the grid twice and build a skinnier door inside the existing frame, which artistically is a better idea, but it is irrelevant for the purposes of this demo.)
Building the car
Lets make the car. An important thing about making the car is DO NOT build it AT a stop. That is where the locator sprite goes… you can’t put the car there.
Instead build the car somewhere out in the track.
The “car” sector can’t be split. Major walls need to be “white” walls. You can put red walls between the white, just so long as you don’t split the bottom sector.
I would suggest building your car in such a way that it is impossible for the player to jump or fall out of it. “Safety First” and all that.
Also don’t forget to have a place to put the button inside the car.


You don’t HAVE to make your train car that complex. You can literally just use a square box with two buttons on it if you want.
Sector Effectoring
We are going to need several switches, activators, a sector effector, two locators, a couple MUSIC sprites and a couple of Sector Tags to make this work.
We are also going to need 3 match tags.
We will use 6 for the activator for the train car, 7 for the first door and 8 for the second. They must be sequential in this case, so 6,7,8 will work. If you tried to use 6,8,10 it would not.
The Fun Part
First, EVERY SINGLE RED SECTOR that is part of your car must be tagged with a Lo-Tag of 31. Leave the Hi-Tag at the default of 0. Every sector of the car.

Now put an ACTIVATOR inside your train. Just put it on the floor in the biggest sector.
Give the ACTIVATOR and ALL the switches (you should have 3, one at each stop and one in the train) a Lo-Tag of 6
Now put a SECTOR EFFECTOR in the middle of your train car. Make sure the angle line is pointing forward towards the train stop. Give it a Lo-Tag of 30 (2 WAY TRAIN) and a Hi-Tag of 7 (This will match the activator of the first door, which is the one down south. The second door, the North door, needs to have an activator one higher than the first door, so it will be 8.)
The documentation that comes with Build is a little vague and I think it is incorrect. It says to give the SE the same Hi-Tag of the activator, but that is wrong, it needs to be +1.
Do the doors. Put a MUSICANDSFX sprite in each door sector, give them a Lo-Tag of 166. Give the door sectors a tag of 20 (Ceiling Door) Put an Activator in each door. Give the Activator in the North side a Lo-Tag of 7, give the South Activator a Lo-Tag of 8.
Now it is time for the LOCATOR (ID 6) sprites. You will need two. The first one goes down South put it in the middle of the track. Line it up with the middle of the door. Leave its Hi-Tag and Lo-Tag at the default of 0.
Then go up to the North station and put another locator in the same place. This one you need to give a Lo-Tag of 1 and a Hi-Tag of 1.
MAKE SURE THE LOCATORS LINE UP WITH EACH OTHER.
Also make sure you are using LOCATOR sprites. They look like they say L+. It is sprite ID 6. Sprite ID 4 is the ACTIVATORLOCKED tag. They look simillar.
You will need to close the North door and leave the South door open.
2 way trains work best in Single Player maps because you can control which side of the train the player comes to first. In Multiplayer there may be issues with the doors being in sync. Doesn’t mean you CAN’T use them in multiplayer, just that it may be possible for a player to come to an open door with no car there and therefore it will be possible to get on to the track. If this is going to be an issue, make sure the player can get off of the track.
Also, use the “B” key on the outer wall of all of the windows. This will keep the player from being able to jump through.
Finally, if you play test the map you will see that the textures on the floor and ceiling of the car “move” with the train. To fix this, from 3D mode, point at the floor, the ceiling and the tops and bottoms of the windows and press “R”.
Troubleshooting
The game is very… twitchy about these things.
If the doors are out of sync, flip which starts closed and which starts open.
If the car fails to move make sure that all of the RED sectors are tagged 31. Also make sure the locators are lined up. The large outer sector of the car must be one solid sector.
Notice that the “doorways” on the car do not split the main outer sector.
If the car doesn’t make it to the doorway or the doorways don’t line up, move the locator sprite forward or backward a little and try again. The way it works is the Sector Effector inside the car moves on top of the Locator and it takes the sector with it. So moving the locators or the sector effector will cause the car to stop in a different spot.
Cranes
Building a Cranes
Cranes are sprites that can pick the player up and move them to another place and set them down. They can also pick up other sprites. They are often used in conjunction with conveyor belts.
We will need two special sprites. Sprite ID 1221 (The Cranepole) and Sprite ID 1222 (The Crane).
First we will build the geometry for the room that we are going to build the crane in.

We are going to build a large room with an impassable pit. The pit is the square inside the rectangular room. Just page down far enough so that the player will be killed if they fall.
The small square is the pickup point. Inside that sector is an instance of ID 1221, the crane pole. Simply create a sector that the player will stand in, place the 1221 sprite inside it. Then go over to the other side of the pit and right across from the pole sprite create an sinstance of 1222 this is the crane sprite. Move the crane sprite to the top of the ceiling.
Give the crane and the pole a Hi-Tag of 9
Now playtest the map. Go stand in the square and the crane will pick you up and carry you across the pit.
You can then add a “track” in the drop off area made of conveyor belts. Then have the conveyor belt loop around to the other side to be picked up and replaced back on the other side.

Give the 2nd crane and pole a Hi-Tag of 10. Give the conveyor belts a Hi-Tag of 11.
Security Cameras
Setting Up Cameras
Cameras are really easy to setup. You need two sprites, The VIEWSCREEN sprite (ID 502) and the CAMERA1 Sprite (ID 621)
You give the VIEWSCREEN a unique Hi-Tag (we will use 12). Then we will set all the cameras that we want to allow that VIEWSCREEN to view with that same Lo-Tag.
Lets build a hidden little security room in our crane room.
Here is the finished room. I also added the power switch to the conveyor belts setup in the previous section.
The VIEWSCREEN is a sprite with a Hi-Tag of 12/

Now lets place some cameras.
I put one in the ceiling between the two cranes so we can see when others come in to the room.
Give the Camera sprite a lo-tag that is the same as the Hi-Tag of the VIEWSCREEN. Set it to 12 in this case.
If we want the camera to rotate we have to give the camera a Hi-Tag. First set the angle of the sprite to the top of the arc of the turn you want. Use the “<” and “>” keys. Then give the camera a Hi-Tag of 256. The camera will then rotate 45 degrees to the left and the right.
Now playtest the map and go use the security screen. It will show the camera.
Elevators
Making Elevators
There are several different types of elevators. Basically an elevator is a sector that goes up and down to the sector above or below it. You can choose whether or not the floor moves, or both the floor or ceiling moves.
Simple Elevators
Lets build some new geometry to play with. I am going to join both sides of the pit in our grabby hands room. Then we will build a small room with an elevator in it.

The small room in the back is the elevator shaft. Texture it, set the North and West walls to floor orientation using “O” and raise the height of the ceiling about 50 button presses.

Now build a room off of the right side of the elevator shaft.
Go into 3d Mode and raise the floor of the new sector up 40 times.
Now make the door frame leading out of the elevator sector.
Finally, go back to the bottom of the elevator shaft and bring the ceiling of the elevator shaft sector down to just above the door.


Then you need to give the elevator shaft sector a Sector Tag of 19. This will cause the floor to rise to the height of the adjacent sector when activated. Add a MUSICANDSFX sprite and give it a Lo-tag of 71 (ELEVATOR_ON) and a Hi-tag of 73 (ELEVATOR_OFF)
If you want to, you can also put a SPEED sprite in the elevator sector to control the speed, but in this case the default speed is fine.
Sector over sector and room over room
Sometimes the terms are used interchangeably but there is a difference.
Sector over Sector means one sector residing over another. As long as the height level of the new sectors ceiling and floor do not intersect with the sector above or below them then it is, for the most part, OK to do. Though it makes glitches more likely, especially in Build (mapster32) which does not care for them.
Sector over Sector Example
In order to build a sector over another sector the two sectors should not share the same hight level. Also the sectors can not share walls, verticies or inner sectors.
I recomend against doing it, especially in a large amount as it is prone to glitches. It also makes editing those sectors of the map in BuildMapster a challenge. I usually use sector over sector for vents or to hide something from someone looking at a map in Build. If you build a sector underneath another, and you make it exactly the same shape and size it can be very difficult to see or modify in the editor 🙂
Now that we have a 2nd floor in our map, lets have a new sector cross into the room below.
Have a look at this:

The rectangle in the lower left hand corner of the upstairs room shares space with the sector beneath it.
Keep in mind that both sectors are still independant of each other, almost like they are in their own little worlds. They can not interact with each other in any way. Any attempt to get them to do so will cause issues. Glitches at best or crashes at worst.
Also as I already mentioned it can make editing the level a pain, especially if you have a lot of it.
Consider this picture:

Where is that sprite? Is it on the top floor where the white arrow is? Or is it on the bottom floor?
Room over Room
Room over room means two rooms that are directly on top of each other. Both rooms have a floor and a ceiling and it is possible to interact with the room below or above from that above or below room, you can see into it, shoot into it and seamlessly cross into and out of it. This is impossible to do with this version of the Build Engine. It can be done in Shadow Warrior but not in Duke Nukem.
There may be mods or other hacks that allow it in DN, but vanilla it is not possible to do it.
In fact, I think Mapster32 and eDuke32 have room over room tools for DN, but their usage is beyond the scope of this guide. Using those tools will also likely lock your map to the specific versions of eDuke32 that support it.
Enter the Wang
If you look at the first picture you can see this section of Shadow Warriors “Airport” level. The parallaxed texture in that square on the ceiling is actually another room. The staircase in the hallway to the right leads up to it. I won’t go into the process of HOW it is done here… (It is a complete pain in the neck, I doubt many people have mastered the process…)
In game, the engine pulls the top floor over to that location and it seems like there is a room on top of the room, you can see into it, shoot into it and fall from it.


That’s nice, what does it have to do with Elevators and Duke Nukem
It is important to understand the limitations of stacking sectors on top of each other when we start going up and down. Up until now we have for the most part stuck to one “floor”. Often we have to resort to cleverly routed hallways and hidden teleporters. to make it look like we are ascending vertically over one part of the level when infact we are just moving the character somewhere else.
Whenever you see a sewer hole or a diveable water zone (which we covered before) where you fall down into a new sector below you, you are actually being teleported to another location. The sewer holes are deep enough so that the player can not look down into them (or up them) to see that there is, in fact nothing below them.
One of these tricks is the “Elevator Transport” (Sector Effector 17). It can be used to simulate going straight up a floor and stepping out directly on top of the floor below it, when in reality you have been teleported to a different place.
Wall Masks
What is a Wall Mask
Build has the ability to create “masks” over red walls. Basically it puts up a barrier that is either one way or two way. Some examples are mirrors, fences, glass (the RIGHT way…) and force fields.
Glass (the RIGHT way)
There is a right way and a wrong way to make glass panes. The “wrong” way is to make it out of sprites. Some people will use ornimentation sprites, set them to the glass sprite and then try to fit them over an opening. While this technically can work, it often does not work well. Especially if multiple pieces of glass (multiple sprites) are needed to complete the effect.
The “correct” way to do it is with a 2 way wall.
First turn the block OFF of the long window along the 2 way train track. Then size the grid down by one and split the sector in half. Then go in to 3D mode and point at the middle of the widow. Press the “M” key to create a mask. You should get the cinderblocky texture again. It may look smeared and stretched. If it does, point at it and press “/”. You may then need to press “M” again to get the mask back. If you put the mask on the wrong wall just press “M” to turn it off.


Now point at the cinderblocky texture and press “V” twice. Now you can choose a transparent texture to put over the wall. You could choose a texture like 1174 to give the window a prison bar look, or a fence texture to make it look like a chainlink fence. But instead for this example we are going to use texture ID 503. This will turn it to glass.

Look how good that glass looks, and think of how much of a pain in the neck it would be to recreate this same effect using sprites…
Now, by default the glass won’t “block” anybody. You must point at the glass and press “B”. It should say “Blocking bit ON” in the lower left corner. Then if we want the player to be able to break the glass we have to turn the hitscan bit on. Point at the glass and press “H”. It should say “Hitscan sensitivity bit ON”.
Playtest the map. the glass should prevent the player from going through. Now shoot the glass. The glass should shatter and disapear and the player can now move through!
Forcefields
Forcefeilds are pretty easy to do. At their most basic level they are basically the same as glass. However making them controllable is a smidge harder.
First lets go create a little cabinet in the upstairs room, the one at the top of the elevator.


Use whatever textures you wish, but use texture ID 276 for the edges. Texture 276 is not required to create a force feild, but this is a good example to show what this guide is going to show.
Now create a 2 way wall mask in the wall that splits the edges. Use the “M” key. You will get those bricks again Use “/” on each side to reset the texture scale.
Change the texture of the wall mask to ID 663. 663 (or W_FORCEFIELD as it is called) will “flicker”. It will also damage the player if the player touches it. There is another force feild, ID 230 (or BIGFORCE). But this one is completely invisible unless the player shoots it and it will not hurt the player when touched. For force feilds that are controlled by a switch or that will be guarding something you want to use 663. Be sure to turn the blocking bit and the hitscan bit on (“B” and “H”)
Now go into 2D mode and give the forcefield wall (the red line that cuts the frame in half lengthwise) a Lo-Tag of 13 (Highlight the wall and press “Alt-T”)
Create a switch somewhere and give it a Lo-Tag of 13 to match. Make sure you use a switch sprite that is in the ON position
Pallette
One of the things we have not talked about at all yet is pallette. All sprites and textures have a pallette that, among other things, control what color they are. Pallets can also be used to override some of a sprites behavior as well. For example, some enemies can be given a pallette to make them stronger.
In this case what we want is to change the pallette of the blue force field wall texture. If we play through a real Duke Nukem map, whenever there is a force field the wall frame changes from red to blue when the force feild is turned off. How do they do that?
They do it with the pallette and a couple of Sector Effectors.
Changing the color of the light
Unfortunately we can’t really change the texture or pallette of the wall in game directly. What we need to do is change the color of the light.
Think of it like this, you are in a room with walls that are painted white and you have a white light bulb in a lamp. How do you make the walls red if you aren’t allowed to paint them? You put a red light in the lamp!
First put two sector effectors, one on each side of the force field. Give each a lo-tag of 12 (Light Switch) and a Hi-Tag equal to the switch (13)
Now in 3D mode, point at one of the Sector effector sprites and press “Alt+P”. In the top left of the screen it should ask for a “sprite pallette”. Give it a pallette of “2” and press enter. You should see the Sector Effector turn a reddish orange color.
Go around the edges of both sides of the force field and lower the shade (the “-” and “+” keys on the NUM pad) until the edges look like lights that have been turned off. I used shade level 16.
Play test the map and turn the force field on and off. While the force feild is on, the force feild and the edges will be red. When you turn off the force feild the edges will turn blue and will dim to the level 16 shade.
If you increase the shade of the Sector Effectors it will make the light brighter, if you dim them it will make the light dimmer.
Note that you aren’t really changing the color of the texture, you are changing the color of the light in the sector. This is why the color of the force field is red, and if you could get close enough to it without taking damage, your character would turn red too!
Also make sure while play testing that the player can not grab whatever is being protected through the force field. In a previous instace of the map I put the freeze thrower too close to the force field and I was able to grab it without turning the force field off.
Here is the finished product:


Mirrors
Mirrors
The final type of wall mask that we are going to talk about is mirrors.
Lets create a mirror in the most logical place, a bathroom.
Go down to the lower floor of the elevator sector.
We are going to create bathrooms on either side of the entrace to this room. We are only going to make a mens room. The ladys room will be “out of order”. Feel free to add it if you choose. We will add an alcove and a door so that it looks right.
Make something like this. Note that the sink area looks like it is too big, this is on purpose.


We will put toilets, sinks and doors up later. Lets focus on the mirror.
First split the sector as shown:

Now go back to 3D mode and point at the further of the two new red walls. Press “1” to create a “one way” wall. You will get the bricks again. Use “/” to fix the stretch of the texture. Press “1” to put the wall back if it disapears.
Point at the bricks and press “V” twice. Choose texture ID: 560. This is the “mirror” texture.
Point at the purple texture and press “B” and “H” to turn on blocking and hit detecting.
Finally, in 2D mode turn blocking “B” on on the red wall right in front of the mirror. This will prevent distortion if the player tries to jump “into” the mirror.
Play test the room. You sould see a reflection of the room and Duke in the mirror. The mirror should shatter and be replaced with a wood texture if you shoot a rocket launcher at it.
Go ahead and finish the bathroom. Put toilets in the stalls and swinging doors on the door to the restroom and the stalls. Put urinals on the wall oposite the mirror.
Here is mine


Troubleshooting
If the mirror is distorted or glitched or giving the “hall of mirrors” effect that probably means your back area (the sector behind the mirror) is too small. Just make that sector bigger. The sector behind the mirror needs to be big enough to render the false image. It’s hard to explain, just make the sector behind the mirror bigger and accept that that will fix it 🙂
Also make sure that your mirror has a small “buffer” sector in front of it.
Sewer Holes
Finishing the Loop
Lets finish off the looping nature of this map. We will connect the east side of the map back to the North side so that we have a nice circle.
We are going to create a little out door courtyard in the North East corner of our little map.
Making a Sewer
Sewer holes are holes in the ground that silently teleport you to another area. In this way it makes it seem like there is an area underneath the sewer hole.
First create this area here.

The area is large because we may want to do something else with it later. If not we can always shrink it down. I was thinking a sushi resteraunt, or maybe a bar, or maybe both.
For now, we want to dig a round hole in the center of the new sector for our sewer.
The Circle Tool
Most of the geometry we have used thus far have been simple squares and rectangles. This makes for an admittedly drab level. Build has a circle tool that can assist in making circles.
First create a triangular sector about 3 grid squares in radius. about the center of this new area. (currently we are on grid level 3. Press “G” until the grid goes away completely, and then press “G” 3 times. This is the “standard” grid I have been using for this level.)
Now highlight one of the sides of the triangle. Press “C” and drag the circle until it has a diameter of about 5 grid squares. Then press spacebar.
Now press “G” to lower the grid one size. Grab the “point” of the triangle and move it into its position to complete the circle.
It might not be perfect… but this is Build. Sometimes we have to settle.
Alternatively if you are good at such things, you could draw the circle yourself.
Moving Sectors
Hold down the “right shift” key and move your mouse. You should see a purple box. Use the purple box to select all of the points of the circle. You can then move all the points of the circle all at once. Center it as best you can on the map and tap “Right Shift” once to drop the selection
Creating the manhole
Press “Alt+S” to convert the white circle into a red circle.
Move the circle down with the “page down” key until you can’t see the bottom. Give the bottom of the hole a black texture, just incase. I use 193 for this purpose. Give the edges the sewer brick texture.

Create a sector just below the outer courtyard. On the South West side. Just make a square for now. It needs to be big enough to hold the circle.
Now we need to copy the circle sector. Hold down the “right Alt” button. You can now drag a green box. Drag the green box over the circle. The circle should highlight green. Press the “Insert” key on the keyboard. You should now have a copy of the sector. Grab one of the points and drag it over to the new place. Press “right alt” again. In Mapster it will gray out the map and ask you if you want to create an inner loop. Press “Y” and it will create the new sector. (If using old school Build it won’t do the last step for you, just hit “Alt+S”.)
You should have something like this:

Go in to 3D mode, you should see the circle going down into the floor and the circle going up into the ceiling. Move the floor hole up to the top. Go up the hole in the ceiling and change the texture to the black texture 193 and turn the parallex off (“P”) If needed, move the hole ceiling up until the player can’t see it looking up.
Now it is time to make the sewer room.
I have created a sewer room using slopes (“[” and “]”) to give it a round tube like feel. Remember if your slope is going the wrong direction use “Alt+F” to reset the first wall of the sector if needed. I also lowered the shade of all surfaces by 5 except for the circle of the hole. That I left at default so that it looks as though light is coming in from the sewer.

The bricky default textury area in the side is going to be our way back. (To be constructed).
Making the hole work
Create a sector effector in each of the sewer hole sectors. Give them both a Lo-tag of 7. Give them both a Hi-Tag of 17.
Move the source (top) sector effector to the bottom of the hole. Then raise it up 10 or 15
“Page Ups”
Then move the destination (bottom) sector effector to the top of the hole. Then lower it by 10 or 15 “Page Downs”.
Also give the “slime” sector in the sewer a lo-tag of 1. This will prevent the player from taking fall damage.
Play test the map, you should be able to fall down the source pipe and fall out of the destination pipe. If done right, the effect should be very good. It should seamlessly teleport you from the source pipe to the destination pipe and you wouldn’t even notice.
Finishing the Sewer section
Put a “lid” sprite over the top of the manhole (ID 690) Turn the blocking (“B”) bit and Hitscan (“H”) bit on. Give the lid sprite a Hi-Tag of 17. Next time you playtest the map you will be able to walk over the manhole and it will break if you blow it up.
Now we will finish the sewer exit. We will connect it via under water teleporter to the under water section we created all the way back at the begining

Coming full circle
The begining of the end
Now we will connect the large courtyard sector to the North room in the begining.
Starting in that North room we are going to build a balcony and a short elevator to go up.
In the elevator sector, give the sector a lo-tag of 17. This will ensure that only the floor moves. This is different from the other elevator where we had the floor and ceiling move. Also give it a MUSICANDSFX tag with a Hi-tag of 73 and a Lo-tag 71.
Along the top of the balcony place a sprite right on the edge of the wall looking out. Press “R” on the sprite to turn it into an ornament. Adjust the angle if nescessary so that the sprite is parallel to the wall. Change the sprite texture to a rail texture (I used ID 510). Turn on blocking (“B”).


Now create a corridor between the courtyard and the North room.


Now the entire level goes around in a loop. This is good for a multiplayer map. You might build a single player map differently.
Subways
How to build a Subway
Subways aren’t really THAT much different than 2 way trains. They follow many of the same rules.
Primarily, the entire track must be one long, continuous sector.
Rules for building the track and the cars are exactly the same as for the 2 way train. You need to make a single “car” sector and then avoid splitting it.
Also, just like a 2 way train, subway cars follow Locator sprites. The major difference is there are a lot more locator sprites, the trains automatically stop at their stations and once the train completes its journey it returns to the first Locator.
To finish off the major features of this tutorial map, we are going to build a large subway that circles the entire level.
Step 1
Lets build the track. Remember, the entire track must be one big sector. Just like 2 way trains, the subway cars can not cross any red or white lines.
First we will build a simple station for the subway. Then we will build the track sector.

Step 2
Build a subway car. You can make it simillar to the 2 way train car. Just like the 2 way train car do not build it IN the station. You should build the train car along one of the straight parts of the track.


I just copied and pasted the sectors for the 2 way train and then made some modifications to it
Step 3
Now we will tag everything.
Give all red sectors in the car a Hi-Tag of 1. This sets them all as part of “Train 1” If we built a 2nd train then we would give the 2nd train sectors a Hi-Tag of 2. And then 3 and so on.
Put a Sector Effector in the middle of the car.
Now we need to make a trail of Locator sprites. Make a path of Locator sprites starting at the end of the station and going around the track. The car will go from Locator to Locator so you don’t need as many on a straight section and you will need more on a curve. Try to avoid a sharp hairpin turn as this will cause the cars behind the main car to clip into the main car.
As you can see it is a bit on the tedious side… but don’t worry you can always reajust the locators later if the subway does not perform as expected.
Now you have to number each locator in numeric order starting AFTER the locator at the station. The station should be Lo-Tag 0. The next in line is 1, then 2 then 3…
Having fun yet?
Give your station locator a Hi-Tag of 1. This tells the subway train to stop there for 5 seconds.
Playtest the map and make sure the subway doesn’t do anything… unusual. If it clips through walls, take note of where and move the locator accordingly.
Creating a 2nd car
Copy the subway train, put it a few grid squares behind the “engine” and change the lo-tag of the Sector Effector to 14. It will now follow the lead car. You can add a 3rd car if you wish but 2 cars seems to be about the max that this track can handle. The turns edge them into the walls.
Creating a 2nd stop
Add a 2nd station behind the North room.
Just give one of the locators a Hi-Tag of 1 and the subway will stop there for 5 seconds.

Subway Quirks
Subways cause issues often. Occassionally the 2nd car will catch up to the lead car and will start humping it for a circuit or two. You should also avoid building any sectors over or under a subway track.
A good BUILDer will test and tweak the subway locators several times before calling it done.
Because subways cover a lot of area, sometimes they seem like the cause issues with other sectors, either because of wall clipping or for some other quirk. In this map I had to rebuild the sewer courtyard because for some reason the subway was causing it to turn inside out.
Also, the pool of water in the sewer that transports you back to the South Room sometimes teleports you to the subway and kills you… for some reason. Also, for some reason, adding the 2nd subway car seems to have reduced the frequency of this happening. I am unsure why this is happening. Possibly deleting the underwater sector and redrawing it will fix the issue. This issue may not even affect your build of the map.
I believe some of these issues may have to do with the length of the track sector. The sector may exceed the maximum length of a single sector and that caused some issues. I don’t know if that is the case, it is just a guess.
Finishing the level
The Nuke Button
Placing NUKEBUTTON, Sprite ID 142 will give the level an exit. The documentation says it needs a lo-tag of 65535 to end the level, but I don’t think it does. I rarely build Single Player levels so I don’t know all the different configurations for the NUKEBUTTON… Setting the Lo-tag to 1-11 can cause it to go to a “bonus” level. The pallet needs to be adjusted to 14. I don’t know how it works though.
Boss Battles
If you place any of the 4 bosses in the level the map will end if someone defeats it. The game will play the cutscene for the end of Episode 1. If there is a way to get it to play the other cutscenes, I don’t know. I also don’t know how to prevent the game from not ending on killing a boss. I think there is a pallet setting for it. But I don’t know what it is.
Dukematch
In order to make a “dukematch” level you need to add spawnners for players.
Simply place 7 APLAYER sprites (ID 1405) around the level where you want players to spawn in. Players will spawn at the default “green arrow” Single Player start and at the 7 APLAYER sprites.
The max number of players on a map is 8. You CAN put more spawn sprites and you CAN put fewer spawn sprites… but you should make sure that at least 8 players can spawn in. If you have fewer spawners than players then someone will telefrag on initial spawn.
Finishing THIS map
This tutorial is at an end. To make it playable in dukematch, if you wish to do so, place some APLAYER sprites around. If you want to make it a single player map, add a NUKEBUTTON. Though this map was designed with dukematch in mind.
You should also go around and place some ammo, health, armor and powerups around.
There are also empty rooms. The “Courtyard” area with the manhole could have more put in it. You could add a bar or sushi resteraunt or something attached to it.
The little room with the bathrooms was meant to have a “breakroom” asthetic. Add some couches or a TV or something. Be creative!
Map Template
If you want to go old-school, fill out a “map template”
================================================================
Title :
Date Finished : The date of your file (eliminates same file name)
Filename : xxxx.MAP
Author : Your name here
Email Address :
Misc. Author Info :
Description :
Additional Credits to :
================================================================
* Play Information *
Episode and Level # :
Single Player : Yes/No
Cooperative 2-8 Player : Yes/No
DukeMatch 2-8 Player : Yes/No
Difficulty Settings : Yes/Not implemented
New Sounds : Yes/No
New Music : Yes/No
New Graphics : Yes/No
New/changed CONs : Yes/No
Demos Replaced : None/1/2/3…
* Construction *
Base : New level from scratch/Modified xxx.MAP
Build Time :
Editor(s) used :
Known Bugs :
May Not Run With… :
* Copyright / Permissions *
Authors (MAY/may NOT) use this level as a base to build additional
levels.
(One of the following)
You MAY distribute this MAP, provided you include this file, with
no modifications. You may distribute this file in any electronic
format (BBS, Diskette, CD, etc) as long as you include this file
intact.
You MAY not distribute this MAP file in any format.
You may do whatever you want with this file.
* Where to get this MAP file *
FTP sites:
BBS numbers:
Other:
Closing thoughts
Closing Thoughts
Build is one of those easy to learn difficult to master things. Practice makes perfect and all that.
I might do a guide for Shadow Warrior in the near future as well. It is the same thing, but different. Its version of Build is more powerful. Only problem is I am unsure if there is a non DOS way to do it…
Making and fixing mistakes
My advice for making misakes in Build – Don’t. Build is very unforgiving… you can corrupt a map beyond recovery. Save frequently and save incrimintally. Mapster32 is more forgiving than old school build. It has a ctrl+Z feature to “undo” mistakes if caught. The sector deleter actually works in Mapster32, so you might have some luck with that (ctrl+delete with the crosshair in a sector)
Publishing your work
Don’t be afraid to publish your maps on the Steam Workshop.
Other sources of info
The mapster32 wiki of course: [link]
Appendix A – Map Template
================================================================
Title : TUTORED
Date Finished : 11/27/2018
Filename : TUTORED.MAP
Author : Redwizard000
Email Address : Just message me on Steam! Or leave a comment on the Guide or
Workshop page 🙂
Misc. Author Info : Just another guy! Been making maps since the late 90s
Description : This map was designed as part of a simple guide on the use of Mapster32 for
Duke3d Megaton pack on Steam.
Additional Credits to : Some facts were checked using [link]
================================================================
* Play Information *
Episode and Level # : NA
Single Player : No
Cooperative 2-8 Player : No
DukeMatch 2-8 Player : Yes
Difficulty Settings : Not implemented
New Sounds : No
New Music : No
New Graphics : No
New/changed CONs : No
Demos Replaced : None
* Construction *
Base : New level from scratch
Build Time : 4 days (mostly due to creating documentation with it…)
Editor(s) used : Mapster32.exe
Known Bugs : The Subway follower car gets stuck in the engine car for a circut or two.
Also, we got a deal on high powered hydraulic door openers; the swinging
door on the left hand side of the bathroom *might* cause death if it squishes
you against the wall.
There is an odd bug that causes the sewer return underwater zone to
teleport the player to the subway and kill them occasionally (sometimes…
minor risk of death). If someone knows WHY this is happening, drop me a
line. I suspect deleting and rebuilding the sectors may resolve the issue.
There are some texture direction issues that I didn’t bother to fix, particularly
with the conveyor belts. Not a bug really, just pure laziness.
* Copyright / Permissions *
Authors MAY use this level as a base to build additional
levels.
You may do whatever you want with this file.
* Where to get this MAP file *
Steam Workshop
Appendix B – _SPRITE.TXT
steamappscommonDuke Nukem 3Dgamerootclassic
It lists all the special sprites and what they do.
——————————————————————————–
Special Sprite Reference Guide
1996 Allen H. Blum III
——————————————————————————–
SECTOREFFECTOR : Sprite #1
ACTIVATOR : Sprite #2
TOUCHPLATE : Sprite #3
ACTIVATORLOCKED : Sprite #4
MUSICANDSFX : Sprite #5
LOCATORS : Sprite #6
CYCLER : Sprite #7
MASTERSWITCH : Sprite #8
RESPAWN : Sprite #9
GPSPEED : Sprite #10
ACCESSSWITCH : Sprite #130
SWITCH : Sprite #132 and all other SWITCHes
NUKEBUTTON : Sprite #142
MULTISWITCH : Sprite #146
DOORTILE5 : Tile #150 and all other DOORTILEs
DIPSWITCH : Sprite #162
VIEWSCREEN : Sprite #502
CRACK1 : Sprite #546 and all other CRACKs
MIRROR : Tile #560
CAMERA1 : Sprite #621
CANWITHSOMETHING : Sprite #1232
SEENINE : Sprite #1247
FEMPIC1 : Sprite #1280
APLAYER : Sprite #1405
Appendix C – _SE.TXT
This file should be in steamappscommonDuke Nukem 3Dgamerootclassic
It lists all the Sector Effectors and what they do.
——————————————————————————–
Sector Effect Reference Guide
1996 Allen H. Blum III
——————————————————————————–
-SECTOR EFFECTOR –
0 : ROTATED SECTOR
1 : PIVOT SPRITE FOR SE 0
2 : EARTHQUAKE
3 : RANDOM LIGHTS AFTER SHOT OUT
4 : RANDOM LIGHTS
6 : SUBWAY
7 : TRANSPORT (UNDERWATER ST 1 or 2)
8 : UP OPEN DOOR LIGHTS
9 : DOWN OPEN DOOR LIGHTS
10 : DOOR AUTO CLOSE (H=DELAY)
11 : ROTATE SECTOR DOOR
12 : LIGHT SWITCH
13 : C-9 EXPLOSIVE
14 : SUBWAY CAR
15 : SLIDE DOOR (ST 25)
16 : ROTATE REACTOR SECTOR
17 : ELEVATOR TRANSPORT (ST 15)
18 : INCREMENTAL SECTOR RAISE/FALL
19 : SHOT TOUCHPLATE CIELING DOWN
20 : BRIDGE (ST 27)
21 : DROP FLOOR (ST 28)
22 : PRONG (ST 29)
23 : ONE WAY TELEPORTER EXIT
24 : CONVAIRBELT
25 : ENGINE
27 : CAMERA FOR PLAYBACK
28 : LIGHTING BOLT ENGINE
29 : FLOAT
30 : 2 WAY TRAIN (ST=31)
31 : FLOOR RISE
32 : CEILING FALL
33 : SPAWN JIB W/QUAKE
36 : SKRINK RAY SHOOTER
Appendix D – _ST.txt
Located in steamappscommonDuke Nukem 3Dgamerootclassic
List of all the Sector Tags and what they do.
——————————————————————————–
Sector Tags Reference Guide
1996 Allen H. Blum III
——————————————————————————–
-SECTOR TAGS –
1 : WATER (SE 7)
2 : UNDERWATER (SE 7)
9 : STAR TREK DOORS
15 : ELEVATOR TRANSPORT (SE 17)
16 : ELEVATOR PLATFORM DOWN
17 : ELEVATOR PLATFORM UP
18 : ELEVATOR DOWN
19 : ELEVATOR UP
20 : CEILING DOOR
21 : FLOOR DOOR
22 : SPLIT DOOR
23 : SWING DOOR
25 : SLIDE DOOR (SE 15)
26 : SPLIT STAR TREK DOOR
27 : BRIDGE (SE 20)
28 : DROP FLOOR (SE 21)
29 : TEETH DOOR (SE 22)
30 : ROTATE RISE BRIDGE
31 : 2 WAY TRAIN (SE=30)
10000+ : 1TIME SOUND
32767 : SECRET ROOM
65535 : END OF LEVEL