
Overview
After over 4,000 hours in game and receiving praise on some of my builds I figured I may as well put together a guide teaching everyone the basics of how I build to try and give people some pointers and confidence!
Introduction

If you’re reading this, it’s because you’ve seen my guide or found it somehow and wanted to get to know building a little better in game. It’s something I am personally quite passionate about, and while still a learner myself I have at least something to share.
What I would recommend is not taking this guide as something set in stone, it’s by no means meant to be a “how-to” but more an introduction as to how I personally do it. I highly encourage you to take the basics I teach you, and push them as far as you can or even make something completely different!
Mods? Mods!

This section contains mods that I would personally suggest should you want to get into any serious building.
I could not stress how useful this is, especially if you plan on building in multiplayer. The mod is available here as well as Quickbar Mini to make it work properly.

If you don’t want to use this mod though, you can always use the:
/spawnitem [item] [amount]
Command to spawn items manually, with a list of all items in game available here[starbounditems.com] that you can search through for all the items and blocks in game. I also implore you leave your inventory open to build rather than trying to place blocks in your toolbar, it’ll just make it easier, everyone I speak to who builds does this.
A quality of life improvement if you plan on building anything floating or if you’re piecemeal like me and like zooming around like me from one part of the build to another. Available here.

Granted, you don’t need this mod, and if you have another one that lets you noclip around by all means use that instead. But it’s what I’ve been using and it works just fine for me. The ability to noclip is pretty desirable when you’re building, especially flying or underground builds!
The final mod I would suggest, which is completely optional, but because I’ve got a rather large monitor I like to be able to zoom in while building more than the game lets me. Available here, it also lets you zoom out further to be able to take screenshots of larger builds!

What goes where?

First thing you’ll want to do, with any build, is to find somewhere, or something you want to build on / upon. For the sake of this guide I’ll be doing this from scratch on a barren planet. Nothing stops you from taking these rules and applying them to a building. One of my personal favourite things to do is restore or improve already existing structures in game.
Where to start? Block palettes? Probably a good idea. Right, so generally you have a set of blocks that fit together when uncoloured. When you get into colouring blocks (more complex) then pretty much anything fits together. But I want to focus on blocks that naturally fit.

For inspiration I looked towards the in-game villages. Personally I feel like they could do with more fluff but they have the palettes on-point. Here are some examples of block palettes:


– Wall and background blocks that will add texture and primarily will be the walls of your structure.
– Support and detailing blocks. They will add ‘spines’ in terms of support and distinct patterns in your buildings.
– Roof tiles / blocks. Notably absent on the first example because the Outposts in-game do not have specific roof-tiles.
– Can be anything else, I like to use pipes to add a feeling of utility to some walls.
Remember, that location is everything with a build. My lovely cottage with a cabbage patch wouldn’t fit too well in a brimstone-raining doomworld… Unless… But that’s not the point. The main part of this section is to chose terrain that compliments what you are building.

When you’re looking for somewhere to start, somewhere with uneven ground is desirable, as it can help shape your build. Flat builds without structure generally feel a bit more artificial, which can be good for cities, but for my general style, differences in elevation help make it look more fluid.

An area with a small incline like this is really good and you don’t have to follow the mountain exactly. You can shape small floors into it as I’ll show later in the guide. When renovating a pre-existing build this part doesn’t really apply.
Begin building!
I will be using the second set of blocks I showed in the last section. It allows me to easily show what I use each set for. I like to use ornate wood to set the basis for my foundation and make the majority of walls and supporting vertical beams.


When placing the supporting or foundation walls, I like to have them run into the ground a bit to give the indication that the building is properly supported. External walls are usually two or three blocks thick. This is done to add a bit more layer to walls. Finally, the ‘grass’ and other modifiers like snow can be removed with damage, so I usually mine blocks slightly but don’t break them. I do this to ground under the floor. But I know some other builders use these modifiers for ‘carpet’ but I don’t.

When building, make sure to leave a few blocks space between each support (and supports should be placed regularly) to let you have a pattern both above and below ground. Having a pattern below ground doesn’t add anything to the build above level but helps add to the feel of the build.
Different kinds of floor blocks can help to give different feels to different rooms. But classic baseboard or ornate flooring blocks are generalist blocks. Also, with layers below ground, you can use coloured thatch or reed blocks for carpet. Or coloured sod blocks for a messier carpet. You would simply replace the baseboard with these, and because there were blocks below that it wouldn’t be placed on dirt.
The pattern below the ground floor will be the largest by far, as it needs to give the foundation feeling. As floors go up, they usually have less blocks acting as this foundation layer.
A quick look at how to properly implement stairs, stairwells, staircases, and any other word involving stairs into your build. Noting that I will only be focusing on a few kinds of stairs, as there’s near countless ways to do them. So experimentation is advised to see what works.


When making stairs, I make a point of making most places accessible to characters without having to jump. You don’t have to do this and some builds look perfectly fine without stairs like I do them, but it’s what I do in my style.
Walls, windows and the first floor

An important thing to note is that walls can sometimes be the biggest part of the build, no build should rely entirely on them, but none feel complete if they are done particularly poorly. I like to pay attention most when doing walls, as they’re the thing I end up doing last. At least before furniture.

With walls, it’s always good to have a repeating, but not repetitive pattern. I know it sounds a bit silly to say, but keep the style consistent and don’t mix it up too much, but don’t just copy and paste one room to the next. You can get away with it sometimes if you really don’t have that much room to do something but not all rooms need to have the same things. Some rooms can get away with not having windows if every other one does!

It is important to try and split the walls up as much as you can with naturally flowing patterns in the build, that way you can easily fill it in. You can add as much flare to these parts of the build if you want, but I wouldn’t go overboard on it, as you will be putting furniture in front of it when we get to that.

Moving onto the next floor of the build can be one of the more important parts of the builds. Stairs never look too natural in my builds I feel, so this could be something you should look into experimenting with yourself. But I’ll do my best to explain how I go about it.

Due to the way stairs are, you can have them be more decorative, or functional depending on how you feel going about it. I really can’t suggest any way to do this, even my method can be a bit elaborate or perhaps doesn’t look as good as others. When making the first floor, you pretty much finish the same rules as the ground floor except you will be putting a roof on top. So you can continue to add more floors if you want!
A roof over our heads

The final part of the building part of the guide will explain how I typically handle building a roof. This is by no means a perfect way to do it, and there’s plenty of different kinds of roofs you can make. Especially depending on what kind of building it is, a castle probably won’t have roof tiles unless it’s a wizard tower or something.

Do note you can follow this style with the cabin roof blocks instead, you will just be using one kind of block rather than two. The outcome should look similar, but for the sake of outlining my thought process better I’ll be using the ornate roof and tile blocks.
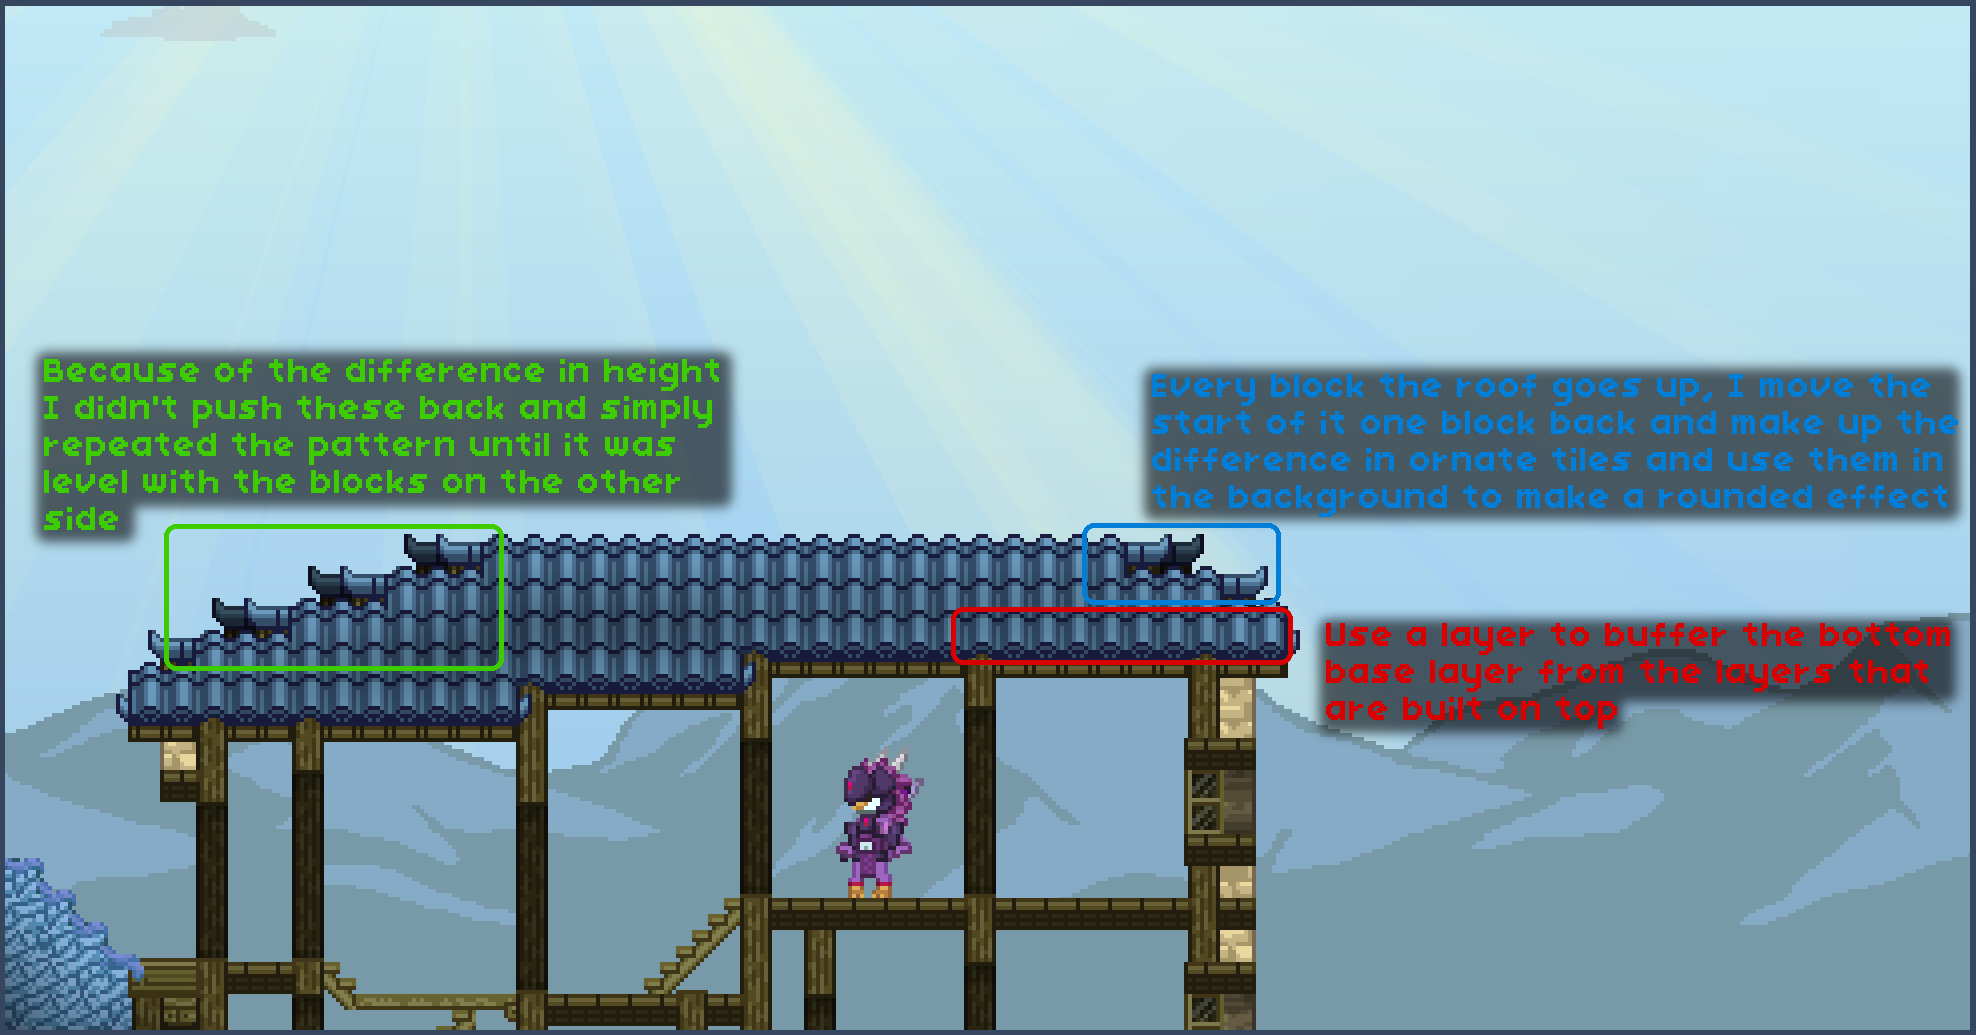
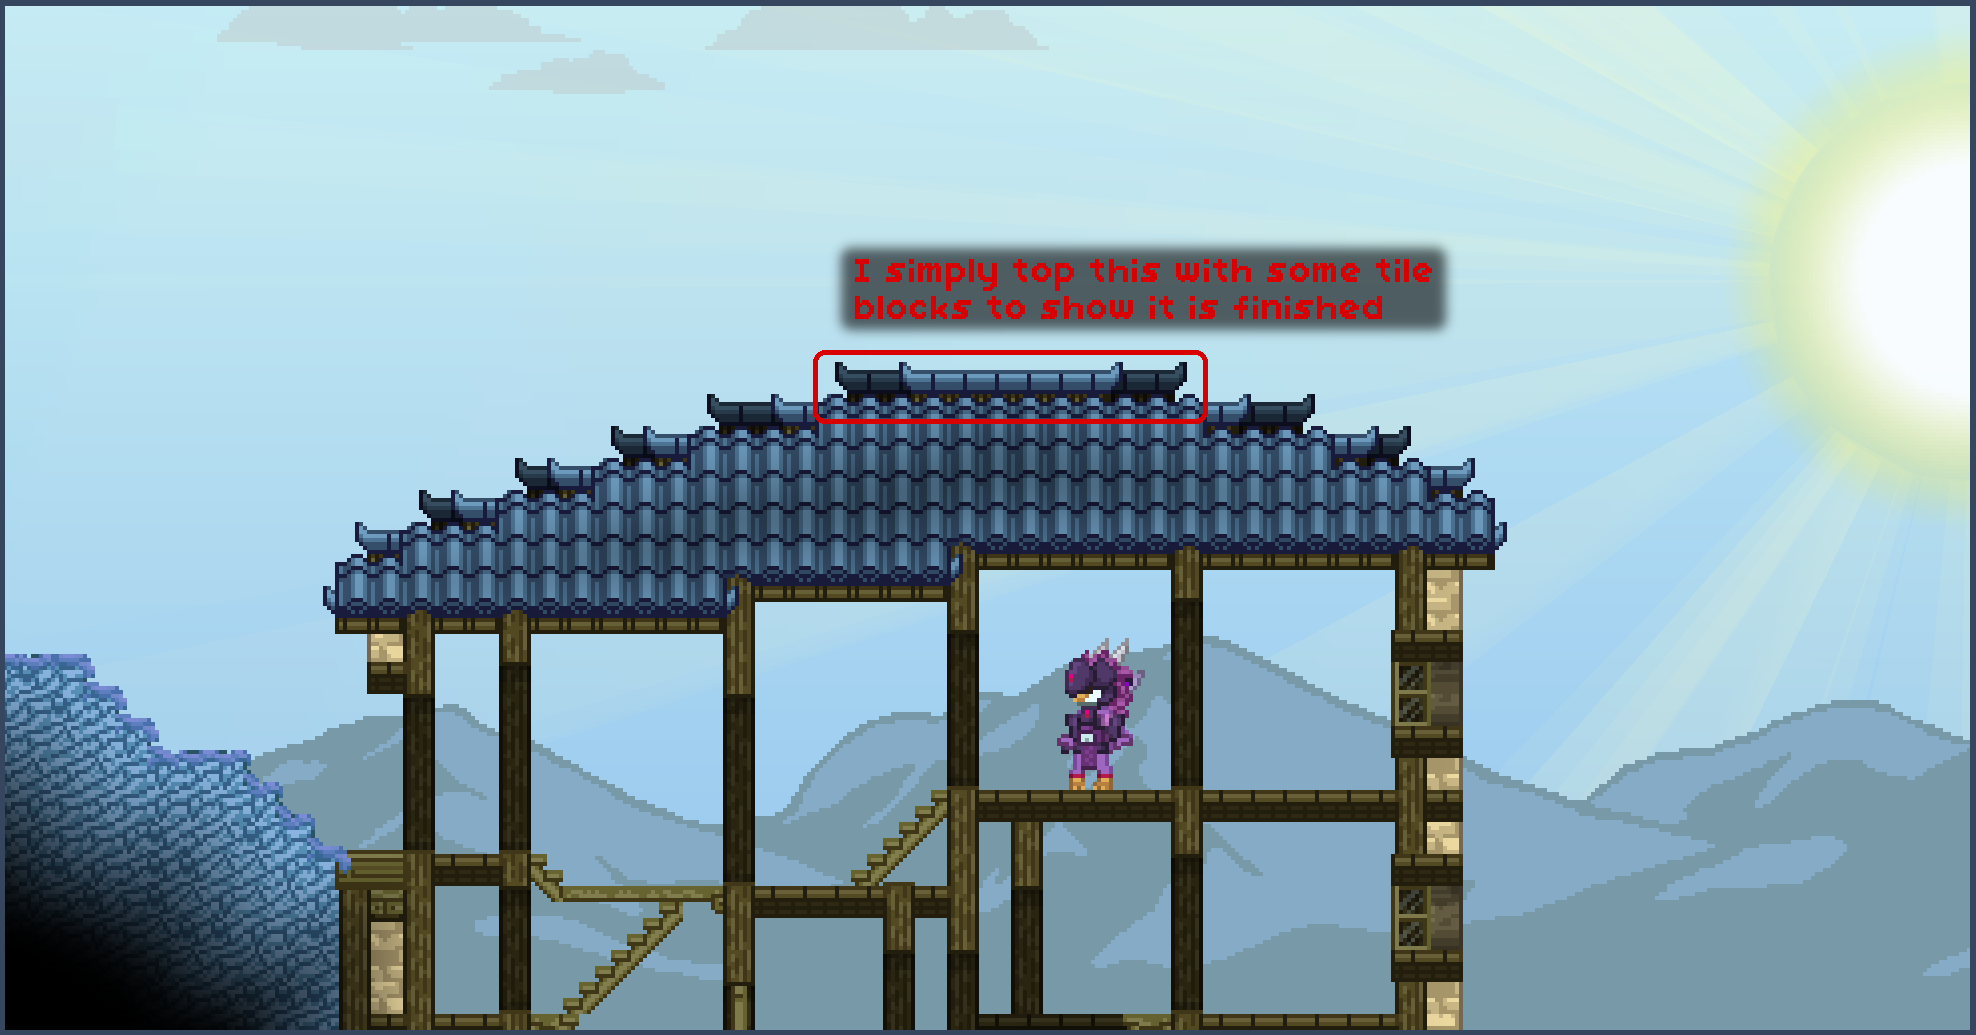
I pretty much continue this until it is a fully completed roof.
You can always add an attic into the roof, by carving into the mass of blocks that are on top of the roof if you want, though at the same time you can also make a roof flatter if you simply make each segment longer. And it depends what style of building you have, sometimes a balcony is better than a roof, especially for a castle with battlements. Or perhaps certain roof segments give way to a balcony. There’s plenty of different ways you can do a roof, and buildings like the outposts don’t particularly have a proper roof at all.
Building? Build it!

With this, the basic structure guide is completed. I will post screenshots of how I build the walls of each floor adhering to the rules I have laid down previously throughout the guide.

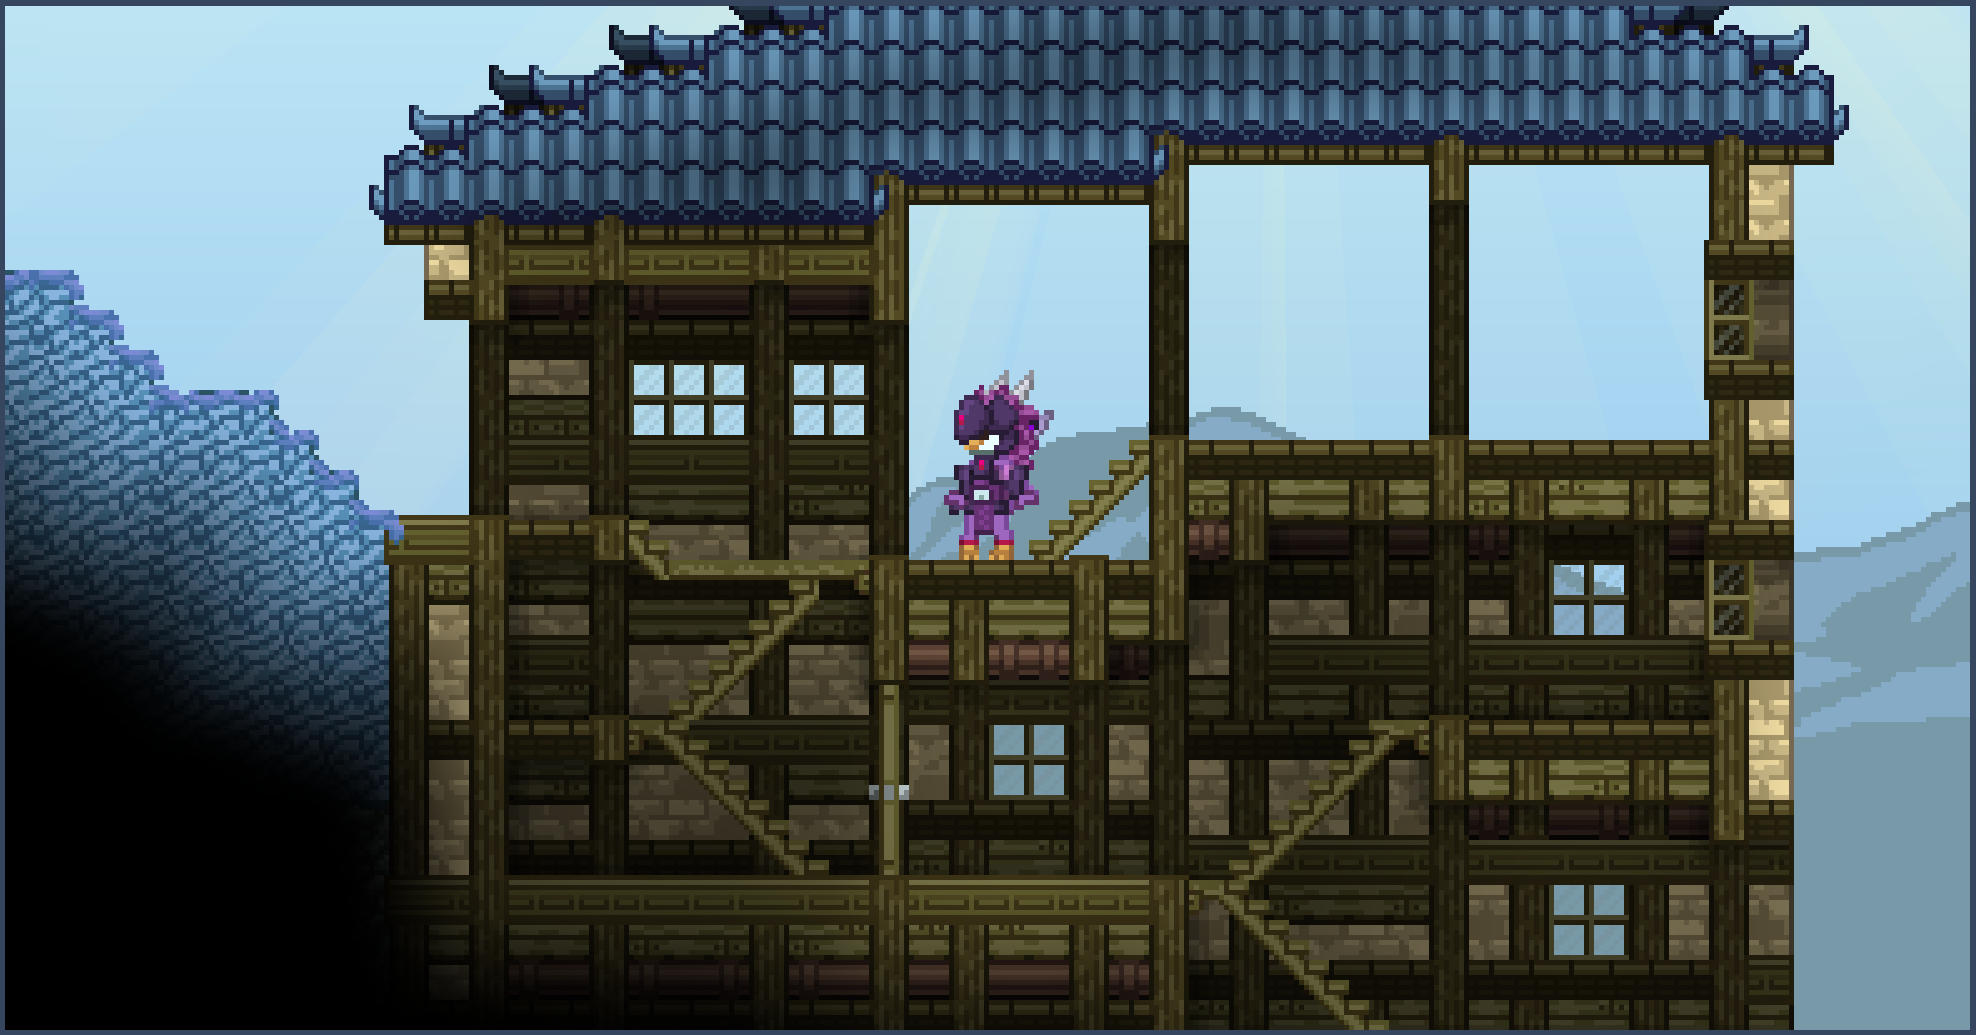

And thus, the building is complete!

This is the end of the building part of the guide, I will give a small part after this on some advice on decorating and filling the house.
A little to the left, actually…

One of the most subjective things is what to put inside a building, some people feel as though they should fill it out as much as they can where others think that an empty building looks nice. To me it matters what you’re building. A science lab can do with being sparsely decorated, whereas a house could do with a bit more feeling to it.
I prefer to try and fill builds out as much as I can, but that’s because my style lends very well to a homely aesthetic, at least I think so. Make use of props that fit with your build. There’s no direct way to know this, as you can make anything fit if you want to, but try not to use anything too out-there compared with the rest of the build. For example, I won’t be using apex lab furniture in my house, but go more for frontier, saloon and other wooden props. Going through the spawnable item pack can sometimes inspire you to use certain props.

I cannot stress how useful spawnable item pack is when making and decorating builds, as it gives you access to some of the better looking props in game that you normally wouldn’t be able to get your hands on.
When doing the lighting of the build, I would highly recommend turning off monochrome lights and fullbright if you have them enabled. I don’t personally use either of them when building because I like to see how dark certain rooms are, and plan either lighting or windows.
A very useful command for this is the /timewarp command, yes, it is a reference to the timewarp, the game will tell you, it’s just a jump to the left. I’ve noticed that a good time is approximately 500. That usually swaps it from day to night, or night to day. So if you want to use it simply type:

/timewarp 500
Into the game chat when you have admin on. Instead of repeating the command every time you want to do this, you can also hit the ‘p’ key for the game to repeat your last command.
I usually try and set up my lighting at night, as during the day it’s hard to gauge what it will look like during the night, and lighting has little to no effect on above-ground structures with an adequate amount of windows. That being said, some structures will need to be lit during the day!

Lighting, much like the rest of the furniture should generally try and flow with the style of the building, and should give it complimentary colours. Things like fluorescent lamps and lights may be too harsh and bright for my build so I stuck to softer flames and lamps instead.
And after all of that

After all of the hard work, this is the final house after this guide is finished, nothing impressive, or massive. But you get bigger things but repeating these techniques and mixing them with new ideas, building styles, and aesthetics.


Granted you shouldn’t have built this house, you’re reading the guide! Though if you want to try and copy this build and see if you get anything similar feel free to. But I would suggest trying to follow with the ideas and such I’ve taught. You should be able to apply these to a lot of builds and structures you try to make. And remember, this was simply pointers for people starting if they don’t know how to start improving. A lot of getting better is seeing things that other people make, and copying bits and pieces from them.
The end!

That’s it for the guide, if this is well received I may try and make additional guides, perhaps outlining different styles, techniques, and species specific building aesthetics. Aside from that though, feel free to ask any questions in the comments and I’ll get back to them as soon as I can. I hope this serves as an ample platform for beginning your building experiences!