
Overview
This guide serves to give a starting point for new players looking to get into the competitive tournament scene of reassembly. This guide covers topics such as Tournament Basics, Ship Classes, Design conventions, Per faction strengths and weaknesses, and other important topics. Note that this guide only describes the basic playable vanilla factions, but design conventions are universal across all of reassembly.
Introduction to Tournaments
In most tournaments, people submit fleets of ships to fight against each other under a few rules like a cost limit, radius limit, acceleration minimum, and specified block bans in order to have as much fun as possible! Rules for tournaments are posted in the Reassembly discord server, as well as some other places.
I am Debris, competitive reassembly player and host of the Debris Regional Reassembly Tournament series, and this is my guide of how to Build a Competitive Ship or Fleet in Reassembly. It will not cover everything or tell you how to instantly make optimized ships, but it should give you a good starting point. (keyword: should)
Remember that everything here is applicable to campaign mode as well.
– – –
In tournaments, the goal is to make your ships deal more damage to the enemy fleet than the enemy fleet does to them. The more damage your ships deal to the enemy, the better your score. The more damage the enemy deals to your ships, the better their score. Destroying ships is also more valuable than just dealing damage, as a dead ship can no longer fight, causing the enemy to deal less damage to your side than your ships are dealing to their side, improving your score.
– – –
This guide assumes that you know how to build a ship. That is, you know how to put blocks on a core in the campaign constructor and understand what generators, cannons, lasers, and thrusters do.
Tournament hosts will post a set of rules that outline the constraints your ship must meet and how the tournament will be held. You would then send your ship(s)/fleet(s) to them. All ships are put in tournament mode, where the AI fights the ship(s)/fleet(s) against each other. They will record or livestream the tournament and eventually post the video online.
Ship constraints are necessary because they prevent participants from designing ships that massively overpower the enemy in an unbalanced/unfair way.
To create a ship file, you must go into Campaign mode, go into the ship editor of the ship you would like to export, and click the “export” button in the lower left of the screen. This will send the ship’s file to your desktop with the “.lua” extension. Alternatively, you can go into the sandbox, create your ship there, and export it with the “export” command. This will send the ship’s file to your desktop with the “.lua” extension.
To create a fleet file, you must go to Tournament mode. You must then take your ships and place them into the participants screen on the left under a single fleet. You can check the p cost and change the fleet name as well. When you are done assembling your fleet, you can export it with the button at the bottom left corner of the screen. This will send the fleet’s file to your desktop with the “.lua.gz” extension.
Send these files to the host and they will take it from there.
I suggest you use the Sandbox to design ships; it allows more freedom and can be more securely saved, protecting your ships in the event of a crash. This guide assumes you know your way around it; Laps and Sumplkrum both made some great tutorials:
- Sandbox command mode can be used to guide ships around by selecting ships and right-clicking somewhere; useful for debugging thrust arrangements
- The stacking cvar, kBlockOverlap, must be set to 100 in the main menu for its effect to take place in the sandbox
- Middle mouse button is an easy way to copy blocks and move them into position
- The sandbox commands `level_save` and `level_load` are great ways to preserve tournament-specific workspaces
- The Space bar can be used to skip the countdown in tournament mode
- Pressing `o` while the sandbox is paused moves forward a single physics frame, great for getting around generated launchables or inspecting things in slow motion
- Using an analog stick (xbox controller, etc) moves the tournament mode camera much more smoothly, great for recording or watching tournaments
- The `debug AI` sandbox command will show in more detail how ships are behaving and what their decision structure is. Redoing the command will exit the mode
Anyway, let’s get started!
Understanding Ship Sandbox Statistics
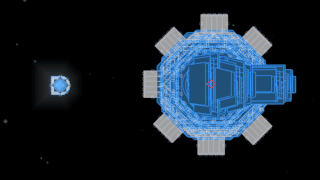
It fits more ships than sane people need, it saves securely, and it allows much more freedom when making a ship. Below, you can see some stuff I thought about when designing ships for an upcoming tournament:
My favorite feature is the expanded stats present in the lower right after selecting a ship:
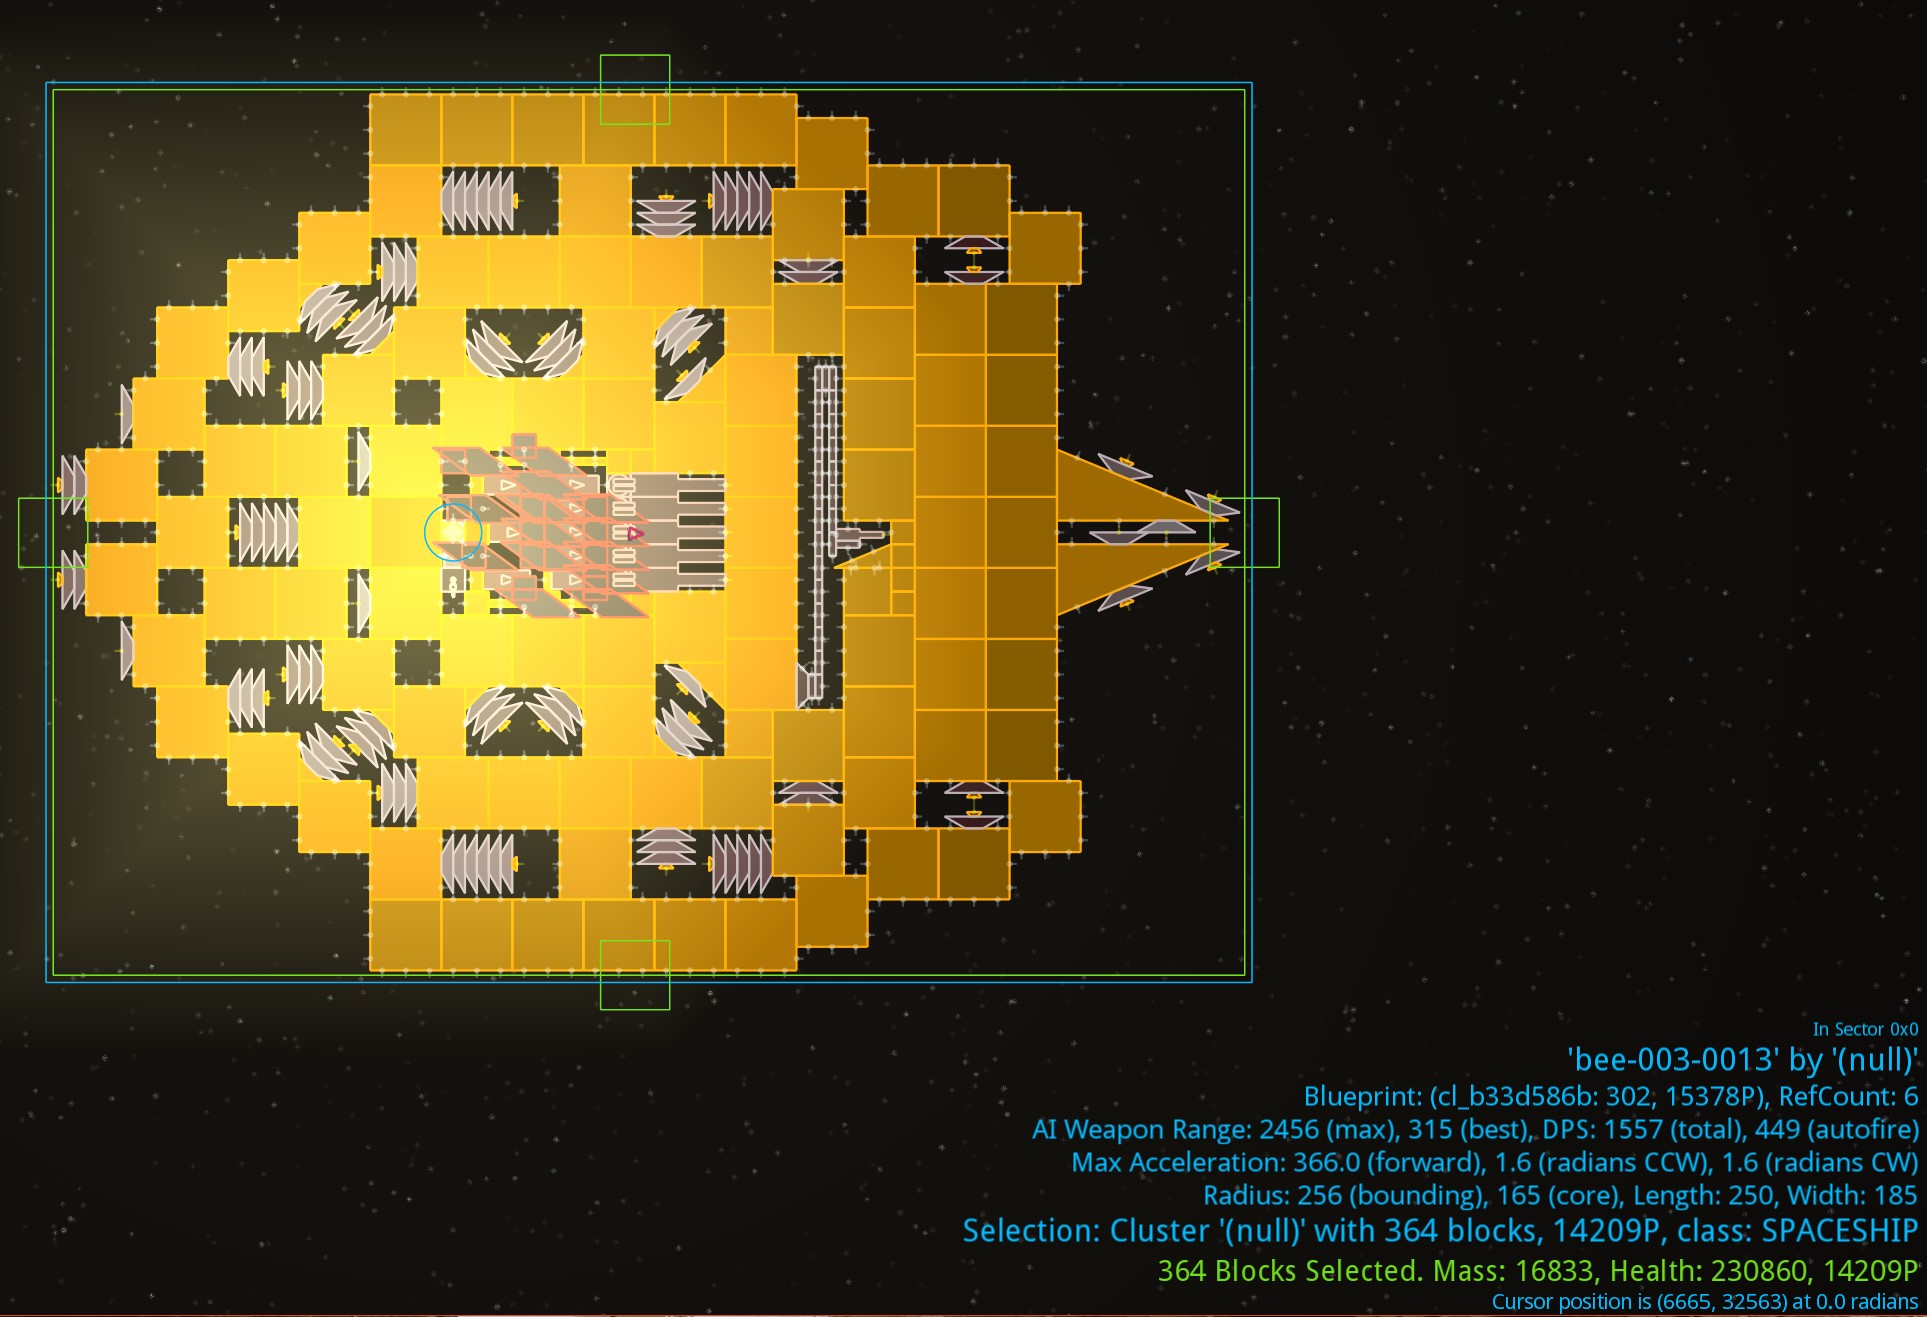
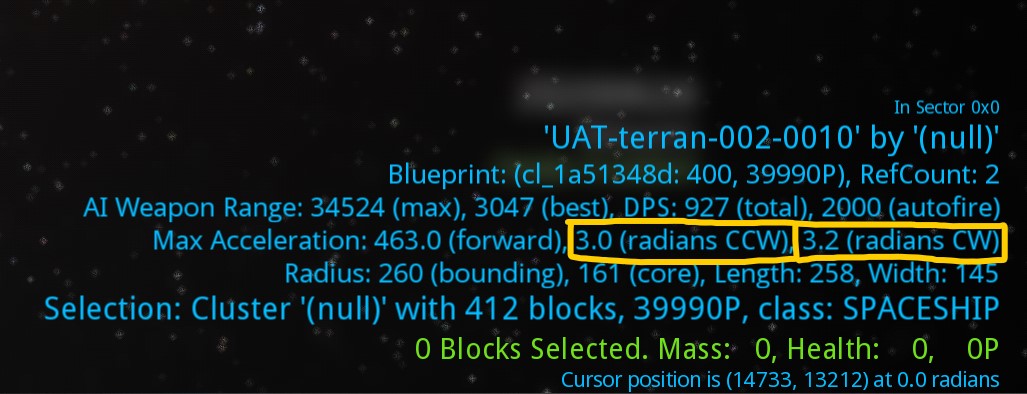
Closer look at the stats of the above ship, color coded for ease of access:

- Red:
Ship Name and Author.
Useful for obvious reasons. - Orange:
Blueprint on the core.
Useful for adding multiple cores to ships (generally illegal in tournaments, but possible! Will be explained in a future section (unfinished)) - Yellow:
Max weapon range on ship (marked “(max)”),
Range the ship will try to fight at (marked “(best)”),
Total damage per second of all non-Autofire/PD weapons on the ship (marked “(total)”),
Total damage per second of all Autofire/PD weapons on the ship (marked “(autofire)”).
Useful for getting a rough idea of how your ship behaves. - Green:
Forward acceleration of the ship (marked “(forward)”),
CounterClockWise angular acceleration rate (marked “(radians CCW)”),
ClockWise angular acceleration rate (marked “(radians CW)”).
Most tournaments have a forward acceleration minimum; this is how it’s checked. Turning rates are useful for determining the ship’s thrust calculus, explained in a future section. - Dark Green:
Bounding radius (distance from center of mass to farthest point on the ship) (marked “(bounding)”),
Core radius (average distance from center of mass that points are concentrated) (marked “(core)”),
Ship length (distance from the front to the back of the ship) (prefaced with “Length:”),
Ship Width (distance from the port and starboard edges of the ship (prefaced with “Width:”),
This is how ship radii are checked, which usually has a maximum in tournaments. - Dark Blue:
Selection: Cluster ‘<campaign-file-name>’,
Ship Block count (amount of blocks on the ship) (formatted: “with <block-count> blocks”),
Ship Price (P-value),
Is ship or station (formatted “class: <ship/station>”),
Price always has a limit in tournaments. Block count sometimes has a limit. - Violet: Unique among the stats in that it is also present in the campaign constructor.
Amount of blocks selected,
Mass of selected blocks,
Total health of selected blocks,
Total Cost of selected blocks.
More versatile way of finding block count and ship price. Useful for finding total mass and health. - Pink: Unique among the stats in that it does not give information on the selected blocks or ship.
Cursor Position,
Cursor Rotation.
Rarely useful, but nice to have.
When selecting ships in command mode, two circles and a box appear around the ship:

- Bounding radius.
- Core radius.
- Length/width box.
Not necessarily the most useful thing, but it gives you an idea of the size of your ship. Note how the Bounding and Core radii are centered on the ship’s center of mass.
Now that we have sandbox stats out of the way, I can refer to them elsewhere in the guide. There’s no test at the end, feel free to look back at this whenever you need to!
Reassembly Design Conventions
Let’s start by talking about important concepts of Reassembly that you can apply to your ship designs.
Remember, in tournament mode, the AI controls ALL ships. Never assume that the AI will use your ship correctly. Actually, assume that the AI will use your ship incorrectly. Always test to find out if it works. Some things about the AI will be covered here, but the best way to fix your ships’ AI is through rigorous testing and editing of Weapon and thruster placement and selection.
Weapons, of course, are used to damage enemy ships. Selecting the right weapons to use on your ship is one of the most important parts of designing one: the right weapons will cause your ship to deal the most damage to enemy ships for their cost in the specific situation you design your ship to fight in.
Weapons will affect how your ship flies in the arena. Close range weapons will decrease the range your ship tries to fight at, and long range weapons will increase the range it tries to fight at.
If you want to make a Kiter, go for long range weapons; if you want a close range brawler, go for shorter range weapons. Choose the range you want your ship to fight at and select weapons based on that range.
(See the section AI Triggers for more information on how to manipulate this fact using weapon bindings)
Launchables are generally dangerous weapons: they generally deal more damage for their cost than standard lasers or cannons. Missiles don’t have to be aimed, making them great for all ships. Unguided rockets (like torpedoes) do have to be aimed, making them more suited for ships that can maneuver quickly to aim them. Drones don’t have to be aimed either, but (in vanilla Reassembly) are generally less effective than other weapons for their cost.
Launchables are unique among weapons in that they have health; and the fact that launchables can be shot down is very important to recognize. Design your launchable-oriented ships around enemy ships with a certain specified Point Defense amount to properly account for this.
Some weapons deal damage constantly over a period of time (lasers and other fast firing weapons), while other weapons deal damage only in bursts (charging lasers and other slow firing weapons). Remember to account for this when designing your ship.
Point defense is necessary on almost all ships: if the faction you are using has effective point defense weapons, add some to your ships to protect them from launchables.
[unfinished]
Almost every ship needs generators for its weapons to work. Some weapons require more energy than others to function. In order to spend the least amount of money on generators, make sure you find the energy/sec requirements of all of your weapons (and shields if you have them), and use just enough generators to power them all (remember to factor in Command Module energy generation!).
Sometimes, you can get away with using more power than you can produce if your ship doesn’t use all of its weapons at the same time or only uses its weapons in short bursts, like skirmishers or Tinkrell ships do.
Unless you are designing a Tinkrell ship with a high recoil or high fire rate gun (in which case it is inevitable), make sure your ship NEVER RUNS OUT OF POWER, as this decreases its damage per second significantly.
Generators should be placed in positions where they are never destroyed during the lifetime of the ship. That is, make it so the generators do not ever get touched, or get touched when the command module or weapons are destroyed: losing generators can lead to your ship losing its ability to fire its weapons, making it unable to fight back against any enemies.
If generators are lost with the weapons, it will be of little consequence.
Placing generators (especially stacked generators) near the core is always a solid arrangement, as the ship dies with its generators, causing it to use them throughout its lifetime. Make sure that these generators do not cause the ship to die much more easily due to their explosive nature.
Experiment with generator placement: test your ship and find the place where they survive the longest, then put them all there.
Sub 1: Primary defense
For primary defense (i.e. the first line for protecting your ship from high DPS), larger, high health hull blocks are always better than smaller ones:
1. Splash Damage absolutely demolishes smaller blocks
2. A group of smaller blocks arranged like a larger scale regenerate slower than a single large block
3. Larger blocks simply have more health than the smaller ones, causing ships to need to deal more damage to your ship in order to actually destroy hull blocks.
Larger blocks are great, always use them for primary defense when you can.
However, all blocks succumb to the power of splash damage: when they are tessellated normally, many blocks will fall into the area of effect of splash weapons. The way to fix this is by increasing the distance between the blocks that make up your ship using the power of SPACED ARMOR. Spaced armor is a technique of arranging armor blocks that minimizes the effect of splash without increasing your ship’s weight by increasing the distance between the armor blocks on your ship.
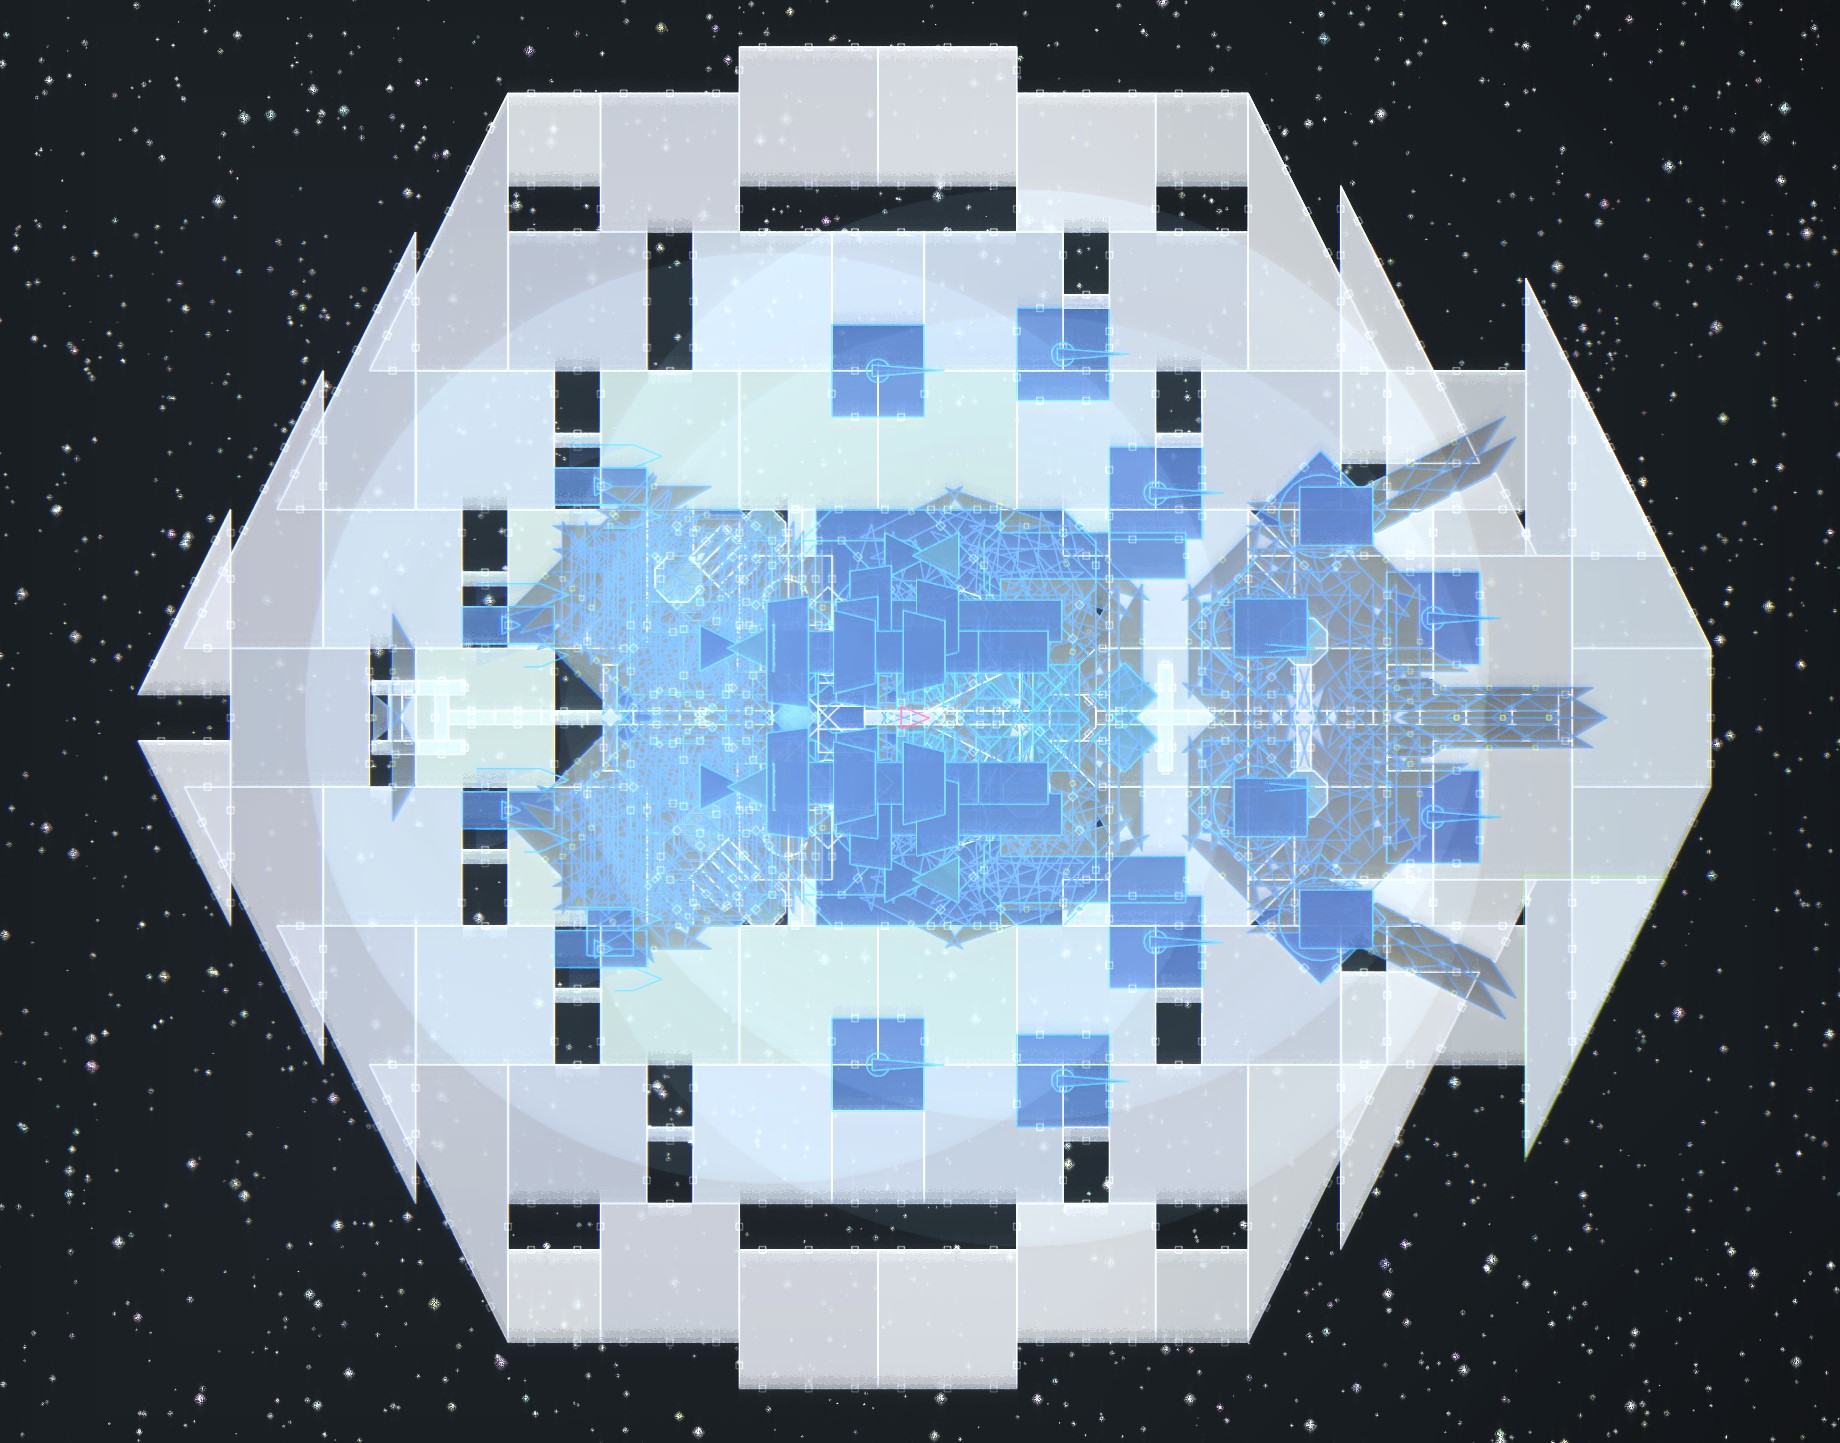
Here’s a great example of a crystalline ship using the power of spaced armor:
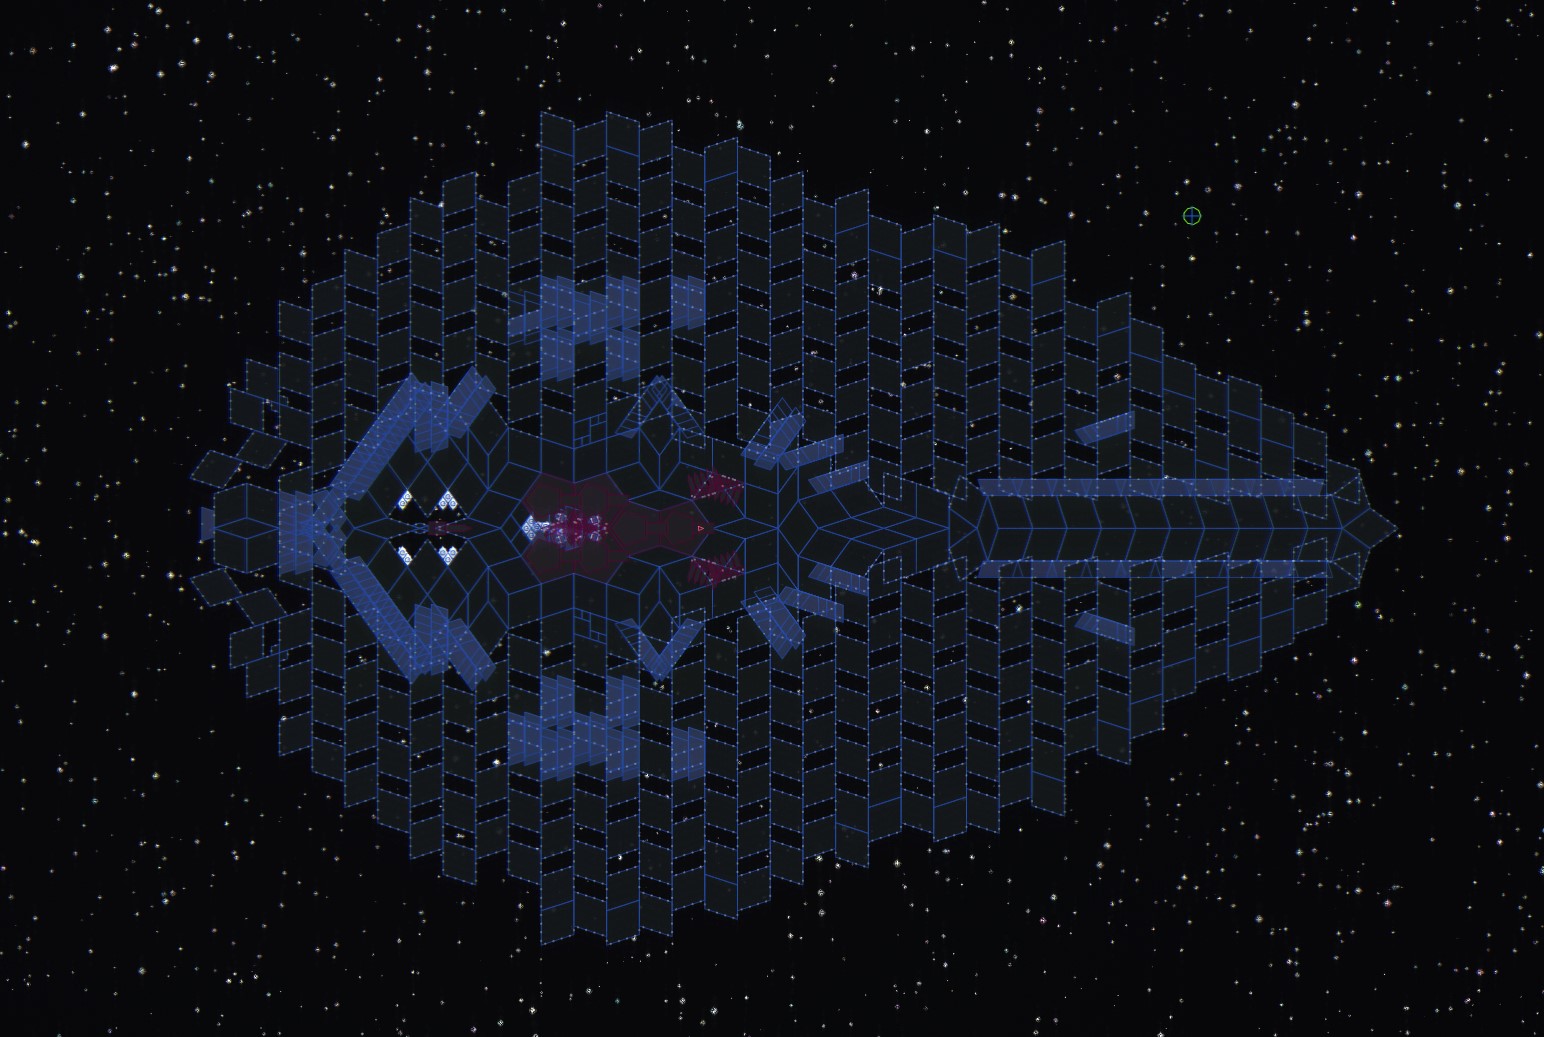
By spacing the armor blocks out, less blocks will fall within the area of effect of splash weapons, decreasing the damage dealt to this ship’s armor blocks and increasing its survivability. The size of the ship also increases, but this does not matter: its mass is significantly smaller than a ship with non-spaced armor of the same size.
– – –
Spaced armor increases the survivablility of ships by decreasing the amount of damage that splash weapons deal to their armor.
Spaced armor is also useful for increasing the size of your ship without increasing its mass as much.
– – –
Sub 2: Utilities
However, only using the largest scale blocks in designs can cause issues: Sometimes blocks don’t touch each other and a ships regeneration is slowed, sometimes it’s more difficult to make modules fit correctly. In this case, using small blocks is useful.
Small blocks, by themselves, have less health than their larger scales, but are also much lighter and regenerate faster. By using smaller hull blocks to connect sections of armor that don’t touch each other, you can cause them to regenerate at a faster pace while minimally increasing weight. This is great for any ship class; connecting sections of ships with small hull blocks is a great way to increase its regeneration speed, which is always valuable. It is much easier to use this technique with stacking.
Other uses for small scale include “ablative spaced armor,” which is used to deter splash
Stacking
Stacking is the overlapping of two or more blocks in ways that the game should not allow.
Sometimes stacking is banned in tournaments, but sometimes it isn’t, and it is wise to use it to its full extent if you are allowed to use it.
Have you ever built your way into a corner; knowing that the only way forward is through an entire redesign? This neat little trick might be what you’ve been waiting for!
By using a place holder block or “orphan” (the scale one thruster), Any blocks place between two separate constructions won’t check for overlapping geometries. With this new world of possibilities, Orphan stacking set the foundation for a new generation of Reassembly design. Without exception, any block can now go anywhere. There really isn’t any limit to your imagination. Or is there…?
Sadly, there’s always a catch. Whenever two or more ports overlap without connecting, corruption may be in your future. Corruption can be a constant struggle when designing a stacked ship. Seemingly stable looking ships can corrupt after the simplest of changes, but do not fret, there are ways to test ships in order to find corruption before catastrophe.
In this demonstration, severe corruption can be observed in its natural habitat, however, the fastest and easiest way to check for corruption is also demonstrated. The act of placing and undoing (press Z) any block (while the core is present) will suss out the majority of corruption issues. It is considered good practice to do this test often to prevent the loss of work. Many a ship builder has fallen victim to corruption, so keep on your toes and always have backups.
You might have caught glimpses of this techniques use in the last demonstration, so let me put your mind at ease.
By using the power of the SCALE 1 RECTANGLE, hyper-stacking builds upon the previous foundation and cranks the possibilities to eleven! This little bugger might not look special, but much like stacking, it’s irrational. The width of this rectangle is (1-1/√(2)) or roughly 0.2929. This means that the scale 1 rectangle doesn’t ever really line up with the standard square palette. Using this method helps builders simultaneously avoid corruption while make higher density constructions.
All this in mind, there is another irrational block in Reassembly.
The right scalene triangle has two angles that, due to the fact that they are irrational, have unique geometric properties. These demonstrations show how a certain arrangement of these triangles can be used to angularly space terran torpedo launchers about 2.17 degrees apart.
This means that right scalene triangles are also a great candidate for hyper-stacking. This method is found commonly used in ships with torpedo arrays, but it can be use in other ways too.


This method of stacking is a common practice in the tournament community. Typing this line into the main menu console (opened with “”) will enable it.
Once enabled, you’ll be able to place blocks without the need for orphan-stacking. This will ease some of the mental gymnastics needed to stack without the cvar and will generally increase the speed at which you can stack. However, be warned: Having this enabled inside of the campaign mode will destroy your saves. Plants will no longer be bound by the laws of nature and will thusly lag your save to death. The fastest way to disable this setting is to either close the game or type
into the main menu console. In the event of a total plant takeover, you’ll be forced to regenerate your save in order to recover any ship files.
This technique is the newest member to join the stacking family. Due to this, circle-stacking isn’t seen in the tournament setting as often as the other types of stacking, however, this doesn’t mean that it isn’t powerful.
Specifically, this demonstration shows 10, 12, and 27 sided shapes, but to aid you in your war against corruption, the general idea is to build a base with as many differing angles as possible. In this way, you truly can reach new heights.
With greater density comes greater corruption, so it might be best to practice with the other stacking methods before trying your luck here.


– – –
Stacking decreases the mass of your ship due to the reduction in the amount of armor blocks required to mount all weapons and thrusters. This makes it extremely valuable. No blocks are required to space modules so that they don’t touch each other, they can be compressed and overlapped. This decreases the radius of your ship. Armor stacking can also double the effectiveness of your ship’s armor against non-splash weapons. In special circumstances it can even be used to manipulate the center of mass without having to change a ship’s silhouette.
Downsides to stacking include increased ship density and massively reduced survivability to splash weapons. Ship corruption can also occur when two connection ports overlap, which can lead to losses of entire designs. Make sure you always check if your ports even slightly overlap!
– – –
Basic Ship Classes
Many ships can be loosely divided into classes based on the way the ship fights in the arena, and its function in a fleet. These are terms that the community came up with to describe certain ship archetypes.
Brawlers are defined as tough ships that like to fight in close range (a very broad definition! There are many brawler subclasses like Tanks, Trappers, etc.). Close range weaponry is generally rather high damage and as a result brawlers can be rather dangerous and difficult for the enemy to handle if they don’t have a way to deal with them. Factions like the Sentinel and the Crystalline as well as the terrans have potent close range weapons and solid armor. The main problem with brawlers is that due to the amount of armor on the ship, the ship is generally slower. This causes fast ships, like kiters and skirmishers, to become a problem.
When I design a brawler, my goal is to make a ship with high damage output that gets within weapon range of enemies and deals significant damage without being destroyed. Your goal may differ, and ships will differ based on their specific application.
Brawlers usually have more forward thrust than backward thrust. Especially large brawlers (referred to as “Tanks”) with high amounts of armor position many of their forward facing thrusters on the outer port and starboard of the ship instead of directly behind the core. This allows them to turn using their forward thrust, decreasing the amount of required thrusters while sacrificing some maneuverability and some good AI behavior. If your brawler is lighter, it may be a good idea to place thrust explicitly for turning on it. It is generally a good idea to put turning thrust on the front of the ship when designing a brawler. In summary, Brawlers are one of the simplest ship designs, but are also one of the most effective.
There are many subclasses of brawlers that are too numerous to cover in this little guide.
Rushers are ships that generally have high forward velocity, causing them to rush the enemy and deal high amounts of damage very rapidly, making them difficult to deal with. Factions with fast thrusters and dangerous close range weapons (bees, Terrans, and others) fit this role quite nicely. In order for them to move at effective rushing speeds, rushers need a reduced amount of armor. Well executed rushers can easily destroy kiters and skirmishers of all kinds.
Kiters are defined as small, light, and fast ships that like to fight at long range. They use long range weapons to score hits on other ships that cannot keep up with their insane speed. Just about kiters’ only weakness (other than bad AI decisions) are rushers. In order to be fast, kiters use very little armor and many thrusters. Some may use shields to primarily protect them instead of armor, due to the lightness and regeneration capabilities of shields. This, of course, increases their speed, but severely reduces their durability. The high speed of kiters and their small size causes the AI to dodge incoming fire, increasing the ship’s survivability. Kiters are one of the more complicated ship designs, but are extremely powerful when done correctly. Kiters like to use missiles, such as basic terran missiles or farmer HM1 and others, due to their homing capability and long range coupled with their respectable damage output, though many weapons work well on kiters. Kiters benefit heavily from stacking, as stacking decreases the ship’s radius and mass, allowing it to move faster and to be hit less often. The reassembly AI causes smaller ships to dodge incoming fire more often, making it extremely important for kiters to utilize the power of stacking.
Skirmishers are the most difficult ship class to build (in my opinion!), but are certainly the most rewarding. Skirmishers are a sort of hybrid between brawlers and kiters: they are generally slower than kiters and have closer range weapons, but have finely crafted thruster arrangements and weapon choices that cause them to move in and out of the range of enemy ships and evade incoming fire, dealing significant damage to the enemy without dying themselves. Due to their higher speed, some skirmishers can quickly eliminate kiters. As with kiters, Skirmishers have a hard time with rushers. I am not experienced in the art of the skirmisher (lol, there are others on the reassembly discord that can teach you much better than I can), but from my tests, the Terrans make the best skirmishers due to their high overall speed, durable and quickly regenerating armor, and dangerous weapons. Skirmishers need to regenerate their armor quickly, so put time into your armor arrangement and make sure the ship regenerates fast as it moves away from the enemy and is ready to fight again as it goes back in. Skirmishers also need to be small ships, as this will cause their AI to dodge incoming fire; that is, skirmishers benefit heavily from stacking.
It may be a good idea to utilize the power of AI triggers when making skirmishers.
Overall, Skirmishers require a lot of iteration and testing, but if executed correctly, they can be one of the more dominant ship classes.
Spinners are usually banned in tournaments, but they have been part of tournaments in the past and are definitely a part of the game’s meta. Spinners are defined as ships that spin as a method of locomotion due to their thruster placement. Spinners are divided into three major groups: fast, slow, or delayed.
Fast spinners use their high angular velocity to their advantage. These ships could be a subclass of kiters or skirmishers. These ships spin so fast that they either can fling torpedoes or other high damage launchable weaponry at extraordinary speeds and deadly accuracy (causing the weapon to phase through the armor of enemies and potentially destroy their core or other internal modules) or can cut through anything with a bunch of high speed sentinel armor spikes. Fast spinners are also extremely maneuverable. These are almost always banned in tournaments due to their game breaking potential.
Slow spinners spin much slower than fast spinners, and with a different goal in mind. These could be a subclass of brawlers or tanks. The slow spinner spins to spread out damage of enemy ships across all of its armor blocks. Instead of drilling through the armor of the spinner directly through to the core, these ships require you to destroy all the armor around the core to reach it. These are less game breaking, but are still extremely efficient and are generally more effective than any other sort of armor arrangement. They are also usually banned in tournaments.
Delayed spinners are unable to spin at the beginning of the round, but are designed to shed mass or thrusters easily when they take damage, turning them into a fast spinner. These ships are just as gamebreaking as fast spinners, but can get past more rules than fast spinners can, and are generally harder to build. These are also usually banned in tournaments.
Tinkrell are ridiculous outliers that will be explained under their faction’s entry; they have their own set of classes that other factions do not share!
Armor v. Shields
Armor is much more effective than shields.
Shields in vanilla reassembly have extremely low health per unit cost compared to armor, with a cost of 0. Factoring in the cost of thrusters to move a block of armor at the standard minimum acceleration of 156.2 accel, we can see that there is a massive health/P difference between almost all vanilla armor and shields (for example, terran armor has a health per thruster p of 1963.140 h/P when using large sized thrusters while a terran small shield has a health per p of only 7.14 h/P).
The cost of armor is calculated by finding the cost of the amount of thrusters required to move a block of it at a specified acceleration. This means that different types of thrusters can change the cost of armor blocks based on the effectiveness of the thrusters (tangent to this discussion: the Largest scale thrusters are ALWAYS more efficient in terms of thrust/P in vanilla. Try to use them as often as possible).
The health/P of armor is almost always greater than the health/P of shields. If you want to truly protect your ship, you are going to have to get used to using armor. Times when shields are effective are when your ship needs splash protection, you want your ship to move at a much higher speed (armor may be too heavy for the application), your faction’s armor is margarine, or your shield has more health regeneration per second then the enemy’s Damage per second.
Armor should almost always be your Primary source of defense.
How the Reassembly AI uses Thrusters (Thrust Calculi)
Thruster Calculi are more important than the other design conventions; it requires a section of its own!
In order for ships to move around the arena, they (of course) need thrusters. Each ship also needs a thrust arrangement tailored to their specific role in the arena; good thrust arrangements cause ships to fulfill their role for the longest amount of time.
Using Command Mode (mode 2) in the sandbox and guiding your ship around (right click somewhere with your ship selected) is a great way to test your thrust arrangement.
There are three different ways the game calculates how to fire thrusters: Normal, Slider, and Spinner:
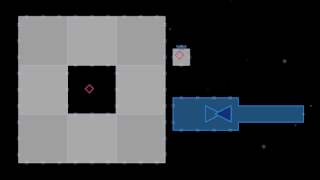
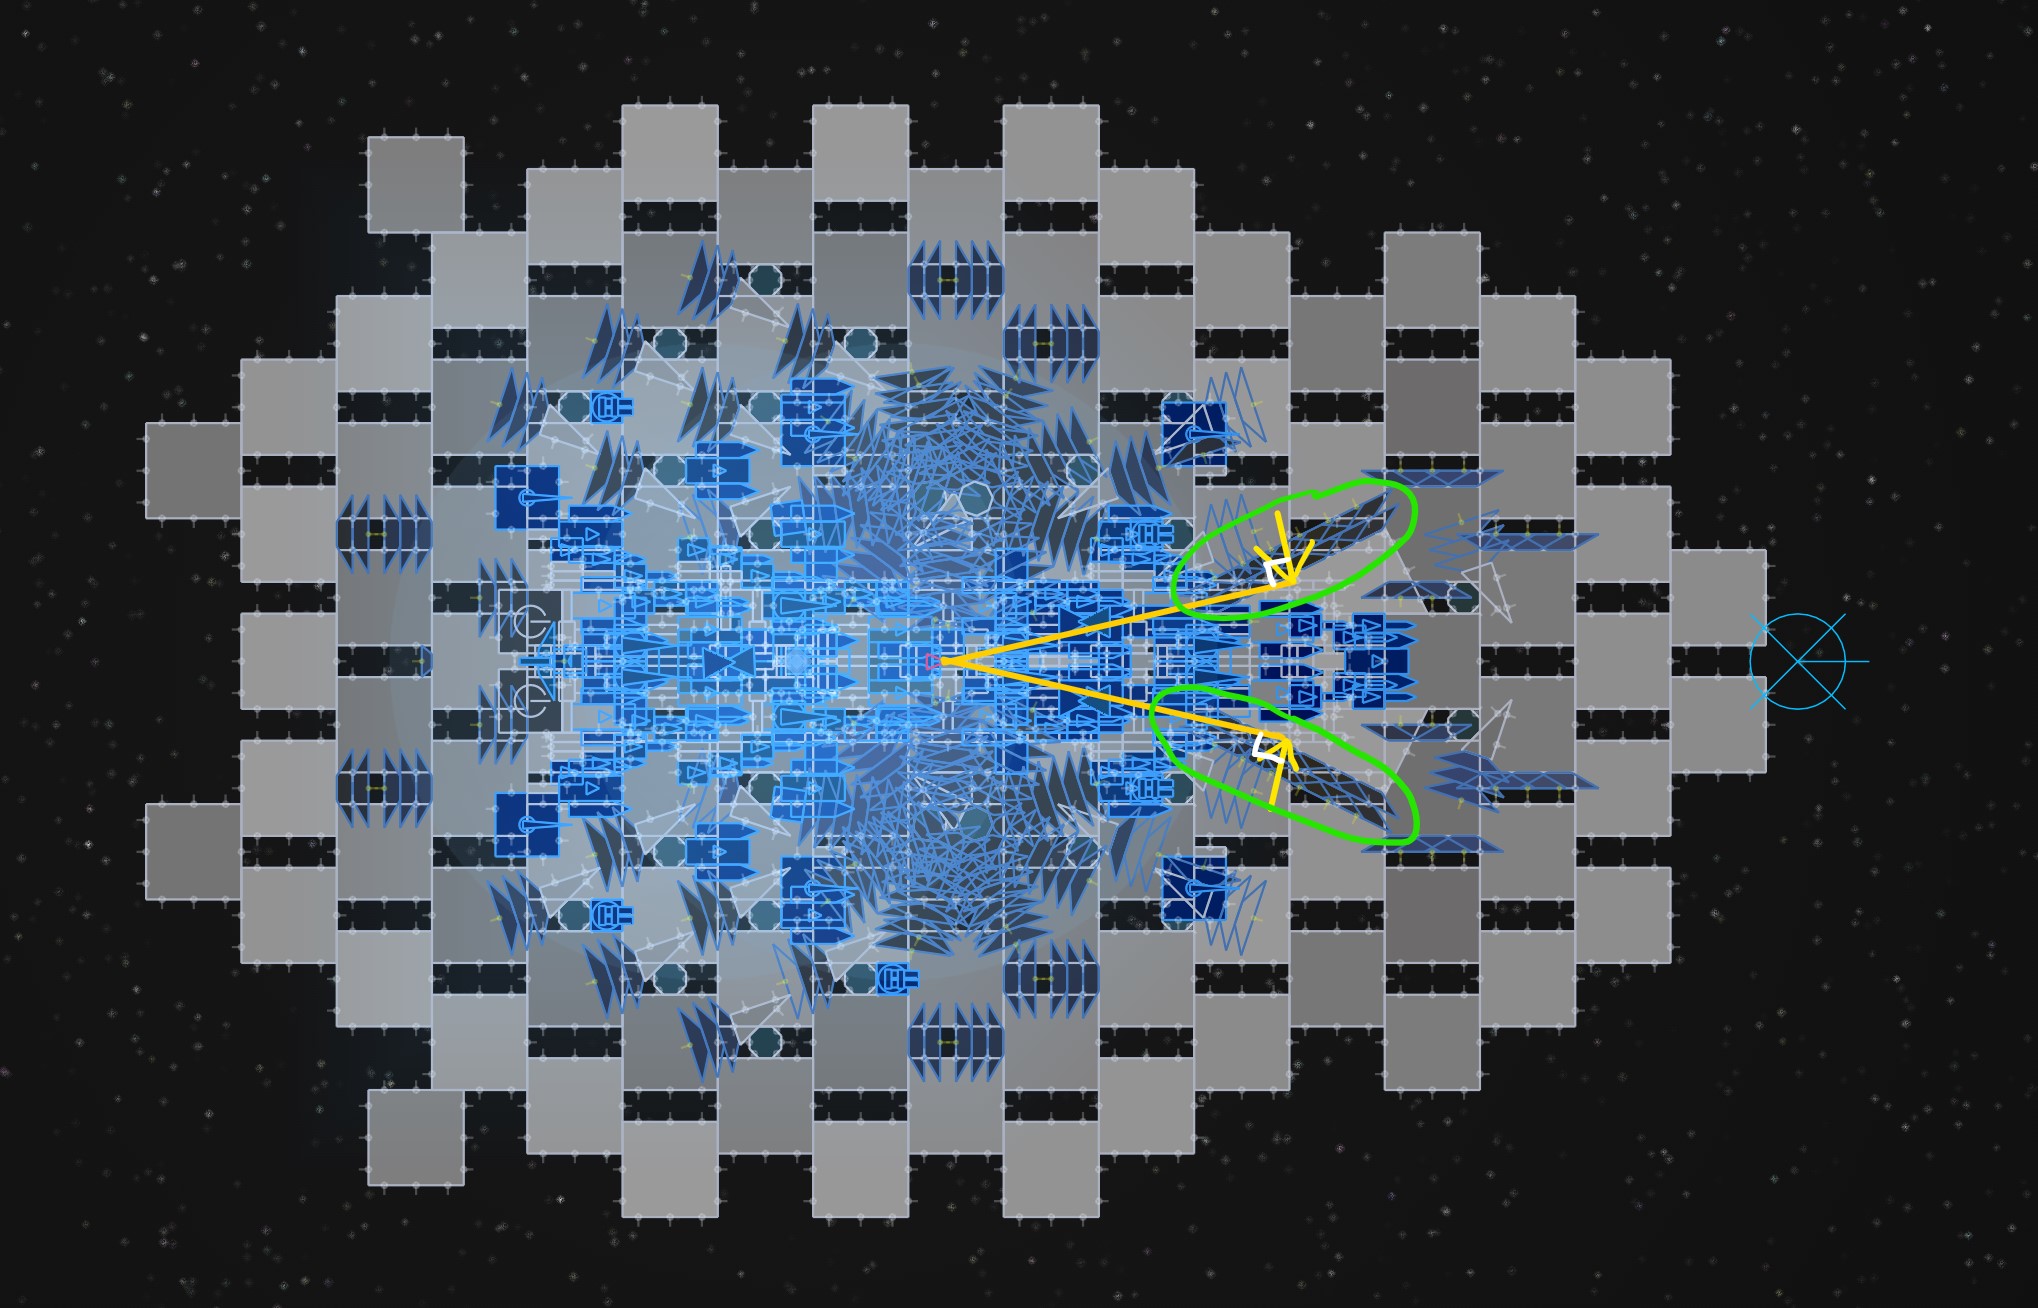
A Normal thrust calculus is generally the most useful for relatively fast ships. Ships are given a Normal thrust calculus when they have a large amount of turning thrust (anything greater than 1.0 radian) in both directions. This can be checked quite easily in the sandbox:
Ships using this calculation style use thrusters on the ship to turn towards their target position and generally prefer to turn towards their target position before moving, surprisingly unlike the other two styles. To make your ship use this calculation style, give it a large amount of dedicated turning thrust in front of the center of mass. Angling thrusters is also a very good idea to make the ship turn more effectively. To find an efficient angle and position for angled turning thrust, Draw a line from your ship’s center of mass to the place you want your thrusters. This place should be far in front of the center of mass. Make your thrusters push about 90° to this line, like so:
Normal thrust arrangements are great for most ships, especially ships with spinally mounted weapons or ships with a recessed command block, as such ships must be oriented towards the enemy for them to work well.
A Slider thrust calculus works well on slow ships or on ships that do not need to stay oriented towards the enemy during combat. This calculus uses an extremely simple method to find which thrusters to fire; way simpler than a Normal or Spinner arrangement. Ships are given a Slider thrust Calculus when they have little to no dedicated turning thrust (0.0 – 0.9 radians) in either direction. As with the other styles, this can be checked easily in the sandbox:

Ships using this thrust calculus do not try to turn. Instead, they simply fire all thrusters pointing towards their target position. This makes Slider easy to hijack compared to the other two arrangements, but also makes it incredibly annoying if you have no reverse or horizontal thrust: If there are no thrusters pointing towards the enemy, your ship may not move! Even if your ship uses Slider, it is still highly recommended to put dedicated turning thrust on the front. This turning thrust arrangement will point to targets on the port and starboard of the ship and will turn the ship to face towards the enemy. Going further, if your ship is stuck facing backwards, try reversing the direction of some of the thrusters on one side of the ship. These thrusters will fire when the enemy is behind the ship, turning the ship around.

A Spinner thrust calculus is made only for spinners, or ships that constantly turn in a single direction as they move around the arena. This calculus cannot be replicated by any other ship class. Spinners have radially symmetrical dedicated turning thrust in a single direction. Again, easy to find out:

Note that spinners’ AI has been broken in a recent update and that spinners are generally illegal in tournaments! This guide refers to the AI spinners used before it broke. The modern spinner barely moves in the arena!
Ships using the Spinner thrust calculus constantly rotate in a single direction. This gives them the ability to move in any direction extremely easily, as they have thrusters pointing everywhere at all times. Spinners tend to be extremely predictable: they will stay at a constant range depending on their weapons, and are still very accurate, despite their angular velocity. If your tournament host allows it, the Spinner thrust calculus can be used to great effect in the arena.
Distractors
The concept of distractors is so important to the game that it deserves its own section!
Distractors are generally cheap ships that deal minimal damage to the enemy, but give the enemy almost no points upon destruction and cause the AIs of enemy ships to prioritize attacking it instead of your other more dangerous ships. Distractors are a great introduction to fleet composition, practice enough and your ships will grow to complement each other.
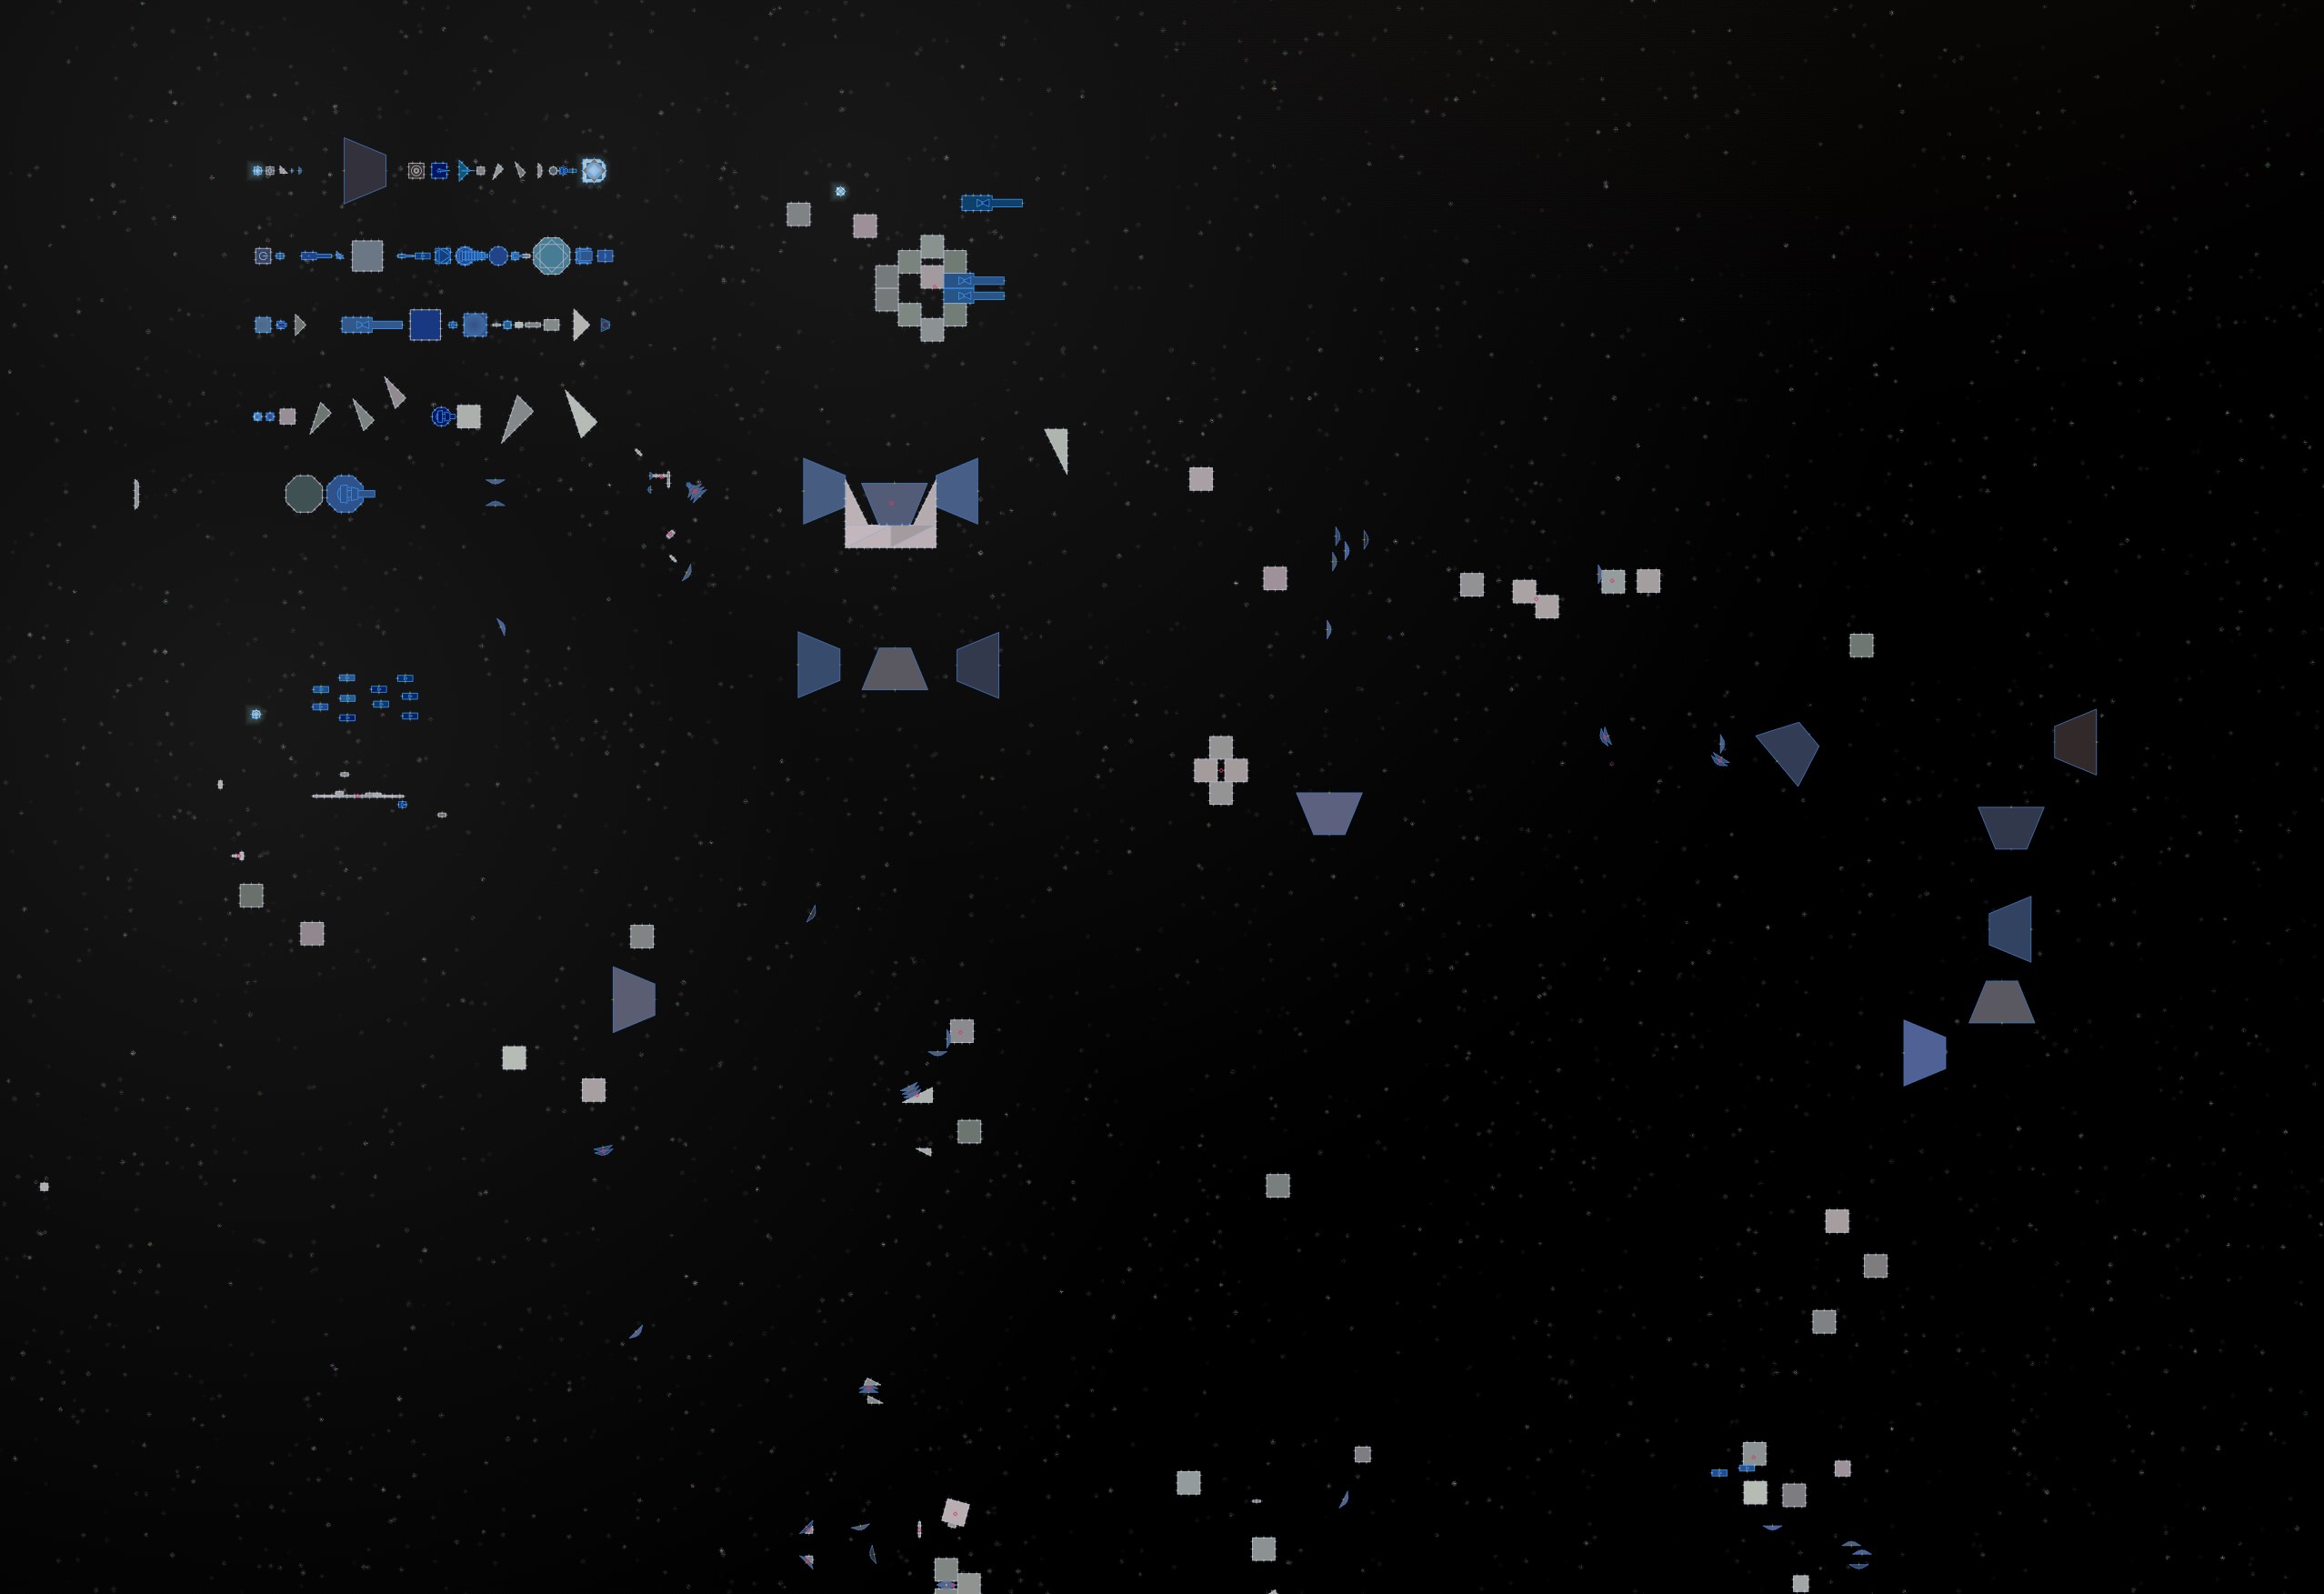
Here is an example of a competitive fleet with distractors:
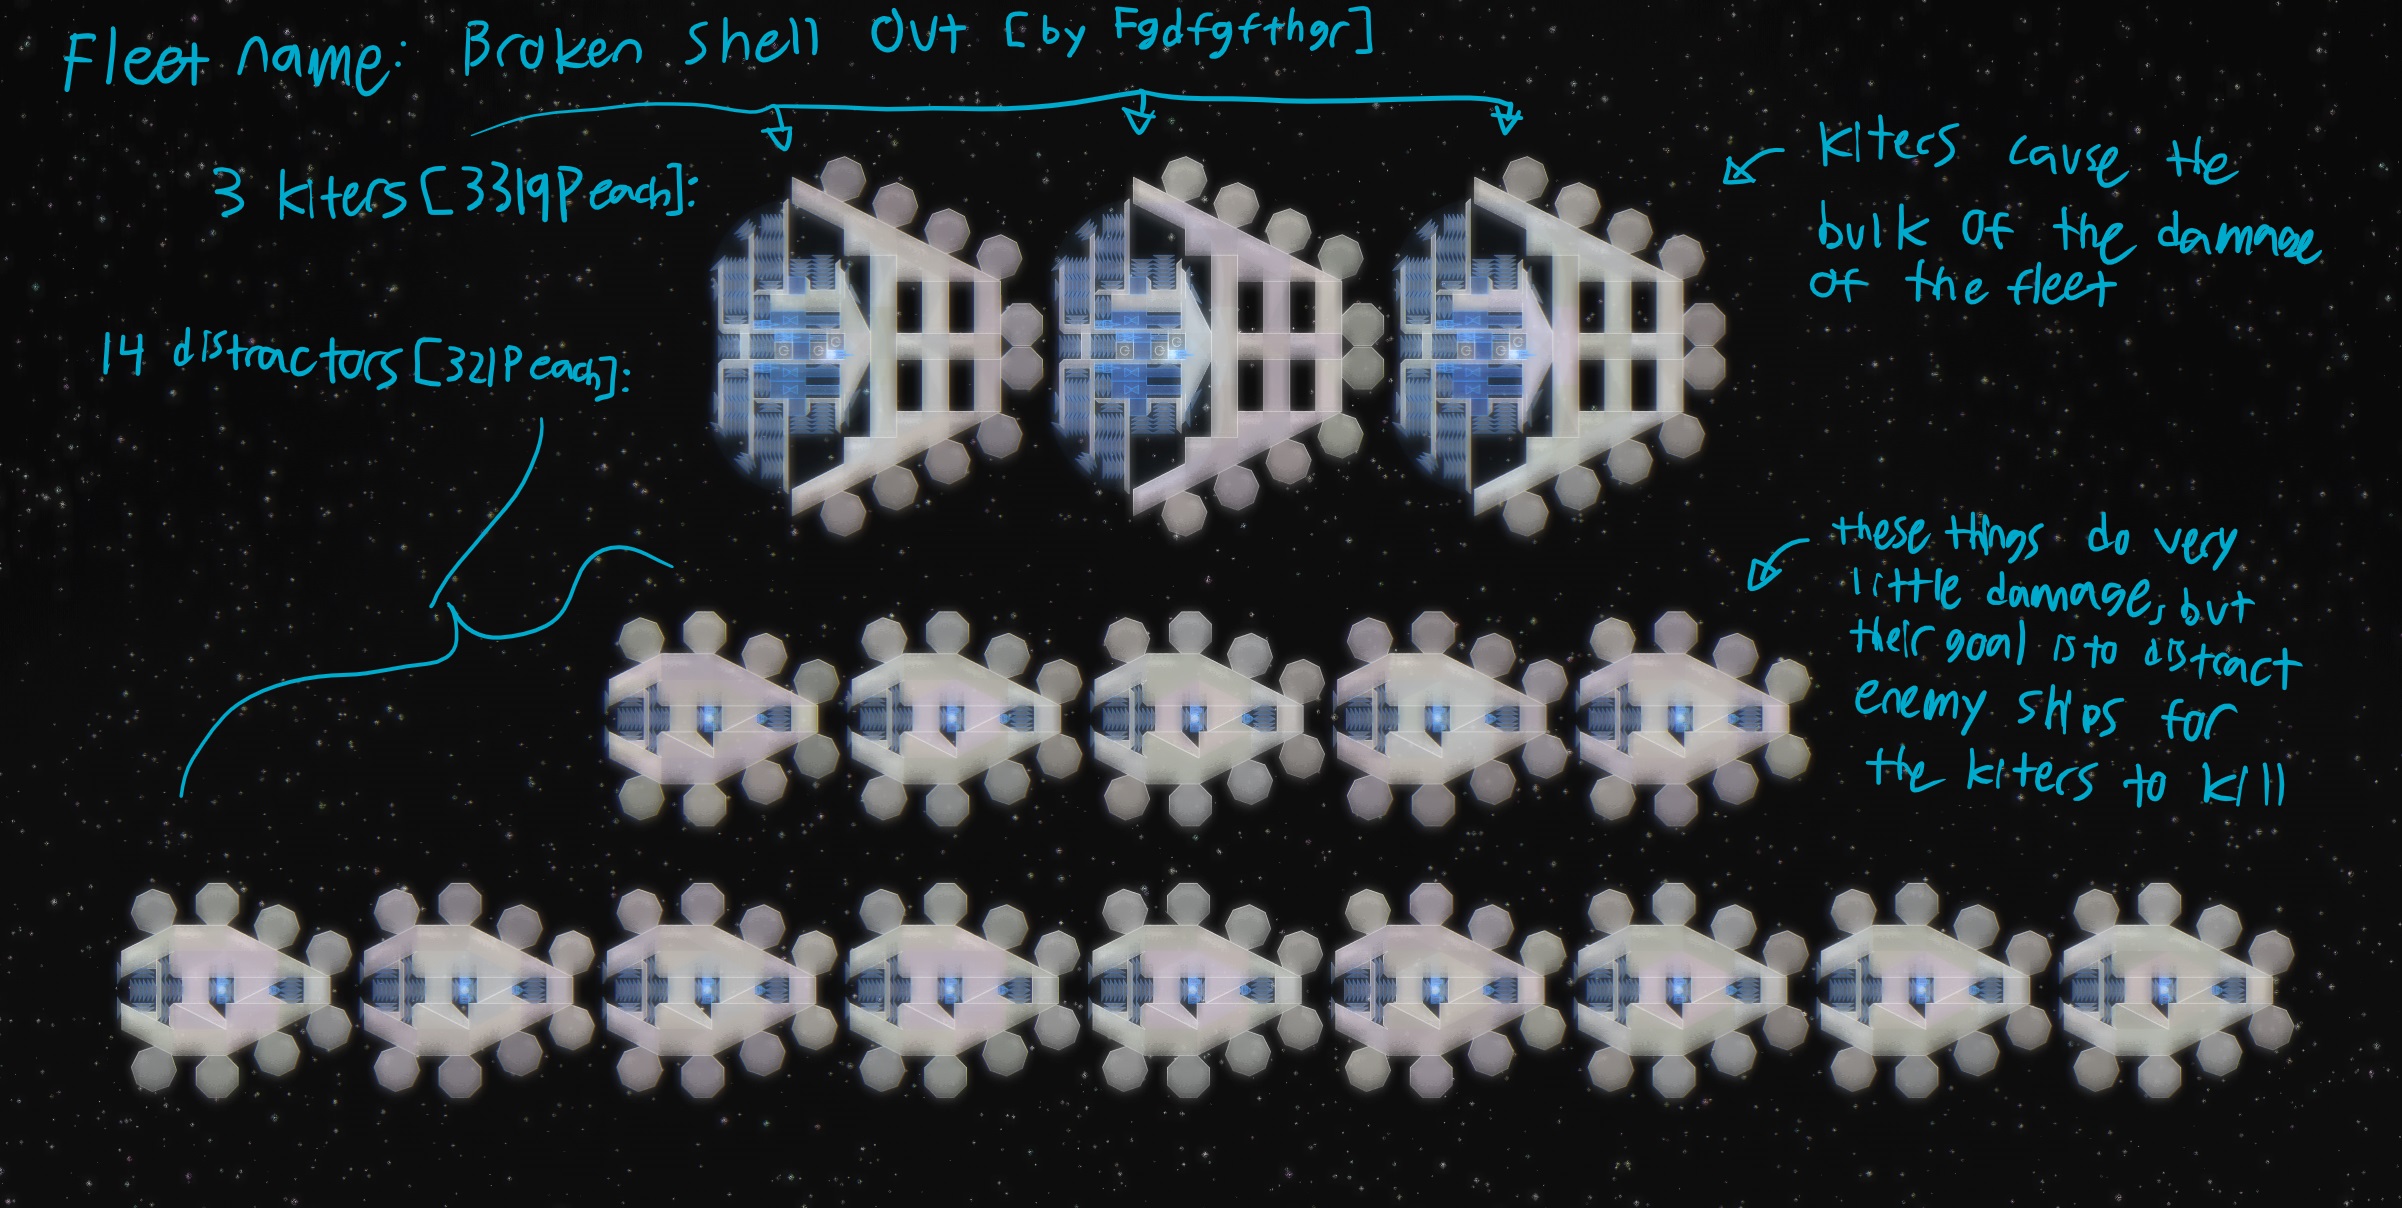
Because of the low cost of the distractors, the enemy AI will almost always target them instead of the kiters. The kiters will not be attacked by enemy ships and are free to dish out as much damage as they can against the distracted enemy ships. Because of the low cost of the distractors, the fleet doesn’t lose many points when they are destroyed. These distractors make the fleet much more effective.
Distractors can be split up into a couple types (with considerable overlap): heavy and light.
The most extreme Heavy distractors use large amounts of armor to stay alive for large amounts of time so that enemy ships keep attacking them instead of other ships. You could call these a subclass of brawlers. This sort of distractor works great against almost all ships, but because of the mass of armor, they need more thrusters and generally cost more than light distractors.
The most extreme Light Distractors generally use very little armor and are much faster than heavy distractors. These ships stay alive by moving away from the enemy like a kiter or skirmisher. These distractors can be incredibly effective, perhaps more so than heavy distractors, and can be made cheaper due to the smaller amount of thrusters required. Due to their low armor, however, they can die very quickly if the enemy manages to hit.
– – –
Experiment with distractors, they are incredibly valuable!
– – –
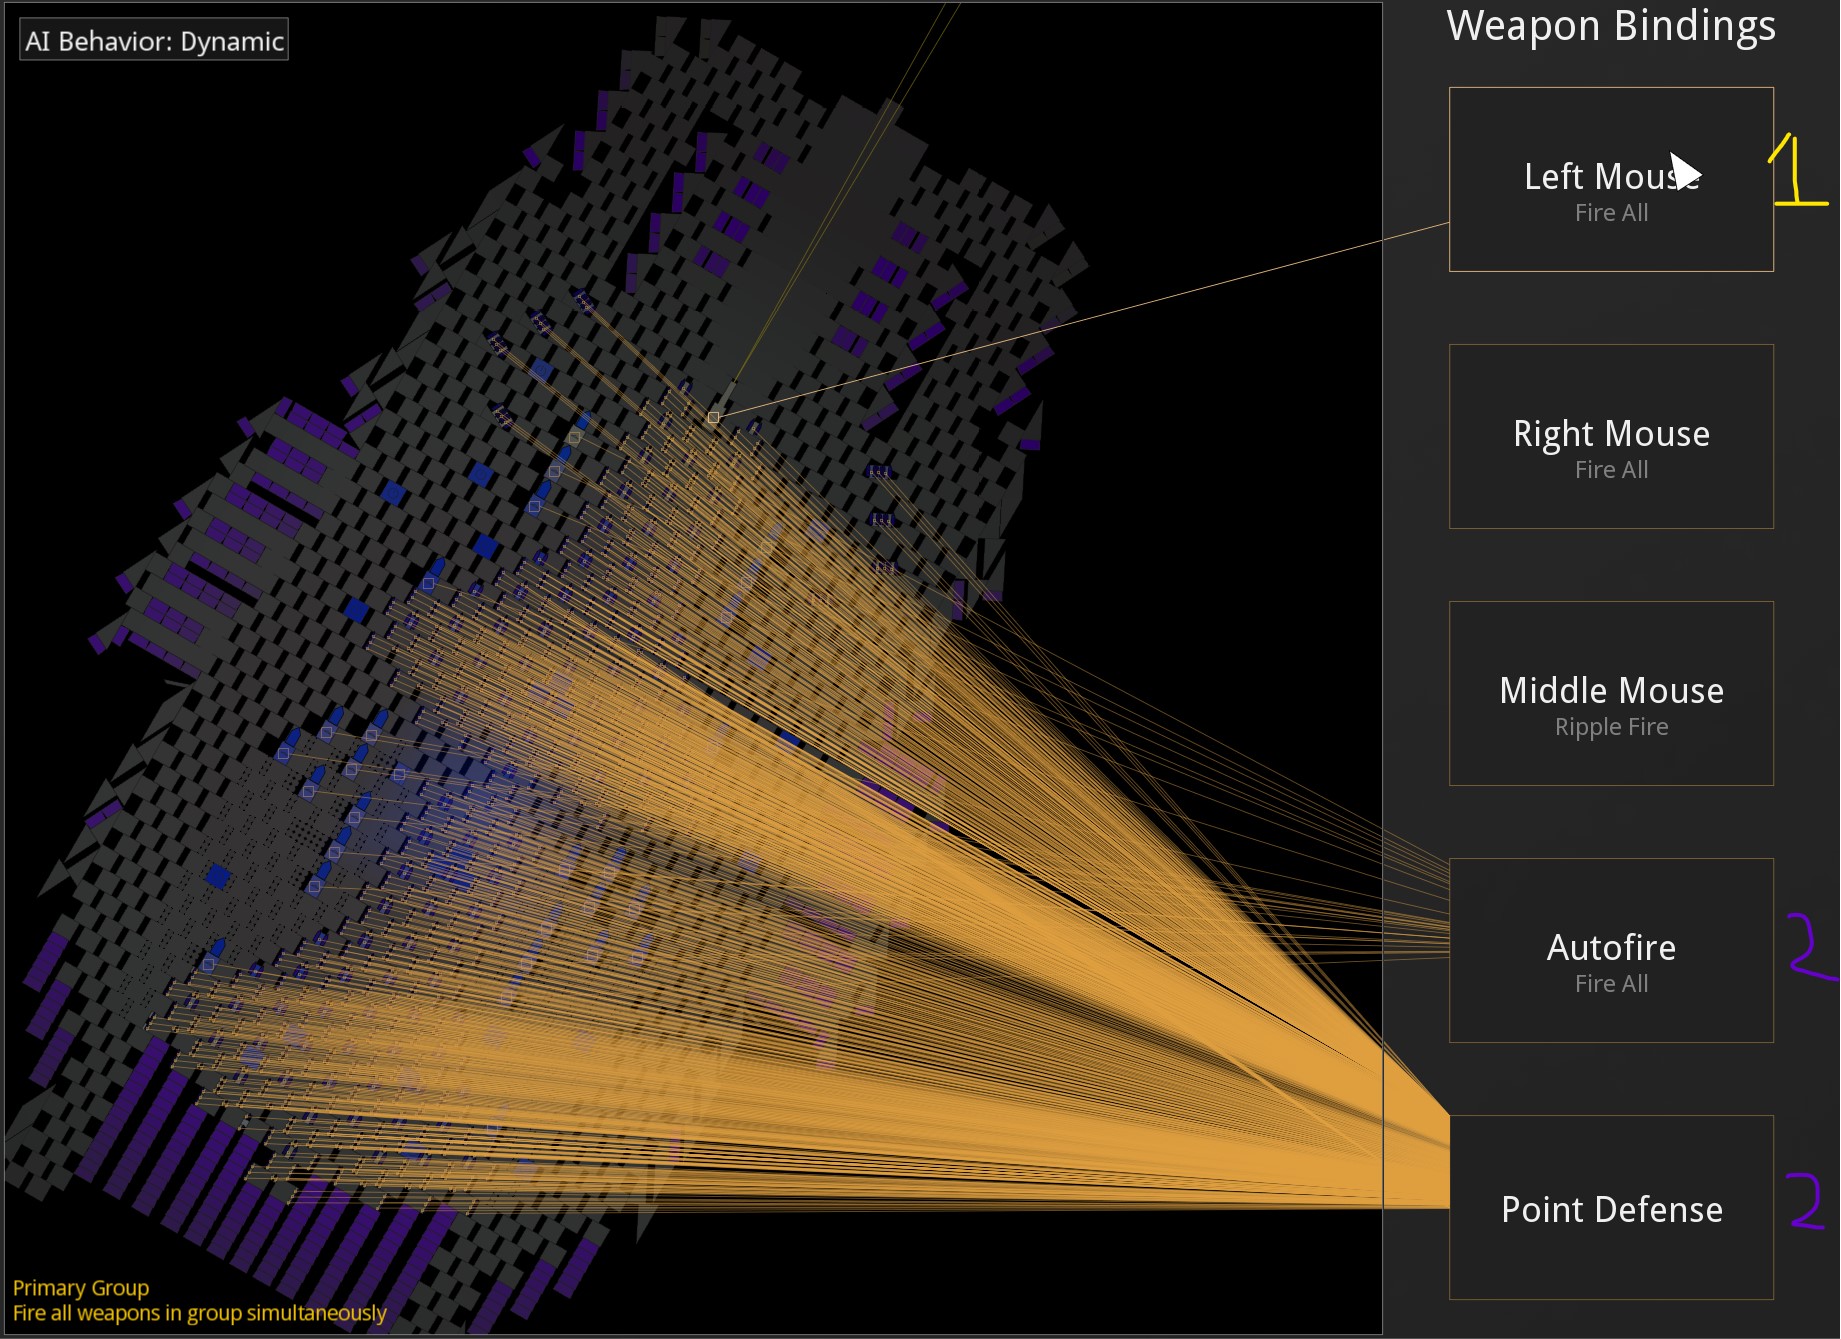
AI Triggers
AI triggers are a relatively new ship design concept that take advantage of the fact that a ship’s behavior in the arena is heavily affected by its weapon bindings. It relies on the Reassembly AI not factoring autofire or point defense bound weaponry into range calculations (until primary/secondary/tertiary bound weapons are all destroyed), causing autofire/PD bound weapons to not influence the behavior of the ship while primary, secondary, and tertiary fire do.
(I believe that the AI will calculate primary before secondary, and secondary before tertiary, all before Autofire/PD, but I will need to do some more testing first!)
There are a couple of different kinds and they are easily hybridized: Active and Passive. Active triggers are designed to be destroyed in battle while Passive triggers are not.
Here is an example of an Active AI trigger on Dukeslayer’s Bee ship “Fallacy-inator:”
Take note of 1, 2, and 3:

- This is a bee ship, and therefore it has access to Quantum doom beams. This acts as the “Primary Trigger.” Quantum doom beams do high damage at extremely short ranges, causing the AI of this ship to decide that rushing directly into the enemy is a good idea. The AI only takes into account this singular weapon, as it is the only weapon bound to primary. Notice the long S shape: If an enemy ship were to drill into its hull and destroy this S (which is very flimsy and lightly armored), the quantum doom beam would be disconnected from the ship.
- This anchor drone is a very long range drone weapon, and it’s bound to secondary fire, acting as the “Secondary Trigger.” It also has a significantly lower damage per second than the doom beam. Normally, when the Primary Trigger is generated, the ship barely considers this weapon in calculations at all. But when the Primary trigger is destroyed (and it will very likely be destroyed!), the ship will find only the Secondary trigger, changing the AI behavior of the ship from a ship with a single doom beam to a ship with a single anchor drone, causing the ship to rocket out of the enemy ships’ range extremely quickly due to the extreme range of the anchor drone. This ship stays away from the fight until its Primary trigger regenerates, and by that time, much of its armor has regenerated as well.
- The two normally bound weapons on the ship are not designed to deal damage to enemy ships; they serve only to make the ship move a certain way. The easy solution to this DPS shortage is to pile on more weapons! The remaining weapons (or “uncalculated weapons”) on this ship are bound to Autofire, and are not taken into account by the AI at all throughout the entire lifetime of the ship. These hyperstacked shard launchers and PD Subsystems do a remarkably large amount of damage per second, making this ship a dangerous opponent in close combat.
This may make it a little clearer:
The AI triggers on Fallacy-inator allow it to survive much longer than a bee ship without the trigger, allowing it to deal more damage to the enemy without being destroyed.

Skirmishers definitely benefit from this behavior, but many other ships can as well:
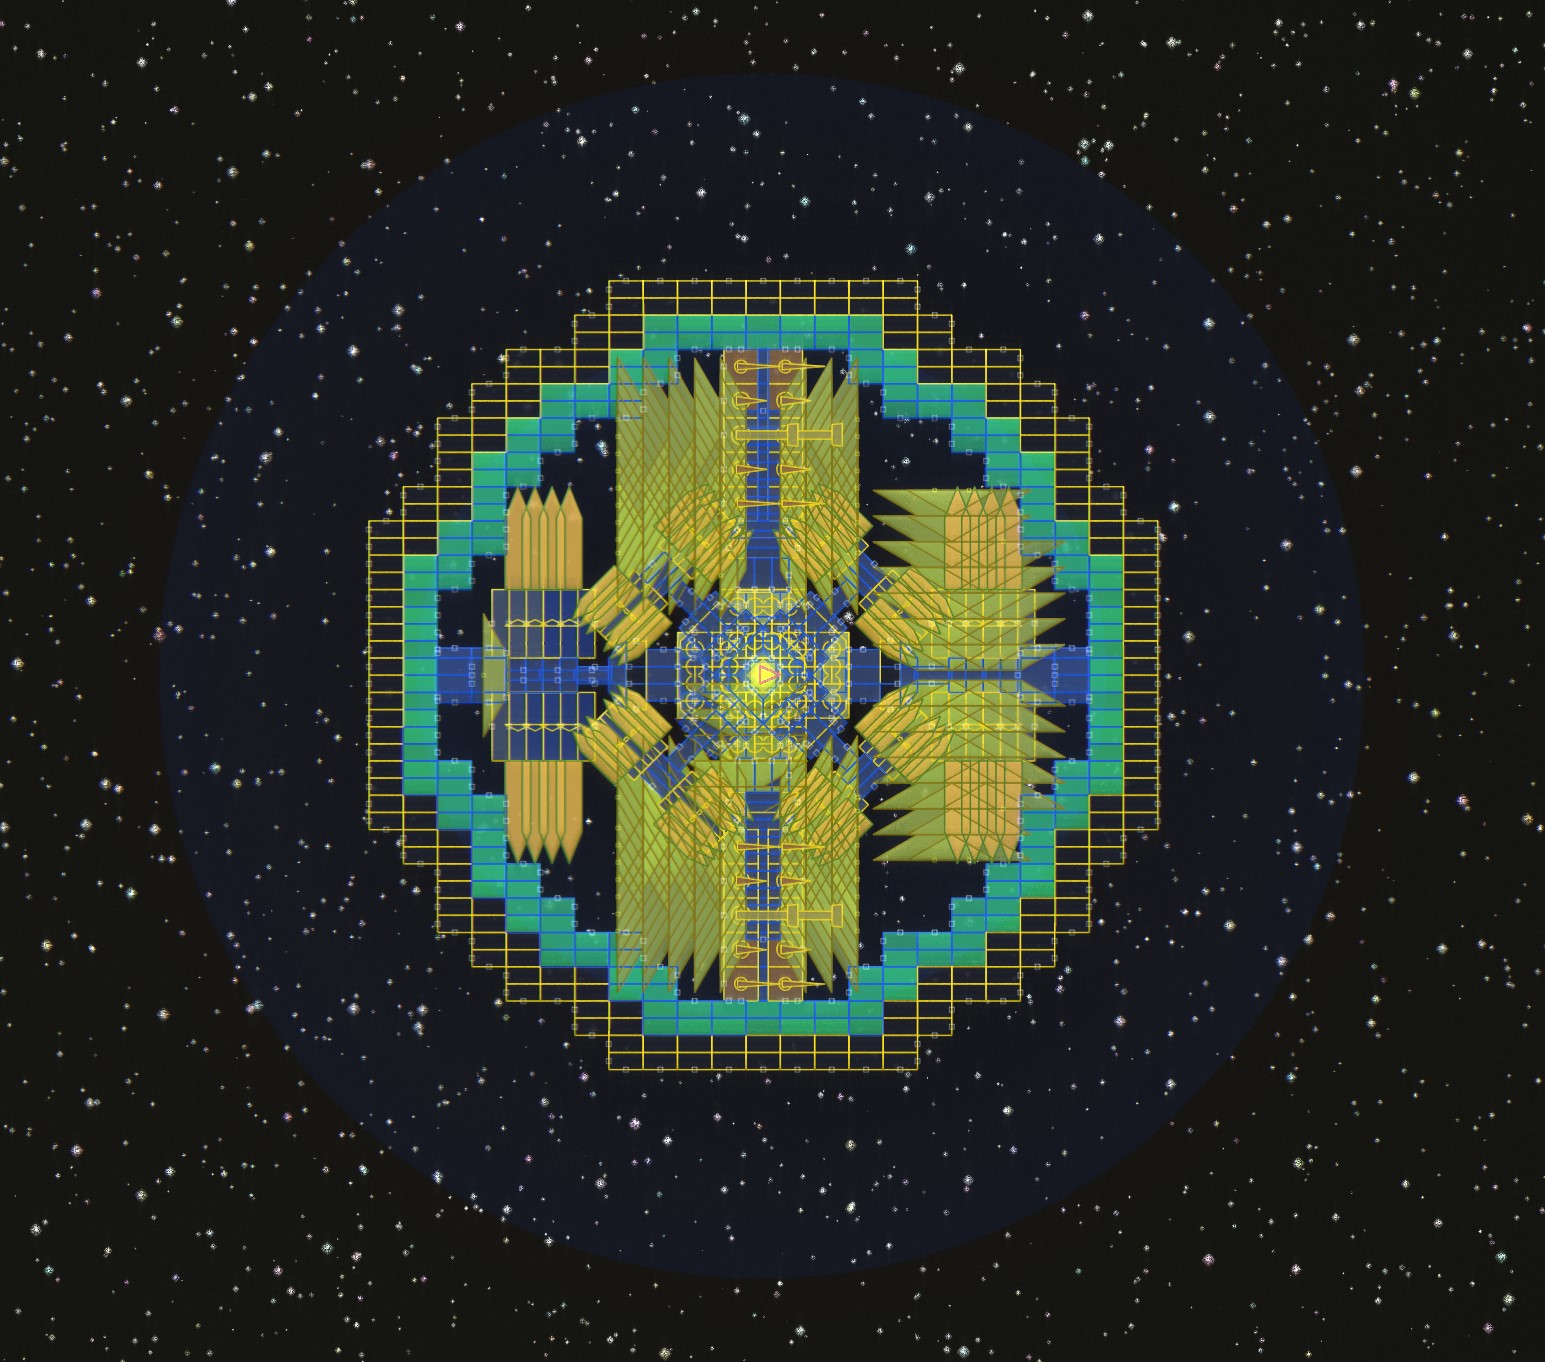
Here is an example of a passive trigger on my ship prototype for Aleks’ Main Line Tournaments (modded factions, but the concepts are the same):
- This is the primary trigger. It is the only weapon on the ship bound to primary fire. This particular weapon is a medium range weapon that I used to make the ship move in to relatively close range. The AI will think that I only have this singular weapon on my ship, and it will attempt to fight at ranges where only it is effective, despite the massive amount of weapons bound to Autofire and point defense.
- This is not the secondary trigger; these are the uncalculated weapons. It comprises a massive array of True Terran torpedoes and bombardment missiles; extremely dangerous in such a quantity. Due to their bindings, however, the AI does not consider these weapons in range calculations at all! These weapons would normally cause the ship to fight at ranges where it is less than accurate, making it less successful. By using an AI trigger, I can be assured that this ship will fight only at the range that I want it to, causing the enemy to consistently be dissolved by an array of torpedoes.
– – –
This incredibly diverse mechanism works for all ships, allowing increased control over the behavior of their AIs. Try to experiment with your bindings, fun stuff happens!
– – –
Planning, Construction, Testing, and Iteration
Reassembly tournaments require knowledge of the engineering design process in order to properly design and improve upon ships. It is also incredibly advantageous to know how to properly test against ships to improve your designs.
You need to know the rules that you are designing a ship for. Is it a 1000P tournament? 100000P? 16000P, but with only 7 ships maximum? An acceleration minimum of 400? Setting constraints significantly decreases the amount of potential ship designs you can build. Design ideas come much easier once you establish your design constraints. Someone (Adam Neely?) has said in the past that “Limitations breed creativity,” and it is the truth.
After establishing your constraints, you now need to find a potential ship design that fits those constraints. This requires some research. If you are unfamiliar with competitive design, look at ships that others have posted in the past and try to decipher what they do best. Its also a good idea to look on the Reassembly discord and see what people are doing on there, there are many tournament veterans that will be more than helpful and should answer your questions. Remember to think about what your opponents will bring to the arena and try to find designs that work best against them.
In the research stage, try to come up with two or three ideas for fleets/ships and move on to the next phase. See if you could summarize the goal of your fleet/ship ideas in a single sentence, i.e. “These distractors will take a lot of damage while the torpedo ship stays back and obliterates the distracted enemies,” or “This ship will skirmish around the enemy and help keep ships distracted for its alliance partners while still dealing significant damage,” or “this ship will fire as many nukes as possible and will have enough armor to retain enough points to keep the point lead caused by the nukes till the end of the match.”
The next phase is where the fun begins. Choose one of your ideas and start making a ship for it! You should explicitly define what the ship will do before you start building, otherwise the idea for your ship could remain unclear and the ship’s role would be less well defined, which generally makes your fleet less effective. Then begin putting blocks on the core!
This is the most grueling phase of them all: take ships/fleets from past tournaments as testing targets and then pit your ship/fleet against them in tournament mode. This is the only way to find out if your ship/fleet works correctly!
Choose some fleets that you think your ship/fleet will win against, some you think you will lose against, and some that you are unsure of the outcome. This will give you a good idea of the performance of your fleet.
Watch individual ships (instead of the entire fleet) carefully: see if your distractors are working, see if your kiters are kiting, see if your skirmishers are skirmishing, i.e. see if the specific ships part of your fleet do what you want. Ask yourself questions about your ships to find out what needs to change, if anything.
Example: If your brawlers die much more easily in a brawling match than they should, think of a way to remedy the situation.
- Could I change my armor layout to increase the ship’s survivability? what happens when my brawler contacts the other? is the front hull shape optimized for brawling? where on the ship is the armor penetrated most often?
- Does my ship have the right weapons? are any of my weapons getting outranged? Does my ship have enough damage per second? Is my ship accurate?
- Are my weapons in the right spot? are any of my weapons getting outranged? are my weapons getting destroyed frequently? could I rearrange my weapons to focus fire more effectively? did I choose the right weapons?
- Do I have an effective thrust arrangement? are any of my weapons getting outranged? does my ship face the enemy? is it difficult for my ship to turn? does my ship face its weapons towards the enemy? does my ship retreat when it should? does my ship face the wrong direction much of the time?
- Is my ship behaving correctly? What do I want my ship to do in the arena? what range should my ship be fighting at? what weapons influence the AI the most, and could I change that to make the ship fight at the correct range? Does my ship try to dodge? Do I want the ship to dodge? could I decrease its radius to make it dodge more effectively? is my thrust arrangement promoting dodging behavior? What makes my ship execute?
- Is my AI trigger working? does the primary trigger have enough influence on the ship? does the secondary trigger significantly change the behavior of the AI? is the ship able to change attacking strategies once the active trigger is tripped? Is my active trigger contacted when it should be? Is my active trigger shaped correctly?
- Most importantly, is my ship doing what I want it to do?
Act on the questions that you said no to in this section! (The set of questions varies with each ship that you make, as each ship always has a slightly different design goal. This set of questions wasn’t made for you to use, it just shows an example of a question set. Try to make your own next time you make a ship!)
Take a look at the ships in the editor or the sandbox and change what needs to be changed.
Continuing with the above brawler example, let’s say that its frontal armor section was weak and kept getting destroyed in testing. Well, the fix is to slap more armor on there! But let’s say that you can’t do that; adding more armor would push the ship below the acceleration minimum. You could add more thrusters, increasing its cost, or look for armor on the ship that isn’t commonly penetrated and put it in the front, keeping the ship’s acceleration and cost constant.
After ONE EDIT, YOU MUST TEST THE SHIP AGAIN! Testing must be done between small changes so that you can more easily see what has changed; i.e. test one variable at a time. for an example:
Lets say that you have a ship that is inaccurate and has weaker armor than you would like. To fix the inaccuracy, you could edit the thrust arrangement of your ship; to fix the armor issue, you could change its arrangement. BUT you wouldn’t change the thrust arrangement and change the armor arrangement at the same time, you would change them both individually. This allows you to see exactly what changed between ship iterations more clearly.
If you change one variable, you can see exactly what that one variable does. But if you change two, you don’t know what either of them do! Test your ship after EVERY EDIT, and you will understand the difference that each change actually made to the ship’s behavior and performance.
Once you have determined that your fleet/ship’s performance is at the best of its ability, think about it a little harder. Could you fundamentally change the construction of your fleet/ship to make it better; i.e. is it a good idea to start over? Could your fleet/ship be more effective? If the answer is yes, seriously consider starting over and repeating the process! It’s incredibly annoying to start over from the beginning, but if you can spare the time and effort to make a better fleet, give it a try.
When you are completely content with your fleet or the deadline for the tournament is in 5 minutes, then it’s time to send it in! If the tournament host confirms it, you are good to go.
Per Vanilla Faction Strengths and Weaknesses
Each section after this focuses on a single vanilla faction and shows their strengths and weaknesses.
Do some tests of your own: After all, the best way to learn to build competitive ship design is to build a lot of ships!
(all armor cost values are in terms of hp/thrust P at 156.2 acceleration)
Faction 8: The Terrans
The terrans are the starting faction, but they are also one of the most versatile and powerful factions due to their rather effective weaponry, effective armor, and their weapon diversity.
Example of one of my terran skirmishers: Gigahex I [by debris (thats me)]:
Terrans have excellent armor, at a health/P using their large thrusters of 1963.140205 h/P at 156.2 acceleration, which is rather high. Their “Asteroid relocation size” thrusters are massive outliers, giving Terran armor a health/P of 11282.78588 h/P, which is the highest in the game! (Due to their position as an outlier, Terran Asteroid thrusters are usually banned, so stick with Large size thrusters.) That is, their armor is light and strong for their thrusters compared to other factions. (terran containers have the same amount of HP/mass as terran armor, but have a larger size (i.e. less hp/volume); if you want a really big ship, use terran containers!) Because of their effective armor and diverse weapons, Terrans can be made into effective Kiters, Skirmishers, Brawlers, Spinners of any kind, or almost any other ship class.
Terrans have numerous effective weapons, but a few of them stand out above the rest (to me).
Terran missiles are incredible weapons: with a high rate of fire, respectable splash damage per missile, very long range, and effective homing capabilities, Terran missile launchers are great for any ship. Missiles help kiters stay out of range of enemy ships and can help any ship consistently apply large amounts of damage. I recommend using at least a few when making a terran ship of any class.
Terrans proton swords are specialized and deadly. These are great for rushers and for taking out ships that just got a little too close. They change the AI of your ship significantly: they can make your ship rush instead of kite. They are great weapons for rushers, able to easily and efficiently pop most kiters if they can get within firing range, and can be extremely dangerous if used correctly, but they are not great for taking out large ships due to their short range and the high DPS that such ships generally have. To prevent the AI from using them in range calculations, where proton swords generally cause your ship to charge toward the enemy recklessly, bind them to point defense or autofire.
Terran Torpedoes are one of my favorite weapons in the game. This launchable seems useless in campaign, but is actually absolutely devastating to any ship when executed correctly. Their range is huge, and each torpedo has respectable splash and deals 500 damage each. Torpedoes have a high burst damage, but fire slowly, giving them a somewhat low DPS. With a large torpedo array, your ship can cut through any type of armor almost instantly, and can do so faster than any other weapon can for the torpedo’s cost and range.
Be sure to test other weapons as well, they all have their merits!
– – –
Terrans are a perfect starting faction; they are solid in almost all categories and are incredibly dangerous when executed correctly.
– – –
Faction 2: The Farmers
Farmers are the easiest to play as in campaign, but are incredibly difficult (possibly the most difficult) to play in tournaments due to their terribly inefficient thrusters and subpar armor, coupled with mostly close range weapons. This is not to say that farmers cannot win at all.
Example of a competitive farmer ship: Joyous succumbs to the meta [by joyous18]:
Farmer Armor is shaped strangely, but is the best armor type that farmers have. At 924.12 hp/Thrust P, it is still not ideal, but it is much better than their hull (694.52 hp/Thrust P) and unobtainium (437.069 hp/thrust P). This can change at higher accelerations; unobtainium becomes more efficient due to its high hp/mass.
Farmer weapons are generally close range, but can be remarkably dangerous if used correctly.
Farmer large missiles (HM1) are interesting weapons. With the second largest splash radius of any weapon in the game (first being the banned sentinel nuclear option), they are devastating if they hit a small ship and still quite dangerous if they hit a large one.
Farmer Arkas PRP-1 lasers are quite nice. With a remarkable range and respectable DPS/cost, they make effective point defense (possibly the best point defense in the game!) that is also good at dealing significant damage to enemy ships.
Farmer heavy turrets and bolsheviks are quite dangerous if they hit, but due to their low muzzle velocity and tendency for farmer ships to die due to subpar armor at ranges where these weapons are most effective, they don’t hit as often as one would like.
Farmer brawlers generally do not work very well, but farmers make effective HM1 missile kiters, as long as the ship is designed well.
– – –
With the best point defense in the game and dangerous missiles, farmers are dangerous if executed well, but due to their crippling armor and thrusters which give them their characteristic low speed and low health, it is incredibly difficult to make a competitive farmer.
– – –
Faction 3: The Reds
Reds have weak, scale 1 armor blocks only. Using their largest scale of thrusters, the reds only have 962.276 hp/Thrust P, only ~49% the amount of HP/mass that terran hull has. Coupled with their small scales, red ships evaporate before any incoming hostile ordinance. With weak armor and a slow maximum acceleration, their best defense is their remarkable arsenal.
Example of a competitive red ship: Discrepancy [by Dukeslayer]:

Unlike most of the other factions, the Reds use the Penrose tile set (practice with it and memorize the angles, it really isn’t that much harder than base square blocks).
The trick with Red is to kill the enemy before they can get shots off; you will die when that happens! Luckily, their anti-missile laser is a great point defense laser, and the Reds have perhaps the most dangerous close range weapons in the entire game.
The Tempest is an insane weapon. It has an insane DPS/p of 22.2, compared to the largest crystal plasma condenser (an insanely dangerous weapon) which has only 6.217 DPS/p, or the terran proton sword, with only 12.9 DPS/p! When applied in bulk, the tempest can cut through anything in its path, including terran, sentinel, crystal armor, large asteroids, etc.!
The Phaser is less appreciated, but is still quite dangerous. When applied in bulk, the phaser can do significant damage to any ship due to their powerful burst damage (with added splash!) and respectable range.
Other Red weapons are not as useful. Blasters and the non-point defense lasers are not recommended.
Red Laser drones are not bad for drones, but as with all drones, there is a threshold of usefulness: too little and they don’t matter at all. If you use enough of them, however, they can be devastating for small ships with little health.
In almost all situations, do NOT use any sort of healing laser on your tournament ship. The benefits are small and the points could be better spent on more weapons. The healing drones can be useful, but only in niche applications; they can’t prevent a wall of torpedoes or plasma condenser fire from eating you or your allies’ armor away in seconds.
Rusher-like Red ships must be fast and small, or they will die before they can properly burn through the hull of the enemy! They benefit heavily from stacking.
Brawler-like Red ships benefit from size. As with all factions, the larger your ship relative to its cost, the more the enemy AI acts unpredictably.
– – –
The Reds are great if you need incredibly high DPS ships, but they will die instantly if they are so much as touched. They can burn through battleships of any stature in seconds, but can be cut in half just as fast. Design your ships accordingly!
– – –
Faction 4: The Tinkrell
The tinkrell are quite possibly the most powerful faction in the vanilla game. With incredible spinal cannons and effective drones, shields, and laser point defense, well-made tinkrell are game-breakingly dangerous, so dangerous in fact that many tournaments limit the amount of generators ships of this faction are allowed to carry on them, limiting their weapons and making them a little less ridiculous then they normally are. Tinkrell are so far from the other factions that they have their own set of ship classes that no other faction can make.
Tinkrell modular cannons are remarkably dangerous. Their recoil can be used to keep your ship out of trouble. Tinkrell guns can be even more dangerous when built correctly. Make sure your gun starts with Velocity amplifiers, then adds (the larger scale (more efficient) of) Damage amplifiers, and ends with range amplifiers with NO Rate amplifier. This makes the gun use minimal amounts of energy due to how the game calculates the energy use of modular cannons: it adds the boosts from the first amplifier to the last. By keeping the energy multipliers (velocity, damage, and rate amplifiers) at the base and the energy adders (range amplifiers) at the end, you are not needlessly multiplying more energy cost. Never use a rate amplifier; they are a multiplier that must be placed at the tip of the gun and will significantly increase the amount of energy your gun uses. Use Velocity amplifiers at the base of the gun to increase its rate of fire more efficiently.
When designing a tinkrell ship, it helps to have an extremely clearly defined design goal. Do you want the ship to fire relatively slowly from long range, dealing large amounts of damage? Add guns with less velocity amplifiers, more damage and range amps. Do you want a high recoil gun with insane burst damage that gets you out of any situation? Try more velocity amps and less range amplifiers.
Tinkrell predominantly use their guns for reverse thrust. Some ships have guns dedicated to the task! Tinkrell are so different from the other factions that none of their ships conform to the various normal ship classes!
Standard tinkrell designs have 1-4 guns: one or two for their main source of damage, and the remaining for high recoil/aiming. Take a look at this:
This is one of my competitive 3-gun Tinks. The two main guns (Guns 1 and 2 in the picture) deal most of the ship’s damage. When the ship gets too close to an enemy, however, the ship uses its central gun (gun 3 in the picture) to deal high damage with a high recoil; this gun sends the ship flying across the arena when it shoots.
Some Tinkrell ships place their guns off the center of mass, causing the ship to spin away from the enemy upon firing, spreading bullets across the arena, and sometimes increasing the range of the ship due to the greater bullet velocity. Some of the recoil from the gun goes into making the ship rotate, potentially reducing linear recoil. This type of spinning is not banned in tournaments, as it does not ridiculously increase mobility or ship effectiveness and because it is not caused by a thruster arrangement.
Some tinkrell ships place some of their guns at 45 degree angles to the ship’s forward direction. This is done to make the ship fire at angles different than just directly forward, potentially causing the ship to fire more often due to the reduction in the amount of time required to turn the guns to face the enemy.

Tinkrell normal Drones are my favorite drones in the game. With their high rate of fire, relatively high damage output, and range, they are perfect weapons for Tinkrell. They can deal significant damage even when you only have a couple launchers on your ship.
Tinkrell Rocket drones, however, are, quite simply, a waste of P. They are innacurate and are too expensive to justify their usage on tinkrell ships that would rather spend the money on the more accurate and point efficient cannon drones or point defense lasers.
Tinkrell small point defense lasers are quite remarkable. They are cheap and are quite good at taking out missiles and drones. The large lasers, although they have a longer range and higher damage, are not needed. The large lasers also have a reduced turret speed, making them worse at hitting incoming missiles.
Tinkrell have the worst armor in the game, but have the best shields. Tinkrell shields have a high enough regen and health for them to be used in place of their glass-like armor. That is, Tinkrell should use shields instead of armor for primary defense not because the shields are great, but because the faction’s armor is atrociously bad. In fact, you could say that Tinkrell should use their mobility and guns for their primary source of defense instead of armor or shields; don’t think that just because you put a lot of shields on your ship that it will be able to survive a lot of incoming fire! Because of their weak armor, Tinkrell ships fail miserably when put up against rushers.
– – –
Tinkrell are one of the most dangerous factions in the game and are certainly the most unique. They can out-kite any kiter, overpower any brawler, and destroy many skirmishers, but perhaps more so than the other factions, they take quite a bit of thought to get right.
– – –
Faction 11: The Crystalline
The crystalline are rather dangerous, with the longest range homing missiles in the game and potentially the most dangerous brawling cannon of all. Crystalline ships also have the most efficient armor in the game, at a health/cost of 2399.505 h/Thrust P; 1.22 times the efficiency of terran armor! However, their weapon diversity and overall speed is low compared to the other factions, making it difficult for them to deal with faster ship designs. Crystal also have terrible point defense.
Example of a competitive crystalline ship: Broacher [by Debris (thats me)]:
Crystalline use the Penrose block set, just like the red faction, but can scale their blocks up to scale four! Use more of the thicker rhombus than the thinner version when you can, as it has a higher health.
Crystalline ships have powerful and efficient thrusters, allowing them to push their durable armor quite effectively, making the Crystalline capable of building the largest ships with the highest mass and health in the game. However, because of the thrusters’ high mass, they have a low maximum acceleration compared to the other factions, completely ruining their chances of making effective kiters. They can make great skirmishers, brawlers, and tanks though. Because of their low maximum velocity, Crystalline ships are not great at dealing with faster ship classes, like skirmishers and kiters.
Crystalline is unique among the factions in that their command module generates no energy. Luckily, they do not need much energy to get their weapons online.
Crystalline plasma condensers are incredible weapons. They have a long range, very high damage, and respectable rate of fire. Six or so from the maximum scale can cut through blocks of armor easily, and a single condenser is still quite a dangerous weapon. Try to use the Max scale whenever you can, they have the longest range and are generally more punchy. They also fit more comfortably with the largest scale armor blocks. Condensers also have the same durability (health per unit volume) as their armor blocks, i.e. you can use plasma condensers as armor! However, due to their somewhat low bullet velocity, these weapons are generally not perfect for dealing with kiters. I don’t recommend using the scale 1 plasma condenser on your ship; they are barely useful as PD and use up points that could be going to thrusters or missiles. For maximum energy efficiency, use 2 generators per max scale plasma condenser.
Crystalline Antimatter missiles are fantastic weapons. They have a great rate of fire, a massive range, and a high damage, coupled with an energy cost of 0. These are great for any ship, and can deal sizable amounts of damage to enemies. The small scale missiles should be used more due to their greater speed and higher damage/P, but sneak in a few large scale missiles for a bit of extra splash and missile lifetime.
The plasma diffractor is the only other weapon the crystalline have, and its pretty ok when used in bulk. It doesn’t make great point defense, but it is able to take out smaller ships and heavily stacked ships that get a little too close due to its high rate of fire, respectable damage, and high splash. Using a few would not hurt, but I would rather spend the cost on extra thrusters.
Due to their restrictive but solid blockset, crystalline ships generally look similar, but are all generally pretty effective at what they do. The limitations posed by their blockset make ship design and construction simpler than other factions, making this faction (in my opinion) an excellent starting point for learning competitive design.
– – –
With Great thrusters and few but solid weapons, optimized Crystal is a sight to behold. They have some significant downsides, but due to their advantages and the simplicity of their blockset, they are my favorite faction in the vanilla game!
– – –
Faction 12: The Bees (unfinished)
This section of this guide is unfinished! please wait and I will complete it eventually.
The Bees are a specialized faction with many significant upsides: They have some of the fastest and most efficient thrusters in the game, a command module that generates 1000 energy per second, efficient close range weapons, and effective drones. However, although they have powerful close range weapons and dangerous drones, the PD subsystem and the shard launchers are somewhat lackluster in filling in the gaps. Coupled with their weak armor, their strange arsenal makes this faction difficult to build competitive ships with.
{picture}
The Bees have access to the Quantum Doom Beam, a dangerous non-turreted version of the Terran Proton Sword. These Beams are much cheaper than the Sword, and due to Bee’s high energy generation, in most situations, no extra cost needs to be spent on generators.
Quantum Doom Beams also make fantastic primary triggers for active AI triggers due to their low cost, range, and size coupled with their high damage per second.
Bee Thrusters are incredibly efficient and come in two types: Impulse and Maneuvering.
Impulse thrusters have a high thrust/cost and thrust/mass value, making them arguably the best thrusters in the game for general purpose use: they allow Bee to make the fastest ships in the game. However, for maximum acceleration, they should be paired with Maneuvering thrusters.
Maneuvering thrusters have a very low thrust/cost and thrust/mass value, making them rather weak to use as normal thrusters. However, they have an absolutely massive boost stat: they output twice their thrust for a short period of time after they are fired. This ability can be exploited to great effect: because thrusters connected end to end inherit the boost stat of the final thruster in the stack, Maneuver thrusters placed on the end of thruster stacks can be used to add a boost stat to Impulse thrusters, which can massively increase the acceleration of ships! For maximum efficiency, use a smallest scale Maneuver thruster on the end of large scale Impulse thrusters.
Other factions coming soon!
Thanks for reading the Beta version of this guide, I will complete this for the other factions momentarily (it might take a while, I’ve been busy with other things!).
Tournaments happen all the time; should you choose to send in some of your ships to one of them, everyone involved would appreciate your submission.
Many of the people on the discord can help you out if you have any issues with your ships, and tournaments are hosted pretty often; they are incredibly fun, especially when you get to watch your ships take out your opponents!
Hopefully this guide has shown you that there is much more to Reassembly than just playing the campain mode; the Tournament scene will introduce you to a whole other dimension of the game!