Overview
An introductory guide to the ships of Naval Action sorted according to recommended rank followed by a series of charts illustrating the differences between them. Aimed chiefly for newer players wanting to understand the differences between various similar vessels and identifying suitable commands for themselves.
Timestamp
Last updated: 2016-06-21 (patch 9.84)
(Although graphs still show values for patch 9.82 – minor errors only in armour thickness of larger ships as well as speed changes to Trincomalee and Rattlesnake (negative) and Belle Poule (positive) – will be updated in the near(ish) future)
Introduction
Ahoy there, fellow Captains! I’m Captain Collister and am here to provide you with an overview of the ships available to you in the Caribbean. I’ve been playing around with Naval Action off and on since Early Access. Having finally got into the game in a big way now with the release on Steam, I’ve been spending a lot of time trying to understand what sort of ships are available to players in Naval Action, and comparing their various specifications, as far as possible.
With this aim, I have captured and constructed many vessels and documented their statistics in an attempt to understand the inherent characteristics of each ship and the effect of various traits on them. Hopefully this guide will be useful for some of you out there trying to decide which ship to go for. I’m aiming this guide mostly at beginner or casual players – I figure most of us old sea dogs that are veterans to the game already have a pretty good grasp of which ships to work towards.
The guide is structured following rank progression. Each section below covers one rank – I’ve given the British rank name as that’s what I see – but the crew number in parentheses after each rank should indicate the equivalent rank for the different Nations. Bear in mind that you can always take any vessel, no matter your crew size, but you will suffer penalties to e.g. reload times, sail operations, etc., if your ships are undercrewed. So for beginners – I recommend sticking to ships fully crewable by Captains of your rank. As I’m still working my way up the Navy List myself, I’ll be continually adding to this list as I nail down more and more numbers for the different ships! Also, as the game is still being developed – bear in mind that numbers may be tweaked – so please let me know if anything herein gets outdated!
Before getting into the ships though, there’s a brief section outlining some information necessary to understand the comparisons and an overview over the rank progression in the game.
Enjoy!
Key & Explanation
This guide is going to compare statistics for the various ships. So here’s an outline of what the different characteristics relate to and how they affect your gameplay.
BR
BR is the abbreviation of Battle Rating. It is used in game to determine the relative strengths of different ships and fleets and controls some mechanics relating to combat balancing, etc. Basically, the bigger the number, the more dangerous the vessel.
Crew
How many folks you have aboard. The greater the crew, the more dangerous you are in boarding other ships. Also, if you are considering sailing a ship which requires more crew than you currently have available (your rank determines your max crew), bear in mind that the % of this number that you lack translates into a % penalty to stuff like reload time, sailing operation time, and so on.
Max Speed
This one is pretty evident. It’s how fast your ship goes measured in knots! Bear in mind, however, that this is a kind of theoretical number, as it is affected by your point of sail (see below).
Turn Rate
Again, pretty obvious – how fast you can turn in your vessel. Your turning speed is also affected by other factors, such as the speed at which you are traveling and proportion of your crew allocated to sailing duties, so bear that in mind also!
Sailing Crew (Sa)
This is the number of men needed to sail the ship. Important for slightly more advanced Captains considering undercrewing a ship, or considering the crew management of guns.
Sailing Profile


Structure (Str.)
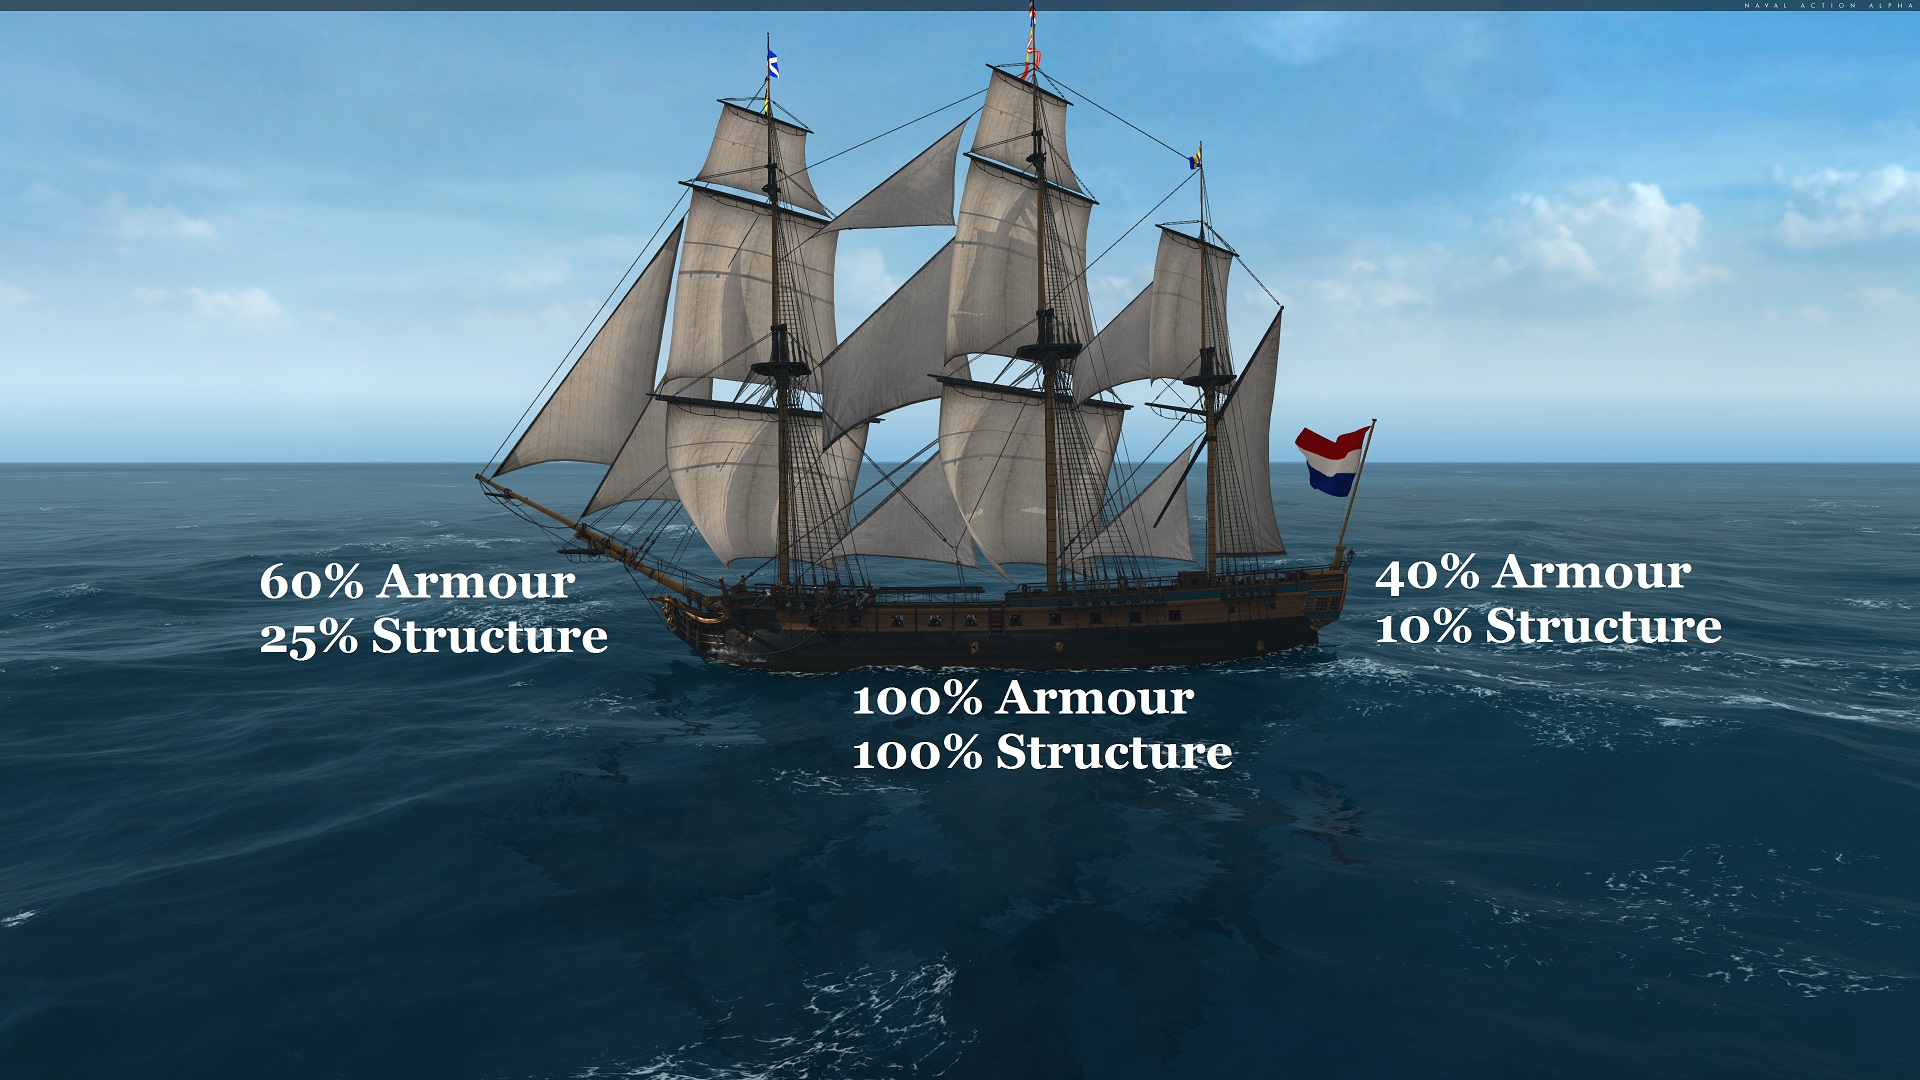
The structure of ships measures how much beating they can take before they start springing leaks and sinking. It is divided into three sections; bow (front), sides and stern (back). Bow structure is by default 25% of that of the sides and stern structure is 10% of the structure of the sides. For this reason, I will simply give the structure value for the sides of the ship in the guide below. This will illustrate the relative strengths of the ships’ hulls.
Worth mentioning here is that ships have other characteristics that affect how much damage they receive. Armour is a hidden value that measures whether shots penetrate the hull or not. As this is not given or measurable by the player, I can’t include this value, but in general – larger ships have higher armour values, presumably. Also, the angle of shot hitting your ship will determine whether it damages, penetrates or just bounces off. This is also not really a measurable value.
Armour (A)
The armour value of ships is expressed as a thickness in cm. The thicker the armour, the less likely a shot will penetrate your hull causing you damage to your structure. The larger ships have very thick armour meaning that smaller guns, or guns fired from long range, will cause little damage. Bigger guns have higher penetration values, which are required to damage thick armour.
The armour, like structure, is strongest on the sides of the ships, weakest at the stern and in between at the bow. The value given in this guide is for the armour value for the sides of the ships. The bow is by default 60% of this and the stern is 40%.
Masts (M)
Masts also have an armour value, given in thickness in cm. This functions in the same way as the armour of the hull of the ship, preventing damage from being taken at long range or from smaller guns. The thicker the masts, the more resistant they are to damage.
Sails
How tough your sails are – important if you want to avoid being stopped in your tracks by chain shot – is given in-game as the Sails value. Sail health is by default the same value as the structure of the sides of the ship. For this reason, I won’t include it in in the guide, but just bear in mind that sails strength = the value given for structure.
Repair Cost
As far as I can tell, all ships can carry 25 +/- 5 repair kits. So some ships will be constructed that can have 30 and others that can have 20, and everything in between. Their cost is also seemingly random within certain intervals. Previously I have included a rough estimate of this cost in the guide, but due to restraints on table size these are now omitted. You should be able to see the repair kit cost when mousing over ships.
Key & Explanation Cont.
Seeing as this is a key characteristic of ships and a central part of the game, I’ll be super clear here. I have calculated the maximum damage per broadside capable by each ship when equipped with the heaviest possible loadout of each kind of gun possible. So this means either all medium cannons, long cannons or carronades in each slot. In the largest ships, carronades can not be equipped in the lower decks, and in these instances the value given for their damage per broadside with carronades has medium cannons in these lower decks instead.
There are a number of subtleties at play when it comes to the guns of Naval Action. Beyond the obvious factors such as shot weight and range, guns are also affected by hidden values such as penetration and gun crew size, or complex values such as DPS. For a detailed look at the guns of Naval Action, have a look at my gun guide!
Here is a brief overview of the relative strengths and weaknesses of the guns:
The penetration of guns decreases with range. Medium Cannons and Carronades have similar penetration at close range but Carronades quickly lose penetration with range. Medium Cannons retain penetration better with range. Long Cannons have the highest penetration values at close range and they also stay higher than Medium Cannons as range increases.
Damage: [C], [M] and [L]
Damage is given as explained above as the maximum broadside damage when outfitted with a certain type of gun. [C] gives the broadside damage when the heaviest carronades are fitted into each broadside slot, [M] is the damage with the heaviest medium cannons and [L] is for the heaviest long cannons. Bear in mind that equipping your ship for maximum damage per broadside tends to actually lower your DPS, due to the increase in reload times for the larger guns. This isn’t necessarily a bad thing, but if you’re fighting the AI and tend to always have a firing solution – sometimes DPS is more important to consider. In any case, for further discussion on guns – have a look at my gun guide linked above. Maximum potential damage output with a given gun type is still a useful indicator of how powerful is a vessel’s armament.
Deck Setup and Total Guns (DS and TG)
I have included upon request the number of guns per deck (per broadside!), starting with the lowest (heaviest) and working upwards. These are given under Deck Setup and are comma separated. I have also included under Total Guns the total number of guns for a ship (again, per broadside).
Bow Chasers (BC) and Stern Chasers (SC)
I haven’t included damage calculations for bow and stern chasers (guns that fire from the front and back of your ship, respectively). They are used more in chases to slow your target or pursuer. Instead, I’m just including in the guide the number of chasers aboard each ship. Ships with bow chasers are suited for hunting down other ships and knocking away their masts or damaging their spars in a chase, while ships with stern chasers use these a deterrent when being pursued by enemy ships in a chase to do the same thing.
Slots (Sl) and Cargo (Ca)
The number of inventory slots available in a ship is referred to in-game as hold. As far as I can tell, this is always 10 for non-trader ships, but is larger for the trade vessels. In the guide this is given in the column Sl. Cargo capacity, or the weight of cargo a ship can carry, is given in-game as max weight and increases with the size of vessel, with trader ships having far higher values. In the guide, this is given in the column Ca.
Please remember that the values given below are the base values for the ships and these can be altered by wood type, built-in upgrades, permanent upgrades and regular upgrades. I’ll aim to include a section at the end of the guide describing these effects later. The underlined values represent the “best in class” values, essentially highlighting the ship(s) that offer the best value in this characteristic.
Ranks
Starting your career as a lowly Midshipman, Jonker, Thief, etc., you have only a selection of four ships available that you can fully crew. Two of them are trading ships and one is the backer reward of the Yacht! So basically, you’re probably stuck with the Cutter. There is a logic in the progression through ranks in the game, however. Historically sailing warships were rated according to a rating system involving the number of gundecks a ship possessed. In the game, there is also a system although the ratings do not correspond to the putative historical rating of said ships. Or at least, not within any one system.
Vessels with fewer than three masts were known as unrated vessels and included ships such as Snows, Cutters and Brigs. Vessels with three masts could be Frigates, if they carried one gundeck (or sometimes two), or Ships of the Line, if they carried between two and four gundecks. Ships of the Line were used for, you guessed it, large organized line battle, whereas Frigates were typically employed with other tasks such as fleet support or ship-to-ship combats, etc. In any case, in game, the progression you will find in the ships you command will take you through three distinct stages, each represented by one of the above broad groupings. Namely:
During your first four ranks you will command nothing but unrated vessels. Snows, Cutters, Brigs and so on. Initially, these small ships are very forgiving in terms of sailing – you won’t be punished for getting trapped sailing into the wind at low speeds, nor will you have much trouble escaping engagements, and you will frequently be faster than your enemies. As you increase in rank and take on larger unrated vessels, you’ll begin to take on vessels that are slightly challenging, such as the Navy Brig, Snow and Mercury, but which remain relatively easy to sail and manoeuver. The Niagara, although technically only fully crewable at rank 5, is frequently seen captained by those at rank 4.
Reaching rank 5 rewards you with the potential to fully crew an exciting new ship; the Cerberus. Although only a small frigate – it is a frigate nontheless! Three masts, square-rigged, with a dedicated gun deck, this ship should give you your first taste of how the larger vessels in the game will feel to sail and command. Learning how to use manual sail control for turning through the wind is absolutely necessary from here on. As you progress through ranks 6 and 7, you’ll get the opportunity to sail other increasingly heavy frigates.
From rank 8 you’ll have the chance to fully crew and sail Ships of the Line. These ships are the largest vessels afloat and have sacrificed speed and manoeuverability for firepower and resilience. You’ll need to use all the sailing skills and tricks you’ve picked up along the way in order to successfully sail these beasts! Also at rank 8, you’ll be able to sail the Constitution; the super-frigate of the game. Very heavy, and uniquely armed for a frigate, the Constitution sails a lot like a 4th rate Ship of the Line. As you progress through the final two ranks, you’ll find the largest vessels in the game potentially at your command.
The ranks in game, or rather the crew limitation they place upon the player, may feel frustrating for gun-hungry Captains. But it serves the purpose of helping the player get used to the game’s mechanics and controls aboard vessels that are increasingly difficult to command. It also makes sure that new players’ periods of experimentation with aspects such as gun type selection and so on will occur with inexpensive smaller ships, rather than aboard expensive unforgiving commands.
So without further ado; let’s walk through the ranks and have a look at which ships are available at each!
Midshipman (40 crew)
* Note that Basic Cutters receive free repair kits, whereas captured or constructed Cutters do not.
** Note that the Yacht is the exception to the rule of the values being unmodified. All players receive the same yacht as it is a backer reward. This is also the reason for Yachts receiving free repair kits.
The Trader’s Lynx is a speedy little ship and is an ideal target for Captains starting off their careers. It’s unarmed and the AI ships often carry valuable cargo. If attacking AI Trader ships, bear in mind that, unlike human players trying to escape, they don’t leave the combat when their timer runs out if you are close to their ship. For this reason a good way of capturing them is sailing up alongside them in a chase and grapeshotting their crew down to 1, at which point they will surrender. The AI in this ship will try and escape by sailing at a beam reach, i.e. point 90. If you find yourself attacked aboard this unarmed vessel, an escape route on point 45 (sailing close to the wind) is often advisable, as the Trader’s Lynx can outrun most other ship types on this point.
Like the Trader’s Lynx, this ship is a good target for Captains starting their careers. They are also unarmed and at times carry valuable cargo. Similarly to above, the AI Trader’s Cutters will not leave combat when their timer runs out if you are near them. For this reason, sailing alongside and grapeshotting down their crew is a fine tactic for capturing them. Compared to the Trader’s Lynx, the Trader’s Cutter is easier to take by boarding due to its inferior sailing characteristics. Sailing alongside and chainshotting away their sails for a while before turning their noses into the wind generally yields a favourable boarding situation. The AI in this ship will also attempt to escape on point 90.
Midshipman (40 crew) Cont.
The Cutter is the starting ship with which all Captains soon become acquainted. Right off the bat, the choice of gun type will dictate your style of combat, or rather, your style of combat should dictate your choice of guns. Take some time to try out the different guns and find the ones you like. If you find yourself always yard-arm-to-yard-arm with the enemy (rubbing sides), then carronades are what you’re after. If you find you are often engaging the enemy from long range, then go for long guns. And if you like mixing it up or would like to be able to do so, then medium cannons are what you’re looking for. In any case, the Cutter is a strong sailer and can usually escape danger when outgunned by sailing on point 45. Remember that you can always purchase a free Basic Cutter from friendly ports that will also have free repair kits!

The Yacht is a ship awarded to alpha testers. Very similar to the Cutter, the Yacht is slightly faster on a beam reach (around point 90) but does slightly less well sailing on other points – in general though, there is very little difference in their handling. Like the Cutter, you should use the Yacht to get used to the game and identify your play style; do you like long range combat, close range, demasting and boarding, etc.? As with the Basic Cutter, make good use of those free repairs kits!

Ensign (60 crew)
The Trader’s Brig is a slow merchant vessel armed with only two stern chasers. Although as robust as the regular Brig, the Trader’s Brig is far slower, has a much smaller crew and as mentioned has no guns other than stern chasers. A prime AI target for Captains, these ships carry cargo that can sometimes be very valuable (e.g. Compass Wood). Like the other merchant ships, when commanded by the AI, they will not leave the combat when trying to escape so long as you remain near their ship. For this reason, sailing alongside and either graping their crew away, or chaining away their sails and pushing their nose into the wind so as to board them are both viable strategies for capturing them. If you are a human player jumped while sailing this ship, you are basically screwed. Set the helm to point 135-150, focus on sailing, and hope that your enemy is either brutally slow or makes a huge error and allows you to escape.

The Lynx is an small but speedy ship. Sailing close-hauled at point 45, there are very few ships that will catch it. However, the small size means that the crew is limited to 50 and that the broadsides carry only 4 guns making it less armed than even the Cutter. This ship is ideal for the role of hunting down and “tagging” enemy ships (ideally ambushing such that they sail close-hauled to catch the opponent), preventing them from leaving combat, but are not the most suited in this class for sustained combat due to her low damage output. They are also perfect for quickly catching up with and capturing AI trading vessels and so can be good money-earners early on. Against human players, however, they function best in the specific role of harrassing other ships as part of a group of ships rather than engaging in lengthy combats itself.

Ensign (60 crew) Cont.
The Privateer is an interesting ship. Although seemingly very similar to the Pickle and Cutter, it has its own strengths and weaknesses. First of all, it is damned fast sailing close-hauled (point 45), but not quite so fast sailing on a beam reach (point 90). This means that it is excellent at quickly closing down on vessels that are not as fast at point 45, or indeed escaping from them, but also means that you may not be able to catch all you would think you could for a ship with such a high base speed value when sailing on other points. Guns-wise, the Privateer carries the same cannons, medium and long, as other ships her size and class. However, she can carry larger carronades. This makes for an interesting trade-off where the increase in damage is actually countered by the increase in reload time, meaning that although capable of a slightly (~15%) more powerful broadside, it actually has a lower DPS than the ships carrying six smaller carronades. Of course, you can always equip her with less than maximally sized carronades, but this remains an interesting option. Particularly given her speed which means that “booming and zooming”, i.e. closing, firing two broadsides, disengaging, and repeating, is a viable tactic. What’s more, the crew of 60 makes her the most ideal combat vessel for boarding at this rank.
The Pickle is an interesting ship. Although very similar ship to the Cutter in terms of armament, she differs significantly in her sailing profile. With the same guns as the Yacht and Cutter, her damage output remains the same, but she still sees an increase in structure, crew size and sails compared to her smaller counterpart. What’s more, the increased crew size means that with the same guns, the Pickle will have a smaller proportion of her crew dedicated to gunning, which frees them up for other operations aboard the ship. Finally, the Pickle actually has a slight increase also to the thickness of her armour making her stand out still more during the early stages of a Captain’s career.
Second Lieutenant (120 crew)
*The Mortar Brig carries two 308 pound mortars specially mounted amidships.
The Trader’s Snow is capable of carrying 3200 weight units of cargo. It is also an ungodly slow whale of a ship. If you are intercepted sailing one of these, you are most likely toast. However, this also means that if you can intercept an AI sailing one of these, you’re looking to take it quite easily. Again, as with the other AI ships, they will not leave the combat even if their timer runs out as long as you are near their ship. With the Trader’s Snow, it’s not difficult to get close! Demasting them and pushing their nose into the wind and then boarding is probably the fastest way of taking possession of them. Very little damage is required in order to reduce their speed to below 3 knots when pushing them into the wind prior to boarding. Alternatively, their crew can be graped away, although bear in mind that the Trader’s Snow actually carries a few guns on either side and so may grape you back.
The Brig is a difficult ship to master. It apparently focuses on resilience and speed over firepower, although the resilience is certainly more apparent than the speed. It is naturally frequently compared to the Snow (below) and represents the choice for those Captains who value health over damage. Unfortunately, an overwhelming majority of players opt for the Snow, simply because it so heavily outguns the Brig (11 guns per broadside to the Brig’s 8, and both stern and bow chasers to the Brig’s only stern chasers). To focus on the positives however; beyond the far more resilient structure, there is some benefit to be had in sailing a Brig rather than a Snow when it comes to sailing skills. The Brig handles much like the larger square-rigged vessels, and although that is not a great thing in itself, the benefit comes from it still being sufficiently forgiving for it to act as a practice ship for Captains new to square-rigged ships.
Second Lieutenant (120 crew) Cont.
Where the Brig focuses on resilience and speed, the Snow focuses on guns. The Snow is often the first ship in which Captains find themselves commanding two gundecks. This means that the potential for varying ammunition used is realised and that a more steady rate of fire can be maintained. The Snow also carries both bow and stern chasers, making it dangerous from all angles and capable of both chasing enemy ships as well as deterring pursuers. The damage output of the Snow actually remains unbeaten all the way until the Renommee (available at Master and Commander, three promotions away!), excepting the Niagara or Cerberus outfitted with carronades. So for the Captain who makes good use of their broadsides, the Snow is a very formidable ship to command. However, don’t get over-confident, as the very weak structural integrity of the Snow doesn’t scale as well as its damage does!
The Rattlesnake is a lightning fast sloop of war built for intercepting enemy ships. Currently the fastest ship in the game on her best point, she will frequently outsail even the Renommee. Her speed, together with her two bow chasers make her quite simply the best ship for chasing, catching and “tagging” enemy ships. Despite her bow chasers being limited to 4 pounders, they are still sufficient to damage fleeing enemy’s sail and rigging and keep them in combat.
Her gun deck carries nine 6 pounder cannons per side or 18 pound carronades. This puts her damage output on par with the Navy Brig (available next rank and discussed below). Her armour is similar to most other unrated vessels but her structure almost rivals the Mercury, making her the second toughest unrated vessel in the game.
All things considered, including her sailing profile displayed below, the Rattlesnake is an immensely powerful ship ideal for hunting down and forcing enemy ships into combat. Her high speed also allows her to escape from essentially any engagement barring any damage incurred to sails and rigging. Her high structural integrity and decent armour also mean that she can hold her own against most ships her class. The Rattlesnake is a very solid choice for Captains of this rank as she has several remarkable strengths and no apparent weaknesses.
Second Lieutenant (120 crew) Cont.
The Mortar Brig is one of the most unique ships in the game. Featuring a reduced battery of cannons or carronades compared to the regular Brig, she makes up for this loss by fitting two specially fitted 308 pound mortars amidships. These weapons are devastatingly powerful but notoriously difficult to operate.
Unfortunately further tradeoffs for the inclusion of these massive weapons are a severly decreased speed rendering her the slowest vessel in the game as well as hugely decreased turning rate. The Mortar Brig is quite simply a regular Brig with some guns removed to make space for the oversized mortars.
They are most frequently seen in large fleet engagements where they aim to disrupt enemy formations and prevent defensive positioning. The damage output of each mortar shot is 500, broadly comparable to an entire broadside from a light frigate such as the Renommee. This means that they truly represent a real danger to lineships in large fleet engagements.

First Lieutenant (150 crew)
The Navy Brig is an upgraded version of the Brig previously mentioned in the guide. Compared to the original the Navy Brig carries an extra gun on either side, raising its damage output slightly. Furthermore it has increased structure and armour, and a larger crew. However, this comes at the expense of speed and maneuverability, as the Navy Brig performs worse in terms of top speed and turning rate compared to the nimbler original. The better structure of the Navy Brig actually brings almost on par with the Cerberus in terms of resilience, and for this reason should not be underestimated in combat. Furthermore, the Navy Brig has the highest armour thickness of all unrated vessels meaning it will be able to resist more shots than the other vessels in her class.
The Mercury is also a brig, though a larger one than the other two previously covered in this guide. The Mercury has a higher damage output than the Navy Brig as well as higher structure. The step up in damage from the Navy Brig is modest only with regards to medium and long cannons. On account of being able to carry larger carronades, the Mercury is capable of firing much (33%) more damaging broadsides than the Navy Brig. However, due to the increased reload times of the larger carronades, this translates into a still impressive, albeit less so, 10% increase in DPS. In most respects (speed, turning, crew, firepower), the Mercury outperforms the Navy Brig, with the exceptions of her lacking stern chasers and having slightly weaker armour.

Lieutenant Commander (200 crew)
The Niagara is and odd ship to become available at Lieutenant Commander, as it competes at this rank with the Cerberus; the first Frigate Captains get their hands on. Of course, with only a roughly 3% crew reduction penalty, the Niagara can also be commanded by First Lieutenants, one rank earlier. It is included at this rank in this guide because it is here that it becomes fully crewable.
The Niagara handles similarly to the other brigs with which Captains may have become acquainted so far. It is almost as fast as the Brig downwind but faster than the Mercury and Navy Brig. Surprisingly, the Niagara, despite being the largest brig, is also the weakest, and has the lowest structure and armour. However, it seeks to balance this with powerful weaponry. Although she carries maximally the same medium and long cannons as the Mercury, the Niagara alone of all the unrated vessels can carry 32lb carronades. This is the loadout at which the Niagara performs best above her class. With the highest damage output of all the unrated vessels when fitted with carronades, the Niagara is truly lethal at close range.
Her low structure and armour make here somewhat of a glass cannon, however, and Captains ought take care not to overextend in combat, getting trapped near heavier vessels.
The other new ship fully crewable by a Lieutenant Commander is the Cerberus; the first Frigate available. It is a light frigate with thirteen guns a side. As a frigate, it is a big step up in armour thickness compared to the previous vessels discussed in the guide. Her significantly thicker hull and masts make her a tougher target than the unrated vessels, especially when engaged by ships with smaller guns or from long range.
The Cerberus is also a big step up in firepower compared to the other vessels mentioned so far in this guide. The damage per broadside is almost 30% stronger with the Cerberus than the Snow when fitted with medium and long cannons. Although it is worth remembering that the added reload time actually brings the DPS of the big guns on the Cerberus below that of the Snow. However, with their high raw damage output, and greater penetration, these guns should rightly be considered more lethal than those aboard the Snow.
With carronades, the Cerberus lethality is a different story entirely. The modest increase of 0.5 DPS pales in comparison to the enormous (~80%) increase in raw damage per broadside. The Cerberus is for this reason suited ideally to close range combat insofar as damage is concerned. Captains will remember the first time they land a full broadside of 32lb carronades into ships with which they used to struggle – the destructive power of these guns compared to those used aboard earlier ships in this guide is truly remarkable.
However, despite still being relatively fast compared to the smaller vessels mentioned so far, the Cerberus suffers from limited maneuverability and so can be vulnerable to the more maneuverable brigs, such as the Brig and Mercury, and the Snow. Yet it is still worth noting the significant increase in structure of the Cerberus compared to these ships.
For this reason, there are two logical doctrines as to how best to play to its strengths and mitigate its weaknesses: The first is by equipping her with heavy carronades – then the Cerberus focuses on making maximum impact with her lethal damage output by sailing close to the enemy and engaging directly. Alternatively, the Cerberus may be outfitted with long guns – then she may remain at distance to her target and rely on slow steady deliberate fire to wear down her opponent while playing to the strength of her own superior structure.
Master and Commander (250 crew)
The Gros Ventre is the currently second largest merchant ship afloat, capable of carrying a cargo of 4800 units. She is a decently armed merchant carrying a decent broadside identical to that of a Niagara. She is more resilient than she would seem with a structural integrity closer to a Belle Poule than her counterparts available at this rank.
However, do not hope to deter many attackers with this ship, as she is still slow and will not hold up well against the dedicated fighting ships of the game. Arguably her greatest strength is her potential for preying on the smaller less- (or un-) armed trader ships. With her spacious hold, you will not need to return to port after each capture and a string of prizes and their cargo can be collected.

The Renommee is one of the two light frigates that become available to fully crew to Captains reaching the rank of Master and Commander. Captains sailing both the Renommee and the Surprise (below) undercrewed at the preceeding rank of Lieutenant Commander are often seen in-game, but it is at this rank that a full complement is available.
The Renommee is damned fast ship having the currently second highest maximum default speed in the game. This makes her excellent at both intercepting and chasing down enemy ships as well as disengaging from combat and sailing clean away from pursuers. Although she is armed with stern chasers for the latter, her unfortunate lack of bow chasers renders her less than optimal for the former. These characteristics, coupled with her high turning rate (which is infact higher than that of the Cerberus) mean she performs the same role of the Surprise (that of a light frigate hunting down slower ships) in a very different way.
Being incredibly fast, very manoeuvarable and surprisingly strong structure-wise, comes partly at the expense of a slight decrease to armour thickness, but chiefly at the expense of her armament. Beyond the lack of bow chasers, the Renommee also packs a considerably lesser punch than the Surprise. Despite her guns not being smaller, they are fewer and the four gun difference between her and the Surprise, although not sounding like much, truly tells in combat. For this reason, the natural position of a Renommee (outside of PvE) is at range armed with long cannons. Her speed and agility will allow her to manoeuver closely to her considerably slower and bulkier foes, but it is wiser to use this speed and agility to manoeuver in such a manner as to deny the enemy firing opportunities from a more removed position than immediately broadside-to-broadside.
Master and Commander (250 crew) Cont.
Where the Renommee focuses on speed and manoeuverability, the Surprise focuses on firepower and a sailing profile that lives up to her name. As a light frigate, the Surprise often engages in chases and has been optimally outfitted for this role. Her two bow chasers are ideal for slowing down fleeing enemies, while her four stern chasers serve to discourage or slow pursuers when the Surprise herself must flee. Armament-wise, the Surprise outguns her competitor at this rank; the Renommee and thus the Surprise is a more suitable candidate for the Captain interested in equipping carronades on a light frigate. Trading broadsides with any other ship at this rank or below will yield a favourable outcome and in fact her broadside damage when armed with carronades trumps that of the Frigate, Pirate Frigate, Belle Poule and Essex when they are armed with medium or long cannons.
However, the chief reason for the Surprise being more suited to carronades is the presence of her bow chasers. While the Renommee will rely on closing on the enemy before turning to unleash broadsides to keep them in the fight, the Surprise can continually chip away at a retreating opponent’s sails with bow-mounted long guns and save her broadsides for close quarters combat. However, a wise opponent will turn to engage with broadsides before losing too much of their manoeuverability, and in such circumstances it is preferable for the Surprise to be equipped with guns over carronades.
The trend of moving towards cannons (medium or long) in PvP as you begin to sail the larger frigates is an important one to observe, as you will begin to more and more be outclassed by skilled Captains armed with cannons who are able to deny you a response with your shorter carronades should you insist on continuing to use them. Carronades still have their place in specific scenarios (such as the chase described above), but should not be used by Captains cruising alone. Assuming equal skill of Captains, a frigate armed with long cannons will defeat one armed with carronades simply because of their range and the ability to deny return fire.
This holds true for PvP of course, yet for PvE carronades are still the go to weaponry for the Surprise as you will be sailing broadside to broadside with the enemy and need high damage and DPS.
Post Captain (350 crew)
The Frigate is a ship that is hard to love, which is reflected in her frequently low price on the markets (which at least make it relatively easy to get hold of one). Although a fine step up in terms of firepower from previous ships, she is still broadly comparable to the Surprise in terms of damage output. However, she is a bulky whale of a ship that does not forgive much in terms of sailing. While the Surprise impresses sailing close-hauled or on a beam reach, the Frigate loses speed quickly when sailing upwind and gives up completely around point 15. Coupled with her low top speed, this makes her an unappealing ship for those interested in manoeuverability. What’s more, her structural integrity is only moderately higher than those of the Surprise and Renommee. All in all, the Frigate unfortunately becomes the poor Post Captain’s frigate, and is often (rightly) shunned in favour of the Belle Poule, Essex or Trincomalee. Captains ought be aware, however, that her modest increase in structure compared to the earlier ships conceals a sizeable increase in armour rating. You will note that many more shots will be unable to penetrate the armour of the Frigate compared to the Surprise, for instance.
When using the Frigate in PvE, carronades, as always, are a safe way to go. You will mostly be sailing broadside to broadside exchanging fire and for this carronades are ideal. However, in combat against other players, arming a Frigate with carronades severely risks the very likely outcome of not being able to sail quickly enough, or manoeuver efficiently enough, to attain a steady rate of fire and a continuous firing solution on your opponent. For this reason, as with all large frigates, cannons are recommended over carronades for PvP purposes! My advice is: if you are PvPing with the Frigate, use cannons or you are going to have a bad time – no one wants to be continually out of their guns’ range to their opponent, yet inside the range of the opponent’s guns!
The Pirate Frigate is a variant of the Frigate which allows for heavier cannons and a larger crew to be brought aboard. Its structure is very slightly lower than the regular Frigate. Otherwise, in terms of speed, turning, etc., she remains identical to the Frigate. These ships are not created by players through crafting but are instead available from NPCs in pirate-controlled ports.

Post Captain (350 crew) Cont.
The Belle Poule is a ship that is very similar to the Frigate but with a slight change in emphasis. Both are 38 gun frigates with similar poor sailing capabilities relative the markedly nimbler light frigates; the Cerberus, Renommee and Surprise. However, a few subtle differences sets the Belle Poule apart from the Frigate.
The Belle Poule is fractionally faster sailing but notably slower at turning than the Frigate, yet her armour is stronger. This makes her a “tankier” ship. Her armament is, however, slightly inferior to the Frigates when equipped with cannons (mediums or longs) – when outfitted with carronades, she will perform on par with the Frigate, however. Also, instead of mounting two bow chasers, she carries two chasers astern, making her more adapted to deter pursuers than herself chase down her enemies. So overall, these changes (higher armour at the expense of firepower and stern chasers instead of bow chasers) render her a defensive ship to contrast with the more offensive Frigate.
The Essex occupies an odd niche in Naval Action. She is something in between a heavy and medium frigate. Her structure is slightly lower than the Trincomalee but slightly higher than the Belle Poule. She is about as fast as the medium frigates; the Frigate (and Pirate Frigate) and Belle Poule, and has a turning rate equivalent to the Belle Poule. So she is in this sense, a simply heavier alternative to the Frigate or Belle Poule.
However, her unique loadout is renders her a particularly unique choice of command; she carries no chasers – neither bow nor stern. This means that the Essex is very poor in a chase, both as the pursuer and the pursued. She will not be able to bring down fleeing or pursuing opponents’ sails or rigging, which means that she will be caught more often herself as well as catch enemies less often! In PvP, this lack of ability to control the engagement is a very large weakness, and it is primarily for this reason that Essexes are somewhat of a rarity on the open sea.
Her strength, however, is in her firepower. With the exception of the Trincomalee (below), the Essex is the most powerful ship in terms of broadside damage available to a Captain at this rank. A Carronade loadout sees only a slight damage increase compared to e.g. the Frigate, but her Cannon loadouts strongly outperform the other ships (again, except the Trincomalee). She carries 18-pounders on her lower deck, much like the Frigate and Belle Poule, but her upper deck loads 12-pounders, which are twice the size of the 6-pounders equipped on the Frigate and Belle Poule. This is what yields her significantly higher damage output than most of her rivals at this rank.
In many ways then, the Essex is a an odd frigate – suited for linefights more than chases. This makes her good in situations of organized combat such as PvE or large PvP engagements, but poor on her own. In large battles where she can offer and receive support from a group of ships, her high structure and firepower will perform well. On her own, however, she is unlikely to be able to escape danger or catch enemies.

Post Captain (350 crew) Cont.
The Trincomalee is regarded by many as the strongest frigate in the game, and it is easy to see why – with firepower almost rivaling that of the super heavy Constitution frigate, she dominates essentially all engagements against other ships smaller than ships of the line. In particular, the ability to carry 32 pound carronades on both of her decks means that she can pour out enormous amounts of damage in PvE engagements. As always, of course, carronades are absolutely not recommended for PvP – simply because of the great risk of being outmaneuvered or outsailed and destroyed when out of range of the enemy.
Sailing-wise, the Trincomalee is not as strong as commonly considered. While it is true that her top speed exceeds those of the other frigates, barring the light Cerberus and lightning-fast Renommee, her sailing qualities leave much to be desired and often negatively surprise Captains who have rushed to attain a Trincomalee. She has a very narrow preference for point of sail and will quickly lose speed when leaving this. Beyond this, she is much slower upwind than other frigates available at this rank. Notably, despite her higher maximum speed, she will be outsailed by essentially all other frigates available at this rank when sailing closer to the wind than point 90. So what modest advantage in speed she possesses is only really noticable when sailing on a broad reach.
The other important factor to note about the Trincomalee is her heel. Of all the ships available to Captains so far, the Trincomalee heels by far the most. She often struggles to find firing solutions in close quarters on account of this, and even long range combat becomes troublesome. This can of course be mitigated with frequent use of lowering speeds either by decreasing or depowering sails, but note that these skills become completely necessary aboard the Trincomalee. Tacking is, of course, not a pleasurable experience, but any Captain sufficiently seasoned to find themselves the rank of Post Captain should have learned how to use manual sails when tacking, but again note that this skill is now a definite requirement in order to sail the Trincomalee. To top off her list of sailing issues, she has a significantly slower turn rate than the other frigates available at this rank.
With her troublesome sailing qualities out of the way, it’s only fair to also focus on her positives. Her four bow chasers are what makes her a favourite choice for PvPers – combined with her top speed (on a broad reach) they allow Trincomalees to catch most large ships by taking down opponents’ sails while in pursuit. The step up in weaponry compared to other ships available to Post Captains is so strong that a Trincomalee armed with a broadside of long cannons will still do more damage per broadside than any of the other ships armed with carronades. Her structure is also best of the frigates available at this rank. Furthermore, her armour equals that of the resilient Essex and Belle Poule.
Essentially, then, the Trincomalee will be the hands-down the favoured ship in engagements with any other ship smaller than a Constitution. The only real weakness is her being outmaneuvered on account of her troublesome sailing qualities (or lack thereof). A skilled Captain will of course mitigate these issues, but note that this represents a challenge and should therefore be carefully considered before deciding to sink money into the purchase or construction of one’s own Trincomalee. For PvE purposes, the Trincomalee is of course ideal – outfitted with maximally-sized carronades the Trincomalee actually has the highest DPS of all frigates (yes, even more than the Constitution) – so for sailing alongside the AI trading broadsides, the Trincomalee will not disappoint.

Flag Captain (650 crew)
The Indiaman is the most recent and largest trade vessel afloat in the Caribbean. Packing a whopping 50 cargo slots and an enormous cargo hold with room for 8000 units of cargo, she is the prime mover of goods available to Captains at present. Unfortunately, however, like the Gros Ventre, she is a large ship unable of sailing in shallow waters and is hence restricted to deep water ports. Note that the Indiaman has a durability of only 4 and thus can only sink four times before being lost forever.
Unlike the other trading vessels, she is decently armed with 14 guns a side. 11 of these are in her gundeck and can be up to 18 pound cannons (she cannot equip carronades). The other 3 are maximally 9 pound cannon on her topdeck (also here she cannot carry carronades). This means that in terms of damage output, she is broadly comparable to a Renommee or Surprise, i.e. a light frigate. While this in principle renders her capable of defending herself, she has a low speed and very poor turning, on par with the sluggishness of the ships of the line. This means that when chased, she will seldom outrun her pursuers, although a couple of stern chasers will aid her in any attempted escape. Her structure and armour are slightly stronger relative her guns. Here she is broadly on par with the larger medium frigates such as the Essex or Trincomalee.
The super-heavy Constitution is given in-game as a fourth rate and not as the monstrous fifth-rate frigate as which she historically served. The reason for this is simple – she’s significantly heavier, bulkier and more powerful than the other frigates and in battles functions more than any other frigate like a ship of the line. This is a good thing because at this rank she competes for the favour of Captains with the first ships of the line they can command. With a durability of 4, she can only sink four times before being lost forever.
Her structure is roughly 30% stronger than the otherwise strongest frigate (the Trincomalee) and her armour is 12.5% thicker as well. This means that she will easily take on and destroy any other frigate in ship-to-ship combat (just like she did in real life), excepting instances where a large gap in sailing skill exists. Manual tacking and skillful handling of sailing operations are of course a must for a ship of this size.
In terms of firepower, the Constitution alone of the frigates can load 24 pound cannons and 42 pound carronades, making her loadouts heavier across the board. Like the ships of the line, however, she cannot carry carronades on her lower deck, which means that Captains wanting to sail up close and personal with the enemy will need to substitute these for medium cannons.
As always, of course, this is not recommended. The Constitution is not only the heaviest and most powerful frigate; she is also the slowest. This is true in terms of top speed, turning rate and sailing qualities. The Constitution was never meant to be a speedy interceptor – she is quite simply the powerhouse of the frigates in the game.
Flag Captain (650 crew) Cont.
The Ingermanland is a 4th rate ship of the line, but a ship of the line nonetheless and for this reason the most affordable entry-level option to this new kind of ship. As Captains will have been moving from the small unrated vessels, through the lighter frigates towards heavier bulkier frigates such as the Belle Poule, Trincomalee and ultimately the Constitution, they should be ready at this rank to take on their first command of a ship of the line. It is important to note that, like the Constitution and Indiaman, the Ingermanland has a durability of 4 and not 5 like all other ships up until this point.
Ships of the line are built to function in a different manner to frigates (although the Constitution is not enormously different). They are as a rule slower, bulkier to turn and more difficult to manage in terms of rigging and sail handling. However, the benefits are massively increased crew sizes, gun loadouts, structure and armour thickness (again the Constitution is an odd exception to this rule, as she functions and behaves more like a ship of the line than the other frigates). Instead of chasing down enemies and engaging in single ship or few-ship engagements, the ships of the line are built, as their name suggest, to sail in line with one another trading continuous and coordinated fire with other lines of vessels.
The Ingermanland has two dedicated gun decks for this purpose as well as guns lining her weather deck. This means that Captains will now command for the first time three batteries per broadside. The guns are also heavier than anything previously; even the mighty Constitution cannot compete with the firepower of the ships of the line – not even the Ingermanland (which is the smallest being only a 4th rate). The Ingermanland carries 32 and 18 pound cannons on her gundecks and 6 pounders on her weatherdeck. With 31 guns a side, this creates a big jump in damage output compared to the 24 and 12 pounders of the Constitution or indeed 18 and 9 pounders of e.g. the Trincomalee. Like the Constitution, she cannot carry carronades on her gundecks and so is restricted to only potentially carrying 12 pound carronades as a substitute for the 6 pound cannons of her weather deck.
The structure of the Ingermanland is far higher than any other frigate, excluding the Constitution and her armour is slightly higher than the frigates, again excluding the Constitution with which it is equal in terms of armour.
In terms of sailing capabilities, the Ingermanland is the fastest and most maneuverable of the ships of the line – unsurprisingly as she is the smallest. However, this doesn’t say much, as she is still slower and bulkier than even the Indiaman. Her good speed for her class, however, is what has prompted the inclusion of four bow chasers and two stern chasers. In a fleet of lineships, she will be the ship tasked with running down disengaging enemies and is therefore very decently equipped for a chase. An escaping Victory, for example, will easily be caught by an Ingermanland – and unlike a frigate, the Ingermanland may even be able to hold her own for a minute or two until more of her own fleet can catch up.
In short, the Ingermanland is the smallest ship of the line, but still markedly heavier than any other ship Captains will have sailed so far. In a fleet she will function as the more maneuverable element used for auxiliary roles when heavier lineships are present or as part of the line of battle itself in the absence of far heavier lineships. In particular, her four bow chasers and good speed make her well-suited to pursuing disengaging enemy ships of the line.
The 3rd Rate is the classic 74-gun ship of the line. Historically, this was the most common type of vessel employed in the line of battle. Compared to the smaller 4th-rate Ingermanland, the 3rd Rate carries an extra six guns per side, which may not sound much but results in a powerful increase in damage output. Oddly, her largest cannons are smaller than the oversized 32 pound cannons of the Ingermanland, but overall her damage output remains higher. Like the Ingermanland, the 3rd Rate can only carry carronades on her weatherdeck. She carries two chasers on her bow and two on her stern.
In terms of structure and armour, the 3rd Rate is markedly tougher than the Ingermanland. Even the until now unparalleled Constitution is trumped by the resilience of the 3rd Rate. To pay for this significant increase in armour and structural integrity, the 3rd Rate suffers from a decreased speed compared to the Ingermanland is in fact, together with the Bellona (below), the fourth slowest vessel in the game; only the first-rates the Victory and the Santisima Trinidad and the peculiar Mortar Brig are slower. She is also slower at turning than other ship mentioned so far in this guide. As a third rate ship of the line, please note that she has a durability of only 3, meaning she can only sink three times before being lost forever, unlike 5 as with all ships prior to this rank.
These characteristics combine to make the 3rd Rate the slow and sturdy warship that she is. Her role in combat is in the line of battle resisting enemy attack and maintaining a steady rate of fire back. As a lineship, it is advisable to sail with an escort if there is risk of being engaged by smaller more nimble opponents as ships of the line of her size run the very real risk of being severely outmaneuvered and stern-camped and sunk by smaller vessels. The 3rd Rate will function at its best in a fleet or at least small squadron of ships where they can be assured of the security of their vulnerable sterns while engaging the enemy.
Flag Captain (650 crew) Cont.
The Bellona is an interesting ship and is the favourite of many Captains in the Caribbean. There is a reason this size of ship was favoured historically and this reason is reproduced in Naval Action; namely its balance between resilience, firepower, speed, maneuverability and cost. Like the other ships of the line she is certainly no easily managed ship. However, she is not as slow as the first rates and while her firepower cannot compete with the three larger ships of the line (below) her moderate cost somewhat mitigates this; losing a Bellona is less financially devastating than losing an e.g. Victory.
In particular this is because, like the 3rd Rate, the Bellona has a durability of 3, meaning she can be sunk three times before a Captain loses her forever. Compared to the Pavel (2), Victory (1) and Santisima Trinidad (1), this means that she can be used in combat more freely without fear of loss. The step up in terms of resilience and firepower with the other larger lineships comes at this cost of increased risk. This is the reason that lineships larger than the Bellona are essentially never seen other than in fleets of large numbers.
In terms of characteristics, she is essentially an improved version of her sister ship the 3rd Rate; she is an improvement on, or equal to, the 3rd Rate in every way. Her armour is very slightly thicker and her structure notably stronger. This boosts her longevity in combat. Her armament is more powerful; both of her gundecks carry a size heavier cannons than the 3rd Rate resulting in the notable inclusion of 32 pounders on her lower gundeck. This yields a small increase in damage output – both ships still carry 37 guns a side arrayed on three decks. Like her sister ship the 3rd Rate she can only carry carronades on her weatherdeck. Also, she carries two stern and two bow chasers. In terms of speed, maneuverability and sailing profile, the Bellona is identical to the 3rd Rate.
The reason she is not permanently favoured over the 3rd Rate is her higher cost of production. Bellona’s require more time and materials to produce and consequently are more highly priced in the market. All things considered and without considering cost, however, there is no reason whatsoever to favour the 3rd Rate over the Bellona at this rank. Indeed, at this rank, the Bellona offers the highest armour, structure and firepower albeit at the expense of speed and maneuverability.
As a third rate ship of the line, the Bellona’s role in combat is in a squadron or small group of ships such that its vulnerable stern is protected. Like the other ships of the line, and more so than the Ingermanland, the Bellona risks being outsailed by smaller frigates and taken down while unable to bring her powerful broadside to bear.

Commodore (800 Crew)
The Pavel is the only new ship that becomes fully crewable at this rank. As a historical 82-gun second rate ship of the line, she is a big step up from the the fourth and third rates available at the preceding rank. The major difference between the second (and first) rates and the smaller lineships is that they have three dedicated gundecks, rather than just two. This, together with the size increase, increases the amount of guns available relative the smaller ships of the line.
Her gun decks, from largest to smallest, carry the following cannon sizes; 42, 24 and 6 pounders. There are also a couple of 6 pounders aside on the quarterdeck. The 6 pound cannons can be substituted for 24 pound carronades but the lower two gundecks must load cannons. Her armament is one of the most powerful in the game.
Her structure is markedly higher than the third and fourth rates, but her armour thickness remains the same as the Bellona. This means that she will be vulnerable from similar distances to equivalent guns. However, her heavier weaponry allow for her to engage from a greater distance (42 pound cannons have great penetration values).
The Pavel is surprisingly fast for a ship of the line and is almost as quick as the Ingermanland. Despite this her turning rate is still very poor. Her decent speed (for her class) makes her choice of chasers even more odd; she carries no bow chasers and two stern chasers. This means that she is ill-suited for pursuing disengaging enemy ships. Seen from the perpective of her primary role, this makes perfect sense – the Pavel is entirely designed to serve in the line of battle exchanging fire with other great ships of the line. However, as one of the faster lineships, it is still somewhat odd that she has not been given a couple of bow chasers.
In any case, as mentioned, the Pavel is built to operate in the line of battle and can serve with the biggest and best. She will pose a real threat to any ship in the Caribbean, first-rates included, and is often a preferred alternative to commanding a first-rate, primarily due to the lower production cost and the fact that she has a durability value of 2 instead of the first-rates’ 1. This means that she can be sunk twice before disappearing forever, making her a slightly more long-term investment than the Victory or Santisima Trinidad (below).

Rear Admiral (1100 Crew)
Congratulations on your promotion to Rear Admiral (presumably!). Once you’ve come so far in Naval Action that you are considering sailing a first-rate ship of the line, you probably don’t need this guide quite as much anymore! Nevertheless, it’s still useful to consider the differences between your two options available at this rank; the Victory and the Santisima Trinidad (below).
The Victory, like the second-rate Pavel, has three dedicated gundecks. Her total gun count is increased mainly as a result of her greater size and the inclusion of a greater number of guns on her weatherdeck, rather than the 4 on the quarterdeck of the Pavel. Packing 53 guns a broadside makes the Victory the second most lethal ship in the game in terms of firepower. They are also very heavy guns; 42, 24 and 12 pounders from lowest gundeck to uppermost. Her weatherdeck carries either 12 pound cannons or 42 pound carronades and like the other large ships, this is the only place she can carry carronades. She carries four bow chasers and two stern chasers.
Obviously, not much more needs to be said about her firepower other than that it is completely enormous. Her damage output per broadside is roughly 25% higher than the Pavel, for instance. This enormous capability for destroying her enemies makes her perfectly suited for her designed role as serving in the line of battle. For this purpose she has also got the highest armour and structure in the game, making her the most difficult target to sink in the game.
All this of course predictably comes at the expense of her speed and maneuverability. Only the awkward Mortar Brig is slower than the Victory only the gigantic Santisima Trinidad (below) is slower at turning. Together with her poor sailing profile, this makes the Victory tremendously difficult to sail satisfactorily. Essentially, she is one of the two obvious choices for best ship for serving in the line of battle, but is very poor at performing any other role. Even more so than the previous ships in the guide, it is vital to sail in a group or squadron of ships, or at least with a more nimble escort that can protect your vulnerable stern, particularly as the Victory has a durability value of 1; sink once and its gone forever. However, if you do manage to wield her successfully in battle, she will tear apart any enemy ship.
The Santisima Trinidad is the leviathan of Naval Action. No other ship is as large or carries as many guns as her. Historically she carried more guns than any other ship of the line and this remains true in Naval Action. The reason for this is that her size and construction permitted filling her weatherdeck entirely with guns to an extent not otherwise done during the age of sail.
So let’s start with her weaponry – she carries 69 guns on each broadside. These guns are equivalent in size to the Victory, and like the Victory she can substitute her weather deck 12 pounders for 42 pound carronades. Carrying more of equally heavy weapons makes her incredibly more powerful than the Victory. Her damage per broadside is roughly 33% higher than the Victory’s. Bear in mind that the Victory is the second most powerful ship in the game – so the Santisima Trinidad outguns everything, and outguns them by far. The size of her guns, just as with the Victory, also permits her to engage at a greater range than many other ships. There is little else to say about her weaponry – it is by far the most powerful in the game and she will destroy any ship foolish enough to engage her broadside-to-broadside. She carries two bow chasers and four stern chasers.
Her structure is only very slightly lower than the Victory and her armour remains equally thick. This means that she will perform equally well in the line of battle, being capable of taking as much enemy fire as even the Victory. Together with the Victory then, she is the strongest lineship in the game. Both her firepower and structure are designed around her role as sailing in the line of battle exchanging fire with the enemy’s line.
However, as with other large lineships, her speed and maneuverability are compromised. This is more true for the Santisima Trinidad than any other ship in the game. She represents the breaking point of the trade-off between strength and firepower on the one hand, and sailing performance on the other. Although her top speed is nominally slightly higher than the Victory’s, her sailing profile reveals that she performs less well on many points of sail compared to the other ships of the line.
Comparisons – Introduction and Methodology
Below follows a series of graphs describing the variation among ships of the same broad class; unrated vessels, frigates and ships of the line. Each of these classes has their own section with four graphs (currently only three for ships of the line). Here is a list of the graphs in these sections followed by a brief summary of how they were calculated:
- Sailing Qualities
- Sailing Speeds (absent for Ships of the Line)
- Resilience
- Gunnery
(1)Sailing Qualities
The first graph in each section plots each ship’s default Turning Rate (y-axis) against its default Top Speed (x-axis). The default Top Speed is observed in ships constructed of Teak or Oak. The Turning Rate is the same for ships of all wood types.
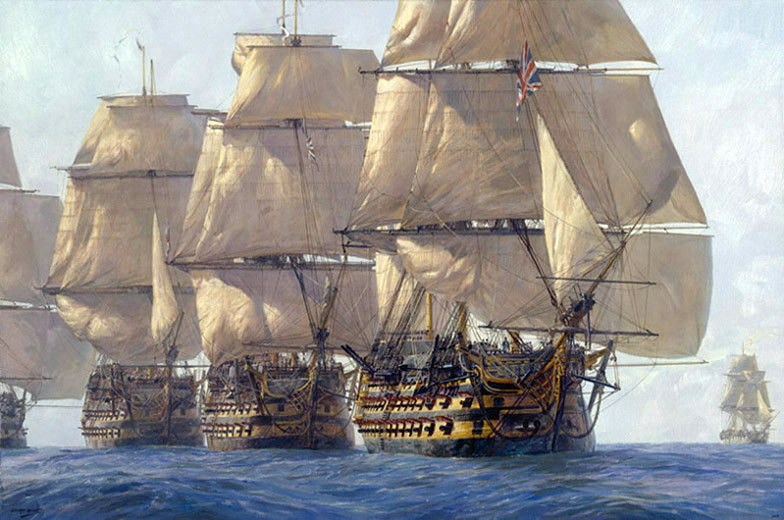
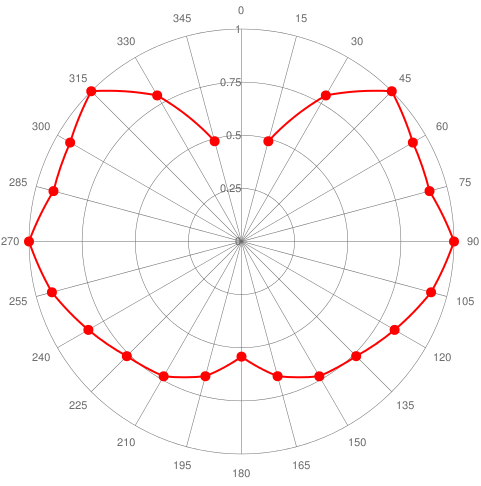
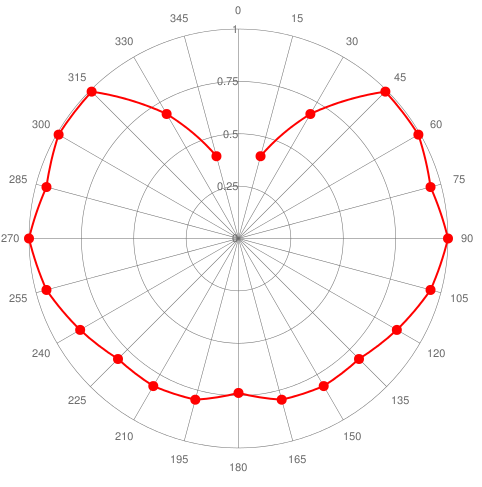
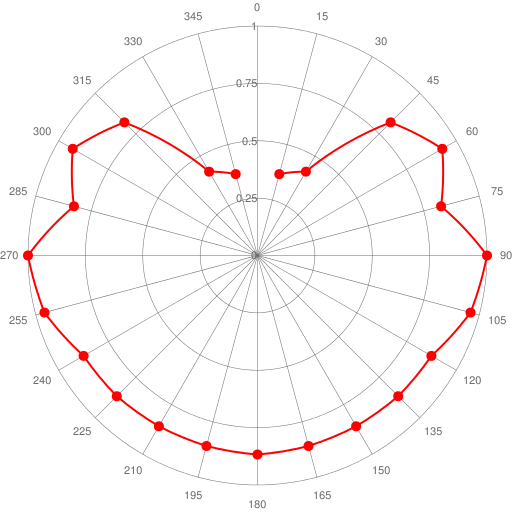
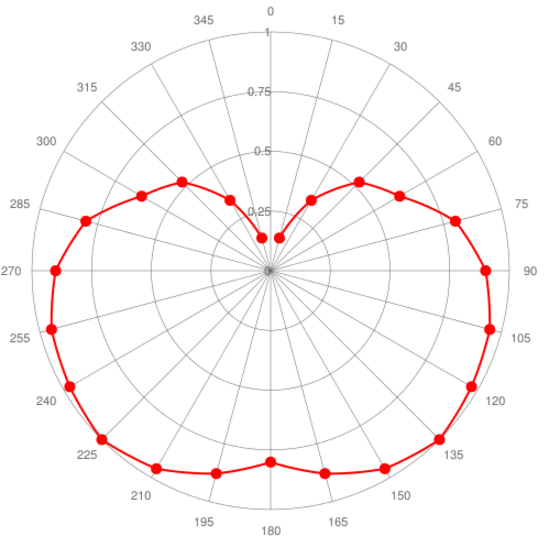
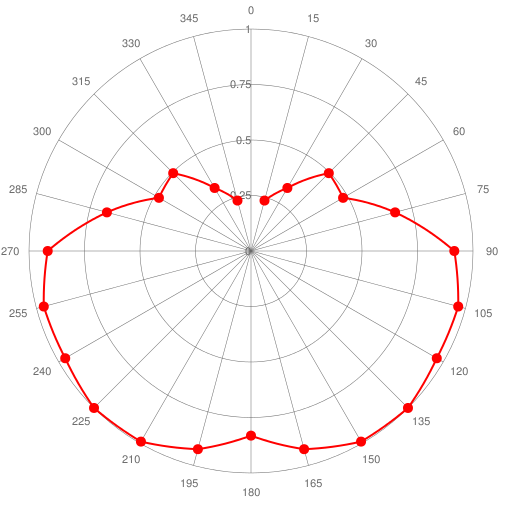
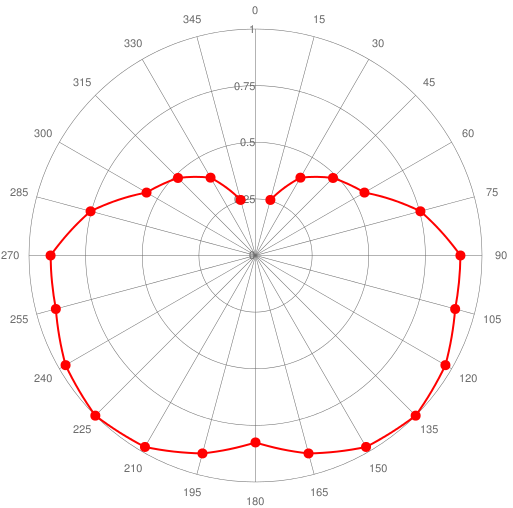
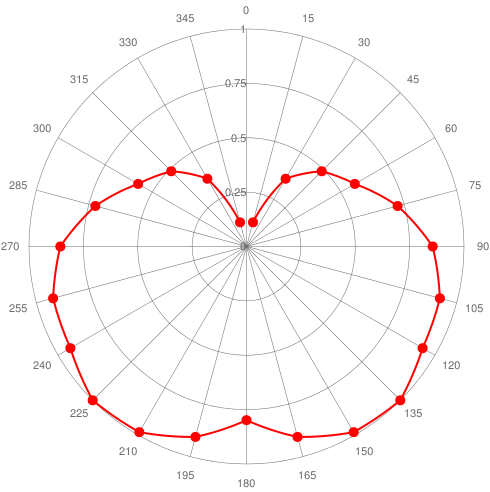
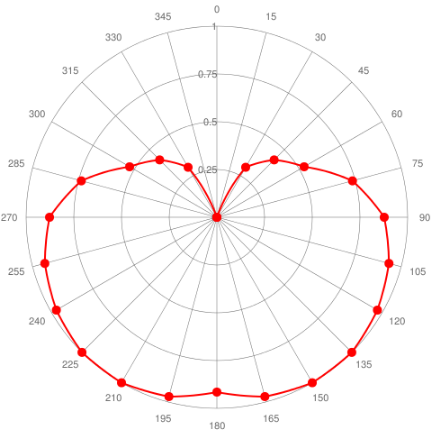
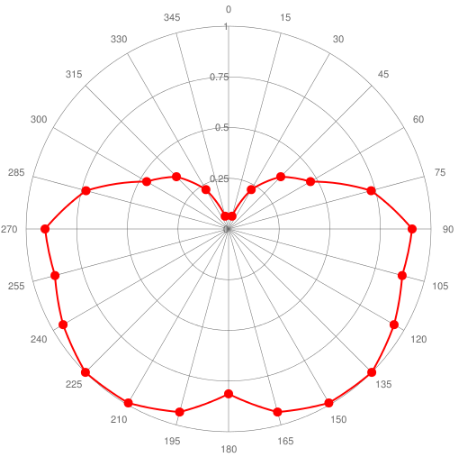
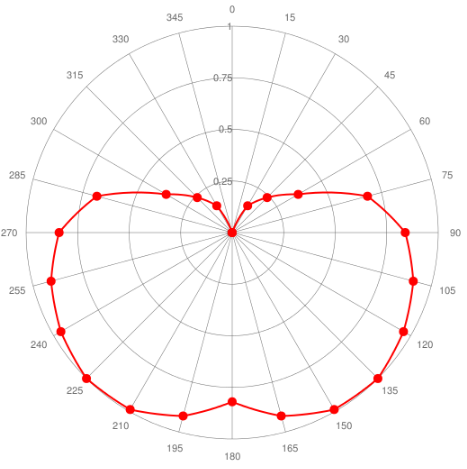
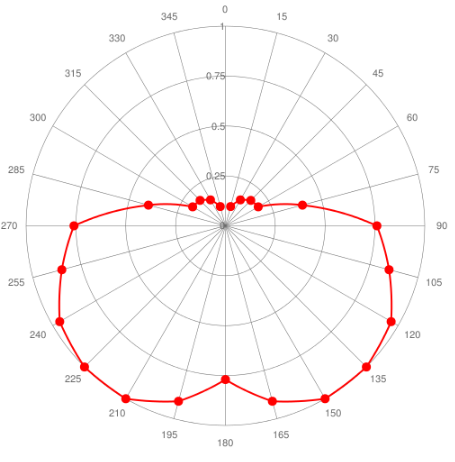
(2)Sailing Speeds
The speed values given in this chart were calculated in the following manner:
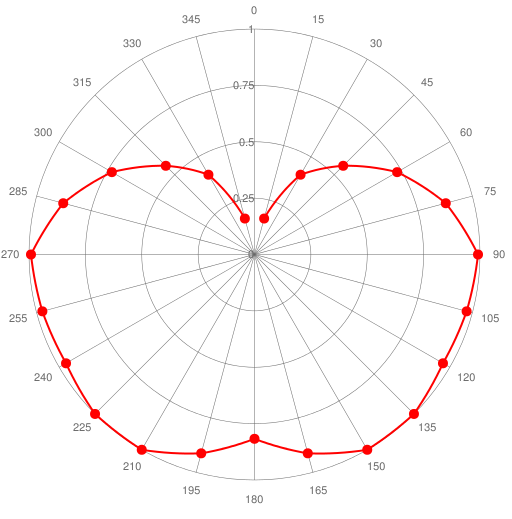
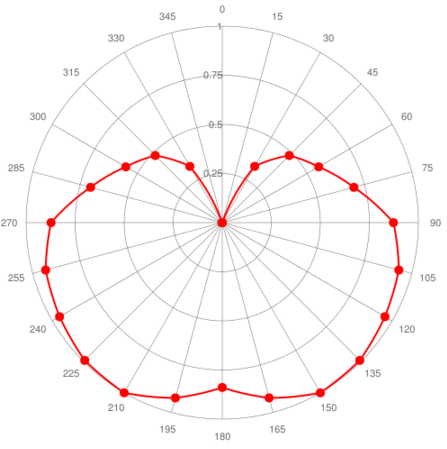
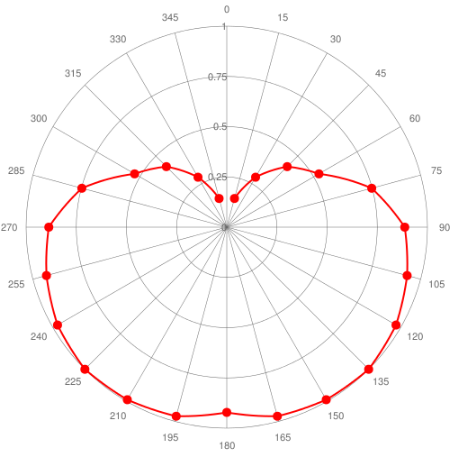
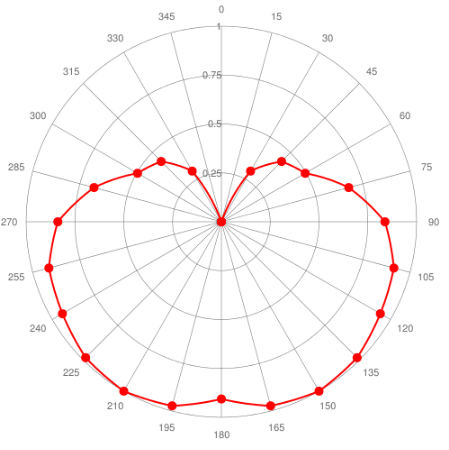
- Each ship was sailed and allowed to reach its maximum speed every 15 degrees relative the wind from 15-180.
- The full speed reached across all speeds was expressed as 1. Any speeds lower than this are expressed as fractions of 1. These values were used to create the sailing profiles of the ships (given above per ship).
- The fraction of full speed that was reached at each point was multiplied by the default Top Speed of the ship for each Point of Sail at which speed was measured.
(3)Resilience
(4)Gunnery
The final graph in each class-specific section plots each ship’s DPS (damage per second) against its DPB (damage per broadside) when equipped with guns of each type; long cannons, medium cannons and carronades. There are a number of important points to note regarding these graphs:
- The ships are always equipped with the maximum-sized guns possible.
- The largest ships (Constitution and above) cannot carry carronades on their lower decks. These ships have replaced carronades with medium cannons on decks where carronades cannot be equipped.
- Long cannons are always the lowermost and leftmost point for each ship and carronades are always the highest and rightmost point. Medium cannons are always in between these two in terms of DPS and DPB.
- These graphs do not take into account the Penetration of the guns, which is a very important game mechanic. Although penetration increases with larger guns, its relationship to gun types is complex. For detailed discussion on this topic, refer to my Gun Guide.
Finally, the Comparisons part of this guide is concluded with an Overview chart and two accompanying charts, for each class. These are generated in a slightly different way. They provide an overview of the relative strength of various ships in three areas: Resilience (y-axis), Gunnery (x-axis) and Speed (annotated value). The Speed value given is a ship’s default Top Speed and is observed in ships constructed of Teak of Oak.
The Resilience and Gunnery values, however, are relative aggregate scores that were calculated in the following manner:
Resilience
- For each class, the average value for Armour Thickness and Structure was calculated.
- For each ship, their Armour Thickness and Structure were divided by this class average. This yielded their fraction of the average. Subtracting 1 from these values yields their relative fractional increase or decrease around this average. (For example, if ships A, B and C have 500, 1000 and 1500 Structure, then their relative fractional increase or decrease around their average is -0.5, 0 and 0.5, respectively.
- For each ship, their relative fractional increase or decrease around their average Armour Thickness and Structure were summed to provide an aggregate measurement of relative Resilience.
It is important to note that this aggregate score values percentage difference in Armour Thickness equally highly as percentage difference in Structure. Although it is true that the mechanics of these two factors are very variable, and at times one or the other may be preferable, valuing them equally highly provides a good aggregate score of a ship’s relative Resilience.
Gunnery
- In the same way as above, for each class, the average value for DPS and DPB was calculated for ships equipped with maximally sized medium cannons.
- For each ship, their DPS and DPB were divided by this class average. This yielded their fraction of the average. Subtracting 1 from these values yields their relative fractional increase or decrease around this average. (For example, if ships A, B and C have 50, 100 and 150 DPB, then their relative fractional increase or decrease around their average is -0.5, 0 and 0.5, respectively.
- For each ship, their relative fractional increase or decrease around their average DPS and DPB were summed to provide an aggregate measurement of the relative strength of their Gunnery.
Bear in mind that the values used for calculating this aggregate gunnery score are those for ships equipped with maximally sized medium cannons on all decks. Also, as above, it is important to note that this aggregate score values percentage difference in DPS equally highly as percentage difference in DPB. Although it is true that the mechanics of these two factors are very variable, and at times one or the other may be preferable, valuing them equally highly provides a good aggregate score of the relative strength of a ship’s Gunnery.
For detailed discussion on the complexities of DPS, DPB, Penetration and Armour Thickness, refer to my Gun Guide.
Comparisons – Introduction and Methodology Cont.
Overview graph
Thus the Overview graph provides an assessment of a ship’s relative Resilience (y-axis) and Gunnery (x-axis) together with their Speed (annotated value). The aggregate scores for Resilience and Gunnery should indicate where a ship’s strength lies and chiefly how it compares to other ships of their class in this respect.
Also in this section, separated per class, are two final graphs for each. The above-mentioned Overview graph compares the aggregate Resilience (y-axis) and Gunnery (x-axis) scores, with Speed printed as an annotated value next to the marker for each ship.
To make the independent study of the relationship between Speed and each of the two aggregates easier, the two final graphs are simply Resilience (y-axis) or Gunnery (x-axis) plotted against Speed rather then the other.
With all these Overview graphs, Captains should be able to form a solid understanding of the relative strengths and weaknesses of each ship.
Comparisons – Unrated Vessels

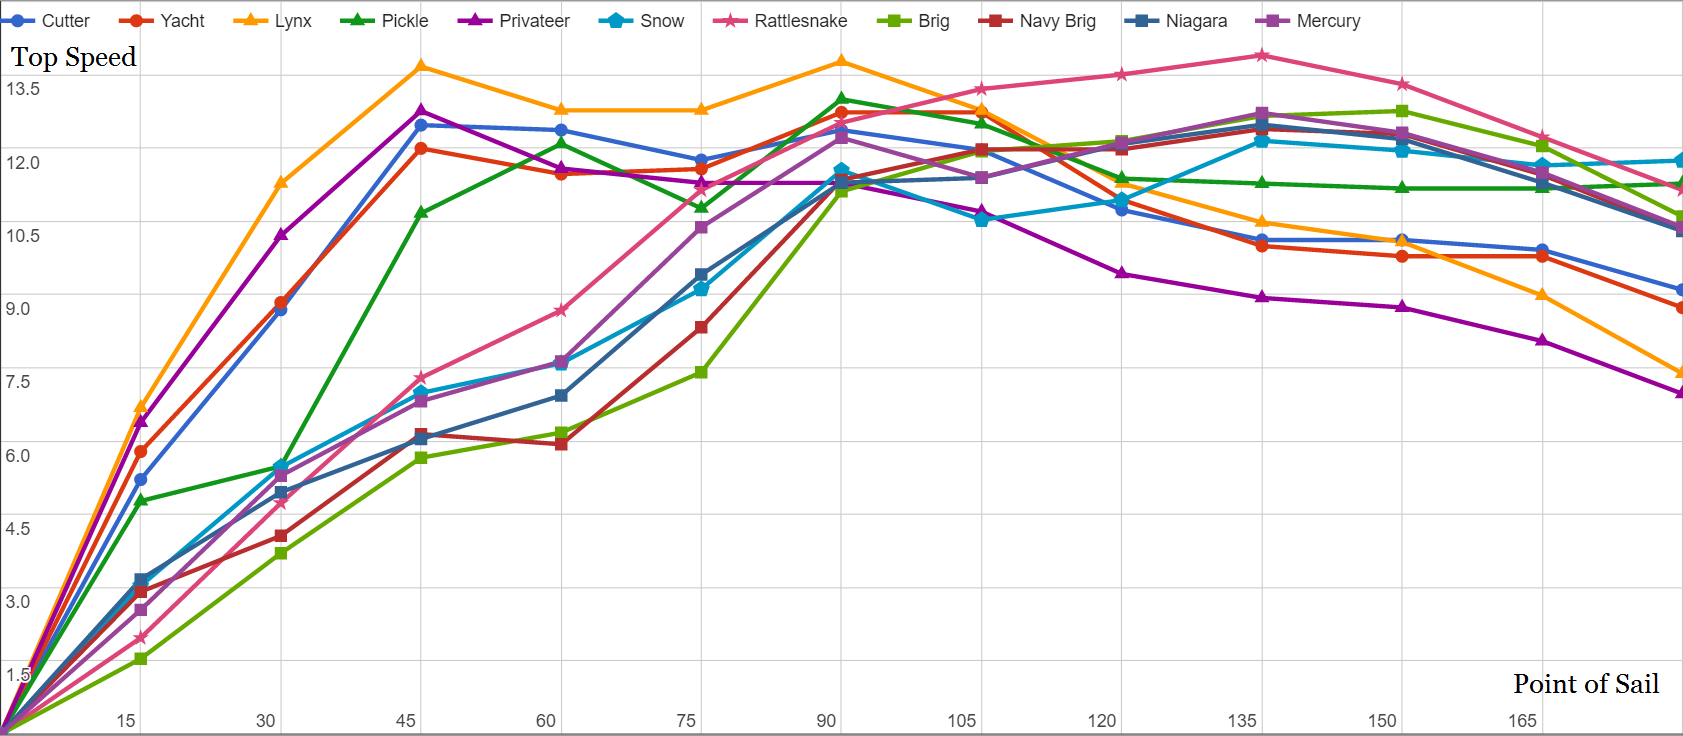
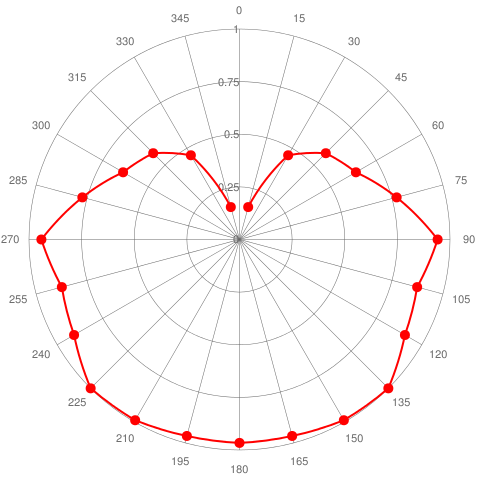
The fore-and-aft rigged vessels (the cutters and schooners) are typically fastest sailing upwind (points 15-90) but struggle downwind (points 90-180) whereas the square-rigged vessels (the snow, brigs and sloop-of-war) are more comfortable sailing downwind (90-180) than upwind (15-90). However, variation exists between ships of the same rigging.
The two racers, the Rattlesnake and Lynx, are clearly faster than the other unrated vessels. The Rattlesnake is fastest broad-reached and the Lynx close-reached as mentioned above. In this graph, however, it is also clear that the Rattlesnake does not stand out quite as much, and is in fact no longer fastest, when pressed too far towards running the wind in her back. With the wind directly behind her, she is outsailed by the Snow (surprisingly) and Pickle.
This is because the Pickle and Snow, despite being slow in terms of absolute highest speed, actually exhibit decent sailing profiles and can maintain a decent speed across a broader range of sailing points. In particular, the Snow is relatively fast at any point beyond 135 whereas the Pickle displays multiple sailing points at which she can surpass 11 knots (~50-70, ~80-180). These two ships are thus versatile in terms of sailing profile, but overall not particularly fast. The Pickle is particularly noteworthy on account of her being the only square-rigged vessel to perform decently even when sailing close-hauled.
The brigs all perform essentially in the same way although the Niagara and in particular the Mercury are slightly faster sailing upwind than the Brig and Navy Brig.
The Privateer and Lynx, while both being fast sailing close to the wind are poor sailers downwind. Especially the Privateer has disastrously low speed when trying to sail at any point beyond 105.
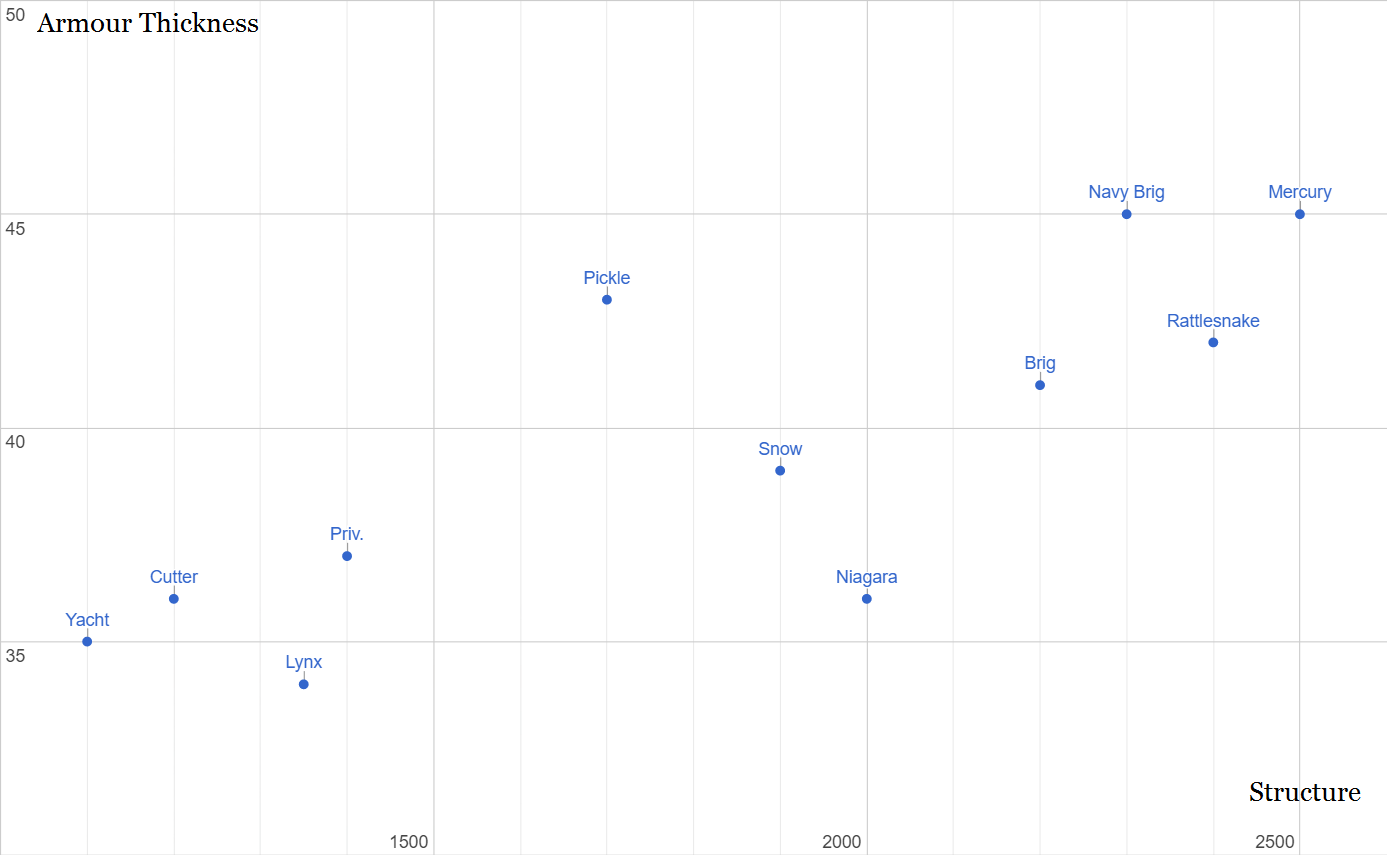
The Snow and Niagara are both glass cannons in this class. Both have powerful weaponry but have low structure and armour compared to other ships of their rank. In the case of the Snow, she is clearly disadvantaged in these factors compared to the Brig and Rattlesnake and in the case of the Niagara she is far weaker than the Mercury and Navy Brig.
The most astonishing feature of this graph, however, is the performance of the Rattlesnake, which despite being the fastest ship in the game also competes for the title of being the most resilient unrated vessel. In a sense she is on par with the Navy Brig as her armour is less thick yet her structure is higher. Only the Mercury definitively beats her in this respect.
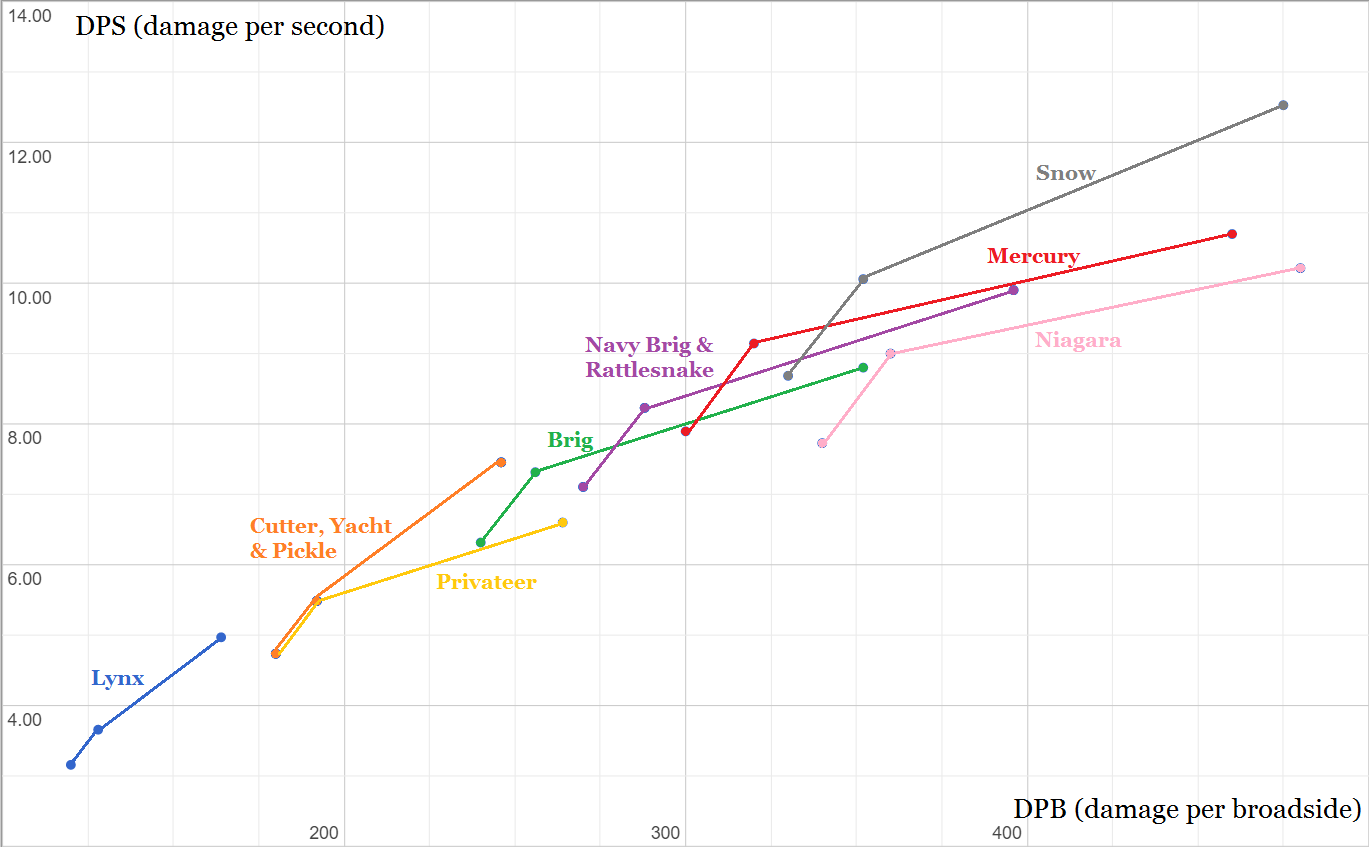
The Navy Brig and Rattlesnake have identical loadouts, which are average for this class. The Mercury competes with the Snow and Niagara for the best weaponry, having higher DPS but lower DPB than the Niagara. The Snow, however, outguns her in both these factors.
Comparisons – Frigates

The Renommee is really in a class of her own when it comes to sailing qualities. She is faster at turning and by far the fastest sailer of the frigates.
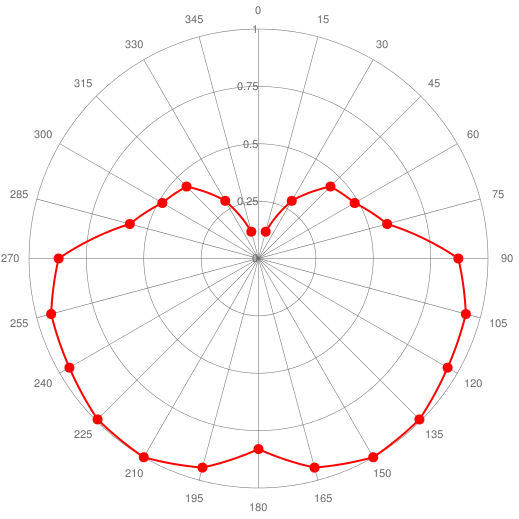
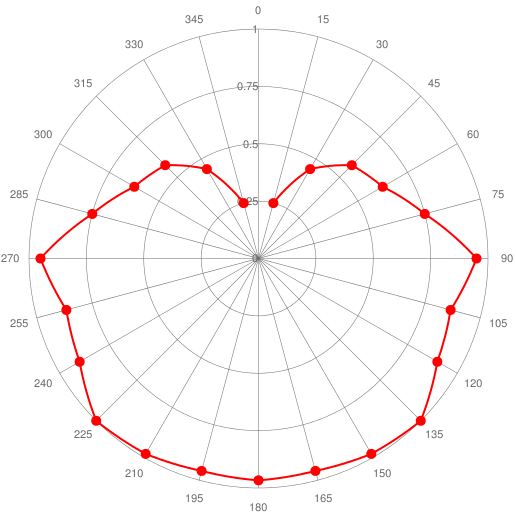
The other frigates do not differ as much as the Renommee compared to these others, although variation does exist. The Cerberus stands out as a slightly faster and more manoeuvarable ship than the others. The Trincomalee and Constitution are both slower turners but the Trincomalee is in fact faster than most other frigates smaller than her. The same can not be said of the Constitution; only Le Gros Ventre is slower (although as discussed below Le Gros Ventre displays other interesting sailing qualities).
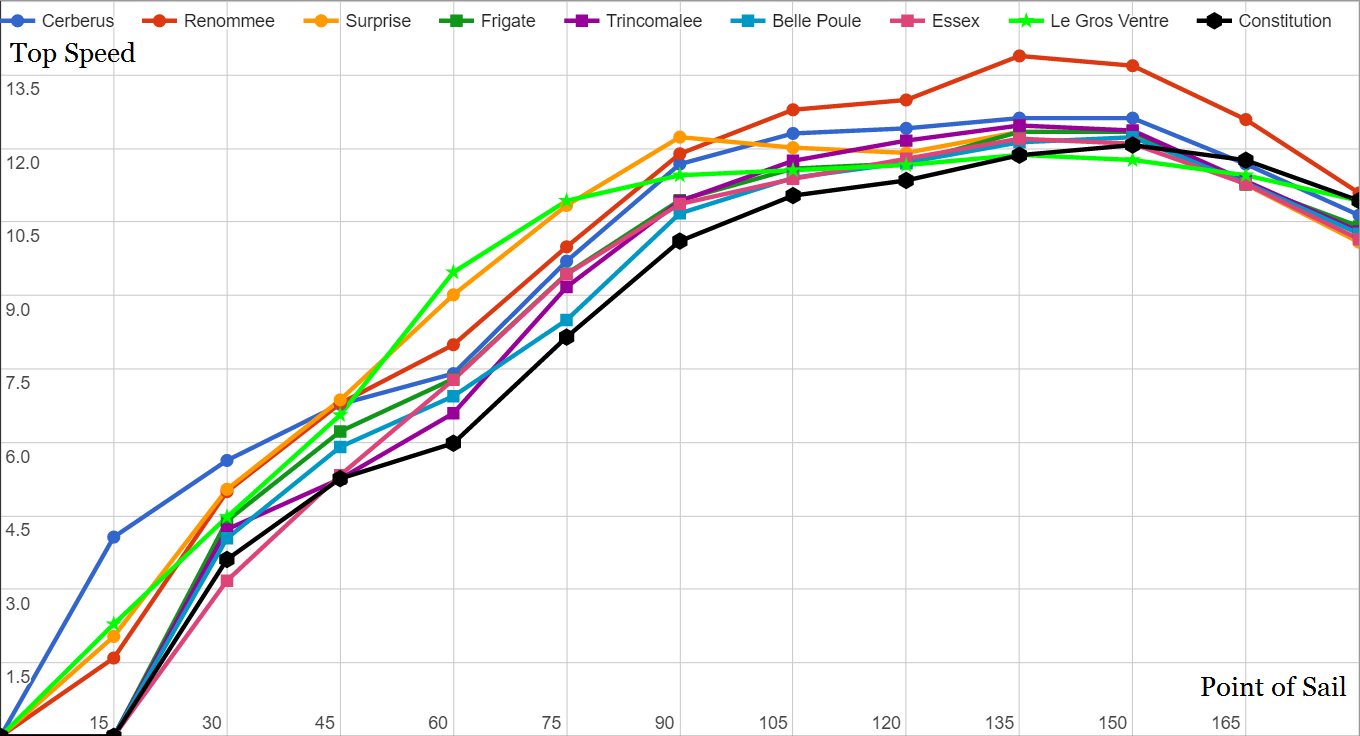
As all frigates are ship-rigged, there is not as much variation in sailing speeds across different points of sail among them as among the unrated vessels. However, there are still notable differences. The Renommee is clearly the fastest ship sailing at a frigate’s preferred heading on a broad reach. However, she is not the fastest sailing upwind. Sailing a somewhat close-reached both the merchant frigate Le Gros Ventre and the Surprise are faster, and sailing closer to the wind than 45 degrees sees her also slower than the Cerberus.
The Surprise and Le Gros Ventre have similar sailing profiles. They are specialised not for high speeds at any one point but for decent speeds at a broad range of points. This allows them to catch up with other frigates on these points or indeed escape from them, in the case of Le Gros Ventre. Le Gros Ventre can in fact outrun even a Renommee when sailing between points 50-75. This should certainly be noted by traders aboard her!
The Constitution is a whale of a frigate and is depressingly slow at almost all points. However, remarkably she is the second fastest frigate when sailing with the wind directly astern. For this reason, should she ever wish to disengage then running before the wind is the correct heading at which to do so.
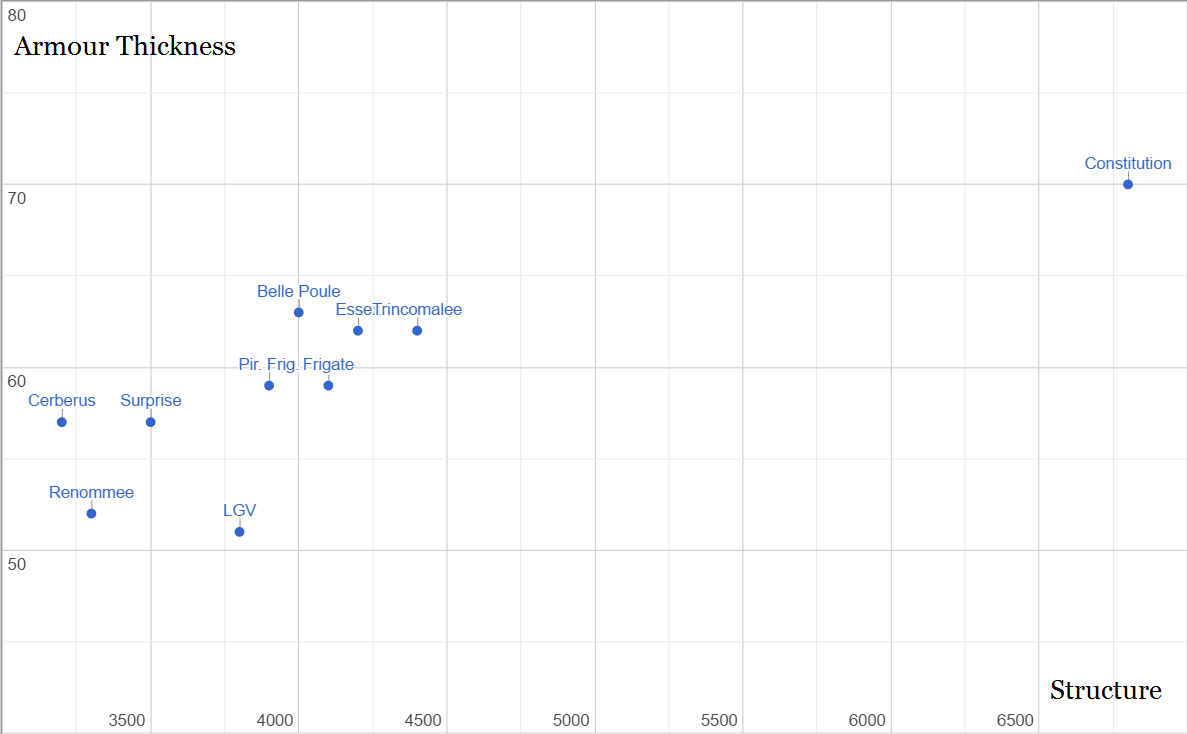
Other notable features of this graph are the low armour values of the Renommee and Le Gros Ventre. The Renommee pays a heavy price for her high speed having the weakest armour of the fighting frigates as well as the second weakest structure. Le Gros Ventre, despite having a decent structure has thin armour of which her Captains should be aware.
The medium frigates group in a tight cluster with little variation. The Trincomalee is obviously the most resilient and the Pirate Frigate the least. The Belle Poule is notable for her slightly higher armour than the others, but this is a very minor difference in the greater scheme of things.
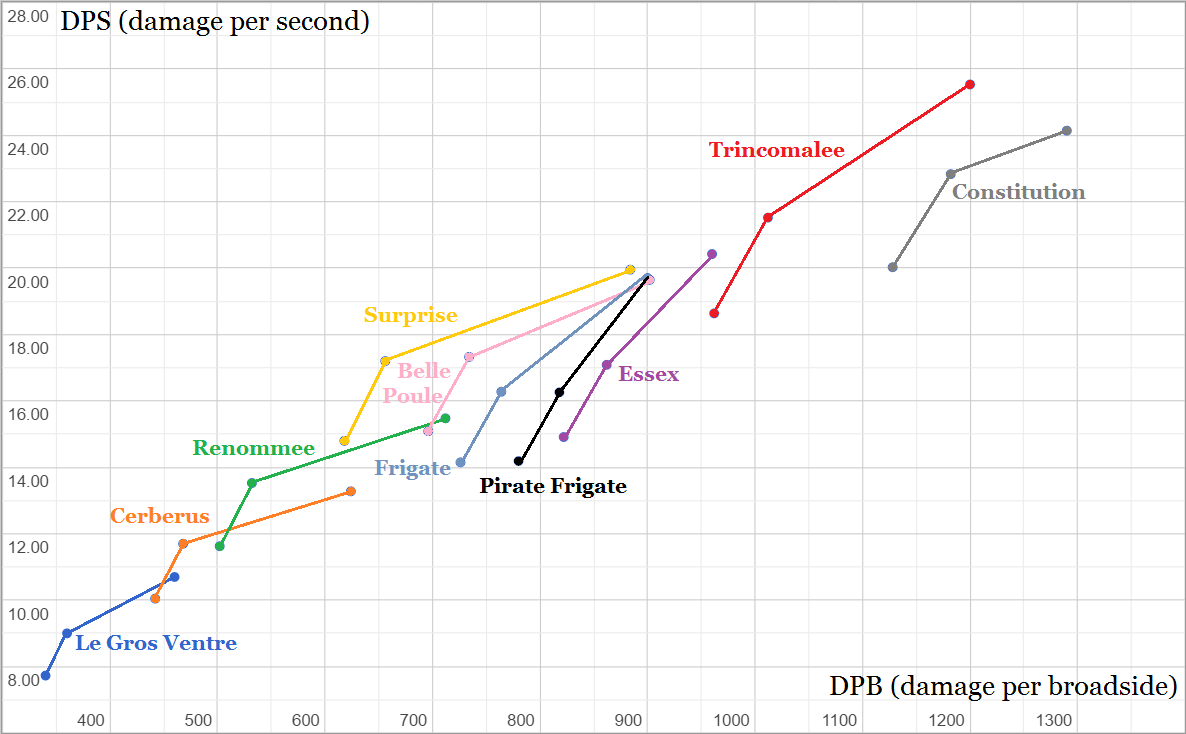
The Trincomalee stands apart from the other medium frigates. The others are clearly ordered in strength in terms of cannons, although their carronade loadouts are all very similar, with the exception of the Essex. When outfitted with cannons the progression from weaker to heavier weaponry among these ships is Belle Poule->Frigate->Pirate Frigate->Essex.
The light frigates, the Surprise, Renommee and Cerberus, are neatly ordered in increasing firepower with the Surprise being the most powerful. The trading frigate Le Gros Ventre is very feebly armed compared to the other frigates.
Comparisons – Ships of the Line

3rd rates.
However, otherwise the Ingermanland is faster and more manoeuverable than the 3rd rate and Bellona, which are faster and more manoeuverable than the Victory and Santisima Trinidad. The merchant Indiaman is included in this class as she is the size of a ship of the line yet obviosuly not a fighting ship. As such, she is faster and more manoeuvarable than the others.
The 1st rates differ with the Victory being notedly slower than the Santisima Trinidad.
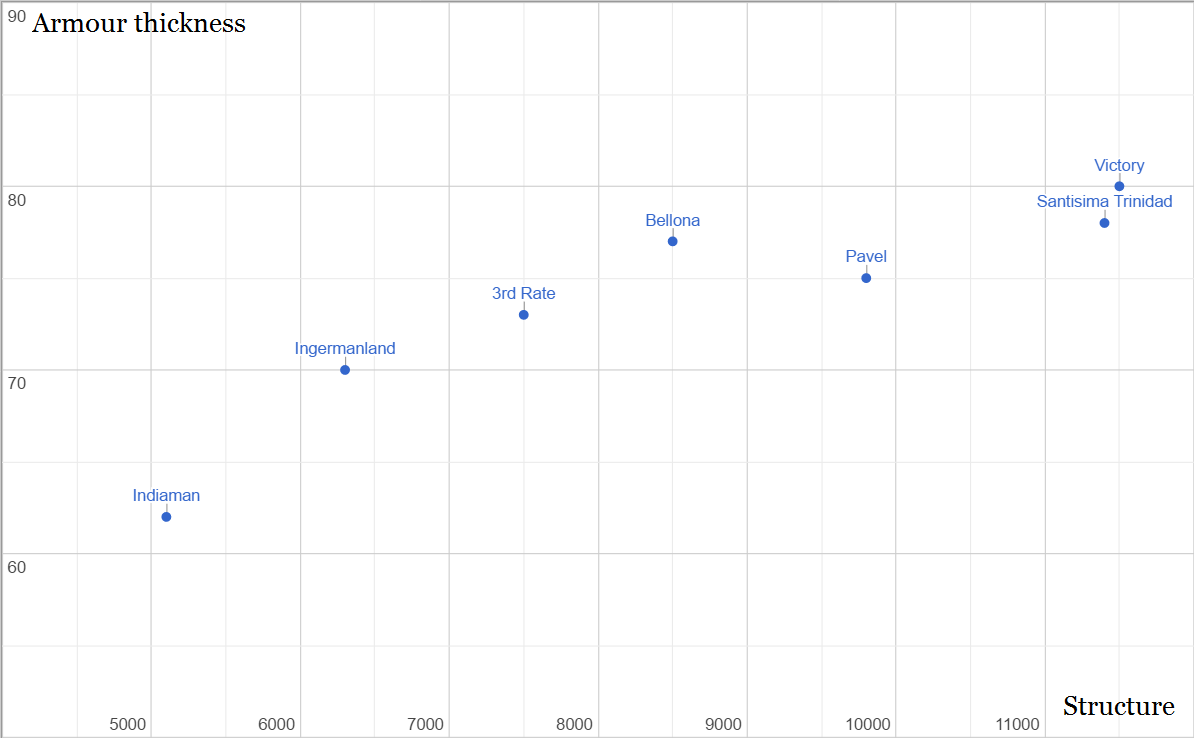
Otherwise, the progression of increasing armour and structure is clear from the 4th rate Ingermanland to the 1st rate Santisima Trinidad and Victory. The Bellona stands out as having notably higher armour than would be expected of her as a 3rd rate although in actuality this increase is very small in the greater scheme of things.
The Victory has very slightly higher structure than the Santisima Trinidad.
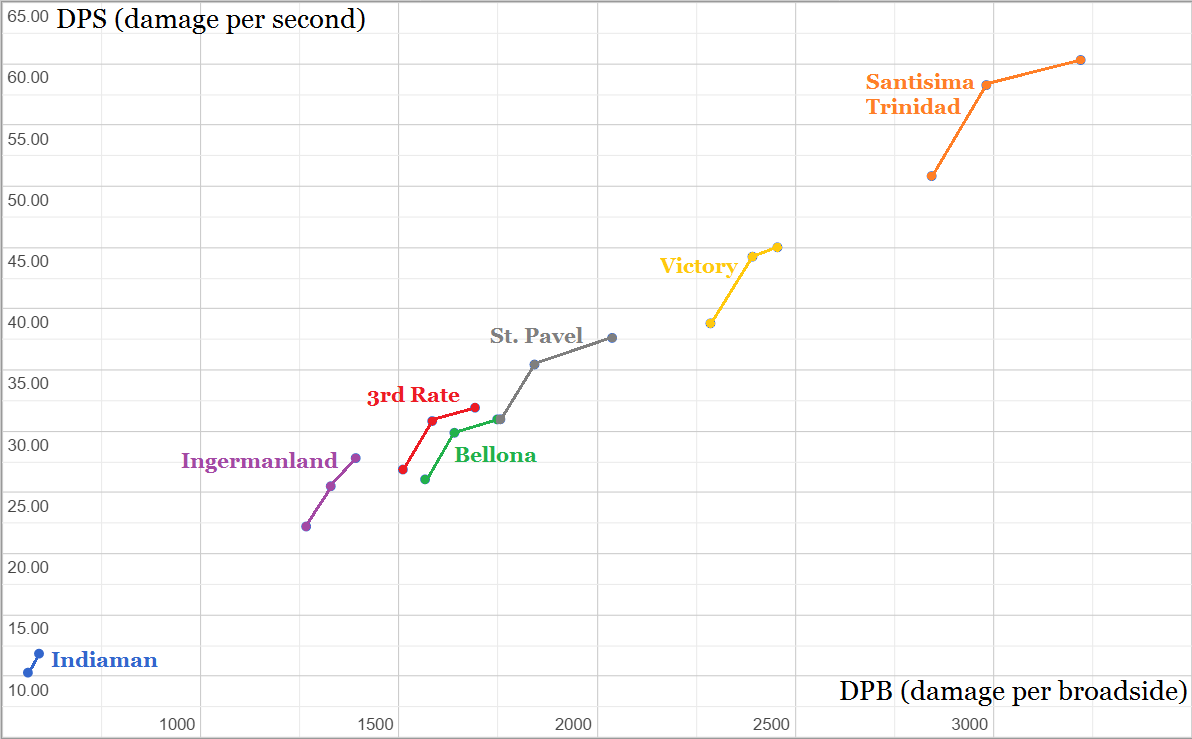
In much the same way as the previous graphs for this class, the progression from 4th to 1st rate is as imagined. However, there are still notable features. The Santisima Trinidad is by far the most powerful ship in the game in terms of weaponry. Her extra gundeck really tells and the difference between her and the Victory is essentially the same as the difference between the Victory and the 2nd rate St. Pavel.
Of the 3rd rates the Bellona carries heavier guns resulting in higher DPB but lower DPS than the eponymous 3rd Rate.
Comparisons – Overview

After the rank of Ensign (60 crew) the step up to Second Lieutenant (120 crew) gives accress to the Brig, Rattlesnake and Snow. These ships are clear improvements in almost every way compared to the smaller ships. All ships after Ensign (60 crew) are of course square-rigged and so will be slower upwind. But in every other way, these larger vessels are improvements.
The Rattlesnake trounces the unfortunate Brig in every conceivable manner, speed, structure, armour, armament and chasers. Thus she is simply a better ship than the Brig, a fact unfortunately obvious from her high price on the market. The Snow is significantly more powerful than the Rattlesnake in terms of Gunnery but suffers in Resilience.
The other ships of this class represent various positions of the trade-off between Resilience, Gunnery and Speed.
Here are the values for Resilience and Gunnery each independently plotted against Speed. Note that Resilience and Gunnery retain their axes in the graphs below – Resilience is still plotted on the y-axis and Gunnery on the x-axis with Speed plotting on the opposite axis in each graph:


The other ships differ more in terms of Gunnery than Resilience. The Renommee has the lowest score in Resilience but the highest speed. The Trincomalee has high values in Resilience and Gunnery as well as a good speed value for her class. It is clear from these factors why she is such a popular choice in Naval Action!
Here are the values for Resilience and Gunnery each independently plotted against Speed. Note that Resilience and Gunnery retain their axes in the graphs below – Resilience is still plotted on the y-axis and Gunnery on the x-axis with Speed plotting on the opposite axis in each graph:

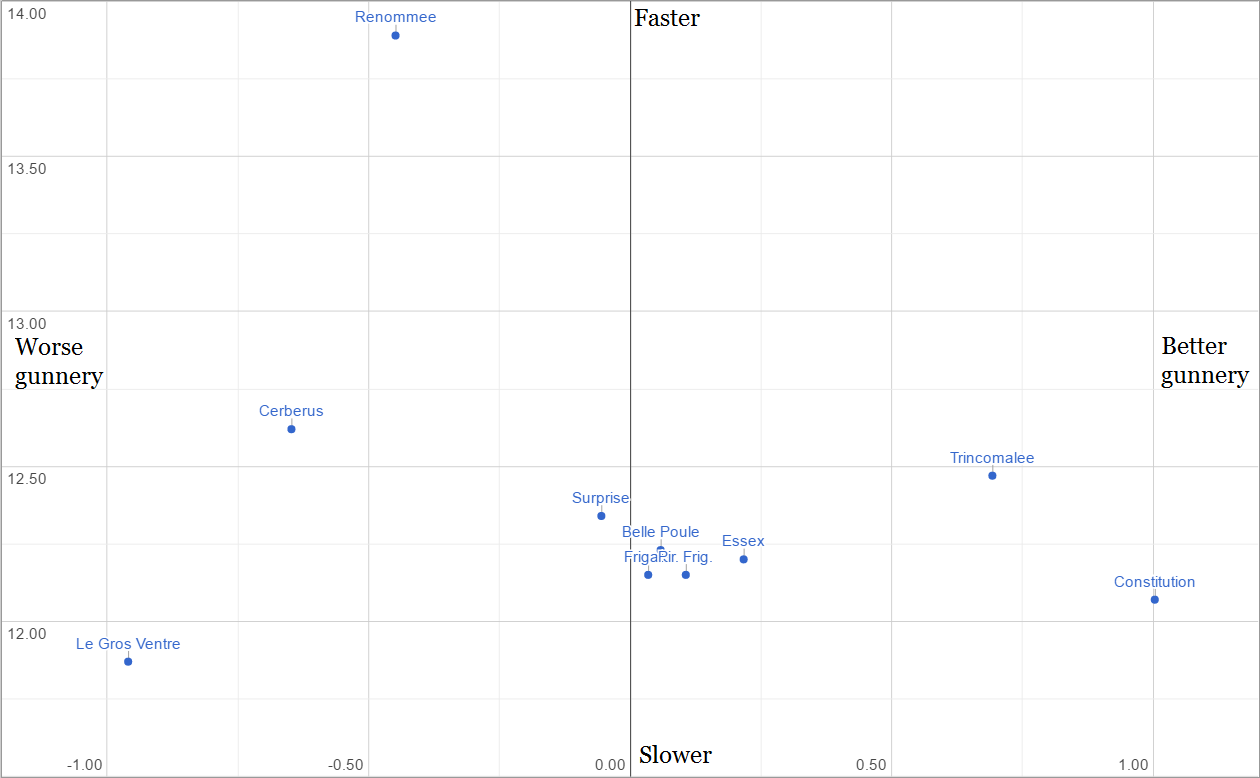
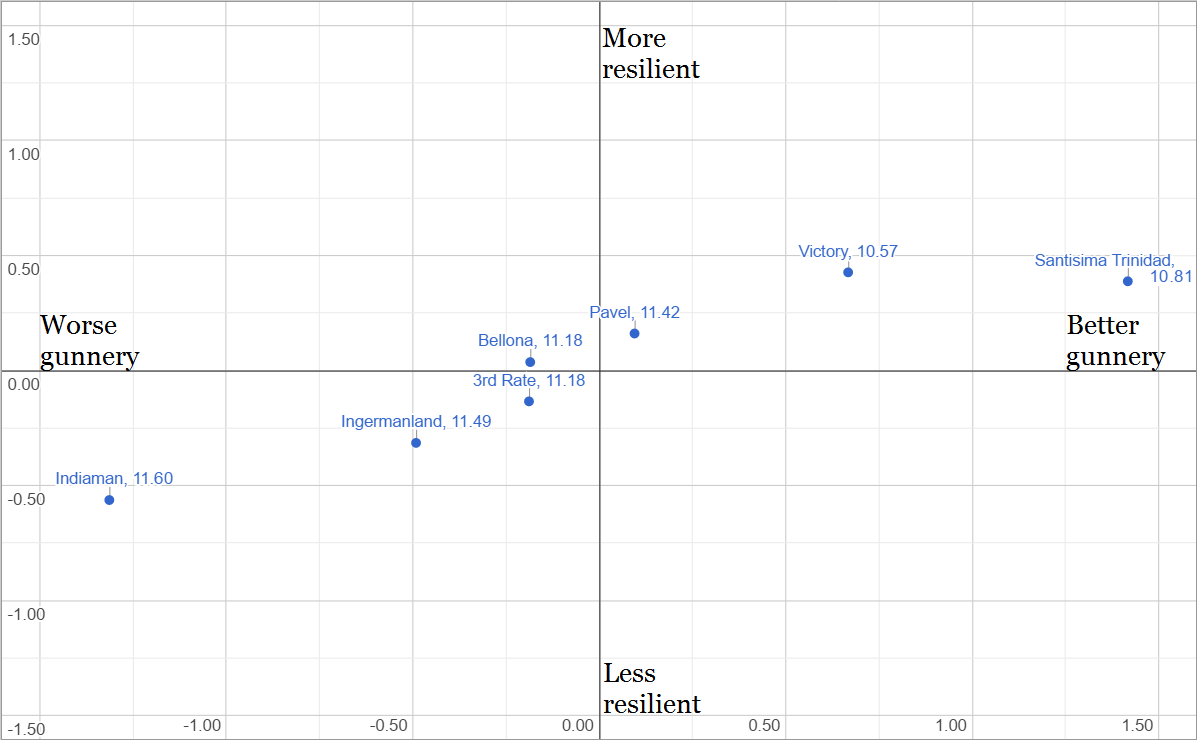
The Bellona and 3rd Rate are on the same position in terms of Gunnery because of their carrying the same number of guns. Remember that the Bellona has higher DPB than the 3rd Rate, but lower DPS, on account of her carrying heavier guns.
Here are the values for Resilience and Gunnery each independently plotted against Speed. Note that Resilience and Gunnery retain their axes in the graphs below – Resilience is still plotted on the y-axis and Gunnery on the x-axis with Speed plotting on the opposite axis in each graph:
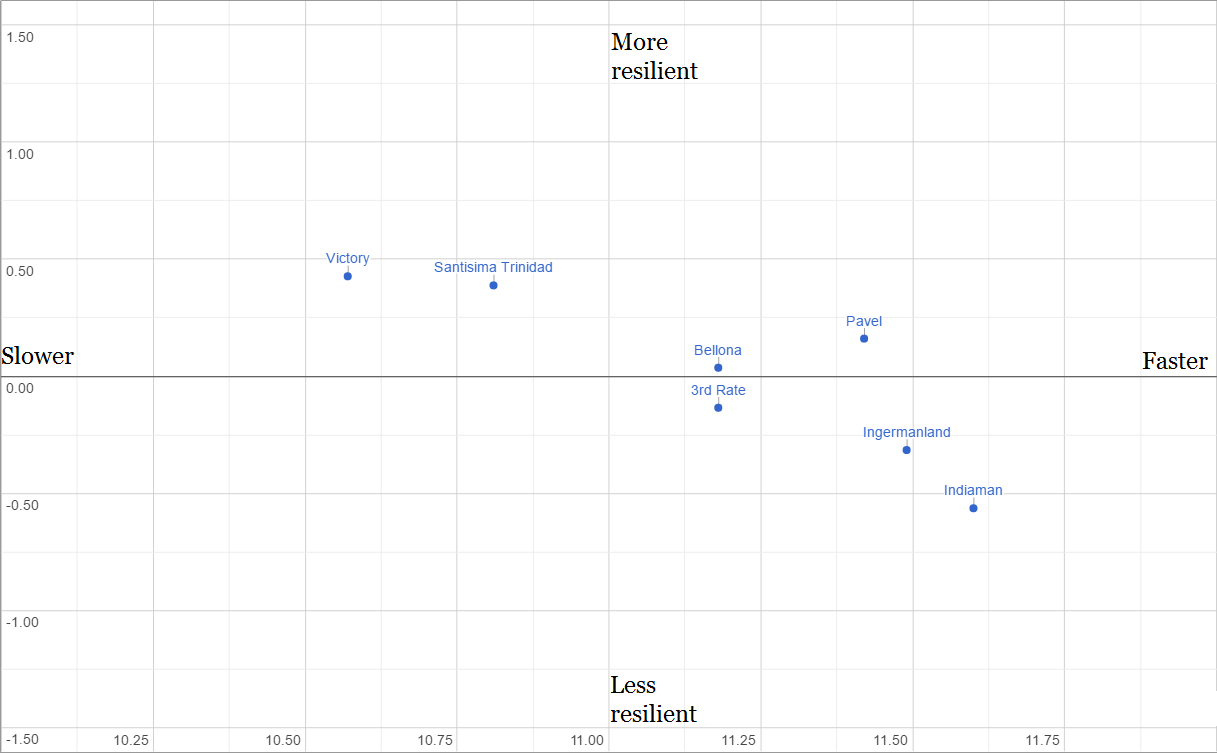

Ship traits
As mentioned earlier on many occassions – all ships are not equal in the aspects discussed above. Wood type, upgrades installed and equipment fitted will all change the characteristics of ships.
Upgrades and permanent upgrades have listed effects, whereas the built-in traits do not. For this reason, only the effects of built-in traits are given below.
Built-in traits vary in quality and are semi-randomly generated when constructing vessels. After comparing statistics for many different ships, I’ve been able to estimate relatively well the effects of various built-in traits.
So far I have looked at Speed and Build Strength. I have also calculated the effect of Wood Type on speed and structure. Here are their effects:
The Stiffness trait affects the amount of heel a ship experiences, i.e. how much the ship rolls as a result of wind. The exact strength of the affect is not given and I have not been able to accurately measure it. However, it can be conclusively stated that the better the trait, the greater the reduction in heel. The progression is, as always, green->blue->purple->yellow. It can safely be assumed that the white trait in fact is a negative one and causes a ship to experience more heel.
The Planking trait affects the amount a ship leaks. The better the trait, the less leaking a ship experiences. Although, again, the exact effect is not known, the progression of increasing traits is safely assumed to be green->blue->purple->yellow. And again, the white trait is presumably negative and so actually increases the of leaking of a ship.
The Crew Space trait affects the total crew of a ship. I have yet to measure the effects of this trait, but will fill out the following table as I acquire more data.
The Rigging traits affects the speed at which rigging and yard operations can be undertaken. The strength of the effect is difficult to measure as this is a hidden value, although the progression of increasing quality is safely assumed to be green->blue->purple->yellow. The white trait is safely assumed to be a negative modifier, making it slower to perform sail and yard operations.
Final Words
Hopefully this guide has served its purpose in introducing to you the different ships of Naval Action and their various strengths and weaknesses such that you now feel comfortable deciding on which ships through which you would like to progress. If you have any questions please leave a comment below and I will be very happy to answer you!
This is the first guide I have made, so I hope it contains relevant/useful information. If you have any questions, or spot any errors, please let me know! I will continue to update the guide as I progress through the ranks!
I strive to keep this guide updated, but at times, particularly after major patches, this may be somewhat outdated. I will work as quickly as possible to upate the guide in such instances.
Fair winds!