Overview
A basic guide to help prevent new players from getting horribly murdered. In theory.
Introduction
Before I even begin, let me clarify: This guide is NOT an in-depth discussion of strategy and tactics. This is simply a guide to help new players get their feet on the ground.
That said, if you’ve either just bought the game, or if you’ve gotten killed repeatedly by giant alien spiders or laser beams, fear not! I am here to assist you with this guide. Follow these simple tips, and you’ll at least have yourself a fighting chance to start off with.
Without further ado, let’s get right down to business!
Pre-Game
Wait, you might say at this point. Didn’t you just say we’re getting right into things? If so, then what’s this “pre-game” nonsense? Well, I’ll tell you what it is. It’s taking a moment to help you get familiar with a few things before we go on.
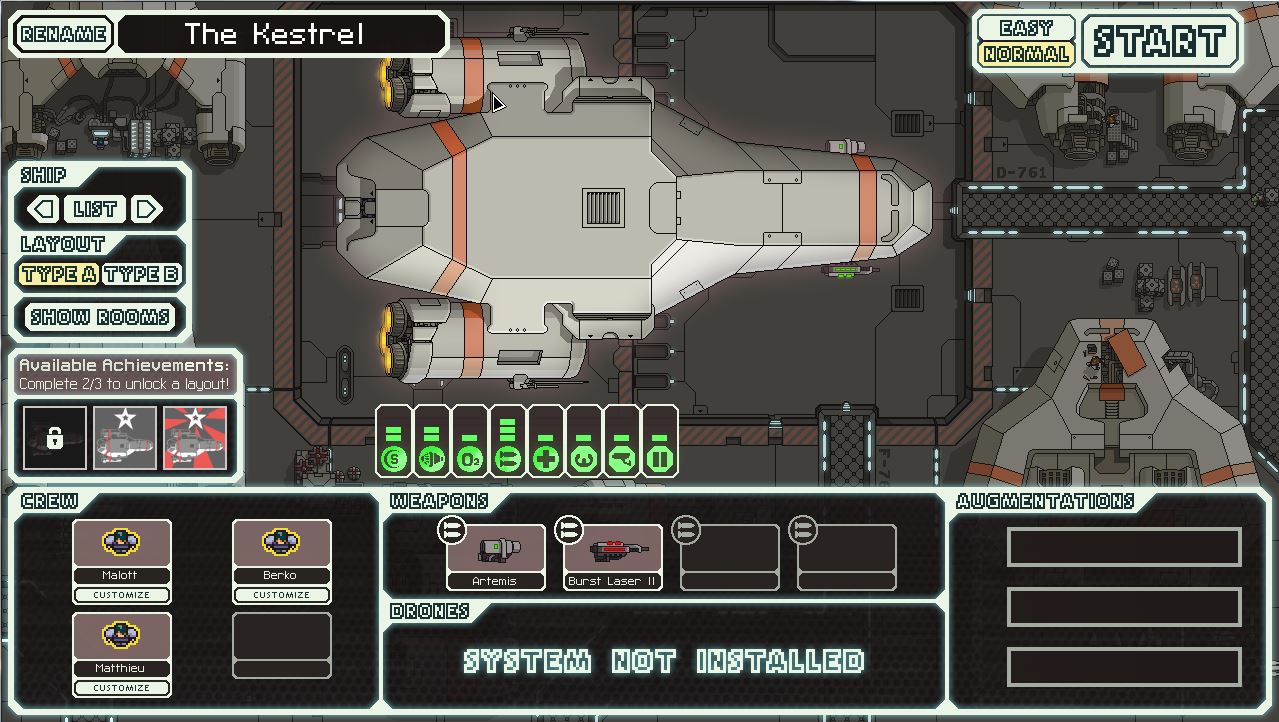
Before you even think of putting some (probably) doomed men into your hands, you need to take a few moments to look at your ship. Get familiar with its rooms, where the airlocks are to the outside, the augmentations, and the weapons. For the Kestrel, this is relatively easy; you’ve got some standard weapons, no augmentations, and pretty standard systems. It’s not my job to explain them; you can do research on your own time.
Also, don’t be afraid to click on the “easy” button before you hit start. No one will make fun of you, I promise. FTL is a harsh and unforgiving game, and it’s quite difficult. Easy mode is a great way to gain some experience, unlock a few ships and/or layouts, and learn a few of the ins and outs of the game.

Name your crew and your ship if you’d like, and begin the game. Now, I can’t exactly hold your hand through all of the events, so I’m just going to take some time in the next few sections to take a look at some of the various types of encounters you’re going to have, and how to handle them.
The Game Begins
Now that you’ve started the game, you’re going to see your ship in all its glory. The first thing you should do is make sure that you’ve put your people in their proper places. You don’t want to get stuck fighting an enemy ship with all your crewmates just standing about. I would recommend keeping one man in the piloting chair (this is all but required), a man on weapons, and a man on engines. Once you get the next crew member, you can put them on shields.

See how the crew is just standing there? Don’t let that be you. Once you have everyone in their place, feel free to jump around the sector map. At every location, you have one of a few possibilities. Below is the basics for dealing with each kind.
1. Enemy Ships
This is probably the most common thing you’re going to encounter. It’s also the thing you’re going to have to know how to deal with. Mostly, it will come from experience. However, if you’re having trouble, the best recommendation I can give you is to try to shut down their weapons as soon as possible, followed by their shields. This may not always be the case, but it works as a general rule. Make sure you target all of your weapons (and set them to auto-fire if you have a hard time remembering to shoot).
The one thing you need to keep in mind is that you should keep an eye on your missile usage. Missiles have limited ammo, and you want to save them for when you really need them. They cut straight through enemy shields, so they’re invaluable tools!
2. Random Events
Sometimes, you’ll be greeted with a screen like the one seen here. These random events usually have one of a few choices – typically, “get involved” or “don’t” is the general premise. Make sure that you read the events carefully. Getting involved is a risk every time, and could lead to hull damage, loss of crew, or other catastrophes…however, it may also yield extra crew, repairs, weapons, scrap, and all sorts of goodies. Think of what could possibly be lost, and determine if you’re willing to risk it.
Also worth noting is that sometimes, you’ll have special, blue-colored options. If available, always pick these options. They usually mean you’ll get all the reward, with none of the risk.
3. Quests / Distress
Other times, locations will have a “Distress” call. Visiting these locations will take you to another ship. Sometimes, it’s an ambush. Sometimes, they want you to do something for them, which begins a “quest.” Other times, you can’t help them at all. But distress beacons are usually well-worth checking out, since helping out can yield nice rewards. Sometimes, you’ll have to travel to another beacon in the galaxy to finish the request. These markers are labelled on the map automatically.
4. Shops
Shops, just like it sounds, are locations where you can buy new items for your ship. These will be labeled on the map once you are adjacent to the shop’s location, like distress beacons. Shops may sell ship components, weapons, drones, systems, and even crew members. You’re also able to sell off unwanted weapons and ship components here for scrap. Shops also sell drone parts, missiles, fuel, and can repair your ship. I wouldn’t recommend going to a shop if you don’t have much scrap, since it’s a waste of time. However, if you’re desperate (for fuel, repairs, etc.), you may still want to drop in.
5. Nothing
Although uncommon, sometimes sectors won’t have anything at all. This can either be a welcome reprieve, or a disappointment.
Now, then. Knowing what to expect is important. But I’m going to move on to a few final, important concepts that are even more essential: Upgrading your ship, and Boarding.
Upgrading Your Ship

If you click on the “ship” button in the top-middle of the screen, you’ll see a screen like this. This is where you upgrade your ship. Upgrading costs a lot of scrap, but it’s how you become more powerful, and allows you to survive later sectors.
The following considerations should be made when upgrading:
- For every major system you upgrade, you will require 1 additional reactor power to fully power that system. IE, if you upgrade weapons by another point you can use more weaponry, but keep in mind doing so will drain more power. Generally, you’ll want to upgrade your reactor with each main system upgrade.
- Minor systems (doors, sensors, autopilot) are automatically at full power, so you don’t have to upgrade your reactor.
- Shields requires 2 bars to grant you an extra “hit.” You can only apply power to shields 2 bars at a time.
- Even if you can’t power a system, if you upgrade it, it can take more damage before it starts losing effectiveness…
- The more you upgrade something, the more expensive it gets. Reactor power gets more expensive at the start of each new column.
- Shields and Engines are probably the two most important main systems to upgrade. Doors is probably the most important subsystem.
Boarding for Fun and Profit
An FTL guide wouldn’t be complete without mention of boarding. This is when you send crew members to the enemy ship to kill the enemy crew, rather than blowing up their ship.
Successfully boarding an enemy ship and killing its crew yields much better rewards than blowing the ship up outright. This can be an increase in scrap, acquiring weapons, and much more…However, there are potential dangers with invading an enemy ship…
The crew itself will fight back, of course. And if you accidentally blow up the ship with your crew on it (or if the enemy ship manages to warp away!), they’re gone. Your teleporter might not recharge before the enemy crew kills you off. But here’s a few simple tips to help keep your boarding party safe:
- Be aware of the enemy’s hull strength. Destroying a system reduces the health of the ship by 1, and can destroy it entirely…
- Try to keep your boarders together, if possible. Your teleporter can only transport 1 room at a time. Plus, they fight better in groups.
- Teleporting crew back to your ship WILL NOT bring enemies in the same room back. Don’t be afraid to get your men out of there!
- If you’re having trouble with the enemy medbay, try blowing it up before sending the crew over.
- If you don’t want to risk your crew, you can invest in boarding drones. Don’t go out of your way to do so, but if you already use drones, it could be worth it.
- This should go without saying, but take care of any intruders on your own ship before sending crew to the enemy’s…
When your ship is boarded, consider the following strategies to take out your enemies:
- Open the airlocks and suck all their air out. Boarders will try to run away from places with no air. This is particularly effective with blast doors, which makes the enemy have to shoot their way through each room.
- Hole up in the medbay if you can’t fight them off directly. Make sure the power’s on. You have a huge advantage there if you can direct them there. Just keep in mind they may try to attack other systems while you’re there, so be sure to herd them away from vital locations if possible.
- Boarding drones suck. That’s all there is to it. They suck out the air from the location they land with a hull breach, and don’t need to breathe. They are extremely dangerous, and should be killed ASAP.
- As before, try to stick together. If you can take a boarding party with a few people, do it, but grouping up makes it more efficient.
It should be noted that Mantis have, by far, the most power in combat, followed by rock men. Use them well if fighting enemies, and be careful when fighting them yourself! The weakest in a fight are Zoltan and Engi.
Ending Comments
Thanks for taking the time to read this beginner’s guide. I hope it helps!
If this guide gets positive feedback, I’ll make a more advanced guide later to help all you captains who want to take their game to the next level. If there are any questions or comments, please leave them below.
Best of luck out there in the galaxy…you’re going to need it.