Intro
 Estrutura diferente:
Este título apresenta uma exploração mais ampla do que o anterior que se limitava ao castelo. Neste, o personagem passa a maior parte do tempo em ambientes externos podendo observar até a transição de dia e noite. Pode comprar armas e objetos (pagando primitivamente com os corações adquiridos) e conversar com NPC’s, coisa que não acontecia no primeiro jogo.
Different structure:
This title presents a wider exploration than the previous one that was limited to the castle. Here, the character spends most of his time outdoors and can even see the transition from day to night. You can buy weapons and objects (paying primarily with your purchased hearts) and chat with NPCs, something that didn’t happen in the first game.
Famigerado?:
Sendo um jogo igualmente amado e odiado pelos fãs da série, Castlevania 2 é inegavelmente um colaborador potencial para o estilo de sucesso dos títulos mais atuais (sotn+). A prova disso é que existem locais que só podem ser acessados com o auxilio de certas armas, outros com talismãs específicos equipados, auxílio de npcs com dicas e por fim, finais ligeiramente alternativos.
Poderia até dizer (dentro das limitações da época em que foi feito) que este é um antecessor primitivo dos atuais “mundos abertos” pois, além da visão lateral (plataforma) o combate é no estilo ação em tempo real (oque elimina muitos rpg’s tradicionais) e o personagem de fato explora diversas localidades durante dias e noites (dentro do jogo) podendo até andar em uma única direção e dar a volta ao mundo, retornando a sua posição inicial!
Notorious ?:
Being a game equally loved and hated by fans of the series, Castlevania 2 is undeniably a potential contributor to the successful style of the most current titles (sotn +). The proof of this is that there are places that can only be accessed with the help of certain weapons, others with specific equipped talismans, aid of npcs with tips and finally, slightly alternative endings.
I could even say (within the limitations of the time when it was made) that this is a primitive predecessor of the current “open worlds” because, in addition to the side view (platform) the combat is in the style of real-time action (which eliminates many traditional rpg’s) ) and the character actually explores different locations for days and nights (within the game) and can even walk in one direction and go around the world, returning to his original position!
Moldando a série:
Este é um dos poucos títulos (antigos) que trazem o mesmo personagem para combater drácula uma segunda vez. A intenção da série posteriormente foi de que gerações mais novas treinassem para combater o conde drácula, que retornaria a cada 100 anos, Então, Simon divide com Ritcher e Alucard um título de maior participação em jogos das séries (contando com remakes).
Casting series:
This is one of the few (old) titles that bring the same character to fight dracula a second time. The intention of the series later was for younger generations to train to fight the Count Dracula, who would return every 100 years. So, Simon shares with Ritcher and Alucard a title of greater participation in games in the series (relying on remakes).
Referências:
Em Castlevania 2 percebemos que mais Lore foi adicionado na intenção de compor um pano de fundo pra história. Então embora no primeiro jogo já houvesse referências como a Múmia, criaturas mitológicas como a cabeça da medusa e até um chefão que seria a criatura de frankenstein de mary shelley, Nessa versão as referências passaram a ser mais voltadas ao culto vampírico como os nomes das mansões (principalmente a bran, referência ao real castelo de Bran, e posteriormente a Bran stoker, escritor de drácula) Outra: Camilla que em outras versões assume o papel da condessa de sangue: Elizabeth bathory. Porém a referência mais evidente são aos filmes clássicos da HAMMER, um específico onde drácula havia sido derrotado e suas partes colecionadas. Deste momento em diante, a série se enriqueceria com muitas e muitas referências, de várias esferas.
References:
In Castlevania 2 we noticed that more Lore was added in order to compose a backdrop for the story. So although in the first game there were already references like the Mummy, mythological creatures like the medusa heads and even a big boss who would be the creature of frankenstein by mary shelley. (mainly bran, reference to the real castle of Bran, and later to Bran stoker, writer of dracula) Another: Camilla who in other versions assumes the role of the blood countess: Elizabeth bathory. However, the most evident reference is to the classic HAMMER films, a specific one where dracula had been defeated and its parts collected. From that moment on, the series would be enriched with many, many references, from various spheres.
Part 1 – Town of Jova > Berkeley Mansion

You start the game in the city of Jova with 50 hearts, but to progress you will need the white crystal and the holly water no matter which you purchase first. Use a right exit for Jova Woods and kill like creatures to get more hearts. In this city there is also a more powerful whip for sale (thorn whip) then the best is return here with 200 hearts in total. buy everything and continue the adventure.

Now you must always go to the right, killing the forest monsters and avoiding falls on the bridge scenery. When you arrive at Veros Woods there will be two paths: the top one that leads to Berkeley’s Mansion and the bottom one, which is the Town of Veros. Follow the bottom one.

You are in the Town of Veros. Here you can buy the dagger for 50 hearts and the chain whip for 150 hearts. There are several tips with the inhabitants, but the important thing is to take the right exit towards Dabi.

In this cave you encounter several enemies. Continue up the stairs and when you reach the top, jump over the two blocks on the right. You will access the next chamber. Go down the platforms and when you touch the ground avoid the right exit, use Holly water in the two blocks on the left and go to a wall, use Holly water in it again to reveal the weapon: Sacred Flame.

After collecting the flame, go back to the top of the previous stage and use the left exit! Leaving the cave, go through the forest of spiders and skeletons until you reach Berkeley’s Mansion.

Upon entering you will not be able to proceed unless you equip the white crystal. A mobile platform will appear, allowing you to move forward. Keep going up to the top and on the right side you will notice two intangible blocks. Maneuver by jumping over the spikes to catch the clue (A) hidden inside the wall using holly water, redo the climb and hit the jump to the other side, repeat the process on the other side and take the clue (B). On this side there is a seller who offers an oak stake, buy it for 50 hearts.

Go down two flights of stairs and head to the right to find the clue (C) inside the wall. go down another flight of stairs and pay attention to the pillars at the bottom of the screen: the second pillar that does not go down to the floor indicates the false floor (intangible blocks) jump to avoid falling and having to go back all the way! Go up the ladder ahead and you will be in a chamber with several bodies hanging. Climb up to the pedestal, equip the oak stake and use it on the crystal ball. Okay, now you’ve got the dracula rib. When equipped it will serve as a shield for projectiles whenever you are standing or jumping!
Part 2 – Berkeley’s Mansion > Rover Mansion

In front of the Berkeley Mansion, you must make your way back to the Dabi’s cave, head right. Use the exit on the right where you got the sacred flame and you will be in another forest: Aljiba Woods. Keep killing the spiders and going right to the Town of Aljiba, ignore any stairs that go down as you will come back here for this later!
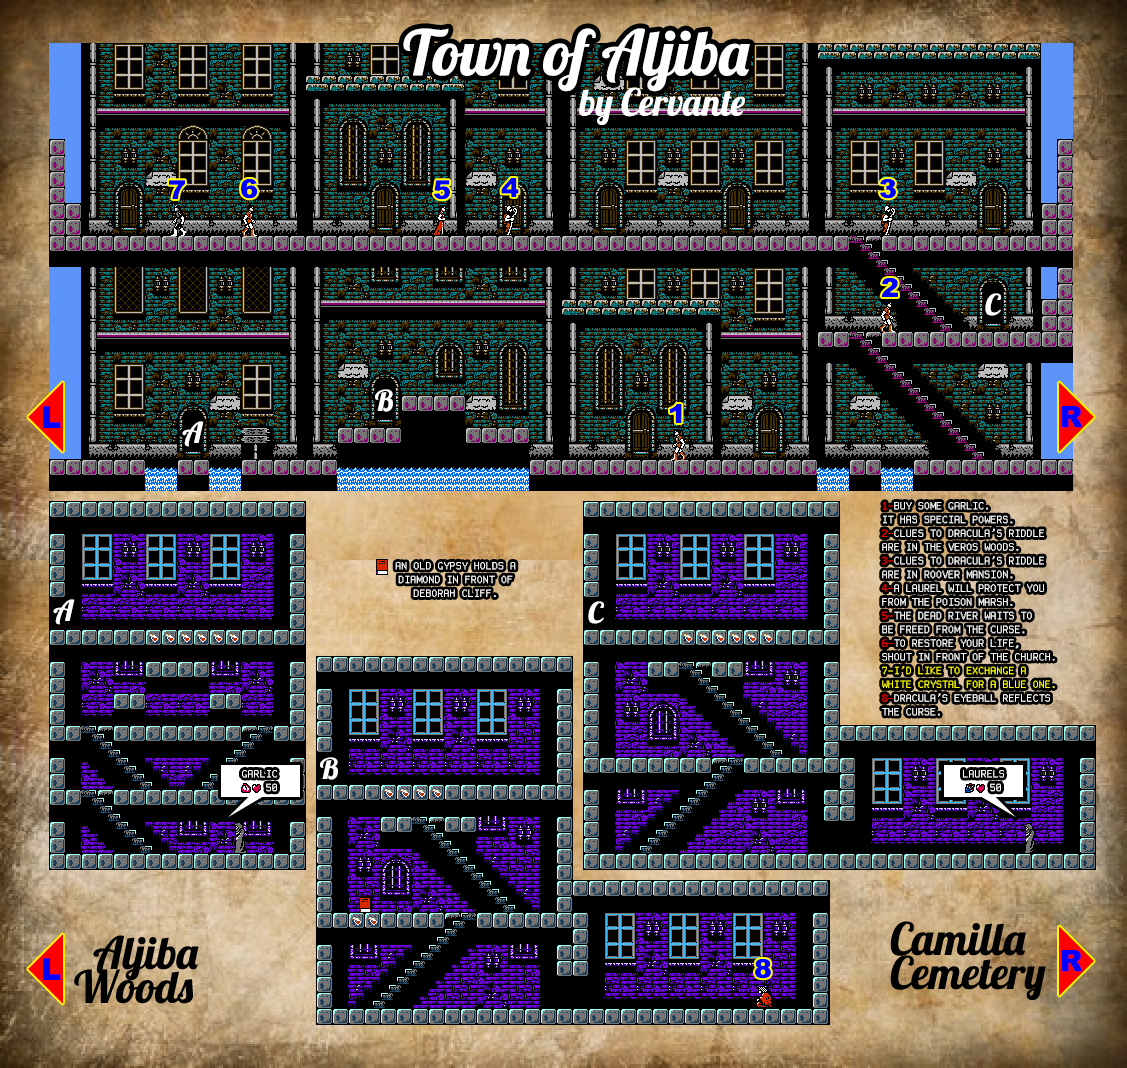
In Aljiba buy some Garlic and Laurel, but don’t forget the most important one: exchange the white crystal for the blue one with the adventurer at the top of the city!

Now take the exit on the right (camilla cemetery) and as soon as you enter the new stage, use 1 garlic. a ♥♥♥♥♥ will appear and present you with a silver dagger! Go back and cross the city back to Aljiba Woods. Go left going to the beginning of the forest, go down the stairs and follow the right.
You will enter a purple cave with several skeletons and a few eyeballs. After the part with mobile platforms, take the right exit and you will be in front of a lake. Equip the blue crystal and kneel for a few seconds. A passage through the lake will open, and you will be able to descend without fear of dying! Go and enter the mansion hidden under the lake: The Rover Mansion!

Here just go to the right, jump on the platform over the water and take a leap of faith through the intangible blocks to the next area. Basically the whole area above is only for the collection of hearts, but the only way to advance in the mansion is to jump through this false wall!

In the second part, go to the right and carefully pass through the purple barrier, avoiding falling into the water. Take the clue above and buy from ♥♥♥♥♥ below a oak stake for 50 hearts. Climb all the stairs and climb to the top, find another clue hidden in the wall on the right side (use holly water) then go down to the room with hanging bodies. Go up to the altar and use the stake in the crystal ball to get Dracula’s Heart! This item will only take effect when equipped in a future situation! Before leaving the mansion, go back to the ♥♥♥♥♥ and buy another stake!
Part 3 – Rover Mansion > Brahm’s Mansion
Fora da Mansão Rover, siga pra esquerda e suba pelo lago retomando o caminho até a cidade de Jova, onde você iniciou a aventura. O caminho mais rápido é seguindo apenas pra esquerda e passando em frente a Mansão Berkeley. Você vai precisar de pelo menos um Laurel então, se não comprou anteriormente, faça o caminho de Veros e compre um.
Outside the Rover Mansion, go left back to the lake and return to Jova, where you started the adventure. The quickest way is just to the left and passing in front of the Berkeley Mansion. You will need at least one Laurel so, if you haven’t bought it before, head over to Veros and buy one.

Take the left exit of Jova and follow the Belasco swamp with the dracula rib equipped (shield) this will protect you from the projectiles. Fight the lizard men and wolfs until you reach the poisonous swamp. Use a Laurel and head left quickly without making any attacks as you will not be hurt by poison or creatures on the way! In the next stage you will be at Dead River. Kill the lizard men and walk to the edge, equip the dracula heart, get on the ferry and talk to the ferrymen to be taken to an islet and be careful with the lizard man who jump out of the lake. (if you don’t equip the dracula’s heart, the ferrymen will take you to the other side of the river!)

Before entering the mansion, go left to the location of the platforms on the water: they go up and down and you should only jump when they go up to gain momentum! Get to the other end and continue to the left. In the next area there are eagles, ghosts, a mummy, medusa heads and a venus plant that is easier to fight with the equipped shield. Arriving at the far left a ♥♥♥♥♥ woman will give you the Diamond weapon which, when launched, bounces off enemies on the way.
Dentro da Mansão: Siga subindo as escadas e matando os inimigos até chegar ao gárgula do topo, após mata-lo, siga pro próximo estagio á direita. Após matar os dois gárgulas desça a escada, pule os espinhos e colete uma pista enterrada nos últimos pisos da direita. Prossiga pela esquerda e você encontrará uma cigana vendendo estacas. Desça até o último andar e, após a câmara com morcegos, você encontrará um chefão: O Ceifador!
Inside the Mansion: Continue up the stairs and kill the enemies until you reach the top gargoyle, after killing it, proceed to the next stage on the right. After killing the two gargoyles go down the ladder, jump over the spikes and collect a clue buried in the top floors on the right. Proceed to the left and you will find a ♥♥♥♥♥ woman selling stakes. Go down to the top floor and, after the bat chamber, you will find a big boss: The Reaper!

To beat the reaper before entering the room, equip the sacred flame. Enter and run to the right side (pass under him) throw the flame to stun him and attack with the whip. repeat the process without give him time to move and you will win without problems! He will drop the golden dagger: A weapon that, when launched, does not disappear until hits an enemy and becomes a flame that also causes damage! In the next room use the stake in the crystal ball and collect the eye of dracula: When equipped it allows you to see hidden clues even before you find them! Ignore the new reaper, make your way back and exit the mansion.
Part 4 – Brahm’s Mansion > Bodley Mansion

Without equipping the heart of dracula, take the ferry that will follow until the margin in the marsh Belasco. stay on the ferry when it hits the bank and turn left (this time it will leave you on the slope of the city of Alba. The important thing here is to change the blue crystal for the red one, do it and go to the left exit.

In Sadam Woods go to the left killing the slimes (sacred flame helps) and the bone pillars (shield helps) until you reach the first ladder, go down the first flight and jump to the left avoiding falling into the poisonous swamp through the false blocks. The next area is the strigoi cemetery. You will fight enemies in the same way until you reach a dead end, use a Garlic to summon a ♥♥♥♥♥ who in return will give you a bag of silk! This item increases your ability to carry Garlics and Laurels! Make your way back and enter the city of Ondol on the left.

In Ondol the most important thing to do is to buy Morning Star for 200 hearts. If you can, supply the Laurels.

Use the left exit and follow to Jam Wateland killing the creatures. Jump on platforms using momentum and at the dead end use holly water on the floor to reveal a clue. further up there are 4 blocks, equip the red crystal and kneel on the third block for a few seconds. A tornado will appear and take you to the entrance to Bodley Mansion!

If you have a spare stake in the inventory, this is going to be a quick foray: go right without going up the stairs, cross the false wall and keep going right. in the part with spikes you can destroy the blocks with mash. Go to the hanging room and destroy the crystal ball with the stake. You will acquire the dracula’s nail: when equipped, your whip can destroy blocks that only the holly water
would destroy!

There is a track hidden in an area above that chamber and a ♥♥♥♥♥ who sells stakes, should you need it. Otherwise, make your way back and leave the mansion!
Part 5 – Bodley Mansion > Laruba Mansion

At the front of the Bodley mansion, take the left path until you reach a lake. Equip the red crystal and kneel, a path will open in front of you, go down to the left. You will enter the path of Uta, a cave with waterfalls full of skeletons. Keep on the ground, skip the first block and keep going left without going up, you will find blue platforms over the water, jump over them and at the end there will be a wall that can be destroyed (mash or whip with a dracula nail) when enter talk to the ♥♥♥♥♥ under the spider web. It will enchant your morning star with flames, making it more powerful! turn around the blocks with the intention of taking the left exit from this area (at the top of this cave there is nothing interesting except creatures to fight).

Now you’re in devious woods, keep killing enemies and find a clue hidden in the ground near the first humanoid on fire. Cross the river by the platforms and continue, you will arrive at another poisonous swamp: Jova Marsh. Have plenty of Laurels and when using them, just follow the path without wasting time killing creatures. After this part you will arrive at Laruba Mansion.
Nesta primeira parte da mansão o caminho é simples: basta subir algumas escadas e combater os inimigos até alcançar a porta da direita.
In this first part of the mansion the path is simple: just go up some stairs and fight the enemies until you reach the right door.

The second part is more complicated: After buying the stake with the ♥♥♥♥♥, you start a descent, the skeletons that throw bones will dodge with jumps and eventually fall on a lower platform, making your path very difficult. Try to kill them before that happens! Before entering the Big Boss chamber, you can go left until you find a ♥♥♥♥♥ who will gladly give you some laurels!

The fight against Camilla’s mask is simple: before entering the chamber, equip the dracula’s rib and enter. The mask will release a fireball that hits the ground and splits into several. Stay at the correct distance to hit lashes and the shield (dracula’s rib) will defend the projectiles. When she spins around the screen, hit her with the gold dagger and the whip. Repeat the process until you kill it and get the Magic Cross! Go to the next room and use the stake in the crystal ball to get the dracula ring (which has no effect but will be necessary to enter castlevania) and then leave the mansion.
Part 6 – Laruba Mansion > Castlevania
Fora da mansão, agora você possui as 5 partes de drácula e a cruz mágica, próximo alvo é enfim Castlevania! Siga pela direita de volta a Jova Marsh, atravesse o pântano venenoso usando os laurels que ganhou até chegar em Devious Woods, continue á direita até o caminho de Uta e suba aquele lago voltando a mansão Bodley.
Outside the mansion, you now have the 5 parts of Dracula and the magic cross, the next target is Castlevania! Go right back to Jova Marsh, cross the poisonous swamp using the laurels you won until you reach Devious Woods, continue right until the Uta path and go up that lake back to Bodley mansion.
Sem entrar na mansão, siga pela direita para Wicked Ditch, uma floresta petrificada com múmias, mate-as até chegar na vênus plant, com o escudo é fácil mata-la. Depois haverá harpias e cabeças de medusa. a saída da direita leva a cidade de Doina.
Without entering the mansion, take the right to Wicked Ditch, a petrified forest with mummies, kill them until you reach the venus plant, with the shield it is easy to kill it. Then there will be harpies and medusa heads. the right exit leads to the city of Doina.

You are not much loved in this city, the only two useful things here are: the church to rest and a gipsy saleswoman from Laurels. exit on the right to the north bridge.

Keep killing the skeletons and fishmen that jump and spit on fast fireballs. On the next screen you will be in Dora Woods. The monsters in this area are fast and spit projectiles as well. Cross the poisonous marsh and go down the stairs taking the path down to the city of Yomi (following the path up, there will be a long road that ends in a dead end!).

There is nothing to do in this dead city. Due to its proximity to Castlavania, it was abandoned, except for an old woman in the last house on the right who invites you to live with her. cross the city and exit on the right.

In Vlad Graveyard keep killing mummies, vultures and ghosts. the next screen will be the bridge to Castlevania. If you got the 5 parts of Dracula and the magic cross, the first blocks that block the bridge can be broken with holy water or whip with the equipped Dracula nail. Go quietly over the empty bridge until you reach Castlevania.

Within the ruins of Castlevania, you will notice that the whole place is deserted. Follow the path without fear to the section where you must destroy blocks with holy water to descend. Continue down to the dracula chamber. As soon as he enters, Simon will automatically burn the count’s parts on the altar making it materialize. Have the golden dagger equipped and use it constantly that you will kill him without having time to move! Congratulations, you’ve finished the game!
Endings
Neste jogo, Já haviam finais alternativos que eram conseguidos de acordo com o numero de dias (in-game) que você demorava para chegar ao final:
15 dias ou mais
O final é em preto-e-branco e o texto implica que Simon não sobreviveu.
de 8 a 14 dias
O final é colorido e o texto diz que Simon não sobreviveu.
7 dias ou menos
O final é colorido e há uma cena adicional após o texto.
In this game, there were already alternative endings that were achieved according to the number of days (in-game) it took you to reach the end:
15 days or more
The ending is in black and white and the text implies that Simon did not survive.
8 to 14 days
The ending is colorful and the text says that Simon did not survive.
7 days or less
The ending is colorful and there is an additional scene after the text.