Overview
Just a collection of general information concerning the new Chaos Wastes gameplay mode. Covers Holseher’s map, Equipment as well as Boons and Potions
1. General Information, Goal, etc.
Welcome to the Chaos Wastes, Fatshark’s latest addition to Vermintide 2. And welcome to this small guide covering some general information for the players.
1.1 Chaos Wastes – What are they
Lore-wise the Chaos Wastes are the area covering the northern part of the world (not to be confused with the Wastes of Chaos in the south or the Realm of Chaos) near the portal to the Warp. Due to the proximity to the chaos portal and the general harsh environmental conditions the Chaos Wastes are not a place for the civilized man. As such they are mostly inhabited by nomadic tribes and Beastmen. Many, many Beastmen.
Gameplay-wise the Chaos Wastes are a new rogue-lite gameplay mode for Vermintide offering 15 new locations with more randomized set-ups including the acquisition of new boonsand equipment over the run to get even more powerful for slaying your foes.
1.2 Chaos Wastes – What is the goal
The “end goal” of the Chaos Wastes story-wise is to reach the Citadel of Eternity in order to communicate with the gods. Gameplay-wise this relates to a total of four expeditions which have to be performed – each with their respective final area:
- Expedition of Fortitude – Arena of Fortitude
- Expedition of Courage – Arena of Courage
- Expedition of Determination – Arena of Determination
- Expedition to the Citadel of Eternity – Citadel of Eternity (one full map & one arena)
The first three are to find scrolls in order to gain the favour of the gods and to open the way to the Citadel of Eternity which makes up the fourth and last expedition. Each expedition has one final area which has to be reached by completing a series of four maps before. There is a total of 11 available maps which are about half the length of most adventure maps – and with one exception completely new locations – and with multiple different branches inside the maps themselves:
- Bel’sha’ziier’s Mine
- Cinder Peak
- Count Mordrek’s Fortress
- Grimblood’s Stronghold
- Holseher’s Tower
- Pinnacle of Nightmares
- Slaughter Bay
- The Foetid Gorge
- The Forbidden Trail
- The lost City of Marakza
- The Pit of Reflection
Each of the expeditions is cursed by a different Chaos God meaning that the final area of an expedition will always have a curse of this specific Chaos God. Additional curses of other gods can be encountered on the maps inbetween based on randomness. The Chaos Gods curse per expedition are changing each week to add more diversity.
1.3 Chaos Wastes – Equipment, Talents, Bots, Late Joiners
Due to the rogue-lite nature of the Chaos Wastes there will be more randomness involved. This means that you start rather weak and grow more and more powerful over the course of each run. The good news though is that you start with the exact equipment and talents you have chosen in the Keep.
Equipment: For your equipment traits and properties as well as power have been removed and reduced (power level depends on difficulty). You basically play with white equipment. This can be upgraded over the course of the run in exchange for Pilgrim’s Coins (which can be found randomly over the course of the maps as well as for slaying monsters). Depending on the reliquary you find you can either upgrade your current equipment or trade in for a random new equipment for a cheaper price.
Talents: Situation looks better as you start with all your Keep talents and only add up on that one. Over the course of the expedition you can gain several new boons/talents. This can range from the missing talents of your career you haven’t chosen (yes, you can get two or even three of the talents in the same row), Charm/Trinket/Necklace traits or completely new boons exclusive to the Chaos Wastes. There are a lot of new interesting boons all together allowing really powerful combinations and gameplay not being possible before.
Bots: For the solo players depending on bots the situation looks rather mixed. While Bots start with their Keep talents they do not gain any additional boons over the course of the run. However, bots will follow the power-level of the host: [link]
Also, the more bots you have in the team the more coins will be gained per pick-up: [link] . The amount of coin increase for playing with bots has increased with Patch 4.4: [link]
With this they stay halfway relevant over the course of an expedition, however due to the missing CW boons they are missing out on power. As such they will alwys feel weaker in comparison to their adventure counter parts. Up to Champion and Legend difficulty they have their usage. Cataclysm is better doable with other human players.
Late Joiners: The good news is that in contrast to the Weaves new players can join over the course of the whole expedition. Due to the in-expedition progress nature of the Chaos Wastes it comes with issue though. Namely, the player has no boons while and still white equipment while his team mates may have already gained multiple boons and more power. So you are comparatively far weaker. It is only slightly compensated by the gainage of some Pilgrim’s coins. On the bright side, map completion bonus of all prior maps count for joining players.
As minor sidenote for late joiners: Upon joining a map in progress you can hear if the Chest of Trials has already been opened or not by its characteristic sound.
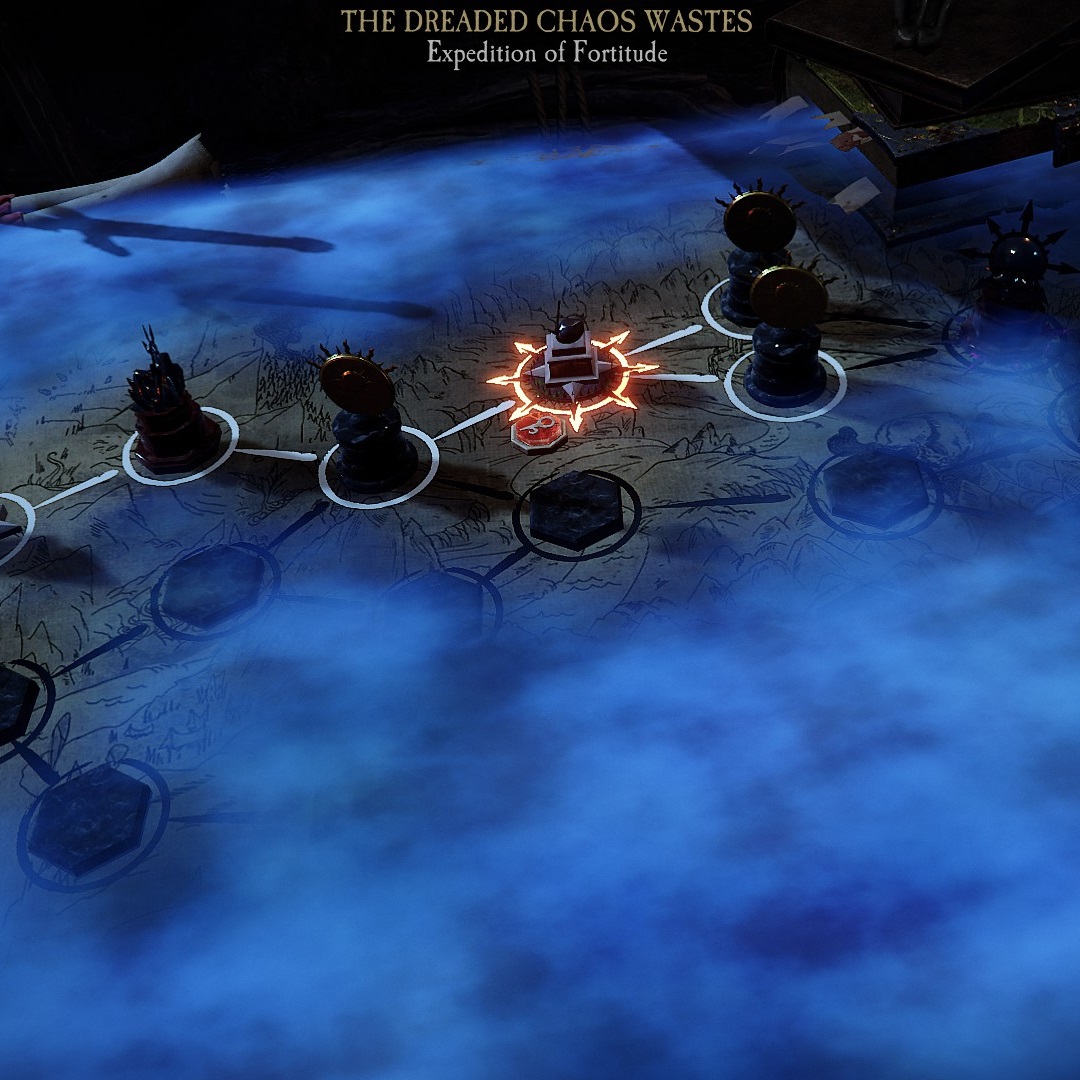
2. Holseher’s Map
Holseher’s Map is the starting screen of every expedition. You start at the left side and can see the first two locations of every branch as well as the goal of your current expedition. The rest is hidden in the mist of the Chaos Wastes. By hovering over a location icon with the mouse you can get some information about the next destinations.


The information (second screenshot can be enlarged by opening in a new tab) presented for the next location(s) covers:
- Potential map curse (not the specific curse, only which Chaos God is cursing you)
- Name of the map
- Which enemy combination you are fighting
- Combination of the two Map modifiers: more/less horde, more/less specials, more Pilgrim’s coins, more health items, more/less monsters, more/less elites, more/less specials etc.
- Reward upon completion of the map
The first subsequent location is also visible having mostly the same information minus the enemy combination. Every location after this is hidden in the mist until you beat more maps. Chaos Gods curses can also be seen in the form of a colored halo around the specific icon.
The information shall help you to make a decision where you want to go next by comparing which modifiers you want to have / to avoid as well as which map reward will be the most helpful for you / your team / your build. As different people might have different preferences, disagreement may be possible. As such the next to-be-played map is decided by a simple majority vote. It shall also be noted that it is possible to get/play the same location twice in succesion on Holseher’s map.
As can be seen in the second screenshot there are not only map locations on Holseher’s map but also Shrines – identifiable by the sun symbol atop – which function as “store”. There you can buy for Pilgrim’s coins additional boons for yourself (four to chose and all can be bought if enough coins) or for your team (two or three depending on the specific shrine). The shrine specific miracles will be covered later.
3a. Equipment & Upgrades
As mentioned in Chapter 1 before, the player and bots start with the same equipment they have chosen in the Keep, although far weaker. Basically, you start with white equipment without any traits and properties and a reduced power level. The starting and maximum power level of the weapons in Chaos Wastes hereby depend on the difficulty. For Cataclysm for example you start with a power level of 400 and you can upgrade up to a power level of 700 (red weapons).
There are two ways for upgrading your equipment split over three different altars:
The two left altars are for melee and ranged weapons respectively while the right altar can be used both for melee and range depending on what you are currently holding. The two left altars provide one random weapon upon activation, the right one does improve the weapon you currently hold. The altars are hereby colour-coded. This means green altars upgrade to green weapons, blue altars to blue weapons and so on. Each upgrade does not only improve the power level but also give access to traits and properties depending on colour. Altars for weapon upgrades can only be used if your current weapon is of “weaker” colour. All of the upgrades as mentioned before cost Pilgrim’s coins dependent of the kind of upgrade. The costs and colour effects are summarized in the following table:

So basically if you want to keep control and the weapon you are currently using, you have to pay twice the amount of Pilgrim’s Coins in comparison to the random altars. Coins which can’t be used for other upgrade like Boons and Miracles. Also, if you want to get properties, traits and more power you have to improve your equipment.
For clarification, the power+ values are in comparison to the starting values of the white equipment you start with. So for Cataclysm the power levels would be: 450 – 500 – 550 – 600 – 700
Also, it is noteworthy to mention that the Upgrade Altars are indeed “just” upgrading. This means that properties and traits you roll on lower rarities will keep the same while upgrading. If you get – for instance – + Pilgrims coins on a green weapon, the property will stay throughout the whole upgrade cycle. Same for the traits and upgrades from orange to red rarity. Conversely, this means that if you want to change traits and properties using the random weapon altars is your only choice.
Sidenote: As runs are rather long, you might sometimes forgot what weapons (and especially properties) you have. This can be easily countered by pressing the inspection button (default on “i”):
As you can see, the weapon power, rarity, traits and properties are shown both for your melee and your range weapon. In addition, you can also what items you are carrying and what their effect is. While this is rather pointless for healing items and bombs, it will be a real help for your potions as the Chaos Wastes have several new potions with new effects (see Chapter 6 for more information). Furthermore, active miracles are also shown on the inspection page.

3b. Exclusive Weapon Traits
There are a few Chaos Wastes exclusive weapon traits which I will list here. I am still missing a screenshot of the metallic shard trait. Take also note that in contrast to the Boons I had from the preview build I have only the german version here, so the translation might not be 1 to 1 to the english original. Also for reasons unknown four of the five listed traits has the same icon. This is not an error (at least on my part).


4. Miracles, Boons, other Bonuses
As previously mentioned each Chaos Wastes run will start with the talents you’ve chosen in the Keep. In addition to this you can gain further Boons, Miracles and other Bonuses over the course of your expedition. While they are mostly random, there are minimal influence possibilities.
4.1 Other Bonuses
Let’s start at the back. As shown in the screenshot in Chapter 2, completion of each map during an expedition run grants you a bonus. These bonuses are more or less equivalent to the properties currently available in adventure mode:
- + 10 % Attack Speed
- + 30 % Block Cost Reduction
- + 20 % Cooldown Reduction
- + 10 % Crit Chance
- + 40 % Crit Power
- + 20 % Health
- + 5 % Movement Speed
- + 60 % Push/Block Angle
- + 30 % Stamina Recovery
- + 4 Stamina
So by chosing your route through the Wastes you have one tool to influence your build in your favour.
4.2 Seer’s Altar and Chest of Trials
These bonus boons can be gained during a map run, so make sure to search well. There are two different possibilities. The first one is the Seer’s Altar:
The usage of the Seer’s Altar will grant you one random boon of random rarity for 200 Pilgrim’s Coins. It will appear for a short time in the middle of the screen with a short description of its effect. As mentioned before unused talents from the career skill tree (meaning you can have two or even all three talents of the same talent row), Charm/Trinket/Necklace traits as well as boons unique to the Wastes can be gained. Seer’s Altar have a random chance of appearing during a map with multiple Seer’s Altar being able to appear in a single map. So you can gain multiple boons in a single map. If you have the coins for it ……

The second possibility for new boons is the Chest of Trials:
Upon activation of a Chest of Trial a random boss will appear on the map with the clear intention to murder you. For better chances, it is recommanded to activate the Chests after the last horde. Upon defeat of the boss or a prolonged passage of time (about 130 seconds) – in case boss bugs out for example – the Chest of Trials will unlock and will provide you with a choice between three different boons of which you can chose one, giving you another possibility to influence your build. So the Chests of Trials have both the advantage of not costing Pilgrim’s coins (actually you gain coins by killing the boss unless you ledged it) and giving you an actual choice for your talent upgrade. Per map exactly one Chest of Trials will spawn. Don’t miss it.

4.3 Holseher’s Map Shrines
Instead of a new location, you can also find Shrines on Holseher’s map. Usually you will cross a Shrine on all branches and at least once per expedition:
On the right side, you can see the boons. These will only influence and have a cost depending on the rarity of the specific boons (Rare for 200 Pilgrim’s Coins, Exotic for 250 Pilgrim’s Coins and Unique for 300 Pilgrim’s Coins). There are four boons for choice and ALL can be bought if you have enough Pilgrim’s coins. On the left side, you can see the Miracle’s of the Gods which functions as “group boons” and are most of the time either one-use items or one-map bonuses. These miracles are always the same per Shrine with three different Shrines existing in total:

Special Sidenot: Similar to the weapon properties, you might sometimes forget what kind of boons you have picked up on your run. Actually, for boons this issue is even more prevelant due to the insane amount of potential boons. As such you can also inspect your boons at all times by pressing “i”.
Further information can be accessed by pressing the right mouse button and hovering over the specific boon icon showing its description. In addition, current active Miracles are shown.

5a. Exclusive Boons – Part 1
As mentioned before the Chest of Trials, the Seer’s Altar and the Holseher’s Map Shrines have all the chance for providing either unused talents from the career skill tree, Charm/Trinket/Necklace traits or boons exclusive to the Chaos Wastes. As the career skill tree talents and the Charm/Trinket/Necklace traits are well known or can easily be looked up I will just provide information on the Chaos Wastes exclusive boons (total of 50) as I gather them:


5b. Exclusive Talents – Part 2
Follow Up due to the character limitation or whatever.


6. Potions
Potions are another big change in the Chaos Wastes. Nowhere to be found are the usual strength, speed or concentration potions. However, as replacement we got 8 new potions with new (although familiar) unique effects. Sad part, is that they are all red making them kinda hard to distinguish.
However, there are two helps for this. The first is the weapon inspection button as described in Chapter 3 which will show you which Potion you are carrying together with a description of its effect. The second one is that each potion got an unique icon attached to them, making distinction possible. Familiarization with the specific icons will help you to remember which potion you or your bots / fellow human players are carrying.


7. Curses
Most of the guide so far (with the exception of the potential map modifier) has been about the boons, bonuses and miracles the heroes can acquire as well as their equipment. However, these are the Chaos Wastes and the influence of the Chaos Gods is ever prevelant.
As such each map has the chance to be cursed by one of the four Chaos Gods (Khorn, Nurgle, Slaaneseh and Tzeentch), indicated by the halos around the map symbols on Holseher’s map. Upon moving the mouse over the map you can also see which Chaos God is cursing it, however not which of his three potential curses is active. In addition to the random chances for curse, you have one guaranteed curse and that is for the final arena map which is identical to the “expedition curse”. This one will rotate every week. The Chaos Gods’ curses are summarized in the following table:


8. Rewards
So what are the rewards for playing the new Chaos Wastes game mode? One of the largest criticism for Weaves was that there was no reward which could be used in the Adventure Mode. This has been solved for Chaos Wastes as you get normal loot chests. You get one – after beating the first map – with increasing value depending on how much Pilgrim’s Coins you collected, how many Chest or Trials and Curses you conquered. So the farer you get in the expedition the better this chest will be. You get two more Emperor Loot Boxes if you successfully finish the Expedition. So for a time frame of about one hour you can get three chests which is about equal to the acquisition rate of the Adventure Mode.
That said, there is no loot or some other kind of meta-progression for Chaos Wastes mode itself. You always start anew the same as before with the same strength. So the loot chests are kinda redundant for the Chaos Wastes mode itself.
In addition to the regular rewards there are also one-time rewards in the form of frames which can be earned for conquering an expedition for each of the four Chaos Gods and also for finishing the Citadel of Eternity with each character on Champion, Legend and Cataclysm.
9. Final Remarks
Guide is mostly done and should be about 98 % finished. Looking for screenshots of missing stuff. Will add them as soon as I get a screenshot of them. Also will replace the current screenshotted boon icons with the cleaner versions.
Sadly my gif is to large to present it here. As such:
Thank you for reading.
If you have any further questions feel free to post them and I’ll check if I can answer them.
Acknowledgement: Better looking (and not screenshotted-and-paint-modified) boon icons have been provided as a courtesy by Royale w/ Cheese. Also in the doubtful case you haven’t noticed, you can find his guide here:
[link]
It has some smaller additional sections like Grail Knight, Potion Decanter Effect or Base Game ported Boons.