Overview
A breakdown of various optimized themed builds I created for fun, detailing skill choices, equipment choices and where to get said skills & equipment. A build of every element – sometimes, a build for two elements!
Changelogs
None right now. Quite happy with how it turned out, and if should I ever think of something to add to this guide or end up working on something for it, I’ll make sure to update this section first.
- Created the guide, detailing the four original builds: ‘Battle Skald (Frost)’, ‘Incanter (Fire)’, ‘Ranger (Decay & Physical)’, and ‘Chancellor (Ethereal & Lightning)’.
- Fixed all the screenshots, gave a name to all the builds outside of just their elements.
- Overhauled ‘Battle Skald (Frost)’ by changing one of its breakthrough skill trees from Rune Sage to Warrior Monk, making it stronger overall and more unique by setting it apart from ‘Incanter (Fire)’.
- Added ‘Thaumaturge (Frost & Fire)’.
- Added both the ‘Closing Notes’ and ‘Changelogs’ section to the guide.
- More fixing of formatting errors, typos and inconsistencies in the guide.
- Removed the repeated advice on coming back for the backpacks later on for all builds of Intermediate difficulty and up.
- Added ‘Dagger Dervish (Decay, Fire & Physical)’.
- Added ‘Plague (Decay & Fire)’.
- Added ‘Druid (All Elements)’.
- Adding in an ‘Item Depository’ section and shoving all the mini guides on how to get certain items into that section. Editing the guide to reflect this change.
- Nope, so turns out that putting a guide within a guide was a terrible idea. Item Depository has been made into its own separate guide.
- Retired ‘Plague (Decay & Fire)’ because I misread / mistook the armor bonuses, whoops. That damn Ethereal and Fire symbols are too similar!
- Added ‘Crusader (Lightning)’.
- Overhauled the equipment selection for ‘Incanter (Fire)’ to be even more beginner friendly.
Introduction
Well, not sure if this section is necessary at all.
This guide turned out to be far lengthier than I originally imagined, but essentially I hope to showcase a bunch of builds I made for fun, all conforming to a theme (much like how classes function in a high fantasy RPG).
If you want or need more detailed instructions on exactly where and how to get the items used in these builds, please refer to my second guide here:
Every item I have used in all my builds can be found there and contains detailed, precise instructions that I couldn’t include in my builds due to character limits.
I will rate a build as either Beginner, Intermediate or Advanced NOT based on difficulty of play, but rather how hard it is (in terms of silver requirements and time invested) to get the build working.
For newer players, I have one Beginner build for each faction that are all easy to gear out, so fret not if you’ve already joined a faction! Plus, most of the equipment featured in those builds can typically be found in the same area or two, making it easier to put together and reduces the need to run around everywhere, outside of skills.
Battle Skald (Frost) [Beginner]
Relatively easy to get early on in the game, the Battle Skald is all about weaving heavy hitting Frost spells into the fray between your melee dancing. It also has the hardest hitting melee potential out of all the builds, which really helps cement the whole ‘Spellblade-esque’ playstyle rather solidly.
Faction: Blue Chamber (required for Crimson Plate Armor and Crimson Plate Boots, as well as a faction reward that increases your health by 40 for successfully negotiating with the Giants)
Health: 80
Stamina: 80
Mana: 80
The above can be achieved by investing 4 points into Mana when prompted to at Conflux Mountain.
After picking up the Warrior Monk’s breakthrough and both the Blue Chamber’s Peacekeeper Elixir and 40 bonus health, head back to the Conflux Mountain and invest a further 6 more points (for 10 points invested total) into Mana, for a final result of:
Health: 150
Stamina: 125
Mana: 220
Breakthrough skills trees and the skill itself will be bolded, and I will list the skill trainers in rough order of convenience – I group skill trainers by area, so if you are following this build step by step, also check out the ‘Equipment’ section in order to find what you need to buy from these areas.
Kazite Spellblade (Cierzo, Chersonese):
Fitness (50 silvers)
Spellblade Awakening (500 silvers)
Infuse Frost (600 silvers)
Elemental Discharge (600 silvers)
First Watcher (Conflux Mountain, Chersonese):
Reveal Soul – you have no use for Sigil of Fire, so pick this when prompted. This combined with Spark refills your Mana tank really quickly.
Second Watcher (Conflux Mountain, Chersonese):
Cool (50 silvers) – this is only necessary after you picked up either (or both of) Infuse Frost and Sigil of Ice, but if you want to save yourself a return trip, you should pick up the skill now.
Shaman (Cabal of Wind Tower, Chersonese):
Mana Push (50 silvers) – may as well pick this up while you’re still in Chersonese, and it’s cheap. It’s a bit of a pain to get to though, due to it being locked behind the Ghost Pass, so feel free to skip this and come back after you’ve acquired the Sigil of Ice.
Philosopher (Monsoon, Hallowed Marsh):
Mana Ward (50 silvers)
Leyline Connection (500 silvers)
Sigil of Ice (600 silvers)
Warrior Monk (Monsoon, Hallowed Marsh):
Focus (50 silvers)
Brace (50 silvers)
Steadfast Ascetic (500 silvers)
Perfect Strike or Master of Motions (600 silvers) – both are really good, personal preference.
Flash Onslaught or Counterstrike (600 silvers) – same here, both are great, personal preference.
Wild Hunter (Berg, Enmerkar Forest):
Enrage (50 silvers)
Mercenary (Levant, Abrassar):
Armor Training (100 silvers) – I know it’s a bit of a travel just to pick up one passive, but seriously, buy this.
Wandering Mercenary (Fang & Claw’s Inn, Monsoon, Hallowed Marsh:
Moon Swipe (50 silvers) – Halberds / Staves only. You probably don’t need more AoE, but if you feel like you do, this is a really solid pick up for it.
Instead of going into Warrior Monk, you can opt to abandon that tree entirely and invest into either Mercenary or Rune Sage instead. Investing in Rune Sage actually provides less overall Mana (40 Stamina is converted into 80 total Mana, and you have an abundance of Health so no worries there).
Rune Sage (Berg, Enmerkar Forest):
Rune: Dez (50 silvers) – Blue
Rune: Egoth (50 silvers) – Purple
Well of Mana (500 silvers)
Arcane Syntax (600 silvers)
Internalized Lexicon (600 silvers) – only if you are plan to use the Rotwood Staff, or if you want to free up your Off Hand slot.
Rune Sage provides:
40 mana less mana overall
Runic Protection buff (improved with Runic Prefix, locked behind breakthrough)
Runic Heal (consumes Runic Protection, big burst heal)
Mercenary provides:
10% movement speed increase
40% reduction to stamina costs for sprinting
2 free quick slots (skills / consumables)
It’s really personal preference.
Helmet: White Priest Mitre (bought from Laine the Alchemist in Monsoon, Hallowed Marsh)
Armor: Crimson Plate Armor (follow and join the Blue Chamber faction quest line)
Boots: Crimson Plate Boots (follow and join the Blue Chamber faction quest line)
Backpack: Light Mender’s Backpack (quest acquired at Spire of Light, Hallowed Marsh)
Tent: Mage Tent (bought from Shopkeeper Suul in Levant, Abrassar)
Food: Pot-au-Dey du Pirate (3x Fish, Salt) or Ocean Fricassee (Larva Egg, Fish, Seaweed)
We use everything we can to gain bonus Frost damage. The Wide Blue Hat might be better, as it offers 10 less damage in exchange for an additional 20% mana cost reduction (that’s good), but it looks silly in my opinion.
The backpack can be tricky to get if you’re just starting out, so feel free to pass it up until you’ve got some passable gear and more confidence with the combat system. Now, onto weapon choices.
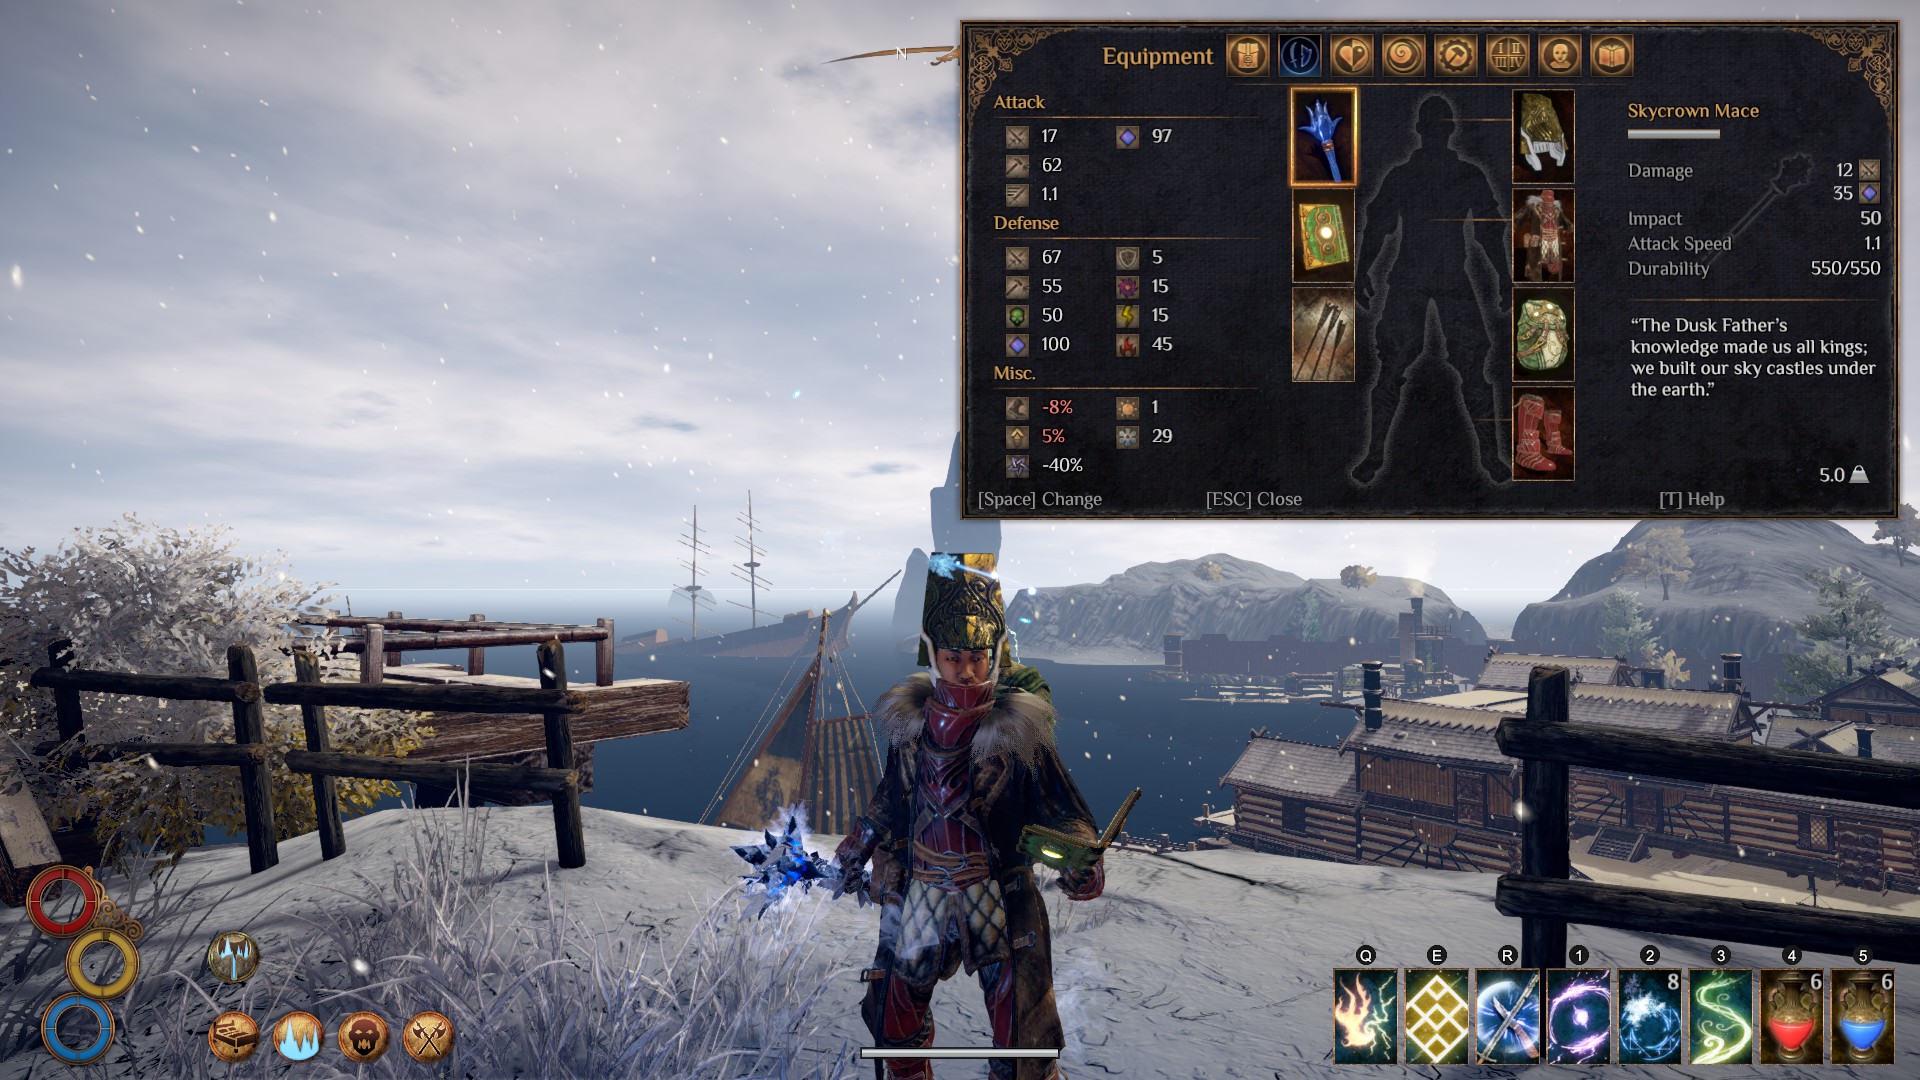
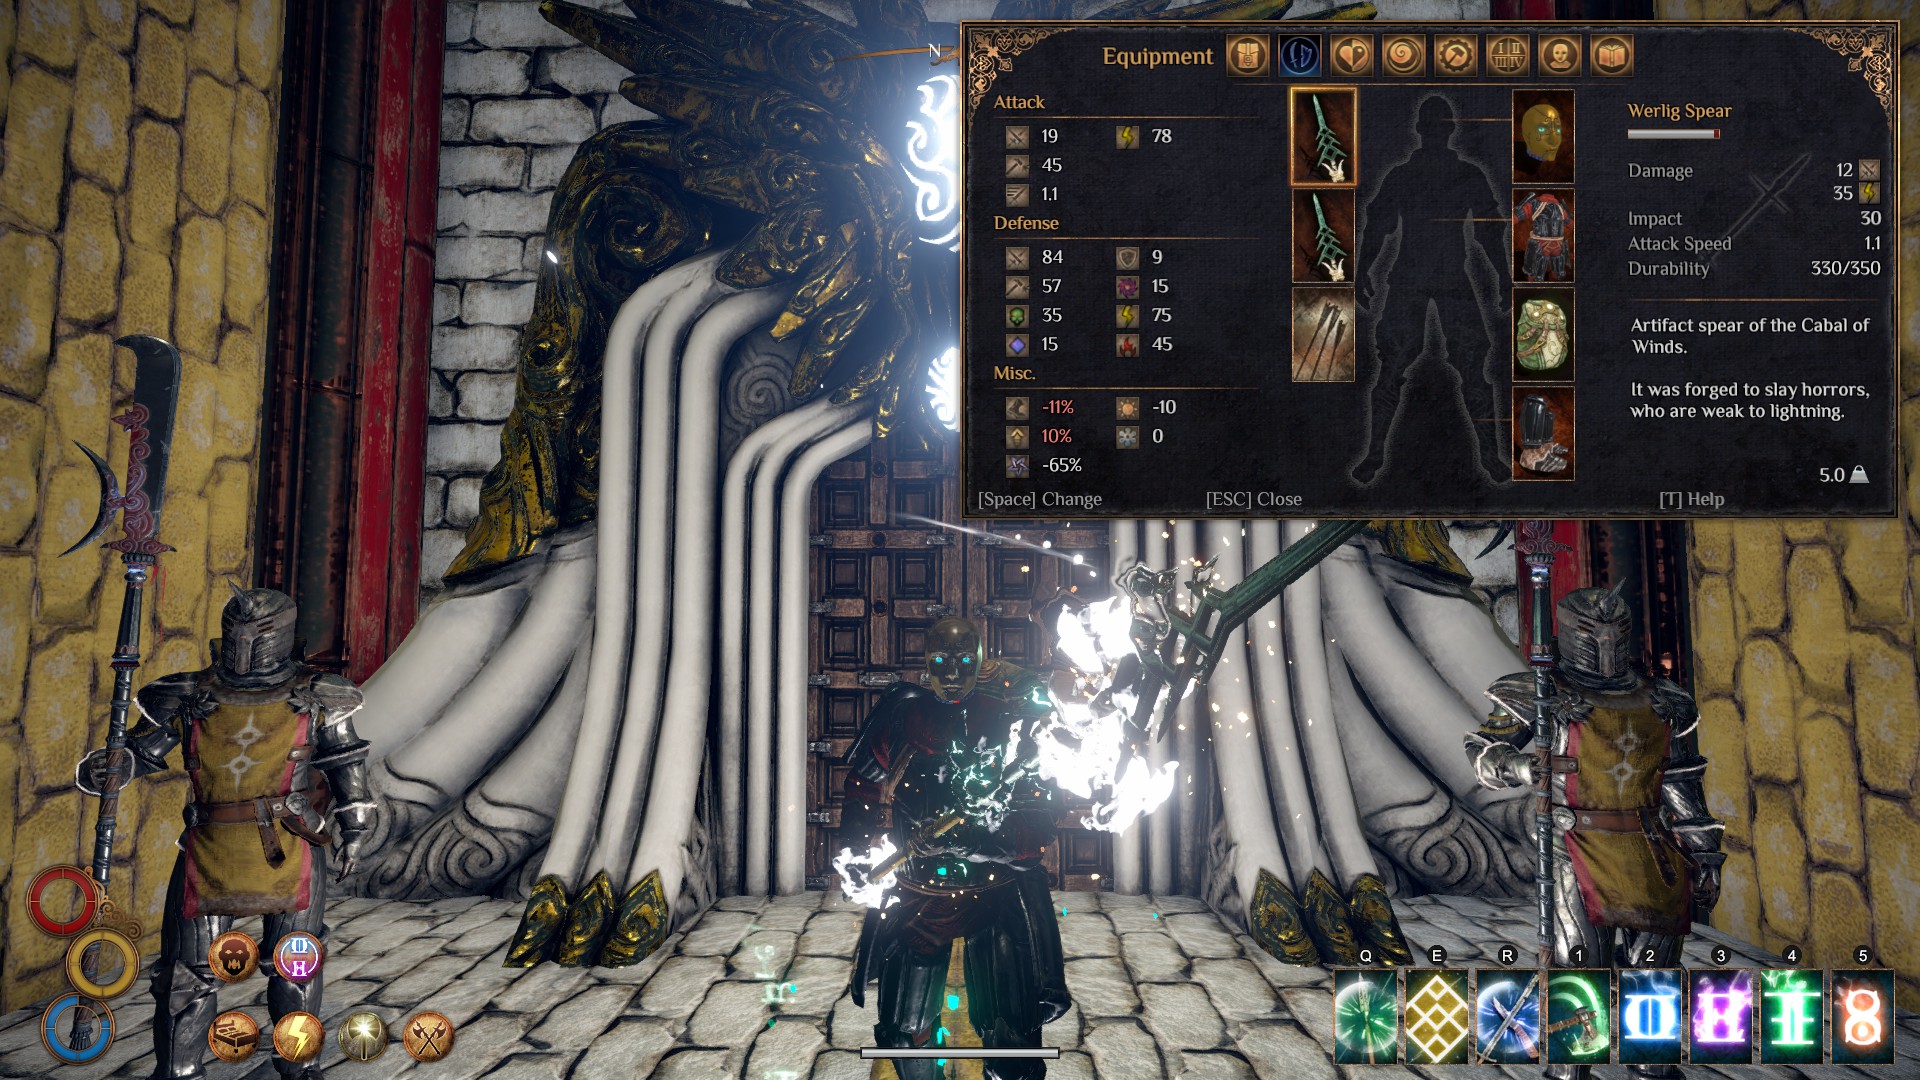
Weapon 1: Skycrown Mace (Face of the Ancients, Enmerkar Forest) + Light Mender’s Lexicon (Voltaic Hatchery, Chersonese)
This is what you see equipped in the first screenshot above. Not too difficult to get early on, heaps of melee damage while still giving you the capacity to repeatedly blast enemies with your Frost spells.
Weapon 2: Rotwood Staff (Necropolis, Berg, Enmerkar Forest)
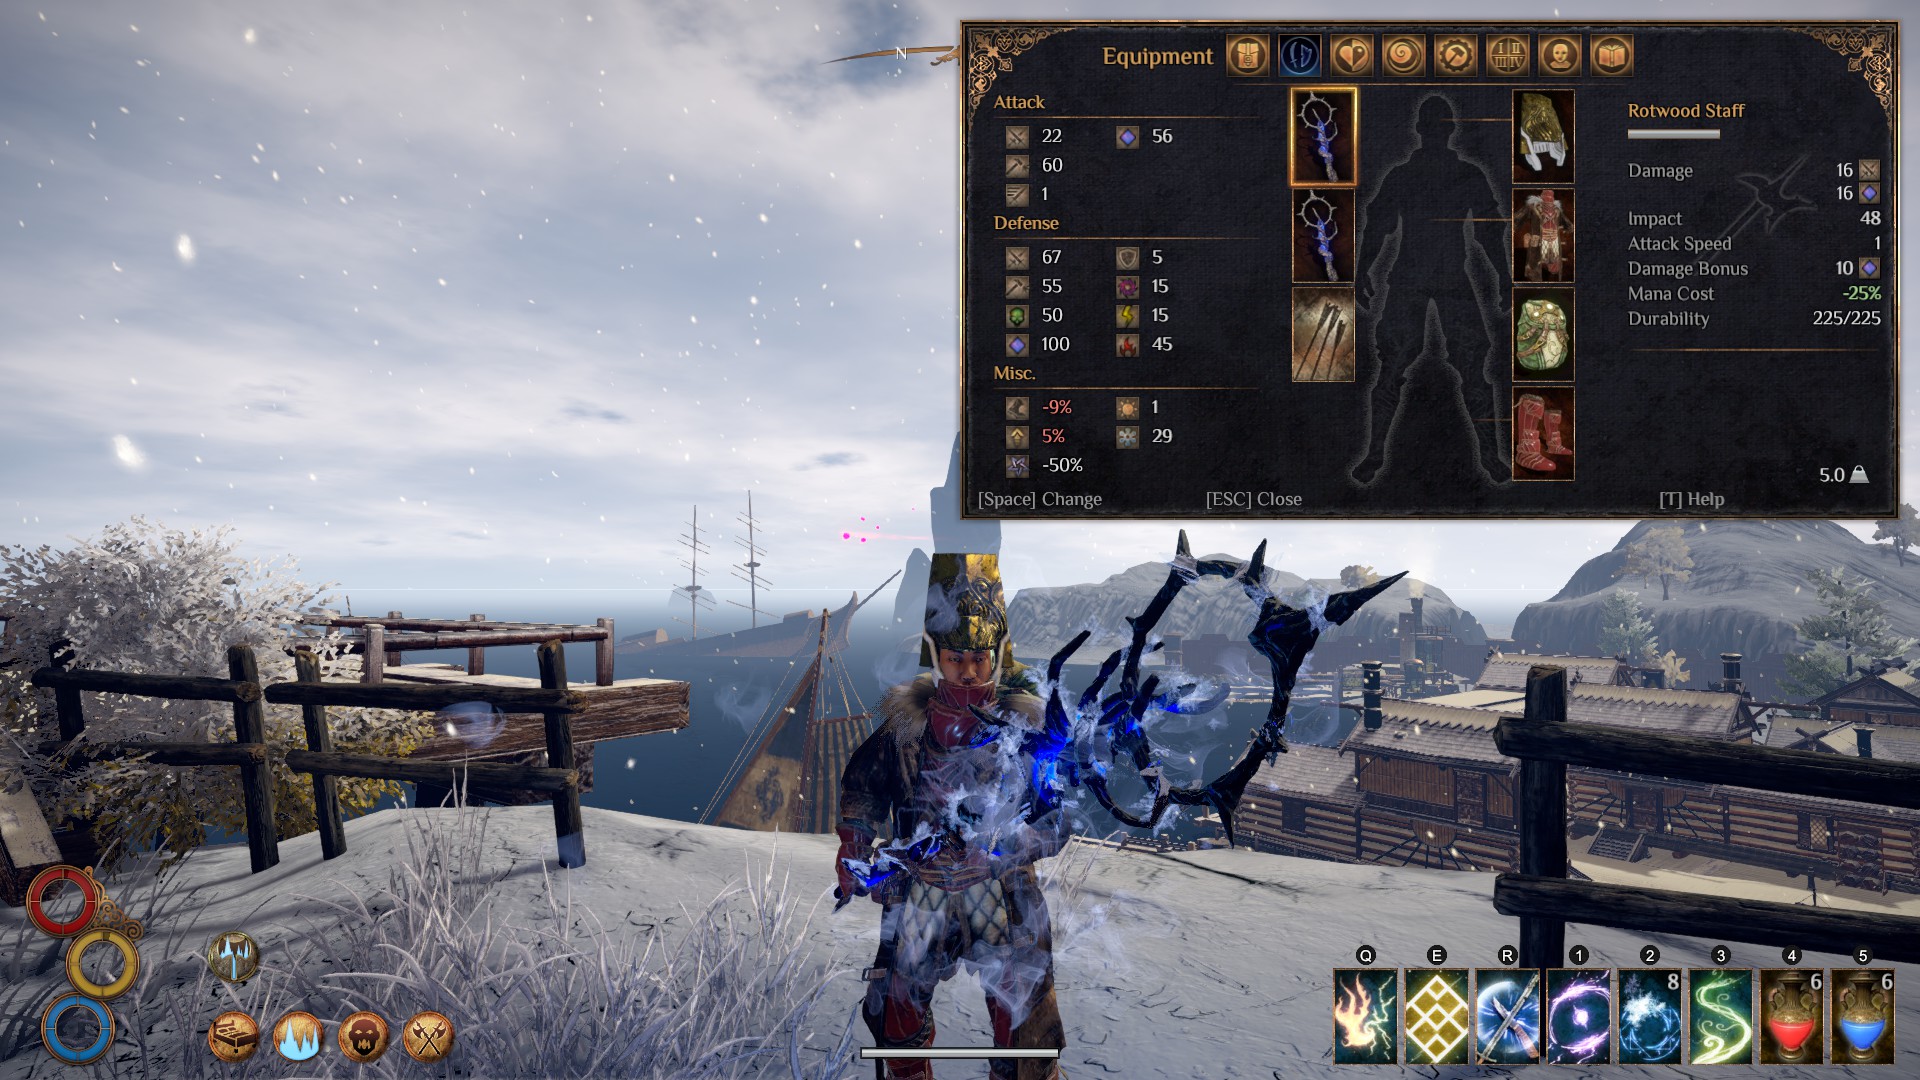
This gives up melee power for even more Frost damage on your spells, and has the highest mana reduction of all the different set ups for more blasting goodness. Moon Swipe is also a good addition to the build (quick slot it in place of one of the potions).
Weapon 3: Brand (pieces scattered in every zone) + Light Mender’s Lexicon (Voltaic Hatchery, Chersonese)

Buffs in general aren’t necessary to any build, but they’re a nice boost in power if you’re expecting a particularly tough or risky fight.
We’re going to be running 3 Boons (all boons last a base of 240 seconds, or 4 minutes) and one casted buff (180 seconds).
Boons:
Discipline (Focus skill, blocking with the Brace skill, Discipline Potions)
Rage (Enrage skill, Rage Potions)
Cool (Cool skill, Cool Potions)
Spell Buffs:
Infuse Frost (remember, this consumes your Cool boon, so make sure to reapply it after!)
I’d recommend keeping a few Cool Potions (Clean Water + Gravel Beetle) on hand because of how easy they are to make and how often you eat through them.
Crusader (Lightning) [Beginner]
The Crusader is a melee-centric build all about having great defenses – a high physical and impact resistance as well 15 resistance across the board for the varying elemental damage types. This allows for plenty of breathing room for mistakes, casting spells in combat or even trading some heavy, hard hitting blows with your foes.
We also pick up a few skills to help block attacks, and some even lets us hit back – and hit back hard.
Faction: Holy Mission (required for Infuse Light and various faction passives)
Note: Personal recommendation here, but pick the damage increase buff for the melee variant, and the mana cost reduction (and stamina cost reduction) for the spellcaster approach.
Health: 80
Stamina: 80
Mana: 80
The above can be achieved by investing 4 points into Mana when prompted to at Conflux Mountain.
After picking up all the recommended passive skills (and the Peacemaker Elixir), the final distribution will look like:
Health: 165
Stamina: 140
Mana: 140
Breakthrough skills trees and the skill itself will be bolded, and I will list the skill trainers in rough order of convenience – I group skill trainers by area, so if you are following this build step by step, also check out the ‘Equipment’ section in order to find what you need to buy from these areas.
Kazite Spellblade (Cierzo, Chersonese):
Fitness (50 silvers)
Warrior Monk (Monsoon, Hallowed Marsh):
Focus (50 silvers)
Brace (50 silvers)
Steadfast Ascetic (500 silvers)
Master of Motion (600 silvers)
Counterstrike (600 silvers)
Holy Mission (Monsoon, Hallowed Marsh)
Infuse Light – you get it when you join the Holy Mission faction quest line.
Mofat (Monsoon, Hallowed Marsh):
Blessed (50 silvers)
Rune Sage (Berg, Enmerkar Forest):
All runes (50 silvers each, 200 silvers total)
Well of Mana (500 silvers)
Arcane Syntax (600 silvers)
Internalized Lexicon or Runic Prefix (600 silvers) – Internalized Lexicon by default, but if you want to take a more spellcaster style of approach, pick Runic Prefix instead.
Wild Hunter (Berg, Enmerkar Forest):
Enrage (50 silvers)
Survivor’s Resilience (500 silvers)
Predator’s Leap (600 silvers)
Mercenary (Levant, Abrassar):
Armor Training (100 silvers) – It’s kind of a far journey just for 1 passive, but you’re going to be weighed down a lot by your armor and picking this up really helps alleviates that.
Wild Hunter (Berg, Enmerkar Forest):
Feral Strikes (600 silvers) – extremely powerful skill, but eats up your Rage buff to execute. There are two viable alternatives to this below, one for two handed swords and one for spears, depending on which you use.
Burac (Cierzo, Chersonese):
Pommel Counter (50 silvers) – for two handed swords, for which you have to leave and return to Cierzo in order to unlock the dialogue option with Burac. A really useful block that does Impact damage and also inflicts Confusion on enemies, and you can knock most enemies down by following up with a quick swipe or two with your sword. Really handy.
King (Levant, Abrassar):
Simeon’s Gambit (50 silvers) – a skill for spears, and a really great one at that. It blocks an attack and counters with a really hard hitting strike.
Instead of running with the Wild Hunter skill tree, one could opt for a more spellcaster approach by choosing to breakthrough in the Shaman skill tree instead. You lose 40 health and a pretty good melee skill or two, but in return, you get Shamanic Resonance (increasing the effectiveness of your Boons), as well as the Sigil of Wind which lets you cast Lightning spells.
However, be warned – in order to use Sigil of Wind, you must first interact with the Wind Altar in your current zone to ‘unlock’ the ability to cast the Sigil, and there’s one Wind Alter in each zone. Otherwise, you won’t be able to cast it, which means you won’t be able to cast Lightning spells.
Shaman (Cabal of Wind Tower, Chersonese):
Reveal Soul (50 silvers) – combine with Spark to get a good amount of mana back.
Mana Push (50 silvers)
Shamanic Resonance (500 silvers)
Sigil of Wind (600 silvers)
Conjure (600 silvers)
Make sure you use the Weapon 3 set up!
Helmet: Runic Helm (bought from Quikiza the Blacksmith in Berg, Enmerkar Forest) or Gold-Lich Mask (Spire of Light, Hallowed Marsh)
Armor: Runic Armor (bought from Quikiza the Blacksmith in Berg, Enmerkar Forest)
Boots: Runic Boots (bought from Quikiza the Blacksmith in Berg, Enmerkar Forest)
Backpack: Light Mender’s Backpack (quest acquired at Spire of Light, Hallowed Marsh)
Tent: Mage Tent (bought from Shopkeeper Suul in Levant, Abrassar)
Food: Pot-au-Dey du Pirate (3x Fish, Salt) or Ocean Fricassee (Larva Egg, Fish, Seaweed)
Runic Helm is much easier to get, but if you have it on hand (or don’t mind the challenge to hunt it down), the Gold-Lich Mask is a great alternative – sacrificing just a little bit of Physical Resistance, Impact Resistance and Protection for massive increases to Fire & Lightning Resistances, but most importantly, a whopping -30% mana cost reduction.
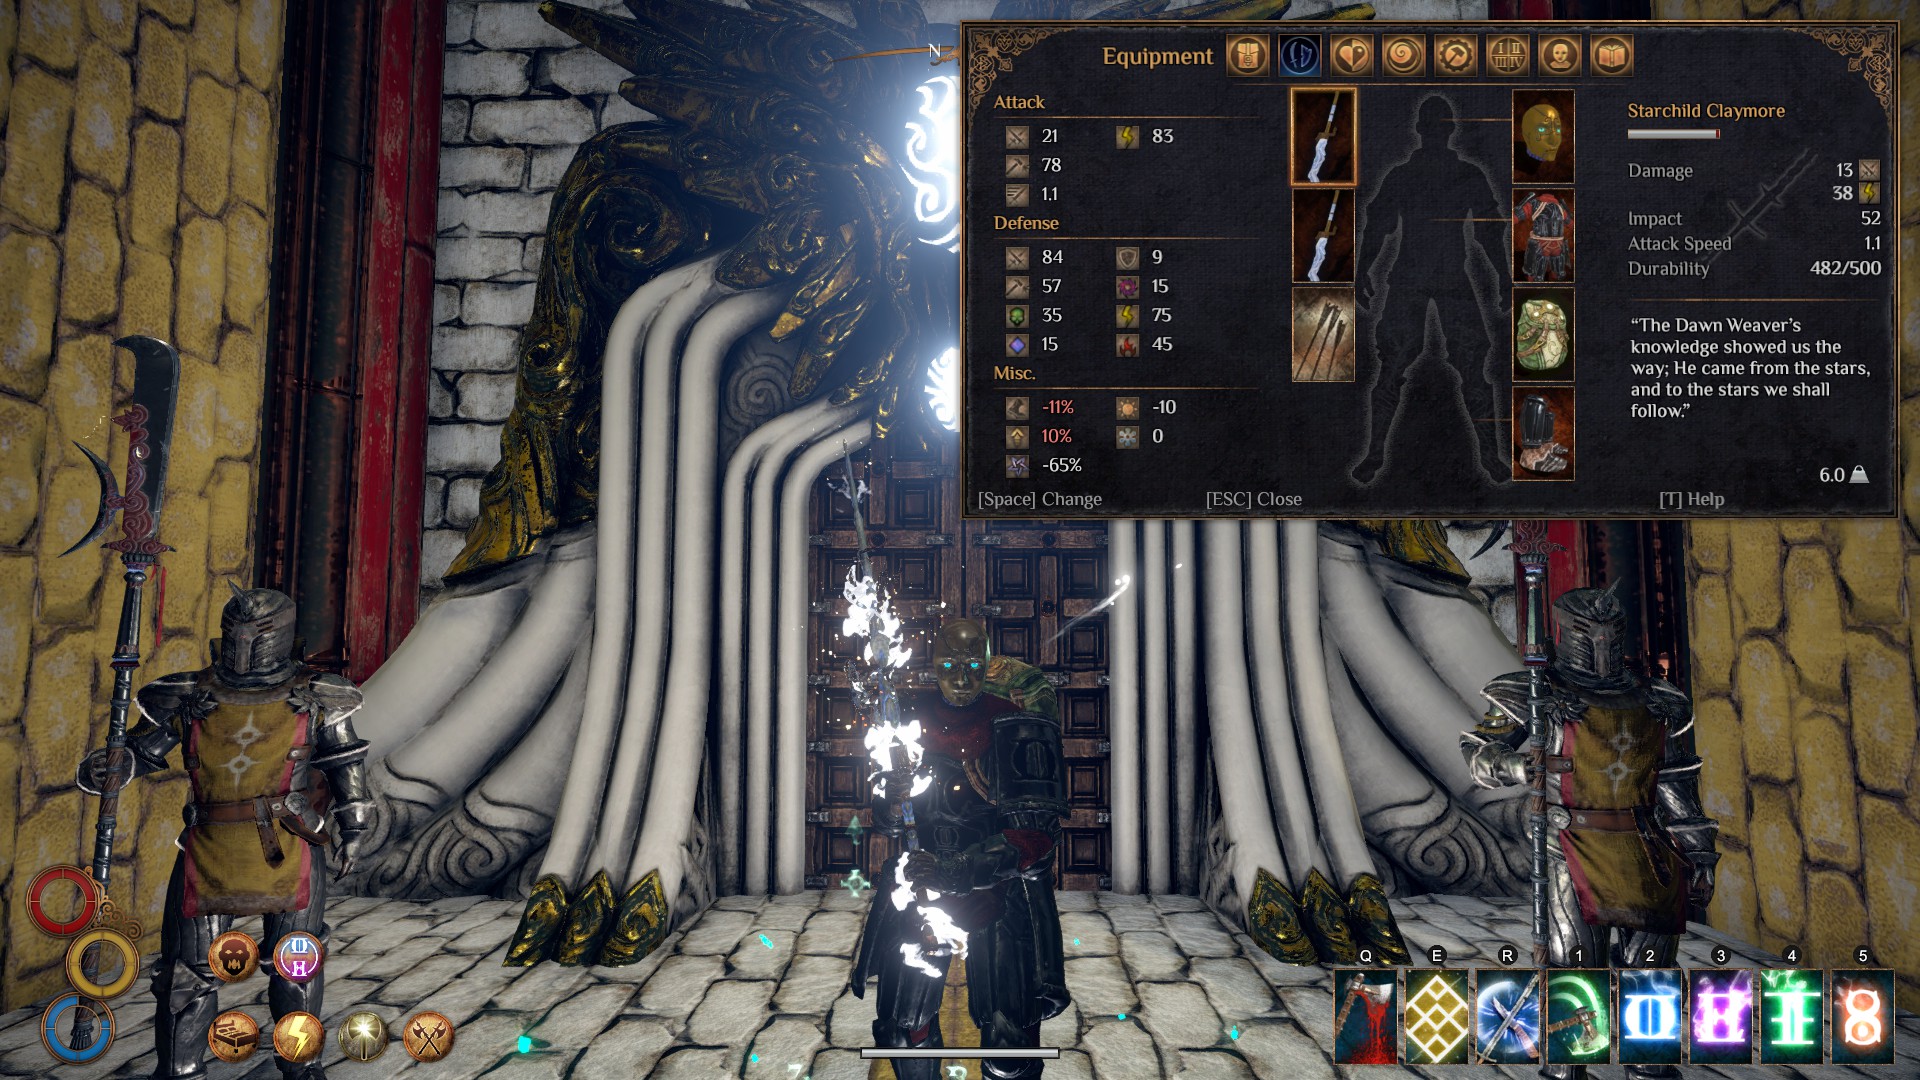
Weapon 1: Starchild Claymore (Royal Manticore Lair, Enremkar Forest)
This is the weapon used for the screenshot above. It’s not actually in the lair, but dropped by the Royal Manticore prowling outside of it. If you don’t see it there, try heading North from that location to possibly find it there. Otherwise, leave the area and sleep for 7 days straight in a Plant Tent to reset spawns, and come back and try again.
An easier to acquire alternative is to craft a Gold-Lich Claymore from two Gold-Lich Mechanisms, an Iron Claymore and Firefly Powder.
Weapon 2: Werlig Spear (Electric Lab, Abrassar)
An easier to acquire alternative is to craft a Gold-Lich Spear from two Gold-Lich Mechanisms, an Iron Spear and Firefly Powder.
Weapon 3: Gold-Lich Sword / Gold-Lich Mace (crafted) + Light Mender’s Lexicon (Voltaic Hatchery, Chersonese)
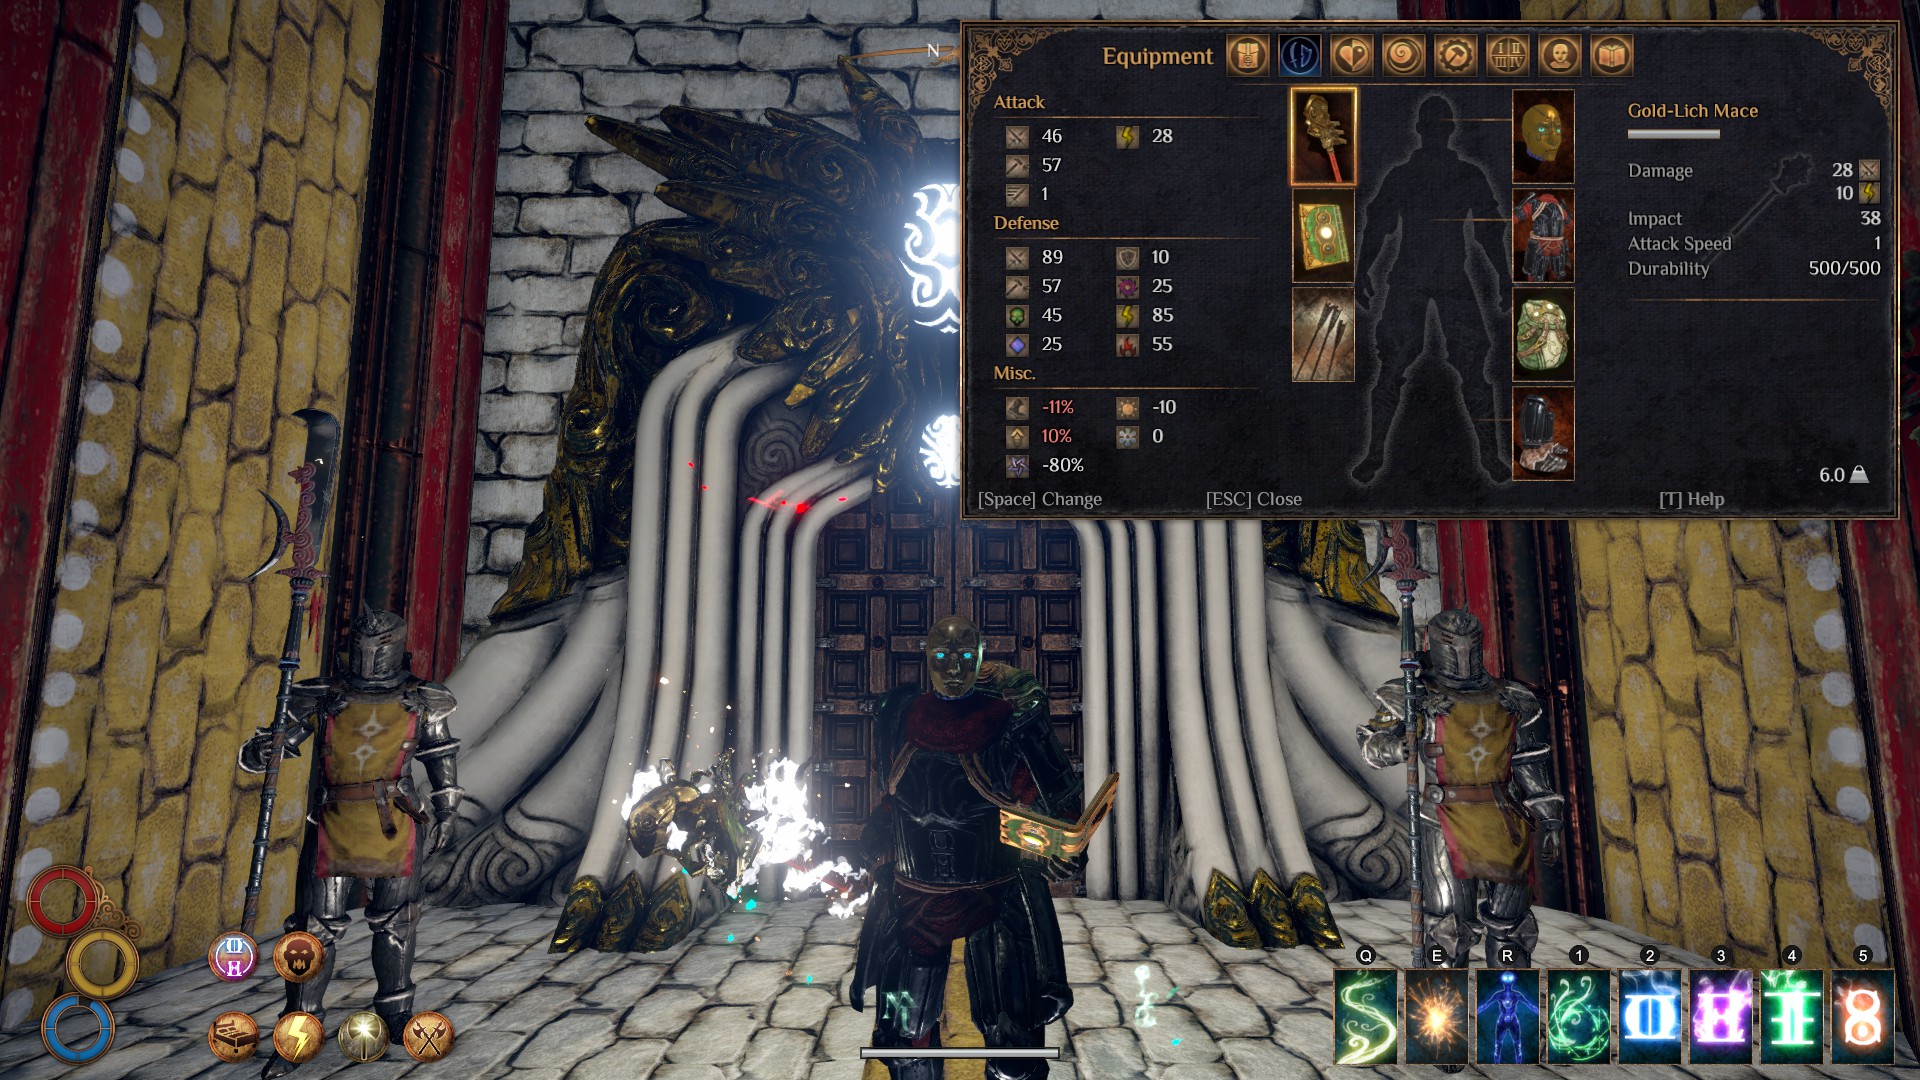
The Light Mender’s Lexicon is found in the Voltaic Hatchery, Chersonese.
Buffs in general aren’t necessary to any build, but they’re a nice boost in power if you’re expecting a particularly tough or risky fight.
We’re going to be running 3 Boons (all boons last a base of 240 seconds, or 4 minutes) and two casted buff (180 seconds each).
Boons:
Discipline (Focus skill, blocking with the Brace skill, Discipline Potions)
Rage (Enrage skill, Rage Potions)
Blessed (Blessed skill, Blessed Potions)
Spell Buffs:
Runic Protection (Blue + Purple runes, can be consumed by casting Purple + Blue for a big heal)
Infuse Light (remember, this consumes your Blessed boon, so make sure to reapply it after!)
I’d recommend keeping a few Blessed Potions (Clean Water + Firefly Powder) on hand because of how easy they are to make and how often you eat through them.
Incanter (Fire) [Beginner]
Like his Beginner siblings, the Incanter is also really easy to get off the ground early. It shares a similar skill foundation, and compared to the other two, it gives up a chunk of protection for more focus on damage through spells and having the mana cost reduction to back it up.
If you want to be a living, breathing and walking flamethrower, this is the build for you.
Faction: Heroic Kingdom (for the 15% damage increase)

Health: 80
Stamina: 80
Mana: 80
The above can be achieved by investing 4 points into Mana when prompted to at Conflux Mountain.
After picking up all the recommended passive skills (no faction passives except Peacemaker Elixir), the final distribution will look like:
Health: 140
Stamina: 115
Mana: 155
Breakthrough skills trees and the skill itself will be bolded, and I will list the skill trainers in rough order of convenience – I group skill trainers by area, so if you are following this build step by step, also check out the ‘Equipment’ section in order to find what you need to buy from these areas.
Kazite Spellblade (Cierzo, Chersonese):
Fitness (50 silvers)
Spellblade Awakening (500 silvers)
Infuse Fire (600 silvers)
Elemental Discharge (600 silvers)
First Watcher (Conflux Mountain, Chersonese):
Reveal Soul – pick this over Sigil of Fire when prompted – you won’t be using the Sigil until you get to the second zone anyways, where a Skill Trainer will sell it for dirt cheap. Picking Reveal Soul now will save you a journey through Ghost Pass / to the Cabal of Wind Tower.
Philosopher (Monsoon, Hallowed Marsh):
Mana Ward (50 silvers)
Sigil of Fire (50 silvers)
Leyline Connection (500 silvers)
Fire Affinity (600 silvers)
Warrior Monk (Monsoon, Hallowed Marsh):
Focus (50 silvers)
Brace (50 silvers) – your lower Physical resistances means you should really have 1 block skill slotted.
Rune Sage (Berg, Enmerkar Forest):
Rune: Dez (50 silvers) – Blue
Rune: Egoth (50 silvers) – Purple
Well of Mana (500 silvers)
Arcane Syntax (600 silvers)
Internalized Lexicon (600 silvers)
Wild Hunter (Berg, Enmerkar Forest):
Enrage (50 silvers)
Mercenary (Levant, Abrassar):
Armor Training (100 silvers)
Smooth the Tailor (Levant, Abrassar):
Warm (50 silvers) – the Fire equivalent of Cool.
Shaman (Cabal of Wind Tower, Chersonese):
Reveal Soul (50 silvers) – pick this up at the Shaman if you chose Sigil of Fire in Conflux Mountain. This combined with Spark refills your Mana tank really quickly.
Wandering Mercenary (Fang & Claw’s Inn, Monsoon, Hallowed Marsh:
Moon Swipe (50 silvers) – Halberds / Staves only. You probably don’t need more AoE, but if you feel like you do, this is a really solid pick up for it.
Instead of going into Rune Sage, you can opt to abandon that tree entirely and invest into either Mercenary or Warrior Monk instead.
Rune Sage provides:
40 mana
Runic Protection buff
Runic Heal (consumes Runic Protection, big burst heal)
Warrior Monk provides:
40 stamina (like before, can be reinvested into Mana)
Lunging Strike or Master of Motion passive (both really good; the passive also frees up a quick slot)
Flash Onslaught or Counterstrike (both extremely good)
Mercenary provides:
10% movement speed increase
40% reduction to stamina costs for sprinting
Blood Bullet shenanigens if using Obsidian Pistol
It’s really personal preference. If you are opting into Mercenary for a Blood Bullet build, I’d replace the Sunfall Axe with Jade Scimitar / Jade-Lich Mace / Living Wood Axe for the mana cost reduction (since you’re probably never going to swing that weapon anyways) and replace the Kazite Spellblade skill tree with something else (Infuse Fire and Elemental Discharge doesn’t work with Off Hand weapons).
I don’t recommend this, however, as it gets boring quickly and the whole theme of this build is Fire!
Helmet: Wide Black Hat (bought from Vay the Alchemist in Berg, Enmerkar Forest or Smooth the Tailor in Levant, Abrassar) or White Priest Mitre (bought from Laine the Alchemist in Monsoon, Hallowed Marsh)
Armor: Clansage Robe (bought from Vay the Alchemist in Berg, Enmerkar Forest)
Boots: Runic Boots (bought from Quikiza the Blacksmith in Berg, Enmerkar Forest)
Backpack: Light Mender’s Backpack (quest acquired at Spire of Light, Hallowed Marsh)
Tent: Mage Tent (bought from Shopkeeper Suul in Levant, Abrassar)
Food: Pot-au-Dey du Pirate (3x Fish, Salt) or Ocean Fricassee (Larva Egg, Fish, Seaweed)
If you’re using the Compasswood Staff, opt for the White Priest Mitre instead for more Fire damage, as you probably don’t need the mana cost reduction from the Wide Black Hat. If you’re using the Sunfall Axe and Obsidian Pistol, grab the Wide Black Hat for the extra mana cost reduction.
Weapon 1: Rotwood Staff (Necropolis, Berg, Enmerkar Forest)
This is what you see equipped in the first screenshot abve. The Compasswood Staff can be claimed by killing the golem boss in The Walled Garden, Abrassar. With this set up, you have a higher mana cost reduction and your Fire spells hits harder.
Weapon 2: Sunfall Axe (Stone Titan Caves, Abrassar) + Obsidian Pistol (crafted)

Buffs in general aren’t necessary to any build, but they’re a nice boost in power if you’re expecting a particularly tough or risky fight.
We’re going to be running 3 Boons (all boons last a base of 240 seconds, or 4 minutes) and three casted buffs (180 seconds for the first two, 60 seconds for the last).
Boons:
Discipline (Focus skill, blocking with the Brace skill, Discipline Potions)
Rage (Enrage skill, Rage Potions)
Warm (Warm skill, Warm Potions)
Spell Buffs:
Runic Protection (Blue + Purple runes, can be consumed by casting Purple + Blue for a big heal)
Infuse Fire (remember, this consumes your Warm boon, so make sure to reapply it after!)
Immolate (Sigil of Fire + Mana Ward – tiny Fire DoT at (0.3/sec for 18 damage total) on yourself, but increases your Fire damage by another 30% for 60 seconds)
I’d recommend keeping a few Warm Potions (Clean Water + Thick Oil) on hand because of how easy they are to make and how often you eat through them.
Ranger (Decay & Physical) [Intermediate]
Alright, we’re finally halfway through these builds. The next one is an Intermediate build that capitalizes on Decay and Physical damages. Since Decay only manifests in the form of Damage over Time, I figured I’d tack on the Physical’s Pain & Extreme Bleed as well to make it one complete package of DoTs (minus Burning, but that’s easily rectified with a couple of Fire Rags if desired).
Coupled with the running package (which some of you may already be familiar with), you’ll be sprinting from map to map with barely a dent in your massive Stamina pool.
Faction: Any (Heroic Kingdom for 15% damage increase or Holy Mission for 10% mana cost reduction and 10% stamina cost reduction)
Health: 90
Stamina: 90
Mana: 40
The above can be achieved by investing 2 points into Mana when prompted to at Conflux Mountain. Alternatively, you can forgo Mana entirely, but you’ll be reliant on Possessed Potions and have to carry more of them.
After picking up all the recommended passive skills (no faction passives except Peacemaker Elixir), the final distribution will look like:
Health: 155
Stamina: 130
Mana: 40
Breakthrough skills trees and the skill itself will be bolded, and I will list the skill trainers in rough order of convenience – I group skill trainers by area, so if you are following this build step by step, also check out the ‘Equipment’ section in order to find what you need to buy from these areas.
Kazite Spellblade (Cierzo, Chersonese):
Fitness (50 silvers)
First Watcher (Conflux Mountain, Chersonese):
Reveal Soul – you have no use for Sigil of Fire, so pick this when prompted. When combined with Spark, you basically get back up to full Mana.
Warrior Monk (Monsoon, Hallowed Marsh):
Focus (50 silvers)
Brace (50 silvers)
Steadfast Ascetic (500 silvers)
Perfect Strike or Master of Motion (600 silvers) – both are good, pick Perfect Strike if you rather apply Pain through melee / prefer the massive burst damage from it or pick Master of Motion if you rather use the Coralhorn Bow + Sniper Shot method. More details in the ‘Equipment’ section.
Flash Onslaught or Counterstrike (600 silvers) – both are extremely good, take your pick.
Wild Hunter (Berg, Enmerkar Forest):
Enrage (50 silvers)
Hunter’s Eye (50 silvers)
Sniper Shot (100 silvers) – see ‘Equipment’ section.
Survivor’s Resilience (500 silvers)
Piercing Shot (600 silvers)
Mercenary (Levant, Abrassar):
Armor Training (100 silvers) – Yeeeeep.
Swift Foot (500 silvers)
Marathoner (600 silvers)
Immaculate (Immaculate’s Cave, one in each zone):
Possessed – you have to find the Immaculate NPC by checking in on the caves; there’s one in each zone. When talking to him, ask him for help and then choose the ‘I need power’ option in order to receive this skill. Having this skill and 40 mana guarantees at least two instances of the Possessed Boon each rest if you’re running low or out of Possessed Potions.
None, this build is pretty fixed.
Helmet: Pearlbird Mask (Chersonese, rare drop from killing Pearlbirds)
Armor: Entomber Armor (bought from Smooth the Tailor in Levant, Abrassar)
Boots: Master Trader Boots (Soroborean Caravanners)
Backpack: Zhorn’s Hunting Backpack (Royal Manticore Nest, Enmerkar Forest)
Tent: Fur Tent (Shopkeeper Doran, Cierzo) or Luxury Tent (Shopkeeper Pleel, Berg or Shopkeeper Suul, Levant)
Food: Ocean Fricassee (Larva Egg, Fish, Seaweed) or Bouillon du Predateur (3x Predator Bones, Water) or Marshmelon Tartines (Marshmelon Jelly + Bread). Marshmelon Jelly is made from 3x Marhsmelons and Gaberry Jam (which is made from 4x Gaberries).
Yep, just… speed and stamina cost reduction, and by pure coincidence, medium-ish resistances. Honestly though, you have so much stamina to burn (blocking / dodging) and so much extra movement speed that you really don’t need to care about your defenses.
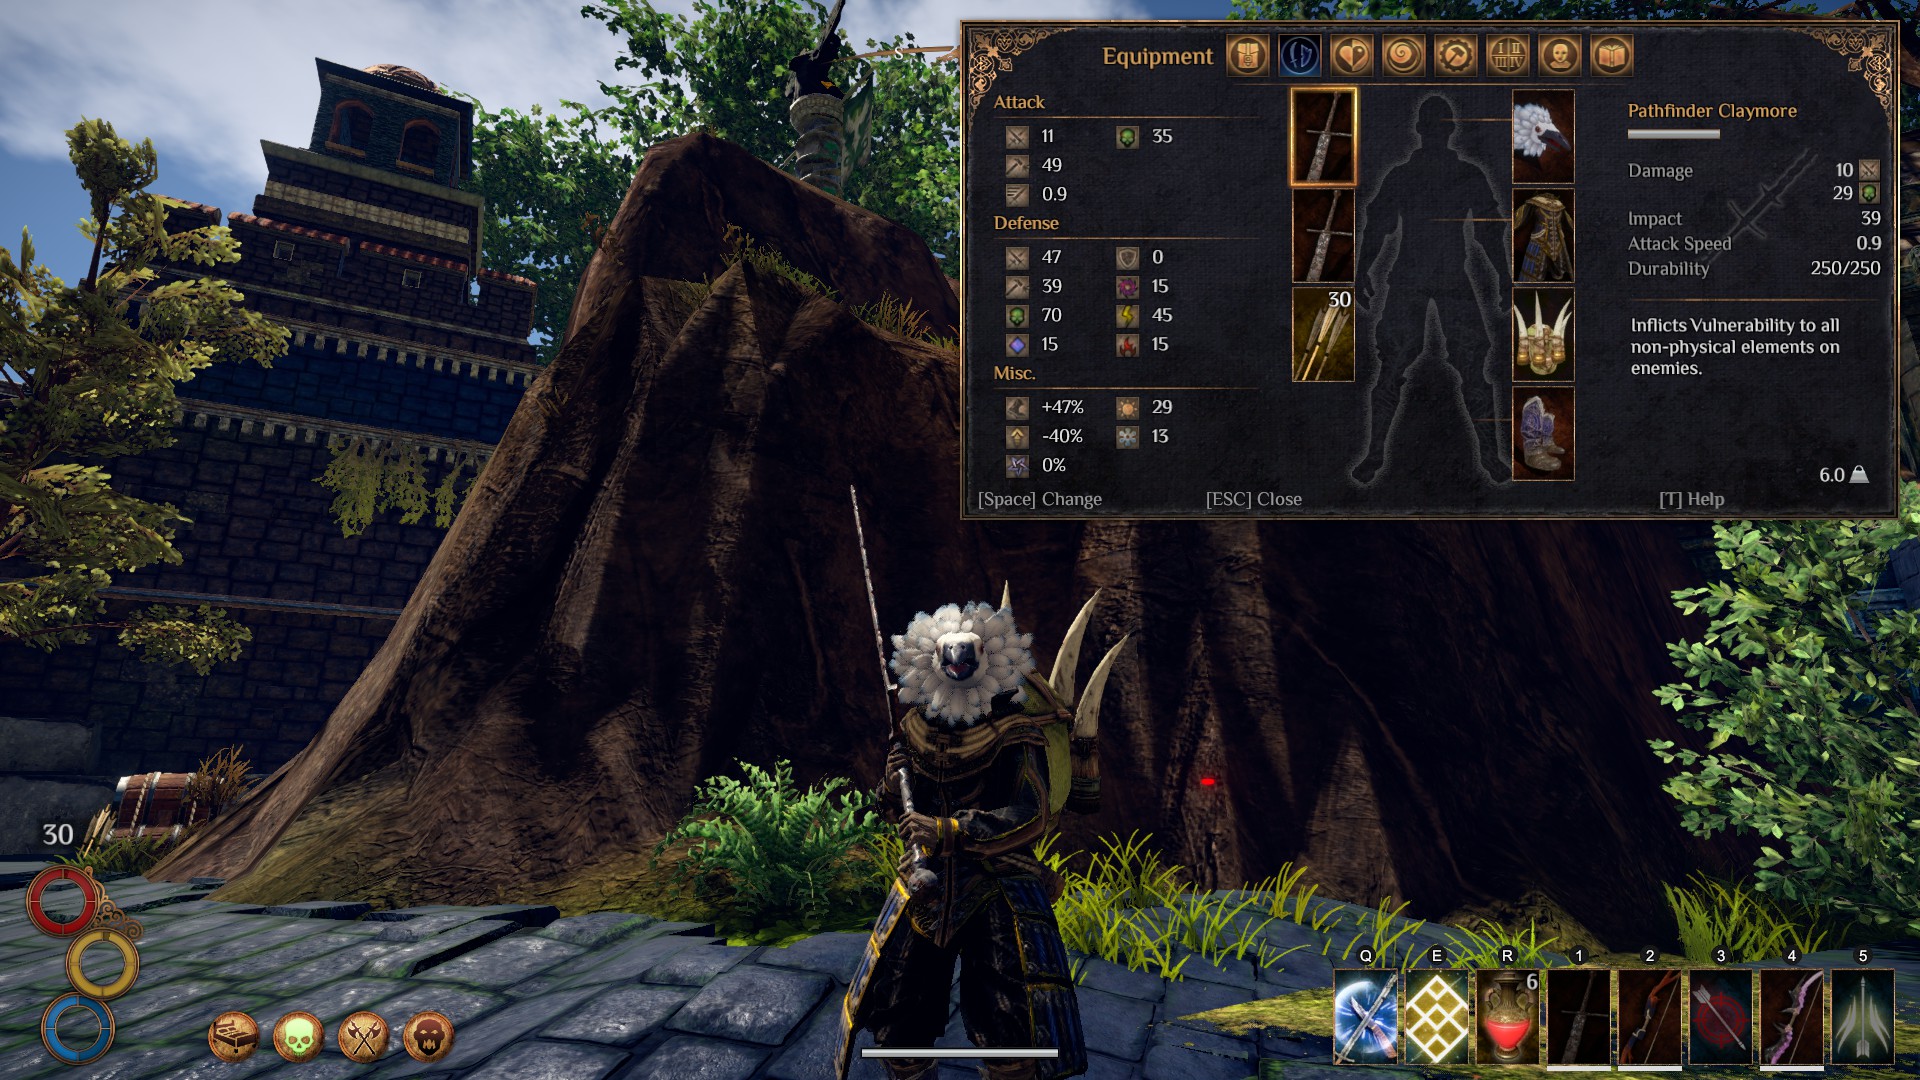
Weapon 1: Pathfinder Claymore (Smuggler in Levant, Abrassar) + Coralhorn Bow (crafted) + Horrow Bow (crafted)
This is what you see equipped in the first screenshot above. An easy way to get the Pathfinder Claymore is to set up a Plant Tent next to the Smuggler, and sleep 3 days (24 hours, 3 times) to refresh her inventory. Plant Tent makes it so that you don’t have to worry about hunger and thirst.
This weapon set uses the Coralhorn Bow in order to inflict Pain on your enemy via Sniper Shot, followed up by a weapon swap to Horror Bow and the Piercing Shot skill, then your choice of kiting the enemy around or going in with the kill with the Pathfinder Claymore (the Pathfinder Claymore applies Elemental Vulnerability, debuffing their Decay resistance so the poison kills them just that much faster, too).
Weapon 2: Worldedge Greataxe (Forest Hives, Enmerkar Forest) + Horror Bow (crafted)
Note: ‘Forest Hives’ is marked as ‘Colossal Hives’ on the ingame map for some reason.

Buffs in general aren’t necessary to any build, but they’re a nice boost in power if you’re expecting a particularly tough or risky fight.
We’re going to be running 3 Boons (all boons last a base of 240 seconds, or 4 minutes).
Boons:
Discipline (Focus skill, blocking with the Brace skill, Discipline Potions)
Rage (Enrage skill, Rage Potions)
Possessed (Possessed skill, Possessed Potions)
I’d recommend keeping a few Possessed Potions (Clean Water + Occult Remains) on hand because of how easy they are to make and how often you eat through them. You can also keep a few Fire Rags (Linen Cloth + Thick Oil) to really exploit the DoT package and Pathfinder Claymore’s Elemental Vulnerability.
Thaumaturge (Fire & Frost) [Intermediate]
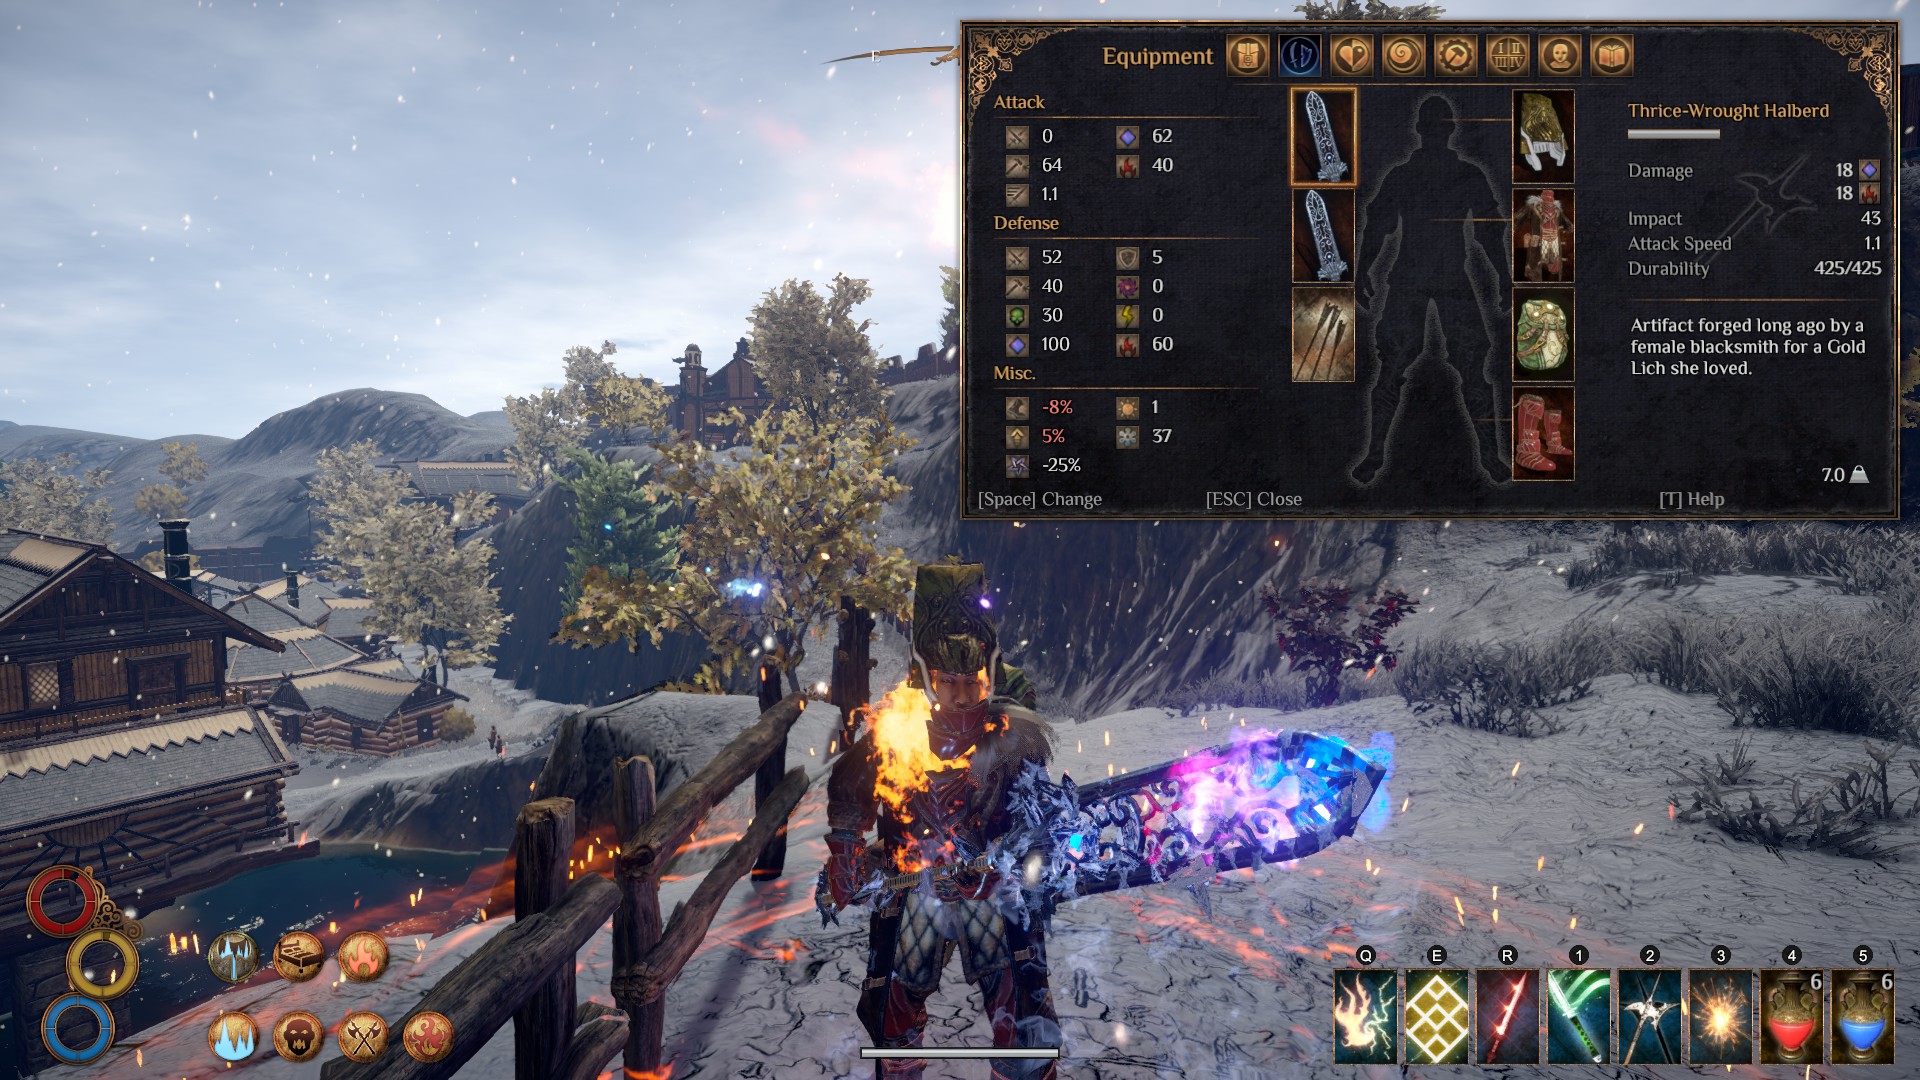
The entire build is centered around the one item that makes this all possible, the Thrice-Wrought Halberd. This build plays more of a melee character that buffs with skills, with only one or two real spell that they cast in combat (Elemental Discharge and, if you want a second option, Spark).
I tested both Infuse Fire and Infuse Frost, and Infuse Frost came out ahead – but if you want to lean more heavily on the Fire side, it’s more than possible (see the ‘Alternative Breakthrough Skills’ section).
All in all, this build was pretty fun to put together and play, if a little less effective than its singular counterparts. It has a bunch of damage and impact, and various skills to make great use of it, too – plus, it has some backup spells just in case you need it, and options to quick slot even more.
Faction: Blue Chamber (required for Crimson Plate Armor and Crimson Plate Boots, as well as a faction reward that increases your health by 40 for successfully negotiating with the Giants)
Alternatively, you can choose to join either the Holy Mission (10% mana cost reduction and 10% cost stamina reduction) or Heroic Kingdom (15% damage increase). You’d lose out on 40 health and you’ll need to make an alt character to acquire and drop you the Crimson Plate Armor and Crimson Plate Boots, but that’s not very hard to do at all.
Health: 80
Stamina: 80
Mana: 80
The above can be achieved by investing 4 points into Mana when prompted to at Conflux Mountain.
After picking up the Warrior Monk’s breakthrough and both of Blue Chamber’s Peacekeeper Elixir plus 40 bonus health, head back to the Conflux Mountain and invest a further 6 more points (for 10 points invested total) into Mana, for a final result of:
Health: 150
Stamina: 125
Mana: 220
Breakthrough skills trees and the skill itself will be bolded, and I will list the skill trainers in rough order of convenience – I group skill trainers by area, so if you are following this build step by step, also check out the ‘Equipment’ section in order to find what you need to buy from these areas.
Kazite Spellblade (Cierzo, Chersonese):
Fitness (50 silvers)
Spellblade Awakening (500 silvers)
Infuse Frost (600 silvers)
Elemental Discharge (600 silvers)
Second Watcher (Conflux Mountain, Chersonese):
Cool (50 silvers)
Shaman (Cabal of Wind Tower, Chersonese):
Reveal Soul (50 silvers) – learn this here if you didn’t pick Sigil of Fire from Conflux Mountain.
Shamanic Resonace (500 silvers)
Philosopher (Monsoon, Hallowed Marsh):
Mana Ward (50 silvers)
Sigil of Fire (50 silvers) – learn this here if you didn’t pick Reveal Soul from Conflux Mountain.
Warrior Monk (Monsoon, Hallowed Marsh):
Focus (50 silvers)
Brace (50 silvers)
Steadfast Ascetic (500 silvers)
Perfect Strike (600 silvers)
Flash Onslaught or Counterstrike (600 silvers) – either or, both are great and do massive damage.
Wandering Mercenary (Fang & Claw’s Inn, Monsoon, Hallowed Marsh:
Moon Swipe (50 silvers) – Halberds / Staves only. Plenty of quick slot space for this, so you should really consider picking it up. Great skill.
Wild Hunter (Berg, Enmerkar Forest):
Enrage (50 silvers)
Mercenary (Levant, Abrassar):
Armor Training (100 silvers)
Smooth the Tailor (Levant, Abrassar):
Warm (50 silvers)
First Watcher (Conflux Mountain, Chersonese:
Spark – you get this for free when you go up to do your mana exchange. I have this slotted since the Sigil of Fire I use to cast the Immolate buff sticks around for a bit, giving me some cheap Fireballs to throw at the enemy (in addition to the Frost Infused Elemental Discharge).
Rune Sage (Berg, Enmerkar Forest):
Rune: Dez (50 silvers) – Blue
Rune: Egoth (50 silvers) – Purple
If you really want to go crazy on the buffing, carry a Lexicon with you so you can pre-cast the Runic Protection buff before combat, and swap back to the Thrice-Wrought Halberd once you’re done.
Honestly, the Moon Swipe / Spark / Life Potion / Astral Potion parts of the quick slot aren’t really integral, you can replace it with whatever you like. Mana Push, Mana Ward, different weapon sets and maybe even their respective skills (for example, slotting in Brand and the Puncture skill so you can apply both the Pain and Chill debuff quickly before swapping back to the Thrice-Wrought Halberd), whatever you wish.
Philosopher (Monsoon, Hallowed Marsh):
Leyline Connection (500 silvers)
Fire Affinity or Sigil of Ice (600 silvers)
What you could do is drop the Warrior Monk breakthrough and invest into Philosopher’s breakthrough instead to pick up Fire Affinity (for the extra fire damage) or Sigil of Ice (for the ability to cast Frost spells).
If going for Fire Affinity, I also recommend choosing Infuse Fire over Infuse Frost from the Kazite Spellblade trainer. If going for Sigil of Ice, make sure to pick up Mana Push and Conjure from the Shaman trainer.
However, for giving up the Warrior Monk breakthrough, you’ll be missing out on 40 Stamina and some pretty hard hitting Warrior Monk skills – plus you have an abundance of free quick slots to put those to very, very good use.
Helmet: White Priest Mitre (bought from Laine the Alchemist in Monsoon, Hallowed Marsh)
Armor: Crimson Plate Armor (follow and join the Blue Chamber faction quest line)
Boots: Crimson Plate Boots (follow and join the Blue Chamber faction quest line)
Backpack: Light Mender’s Backpack (quest acquired at Spire of Light, Hallowed Marsh)
Tent: Mage Tent (bought from Shopkeeper Suul in Levant, Abrassar) or whatever tent you fancy really.
Food: Ocean Fricassee (Larva Egg, Fish, Seaweed)
In this case, the White Priest Mitre is actually better than the Wide Hat variants (believe it or not), as it adds to both our Fire damage and Frost damage.
Weapon 1: Thrice-Wrought Halberd (Cabal Wind Temple, Enmerkar Forest)
Pretty easy to get, just have to kill all the mobs in the Shell Horrors (the big ones) in the dungeon. There’s a trick where you can lure them into the center room and blow them up by pulling a lever above, but the fights are doable as is. Once you’ve done so, you’ll unlock the chest this weapon is stored in.
No alternate weapon sets, as this build revolves around the Thrice-Wrought Halberd.
Typically I’ll say that buffs aren’t necessary here, but in this case, it’s a core part of the build.
We’re going to be running 4 Boons (all boons last a base of 240 seconds, or 4 minutes) and two casted buffs (180 seconds each).
Boons:
Discipline (Focus skill, blocking with the Brace skill, Discipline Potions)
Rage (Enrage skill, Rage Potions)
Cool (Cool skill, Cool Potions)
Warm (Warm skill, Warm Potions)
Spell Buffs:
Infuse Frost (remember, this consumes your Cool boon, so make sure to reapply it after!)
Immolate (Sigil of Fire + Mana Ward – tiny Fire DoT at (0.3/sec for 18 damage total) on yourself, but increases your Fire damage by another 30% for 60 seconds)
I’d recommend keeping a few Warm Potions (Clean Water + Thick Oil) & Cool Potions (Clean Water + Gravel Beetle) on hand because of how easy they are to make and how often you eat through them.
Chancellor Palpatine (Ethereal & Lightning) [Advanced]
Unlike Ranger, which got its Intermediate difficulty from being RNG-dependent on equipment, Chancellor is tagged at Advanced difficulty because it only works when you’ve got all the pieces and end game gear together.
You guessed it, this build is all about spamming spells – even more so than Fire, as the build culminates into a 100% mana cost reduction status, meaning all spells are cast 0 mana. I chose Lightning because… well, y’know. Unlimited power.
I slapped Ethereal on here too because Ethereal doesn’t really have a lot of stuff to support it, and the best way to deal Ethereal damage conveniently works hand-in-hand with my Lightning build.
Faction: Holy Mission (required for Infuse Light and either the 10% mana cost reduction or 10% Lightning damage increase)

Health: 80
Stamina: 80
Mana: 80
The above can be achieved by investing 4 points into Mana when prompted to at Conflux Mountain.
After picking up all the recommended passive skills (including the Holy Mission quest passives), the final distribution will look like:
Health: 125
Stamina: 100
Mana: 140
You could also literally put 0 points in Mana and wait until you have all the gear to get to 100% mana cost reduction; you can still learn the spells along the way, you just can’t cast them until you reach that point. Saves you 20 Health and 20 Stamina (at the cost of not being able to cast spells until much later), so hey. Your choice.
Breakthrough skills trees and the skill itself will be bolded, and I will list the skill trainers in rough order of convenience – I group skill trainers by area, so if you are following this build step by step, also check out the ‘Equipment’ section in order to find what you need to buy from these areas.
Note: For this build, only two breakthrough points were necessary. You can spend your third in whichever tree you fancy.
Kazite Spellblade (Cierzo, Chersonese):
Fitness (50 silvers)
Shaman (Cabal of Wind Tower, Chersonese):
Reveal Soul (50 silvers)
Shamanic Resonance (500 silvers)
Sigil of Wind (600 silvers)
Conjure (600 silvers)
Warrior Monk (Monsoon, Hallowed Marsh):
Focus (50 silvers)
Holy Mission (Monsoon, Hallowed Marsh)
Infuse Light – you get it when you join the Holy Mission faction quest line.
Mofat (Monsoon, Hallowed Marsh):
Blessed (50 silvers)
Rune Sage (Berg, Enmerkar Forest):
All runes (50 silvers each, 200 silvers total)
Well of Mana (500 silvers)
Arcane Syntax (600 silvers)
Internalized Lexicon (600 silvers)
Wild Hunter (Berg, Enmerkar Forest):
Enrage (50 silvers)
Cyril Turnbull (Berg, Enmerkar Forest):
Mist (50 silvers)
Shaman (Cabal of Wind Tower, Chersonese):
Mana Push (50 silvers) – If you want to replace the Ethereal half of the build, you can take off the Bone Pistol and slot Mana Push in place of Shoot / Reload Pistol for even more Lightning damage. See below if you want to do the opposite (replace the Lightning half of the build with more Ethereal stuff).
Not really ‘alternatives’ per se, since you have 1 free breakthrough point still floating around. I showed you above how to replace the Ethereal side to go full Lightning, so this time I’ll showcase how to replace the Lightning side to go all in on the Ethereal by investing into Mercenary.
Mercenary:
Swift Foot (500 silvers)
Marathoner (600 silvers)
Blood Bullet (600 silvers)
You have infinite mana, and two mana skills (Blood Bullet, Runic Heal) that generates health, so also infinite health. Replace Sigil of the Wind / Mana Push / Conjure with Blood Bullet and two quick slots of your choice (Mana Ward, Brace, Potions / Consumables, anything really). You can still deal Lightning damage by virtue of having Rune Magic (Green, Blue into Green, Red for Lightning ball), but your main damage is going to come from your Ethereal damage Runic Traps (Red, Green) and your Bone Pistol’s Haunted debuff and its own Ethereal damage.
Philosopher:
Sigil of Fire (50 silvers)
Leyline Connection (500 silvers)
Sigil of Ice (600 silvers)
Philosopher is also a solid choice for that passive mana regeneration if you want to do a 90% mana cost reduction version (see ‘Equipment’ section). This’ll ensure you regenerate more mana than you can spend when combined with food buffs. Casting Spark / Mana Push / Conjure in quick succession while standing in three overlapping Sigils of Fire, Ice and Wind is also pretty fun, not going to lie.
Helmet: Gold-Lich Mask (Spire of Light, Hallowed Marsh)
Armor: Gold-Lich Armor (Spire of Light, Hallowed Marsh)
Boots: Gold-Lich Boots (Spire of Light, Hallowed Marsh)
Backpack: Light Mender’s Backpack (quest acquired at Spire of Light, Hallowed Marsh); see below
Tent: Mage Tent (bought from Shopkeeper Suul in Levant, Abrassar)
Food: Pot-au-Dey du Pirate (3x Fish, Salt) or Ocean Fricassee (Larva Egg, Fish, Seaweed)
The Light Mender’s Backpack is nice and will help you achieve 100% mana cost reduction before you acquire the 10% mana cost reduction passive from the Holy Mission faction quest line.
Once you get that passive, the backpack becomes largely unnecessary, so you can swap it out for whatever you want (I was wearing the Mefino’s Trade Backpack for capacity in the screenshot above). On the other hand, if you chose the 10% Lightning damage increase passive instead, you’ll need the backpack to reach 100% mana cost reduction.
You can even opt to swap your tent out for something else or not rely on tent buffs at all, as a 90% mana cost reduction (80% if you chose the Lightning damage increase passive instead) combined with the Leyline Connection passive and mana regen food means you basically have unlimited mana anyways.
Unfortunately, this won’t work for the 0-mana variants of this build – if you are running that variant, you’ll either have to keep the backpack on or sleep in the mage tent once every 40 minutes to keep your mana cost reduction at 100% or more, or both if you chose the 10% Lightning damage increase passive.
Weapon 1: Living Wood Axe (random loot, found in Enmerkar Forest chests) + Bone Pistol (crafted)
Both are easy to get very early on, but they don’t really work well until combined with the rest of the gear. The Living Wood Axe is there mostly for the 10% mana cost reduction, and the fact that it has built-in Ethereal damage. Combined with the Infuse Light spell it also does Lightning damage to go with the theme of the build.
Buffs in general aren’t necessary to any build, but they’re a nice boost in power if you’re expecting a particularly tough or risky fight.
We’re going to be running 4 Boons (all boons last a base of 240 seconds, or 4 minutes) and two casted buff (180 seconds each).
Boons:
Discipline (Focus skill, blocking with the Brace skill, Discipline Potions)
Rage (Enrage skill, Rage Potions)
Blessed (Blessed skill, Blessed Potions)
Mist (Mist skill, Mist Potions)
Spell Buffs:
Runic Protection (Blue + Purple runes, can be consumed by casting Purple + Blue for a big heal)
Infuse Light (remember, this consumes your Blessed boon, so make sure to reapply it after!)
I’d recommend keeping a few Blessed Potions (Clean Water + Firefly Powder) & Mist Potions (Clear Water + Ghost’s Eye) on hand because of how easy they are to make and how often you eat through them.
Dagger Dervish (Decay, Fire & Physical) [Advanced]
Originally going to be called ‘Trophy Hunter’, where the theme was going to be only using equipment crafted from the parts of dead enemies, I found that it was a little harder than expected (looking at you, backpack and shields). Instead, I kept half of it, and shifted focus to doing something new.
The Dagger Dervish is all about being in the thick of it, applying all three form of DoTs (Burning, Extreme Bleeding & Extreme Poison) as quickly as possible, while having extremely hard hitting skills. I built it around the Rogue’s dagger skills, as I haven’t done one yet, and it worked perfectly.
Faction: Heroic Kingdom (for the 15% damage increase and Zagis’ Mask)
Health: 95
Stamina: 95
Mana: 20
The above can be achieved by investing 1 point into Mana when prompted to at Conflux Mountain.
After picking up all the recommended passive skills (and the Peacemaker Elixir), the final distribution will look like:
Health: 180
Stamina: 155
Mana: 40
Breakthrough skills trees and the skill itself will be bolded, and I will list the skill trainers in rough order of convenience – I group skill trainers by area, so if you are following this build step by step, also check out the ‘Equipment’ section in order to find what you need to buy from these areas.
Kazite Spellblade (Cierzo, Chersonese):
Fitness (50 silvers)
Immaculate (Immaculate’s Cave, one in each zone):
Possessed – you have to find the Immaculate NPC by checking in on the caves; there’s one in each zone. When talking to him, ask him for help and then choose the ‘I need power’ option in order to receive this skill.
Warrior Monk (Monsoon, Hallowed Marsh):
Focus (50 silvers)
Brace (50 silvers)
Steadfast Ascetic (500 silvers)
Perfect Strike (600 silvers)
Flash Onslaught or Counterstrike – as usual, either or, both are really great.
Wild Hunter (Berg, Enmerkar Forest):
Enrage (50 silvers)
Survivor’s Resilience (500 silvers)
Predator Leap (600 silvers)
Feral Strikes (600 silvers)
Rogue (Levant, Abrassar)::
Opportunistic Stab (100 silvers)
Feather Dodge (500 silvers)
Serpent’s Parry (600 silvers)
Mercenary (Levant, Abrassar):
Armor Training (100 silvers)
Smooth the Tailor (Levant, Abrassar):
Warm (50 silvers)
None that really adds to the Core list.
None, really. Things are pretty fixed here.
Helmet: Zagis’ Mask (finish the Heroic Kingdom faction quest line for this)
Armor: Pearlescent Mail (Ruins of Old Levant, Abrassar)
Boots: Scaled Leather Boots (crafted)
Backpack: Zhorn’s Hunting Backpack (Royal Manticore Nest, Enmerkar Forest)
Tent: Fur Tent (Shopkeeper Doran, Cierzo) or Luxury Tent (Shopkeeper Pleel, Berg or Shopkeeper Suul, Levant)
Food: Ocean Fricassee (Larva Egg, Fish, Seaweed)
Miscellaneous: Fire Rag (Linen Cloth + Thick Oil)
An easy alternative for the Helmet and Armor is to use the Scaled Leather Hat and Scaled Leather Armor – these both also work pretty well, just not as well as the Zagis’ Mask and Pearlescent Mail.
This is really a melee build that uses mana just for two buffs (the Possessed & Warm Boons). It capitalizes on applying all three DoT effects – the Extreme Poison comes from the Manticore Dagger, the Burning comes from applying Fire Rags (which are super easy and cheap to make), and Extreme Bleeding is applied by either Serpent’s Parry or Feral Strikes.
If you followed my Attribute Distribution and Food suggestions, you will have enough mana to cast the two Boons (each lasting for 240 seconds) and have enough passive mana regen to refill your mana tank in 80 seconds, which means you will always have enough mana to recast the Boons when they fall off.
Weapon 1: Brutal Club (near Vendavel Fortress, Chersonese) + Manticore Dagger (crafted)
Note: So I know the Marble Morning Star exists and is superior to the Brutal Club in literally every aspect, but I haven’t found it yet myself. I’m assuming it’s found in the Enmerkar Forest like the rest of the Marble stuff.
Right, well, pretty fixed set of weapons here, no real alternatives without redoing the build completely. You can craft the Manticore Dagger with a Manticore Tail and Palladium Scraps – the Manticore Tail you can probably get when entering the Royal Manticore Nest to get your Zhorn’s Hunting Backpack.
With this build, you generally open with Perfect Strike to inflict Pain, Burning and Confusion on your enemy, followed by either a quick Opportunistic Stab (dealing quadruple damage!) or Serpent’s Parry (if they’re swinging back; this also Stuns them) to inflict Extreme Poison.
Feral Strikes gives you another way to inflict Pain, Burning and Confusion with one hit, and Dagger Slash lets you apply Extreme Poison if your Opportunistic Stab and Serpent’s Parry are both on cooldown.
Predator Leap just does a bunch of damage. Like, a whole lot.
Buffs in general aren’t necessary to any build, but they’re a nice boost in power if you’re expecting a particularly tough or risky fight.
However, it’s easy to have 100% uptime on certain buffs (explained in the ‘Equipment’ section) so there’s that.
We’re going to be running 3 Boons (all boons last a base of 240 seconds, or 4 minutes) and one consumable buff (90 seconds).
Boons:
Discipline (Focus skill, blocking with the Brace skill, Discipline Potions)
Rage (Enrage skill, Rage Potions)
Possessed (Possessed skill)
Warm (Warm skill)
Consumable Buffs:
Fire Imbue (Fire Rag)
I’d recommend keeping a stock of Fire Rags (Linen Cloth + Thick Oil) on hand because of how easy they are to make and how often you eat through them.
Discipline Potions (Clean Water + Ochre Spice Beetle + Livweedi) and Rage Potions (Clean Water + Gravel Beetle + Smoke Root) are a bit harder come by, but not that hard to keep a small stash of on your person, either.
Druid (All Elements) [Advanced]
You read that correctly – all elements, being Decay, Ethereal, Fire, Frost, Lightning & Physical.
If you noticed, I use the White Priest Mitre a lot in my builds. It only looks okay, but the benefits are insane. So I thought to myself, how do I maximize its use? Then as I was chugging along and testing things out, the question quickly changed to, how many debuffs can I inflict on an enemy?
Then after more testing, I changed the goal of this build to ‘inflict a reasonable amount of useful debuffs that helps capitalize on our White Priest Mitre’, and thus, the Druid was born – using all sorts of elemental magics to drown the enemies in debuffs and damage.
Faction: Holy Mission (for the 10% mana cost reduction)
Health: 80
Stamina: 80
Mana: 80
The above can be achieved by investing 4 points into Mana when prompted to at Conflux Mountain.
After picking up all the recommended passive skills (and the Peacemaker Elixir), head back to the Conflux Mountain and invest a further 6 more points (for 10 points invested total) into Mana, for a final result of:
Health: 135
Stamina: 70
Mana: 260
Breakthrough skills trees and the skill itself will be bolded, and I will list the skill trainers in rough order of convenience – I group skill trainers by area, so if you are following this build step by step, also check out the ‘Equipment’ section in order to find what you need to buy from these areas.
Immaculate (Immaculate’s Cave, one in each zone):
Possessed – you have to find the Immaculate NPC by checking in on the caves; there’s one in each zone. When talking to him, ask him for help and then choose the ‘I need power’ option in order to receive this skill.
Kazite Spellblade (Cierzo, Chersonese):
Fitness (50 silvers)
Second Watcher (Conflux Mountain, Chersonese):
Cool (50 silvers)
Shaman (Cabal of Wind Tower, Chersonese):
Reveal Soul (50 silvers) – combine with Spark to refill your considerably large mana tank – you can never have too much mana with this build.
Shamanic Resonance (500 silvers)
Philosopher(Monsoon, Hallowed Marsh):
Sigil of Fire (50 silvers)
Mana Ward (50 silvers)
Mofat (Monsoon, Hallowed Marsh):
Blessed (50 silvers)
Rune Sage (Berg, Enmerkar Forest):
All runes (50 silvers each, 200 silvers total)
Well of Mana (500 silvers)
Arcane Syntax (600 silvers)
Internalized Lexicon (600 silvers)
Wild Hunter (Berg, Enmerkar Forest):
Enrage (50 silvers)
Hunter’s Eye (50 silvers)
Survivor’s Resilience (500 silvers)
Piercing Shot (600 silvers)
Cyril Turnbull (Berg, Enmerkar Forest):
Mist (50 silvers)
Smooth the Tailor (Levant, Abrassar):
Warm (50 silvers)
None that really adds to the Core list.
Nope, doesn’t exist. This build is pretty fixed.
Helmet: White Priest Mitre (bought from Laine the Alchemist in Monsoon, Hallowed Marsh)
Armor: Runic Armor (bought from Quikiza the Blacksmith in Berg, Enmerkar Forest)
Boots: Gold-Lich Boots (Spire of Light, Hallowed Marsh)
Backpack: Light Mender’s Backpack (quest acquired at Spire of Light, Hallowed Marsh)
Tent: Mage Tent (bought from Shopkeeper Suul in Levant, Abrassar )
Food: Pot-au-Dey du Pirate (3x Fish, Salt) or Ocean Fricassee (Larva Egg, Fish, Seaweed)
Weapon 1: Brand (pieces scattered in every zone) + Bone Pistol (crafted) + Horror Bow (crafted)
Plenty of other guides out there that details step by step how to get Brand – I need to skimp on character usage because I frequently hit the cap in each build section, and describing the process accurately would take too many characters!
Bone Pistol is crafted with Flintlock Pistol, Occult Remains and Crystal Powder. Horror Bow is crafted with 2x Chitin, War Bow and Occult Remains.
So… yep. For those keeping score at home, here is the list of debuff we will inflict: Burning (Fire Rags on Brand), Chill (Brand), Pain (Brand), Haunted (Bone Pistol), Extreme Bleeding (Piercing Shot skill), and Extreme Poison (Horror Bow).
Your rotation begins with prebuffing the crap out of yourself (see the ‘Combat Buffs’ section below), making sure your pistol is reloaded, as well as laying down a Runic Trap (Red, Green). Equipping the Horror Bow and use Piercing Shot, followed up by a weapon swap to Brand and Bone Pistol.
Fire your pistol off once they get in range (make sure to tag them with the pistol before they reach your Runic Trap, so you can debuff them with Haunted – making them take an extra 25% damage from Runic Trap!), then proceed to beat the ever living crap out of whatever you’re fighting.
Wanna be extra fancy and optimal? Open up your inventory and swap your Bone Pistol out for the Light Mender’s Lexicon once you’ve shot off your pistol round. Oh, the good old memories of Dark Souls…
If melee range is a no go (e.g fighting hyper aggressive mobs), after you apply your melee debuffs, you can easily back up and kite with a combination of Runic Lightning (Green, Red) and Runic Traps (Red, Green). They go down pretty fast.
Buffs are absolutely necessary, it’s the whole point of this crazy build.
We’re going to be running all 7 Boons (all boons last a base of 240 seconds, or 4 minutes), 3 casted buffs (varying lengths, I will detail how long each one last below) and 1 consumable buff (90 seconds).
Boons:
Discipline (Focus skill, blocking with the Brace skill, Discipline Potions)
Rage (Enrage skill, Rage Potions)
Blessed (Blessed skill, Blessed Potions)
Cool (Cool skill, Cool Potions)
Mist (Mist skill, Mist Potions)
Possessed (Possessed skill, Possessed Potions)
Warm (Warm skill, Warm Potions)
Spell Buffs:
Runic Lantern (Green, Blue, lasts 500 seconds) – cast the Blue rune from your skills menu. This buff is prerequisite to casting Runic Lightning.
Runic Protection (Blue, Purple, lasts 180 seconds) – cast the Blue and Purple rune from your skills menu.
Immolate (Sigil of Fire + Mana Ward – tiny Fire DoT at (0.3/sec for 18 damage total) on yourself, but increases your Fire damage by another 30% for 60 seconds)
Consumable Buffs:
Fire Rags (90 seconds) – allows us to inflict Burning on enemies, and adds a bit of bonus Fire damage at the same time.
As usual, I’d recommend keeping a stock of potions since they’re easy to craft. Here’s a quick list of recipes:
Fire Rags (Linen Cloth + Thick Oil)
Blessed Potions (Clean Water + Firefly Powder)
Cool Potions (Clean Water + Gravel Beetle)
Possessed Potions (Clean Water + Occult Remains)
Mist Potions (Clean Water + Ghost’s Eye)
Warm Potions (Clean Water + Thick Oil)
Discipline Potions (Clean Water + Ochre Spice Beetle + Livweedi)
Rage Potions (Clean Water + Gravel Beetle + Smoke Root)
Closing Notes
There’s one general tip I wanted to share in the build pages, but couldn’t due to hitting the character limit in each and every section – I literally hit the absolute character limit on the Proto-Druid build, yikes. Couldn’t insert a new line even if I wanted to!
Anyways, the gist of it is, if you are having trouble getting any of these Equipment pieces featured in each of these builds, there are almost always more readily available (albeit slightly less effective) counter parts you can buy from vendors. The exception being the Crimson Plate Set, but that set is also ridiculously easy to get (join and follow the Blue Chamber quest line).
For example, a cheaper alternative to the Gold-Lich Set is to purchase the Wide Hats and Clansage Robes from Berg, Enmerkar Forest. An alternative to the Pearlbird Mask can be the Master Trader Hat or Entomber Hat, and so on forth.
Finally, there are two great resources I recommend checking in on (and ones I used myself), found at:
Rune and Spell Combos for Mages
Efficient Cooking Guide
Well, that’s about it really – I tried including as much information as I can in each relevant section, so there really isn’t anything else to add here.
If you have any questions or suggestions feel free to leave a message and I’ll get back to you. Otherwise, please rate this guide on how useful (or useless) you found it. Good luck and have fun!