Overview
Detailed maps for every level – safes, Angel Statues, recipes, and hidden loot.
Foreword
I created this guide because I was having difficulty using existing guides, which are often vague and unhelpful, or video guides, which sometimes didn’t even contain the information I was looking for. This guide is intended to be a general reference for finding any and all hidden, locked, or hard to find items which may be found within New Orleans.
Included within:
- Marked maps containing locations off all enclosed information
- Angel Statues
- Safes & corresponding Codes
- Recipes
- Hidden locations
While I have tried to make this guide as all-encompassing as possible, it is likely some information has been unknowingly omitted. If you have information that may be useful to other survivors, leave it in the comments, and it will be added post-haste.
Important Notes
While the levels are labelled with numbers, it is important to know that these numbers are simply the order in which I personally completed the game. Following the third level, the order is fairly non-linear, and you can go back to any level at any time, as well as progressing in whichever fashion you choose fit.
In order to stay alive as long as possible, it is highly recommended that you treat each area as a higher threat than the one before it. Always stay on guard, always come well prepared, and ALWAYS have a backup plan. The .45 revolver and hunting rifle work well against humans, but are bulky and ineffective against large numbers of walkers. As such, you should have a plan for each enemy you encounter.
I have done my best to omit as much information about the story as possible, in order to reduce spoilers. However, there are multiple points when important plot information has been disclosed. Please note, these should only be read as you reach them in order to maximize your experience.
Map Key:
I – The Resting Place
The Resting Place serves as your base of operations, as well as a hub for many of the quests you will encounter. Here, there are not many items of note, however, it is still worth looking around.
Angel Statue:
The first statue in the game, it can be found behind the coffin where you will drop off and receive intel for the story. It is unlocked via natural story progression.
Safe Four – Jazz Men:
To unlock the gate to the coffin where the first Angel is, you will be required to go down into the crypt and fight several walkers in order to get a key in the graveyard on the other side. Directly adjacent to the key is a safe sitting in plain view, near some statues playing instruments (the Jazz Men). This safe cannot be opened at the start, and requires a code found in Bastion.
- Explosive Arrows recipe
Notable Loot:
There is a very damaged bow sitting at the end of a small alley on the route to the coffin. Similarly, there are two bundles of arrows sitting on a table near the bus.
II – The Shallows
The Shallows is most aptly described as the introductory area for the game. Here, there is only one building of note, the Blue Mansion.
Upon entering the area, you will see a woman in distress who will ask you to find her husband, who has turned, and give him mercy. To aid in this task, she will give you a key which unlocks the attic of the Blue Mansion.

Angel:
The Angel Statue is in the attic of the Blue Mansion, sitting in plain view at the back of the room.
Safe One – Blue Mansion:
On the ground floor level of the Blue Mansion, there is a small office. The safe is in the back of the room, and the door to this office is near the front double doors of the mansion.
- .45 Revolver Recipe
- .45 Revolver Ammunition
- .45 Revolver Ammunition Recipe
Safe Code:
Option One:
The simplest way to access this safe is to complete the mission for the woman, and return her husband’s wedding ring to her before the bell’s chime. She will then give you the code to the safe, which may be accessed at any time of your choosing.
Option Two:
Should you fail to complete the mission on the first day, the woman will disappear, along with the quest items you collected. Fear not, as the code for this safe can still be acquired in the next level (Via Corolla).
Notable Loot:
There is a double barrel shotgun in the attic of the Blue Mansion.
In the garage, there are several junk boxes which can be scrapped for valuable parts.
III – Via Corolla
This map is a bit larger than the previous, and has two major locations of interest – the Tower outpost (named for the large banner which says Tower), and the Gold Lion house (named for the two golden lions standing watch in front). It is worth noting that BOTH of these locations are protected by armed guards, who will open fire if you trespass. Thus, before embarking to this area, make sure you are well armed and have medical supplies on hand.
Angel:
The Angel Statue can be located in the Tower Outpost, underneath the staircase, in a closet all the way at the back.
Recipe:
Jambalaya
The recipe for Jambalaya can be found in the Tower Outpost kitchen, on top of the stove.
Safe Two – Gold Lions:
There is a safe located in the Golden Lions house, which can only be accessed from the outside of the building. Go around the side, through the collapsed brick wall, and climb up and inside.
- Samedi’s Hand recipe
Safe Codes:
Blue Mansion Safe – Option Two
There will be a piece of paper with the code sitting on the pool table in the Golden Lions house.
Note, this option only appears if option one has expired.
Golden Lions Safe
Found in The Ward.
Note from Chardsy
The Golden Lions house has two guards at the entrance, and another around back. They can be easily overpowered with a few quick head shots.
The Tower Outpost is SIGNIFICANTLY better guarded, and as such a frontal assault is certain death. It is possible to sneak in through a hole in the back wall, using a bow to silently dispatch the patrols and a knife to cut the barbed wire booby traps.There is a boarded up hole in the back wall which can be used to gain access to the building, and once inside if you are silent and careful, you should be able to obtain the recipe and Angel Statue without being spotted.
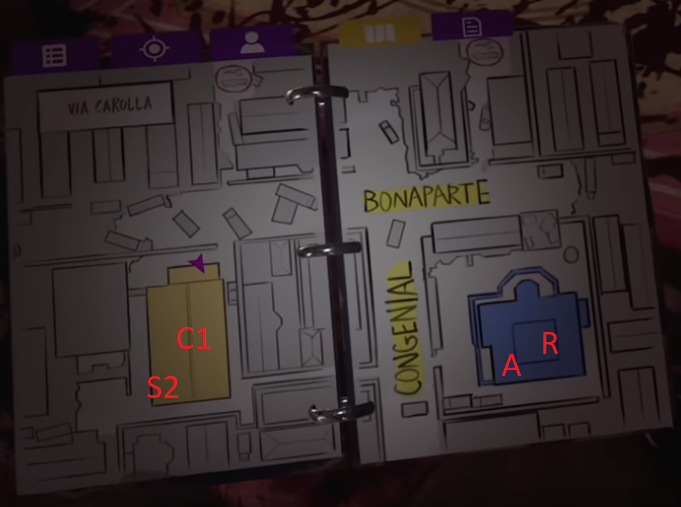
IV – Memorial Lane
This area is fairly large, but there are only 2 buildings of note – the Blue House and the Red House.

Angel:
The Angel Statue can be located inside of the Red House. On the second floor, there is a room with an armored mannequin – look up on top of the shelves and you will see it.
Recipe:
Compound Bow
Located in a Hidden Room in the Red House. On the first floor, there will be a bookshelf with a slot for a key. This key can be obtained in the Ramparts (see IX).
Notable Loot:
The Hidden Room inside the Red House, besides containing the Compound Bow recipe, also contains a fully-loaded Assault Rifle, a fully loaded Shotgun, and copious amounts of ammunition.
Note from Chardsy:
During the story mission associated with this level, both houses will be occupied by rival factions (the Tower and the Reclaimed). You will be able to chose allying with one side or the other. While the soldiers are excellent at keeping walkers away, I found looting to be a lot faster by going BEFORE the mission, as soon as the area is unlocked, thus avoiding the human patrols.
V – Old Town
This area is a bit chaotic – while not large in size there are many routes which are obstructed or blocked. Combined with frequent booby traps, it requires a Tourist to keep their head on a swivel at all times to avoid being ambushed. The dominating feature of this area is a large house whose corner has collapsed, revealing the interior.

Angel:
The Angel Statue for the Old Town is relatively easy to find, but also very easy to miss. You will find a short alley that has a tarp overhead – on the left hand side there is a dresser wedged against the wall. The Angel is inside of this dresser.
Safe Three – Old Town:
This safe is easy to find but hard to reach. It is located in the building that has the collapsed corner. Note that this building, both during the story and otherwise, is heavily patrolled by either Reclaimed or Tower soldiers, and that entering it may make them enter combat with you. The safe is on the second floor, in the room revealed by the collapsed corner.
Recipe:
Gumbo
Located in the small house directly adjacent to the collapsed corner house, on the first floor, in the kitchen fridge.
VI – The Ward
This area is quite massive, and contains half a dozen buildings. Please note – it is extremely easy to lose track of time trying to search through all of this, so develop a plan as you go and do not try to get everything in one pass.

Angel:
There is a large, 2-story warehouse building located directly adjacent to the building where the first skiff lands. Enter the far-right door, and in the warehouse area (not the office area), you will find the statue sitting on some crates near the back of the room.
Safe Code:
Golden Lions Safe – The code for this safe is found in the same building as the Angel. Go to the back-left corner of the building (relative to the entrance), and there will be an office underneath the stairs with the code sitting on the desk.
Notable Loot:
In the same warehouse as the angel and the safe code, there is a large amount of junk boxes. Similarly, in the area where the Tower cache is located, a number of junk boxes can be found, along with a fully functional Lever Action Rifle.
User @Perceiveall has noted that the Lever Action Rifle may be difficult to come by in future levels. It is recommended that you obtain it here and now if possible.
This area is extremely large, and as such new information will be added once I have fully explored it.
Note from Chardsy
There is a very large number of Tower guards in this area, at least a dozen or so, and they are very well-armed. I would HIGHLY recommend bringing a bolt-action rifle and a well-maintained handgun. Furthermore, while medical supplies can easily be found throughout the level, it is best to bring some in advance as well.
VII – Bastion
Bastion is a small neighborhood characterized by the large fortified townhouse in the center of the map. There is one other building which can be accessed, and this lies off towards the back of the area.

Angel:
The Angel Statue for Bastion can be located and found rather easily. It is on the eastern most street of the map, on the porch of an inaccessible building (this building is directly adjacent to the fortified townhouse). The statue is underneath a pile of trash, and can not be seen easily from the street, however, it is easily located if you know where to look.
Safe Code:
Jazz Men Safe
In the other main building on the map (not the fortified townhouse), a car has crashed into the side of the house. You can climb up near the wreck to gain entry to the house. Inside, you will find the Jazz Men Safe code sitting on the kitchen table.
Note from Chardsy:
During the story mission associated with this level, no walkers will spawn in. This allows it to be explored relatively free of danger.
Spoilers:
If you chose to kill JC this level will go much quicker, and you will become allied to the Tower. This may be the easier option, as there are around a dozen Tower soldiers which spawn in and they are very well armed.
If you choose to warn JC, these soldiers will first target him, and then you. Fighting them with success will yield a large number of weapons, weapon scraps, and junk boxes. Furthermore, (in my save atleast) Georgia drops the recipe for the Sticky Proximity Mine, which can only be acquired through killing human soldiers.
VIII – Bywater
This map is extremely large, and consists of an industrial area with several warehouses, a fish cannery, and an auto parts store. Due to the size of the area, it will be difficult to explore it all in one day, and should most likely be broken up into multiple expeditions. Tower soldiers/patrols will also frequently spawn here, but due to the size of the level these can be avoided with diligence.

Angel:
The Angel Statue for Bywater is relatively easy to find. Inside the auto parts store, in the garage area with the three Reclaimed soldiers, there is a wall with climbing hand holds. Jumping onto the table and climbing up reveals a small attic, where the Angel is sitting in plain view.
Note from Chardsy:
This area is quite large, and due to its industrial nature, it is also excellent for scavenging for upgrade components. Junk boxes can be frequently located throughout the level, as well as other high-density junk which can be scrapped for lots of usable components.
IX – Ramparts
Rampart is a high school and gymnasium which has been locked down due to the outbreak. The school itself is two floors and consists of three wings. The gymnasium is smaller, and can only be accessed by climbing in through the side.
By far, this is the largest and most intimidating level in the game. Due to the level taking place largely indoors, poor visibility and cramped quarters are common features.
Do not attempt to travel here without a well-maintained handgun and plentiful ammunition. Long rifles and shotguns will not be useful for quickly drawing and sighting inside of the hallways and classrooms. The Night Shift is an excellent weapon for this area, and I recommend bringing at least two. Medical supplies are a necessity.

Angel:
To access this Angel Statue, you must first find a room on the first floor which has two holes in the wall on either side of it, both covered by boards. The left side hole, once accessed, leads to a small janitor’s hallway. This hallway has another hole at the end, which can be difficult to see in low light. Going through this hole leads to the Art Room, which is completely pitch-black. Navigate to the back of the room and the Angel will be sitting on a table.
Hidden Key:
Head out from where the Angel Statue was into the room with 2 boarded up holes. Breaking down the boards over the second hole will give you access to a classroom where you will find a dead couple against the back wall. There is a key sitting near the hand of the dead female.
Recipes:
Timed Noise Maker Bomb
Located in the gymnasium. In the far right corner from entering the building, go up the bleachers and there will be handholds you can use to climb up. There is a series of holes you can fall through to the ground level, and the recipe will be clearly visible on the ground.
4th and Pain Cleaver
In the main school, in the same wing as the Angel Statue/Key room, head all the way down the hallway. You will reach a staircase which is barricaded with chairs. Directly across from it is the Nurse’s Office. Head inside and go to the bathroom, where the recipe will be on the sink.
Safe Code:
Old Town Safe
This code can be acquired by heading to the OPPOSITE wing from where the other collectibles are located. In the Band Room (has a large piano sitting in the corner), head to the back of the room, near the hole in the wall, and the code will be sitting on a stand facing the window.
Note from Chardsy:
To survive this area, move quick, and move silently.
X – The Church Yard
The church yard is a zone which does not require the skiff to travel to, but is rather unlocked via the story and can only be accessed by going through the crypt in the Resting Place. There are several story missions related to this area, but only one collectible of note.

Recipe:
Beignet
This recipe can be found in the small house across the street from where you meet May for the first time. It will be on the stove, or near the kitchen table, on the first floor of the building.
Assault Rifle
Located inside the Reserve. See spoilers. Can also be acquired as a random drop from human patrols.
Assault Rifle ammunition
Located inside the Reserve. See spoilers. Can also be acquired as a random drop from human patrols.
Note from Chardsy:
Installing Pump Valve #1 (South)
Installing the first pump regulator, you will find that the objective is completely swarmed by walkers. The easiest method for surpassing them is to kill the gutbag walker around the corner from the area, and use guts mode to camo yourself and avoid being mauled. Failing this, be prepared to kill at least a dozen walkers (plus stragglers).
Installing Pump Valve #2 (North)
Installing the second pump regulator, you will find there is a tower patrol which has gotten to the area first. You may chose to engage them, however, they will get distracted from nearby walkers and run away from the objective. Using this time diligently, it is possible to install the regulator and escape before they notice you.
Installing Pump Valve #3 (Final – Mega Spoilers)
Installing the final pump regulator leads to the conclusion of both the story and the game. You will be given three options on where to reroute the water – to the Armory, to the Comm Room, or to Both.
Flooding the Comm Room will kill Casey, and give you access to the Armory. Inside is the recipe for the Assault Rifle and Assault Rifle Ammunition. Please note – this is NOT the only way to acquire these items. Should you chose either of the other options, these recipes will appear as drops from human soldiers should you continue playing.
Note on the Recipe – Once a given story mission has been completed, the doors to this area will automatically close. Thus, it is suggested that you obtain the recipe during the first encounter with May.
Conclusion
The Bayou is a dangerous place to travel unprepared. Through this guide, you have learned its secrets and treasures, and hopefully have come out ready to tackle the challenges within. If you found this information useful, please take a moment to rate the guide or leave a comment, so that others may find it as well.
A single recipe has been omitted from this guide – the Sticky Proximity Mine. This can only be acquired through killing Human soldiers/patrols.
Stay safe, Tourist. The Bayou awaits.
Remember to RATE and FAVORITE this guide so you can find it again!