Cities Skylines | A Beginner's Guide To Using Mods & Custom Content
Intro
Welcome to this guide to modding cities Skylines for beginners!
If you’ve just bought the game, or finally got tired of playing vanilla, here’s a handy guide on how to get started. Modding this game isn’t a simple matter of plug & play, if you do it wrong or don’t read properly, things will not work and your game may crash. Read on!
Disclaimer: I am not accountable nor responsible if your game stops working, if you screw up, or if you set your computer on fire. Modify the game at your own risk.
Important!
- READ THE DESCRIPTIONS.I will say this a thousand times more, because mods are NOT plug&play! If you forget a required mod, things won’t work. If you install a broken mod, your game won’t work. If you don’t read how a mod works, things will behave strangely.If you can’t be bothered to read everything, please leave the workshop. Modding isn’t for you.
- Every asset in this game, both vanilla and custom, is loaded into the RAM on level load.
If you have more assets than RAM, your game will crash. This can only be avoided by using less assets, or buying more RAM.If you have 6GB RAM or less, you can't use custom assets. If you have 8GB and DLC, you can't use custom assets.Don't complain if you ignore this and your game crashes. The more assets you want to use, the more RAM you need. 12GB is the bare minimum. But 16GB is the minimum recommended.No, putting them in the Local folder doesn't magically make them not use system resources.
No, having the devs add it to the game does not magically make them not use system resources. - Every game update breaks mods!
You can not continue playing after the game updates. You must wait for the mods to update, and manually keep track of each mod that is and isn't updated. The list of broken/dead mods (see below) usually contains a list of broken mods after a patch, but is by no means definitive nor complete. Manually checking the update-date, comments and description of each mod is mandatory. - NEVER DO A SECOND LOAD!Always quit to the desktop between loads!
This is a Unity game. Which means you can’t do a second load if you mod the game.A second-load is loading another map/save when one has been loaded before in the current session, including after quitting to the main menu. The game loads mods in two halves, one part on the Paradox logo, and one part during the loading screen. By loading a second time, the game forces mods to load themselves twice, which causes problems.
- Do NOT use the 'Subscribe To All' button on a collection!
This will subscribe all content, regardless of whether your system can run it, and doesn't check if required mods are included. Don't be the idiot who subs to a 999 item Youtuber collection, then complains his game crashes. - If you disable or unsubscribe from a mod, it may break your save.
Always check if a mod is safe to disable or unsubscribe before doing so! If you disable or unsubscribe an asset, it will disappear from your game and your city. In some cases, this may break your save. Be careful. - If you use mods, the game will probably crash when you use the 'Exit Game' option.
This is completely normal, and nothing to worry about. Some mods prevent you from going to the main menu. This is for your own safety.*Disabling a mod does not fully disable it.
Mods still run code even if they are disabled. Always unsubscribe mods if you don't use or need them, or if you're using a mod that does the same thing. - Mods that do the same thing are always incompatible. Don't use two mods that do the same thing.
This causes conflicts, bugs, error, and can break your game and/or save. This includes old and new versions of the same mod. - NEVER OVERWRITE A SAVE FILE.ALWAYS make a new save when you save your game.
"Save often and in different slots." The oldest mantra in gaming history. This should be basic common sense, but apparently it's not.
Make them incremental, so city_1, city_2, city_3, etc. Don't rely on one or two saves, they can become corrupted very easily, and you don't want to lose your entire city just because you only have one save.
Things you need to mod Cities Skylines
- Your system specifications. And an understanding of what they are.
- Sufficient RAM.
- Patience.
- The ability to read.
It is *strongly* recommended to use the Loading Screen Mod.
This mod reduces the amount of RAM used by assets, improves the speed with which the game loads (by anywhere between 20% and 800%, depending on your CPU, RAM and harddrive), and improves stability. Use the process below to install it.
Mods, Assets, Props, what is what?
As I'm writing this, there are 168,554 items uploaded to the workshop for everyone to use. That's a lot! But what is what? And what does everything do? And how do you use it? Read on!
Let's start at the beginning:
Vanilla
Vanilla is a software term used to describe the original state of the software.
In the case of videogames, this means the game as it was made by the official developers, without custom content or mods.
DLC made by the official developers is also considered vanilla.
Vanilla Mods are the mods that are made by the official developers that come with the game.
Custom Content is everything for the game made by people who are not the official developers.
There are three main types of custom content:
- Mods.
- Assets.
- Environment.
Mods
Mods are snippets of code that alter or add game functionality. These are usually run on the CPU, and can slow down your game depending on how powerful your system is. Mods regularly break with every update, and using the wrong mods can prevent the game from working properly. Assets
Assets are all the useable content in the game. There are several different types of assets:
- Buildings
Buildings come in various types. The two main types are Growables and Ploppables.- Growable buildings grow in zoned areas, and have a size limit of 4x4 units. They work just like the grown buildings from the vanilla game. People live, work and shop in them as normal. When installed, they will be added to the list of buildings that can grow and appear automatically.
- Ploppables are zone-free buildings, but only function as services, parks or uniques. These are generally bigger than 4x4.
The Ploppable RICO mod adds RICO functionality to ploppable buildings and growables to make them into usable homes, shops, factories and offices. More on that later. - District Styles/Building Themes are text files that mention the name of every asset in that style. They don't contain any assets, you still need to subscribe to the actual buildings.
- Growable buildings grow in zoned areas, and have a size limit of 4x4 units. They work just like the grown buildings from the vanilla game. People live, work and shop in them as normal. When installed, they will be added to the list of buildings that can grow and appear automatically.
- Networks
These are roads, walls, tracks, etc. Keep in mind that removing networks from your game may break your save, and networks like roads and tracks are required items for assets that use them. - Props
Props are decoration pieces. This includes everything from benches to advertising signs. Since the Park Life DLC we have access to some of the props, but for most you still need a mod like Find It! 2 - Trees
Trees are what it says on the box: trees, plants, grasses, flowers, bushes, etc. They can be placed via the Landscaping menu.
Environment:
These are maps, map themes, and LUTs.
- Maps are the world you play on.
- Map Themes are the textures that make up the terrain, such as grass, gravel, dirt and the pavement. The heavier the texture, the more RAM and VRAM it uses.
- LUT’s are colour overlays. These are colour filters that change how the game looks. Contrary to popular belief LUTs do not affect system performance, as the game always uses one, even if you select ‘none'. LUT's can be enabled from the ingame Options > Graphics menu.
Broken & Dead mods
The Workshop is not the most well maintained system in the world. (Hah, understatement.) A lot of content on it is severely outdated, and can be considered dead and/or broken.
A dead mod is a mod that has been abandoned. This doesn't necessarily mean that the mod is broken, it may still work. If a game update doesn't change the code the mod relies on, the mod usually isn't broken and doesn't need updating.
A broken mod is a mod that is, as it says, broken. These mods will cause your game to misbehave, throw errors, and/or crash completely.
https://docs.google.com/spreadsheets/d/1mVFkj_7ij4FLzKs2QJaONNmb9Z-SRqUeG6xFGqEX1ew
(copy the URL if the link doesn't work, because steam's link filter is not the smartest biscuit in the tin, and considers all google docs links evil.🙄)
Compatibility Report is also a very helpful mod: https://steamcommunity.com/sharedfiles/filedetails/?id=2881031511
How do I install mods?
Please note: The Steam Workshop, Simtropolis, and specific modders' official discord channels are the only legitimate sources of custom content. Other sites host stolen content and qualify as piracy. I can not and will not vouch for the safety and functionality of mods and assets acquired on third party sites. Use at your own risk.
Step 1: Accessing the Steam Workshop
The safest and most stable way to do this is via the browser.
Go to https://steamcommunity.com/app/255710/workshop/
Make sure you are logged in with your Steam account.
Please note: Do not subscribe/unsubscribe to content whilst the game is running, even on the main menu. This is not safe to do, and it will also reset certain mods. If you use Network Skins or Surface Painter, all modifications made with those mods will be undone.
You can also access the Workshop via the Steam Client and from inside the game. However, the Steam Client is not the most stable at the best of times, and using the Workshop whilst the game is running will reset certain mods and cause all sorts of instabilities. Stick to the browser.
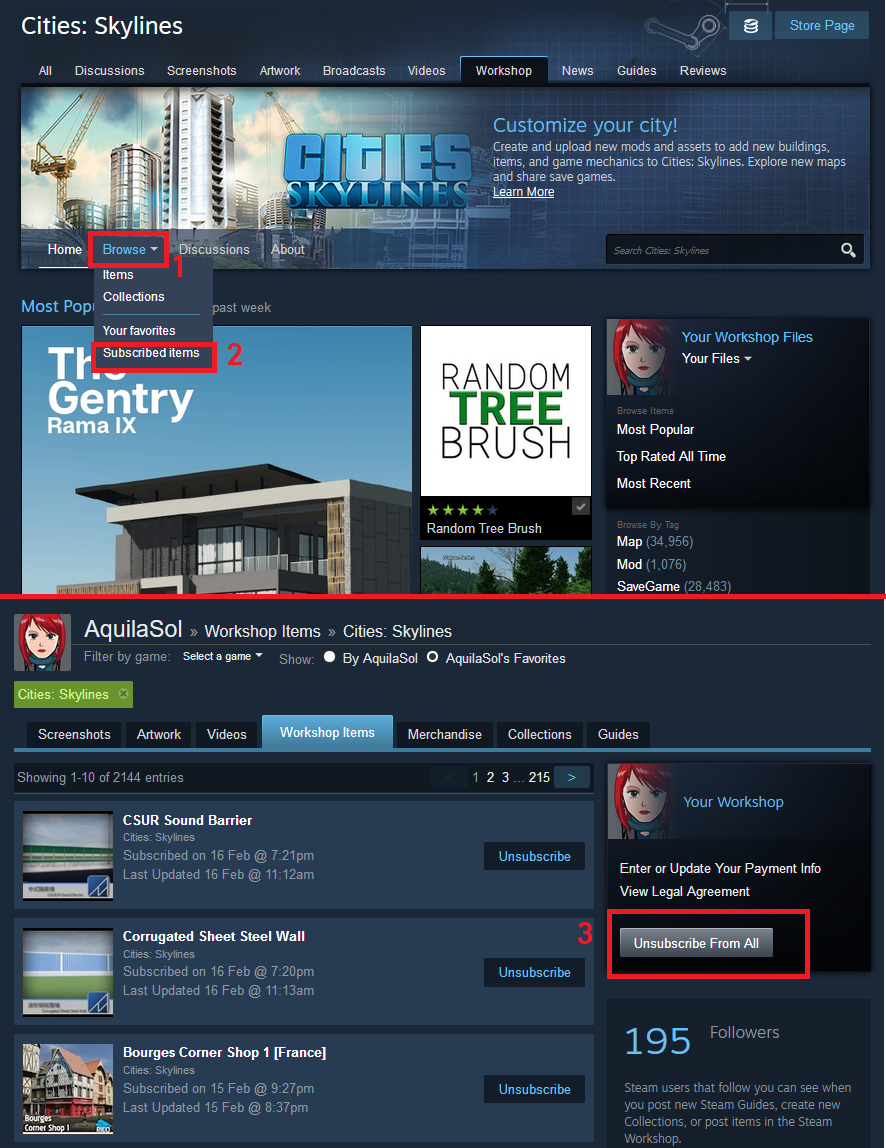
Step 2: Locating mods
When you open the Cities Skylines Workshop, you'll find yourself on the Workshop's front page. There’s a lot of stuff here, so let’s quickly go over the basics.
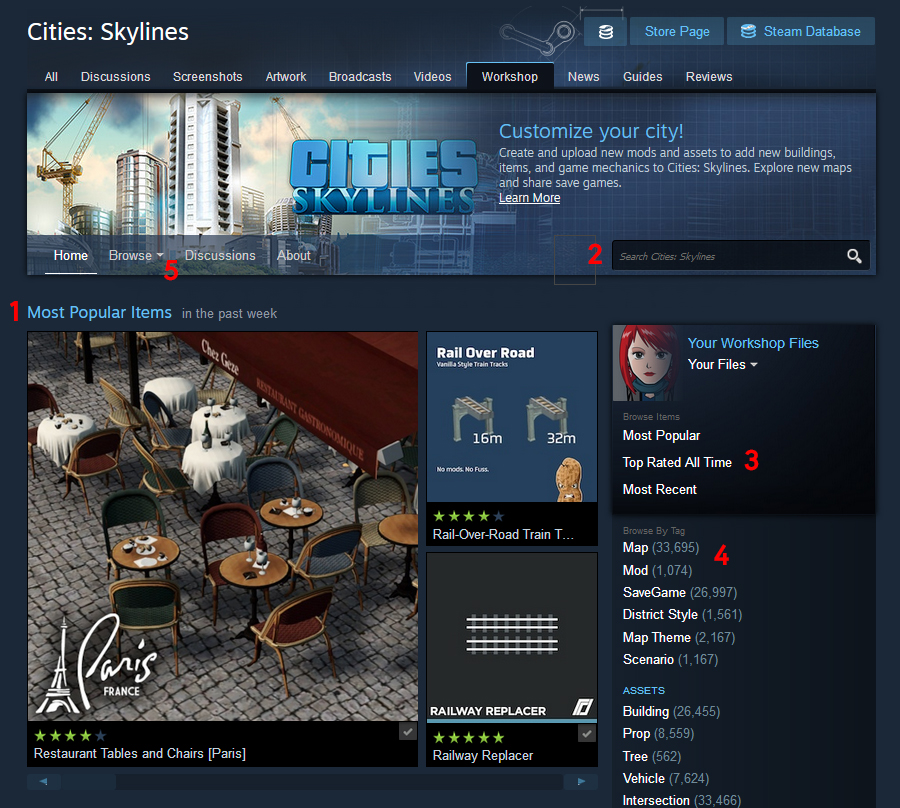
- Most Popular Items: This gallery are the 9 most upvoted items in the Workshop this week. You can click the title ‘Most Popular Items’ to view a larger list with everything in the workshop sorted by popularity in the past week.
- The search bar. Use this to search for content. Searches are done in both the title and description.
- The top one is the same as #1. The other two are useless. Avoid these. Most mods in the Top Rated category are broken and will break your game, and the Most Recent one is full of slightly-edited vanilla junk.
- The categories. If you’re looking for a specific type of item, use these to quickly filter. You can also use these when searching.
- Browse. Under the drop-down menu you will find the Subscribed Items options, which lists everything you subscribed to. The page also has a handy ‘Unsubscribe All’ button.
Step 3: Content page
Click on the image of the mod you’d like to use. For the moment, I’ll use one of my own maps.
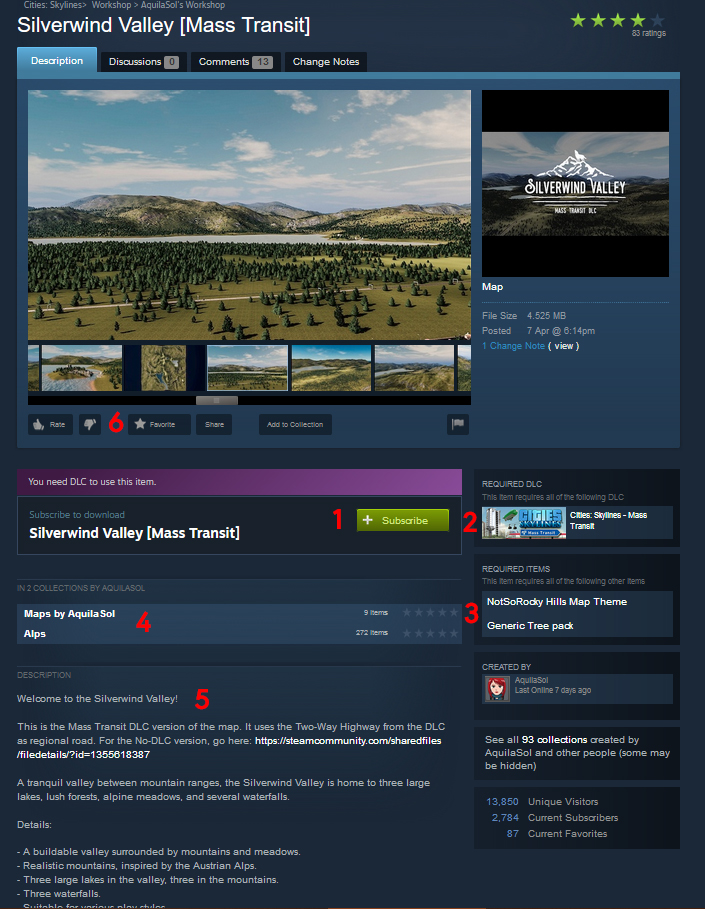
- The Subscribe button. This will add the item to your Library. Don’t click this until you’ve read the rest.
- Required DLC. This lists the DLC needed to use the content. If you don’t have the DLC, the subscribed asset/mod can’t be activated inside the game.
- Required items. This lists the content required to make the asset/mod function. If you skip a required mod, the asset or mod will not work. Don’t ignore these.
- Linked collections. Some items, such as maps or massive mods, come with a collection of items required to use it. A collection makes it easier to subscribe to these. Creators will also link a collection if the item goes together with other items (like a set of buildings), or to group all of their content together.
- The description. Here comes the reading! This will tell you what the item is, what it does, and how to make it work. READ THE DESCRIPTIONS!
- If you like an asset or mod, give it an upvote!This way you can thank the creator for all the work they put into the item. It also puts it higher up in the Popular list we saw on the front page.

Once you’ve read the description and subscribed to the required content (read the description for those as well), go ahead and click Subscribe.
Step 4: Enabling the content
Once Steam has finished downloading the content, launch the game.
Mods need to be manually enabled before they can be used in the game.
Assets and environment content are enabled by default.
On the Main Menu, select the Content Manager.
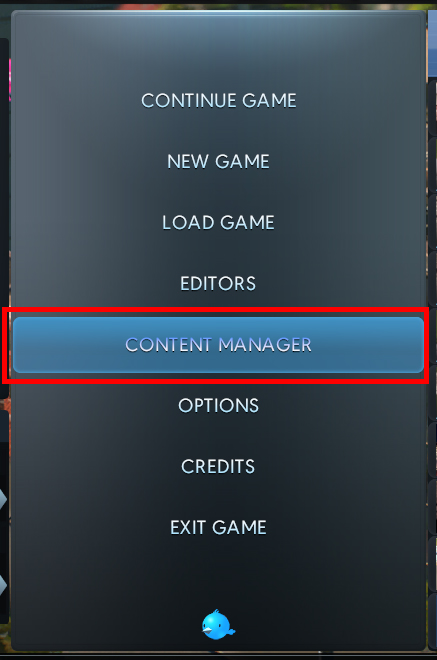
This will open the content manager menu. From here you can enable and disable content.
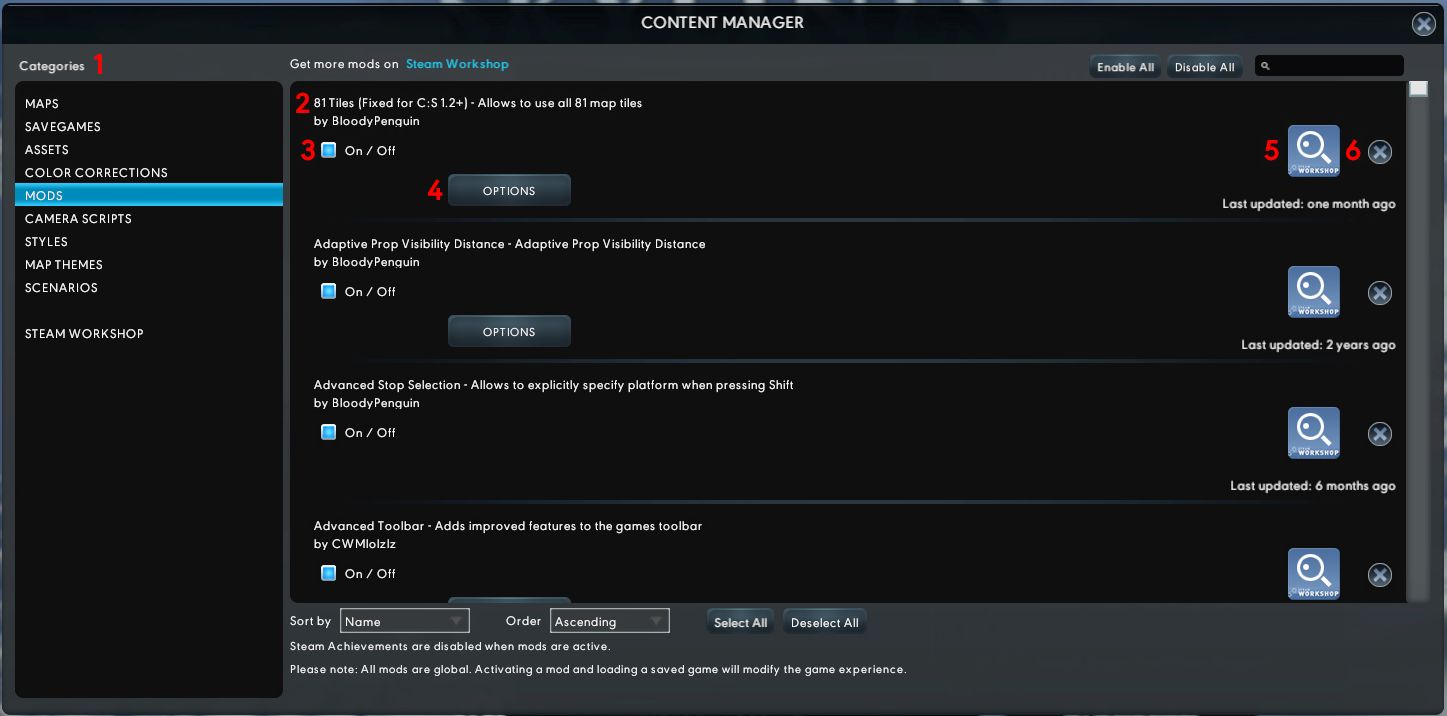
- Content is split by categories. These are pretty self explanatory.
- Mod name and Creator.
- On/off switch. Toggle this to turn the item on or off.
- Options. This opens the options menu for the mod. Not every mod has settings, and assets don’t have these at all.
- Workshop button. This opens the Workshop page in the Steam Overlay browser.
- Unsubscribe button. Don’t use this. Unsubscribe content from the Workshop page in your browser. Don't leave the game running.
Go ahead and turn on the mods you want to use. In some cases, you may have to exit and relaunch the game after enabling the mods.
Step 5: Using the mods
There is no basic guide to using them. Each item is different.
Mods all do their own thing. Read their descriptions for information on what they do and how to access them.
Ploppable buildings are in their respective interface tabs.
Growables will grow automatically.
Props can only be accessed with a mod.
Trees can be found in the Landscaping tab.
Maps can be selected when you start a new city.
Map Themes are also selected when you select a map to start a city on.
LUT's can be selected from the Graphics Options in the ingame Options Menu.
Frequently Asked Questions
For a full list of frequently asked questions, errors, useful tips. and general information, please see the
Mod [name] doesn't work.
Did you read the description?
How many assets can I install on [xx]GB RAM?
It depends on the size of the assets. The game runs on the Unity engine, which loads all assets directly into the RAM on game load. so a 60MB train station uses 60MB RAM. A 10KB prop only uses 10KB, and so you can subscribe to a lot more before reaching the limit.
4GB: 0-10 assets
8GB: 100-400 assets
12GB: 400-800 assets
16GB: 800-1200 assets
24GB: 1200-2000 assets
32GB: 2000-2800 assets
64GB: 2800-6000 assets
If it crashes on the loading screen, you've got too many. Remove them or buy more RAM.
How much RAM do I need?
It depends. The vanilla base game requires around 6GB. Once you start using DLC and/or assets, you’ll need a lot more. The game with all DLC will need at least 12GB. Custom content requires more. (Yes, this game is very RAM heavy.)
Can I run the game on an IntelHD Integrated GPU?
As listed in the specifications, Cities Skylines does not support Intel Integrated Graphics Cards. It might run, but it won’t run smoothly. Integrated GPU’s are meant for office use. Yes, that includes a Mac.
Steam / The Workshop doesn’t work
Always check https://steamstat.us/ if Steam is having issues.
The Steam Community Servers (which house the Workshop) undergo scheduled maintenance every Tuesday-to-Wednesday night around 00:00 (GMT, London time).
And if there's a Steam Sale, the servers are permanently overloaded. That's normal.
Recommended System Requirements
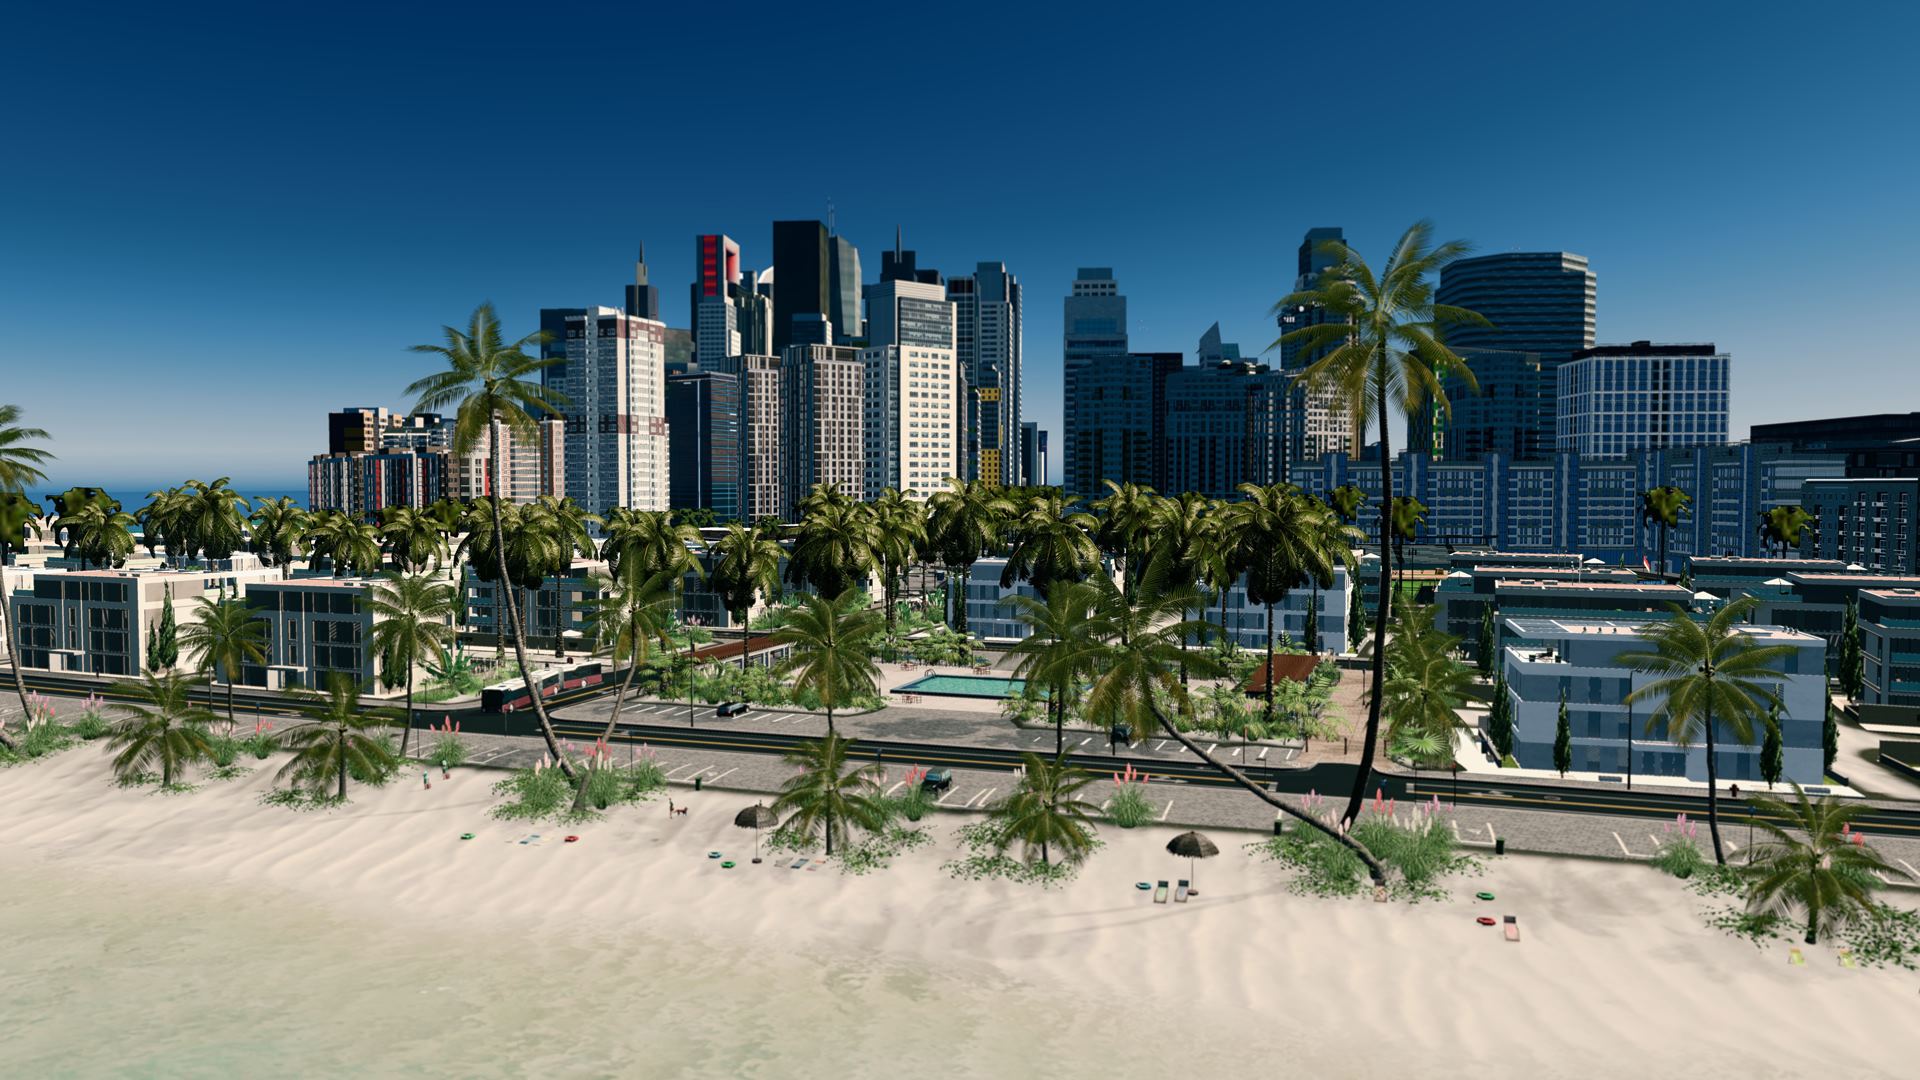
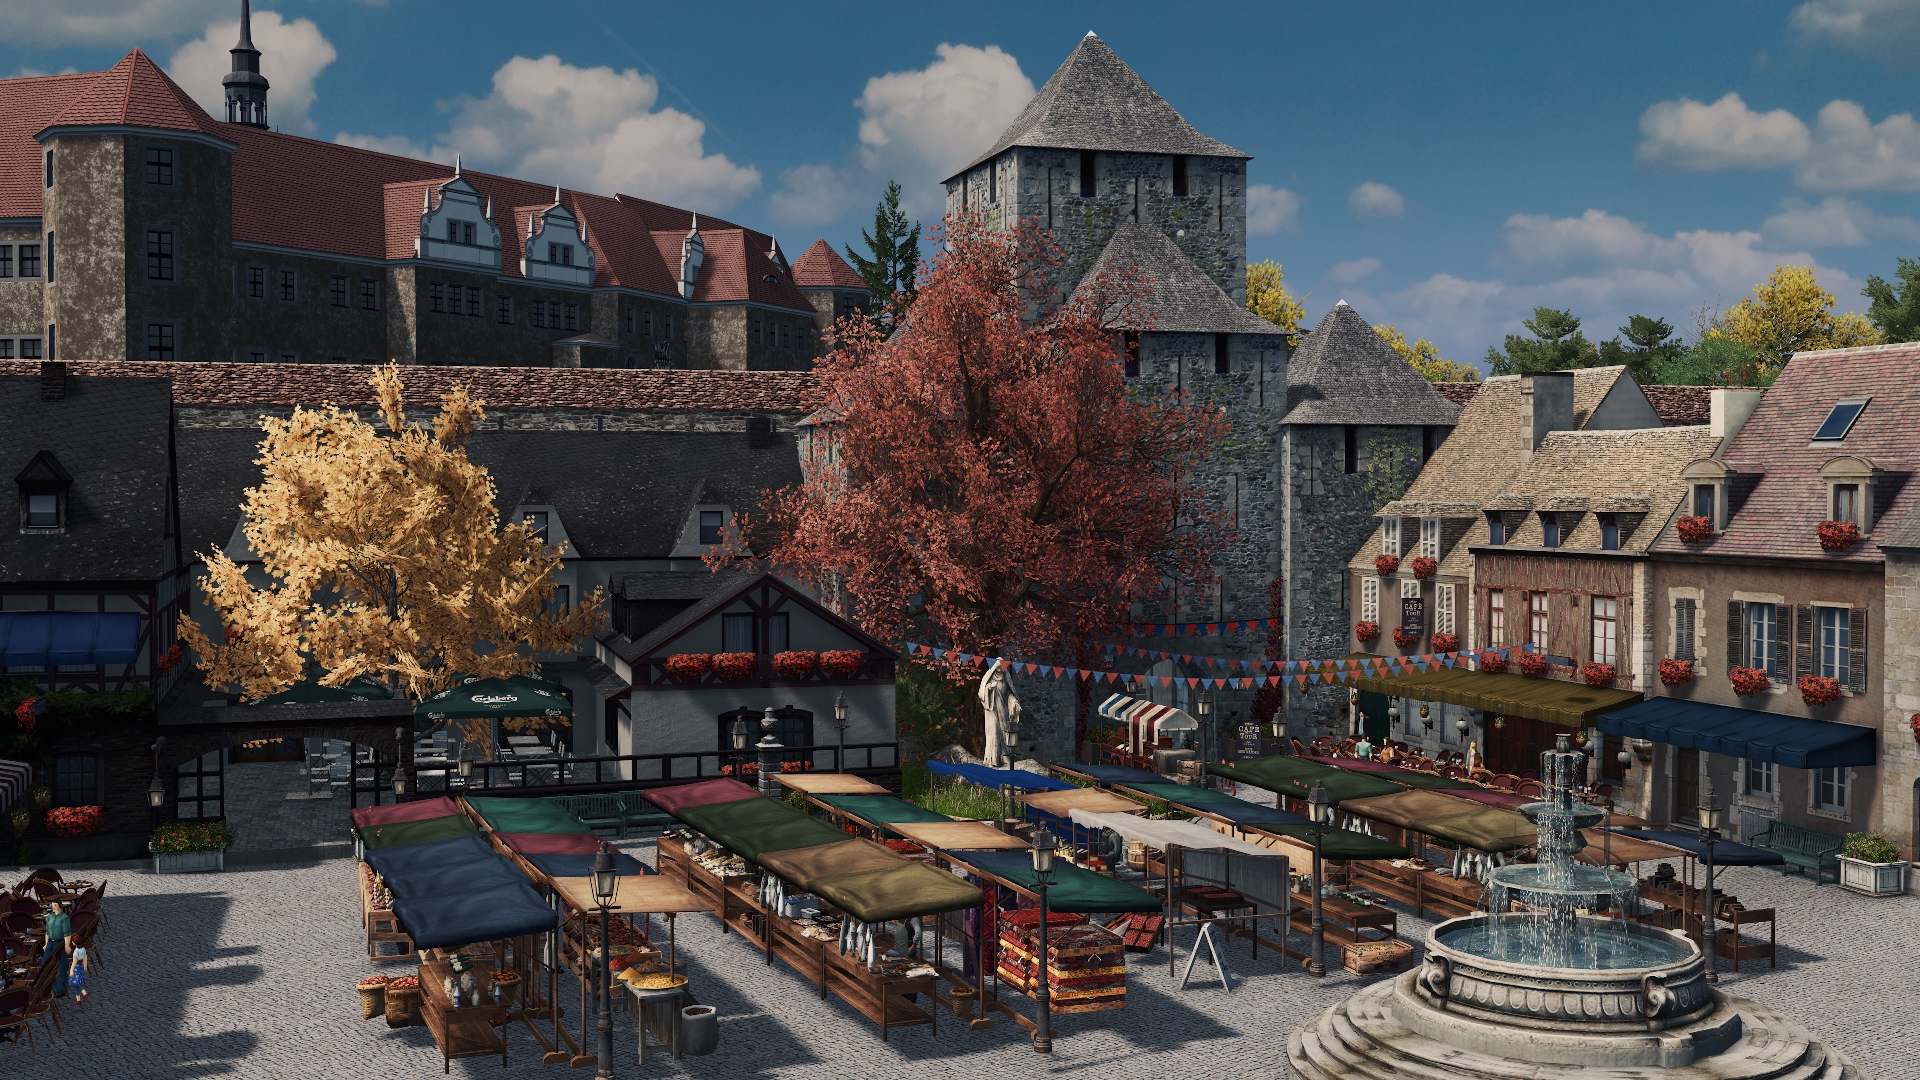
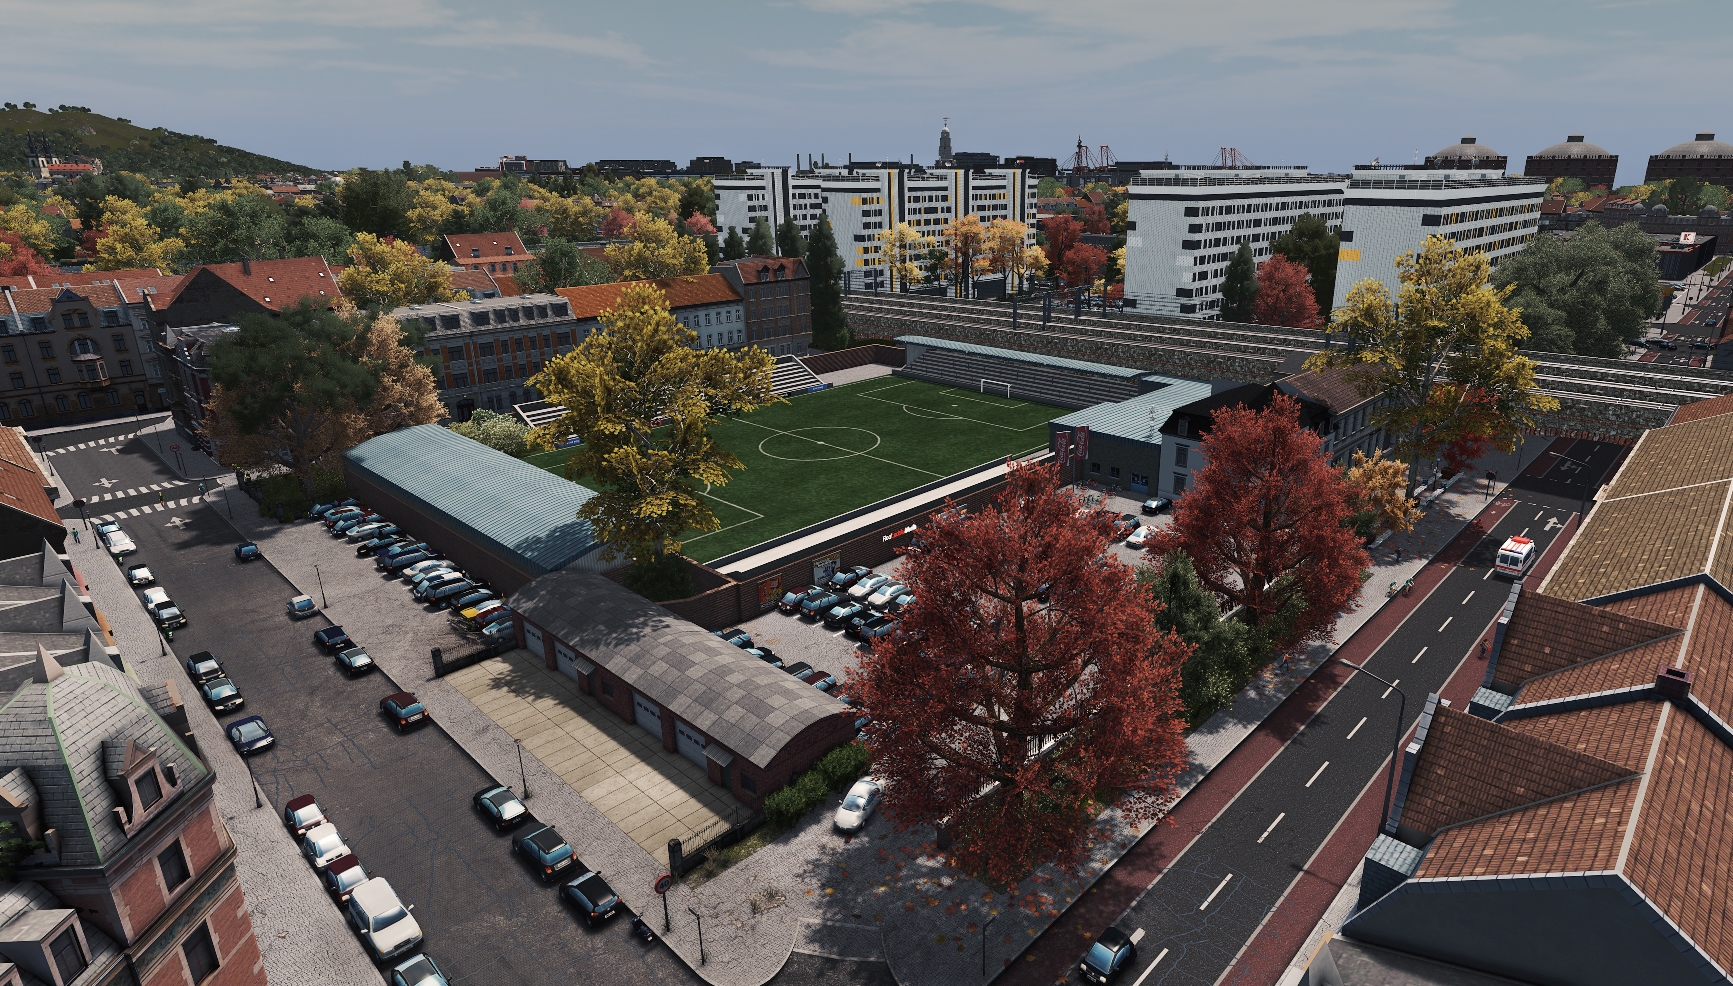
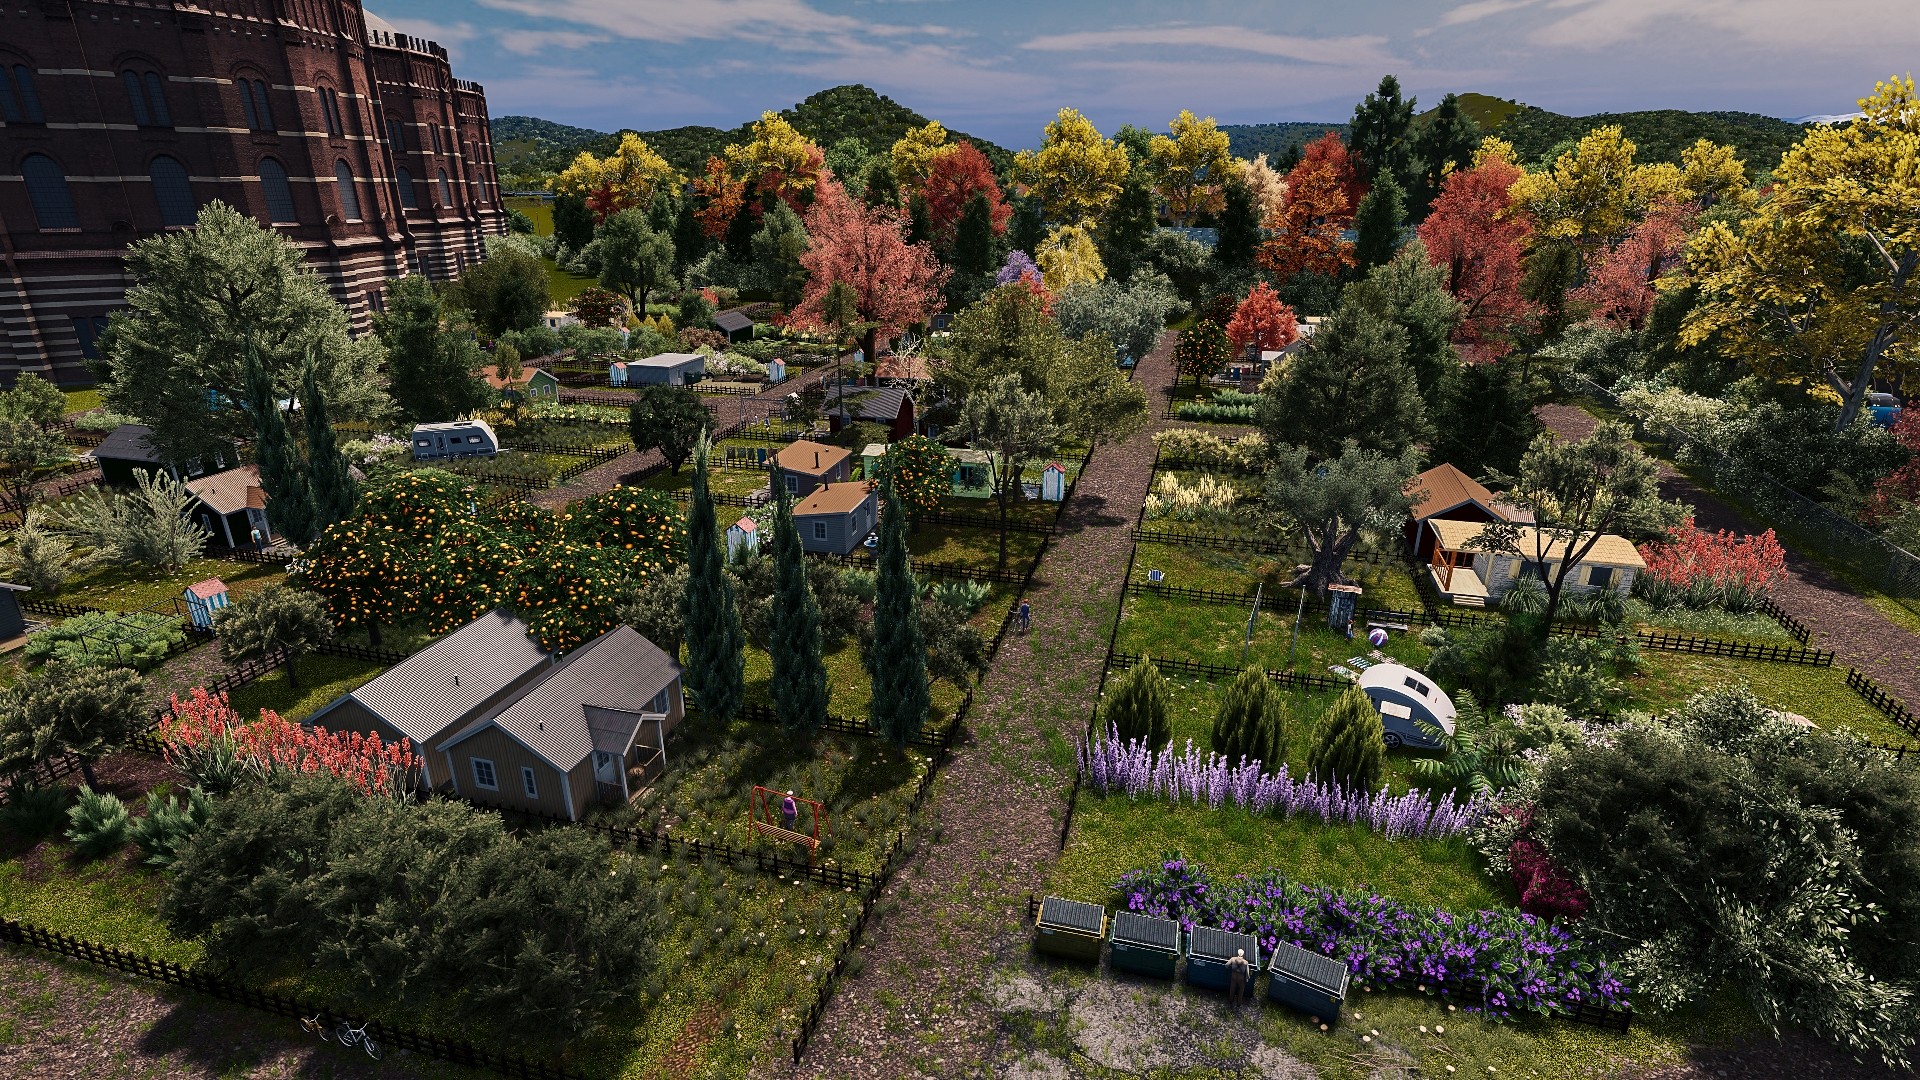
There are roughly four different levels of playing: Vanilla, Semi-Modded, Mostly-Modded, and Detailer. Each has a very different level of system requirements. I'll be breaking it down by screenshots, so you can get an idea.
Note: I'm going by recommended specs, not minimum requirements. You might be able to do it with less, or might need more. It isn't an exact science, just a rough guideline
Also, I will be using Intel/Nvidia as a baseline, since I'm not familiar enough with AMD's current catalogue. You can find the AMD equivalent of any of these by looking on https://www.userbenchmark.com/
Warning: Integrated graphics chips such as the IntelHD and Intel Iris are NOT Graphics cards, and are not supported. This includes the ones in most Macbooks!
 (Image source: Colossal Order)
Also known as the basic game without modifications.
The developers recommend the following official specs, which are pretty accurate.
Recommended:
Processor: Intel Core i5-5th gen or higher
Memory: 8 GB RAM
Graphics: nVIDIA GeForce GTX 660, 2 GB (Does not support Intel Integrated Graphics Cards)
 This is the base game with a few custom assets and a handful of mods. Still everything zoned, a bit of RICO.
Recommended:
Processor: Intel Core i5-7th gen or higher, or an i7 6th gen or higher.
Memory: 12 GB RAM
Graphics: nVIDIA GeForce GTX 940 (Does not support Intel Integrated Graphics Cards)

Large parts of the city made up of custom content, handplaced with RICO, some detailing, but still some vanilla assets.
Recommended:
Processor: Intel Core i7 6th gen or higher.
Memory: 16 GB RAM
Graphics: nVIDIA GeForce GTX 1050 (Does not support Intel Integrated Graphics Cards)
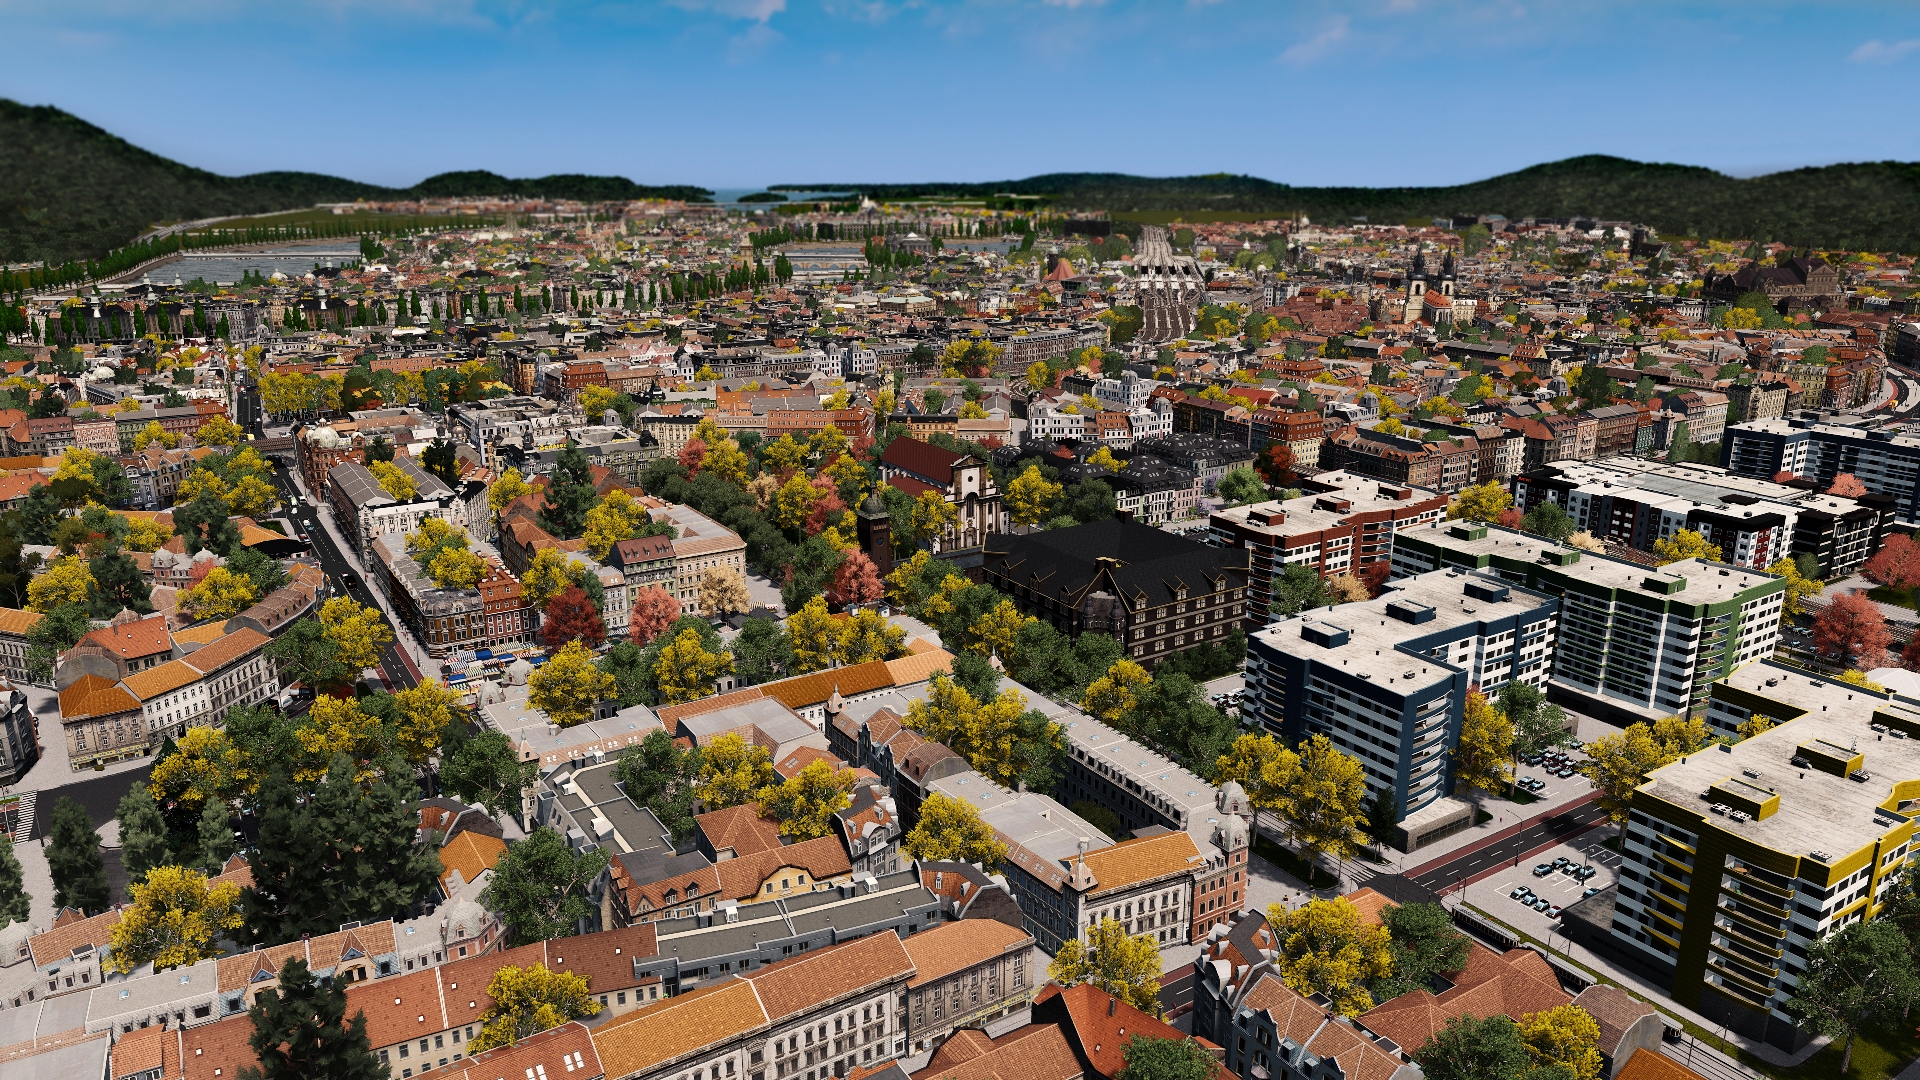
This is what you see most Youtubers do as well.
No vanilla assets, 100+mods, thousands of custom assets and props. Everything handplaced with Plop The Growables and moved into place with Move It. You need a powerful system for this!
Recommended:
Processor: Intel Core i7 7th gen or higher.
Memory: 32 or 64 GB RAM
Graphics: nVIDIA GeForce GTX 1070 (Does not support Intel Integrated Graphics Cards)
Harddrive: SSD (For load speed. If you don't mind waiting over half an hour to load, a HDD is fine.)
Mods For Beginners - Important
These are some of the more basic mods that improve the game. This section focusses on mods that improve the stability of the game, and basic non-gameplay processes.
The Loading Screen Mod does several things:
- It enables multi-core loading.
By default the game only uses 1 CPU core to load, which takes ages. The mod lets the game use all cores to load content, significantly speeding up the process. (Depending on the strength of your CPU.) - It allows assets to share Textures, Meshes and Materials.
The game loads every mesh and texture for each building, including identical ones. So if 20 assets use the same texture and mesh of 10MB, it loads 200MB. The Loading Screen Mod allows buildings to share one instance of those, so it only loads 10MB once then links it to each file. - It creates a list of all loaded assets, and lists those that failed to load, weren't found, are in use, and are not in use. Check the option in the Options for it, which also lists the location of the log.
- The assets listed in orange as missing are not an issue you need to fix. They're just props, such as logos on a building. All that happens if you don't subscribe to them is that the building won't have a logo; the actual building will work as normal. When they are missing, they do not use system resources; if you subscribe to them, they will use RAM. The ones in red as failed are a problem you need to fix.
Compatibility Report
Helps you find conflicts between mods, locate outdated mods, and thus keep your game stable.
FPS Booster
Increases in-game frame rate. Results may vary because there are many factors like CPU/GPU speed, RAM usage, current in-game scene complexity etc. WARNING: Mac OSX not (yet) supported!
Sort Mod Settings
Mods in the Options Menu are normally listed by install date. This makes finding them a hassle. The mod sorts them alphabetically.
Mods For Beginners - Gameplay
Move It!
Move It lets you rotate, move, raise/lower, copy and select every placed item in the game. Can be used on everything from buildings to roads. Also lets you export entire selections as a blueprint. A real gamechanger!
Traffic Manager: President Edition)
The big traffic mod. TMPE adds everything from manual lane control, junction rules, lane speed selection, and vehicle restrictions to timed traffic lights. Also adds options for an improved Traffic AI, and parking AI.
WARNING: The Traffic AI is a severely heavy feature, which will slow down your system significantly. Avoid if you don't have a high end, powerful PC. You can still use all the other features of the mod, simply turn off the AI options in the mod's settings.
Ploppable RICO Revisited
Ploppable RICO stands for Ploppable Residential, Industrial, Commercial and Office. It makes unique buildings functional.
- Subscribe to the Ploppable RICO Mod.
- Subscribe to buildings listed as RICO compatible.
- Launch the game and enable the Ploppable RICO Mod. (See Step 4 on how to do that.)
- Open the Ploppable RICO Tab.
- Select the building you want to place.
- Place it.
You do NOT need to add custom RICO settings to Workshop buildings that are RICO compatible. They already have RICO settings added to them by their creator!
You can also convert growables to Ploppables. See this guide. Please note: The mod was not meant for this, and it's a lot of work. If you intend to handplace growables, Plop The Growables is the one you want. (No direct link as it is an advanced mod that isn't what most people new to modding are looking for.)
IMPORTANT!- Local settings don't do anything until you quit the game, relaunch it, and reload your save.
- You can NOT install and/or convert to RICO Leisure/Tourism buildings if you do not have the After Dark DLC!!!!!! Doing so will break your game! Same goes for Eco/High Tech without the Green Cities DLC, and Industrial specialisations that came with the Industries DLC.
- The Ploppable RICO tab does not have a visual scroll indicator. If you can't find your buildings past the first 7, hover the mouse over the buildings in the tab and roll the scroll wheel!
- When making local settings, you MUST set the ConstructionCosts and Worker/Home Count to a value above 0. If you do not, you will get an error and the building does not work.
81 Tiles
Lets you use all 81 tiles of the map. (AKA the entire map, edge to edge.) You MUST click the button in the mod settings, the tiles won't unlock until you do.
Network Anarchy
Disables collision and height detection, disables the forced road curves, and allows you to place roads anywhere. This makes building intersections and roads better and more realistic. Provides manual control over the various road modes. You can select when you want to use elevated, bridge, ground or tunnel roads. Lets you build quays on land.
All other Road Anarchy mods are broken, dead, and should NOT be used!
Employment Details
Adds an infopanel that displays the employment levels for the various education levels. You can now see if you need Offices(high educated) or Industry(low educated) jobs.
Environment Changer (+ Improved Theme Selection )
Lets you change the biome and map theme when loading a save. You no longer need to start over when you want to make your city a winter city, or change the map theme.
Theme Mixer 2
Lets you mix map themes inside the game. If you only want the pavement from one theme, but everything else from another, this mod is the answer. Works inside a loaded save, no need to reload.
Find It 2
Allows access to every item in the game via a searchable menu. Also allows access to props.
Extra Landscaping Tools
Adds the Map Editor terrain tools to the game, including Sand and Water Spawns.
Surface Painter
Paint terrain textures such as Pavement and Ruined where you want. Easy way to fill large spaces with pavement. Requires the Extra Landscaping Tools Mod to work.
Note: May cause vanilla trees that are embedded in buildings to flicker!
Roads:- Vanilla+ Roads: A lot of new roads based on the vanilla template.
- Network Extensions 2 Roads Replacement Complete List: Adds the old Network Extensions 2 roads as standalone roads.
Mods For Beginners - Visuals & decluttering
The game has a lot going on, visually. These mods make things easier to see, look better, and removes visual annoyances.
Toggle It!
Adds the option to toggle certain things in the game on and off, including the topographic lines, the district names, the district icons, border lines, zoning grid and notification icons. (Note: Does not disable their functionlaity, only hides them from the UI) See mod page for the full list.
Hide It!
Has options to remove most of the decorative props, dirt, seagulls, purple pollution, dead trees on the shore, the ground colours from the resources (field, oil, ore, forest) and much more. Only removes the visual effects! It doesn't change the actual gameplay.
Tree Control
Adds the option to randomize the tree rotation. This makes the game look significantly better.
Also adds options to increase/decrease/disable tree sway. Makes the game look better and improves framerate. Also adds a bunch more options such as sway.
Mods For Beginners - Fixing Annoyances
Some things in the game are just annoying. These mods help with that.
Yet Another Toolbar
The interface tabs on this game are tiny, and only display 7 items at a time. If you have a lot of content, scrolling becomes a nightmare. This mod allows you to have more than 1 row in the build tabs. It also fixes the problem with toolbar icons disappearing on lower resolutions.
Subtle Bulldozing, Dragging and More
Every time you bulldoze or place something, the game makes a lot of noise and creates a sandstorm of dust. This mod lets you turn each of those sounds and effects off. Not only does that make things easier, it also improves the framerate.
SimpleClock
Adds a clock with the real-world time to the game's interface.
Unlock Tracks + Metro Tunnels
Lets you build train tracks and metro tunnels without having to place a station first. Does not change the milestones unlock.
Mod Collections
Here are a bunch of collections with useful, quality Workshop items and mods.
Remember the warnings about RAM! don't sub to everything at once!
https://steamcommunity.com/sharedfiles/filedetails/?id=1289845913
https://steamcommunity.com/sharedfiles/filedetails/?id=840498314
https://steamcommunity.com/sharedfiles/filedetails/?id=823267366
Other Things
Video guide!
https://www.youtube.com/watch?v=fUrr32e5y3M
This works best in the Browser version of the Workshop.
- On the main page of the Cities Skylines Workshop, click on Browse.
- In the drop down menu that appears, click on My supscriptions.
- In the My subscriptions page, click on Unsubscribe All to unsubscribe from all Cities Skylines Workshop content.
- If you have a lot of content, this may take a while.
How do I reset the game to a completely clean install?
Backup everything you don't want to lose, such as saves or screenshots.
Note that this method is for Windows, but you can use a similar method for Linux and OSX, the folder paths are just different.
- Do the above steps for unsubscribing all Workshop content.
- Uninstall the game. Open the Steam client, rightclick on Cities Skylines > Manage > Uninstall.
- Delete the following folders via Windows Explorer:
- %localappdata%\Colossal Order\Cities_Skylines
- C:\Program Files (x86)\Steam\Steamapps\Workshop\Content\255710
- C:\Program Files (x86)\Steam\Steamapps\Common\Cities_Skylines
- %localappdata%\Colossal Order\Cities_Skylines
- Open the Steam client and reinstall the game.
Do placed assets disappear if I disable or unsubscribe them?
Yes.
All assets will disappear from your game and your cities if you unsubscribe them.
The only thing you can safely unsubscribe are maps. Those will remain as your city even if you unsubscribe them.
Warning: There is a chance that unsubscribing content will break your save. This is especially common for roads that have been placed, vehicles that have been assigned to a line, stations with a line assigned to them, and props used in Prop It Up.
Also, unsubscribing buildings may cause an Array or Nullreference error for every building you unsubscribed. However, these errors only appear once for every building, and then don't happen again.
Dictionary
The Cities Skylines Modding Community uses a lot of abbreviations and slang to describe things. Here are the most common ones:
Asset
An object that can be placed in the game, such as buildings, trees, parks and vehicles.
Asset Creator
Someone who makes custom assets for the game. (Not mods)
BSOD
Blue Screen Of Death. General tech term for the blue screen Windows gives when it crashes.
Build Limits
Everything in this game has limits on how much you can place of it, and how many can spawn on the map. Please see the FAQ for more information.
Cims
Citizens. Short for Cities Skylines Sims. EA owns the rights to Sims, so we can’t use that.
CO
Colossal Order. The game's developers.
Creator
Someone who makes custom content for Cities Skylines. Note: People who slightly edit vanilla assets and publish them to the workshop do not count as Creators.
CS & CSL
Cities Skylines. Abbreviation.
CSUR
Cities Skylines Urban Road mod.
CTD
Crash To Desktop. General tech term for the game or program crashing to the desktop.
Decal
Decorative flat ground props. Usually tiles, brick, etc.
Detailer
Someone who focusses on designing (hyper)realistic scenes in the game by placing every single asset by hand. Generally does not use the zoning tool to grow assets.
Find It
A mod that lets you search through all the assets in the game.
Growable
A building that grows inside a zoned area.
IPT2
Improved Public Transport 2. Abbreviation.
LOD
The low poly model the game displays on every asset when you zoom out. Without these, your computer would melt.
LSM
Loading Screen Mod. Abbreviation.
LUT
Colour correction filter.
Map
The world plane.
Mapmaker
Someone who makes custom maps for the game.
Map Theme
The terrain textures.
Mod
A piece of code that modifies the game. Not to be confused with Assets.
Modder
Someone who makes mods for the game. (Not assets)
MOM
Metro Overhaul Mod
Move It
A mod that lets you move, rotate and duplicate.
NE2 & NExT2 / NExT 2
Network Extensions 2. Abbreviation.
NEP & NExT
Network Extensions Project. Abbreviation. Dead, broken mod; Do not use this mod!
PDX
Paradox. The game's publishers.
Ploppable
Buildings that can be placed without zoning.
Ploppable RICO
A mod that converts growables, parks and uniques into ploppables with RICO function.
Prop
Decorative item. Some props, like benches, can be used by Cims if part of a park.
RICO
Residential, Industry, Commercial, Office. Refers to the four main zone types.
Second Load
Loading the game a second time during a session. i.e. quitting to the menu and loading a different save or starting a new city, or loading/starting a city from inside a loaded city, or going from the editor into the city. You CAN NOT do this in a modded game!
Tile
A map tile. There are 81 tiles on the whole map, 25 are accessible, and you can unlock 9 without mods.
TLMR
Transport Lines Manager Reborn. Abbreviation.
TMPE
Traffic Manager President Edition. Abbreviation.
Tris
A 3D modelling term, Tris refers to the number of triangles on a 3D model. The more tris an asset has, the heavier it is for a videocard to render.
Unique
Buildings that can only placed be once (without mods). Can be found in the Uniques tab.
Unit
A single zoning block.
Vanilla
The game without custom content.
Useful links
Official Cities Skylines Forum: https://forum.paradoxplaza.com/forum/index.php?forums/cities-skylines.859/
Cities Skylines Reddit: https://www.reddit.com/r/CitiesSkylines/
Gaming Tech Support Reddit: https://www.reddit.com/r/pcgamingtechsupport/
Tech Support Reddit: https://www.reddit.com/r/techsupport/
Can I Run It Reddit: https://www.reddit.com/r/CanIRunIt/
Suggest-A-PC Reddit: https://www.reddit.com/r/suggestapc/
Suggest-A-Laptop Reddit: https://www.reddit.com/r/SuggestALaptop/
If you're looking for a friendly Cities Skylines community, come join us over at the SkylinesNation Facebook group. Beginner or master, creator or player, PC or console, everyone is welcome! (We do NOT do Tech Support!) https://www.facebook.com/groups/SkylinesNation/
- The Beginner's Guide to Traffic★ 5 (5.9k)167k views13k ♥27 minUpdated Sep 26, 2015
- HOW TO TRAFFIC★ 5 (3.5k)95k views5.2k ♥33 minUpdated Mar 26, 2017
- 都市天际线模组推荐指南V5.1★ 5 (1.9k)67k views6.5k ♥29 minSimplified ChineseUpdated Dec 26, 2023
- Cities Skylines: An In-Depth Beginner's Guide & Walkthrough★ 5 (926)66k views2.8k ♥37 minUpdated Apr 9, 2015
- Traffic Planning Guide for Realistic Cities★ 5 (1.4k)59k views3.1k ♥30 minUpdated Jul 20, 2017
- How to Bypass the Paradox Launcher (All Platforms)★ 5 (1.3k)47k views1.3k ♥6 minUpdated Dec 23, 2025


- Upgrading to PremiumTeam Fortress 2★ 5 (20k)1441k views11k ♥6 minUpdated May 11, 2022
- No More Room in Hell Official ManualNo More Room in Hell★ 5 (2.8k)569k views2.1k ♥29 minUpdated Apr 22, 2019
- NMRiH Community Hosting GuidesNo More Room in Hell★ 5 (526)351k views653 ♥1 minUpdated Aug 10, 2022
- How to 'Git Gud' Soon™MORDHAU★ 5 (2k)318k views3k ♥68 minUpdated Nov 16, 2024
- Лучшие кооперативные игры SteamPAYDAY 2★ 5 (1.5k)315k views2.1k ♥56 minRussianUpdated Apr 27, 2025
- Desert Eagle Heat Treated | Blue GemCounter-Strike 2★ 5 (1.6k)293k views1.5k ♥2 minUpdated Jan 16


This guide was created by its original author on the Steam Community. Are you the author and want it removed? Request removal.