Overview
This guide should show you how to use the Basics of the Map Editor to create a Tiberium Dawn single Player map
How to Use the Cnc Map editor to create a single player TD Map Part1
You can click on an Image for a better view.
First a page you should get familar with
[link]Next I will give you a list to refer to for Units,structures etc.
[Units]
apc = apc
arty = artillery
bggy = Nod Buggy
bike = Recon Bike
boat = Gun Boat
ftnk = Flame Tank
harv = Harvestor
htnk = Mammoth Tank
jeep = Light Scout
lst = HoverCraft
ltnk = Light Tank
mcv = MCV
mhq = Mobile HQ
mlrs = SSM Launcher
msam = Rocket Launcher
mtnk = Medium Tank
rapt = Velociraptor
steg = Stegosaurus
stnk = Stealth Tank
trex = Tryannosaurus Rex
tric = Triceratops
vice = Viceroid
[Aircraft]
a10 = A10
c17 = C17
heli = Attack Helicopter
orca = Orca
tran = Transport Helicopter
[Infantry]
c1 = Joe
c10 = Nikoomba
c2 = Bill
c3 = Shelly
c4 = Maria
c5 = Eydie
c6 = Dave
c7 = Phil
c8 = Dwight
c9 = Erik
chan = Chan
delphi = Agent Delphi
e1 = Minigunner
e2 = Grenadier
e3 = Rocket Soldier
e4 = Flamethrower
e5 = Chem Warrior
e6 = Engineer
moebius = Dr Mobius
rmbo = Commando
[Walls][Overlay]
barb = Barbed Wire
brik = Concrete Wall
cycl = Chain Link Fence
sbag = SandBags
wood = Wooden Fence
[Structures]
afld = Airstrip
arco = Civilian Building
atwr = Adv Guard Tower
bio = Bio Reasearch Laboratory
eye = Adv Comm Center
fact = Construction Yard
fix = Repair Facility
gtwr = Guard Tower
gun = Turret
hand = Hand of Nod
hosp = Hosptial
hpad = Helipad
hq = Comm Center
miss = Prison
nuk2 = Adv Power Plant
nuke = Power Plant
obli = Obelisk
proc = Refinery
pyle = Barracks
sam = Sam Site
silo = Silo
tmpl = Temple of Nod
v01 = Church
v02 = Han’s and Gretel’s
v03 = Hewlitt’s Manor
v04 = Ricktor’s House
v05 = Gretchin’s House
v06 = The Barn
v07 = Damon’s Pub
v08 = Fran’s House
v09 = Music Factory
v10 = ToyMakers
v11 = Ludwig’s House
v19 = Civilian Building (oil derrick)
weap = Weapons Factory
Ok to make things a bit easier for you i would suggest you make a short cut on your desktop to
Steam ~~ SteamappsCommonCnCRemastered —- ClientLauncherG.exe & CnCTDRAMapEditor.exe
This way you can start the game up with the editor running
Ok so the first thing we need to do is to start the Editor up ,pick File New , Set the buttons like so .

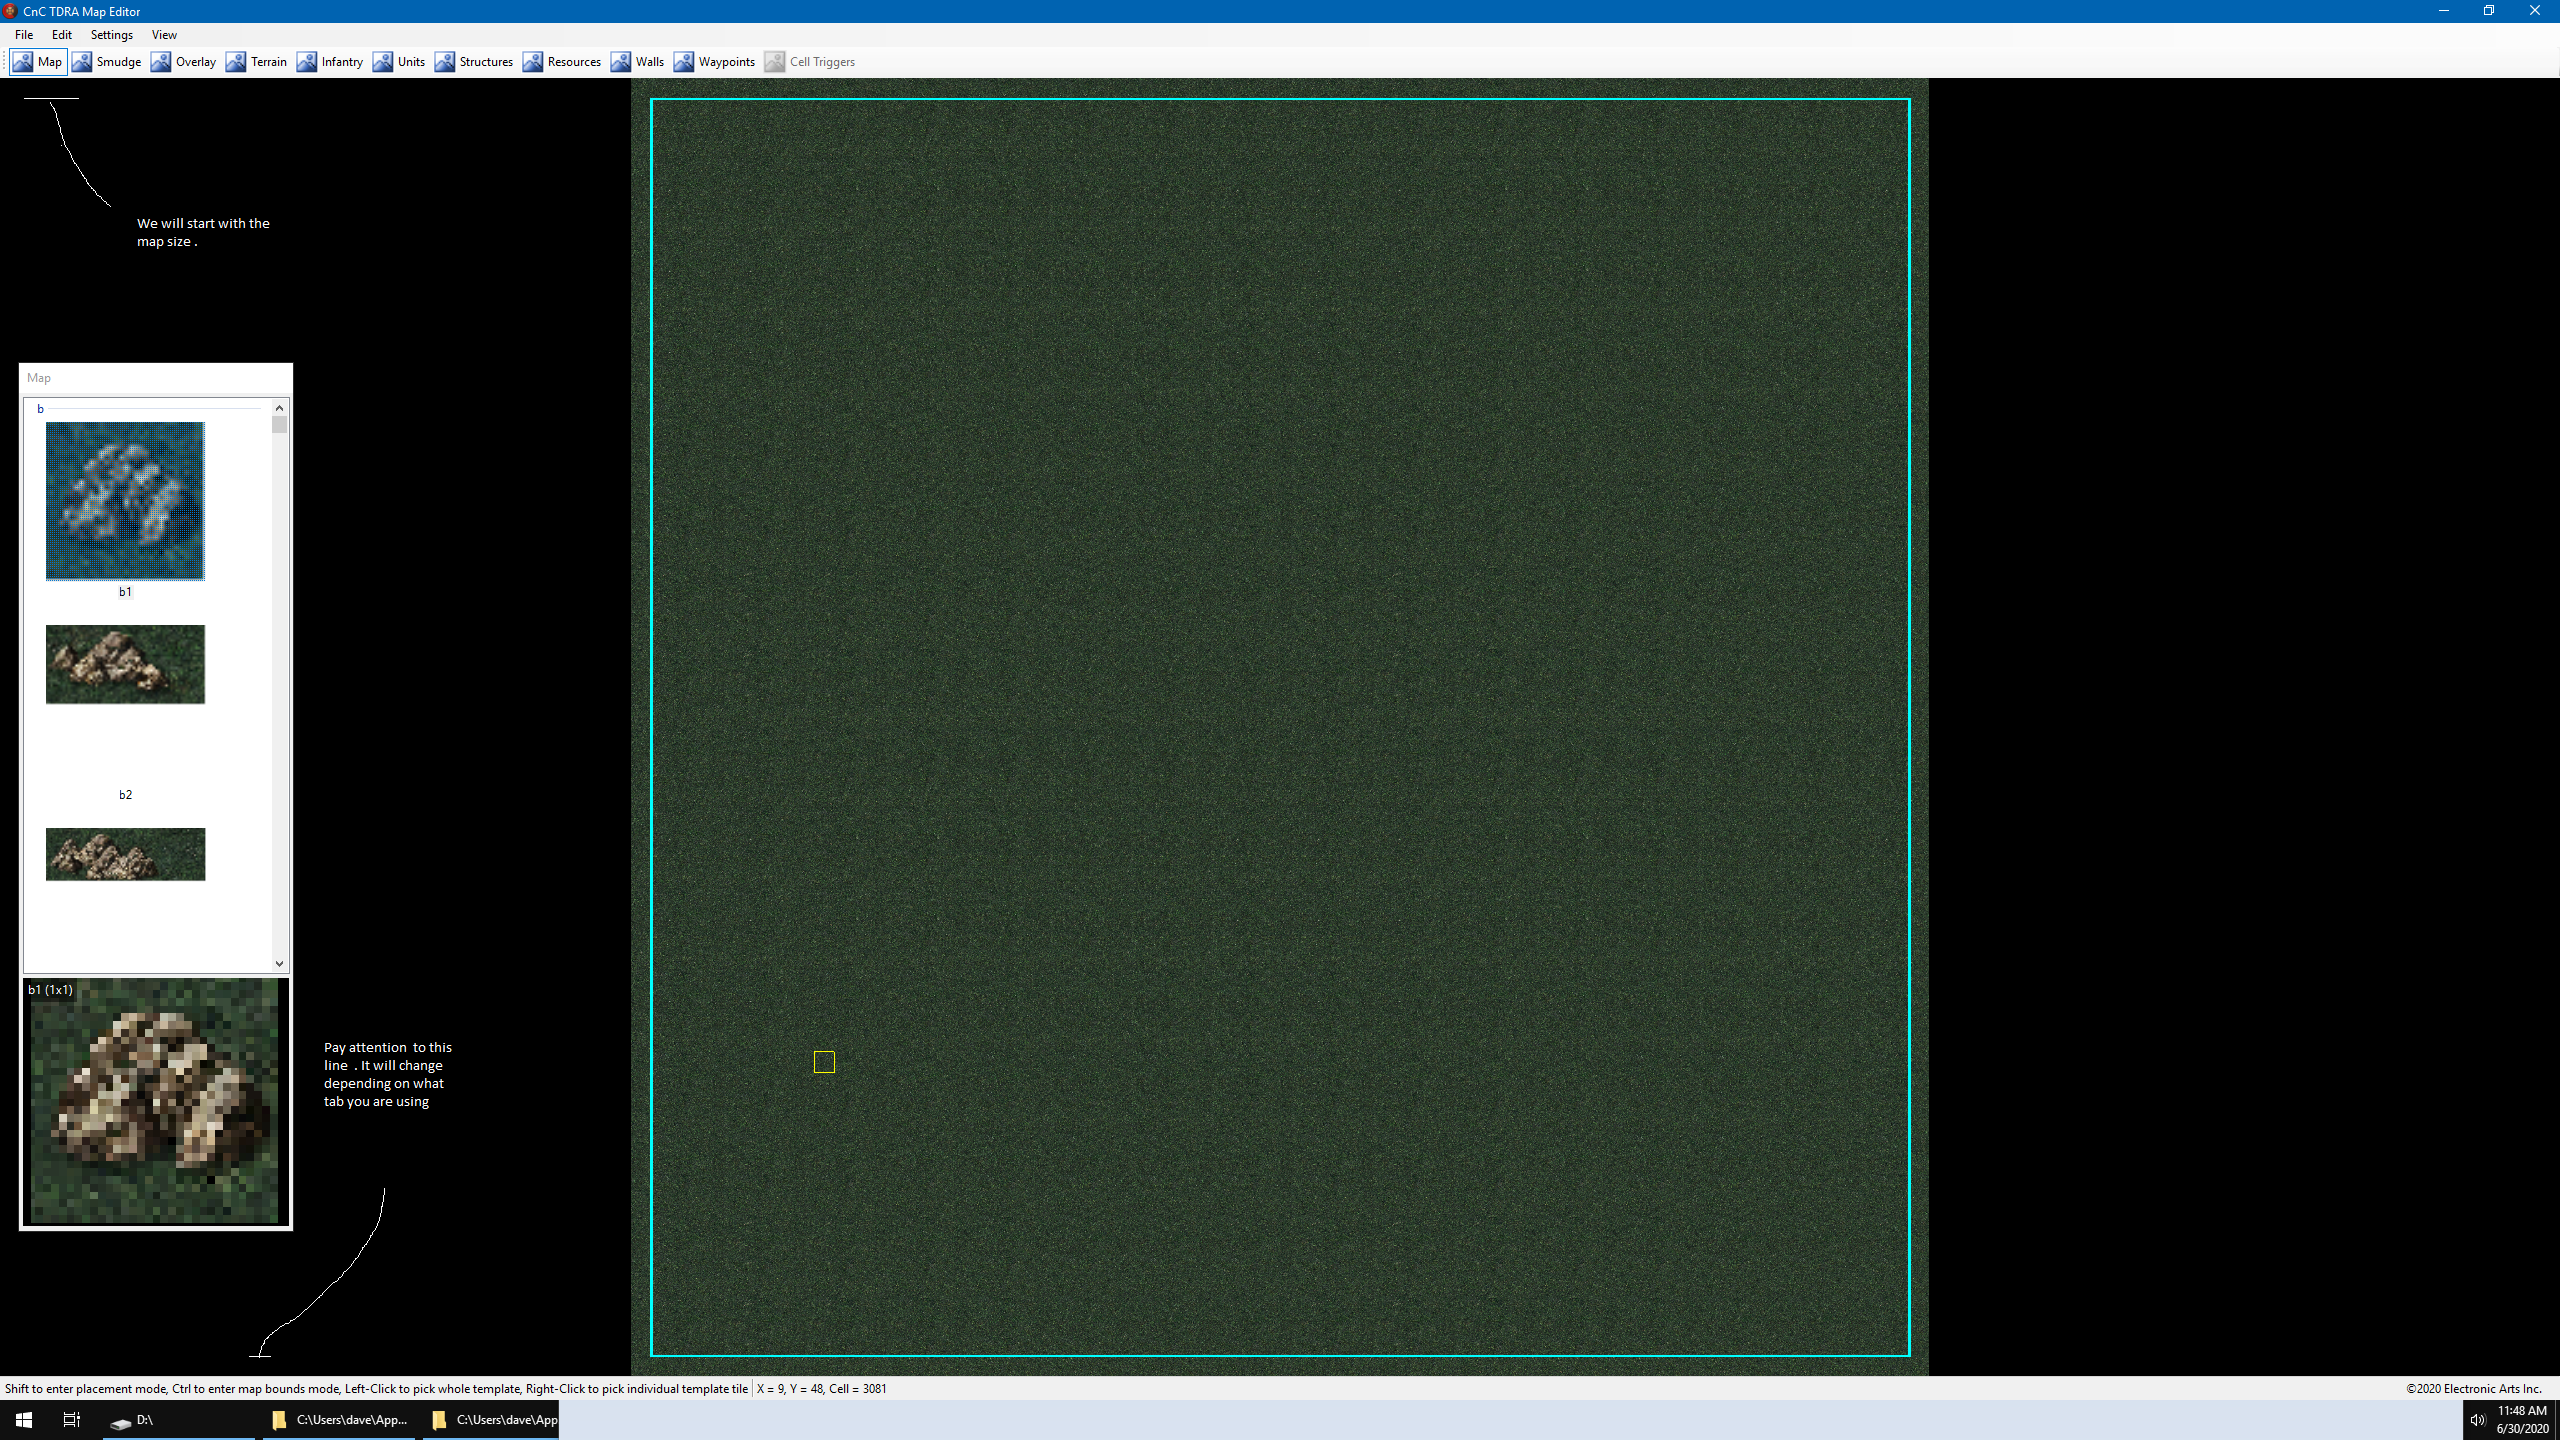
Now you have a new map , Notice the wording down in the bottom Left . This tells you what you can do , depending on the Tab selected.

Alright so the very first thing you need to learn to do is how to resize the map .
You do this by Holding down the CTRL + Holding the Left Mouse Button and dragging the window
. Go ahead and practice that , you can set the size anywhere you start the hold and then releaing the button and key.
When you done practicing that go ahead and make an area similar to the picture .


Now your going to place some textures on the map , so select the MAP tab if it is not already selected.
To Place a texture you first select one in the list of textures by simply left clicking it.
Then move the Mouse to where where you want the texture and HOLD the SHIFT KEY + LEFT MOUSE BUTTON CLICK
To use a portion of a texture select one that is bigger than 1×1 , and left click on the portion you want in the bottom preview window (see #1 in the image below)
If you have changed textures and want to reuse one already on the map , simply click on the map over the texture you want to reuse (see #2 in the image below)
To remove textures there is two ways , First you can use SHIFT + RIGHT CLICK on the texture you want to remove , this will remove the whole texture.
The second way is to select the background grass by simply clicking on it , and then using the SHIFT + LEFT Mouse simply over write it with the grass. (see #3 In the image below)

Now we need to talk about your map settings .
So go ahead and open the Map Settings window , First off you will want to control the build level of your map , I usually set mine to 15 this lets you build most everything . but you can usually use 1 – 15 to control how much the player can build.
CarryOver is how much money is carried over form other games , not much use to us.
Type in a Name for your level , this is what you will see in the Mission Select window.
Select which team you will play set it to GoodGuy for now.
The last thing is the Single Player Box , go ahead and check that box

Now we need to do a few things to the Good Guys and BadGuys Mostly add credits ,
So select the Players – GoodGuy in the credits type 60 , this is the amount of credits they will start with X100 so 60 X100 = 6000 credits.
You can also select the Edge to be West , this controls the direction reinforcements will come from.
You can go ahead and set the credits for the badguy , and also uncheck the rest of the factions ,,if you reload the map you will have to uncheck them again . it wont hurt if they are left , it just cleans up the ini file abit.

The Briefing , go ahead and type something here , or leave it blank.
If you want things on Multiple lines , type your first line then fill it with spaces until the cursor moves to the next line down then type your second line

Now we need to do one more thing before we can save the map
Set the HOME waypoint (home) , I usually also set the REINFORCEMENT way point (reinf) as well .
Go ahead and place those on your map . It doesn’t matter where they are. for now ,later on youll want the Home one near where you start You can place the home & reinf way point by selecting them from the WayPoint tab window , and using SHIFT + LEFT MOUSE to place them

So now we can save our map , go to File , Save AS and save it

Now we do need to add at least 1 Good Guy unit of some sort for the game to be playable,
For this exersise you are going to add a GoodGuy apc and 4 Nod Infantry to your map
To start with the APC select the Units tab then the APC , now you can set a few things now or change them later . House = GoodGuy , Strength = 256 (this is full strength ,1/2 would be 128)
Direction we will set it to be East, Mission = Guard .
Now to place the apc its SHIFT + LEFT CLICK .
If you have forgotten to set something or just need to change something while the Units tab is active just double click on the unit and a smaller box with out the preview will open and you can change the unit there as well.
IF you want to delete the units , while the UNITS tab is active SHIFT + RIGHT CLICK will remove the unit.
If you want to move a unit , while in the UNITS tab is active , simply LEFT CLICK and DRAG the unit to its new spot.
Structures are placed with the same key strokes.
Now for the Infantry it is done the same way , but it is easier to set them before you place them.
So select the infantry tab , find the mini gunner and set it to BadGuy, Direction West ,Mission AREA GUARD .
Now to place the MiniGunners , Hold the SHIFT + LEFT CLICK the MOUSE 4 TIMES this will put 4 minigunners in one cell (you can place up to 5 in one cell)

Check Out part 2 .
[link]
Important Hints
Although I had good intentions i forgot to do some checking while making the screen shots.
Every where i had put in a time and made a screen shot of it , the iNI file produced a zero .
EG:in the ini file i got this
nd12=Time,Create Team,0,BadGuy,nod3,0
when it should have been
nd12=Time,Create Team,24,BadGuy,nod3,0
So when you enter numbers , you need to use the bottom data block and ignore the two on the sides

Also it seems to be that the Teamtype box has some issues as well .
EG:
win=# Bldgs Dstr.,Win,3,BadGuy,,0 is what I got when i didn’t select the teamType , even though it already says none you must be sure to set the team Type box to none
It doesn’t just happen when it says NONE , You must actually select the TeamType
So the correct INI file entry should look like
win=# Bldgs Dstr.,Win,3,BadGuy,None,0
If you mark one of the non AI buildings so it goes into the BASE section , when you reload that map , your buildings will be marked as the opposite team . If you then save the file , those buildings will be marked in the INI file as belonging to the opposite team.
This will happen to any building the AI does not own
So to stop this from happening, do not mark anything but the AI side buildings , so they end up in the Base section of the INI file.
On the Sept 16 2020 patch Ea changed the Home waypoint from # 26 to #28 .
If you already had a map started it will renumber the old waypoint to 26 and ask you to put down a new Home waypoint . This will work as long as you leave the waypoint 26.
If you now start a new map , and put down the Home waypoint , the editor thinks it is fine but the game is still using waypoint 26 for the camera position. This results in a black screen.
To fix the black screen put down a waypoint 26 where you want the camera to start.

Some of you may be wondering what the Intro,Brief,Action,Win,Lose sections are.
These will play the selected movies in the order of Intro,Brief,Action , the Win will play when you win , The Lose section i suppose will play when you lose , but it is never used in the original game.
You can use any that you want , in any order.
Here is a list of the original missions and the movies they use .
Nod_Campaign_1_Map,Brief=NOD1
Nod_Campaign_2A_Map,Brief=NOD2,Action=SEIGE,Win=AIRSTRK
Nod_Campaign_2B_Map,Brief=NOD2,Action=SEIGE,Win=AIRSTRK
Nod_Campaign_3A_Map,Brief=NOD3,Action=DESSWEEP,Win=DESFLEES
Nod_Campaign_3B_Map,Brief=NOD3,Action=DESSWEEP,Win=DESFLEES
Nod_Campaign_4A_Map,Brief=NOD4A
Nod_Campaign_4B_Map,Brief=NOD4B,Action=RETRO
Nod_Campaign_5_Map,Intro=SETHPRE,Brief=NOD5,Action=SAMSITE,Win=INSITES
Nod_Campaign_6A_Map,Brief=NOD6,Action=SUNDIAL
Nod_Campaign_6B_Map,Brief=NOD6,Action=SUNDIAL
Nod_Campaign_6C_Map,Brief=NOD6,Action=SUNDIAL
Nod_Campaign_7A_Map,Brief=NOD7A,Action=TANKGO
Nod_Campaign_7B_Map,Brief=NOD7A,Action=TANKGO
Nod_Campaign_7C_Map,Brief=NOD7B,Action=BCANYON
Nod_Campaign_8A_Map,Intro=TIBERFX,Brief=NOD8
Nod_Campaign_8B_Map,Intro=TIBERFX,Brief=NOD8
Nod_Campaign_9_Map,Brief=NOD9
Nod_Campaign_10A_Map,Intro=KANEPRE,Brief=NOD10A
Nod_Campaign_10B_Map,Intro=KANEPRE,Brief=NOD10B,Win=TANKKILL
Nod_Campaign_11A_Map,Brief=NOD11,Action=STEALTH,Win=OBEL
Nod_Campaign_11B_Map,Brief=NOD11,Action=STEALTH,Win=OBEL
Nod_Campaign_12_Map,Brief=NOD12,Action=AKIRA,Win=SPYCRASH
Nod_Campaign_13A_Map,Brief=NOD13,Win=NODFINAL
Nod_Campaign_13B_Map,Brief=NOD13,Win=NODFINAL
Nod_Campaign_13C_Map,Brief=NOD13,Win=NODFINAL
GDI_Campaign_1_Map,Brief=GDI1,Action=LANDING,Win=CONSYARD
GDI_Campaign_2_Map <!– Estonia –>,Brief=GDI2,Win=FLAG
GDI_Campaign_3_Map <!– Latvia –>,Brief=GDI3,Action=SAMDIE,Win=BOMBAWAY
GDI_Campaign_4_Rods_West_Map ,Intro=BKGROUND,Brief=GDI4B,Action=NITEJUMP,Win=BURDET1
GDI_Campaign_4_Rods_East_Map ,Intro=BKGROUND,Brief=GDI4B,Action=NITEJUMP,Win=BURDET1
GDI_Campaign_4_Bialystok_Map ,Intro=BKGROUND,Brief=GDI4A,Action=NODSWEEP,Win=BURDET1
GDI_Campaign_5_Germany_A,Intro=PODIUM,Brief=GDI5,Action=SEIGE,Win=NODLOSE
GDI_Campaign_5_Germany_B,Intro=PODIUM,Brief=GDI5,Action=SEIGE,Win=NODLOSE
GDI_Campaign_5_Ukraine_A,Intro=PODIUM,Brief=GDI5,Action=SEIGE,Win=NODLOSE
GDI_Campaign_5_Ukraine_B,Intro=PODIUM,Brief=GDI5,Action=SEIGE,Win=NODLOSE
GDI_Inflitrate_NOD_Base,Brief=GDI6,Action=NITEJUMP,Win=SABOTAGE
GDI_Finish_NOD_Base,Brief=GDI7,Action=TURTKILL,Win=PINTLE
GDI_Restore_GDI_Salzburg,Intro=TBRINFO1,Brief=GDI8A,Win=PARATROP
GDI_Protect_Bratislava,Intro=TBRINFO1,Brief=GDI8B,Action=DESOLAT,Win=HELLVALY
GDI_Secure_Danube,Brief=GDI9,Win=GUNBOAT
GDI_Test_Orca_A,Intro=TBRINFO2,Brief=GDI10,Action=BCANYON,Win=NODFLEES
GDI_Test_Orca_B,Intro=TBRINFO2,Brief=GDI10,Action=BCANYON,Win=NODFLEES
GDI_Evacuate_Delphi,Brief=GDI11,Action=LANDING,Win=BANNER
GDI_Evacuate_Mobius_A,Intro=TBRINFO3,Brief=GDI12,Win=SAMDIE
GDI_Evacuate_Mobius_B,Intro=TBRINFO3,Brief=GDI12,Win=SAMDIE
GDI_Level_Lab_A,Brief=GDI13,Action=VISOR,Win=BOMBFLEE
GDI_Level_Lab_B,Brief=GDI13,Action=VISOR,Win=BOMBFLEE
GDI_Fish_In_A_Barrel,Brief=GDI14
GDI_Destroy_Bastards_A,Brief=GDI15,Win=GDIFINA
GDI_Destroy_Bastards_B,Brief=GDI15,Win=GDIFINA
GDI_Destroy_Bastards_C,Brief=GDI15,Win=GDIFINA
Mobius_Covert_Ops_Campaign_22_Map,Action=OBEL,Win=BLACKOUT
Mobius_Covert_Ops_Campaign_23_Map,Action=VISOR,Win=BANNER
Mobius_Covert_Ops_Campaign_36_Map,Action=SABOTAGE,Win=NODFLEES
Mobius_Covert_Ops_Campaign_38_Map,Action=INFERNO,Win=FORESTKL
Mobius_Covert_Ops_Campaign_40_Map,Action=NUKE,Win=NODLOSE
Mobius_Covert_Ops_Campaign_41_Map,Action=AIRSTRK,Win=PARATROP
Mobius_Covert_Ops_Campaign_50_Map,Action=samdie,Win=Flag
Mobius_Covert_Ops_Campaign_Nod_20_Map,Action=TANKKILL,Win=OBEL
Mobius_Covert_Ops_Campaign_Nod_21_Map,Action=NITEJUMP,Win=NUKE
Mobius_Covert_Ops_Campaign_Nod_30_Map,Action=CONSYARD,Win=INFERNO
Mobius_Covert_Ops_Campaign_Nod_31_Map,Action=NODSWEEP,Win=DESOLAT
Mobius_Covert_Ops_Campaign_Nod_32_Map,Action=GDILOSE,Win=STEALTH
Mobius_Covert_Ops_Campaign_Nod_33_Map,Action=DESSWEEP,Win=SAMSITE
Mobius_Covert_Ops_Campaign_Nod_35_Map,Action=SEIGE,Win=INSITES
Mobius_Covert_Ops_Campaign_Nod_37_Map,Action=IONTEST,Win=BANR_NOD
Mobius_Jurassic_Map_Base
Mobius_Jurassic_Campaign_1_Map,Brief=GENERIC,Action=DINO
Mobius_Jurassic_Campaign_2_Map
Mobius_Jurassic_Campaign_3_Map
Mobius_Jurassic_Campaign_4_Map
Mobius_Jurassic_Campaign_5_Map
Mobius_PSX_Map_Base
Mobius_PSX_GDI_Map_Base
Mobius_PSX_GDI_Campaign_60_Map,Action=PSX_MISSION_INTRO_01
Mobius_PSX_GDI_Campaign_61_Map,Action=PSX_MISSION_INTRO_01
Mobius_PSX_GDI_Campaign_62_Map,Action=PSX_MISSION_INTRO_02
Mobius_PSX_GDI_Campaign_72_Map,Action=PSX_MISSION_INTRO_02
Mobius_PSX_NOD_Map_Base
Mobius_PSX_NOD_Campaign_60_Map,Brief=OBEL,Action=PSX_MISSION_INTRO_01
Mobius_PSX_NOD_Campaign_61_Map,Action=PSX_MISSION_INTRO_02
Mobius_N64_Map_Base
Mobius_N64_GDI_Campaign_30_Map,Action=SCG30EA_INTRO,Win=N64_GDI_WIN
Mobius_N64_GDI_Campaign_90_Map,Action=SCG90EA_INTRO,Win=N64_GDI_WIN
Mobius_N64_NOD_Campaign_21_Map,Action=SCB21EA_INTRO,Win=N64_NOD_WIN
Mobius_N64_NOD_Campaign_22_Map,Action=SCB22EA_INTRO,Win=N64_NOD_WIN