Overview
This is a guide with screenshots & a list of all cures from start to finish with their respective catalysts from Free Build. I have restarted the Free Build mode several times to compare the screenshots to each restart and to the campaign to make sure the catalysts do not change. They do not. So this is a easy way to quickly pull up the complete cure list to find out every step to building a complete machine from start (basic cure) to finish (max cure) without having to upgrade the cure to figure out the next steps of machinery you need to install, also without unpausing your game. The Maximum Concentration Ratings of the cures are random in each game so that is not included (see ending).Also included with each cure are what I have percieved to be the best output method for each cure; Single cures only at this point in time. For multiple cures your best bet is probably to use the Sachet Maker, and I am almost positive to get a high level rating with the Satchet Maker you have to have cures paired that are similar in fasion, such as Cures HIV & Combats Sickle Cell Anemia (Further research required). I have had many cures that I was able to get to an S+ rating (40% Bonus) and believe that each has a preferred output method. I used real world knowledge of how cures are typically administered to determine the output methods.I will add a list of side effects & their removals soon, if and when I have determined that they do not change from game to game. Honestly I don’t think its necessary since side effects are random to the starting ingredients and you should be able to find out how to remove them on your own. (Machine Removal or Multimixer Elimination)If you discover any errors or they do not match up in campaign play, please let me know and I will adjust accordingly.
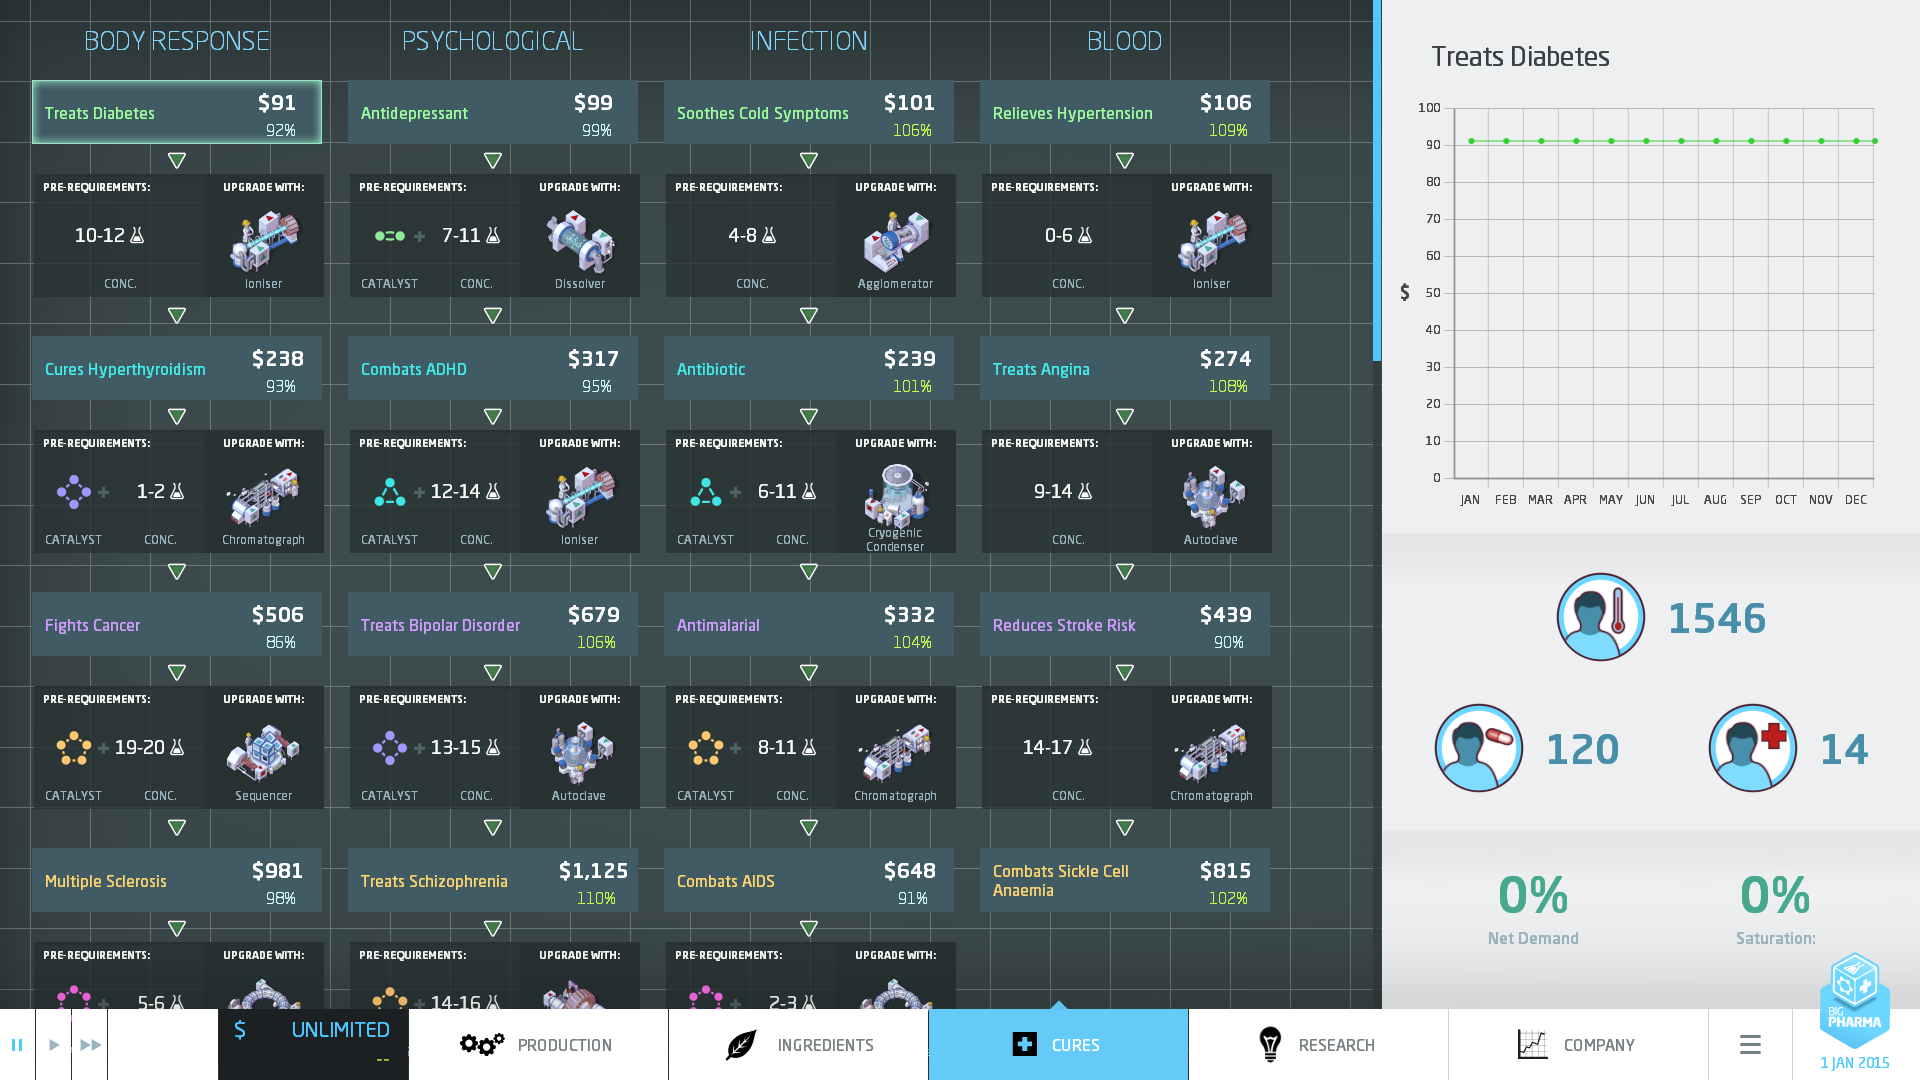
Cure Tier 1 (Cures 1-4) Screenshot
Tier 1 (Cures 1-4)


Cure Tier 2 (Cures 5-8) Screenshot
Cure Tier 2 (Cures 5-8)

Cure Tier 3 (Cures 9-11) Screenshot
Cure Tier 3 (Cures 9-11)

Body Response
- Treats Diabetes – Active [1-5] – Pill Printer
Ioinizer [10-12] - Cures Hyperthyroidism – Active [11-15] – Pill Printer
Chromatograph (Purple Catalyst [1-2]) - Fights Cancer – Active [2-7] – Syringe Injector
Sequencer (Orange Catalyst [19-20]) - Multiple Sclerosis – Active [12-15] – Syringe Injector
Hadron Collider (Pink Catalyst [5-6]) - Cancer Vaccine – Active [16-20] Syringe Injector
Psycological
- Antidepressent – Active [15-20] – Pill Printer
Dissolver (Green Catalyst [7-11]) - Combats ADHD – Active [15-20] – Pill Printer
Ionizer (Blue Catalyst [12-14]) - Treats Bipolar Disorder – Active [15-20] – Pill Printer
Autoclave (Purple Catalyst [13-15]) - Treats Schizophrenia – Active [16-20] – Syringe Injector or Pill Printer
Ultraviolet Curer (Orange Catalyst [14-16]) - Cures Alzheimer’s – Active [17-20] – Syringe Injector or Pill Printer
Infection
- Soothes Cold Symptons – Active [3-10] – Pill Printer
Agglomerator [4-8] - Anitbiotic – Active [12-18] – Pill Printer
Cryogenic Condenser (Blue Catalyst [6-11]) - Antimalarial – Active [11-16] – Syringe Injector
Cromatograph (Orange Catalyst [8-11]) - Combats AIDS – Active [12-18] – Syringe Injector
Hadron Collider (Pink Catalyst [2-3]) - Cures HIV – Active [16-20] – Syringe Injector
Blood (No Catalysts)
NO CATALYSTS REQUIRED
- Relieves Hypertension – Active [9-13] – Pill Printer
Ionizer [0-6] - Treats Angina – Active [6-12] – Pill Printer
Autoclave [9-14] - Reduces Stroke Risk – Active [10-15] – Pill Printer
Cromatograph [14-17] - Combats Sickle Cell Anemia – Active [13-17] – Syringe Injector
Digestion (No Catalysts)
NO CATALYSTS REQUIRED
- Calms Acid Reflux – Active [15-19] – Pill Printer
Evaporator [16-18] - Alleviates Stomach Ulcers – Active [8-12] – Pill Printer
Autoclave [6-8] - Appetite Suppressant – Active [11-15] – Pill Printer
Ultraviolet Curer [8-10] - Cures Irritable Bowel Syndrome – Active [14-18] – Pill Printer or Syringe Injector
Lungs
- Soothes Cough – Active [6-13] – Pill Printer
Evaporator [8-11] - Eases Asthma – Active [4-10] – Pill Printer or Creamer
Dissolver (Green Catalyst [17-20]) - Treats Bronchitis – Active [6-11] – Pill Printer or Creamer
Cryogenic Condenser [9-12] - Cures Tuberculosis – Active [1-6] – Pill Printer or Creamer
Pain
- Painkiller – Active [5-12] – Pill Printer
Evaporator [7-10] - Eases Migrane – Active [5-9] – Pill Printer
Agglomerator (Green Catalyst [15-18]) - Antisiezure – Active [11-15] – Pill Printer
Ultraviolet Curer (Purple Catalyst [0-4]) - Anaesthetic – Active [14-18] – Syringe Injector
Sexual Health
- Removes Warts – Active [11-16] – Creamer
Ionizer [13-15] - Female Contraceptive – Active [1-6] – Pill Printer or Creamer
Agglomerator (Blue Catalyst [17-19]) - Alleviates Erectile Disfunction – Active [9-13] – Pill Printer or Creamer
Ultraviolet Curer [7-9] - Male Contraceptive – Active [15-17] – Pill Printer or Creamer
Relaxants
- Antihistamine – Active [2-8] – Pill Printer
Dissolver [4-6] - Alleviates Insomnia – Active [12-17] – Pill Printer
Cryogenic Condenser (Blue Catalyst [11-14] - Reduces Anxiety – Active [2-6] – Pill Printer
Skin
- Soothes Rash – Active [8-12] – Pill Printer or Creamer
Evaporator (Green Catalyst [10-12]) - Prevents Acne – Active [3-8] – Pill Printer or Creamer
Sequencer [1-5] - Restores Hair – Active [10-19] – Syringe Injector or Creamer
Liver
- Prevents Gout – Active [5-9] – Pill Printer or Syringe Injector
Dissolver(Green Catalyst [6-8]) - Combats Liver Disease – Active [15-19] – Pill Printer or Syringe Injector
Side Effects & Their Removals (Future)
To determine the Side Effect Maximum Concentration Rating with the Analyzer I suggest you do that at the Input door. Don’t do it half way through a manufacturing process unless you have money to burn. It might even be best to have multiple Analyzers along your chain if you’re trying to determine the Maximum Concentration Rating of a Cure as well.
A note on the Satchet Maker & Big Machines
From personal experience so far:
Satchet Maker
The Satchet Maker is kind of useless. It does sound like a great idea to output multiple cures for a high profit but as far as I can tell the price of multiple cures in a Satchet does not stack. i.e. Cure A Single = $1000 & Cure B Single = $900, Cure A & B in Satchet = $1200. You’re probably better off selling them seperate.
Big Machines
Another thing I have attempted to do many times is to build large machines to output the maximum amount of a high level cure per day, i.e. 1 Per Day. This requires building multiple large components such as the Multimixer, Autoclave, Ultraviolet Curer, Cromatograph & Hadron Collider. These machines take up an enormous amount of space when you have to chain 2 or 3 of them. These components can take 2-4 days alone to process ingredients which is a lot of time but you are sacrificing huge amounts of factory floor to puzzle in the belts with lots of parts. It seems better to allow the components of the manufacturing process to just do their thing with only 1 or at most 2 and let time pass. What I am getting at is instead of building 1 or 2 giant machines for 1 or 2 expensive cures, build machines smaller and output many cures slower instead of a lot of 1 or 2 expensive cures. On top of that when your output is really high the market becomes saturated and the price of a cure drops and diminishing returns take over.
Ending
Originally posted by author:Each cure has a Maximum Concentration Rating that is not listed here. The Maximum Concentration (Best effective concentration) is random per game so you will have to use the Analyzer to determine each cures Maximum Concentration to work toward a high cure rating (B,A or S). Comments and ratings are appreciated.
This is the Vanilla Game (No Mods Included)
Written By DelScorcho