Overview
No good at searching for those pesky relics? Spent too many hours looking in dark holes only to have a genestealer try to violate your face? Well you’re in luck, this brother has just the guide you need.
Preamble
NOTE: It’s been brought to my attention that only Major Relics are needed for the Time Lord Achievement. Thanks to Totenwache for pointing this out.
An important thing to remember as you’re hunting for those relics, they sometimes don’t load in. If this happens, I’ve only had them appear after restarting the whole map. So just a heads up.
For the most part, the noted locations on the maps will be pretty self explanitory. If it’s not out in the open, there’s generally a smashable wall hiding the relics. Often, looking at the map, if there appears to be an extended part of a hallway or room, check for a smashable wall.
Also, it seems like the game flags a mission for the Time Lord achievement once all relics are found on any given mission. So if you’re half way through the game and realize you’re missing some from a previous mission, don’t worry, you don’t need to do a complete playthrough (I think), provided you find the rest with no problems. But when you replay those missions, you need to find all of them, not just the ones you missed, for it to flag the mission as 100% found relics.
Based on some new information, the above is likely not 100% correct. I do believe that it still flags the missions as complete for the achievement if you have collected all the major relics on a single run of a map however, so I don’t think you need to collect all the Major Relics in a single play through for Time Lord.
Mission 1
This map allows you to take your time, so you can get a taste of what the relics look like, and hear the audio/visual clues they give. From what I’ve heard, minor relics whisper, and major relics crackle with energy (although I swear they just whisper too)
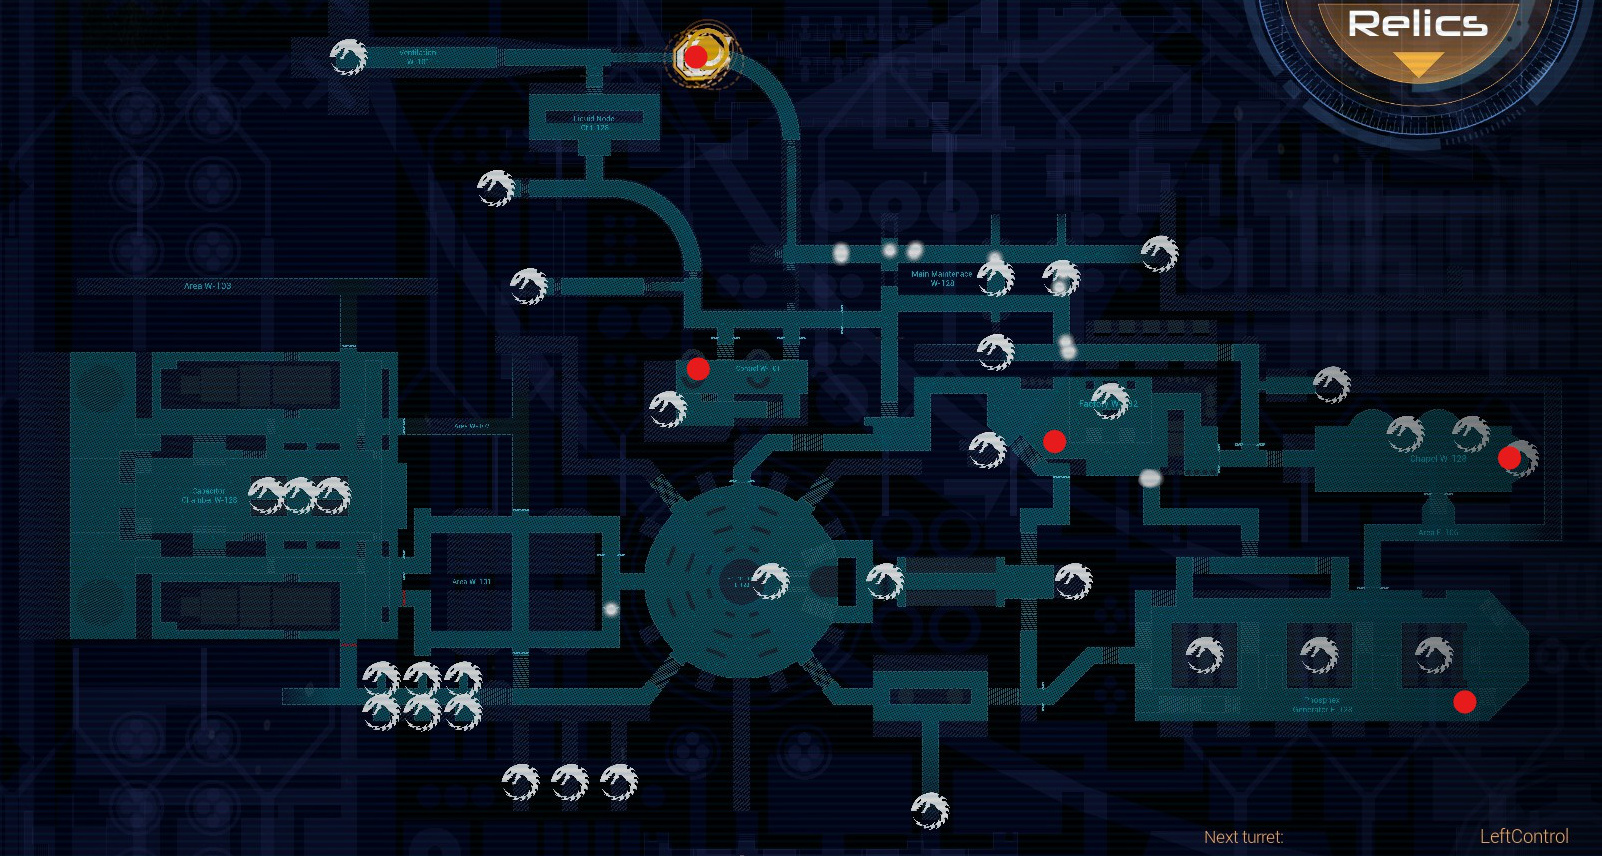
You’ll note this is the only map in the game that does NOT tell you how many relics there are. There’s five on this map.
Right back corner of the southwest room, where you activate the defenses. Seemed all it did was piss everything off, but, hey, I’m not the Grand Master here.
Bolter is hiding behind the statue in the chapel area.
Sitting on a table, just under the ramp going up above.
In a side room, just sitting on a terminal.
Impossible to missing this one, being a mission objective. Nice big shiny staff.
Mission 2
Now it’s time to get dirty. No easy ride for this one fellow brothers. If surviving is becoming a challenge, I highly recommend giving your buddy Barry claws. And myself, I found the Assault Cannon was extremely effective at keeping me alive, and since you have four points from the first mission, get yourself the inferno spell. Only the biggests xenos can survive it (which you shouldn’t be encountering yet), and you can direct it (spin around to make it come back towards you). Chain lightning will also make short work of active turrets and rocket hybrids.
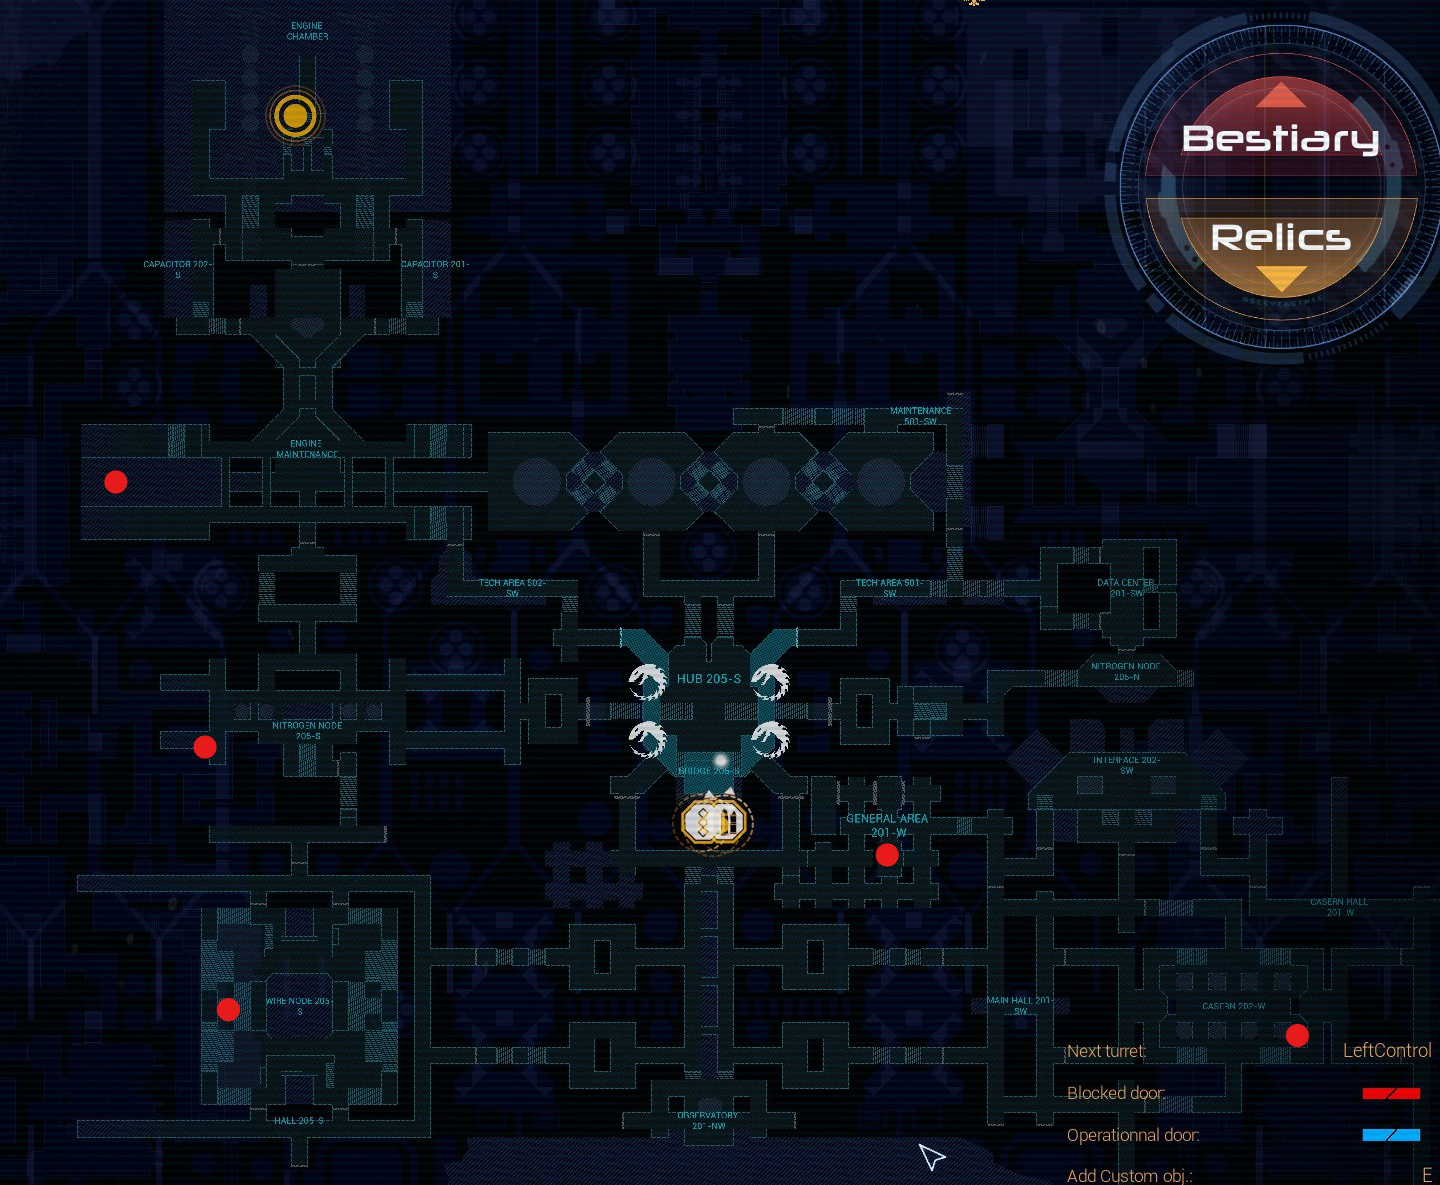
Hard to miss this book, it’s sitting in the crashed ship you see on your way to the engine room.
After torching the first nest, you’ll find this relic in a marine sized pipe.
This sword you’ll find on the bottom level of the south west room. Watch for turrets and rocket hybrids.
The marine barracks in the south east corner of the map, tucked behind the pillar. Heavy fighting in here.
After you torch the second nest, exit the room via the door on the west side of the room. This will take you to a series of interconnected hallways. This room is in the middle, with two breakable walls. Warning. this one didn’t appear for me, so just be aware that it might NOT be there.
Mission 3
This is when things start getting a little more harder for us relic hunters. To keep yourself sane, do what you did on the first mission, and put off going to the beacon until you’re ready, as completing that part introduces a new pain in the ass, and ramps up the horde.
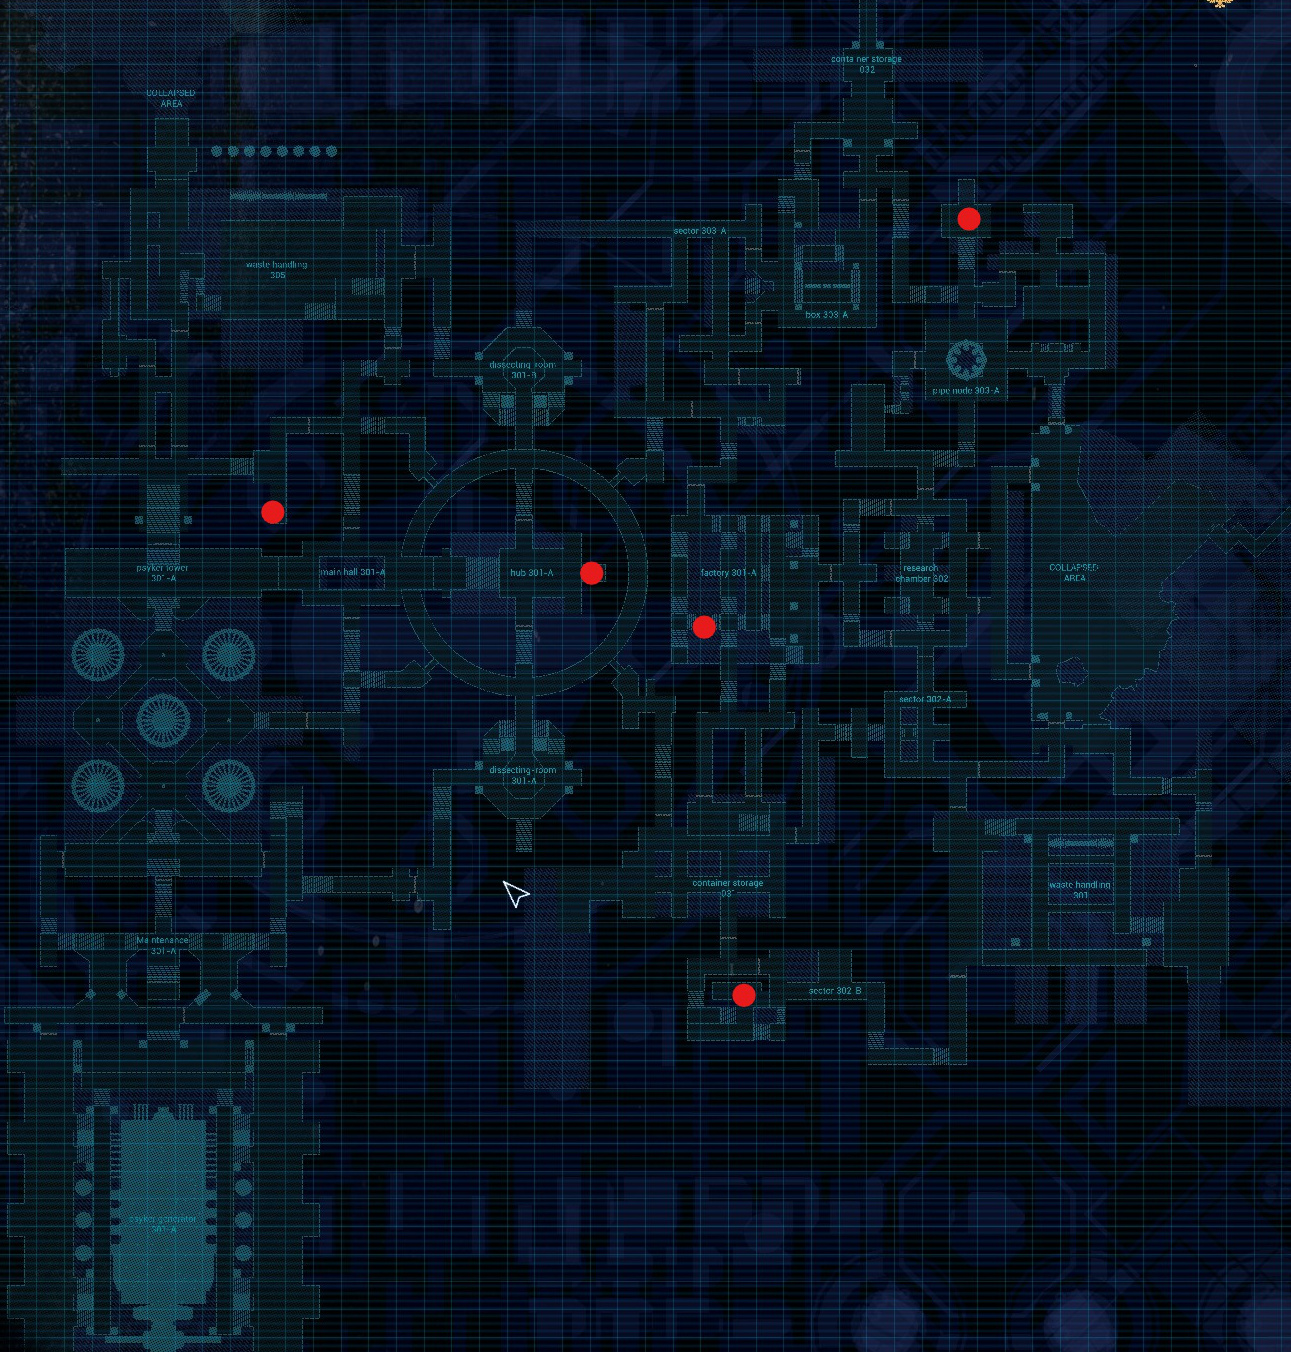
When you enter the collapsed area, take either of the two doors on the right. You’ll eventually find the junction north of the pipe room. Smash the wall, and you’ll find this scroll in the hidden room.
You’ll find this brain in a jar in the middle south room on the map. You’ll see the relic’s glow when you enter from the east.
This is the room in the middle of the giant ring. Another smashable wall to reveal the niche this little guy is hiding in.
Head north west out of the ring, and follow the hallway. You’ll find another smashy wall.
This was the most annoying one to find on this map. It’s not even that well hidden! This is the room just east of the ring, with a bunch of small tunnels. There’s a small alcove in one of the tunnels in there, and can be easily missed if you come from the west side of the room.
Mission 4
Important thing to note on this map, is that once you reach the big junction of the chapel in the north, you’ll trigger an objective that is TIMED. The event that comes right after it involves holding that northern middle area for a period of time, which, if I recall, ends the mission once completed. So no matter how you cut it, you’re on the clock.
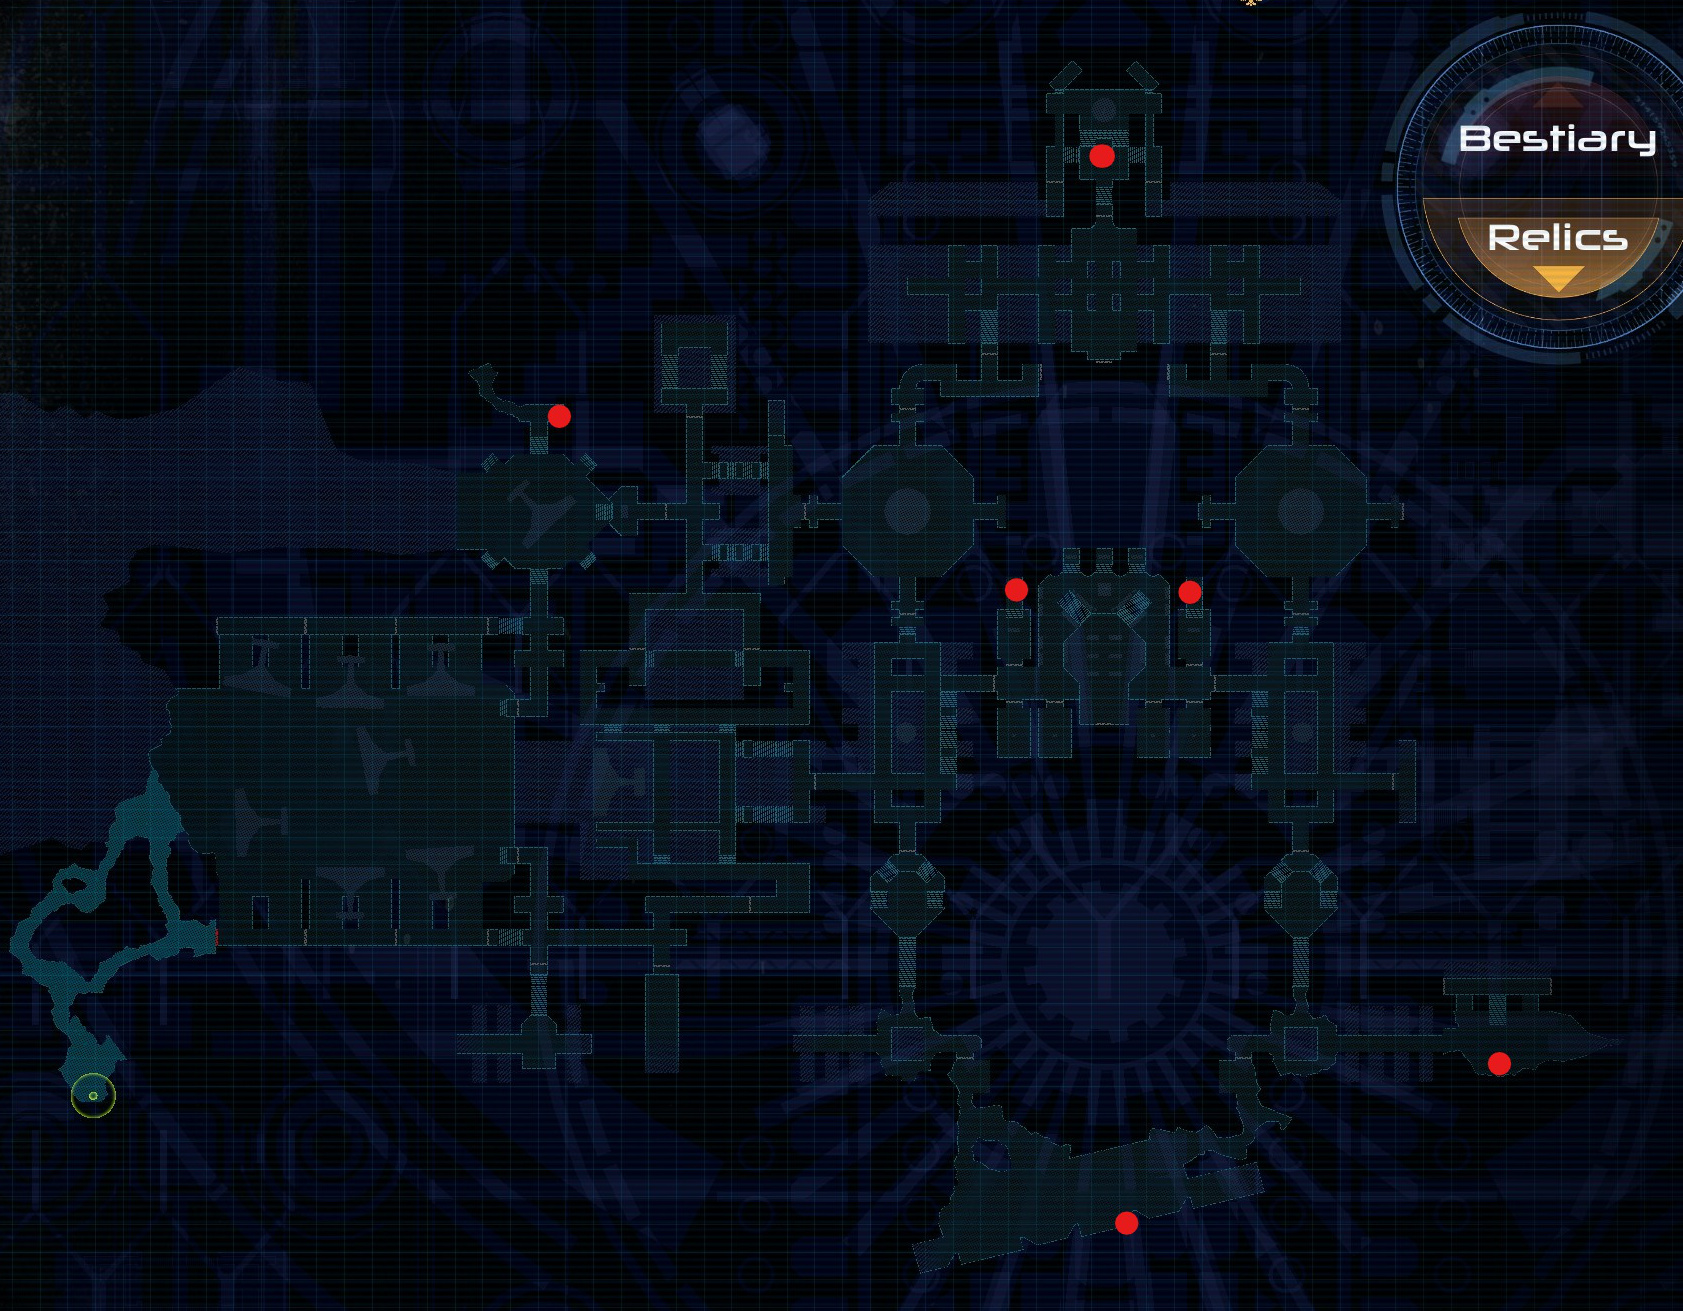
This guy is just sitting on the table in the room to the right after you pass the amazing ‘faith guided missiles’. Just like in one of the preview videos.
After the previous relic, you’ll cross a room with four bridges, and exit to the stairs down in the north. Once there, hang a left, and you’ll find this room. Watch out for the turret down the hallway opposite of the relic.
On a slightly related note, the room that is identical to this one on the other side is bugged. You can actually walk over the rubble. The problem is, you can’t get out. So don’t do that.
As you make your way into the more catheral looking section, you’ll want to get into the room on the right side. On a table immediately to the right you’ll find this little relic.
After the Scythe Warrior fight, go deal with the objectives on the right side of the map. While there, you’ll note the hall way that curves towards the middle of the map and abruptly ends. You’ll find this relic there.
As you return back to the middle area to do the objectives on the other side, in the triangle section of the room before you head down to the west relays, you’ll find some rubble on the right side. There’s a marine sized pipe that will take you to your final relic.
Mission 5
Finally, Calibans Will! When things get really interesting story wise. Important stuff! But not important to the task of relic hunting.
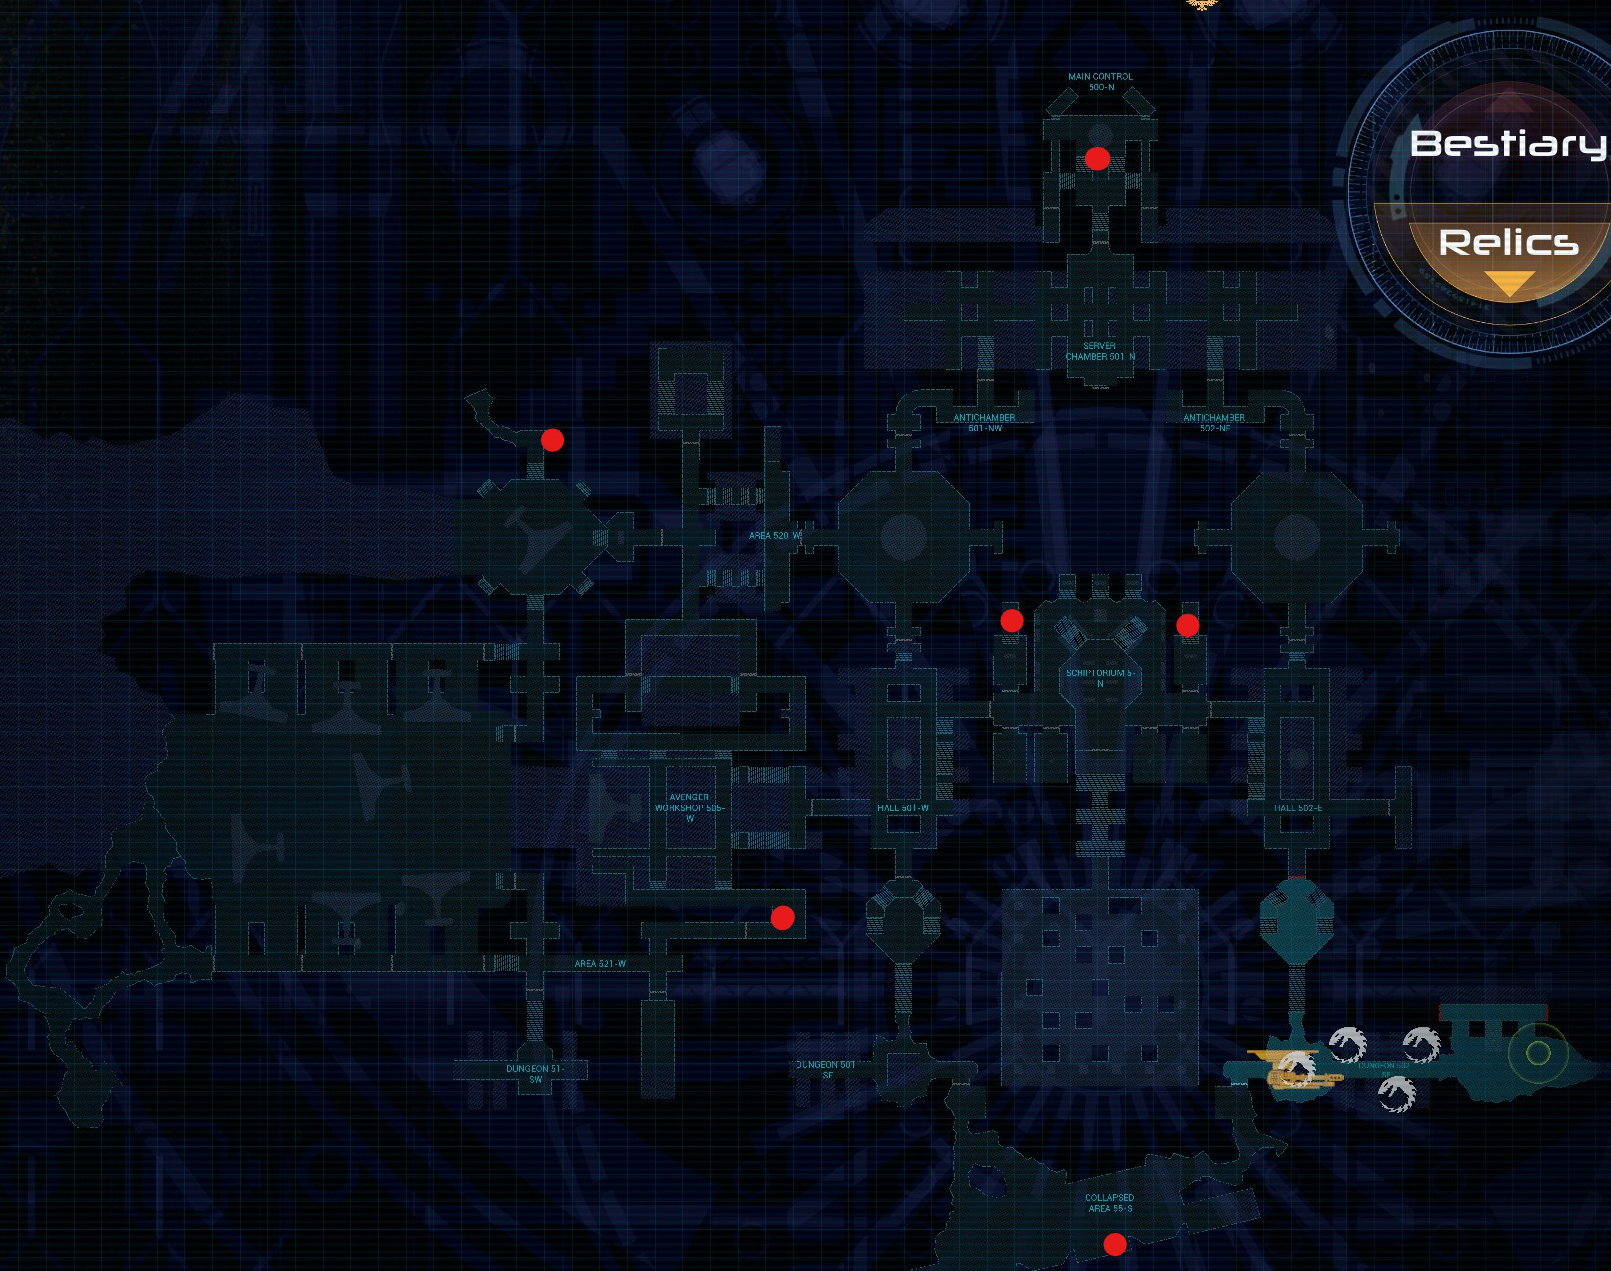
You’ll find this smashable wall just off the personal hangar.
Literally just sitting out in the open along the wall in the collapsed area in the south.
On a table in the south east room.
These two rooms are adjacent of the Scriptorium room in the middle, on the north walls.
You come in here for the objective, so you should question your worthiness if you missed this.
Mission 6
Time to teach those xenos whose rules the galaxy! But first, RELICS! But not that many, only four this time. This is another mission where you can do the objective at your leisure, so you might as well do just that.
Bottom of one of the many stairwells in this bloody map.
And the top of one of the many stairs you’ll find in this place.
I can’t remember which is which, but the two above are the bottle two points on the map I have marked. Went in so many circles I completely lost track of which was which.
This is the bottom of the warehouse area, under the big ass xeno skeleton. Break down some walls to find.
The fourth is the room just east of the first objective.
Mission 7
You got two choices here Brothers. The short and hazardous way, or the long and safe way.
This mission requires you to reach the exit before it ends. And because of what you do in this mission, that walk is really boring because everything will be dead. But you’re tough guys, so you’ll do it the short way, RIGHT?!
This is actually just off right side of where you start.There’s a set of stairs that takes you into a pipe, hang a right after you get out, and you should find the breakable wall.
Nothing fancy here, you find this in the south west corner of the map. If you enter from the north, just follow the hallway and it’ll take you right too it.
This is in the machine shop looking room on the west side of the map, tucked in one of the side work areas.
A biggy Scythe warrior charges out of this room, just south of the large circle room.
Just south of that last one, you’ll find a sort of chapel area with pews. This is on the east side, behind a breakable wall. Smashy smashy.
Just sitting on a table, minding it’s own business, in the south east corner of the map.
Mission 8+9
I’m just gonna combine these two missions into one section, because they’re maps you’ve been on before, and aside from one location, they’re all identical to the previous ones.
MISSION 8
You start at the location where there would’ve been a relic, but they wouldn’t put a relic in the room you started in, that’s silly. So they moved it. The rest, however, are the same. Don’t worry about the modifed CAT, the xenos don’t bother it. So you’re free to ditch it and go finding those relics.
It didn’t occur to me to mention this, but most of the areas are locked. Just follow the objectives and the areas will get unlocked as you need them.
The one that was moved is super easy to find. Following the CAT will take you right past it.
MISSION 9
On this mission, however, the locations are 100% identical as the last time you did it. You will need to grab them before completing the objectives however.
There you go, Brothers! You’ve recovered all the artefacts, killed countless xeno scum, preserved the Emperors Legacy, and spared the galaxy the headache of a new breed of Tyranids. Not too shabby!
Relics of the Past Complete Set
For those curious and haven’t done it yet, this is the completed set of major relics
Some fine looking gear, dead guy.

![How to redeem '3rd Echelon' map - [DEPRECATED; GAMESPOT REMOVED THE PAGE] for Tom Clancy's Splinter Cell: Conviction](https://steamsolo.com/wp-content/uploads/2021/07/how-to-redeem-3rd-echelon-map-deprecated-gamespot-removed-the-page-tom-clancy-s-splinter-cell-conviction.jpg)
