Overview
See how maps and stairways are connected for easier orientation. Includes a full map with all items, empty map for your own exploration, and a basic route to get to the ending. Upgrades, tips for inventory and achievements.
Intro
Initially, I was just trying to find the shortest path for the 60 Minutes achievement. I ended up with several versions of maps with all items and keycards, where to use them, when to drop them, storage and save optimization, and many tips on how to get faster.
Orientation between levels was the most difficult for me. On this connected map you can simply follow the dashed lines to see which door connects where, what staircase leads to what level, and how floors actually stack up.
If you haven’t finished the game I’d recommend doing that and explore everything yourself. Take your time. My advice (although it might sound silly): discover as much as you can until you die or run out of bullets. Then just load the last save. Repeat until you find another save point. After 2 or 3 saves start a new game! You will get back to the same point much faster and with way more bullets, health, and knowledge. Repeat every 2 to 3 saves.
Relax! Once you find the Damage Upgrade for the pistol things get sooooo much easier! Use one of these maps (with or without items) and draw your own paths, cross off rooms, and solve the riddles of NSola 7!
This wouldn’t have been possible without VanessaMagic’s ‘Labelled Map’ and the first walkthrough she posted, and all her support here on the forums, the official Discord, and on speedrun.com. Big shout out to Vanessa!
In case anything is missing please let me know in the comments! Thank you!
Connected Blueprint
Want to go it alone? Just the plain map without further hints? Here you go, Medical is rotated to point north, floors are stacked up correctly, and all connections between staircases are marked:
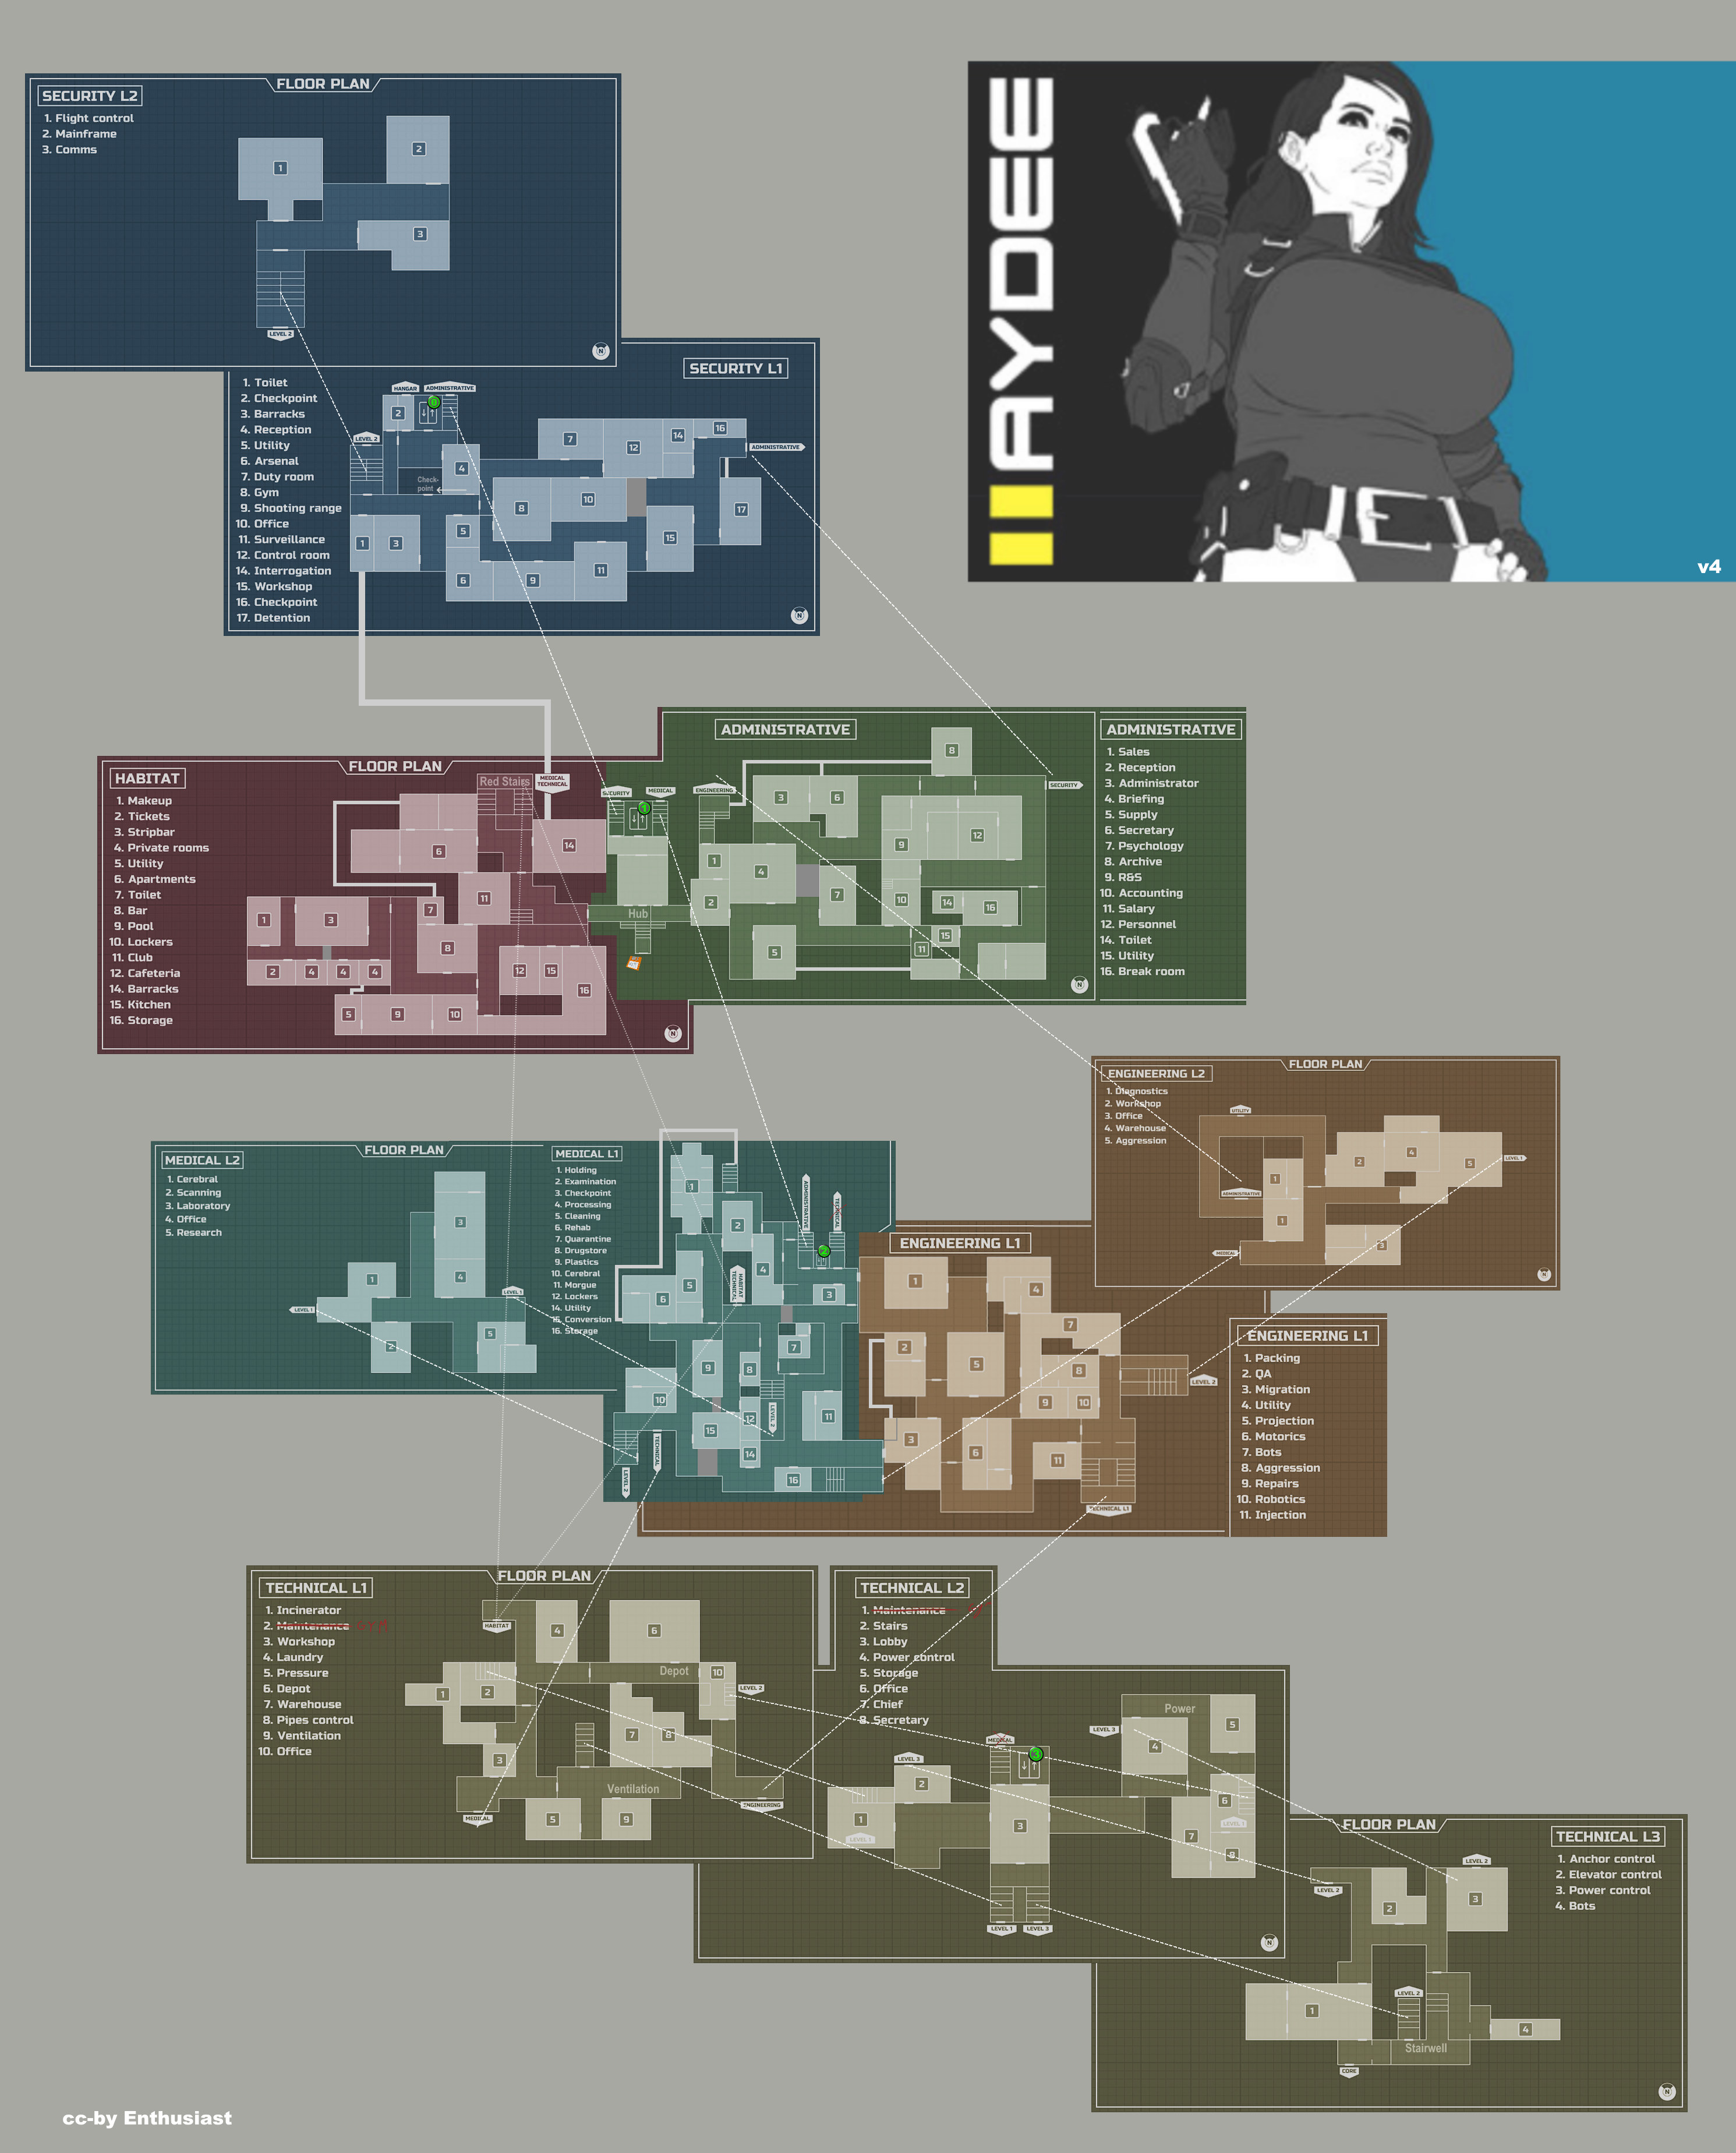
Here you can see how all levels connect from top to bottom. Elevator floors are labeled accordingly and it’s nice to see that the elevator shaft is really at the center and connects everything.
Also of note, the Medical L1 map is not pointing north, adding to the confusion. Love it! It’s rotated here and adjusted for the connections to Engineering.
‘Hub’ is what I call the big green staircase where you find a save room up the middle stairs, connecting Admin, Habitat, Medical, and Security. I added that and the missing part with the elevator stairs since you cross through here quite often (internally it’s called Crossroads). I also labeled the ‘Red Stairs’ in Habitat and the 4 gates: Ventilation, Depot, Power, and Stairwell for easier reference.
Now it’s up to you to find a good route, use a drawing program like [link], and start drawing your own paths, marks and notes!
(cc-by: You are welcome to re-post maps with or without changes, just kindly mention my name.)
Full Map with All Items

What’s NOT on this map:
– compounds (jars, not very helpful imo)
– notes and magnets (see MagicPortal to find them easily)
– differences on hardcore (see Hardcore Guide)
For clarification, you’ll find 4 types of buttons:
- blue is the Receiver for the Wifi Remote (there are 2 but you can only take one)
- red is the Jammer for the laser doors
- green are the 2 Power Buttons (hard to see with NVG…)
- 2 white button caps are used to repair broken buttons, each used once and stay there
There is a particular order in which you can access areas and items. Often you first have to open a door by pressing a button. As simple as that. Now you might be able to walk around to the other side of a closed gate. It’s the same principle over and over.
The following maps may help all players, I created them mainly for the 60 Minutes achievement, though. If I’m saying you don’t need this, or that is optional, I mean for a fast playthrough.
The Plan
Before envisioning a route you need to know where all the required items are,
where to use them, and in what order that is possible.
For example, you need the Yellow keycard to access the core at the end.
For that you need to clear Medical L2, so you need the Gas Mask, some colored tubes
and the Teal key. And so on, and so on.
Here’s a complete break-down:

Taking the SMG and Pouch at the beginning is optional and you may as well do that later. The (1st) Damage Upgrade for the pistol is highly recommended! It basically doubles your ammo. There are some local items, that you only need between steps (saw+hand, white button+Valve+Fuse). And the path shows taking some items just because you’re already there, even though, theoretically, they could be taken later.
You may very well get the Blue Key+NVG before the Teal Key, I don’t think it matters. You could also do the 1st part of Medical before Engineering to get the Crowbar, and then either go for the White key or to Security. And there’s a staircase in the middle of Medical I didn’t use here, it’s another way to get into L2 if you collect the blue+green vials after the red one.
And that’s the gist of it. What follows in this guide is a nerdy analysis for speedrunners. Don’t read it, carry on with your life, or play another round of Haydee and discover more yourself!
What’s your plan? Share your ideas in the comments!
The order of key cards:
- Orange
- (Blue is also possible here)
- White
- Pink
- Teal
- Blue
- Yellow
- Black
There are also some optionals that take make your life easier but cost some time: the 4th Pouch in Habitat which requires the Teal key. For the SMG you need the Blue key but there is also a hidden vent that only requires the Screwdriver. With the Green key you can access some weapon upgrades. And the Lockpick of course opens metal cases, containing (very little) ammo (not for pistol) and sometimes health. The Pouch in Admin only requires the Screwdriver (but takes longer), the one in Engineering the Orange key (easy one), and that in Security the Blue key (also on your way).
Optionals
– Pliers are kind of optional, however, you miss out on 37 mines you could use against enemies
– SMG (arguably)
– Lockpick (arguably)
– Rifle (needs the Flashdrive)
– Shotgun (once you have the Jammer)
– 4th Pouch with Blue Key (Habitat)
– lime Green Key -> Aim and fire Rate Upgrade (Admin)
– another Rate Upgrade with Orange Key (Habitat)
– another Damage Upgrade with Yellow Key (Technical)
– another Aim Upgrade (Technical)
Damage Upgrade clearly makes the most sense for pistol and later SMG. Mag Size Upgrades are both (relatively) easy to get and give a free re-fill. Aim Upgrade might make sense for SMG and shotgun. Fire rate is the best used on rifle and shotgun.
(If I counted correctly, there is 90 ammo for rifle and 90 for shotgun on Softcore. On Hardcore the total is 190 SMG, 35 rifle, 40 shotgun.)
SMG: Is it Worth It?
Speaking of optionals, not collecting stuff saves time. Shuffling two guns and their respective ammo takes up space. Since there is a pistol-only achievement it seems possible to go without even the SMG. Also, you barely find any ammo for it except in Security.
Where to find SMG ammo:
30+20+40+30 = 120 without
30+30+30+30 = 120 with Lockpick (very time consuming…)
20+45 = 65 with Flashdrive (long run around, not advisable)
=305
Let’s say 10 shots per kill ~ 3 pistol rounds with headshot and Damage Upgrade
without 12 kills ~ 40 ~ 2 ammo packs
Lockpick 24 kills ~ 70 ~ +2 ammo packs
Flashdrive 30 kills ~ 90 ~ +1 ammo pack
However! with Damage Upgrade in Technical L2 (7) ~ 5 shots per kill
without 24 kills ~ 80 ~ 4 ammo packs
Lockpick 48 kills ~ 140 ~ +3 ammo packs
Flashdrive 60 kills ~ 180 ~ +2 ammo packs
- only use it then, i.e. after you got the Yellow Key
- expend smg ammo on your way back up from Technical, which has the most savage attacks, save pistol for finale
- also get Aim Upgrade in Technical L1 (5), more important than for pistol
Maybe: collect 5 yellow and 5 red jars (takes a lot of time…)
= 5×20 smg = 100 smg ~ 10 kills ~ 30 pistol rounds ~ 2 ammo packs
In conclusion: if you take the SMG also take the 2nd Damage Upgrade in Technical and only then use it. Once you end up with more than 80 pistol rounds, skip SMG next time.
By the way, you save ~1 minute not taking it at the beginning (after Screwdriver leave through stairwell and open that door). Once you have the Blue Key get it when coming back from Security.
Pistol Upgrades?
I counted 33 ammo packs with 20, and 7 packs with 10 rounds (-2 if not taking the Flashdrive, +1 Clip Upgrade if totally empty):
So the maximum pistol rounds you could get is 750. With good aim 3 per headshot ~ 250 kills. To kill all 277 creepers and slashers you’d need other weapons, too, but luckily on a 60 Minutes or speed run you only encounter roughly 180 enemies.
(Btw, those in the cake room are not required for the ‘No Witnesses’ achievement unless you actually stick your head in there, then you’d have to kill them, too. That is +6 = 283.)
(And in case you wondered: the locked racks with 6 packs of ammo on the Shooting Range or in Office can not be triggered to open. And even if, they only contain 1 round each. Booo!)
Pistol ammo can be found all along or near the main path, mostly in Admin, and only 2 down in Technical L1. Rush for the Damage Upgrade in Admin (12) to save halve of your ammo!
One major topic of discussion: is the Clip Upgrade (magazine size from 12 to 20) worth getting? Short answer: it’s mainly for convenience and the additional ammo. Reloading costs about half a second since aiming slows you down by 30% (from 112 to 80) and lasts about one and a half seconds. To get the first Clip Upgrade costs about 25 seconds. Let’s say you shoot 500 times after the upgrade and reload at 6 rounds left. With a clip size of 12 you’d have to reload about 80 times, costing you 40 seconds. With a clip size of 20 you’d only have to reload 36 times taking 18 seconds. So you save 22 seconds but also loose 25 (and since you need to shoot a guy and two slashers you really only gain 10 rounds…) The second upgrade is just in-and-out in about 7 seconds. But it comes a bit later in Security, with maybe 110 enemies left, let’s say 350 shots with mines and what not, 57 vs. 25 reloads, 32 times fewer reloads ~16 seconds saved, minus 7 to get the upgrade = 9 seconds saved. And the free reload of 20 rounds. In conclusion, go for the second Clip Upgrade up in Security, forget the first one, it takes too long.
Dropping Tools
One interesting question (to me at least) is when can you throw things away? Handling inventory is time consuming and unnecessary if you can just drop items instead, once they’ve been used. The more space you have, the better.
Pliers: scratch that, you don’t need them:
You want the Pistol showing in the bottom 4 spaces to know when to reload. (It’s technically possible to not have it on a shortcut, though.) Put it on your least favorite shortcut key.
I always keep the Screwdriver on the same shortcut since I’m not savvy enough to change hotkeys quickly and remember which is what. You need it for the finale, so no throwing away! However, you only need to carry it 5 times:

– (optional: in Habitat for SMG)
– (in Admin for Pouch)
– Damage Upgrade
– (optional: in Engineering for Clip Upgrade)
– in Admin later for White Key (also needs Crowbar, btw)
– and then in Habitat for Teal Key (also needs Wrench, btw)
– in Security once when coming back from the run-around
– (in the Finale of course)
Now, what about Crowbar, Wrench, and Boltcutter? Where do you need them and
can you throw them away at some point? See the following map for possible and required uses:

Boltcutter:
– (Engineering right next door where you got it)
– 2x in Security L1 to get the Jammer, /drop after Security
– (optional: again on the other side if you go for the Flashdrive)
– (not really: upstairs, Security L2, should you touch those lasers…)
– (completely unnecessary: Engineering L2 to open some door)
Wrench:
– (to get out of the room where you found it in Admin)
– right next, at start, to get to Engineering L1
– to get the Forceps (Medical)
– to get the Pink/Teal Key (Habitat), /save to drop here
Crowbar:
– (right where you found it in Medical)
– White Key (Admin)
– only passage into Security, /save to drop here
(or the other way round if that is your route)
And then there is the list of items you only need once. Safely drop them when used:
– Saw
– Hands
– Hammer
– Jammer: leave in Security L2 (unless you want to go for the Shotgun)
– Wristband
– Black Decoder
– Blowtorch (or can you?)
2x:
– Knife (Habitat for Teal Key, Technical at the end, then drop)
Some items vanish or stick, so you can’t keep them:
– Jack (or Forklift Lever)
– all 4 vials (or flasks)
– white repair buttons
– Valve, Fuse
– Balloon (or Gas Cylinder)
- Gas Mask – drop it once you did the Ventilation thing
- NVG/Visor – you can drop it once the light is fully back on (Anchor)
- Wifi – you need it at the hangar, so don’t leave it in Technical
Talking about bringing tools: for the Garbage Collector achievement you need (definitely, I checked with Edith): Pliers, Screwdriver, Wrench, Boltcutter, Crowbar, Lockpick, Saw, Forceps, Hammer, Blowtorch/Cutter. So you really only need 10 slots.
+Black keycard, +Wifi to get into Hangar = 12 but you could throw away both and still get the achievement. In case you only have 12 slots you need to install the receiver and kill that last guy first. Even with 10 slots you are fine, just bring the tools in first.
Main Items and Where to Use Them
Here is another version with just the main items:

Here is where to use the main items:

Wifi is only needed much later in Technical so you might want to pick up the button later at a convenient run-around, or drop both Clicker+Receiver at the stairs to Technical for pick-up. However, don’t leave it down in Technical once the power is up…
The same for key cards:

- Orange in Engineering
- White+Pink in Habitat
- Teal in Medical
- Blue in Security
- Yellow in Technical
- (Green in Admin, completely optional, not for speedrun)
- (Black shouldn’t be a problem to keep)
What they do and where to drop them (room number):
Orange in Engineering
– 5: small white button
– 1: Pouch //drop
– (11: nothing)
– (L2-3: Lockpick, not for speedrun)
– (Habitat: Fire Rate Upgrade, optional)
White in Habitat
– 16: get to Knife //drop
Pink in Habitat
– (4: health if necessary)
– (4: jar, don’t)
– 4: get into pool area //drop
Teal in Medical
– 8: blue tube
– 11: green tube
– L2-3: make White Agent //drop
– (L2-4: health but shouldn’t be necessary)
– (Habitat: Pouch, optional)
Blue in Security
– 6: +20 ammo +2 mines
– !! open Hangar
– 14: get 2nd Pouch //drop
– (Flashdrive in Office)
– (Habitat: get SMG)
Yellow in Technical
– (L2-7: get Damage Upgrade in Secretary/Chief)
– L3-1: open Anchor Control //drop
The 3 Extras in Habitat’s Apartments (6):
- Orange (right): Fire Rate Upgrade (don’t)
- Blue (left): SMG (not really, either at start or not at all)
- Teal (up left): Pouch (…nnnah)
- Green (up back): nothing (lore and magnet)
Here is what I remembered:
- drop Orange once you have the Pouch
- drop Blue once you have the Pouch (or better drop it near Hangar once you have the Pouch)
- drop Wrench at Stripbar (that’s the easy one)
- drop Crowbar once you got into Security (or after White Key if that is what you do later)
- drop Boltcutter once you are out of Security (actually after the 2nd alarm box)
- Teal when you have Yellow (actually when you get White Agent)
- Yellow at Core
- White and Pink are easy
- so is Hand, Saw, Foreceps, Hammer
- Knife down in Technical
- let the Jammer stick in L2
- take the Wifi button once the elevator is back on
- always keep Screwdriver
The Power Button Shell Game
At first, the 2 green power buttons are at:
>> Power
>> Ventilation
After you found the Hammer (start) take the button from Power (green line) and use it at Stairwell to get out:
+Power >> Stairwell
This is probably where you go get the Yellow keycard and return here. Then, to repair a few things, take the button from Ventilation and use it at Depot:
+Ventilation >> Depot

So they are now at Stairwell and Depot. Next, you replace the white button (pink line) and use it to get the Valve, move through the gym to the Fuse, repair that and use the Wifi button to open the double-doors.
To be able to have both, take the button from Stairwell and bring it back to Power (blue line, back and forth):
+Stairwell >> Power
Finally, just move up the stairs and grab the one from Depot:
+Depot,
then walk the same way back and claim:
+Power
You now carry 2 green power buttons!
(There is at least one other way but I think it’s slower.)
60 Minutes Achievement
Speedrunning is fun! You can play the game you like over and over. You can prove you have full command over the game by recording a run, and connect to other fans. The Gone In 60 Minutes achievement is a great challenge to get faster and fully understand the game.
These tips might help you with the 60 Minutes achievement:
- To save time, don’t get the rifle and shutgun, and don’t go for the lockpick that opens metal cases.
- Don’t collect red/yellow/blue jars for SMG ammo. 1 combination only creates 20 rounds. You might end up with 4 pairs for 80 shots. That equals about 8 kills or about 24 pistol rounds with headshots. 🙁
- I guess going for the SMG makes you feel safer on your first runs but later is not worth the time. You can go for the SMG before the end, once you have the Blue Key and happen to pass by the Red Stairs.
- Collect (red) ammo for Pistol and health of course (and maybe blue for SMG), but ignore green and yellow
- Use mines pretty much right away to free up space, especially before you get the 1st Damage Upgrade, and later in Technical since there are a lot. (Or rather, skip Pliers and shoot mines.)
- If you choose to take mines, practice getting to them without hesitation
- Don’t take any detours for ammo if you pass there later anyway. Save space.
- Know locations near you with a health pack. You don’t want to go the no-damage route but be rather aggressive. Once you have been hit, though, collect and use a medkit.
- If you’re new to this: always save, time doesn’t matter. Practice one segment several times. Have a break.
- Inventory at save stations is convenient but takes time. Instead, throw items at a central place where you know you are coming back later. E.g. the Wifi remote in front of the Receiver button door instead of taking both with you. 2 packs of ammo are well placed at the stairwell to Technical L1.
- Less inventory re-arranging can shave off 10-20 seconds each time – it adds up! Have a cheat-sheet for what you need to take and what to toss. Tip: right-click to drop items quickly.
- get used to applying hotkeys – much faster and more reliable…
- …and don’t double-click but use the middle-mouse button instead
- change hotkeys: you could use Q instead of 2, easier to reach. Or F instead of 1.
- With more headshots you will not need the SMG, which saves ~2-3 min.
- Press F1 to activate the in-game timer to check your times.
- For the achievement you can save whenever you pass a save station. I saved 24 times and made it in 57 minutes. Repeat every sequence until you are happy with it. This is the way…
- Speedrun: start playing the whole game in one go. However, unless you are actually recording, save! Otherwise you don’t get to the ending often enough. You want to practice segments.
- Practice headshots, aim rather high at the forehead of creepers, for slashers just below the red dot. With damage upgrade the big guys need exactly 3 headshots, the scissor ladies only 1 headshot and one center-mass.
- re head-shots: note the cross-hair changing on a hit! This tells you exactly wether you missed and have to back-up or can go forward.
- have a map open on your 2nd monitor until you memorized all rooms, paths, and what to find where
- Find out which guys you don’t have to kill, who are just standing around and not attacking. There are a lot! You can even outrun slashers twice, on the Security run-around, and on the stairs up from Technical to Medical at the end.
- Check out my Easy 1-Hour Guide for more.
We’ve already discussed when to drop items, and that’s more or less straight forward to remember. However, when do you need to take which items and will you have enough space?
- First: drop 2 packs (2×40) at the Technical L1 staircase. At the time you’re coming back here you’ll have the 2nd pouch upgrade and hopefully enough free slots.
- Easy: drop the Wifi remote in front of where the receiver button is. Take both later on your way to Technical.
- Swing by the save station in Medical and store Lever + Boltcutter, and basically all ammo (there’s more to find).
- Pick up Lever + Boltcutter in Security, it’s a small save station on the way, doesn’t take too long. Also store the Knife for now.
- have a look at your free slots before you leave Security: you want to pick up remote+receiver, and 2 packs of ammo and bring it all down to Technical.
- Store Wifi remote+receiver, and all but 40 ammo in the save room near Ventilation in Technical (or just drop it on the floor?). Now you can handle the 3 colored vials, gas-mask and hammer.
- Once you grabbed the 2nd Power Button (near Depot on my route) visit the save room (nearby, on the way) to take Wifi remote+receiver and knife, and as much ammo as you can carry.
- If there is any ammo left you may need to visit the last save room after the timer has started.
- If you wanna be real fancy toss the screwdriver after Damage Upgrade at the door to the White key. And again after Security in front of the elevator for the ending.
Okay, one last tip, how to get rid of the announcer. If you practice and repeat a lot… I mean, you can easily turn off the music with a slider in audio settings (Background). As much as I like the sound track, after 50 hours I really want to listen to something else.
The announcer is a bit more difficult: find the installation folder (…SteamLibrarysteamappscommonHaydee 2). There is a folder called Packs. In there you find a file called Sounds.zip. You can safely change the file since you can verify files with Steam. However, you may want to make a backup – just store it in some other folder! Otherwise Haydee will unpack all files and still find the copy… Now, remove some of the .wav files in the zip file under Sounds – Announcer. Namely: N7_Attack, N7_Denied, N7_Engaged, N7_Imminent, N7_Insufficient, N7_Leakage, N7_Levels. Keep the rest.
Or use the STFU mod if it is still available.
Replay value is high because you learn so much about the world with every play-through. Get into it again, see if you can finish faster, check out every last corner from a recent save, or go for more achievements.
- Pistol only: just don’t use the SMG at the end
- no saving + no inventory: yeah, that’s basically speedrunning
- play on hardcore: frankly, I didn’t like it – for a long time, it’s the same with less ammo. But it is a challenge since you need to use more weapons and a different path (see my Hardcore Guide).
- other achievements to your heart’s content
- Can you run the finale in under 5 minutes? Submit a level speedrun!
- The WR for a full run on softcore is 30 minutes. However, you can still grab your spot in the Top-10 list: [link]
- Haydee 2 also has an auto-splitter for LiveSplit. Just type the name ‘Haydee 2’ in your splits settings. And there’s an .lss file with all splits and icons available on the github page[github.com].
If you think anything is missing please let me know in the comments!