Overview
This guide has text hints and pictures of the environmental corruptions and non-inventory objects in the game for you to reference / solve on your own. There are no solutions in this guide.
Introduction
Guide is work in progress.
Todo: Moving puzzles, resize pictures.
———————————————————————
There are two types of corruption puzzles: environmental, which are objects/drawings in the room which you cannot interact with; and non-inventory interactable objects which can be rotated but not stored in your inventory.
The map image found in each floor section has numbers for each room which contains the corruption images or objects used in this guide.
If you have any comments, contributions, ideas or other feedback, please leave a reply below or private message me.
Last Updated May 7th, 2020. Work in Progress.
Finding Corruption Puzzles
When you view a map at a terminal, the blue squares represent corrupt environmental or non-inventory object puzzles in a room. The black squares represent computer terminals. The cyan squares represent collectable inventory objects.

At the time of writing, there is only one puzzle which does not have a C associated with it.
Some rooms have only one puzzle but that puzzle has multiple solutions. Each solution has a separate blue square on the map.
Text Only Spoiler Free Information
This section contains text and spoiler tags meant to help you locate or solve the corruption puzzles without an image spoiling it for you.
I do this because Steam’s spoiler tag on images is super ugly and doesn’t permanently reveal when you mouse over, making the use of images as references a chore.
Note: Books are not counted as “number of puzzles” below. Only environmental puzzles and non-inventory objects are counted. Book clues are listed separately later on.

Number of Puzzles: 1
Location Hint: Containers
Solution Hint 1: Directions to follow
Solution Hint 2: Start Top-Left
Number of Puzzles: 2
Location Hint: Ground
Solution Hint 1: Follow the path
Solution Hint 2: 1 puzzle with 2 solutions
Number of Puzzles: 1
Location Hint: Ground
Solution Hint 1: Follow the path
Solution Hint 2: Combine with Room 4
Number of Puzzles: 1
Location Hint: Ground
Solution Hint 1: Follow the path
Solution Hint 2: Combine with Room 3
Number of Puzzles: 2
Location Hint: Ground
Solution Hint 1: Follow the path
Solution Hint 2: Height
Number of Puzzles: 1
Location Hint: Escape
Solution Hint: Hex Codes
Number of Puzzles: 1
Location Hint: Wall
Solution Hint 1: Follow the path
Solution Hint 2: Tools
Number of Puzzles: 1
Location Hint: Ground
Solution Hint: Follow the path
Number of Puzzles: 2
Location Hint: Walls
Solution Hint 1: Binary
Solution Hint 2: Mirrored
Number of Puzzles: 1
Location Hint: Machine
Solution Hint: Follow the order

Number of Puzzles: 1
Location Hint: Machine
Solution Hint: Follow the path
Number of Puzzles: 1
Location Hint: Furniture
Solution Hint 1: Cards
Solution Hint 2: Binary
Number of Puzzles: 1
Location Hint: Storage
Solution Hint 1: Left to right
Solution Hint 2: Number of Cans
Number of Puzzles: 1
Location Hint: Nice view
Solution Hint: Follow the path
Number of Puzzles: 1
Location Hint: Machines
Solution Hint 1: Left to right
Solution Hint 2: Morse Code
Non-environmental Object: 1
Location Hint: Furniture
Solution Hint: Follow the order
Number of Puzzles: 1
Location Hint: Floor
Solution Hint: Follow the path
Non-environmental Object: 1
Location Hint: Furniture
Solution Hint 1: Follow the path
Solution Hint 2:
Number of Puzzles: 1
Location Hint: Wall
Solution Hint: Follow the path
Number of Puzzles: 1
Location Hint: Wall
Solution Hint 1: Binary
Solution Hint 2: Fan Speed
Number of Puzzles: 1
Location Hint: Walls
Solution Hint: Its complicated!

Number of Puzzles: 1
Location Hint: Center of room
Solution Hint 1: Lights
Solution Hint 2: Height
Number of Puzzles: 1
Location Hint: Machine
Solution Hint 1: Left to right
Solution Hint 2: Arrows
Number of Puzzles: 0
Location Hint: n/a
Solution Hint: n/a
Non-environmental Object: 1
Location Hint: Furniture
Solution Hint 1: Follow the order
Solution Hint 2: Pointing
Number of Puzzles: 1
Location Hint: Floor
Solution Hint 1: Bottom to top
Solution Hint 2: Hex code
Number of Puzzles: 0
Location Hint: n/a
Solution Hint: n/a
Non-environmental Object: 1
Location Hint: Furniture
Solution Hint: It’s really complicated!
Number of Puzzles: 1
Location Hint: Furniture
Solution Hint 1: Robot
Solution Hint 2: Moving
Number of Puzzles: 1
Location Hint: Machine
Solution Hint 1: Follow the path
Solution Hint 2: Moving
Number of Puzzles: 1
Location Hint: Netting
Solution Hint 1: Follow the path
Solution Hint 2: Dots
Number of Puzzles: 1
Location Hint: Various locations
Solution Hint 1: Spine
Solution Hint 2: Lines
Solution Hint 3: Hex code
Check out individual terminals.
Check out the terminal in room 5.
Check out the terminal in the room next to room 3/4.
Terminal hex code order: [link]
This blank space is to move the images further down the page to avoid spoilers.
Floor 1 Images


Floor 2 Images

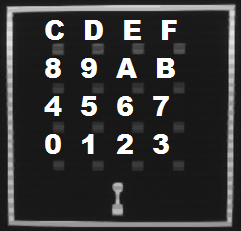
WIP, Arcade machine, moving


Floor 3 Images


WIP, video screen, moving
(C is on bottom of container)


WIP, video screen, moving

Other Objects and Books
Found next to one of the terminals
Found in the room next to room 3/4 on the map

Found in various rooms.


