Overview
This guide will provide you with the basic info needed to create a survival (NMS) type map using hammer
Before you begin
I’m sure you are wanting to jump straight into Hammer and start making maps but first there are certain things you need to learn before doing that. This guide is not going to serve as a walkthrough for first time Hammer users, it is expected that you know at least the basics of Hammer and the Source engine before you begin this guide.
If you are completely new to mapping for Source please see TopHATTwaffles excellent tutorial series[www.tophattwaffle.com]. His videos are made in CSGO’s Hammer BUT the same rules and techniques for mapping apply to NMRiH and all Source engine games. At the very least watch videos 1 through 8, 14, 21, 23, and 24 in his v2 series (the ones at the top).
In addition to the written version of this guide we have a video version as well.
If you are wanting to follow along, please download the starting version of the example map here[drive.google.com].
A finished version is also provided if you want to see what a working map looks like, you can download it here[drive.google.com].
Player Spawns
Player spawns in NMRiH are done using the info_player_nmrih entity which resembles Gordon Freeman if he were fighting the Combine in cyberspace in a bad 90’s movie.
Each player spawn MUST be 32 units away from all brushes and models to make sure it does not spawn the player into something causing them to get stuck. This includes the floor, meaning if you place the entity directly on the ground it will not work. It must be floating 32 units above the ground. In addition each info_player_nmrih entity should be around 64 units away from another info_player_nmrih entity.
At a minimum you need 8 info_player_nmrih entities but you can have more. The more you have the more variety in spawn locations you get.
Zombie Spawns
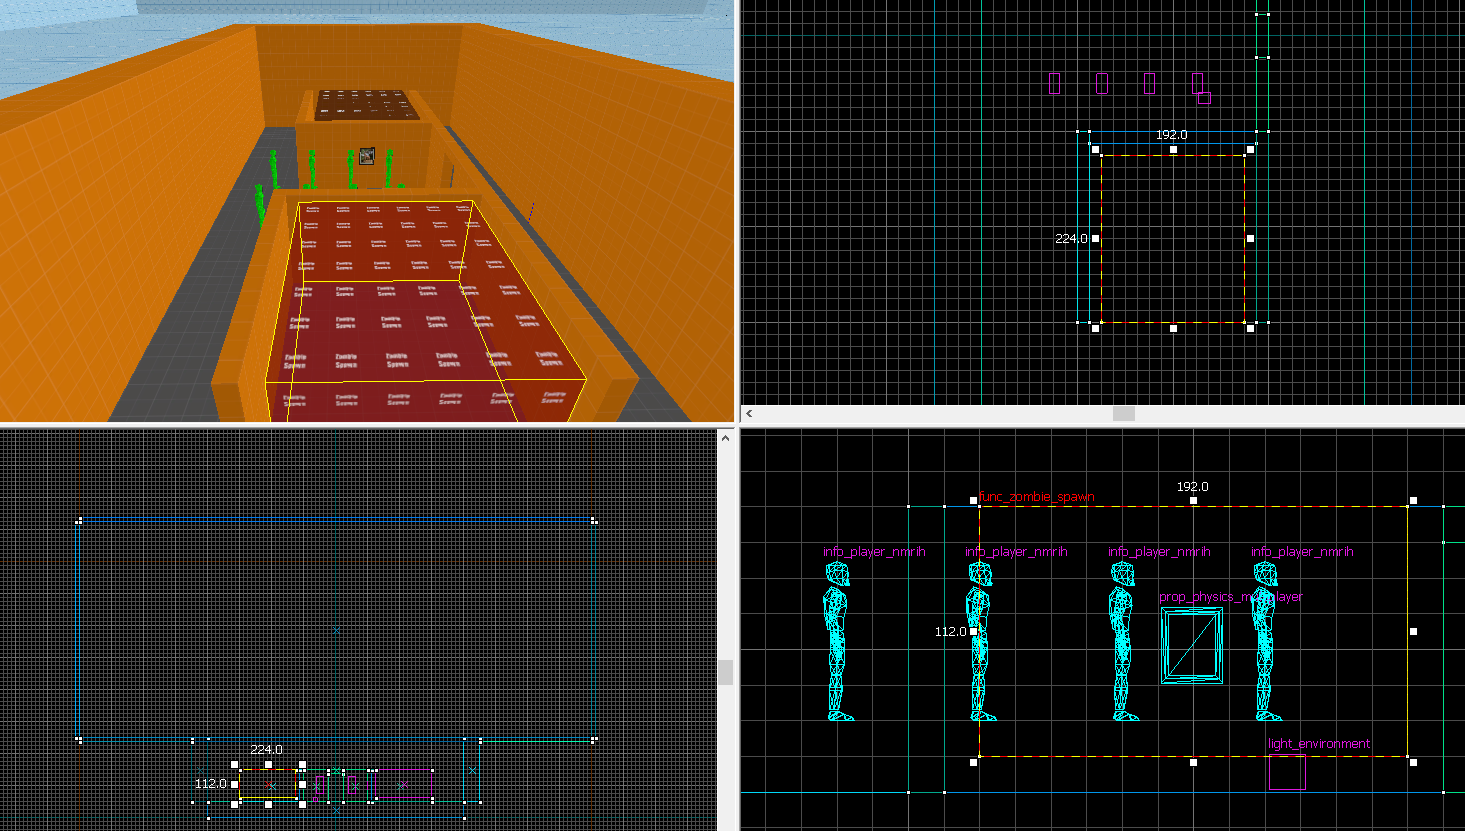
In the example map we will be using the two side rooms as zombie spawns. To start, open the texture browser and filter using the word zombie then select the “tools/zombie_spawn” texture.

Using the zombie_spawn texture, create a brush in one of the two rooms that almost completely fills it, but leave a 16 unit gap on all sides. You should end up with a brush that is 224x192x112. Press Ctrl+T and set the brush to be the entity func_zombie_spawn. Copy this brush entity to the other side or repeat the process.
Select the entity tool and place an overlord_zombie_helper entity somewhere in the map. Every map, no matter what game mode, needs at least one of these.
For the survival gamemode you also need an overlord_wave_controller. This is the entity that allows you to control the wave mechanics for your map. Click on each value to learn what it does, as of right now “NG Freq” does not work. Pay special attention to “Custom Win Scenario”, if this is set to No then when the last wave ends players will win right away, if set to Yes then the game will wait until players extract using a func_nmrih_extractionzone.
Safe Zones
Safe zones are the control points that survivors must defend against the zombies. Each map must have at least one and can not have more than six.
Unlike the zombie spawn zones, safe zones can touch the ground and do not have to have any gap if you do not want to.
To create a safe zone select the “tools/trigger” texture from the material browser and create a brush that will act as the zone then turn it into an entity using Ctrl+T and change it to func_safe_zone.
The lettering of the zones is dependent on the order in which they were created in hammer so if you want a certain zone to be a specific letter take that into account.
Resupply Helicopter
The resupply helicopter system is composed of three important parts.
- The entry and exit locations for the helicopter (chopper_entryexit_point)
- The 3D Nav brush so it knows how to navigate the skies (nav_area_3d)
- The location where it should drop the supplies (wave_resupply_point)
To begin, select the trigger texture from the texture browser. Now create a brush that is flush with the ground (don’t worry too much about the size for now) and set it to nav_area_3d (CTRL+T). The nav_area_3d brush entity needs to be at least 770 units above the ground where it will be dropping the supplies select the brush and press CTRL+M, this will open the transformation window. Set Z to 770 and set mode to move then press okay.
Now resize the brush so that it is at least 300 units tall and fills the region of the sky you want it flying around in (which should be the entire sky for this example map).

Next using the entity tool place several chopper_entryexit_point entities inside of the nav_area_3d where you would like the helicopter to spawn and despawn at. During gameplay the game will randomly choose one of these to be the spawn point and one to be the despawn point.
Finally, place wave_resupply_point entities on the ground where you would like the helicopter to drop the supplies at.
Health Station and Fema Bags
To make a health station, begin by going to the texture browser and search for “sp_healthcrate_decal01” (or by searching for the word health). Now use the overlay tool and place it where you plan for your health crate to go. We use the overlay tool instead of the decal tool so that we can rotate the texture if need be. Keep in mind that you do not want to place in a high foot traffic area or where a player spawns as a medical crate will be going there at some point.
Use the entity tool and place a nmrih_health_station_location where you want the players to bring the medical crates to. If you align the nmrih_health_station_location’s origin in the X and Y axis it will be perfectly aligned.

Finally use the entity tool to place a nmrih_health_station where you would like it to spawn at the beginning of the map.
Remember once a nmrih_health_station is used up, players can’t bring another one to that location. You do not need to have a 1:1 ratio of health stations and locations, mix it up try having more locations than actual health stations so players have to decide where they want them to be at!
Nothing special required outside of placing nmrih_safezone_supply where you want it and changing how many uses you want it to have before it is no longer usable.
Where to go from here
You now have a basic working survival map! From here you should go look at our other tutorials that cover essentials you need to know such as placing weapons, setting up barricade positions, and how to create a navmesh.
[link]Survival Map Checklist
The following is a checklist to help you make sure you have everything you need (optional things are excluded) for your map to properly work.
- Its name starts with nms_
- It contains at least one func_safe_zone
- It contains at least 8 info_player_nmrih entities with 32 units of free space around them and should be 64 units away from each other
- It contains an overlord_zombie_helper
- It contains an overlord_wave_controller
- It contains func_zombie_spawn brush entities that are off the ground (non touching) and 13 units away from the walls
- It contains a nav_area_3d brush entity that is 770 units off the ground at least and inside of it are at least one chopper_entyexit_point and some where under the nav_area_3d brush on the ground is at least one wave_resupply_point
- It has a working navmesh