Overview
Would you like to have an active time system in your game, complete with day & night cycle, weather system, & seasonal changes? In this guide I’ll show you step by step how to create the system I use for my own projects to do just that.
Introduction:
If you’re new to RPG Maker, you might think the same fixed unchanging maps you see everywhere are what your project needs to look like, unless you have some tight scripting skills, or find plugins made by other people.
In this guide I am going to show you how to make your basic maps come alive, with a fully integrated world, complete with day & night cycles, weather mechanics, & seasonal changes. All without plugins, scripts, or anything else.
Requirements & Recommendations:
Requirements:
Plugins: None.
DLCs: None.
Scripts: None.
Additional Programs: None.
Nothing I am going to show you how to do here is going to require plugins, scriptings, DLCs, or additional programs. Everything I am going to be showing you here, is basic eventing.
Recommendations:
DLCs: Art style dependent, for potential seasonal variation.
I am not going to tell you what to use, there is enough variety out there, that multiple options exist for you. Depending upon your desired aesthetics for your game. However, if you want to make fully functioning seasons for your world, it would be a good idea to expand beyond what the default assets provide.
I am not saying you can’t make it work without them, only that you’ll have an easier time creating those seasons, if you have more assets to work with.
Additional Programs: Gimp, free to use, & will accomplish anything I might suggest to you here in this guide.
Getting Started:
To begin with, we’re going to create a set of variables & switches, that are going to control our world’s time, weather, & seasons. Understand you can name these however you like, I am simply going to use the terms I use in my own project, so that when I post examples of my own events, you’ll understand better.
For variables first create the following:
1) Region.
2) Weather.
3) Minute.
4) Hour.
5) Day.
6) Month.
7) Year.
& for switches create the following:
1) Pre-Dawn.
2) Dawn.
3) Day.
4) Dusk.
5) Twilight.
6) Night.
7) Spring.
8) Summer.
9) Fall.
10) Winter.
11) Time Start.
To clarify, you can have more or less switches than what I’ve included here, depending upon your desired level of complexity for the system. For example, 7-10 are unnecessary if your decide to forego seasons. On the other hand you can dramatically increase the number of hour based switches, i.e 1-6; to make the passage of time feel more active if you prefer.
I am using these as a baseline, so that you can see what I’ve done & then adjust accordingly to personal taste. But in the end this will be your game, & you need to decide how to best make your game come to life.
Indoors or Outdoors:
Now first & foremost we need to separate indoors versus outdoors.
Obviously we don’t want it raining inside the tavern, or the sun rising & setting in a crypt. So before we add all of our changes to those exteriors, we need a mechanism for ensuring they aren’t applied unnecessarily.
This is one of the primary uses of our “Region” variable. Both our time & weather system are going to be dependent upon having at least two “Region” values, an indoor & an outdoor value. Though additional variety may be implemented later, depending upon your desired level of system complexity.
The first thing I want you to do is create an event, in the upper left hand corner of one of your maps; dungeons, interiors, exteriors, world maps, doesn’t matter what kind it is.

The reason why I want you to do this are many, but lets go over some of them now.
1) So that these type of event controls are always in the same place, on all of your maps.
2) If you are making connected Zelda like field or dungeon maps, they still won’t be in the way, because you would have to touch the transfer event to the right or below it first.
3) But most importantly because I said so, & I am always right, ask anyone.
Now that you’ve placed the event, set the the trigger to parallel, set the priority to below the character, don’t assign an asset to the image file, leave the movement route fixed, & you don’t need stepping or walking animations either. This is only here to apply situational dependent controls we’re going to establish in our database common events.

Once you’ve created the event, open up the contents & you’ll want the first page, in a section labeled “Game Progression” titled “Control Variables”.

Now depending upon your region variety, for example I use a total of seven, for varying altitudes weather control, here is where you’ll place your region ID, via setting the “Region” variable to a specific amount.
For now, we’ll stick with two, 0 = indoors & 1 = outdoors. So if you’re in a building interior or dungeon set the variable you’ve selected for region to “0”, anywhere outside exposed to elements & where you could see the sun or moon set the variable you’ve selected to “1”.

Then simply copy & paste that event, to all maps that will share that “Region” value, i.e. if it’s an indoor map, copy & paste it to the same location to all indoor maps. Then create the same thing in one of your outdoor maps, rinse & repeat.
So, now that all of your maps, have their respective “Region” vaules. It’s time to explain to the game exactly what those values mean.
What time is it?
Time for a time system, yes?
Have you identified all of the switches & variables I’ve asked you to yet? If not do so now, then come back. You won’t be able to do what’s next without them. Perhaps you’re wondering, okay I have all of these variables, but how does that give me a time system.
Answer, by explaining to your game exactly what those variables mean, & giving it an understanding of how those values work in concert, like so.

First create a “Time” common event in your database’s common events. Set it to parallel, & then have it active when the switch “Time Start” is on. This switch should be turned on in the beginning of your game, when you player first takes control of the character. Simply integrate into whatever, opening text crawl, cutscene, or whatever you are using for your intro.
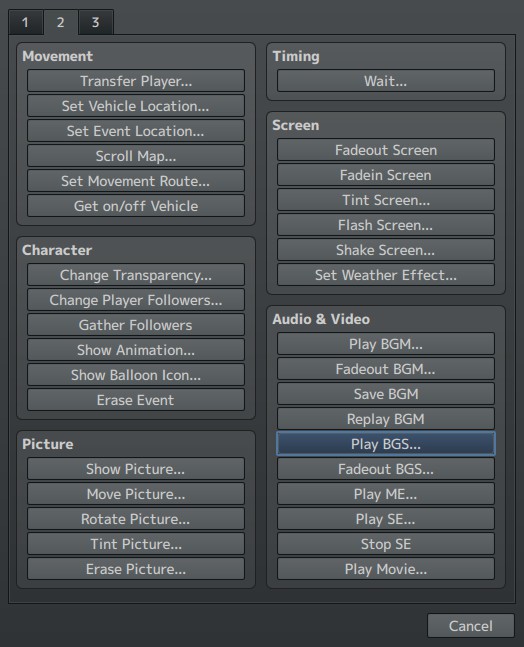
Next we need to anchor our internal “world time” to an actual measurement the game can understand. To do that open up the contents of that common event, then go to the second page of available options, & find “wait”.

Click on it,

Note the ratio. Sixty frames equals one second. Now most games operate on a compressed time scale, i.e. an hour in game is far from it in real time, & we’ll do the same here. So let’s set the wait time to 300, & then use the “control variable” option again, & alter the variable “Minute” by adding “1” to that variable. & because we’ve set it to a parallel it will continue to cycle.
So every 300 frames or five seconds, will increase our minute count by. Now we need to set our hours, so we’ll need to explain to game how “hours” relate to “minutes”. So open up the first page of contents again, & this time click on “conditional branch”.

Click on it,

Now we need to set the properties of the conditional branch, so that we can start increasing our hours as well. So when the minutes are equal to or greater than “60”, we’ll use the Control Variables function to both revert “Minutes” back to “0”, & to add “1” to the hours. The same way we did with waiting 300 frames then adding “1” to minutes.
If you look at this first screenshot in this section I am sure you can see what comes next. Choose your desired revert to zero point for each of the variables, set up your conditional branches, & combine that revert with an addition of “1” to the next variable. I.e. 24 hours gives us 1 day, 28 days 1 month, 13 months 1 year.
Remember though you aren’t required to use these numbers, you can have a Sci-fi world with 36 hour days or 8 hour days, months that are 10 days or 100 days long. These are just intended as template for you to see how I did it in my own project. Nothing more.
Dusk til Dawn & even Twilight:
Once you’ve completed setting up the cycles of all your time variables, minutes, hours, days, months, etcetera; it’s time to link our day & night cycles.
If you haven’t set up all of the switches I listed previously, do so now, as you’re going to need most of them for this section.
Now it’s time to add our day & night time cycles to the “Time” common event, via screen tinting. Scroll down in the content of the “Time” common event, until you find open space not linked to our previously created conditional branches, open up the contents, & on the second page find the “tint screen” option.

Click on it,

As you can see the program comes with various preset levels, as well as the option to create custom tinting. So what we need to do is decide how many color shifts we are going to have in a given day; & as you might have surmised from the switchesI had you create, we’re going to go with six here for the purpose of this guide.
Though as always, you can modify what we’re doing here to suit your own project. Place as few as two shifts, or as many as one for every hour in the day, it’s all up to you. However, you should ensure that you don’t leave “Wait until completion” checked, so that your player can continue to move around, as the light transitions.
Then we’ll need to create six conditional branches, each based on a different “hour” value that we will assign our intended shift to. Via controlling switches we’ve labeled “Pre-Dawn”, “Dawn”, “Day”, “Dusk”, “Twilight” & “Night”. So that when each “hour” variable amount linked to the conditional branches is reached, each of the previous switches will be turned off, & the subsequent switch will be turned on, like so.

Once you’ve set up your “hour” triggers, you’ll need to set up layered conditional branches. The first layer of conditional branches are defined by “Region” variable amounts, & the second layer will be based on which trigger is on, like so.

You’ll need a conditional branch layer that has no active effects applied to it, see “Region 0”, of the above screenshot, for all interior & dungeon maps. As well as a conditional branch layer for each identified “Region” variable type for all of your exterior maps.
Once you’ve laid out your “Region” variable conditionals, & their respective trigger secondary layers, go back to the “Tint Screen” option, & apply your desired tinting to each of your switches you’ve created. Again see the above screenshot for examples.
Weather Forecast:
Now that we’ve established our day & night cycle, as well as the time system. It’s time to create our second common event in the database. Namely our weather system. Like the time system common event we’ve already created, set the trigger to parallel, have the event activate when the switch “Game Start” is on. Now we need to fill out the content
First, much like how we created the day & night cycle, we will use layered conditional branches, for our weather system. With the first layer being separated by “Region” values, & with the second layer being separated by “Weather” variable values. Like so,

Second, we must determine the level of variety we want to have in our weather system, for any given region, based on the “Weather” variable values. Personally, I recommend a one thru ten level system, based on an RNG mechanic.
Perhaps you’re wondering what that means, simply put, we’re going to allow the system to assign a value to the “Weather” variable, between “1” & “10”. Like so,

However, the question we need to determine, is how are we going to apply this RNG mechanic. Obviously we want this weather system to be actively changing, to make our world feel dynamic; yet we also don’t want it changing so quickly as to appear nonsensical, or to cause glitches.
The solution, integrate the “weather” value RNG mechanic into the time system. Specifically, have cycle “hourly” as it were, via attaching it to when the “Minutes” revert to 0, & the “Hours” gain 1, “Weather” will be set somewhere between 1 thru 10. Like so,
Then assign different weather effects to those variable values. Again see the first screenshot in this section for reference.
Once we’ve set up our “Region” value conditional branch layer, & our “Weather” values conditional branch layer, it’s time to explain to the game what those values actually mean. Open up the contents below each conditional branch & go to the second page to the option “Set Weather Effect”.

Click on it,

Now, you need to decide which weather effects if any, you are going to assign to each “Weather” value. Understand for this section there truly isn’t a “wrong” answer. It’s a question of how you want the weather to operate in that region.
However, I do have some recommendations. First, vary the intensity level of the weather effect from value to value, this gives the weather effect more of an at random feel to it. Second, use BGS to accompany those weather effects, to provide a greater realism to your weather effects. Third, if you do integrate BGS with your weather effects, vary the BGS used, just like the weather effect intensity. Fourth, set the frames to 999 to make the weather effect last until the next “hourly” cycle.
Additionally there are two things that you must do. First, uncheck “Wait till Completion”, you want these weather effects running as background, not preventing your player from moving. Second, any “Weather” value that isn’t going to have an active weather effect, add the set weather effect to that value, but set the “type” to “none”. This includes your “Region 0” control conditional branch, that you use for interior & dungeon maps. Third, if you use BGS, to provide audio for your weather effects, on “Weather” values that don’t have active weather effects, set your play BGS to “none”, including in your “Region 0” control conditional branch that you use for interior & dungeon maps.

If you don’t do both of these things, your weather effects & BGS will continue even when the “Weather” values that you are intending to have no active weather effects on, are activated by the RNG mechanic we’ve already created. Which, will leave you with rather interesting scenarios like, indoor blizzards & subterranean thunderstorms.
Tis the Season:
Now we come to the simplest to create, but the most difficult to implement portion of our guide.
If you’ve created everything we’ve gone over in this guide up to this point, you have almost everything set up for your seasonal shifts. Which may cause you to ask, so why is this next part the hardest?
The answer is simply that this portion potentially relies heavily upon DLC or your own created assets. Because depending upon the level of visual variety you wish to have, you’ll need at least four different color schemes of your default exterior assets. Because while you can create different seasons with the defualt assets, you aren’t going to have many options unless you purchase, acquire, or create more parts for you to work with.
Now I am not going to go into how to create these items here, as a single section of this guide wouldn’t do it justice. A topic like that warrants multiple guides, depending upon what you are trying to do. However, I’ll point you to a thread to help you get started with some ideas of what tools you can use, if you decide to try your hand at creating your desired assets. If that doesn’t interest you, I recommend giving the DLCs a look through here on Steam, as well as the resource threads on the official site forums.
Potential Options for Creating your Seasonal Assets
RPG Maker Official Site Resource Forums[forums.rpgmakerweb.com]
On to making our seasons.
First, we need to anchor our seasons to the time system we’ve already created, & to do that we need the switches “Spring”, “Summer”, “Fall”, & “Winter”. If you haven’t created them already, do so now.
Have you guessed what we’re going to do yet?
We’re going to add another component to our time system, & tie in those switches you’ve created to specific months, just like how our day & night cycle is tied into specific hours. Like so,

Second, we’re going to give those switches meaning. How you ask? Do you remember those little event boxes in the upper left hand corner of your maps I had you create?
We’re going to use them. Specifically, we’re going to use an already active parallel event, & add another layer to it. Namely a conditional branch that checks to see which of our seasonal switches is on, & selects our tileset for us. Like so,


Now perhaps, you’re asking but what happens if I am on a map, when the seasons change, isn’t that going to look weird? Yes, yes it quite frankly will look weird, & if you wish to avoid I can provide you with a solution, but that solution will include more work for you.
Specifically, instead of using the “change tileset” option, you’re going to have to use your different seasonal tilesets, to create four different maps. Now understand, I am not telling you to draw all four of them, I am telling you to create one, make three copies, & then change the tilesets they are drawn with.
& then at your transfer points between maps, create four conditional branches each dependent upon a specific seasonal switch being on, that will transfer you to the respective seasonal map. Then you won’t have to worry about the immersion breaking map swap, while on the map.
However, that’s going to increase your workload by a rather large amount. So, I’ll leave it to you to decide which option you wish to use.
Summation:
If you’ve completed all of the steps I’ve listed off, your game should now have a working time, day & night cycle, weather generator, & seasonal shifts system.
Understand though this system can be built upon by you, into areas that aren’t related to just time & the weather. NPC dialogues, shops opening & closing, what enemies are present on a map, all of these things & more can be tied into the variables & switches you’ve already created for these systems.
So don’t be afraid to take advantage of them.
Furthermore, as I’ve stated before don’t feel obligated to follow the template I’ve laid out here, you can scale it back, or deepen its complexity levels, to whatever you desire. The purpose of this guide isn’t to get you to build things my way, but to show you how I build things my way, so that you can build your own as you like.
Finally, remember that all of these switches start in the off position, & all of the variables start at zero. So remember to turn on the “Game Start” switch, & perhaps set the “time” as it were, to when you want your player to start their journey.