
Overview
UBoat Version: B127 Preview 1 (at time of writing)This guide will help you to understand the basics of crew management system. Prioritize tasks, plan shift schedules and compose squads in order to automate routine work on board in an effective way and reduce manual micro management. Want more UBoat info – Visit the Fandom Wiki[uboat.fandom.com] page.
Basics
It is wise to prepare the crew before leaving the port for patrol in terms of recruiting, combining squads, prioritize tasks and prepare shift plans. Although it is optional it will help to automate most of routine work during the patrol and to establish efficient rotation with a minimum of your personal intervention.
Accessing crew management menu

Crew Tab: Officers, Sailors, Classes and Roles.
At first lets take a look at the crew tab.
Crew tab
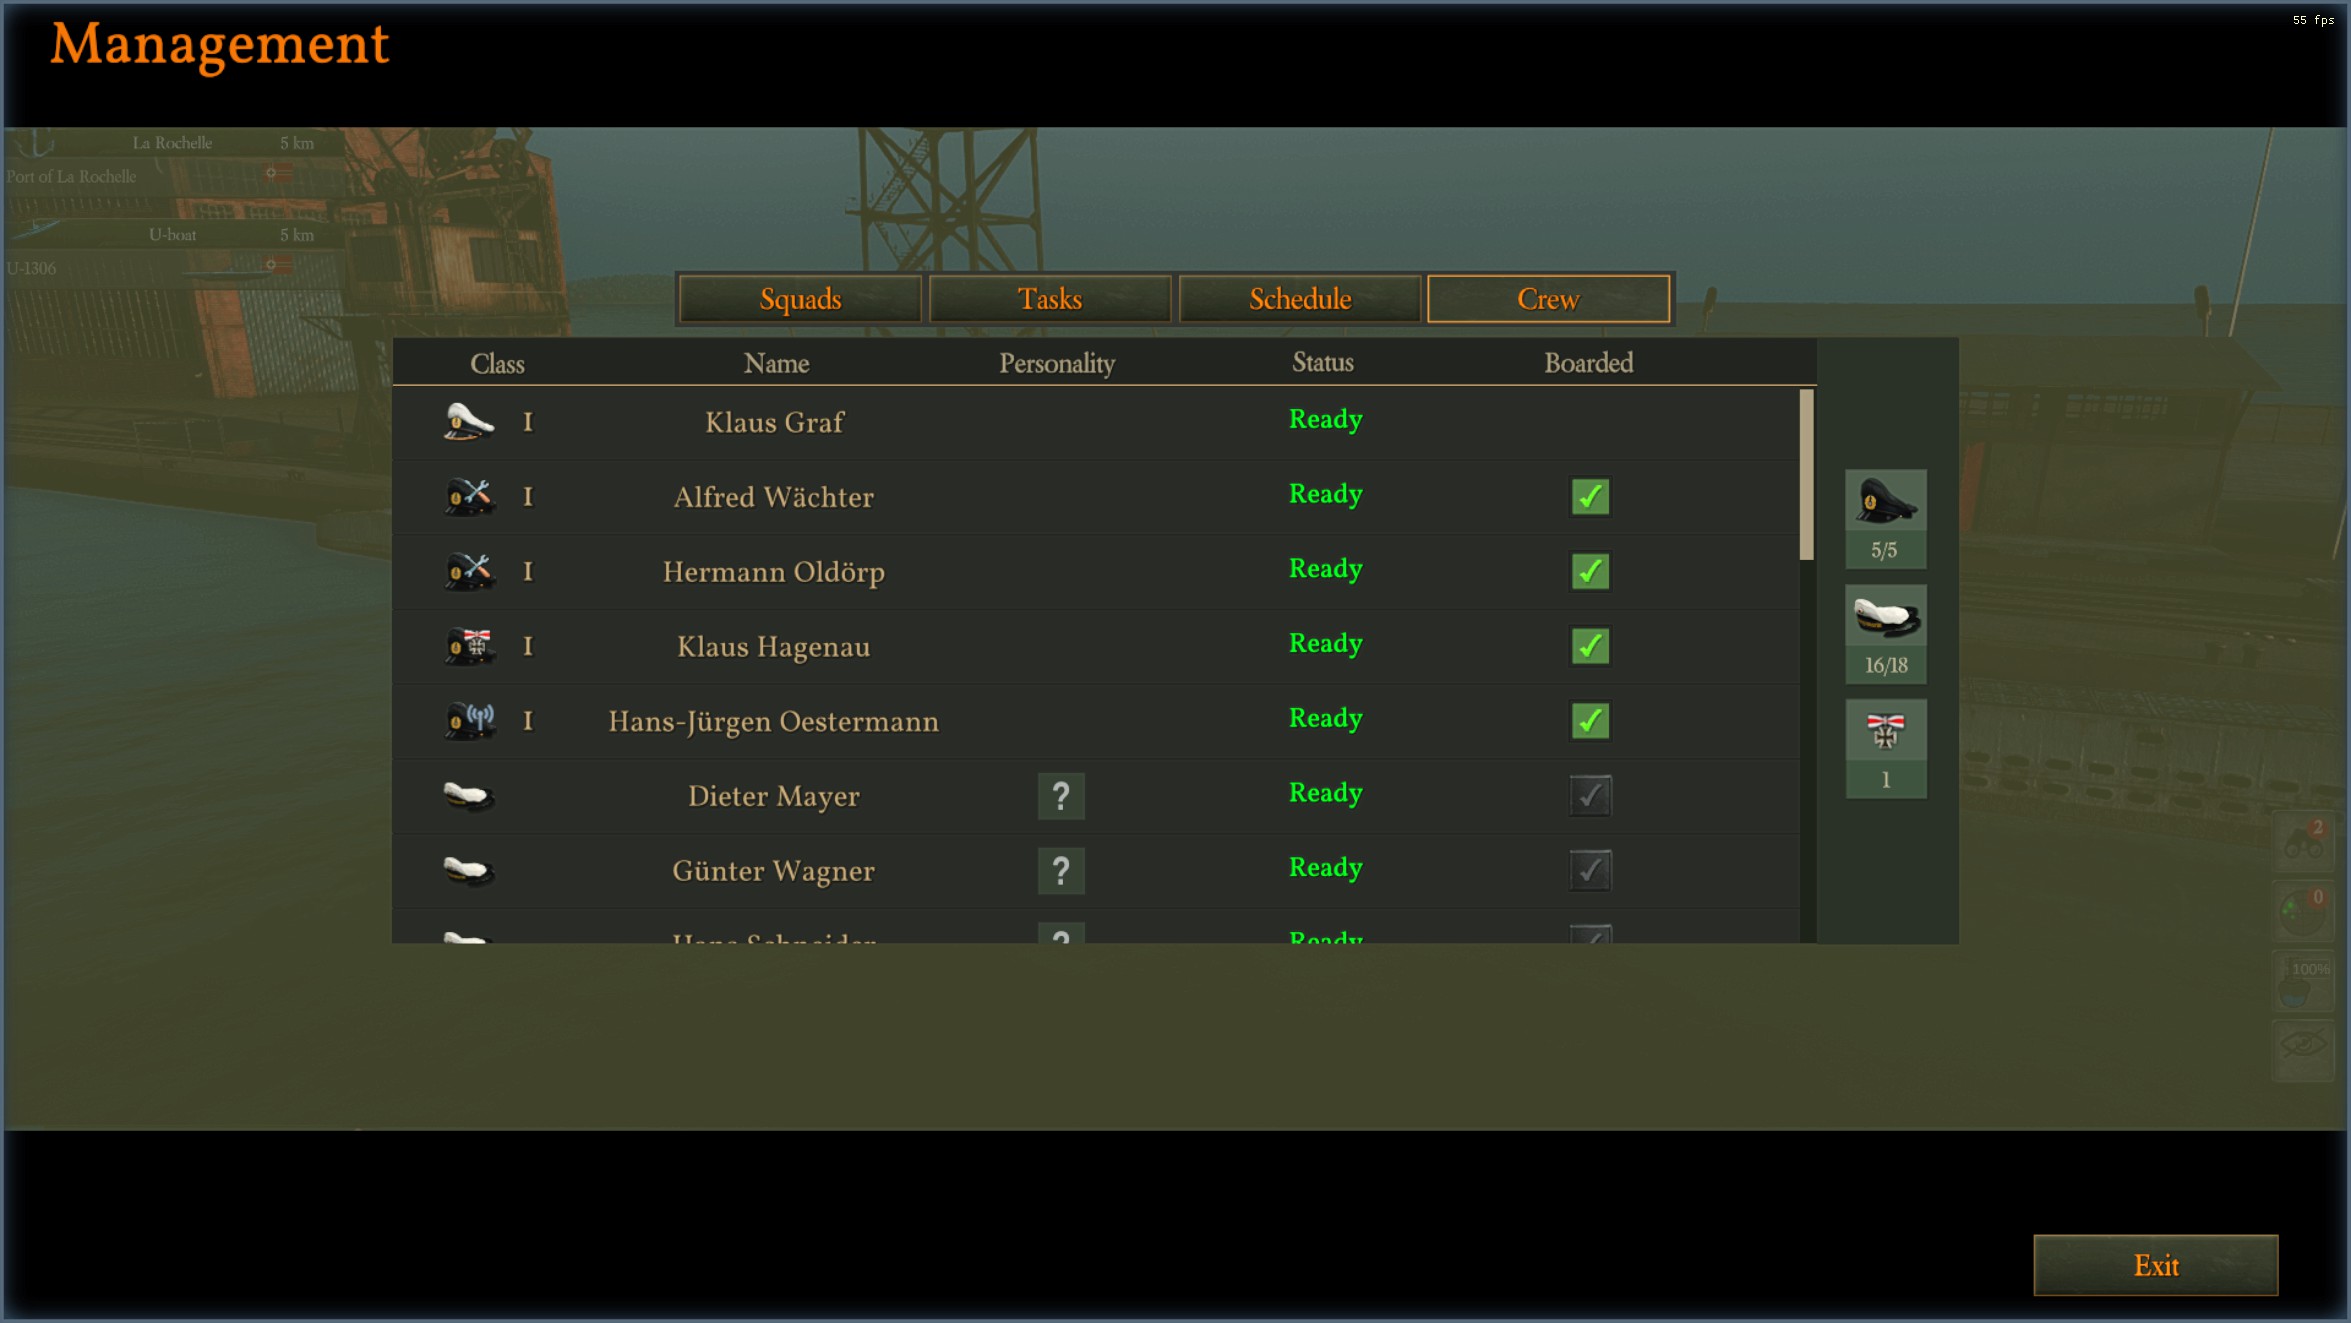
Here you can see a listing of all boarded and available officers and sailors. On the right hand side the total and maximum amount of boarded crew. When starting a new career you can board up to 5 officers and 18 sailors while only 16 sailors are actually boarded.
Total amount of boarded officers can be upgraded up to 7 later in the game at the Loading Officer for renown points.
Clicking on each of the listed crew members allows you to customize and permanently disband them. Sailors can be promoted to officers for renown points which you get for successful patrols.
Officers cannot be promoted further, but you can change their role and develop their skills. Each officer will gain experience on patrols by participating in successful sinking.
Crew member customization view.

Whenever your crew sinks an enemy ship or downs enemy aircraft, each of the officers who were involved in it is gaining experience and eventually levelling up getting “skill points” which you can invest in developing their skills. Skills become revealed when they level up. Each class of officers has a different skill tree.
There are three different officer classes.
- Leaders: can operate almost at any station, but their main role is navigation, watching for targets and threats, preparing firing solutions and performing attacks. They can however also operate at sensors stations, command the deck-gun and the flak crew. They cannot do engineers tasks though.
- Engineers: are responsible for operating the engines, loading and preparing torpedoes and provide damage control. They are the only class who can fix equipment and stop leaks. They can however operate at sensors stations too. Also they are important at land jobs doing research on new equipment and ordnance.
- Radioman: are responsible for operating at sensors where they excel. They make up the best hydrophone, radar warning device and radio operators. Also they make good doctors providing medical aid to injured or sick crew members. They cannot do engineers or leader tasks.
Each of the officer class can be assigned to certain roles. At this point ill just shortly explain what the roles are about, we will take a deeper look into them when dealing with task priorities.
- Leaders can be assigned as Watch Officers and Chief Boatswains.
- Engineers can be assigned as Chief Engineers and Mechanics.
- Radiomen can be assigned as Radio Officers and Technician Officers.
All of them can be assigned as Quartermasters, Medics and Gunners or be Unassigned at all, which is OK, it doesn’t mean they won’t do anything.
Assigning a role doesn’t have a huge effect, it just changes the prioritization of their tasks. So basically according to their role they will do certain tasks at higher priority then the others. In example Chief Engineer will prioritize operating at engines over loading torpedoes, while the mechanic will prioritize torpedoes over engines.
However you can override task prioritization for each of your officers and set them up to your favor regardless of their role. A role just provides you a quick set of task priorities. I will explain how you can customize Task priorities plan for each of the officers individually later in this guide.
Sailors are special class crew members. Unlike officers they are not specialized and doing all kinds of simple jobs on their own (they have their own priority list). But they also do certain important tasks such as operating the rudders and diving planes. Also they are holding watch when no any officer is available on the bridge and manage the engines when no officer is available for that. Without officer at station they are very limited though. They can also form squads to support officers at stations improving their efficiency. They cannot get exhausted (!) or gain experience and level up. However they can be promoted to officers for 1 renown point each.
In the personality column in the beginning of your career you see for each of the sailors just question marks, indicating that their personality has not yet been revealed. During a patrol you will sooner or later come into situations when their morale breaks down revealing the “true nature” of each of them. Every time when the crew morale breaks down (in example when being bombed by escorts), one of the sailors will react on that. Some will start crying and needs to be calmed down (or beaten up, or even executed its up to you), some will prove themselves as true “sea-wolves” resisting the panic. Once they have experienced extreme fear the personality of each of them will become revealed. You can see then in the crew tab who is a “coward” and who is a true “sea-wolf”.
The thing is that each of the sailors will react to fear always according to his personality. So a coward will always start crying, while sea-wolves will always resist the panic.
Officer Tasks
Next lets look at the officer task plan.

The task plan is like a spread sheet of priorities with a line for each of your officers and a column for each of the tasks. Tasks are basically jobs (continuous) or actions (finite). The numbers in cells is the priority for each of the tasks for each of the officers. The higher the number the higher it is prioritized, meaning that higher prioritized tasks the officers will do first (if they can), before doing the ones with lower priority number. At the beginning there are already some numbers set, according to the assigned role of each officer. You can change the roles here too and therefore change presets of priorities for particular officer. You can also change the priority for each of the tasks to your favor for each officer using the mouse wheel when hovering over the cells, or by clicking on the cells and typing the desired priority number.
There are 17 officer tasks in total in current game version (B127). These are:
- Use Flak Gun
- Use Deck Gun
- Calm Down
- Observation
- Navigation
- Playing Cards
- Resupply Ammunition
- Repair
- Managing Engines
- Loading Torpedoes
- Warming Up Torpedoes
- Salvaging Replacement Parts
- Listening
- Listening on Radio
- First Aid
- Cook
- Rest
Be aware that giving direct explicit orders to an officer overrules any of his planned tasks. Meaning that if you give a direct order using the TAB Menu, that officer will continue doing the direct ordered task until he is finished with it (like loading torpedo) or exhausted or until you manually cancel direct command. When manually directly ordered to do something you must make sure to cancel the order when it is an endless task (like observation or listening or operating the deck gun or managing engines) if you want the officer to return to its routine tasks. Remember that officers will only pick up tasks from the task priority list when they have no any direct order.
When an officer is doing a direct order ignoring its task priority list, its indicated as:
- Thin orange outline around the task next to his portrait.
- Solid green background behind its task officer focus view in the bottom left corner when having an officer selected. When he is following his task plan the background is dashed.
- Little white arrow on top of his task in officer focus view.
You can cancel direct orders by right-clicking on the task itself in officer focus view in the bottom left corner of the screen, when having that officer selected, as shown on the next screenshot.

Now how do you know what makes sense here and how to tune the tasks priority plan to make it more efficient? I can only share some advise from my own experience. Some other players may disagree and have “better” ideas, everyone has its own style after all.
Some of the tasks can be completely disabled or set to very low priority. They are not all important. Playing Cards is something you certainly don’t want to see on the plan and do on routine basis every day. You can direct order to play cards anytime when you actually need it, it helps restoring morale between battles.
Same is with cooking by officers. Usually the dishes are cooked by one of the mates automatically, you don’t have to set a task for an officer on it. When an officer is cooking it just gives you some morale boost, just like with playing cards.
Sleeping is ranked highest by default (11). Which is fine. Note that this will not be applied when an officer is scheduled on duty. But only in the “grey” time frame where they are allowed to go to sleep when there is nothing else to do.
Important tasks that should be ranked high too are Calm Down, Navigation, Observation, Repair, Medical Aid, Managing Engines and Loading Torpedoes.
There are some tasks which are critical and needs to be ranked higher then sleeping. These are: Calm Down (Leaders), Repair (Engineers) and First Aid (Radiomen). That means if they are on duty and there are leaks, damage or anybody requires medical attention, they will take care of this first.
I prefer to rank navigation over observation. The point is that observation is an endless task while navigation is an action that is finished when precision certainty reaches 100% (done). Meaning if the leader picks up observation first, he will never finish with it and will never start doing navigation. This can result in being lost in the middle of the ocean leaving you without a clue where you are. It can take hours to restore your position when it happens. Also leaders are smart and will not do navigation when they are anyway to 75% or better certain about their position, instead they will go to observation right away when they “good enough” know where they are.
I prefer Loading Torpedoes over Warming Torpedoes. To be honest i have disabled warming completely. Even though it is not an endless task, but it becomes endless because when engineer is finished warming the last torpedo, the first one is already cooled down, and he starts over again doing almost just that ignoring other tasks. After all you need warm torpedoes only when you attack, so i prefer to order that directly shortly before the attack.
I prefer listening over radio. It makes a difference only when you have radar warning device since it is also used when surfaced from sonar station (not from radio station).
Sailor Tasks
Next lets look at the tasks for sailors.
Sailors Tasks plan.

Sailors have their own task list separated from officer tasks. Unlike officers the sailors are not specialized and can do any task from this task list. SM Tasks are prioritized not individually, but per each shift (Morning, Evening, Night shift by default). Here you can also create additional shifts if you wanted, although three shifts are absolutely enough having 6 sailors per each shift. Duty and resting times for each shift can be configured in SCHEDULE tab witch we will look at later.
Sailor Tasks are:
- Engines
- Observation
- Cleaning
- Galley
- Observation Persicope
- Helmsman Station
- Depth Steers Station
- Valves
- Power Switch
They are all more or less important. You can basically keep this untouched and adjust when you are unhappy with the defaults.
Sailors witch are on duty and assigned to a shift (usually 6 per shift) will be distributed to these tasks when they can according to task prioritization. The higher the number the more sailors in a shift will do the job.
Some of these jobs are critical and should be prioritized higher then others. These are Helmsman Station and Depth Steers Station. These Tasks can only be done by sailors, so when you assign all sailors to cleaning and cooking you may find yourself with nobody controlling the ruder and the depth planes after diving.
Important tasks are also Engines and Observation. There should always be somebody in the engine room, even when no engineer is assigned to manage the engines, the sailors can manage them too to a certain degree. When nobody is left to manage the engines you basically cannot move. The bridge should also never be unmanned when no officer doing the observation task there should always be at least one or two sailors on bridge. Otherwise you become blind and see nothing around you, also not on the map. You may collide with something or get bombed out of nowhere when nobody is aware of the situation around.
By default sailors are not supposed to use the main valve. The main valve needs to be opened when submerging. By default this job is handled by one of the officers (doing a task with lowest priority), usually by an engineer or a leader.
Power Switch allows sailors to switch equipment on/off. In example when you order to switch on the diesel compressor, the next free sailors in a shift will do that instead of the next officer. Quite handy too, you can increase the priority on that slightly.
Some may not like that sailors are using observation periscope when submerged on periscope depth, because observation periscope can reveal your position and alert enemy ships when sneaking at periscope depth between them. In such situations (in example in shallow waters in enemy harbor) you can set the priority on using observation periscope to zero both for the officers and the sailors and ordering an officer directly when needed. Personally i like to keep sailors using it by default to stay aware about the situation around and watch for planes. When i don’t want them to use it i just go a little bit deeper then periscope depth.
Some may wonder what are the check boxes and drop downs on the left side good for. To be honest I didn’t figure these out yet. The plan works when these check boxes are not enabled and they don’t keep their state. I assume they are not yet working. in current version (B127 p1). Just don’t care about them.
Schedule
Next lets take a look at the Schedule.
Schedule view
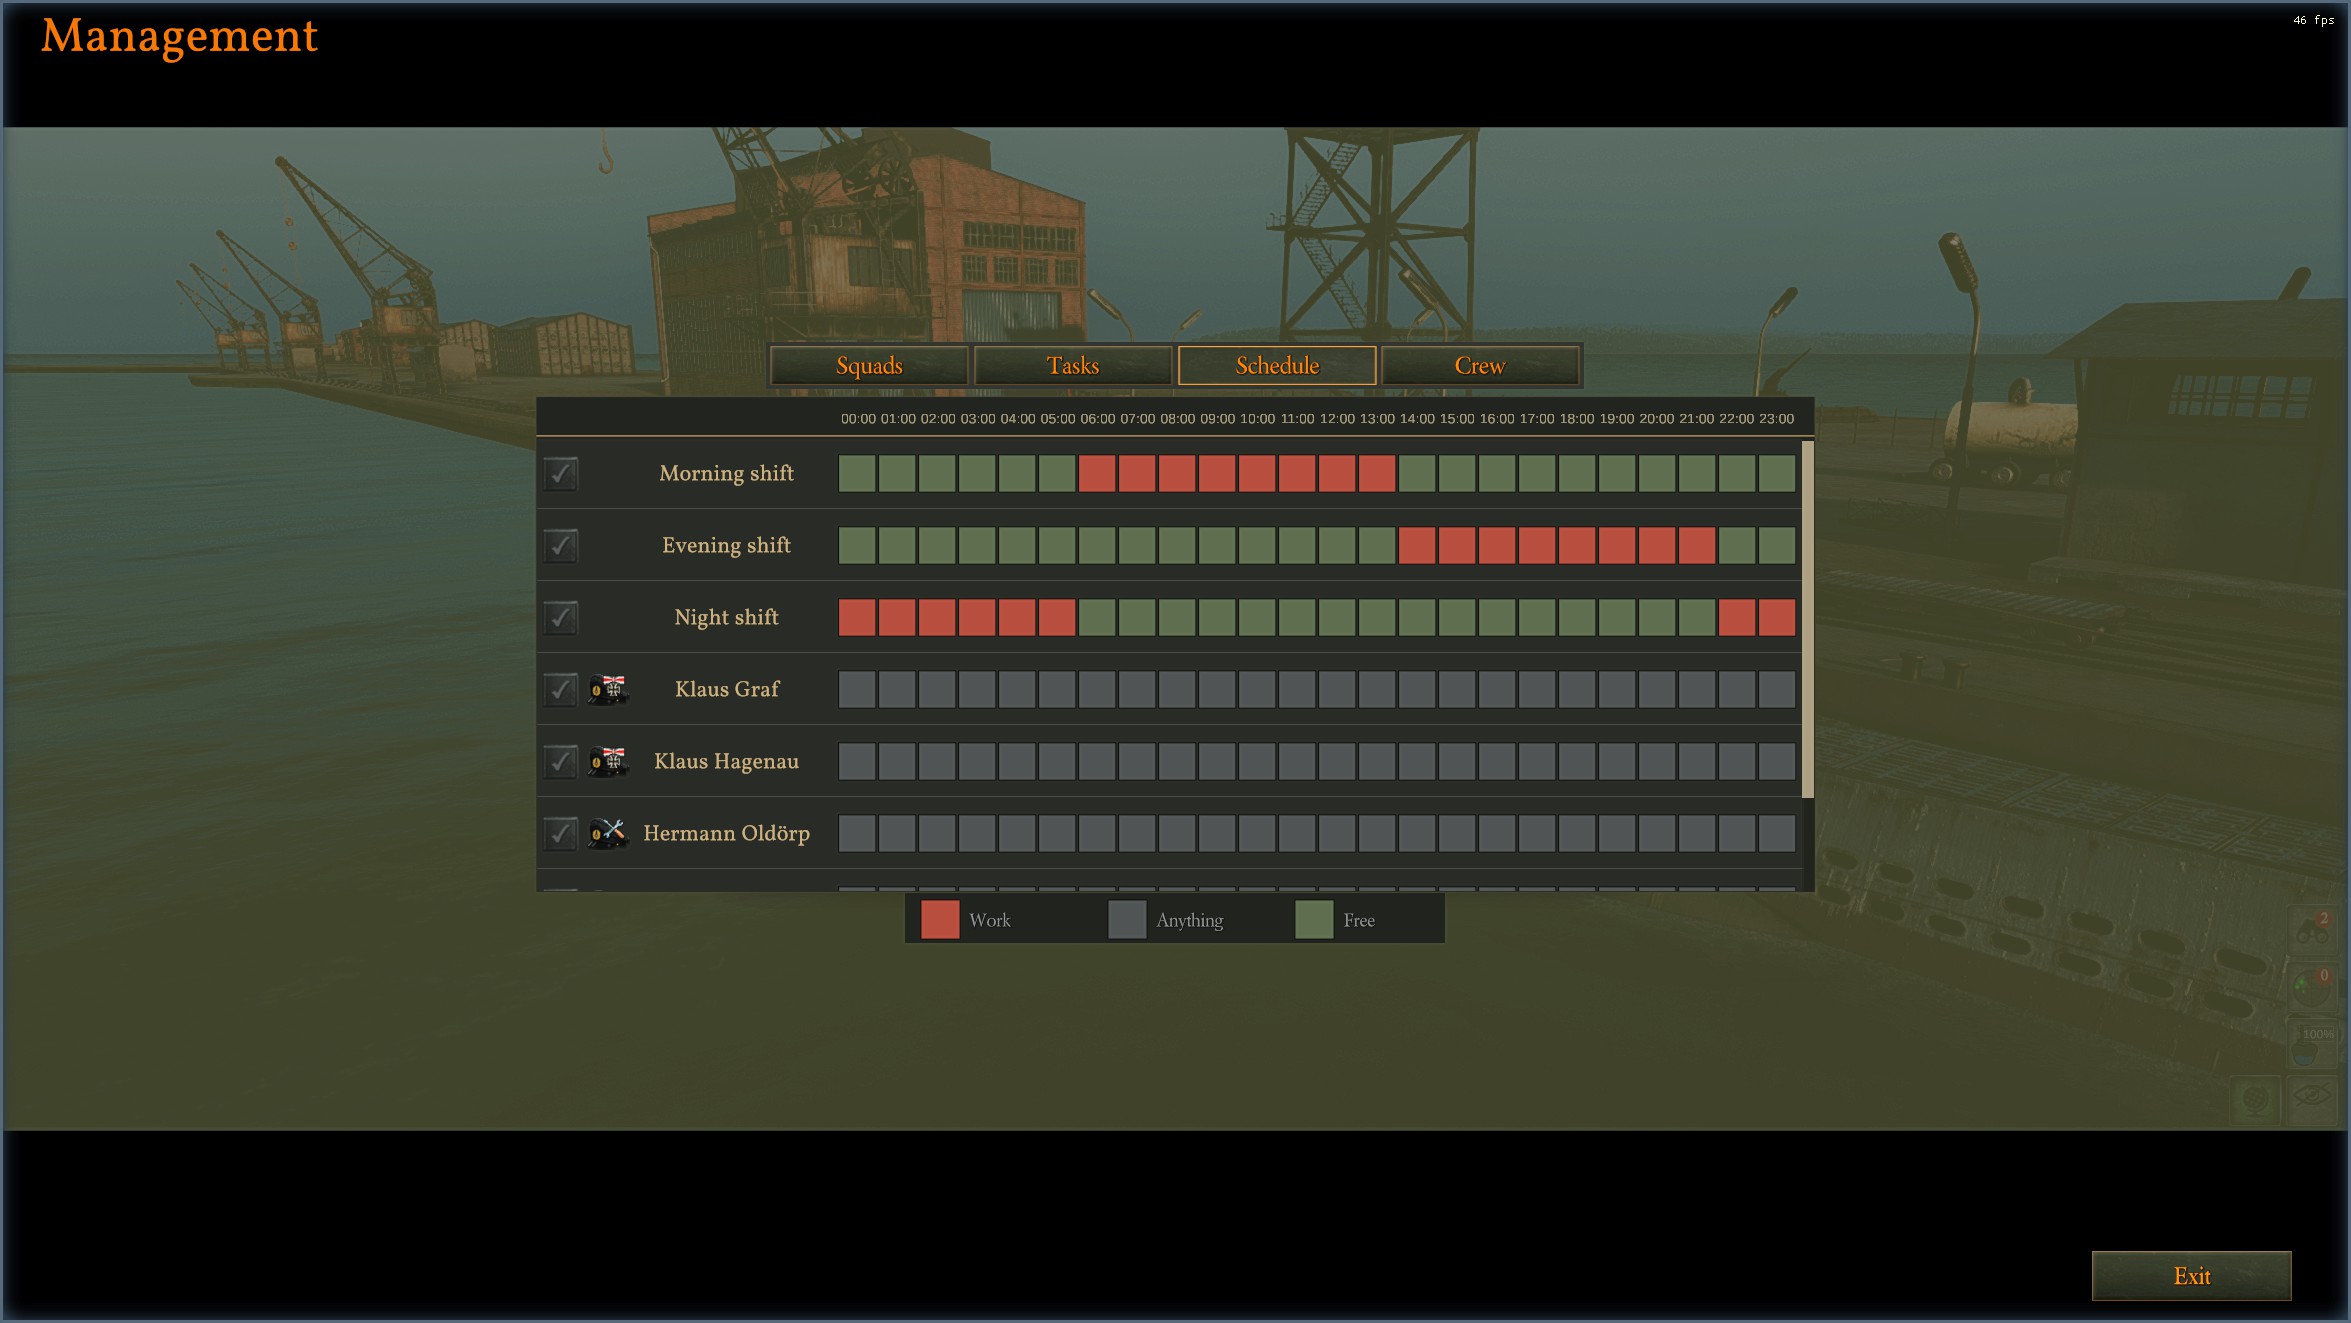
This tab is the most interesting and most powerful one. It allows you to plan time frames when each sailor shift and each officer individually is planed to be on duty and when supposed to rest, therefore enabling you to set up proper rotation. Its purpose is setting up rotation so that the crew can manage routine jobs automatically without getting exhausted and without too much micro management with direct orders. This is the place where you will have to experiment a little, since proper setup is strongly depending on your style of playing, your officers set and individual skill of each officer.
Officers have their own time frames and they don’t need to match the shifts of the sailors.
There are 24 squares through day / night cycle. Each square represents an hour within a time frame. Each square can be colored green, grey or red by LEFT-CLICKING on them. Meaning:
- Red : Work
- Grey : Anything
- Green: Rest
By default entire day for the officers is colored grey (anything). Grey means the officers will pick up tasks from their task priority list and ignore “sleep” task when they are not tired and continue doing their jobs until exhausted and then go to bed and sleep until completely rested. This is not optimal if you want them to rotate properly.
You will have to define at which times each officer is supposed to be on duty (red) and at which he is supposed to rest (green). There can also be some grey hours where they are free to chose, however in most cases they will continue working during grey hours unless they are exhausted.
In Order to set up proper rotation you will need two officers of same class, which will substitute each other on duty. You can see an example on the next screenshot.
Example on proper rotation for 6 officers (2 of each class)

In this example you can see that there are 2 officers of each class with alternating duty times. While the first engineer is on duty, the second one is resting.
Cancelling direct orders.
What to do when you have only one Radioman?
As I already mentioned this is not a big problem, you actually don’t need to man the radio station 24/7. It is enough when he is picking up radio messages every few hours. So just don’t bother to substitute him during first patrols when you have only one radio-man. Give him short duty times so he is is not getting too exhausted and will always stay fresh enough when you suddenly need him on hydrophone. In worst case when he is totally exhausted you can direct order one of the fresh engineers or leaders to substitute him on hydrophone temporarily. Just don’t forget to cancel this order when you are finished with that.
Squads
Finally lets check out the Squads tab.

A Squad is a group of crewmen working together. Each shift of sailors can be considered a squad and also there can be special squads supporting officers at their stations increasing their efficiency. In example a radio man can handle the hydrophone station alone, but he will detect targets at greater range when he has mates supporting him at station. A leader will detect visual targets at greater range, prepare firing solutions and perform navigation faster when having some sailors supporting him at his stations etc…
In the first three rows (Morning, Evening & Night shifts) are the sailor shift squads supposed to do the routine sailor tasks according to priority list. By default they are configured to be composed of 6 mates working at same time on routine tasks. This is just fine considering that you have 3 shifts and 18 sailors in total.
Below these you can add supporting sailors to each of the officers when they are on their duty.
Click on “add sailor” button.

To remove a sailor from supporting squad hover with the mouse above the number of supporting sailors and click on red “Disband” button that appears.

You can also add and remove supporting sailors to each of the officers manually any time by clicking on the little green buttons over their portraits. In crew management you are just setting the amount of supporting sailors which will be set by default when officers begin with their duty.

Other
Ruby has also got a guide about crew management. It’s well worth a visit now you have finished reading this one:
[link]Sick of reading, how about a video? Here’s one from McDewgle. Don’t forget to leave a like, subscribe and comment 🙂