Overview
A relatively basic tutorial to show the setup of hammer and the custom entities required to make maps for the game. **Not this tutorial is only applicable to windows, no version of hammer exists currently for mac/linux**
Hammer Setup
In your “steamappscommonCodename CUREbin” directory run an executable called “HammerConfigSetup.exe” this will generate a custom “GameConfig.txt” required by hammer to run correctly based on your particular steam installation:

Within the same folder “steamappscommonCodename CUREbin” the “hammer.exe” executable is located (you may want to create a shortcut to this file somewhere e.g. the desktop). Run this program and if asked select the “Codename CURE” option, hammer will then launch, the assets / custom entities should now be correctly available ready for creating / editing a level.
Mapping Introduction
There is a basic example map (with vmf) you can download which shows most of the elements described in this tutorial (for bomb escape mode) at work:

This tutorial will be focusing primarily on the custom entities available in level creation for Codename CURE, (if you want to learn the basics of hammer and mapping for half-life 2/mods, there are plenty of tutorials out there and as everything but the custom entities mentioned here is the same, it need not be re-included).
In CURE the zombie spawn system is handled by the game automatically (similar to the AI director in left 4 dead) so you do not need to work out complex spawn systems, you simply need certain entities (primarily “info_nodes”) in place to allow the system to do its thing.
There are four game modes in cure, these are “Bomb Escape”, “Survival”, “Player vs Player”, and “Custom Co-op” as such maps for these game modes should be prefixed with “cbe_”, “csv_”, “cpvp_” or “ccs_” respectively so the game can determine which game rules to enforce, your map name should therefore look like: “cbe_yourmapname”, “csv_yourmapname”, “cpvp_yourmapname” or “ccs_yourmapname”, depending on which game mode you desire.
Required Entities
The following entities are required in order for a cure level to function correctly:
info_player_deathmatch – This is the player spawn entity at least 5 of these need to be in you level in close proximity to one-another (5 because there a maximum of 5 players).
***DO NOT USE “info_player_start” ENTITIES! They are known to crash some servers***
info_node – This is the AI navigation and spawn entity, these need to placed throughout the walkable space in your map (not too close to walls or other objects). These are for both bots and zombies to navigate and used as zombies spawn locations. If you do not want zombies to spawn in a particular walkable area, use the “spawn_controlarea” entity to prevent spawning (don’t be tempted not to place any nodes there as this will cause issues with navigation).
info_node_hint – This can be very useful for AI navigation (both bots and zombies) when there
are tight spaces to navigate through (such as doorways, or between obstacles), in the
keyvalues you will need to set “hint” to “Entrance / Exit Pinch”.
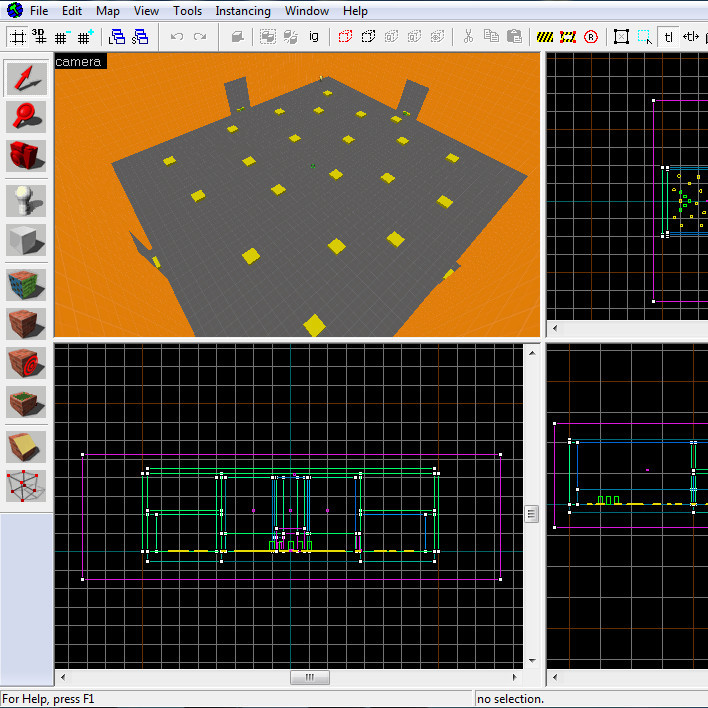
*note about node placement – You will want to make sure your nodes are connected up and spaced correctly (particularly between areas and obstacles – don’t underestimate the value of info_node_hint) otherwise the zombie spawn system may not function as expected, in engine run “ai_nodes” and “ai_show_connect 1” in console and you will see something like this:

BOMB ESCAPE MODE ONLY:
bomb_plantarea – This is where players plant the bomb, there needs to be at least one of these, more can be added if you want different paths through the map, a bomb site is selected randomly at the start of each round and the “OnSelected” output (fired from the bombsite that is selected) event can be used to close off different areas of the map (close/lock doors etc…) to give you varied play-throughs. “OnActivated” fires when a player plants the bomb (could be used to open up an escape route), “OnVehicleLeave” fires when a predetermined time (set by you in the keyvalues) is left on the bomb timer, this can be used for example to make your escape “func_tracktrain” leave with 20 seconds to go, and “OnDetonated” fires when the timer reaches zero and can be used to enable a “trigger_hurt” and an “env_shake” to kill players and AI that are not in the designated escape area (thus determining the win/lose scenario).
SURVIVAL MODE ONLY:
item_survival_crate – This is where players resupply from in-between waves of zombies, you need at least one of these in a survival map, and is activated prior to the start of each wave. With multiple versions of this entity spread around the map the gamemode will pick one at random that players will have to make their way to, this is good method of encouraging players to move around the map, as opposed to just camping in one spot.
CUSTOM CO-OP AND PLAYER VS PLAYER ONLY:
custom_controller – This entity allows the custom co-op and pvp game mode rules to be manipulated. It’s keyfields allow you to alter score and time limits, AI spawning, player respawning, win/lose scenario and if the map allows player classes. Its inputs allow you to trigger a win or loss, start a time limit mid game, or print centre text, and its outputs trigger on timer ending, player spawns/frags/deaths. All of this (and other optional custom entities described below) allow you to effectively build custom game modes into your maps.
Optional Entities
The following entities are not required for the game to function but you may find them useful depending on what you are making:
spawn_controlarea – This is a useful entity for preventing zombies from spawning in particular locations at given times, when enabled it will prevent zombies from spawning at any “info_nodes” visible to it, also when the keyvalue “radius” is set it will only prevent spawning within the radius, it can be enabled and disabled via inputs, and you can have as many as you need. This entity is of particular use when you have blocked off an area of the map for a bombsite path, the “OnSelected” output of the bomb site can be used to enable the “spawn_controlareas” within the blocked off part thus preventing zombie spawns (otherwise zombies will spawn there making the horde much less effective).
cure_random_output – This can be used to generate random outputs between 0 and 9, use the min/max keyfields to set how many random outputs you need (clamped between 0-9 of course) and call the “generate” input to call one of the outputs at random. “GenerateSuffled” will do the same as generate except it won’t call the same random output twice until all outputs have been called, or the “ResetShuffle” input has been invoked.
BOMB ESCAPE ONLY:
guidence_node – These entities are used for helping players navigate the escape route after the bomb has been planted, and are shown on every difficulty apart from insane difficulties. With the “Last” keyvalue set to “yes” this node is the ultimate goal for the players (where players need to be to win) and is shown regardless of difficulty or how far the player has gotten in relation to other nodes (there can only be one last node per map at time of writing). The other nodes can be used to show players where to go step by step, and are operated via the input/output system, when one node is enabled all others are disabled automatically, and when the “radius” keyvalue is set the node will output “OnInRadius” when a player gets close enough; this can be used to enable the next node, if radius is not set other means can be used to enable the next node, such as the press of a button or opening of a door.
spawn_controlwave – This entity gives mappers the ability to force a wave of zombies, pause all normal zombie spawning and resume normal spawning again using the input system, via the “ForceWave”, “PauseWave” and “UnpauseWave” inputs, this can be useful if you don’t want any zombies to spawn until players have gotten so far or performed a certain action, or want to force a full wave on that action. The entity also outputs “OnEndForce” when the forced wave is completed, this could be useful for example if you force a wave and only unlock an exit once the wave is survived.
SURVIVAL ONLY:
cure_survival_info – This entity fires a set of outputs for every wave start and end. A generic “OnStartWaveAny”/ “OnEndWaveAny” when any wave has started / ended as well as a specific wave number (up to and including wave 15) e.g. “OnStartWave1″/ “OnEndWave1” – “OnStartWave15″/ “OnEndWave15”. These can be used perform map specific actions when waves start or end, as well as to open up areas of the map when specific waves are reached (similar to how barricade rooms are opened up in official survival maps on waves 5/10/15).
cure_survival_barricade – This entity (as the name suggests) allows you create barricades in survival mode, you can set the health up to 1000hp and a custom model (official maps use a wooden plank across doorways to good effect). When enabled the barricade will appear translucent with players and zombies able to pass through, players can then press USE on the barricade to make it solid / attackable by zombies, the “Barricade” input can also be used to achieve this. When killed or disabled the barricade will be invisible until re-enabled.
CUSTOM CO-OP AND PLAYER VS PLAYER ONLY:
ccs_give_items – This allows you to give players weapons, equipment, health and ammo, by input, which can be called from a map element (such as a button) or from the “custom_controller” (player frags/spawns etc… as described above). It also contains logic necessary for gun game style modes.
ccs_protection_ent – This allows you to setup modes whereby players protect specific static objects from zombies, it uses similar logic to the “cure_survival_barricade” entity described above. The “PlayersDefend” keyfield switches its role from it being attacked by zombies to being attacked by players. “OnDisabled” is called when the entity is killed.
ccs_bot_goto – Bots will go to this point when enabled and visible to them. Use the “Target Type” to let the bot know how to prioritise when to go to the point, e.g. if set to “health” the bot will only go here if they feel they need health, however be careful with “generic” the bot will always go to this above all else until disabled.