
Overview
This guide is intended to help people who want to create their own characters in NOBUNAGA’S AMBITION: Sphere of Influence
Introduction
Note: I’m French, so I might make English mistakes.
Names will be in the Japanese order (e.g. Oda Nobunaga, Takeda Shingen), instead of the western order (which the English version of the game uses).
This guide is intended as a compilation of informations related to character creation obtained from the game, the official manual, as well as the Steam Community Hub for the game.
All screenshots below are in 1280×720.
General Information
To create your own characters, on the game’s main menu, select Edit Custom Officers.
Know that this section also stores extra officers earned by completing Feats.
The four options allow you to, respectively:

- Create and/or edit custom officers
- Delete custom officers
- Set one of the conditions to make officers appear (more info in the section titled “Making Characters Appear In-game”)
- Import and export custom officers (more info in the section titled “Export and Import Characters”)
Basic Character Creation/Edition
When clicking on Create/Change, you will be presented with this screen:

To create a character, simply click the first line of the table. To edit a character, you click on its line.
After clicking “New”, you will be presented with this screen:


As you have noticed, there are three pages to that “character sheet”. Options specific to a page will be described in the corresponding sections, while the rest of this section will be dedicated to the customisation elements available on all pages.
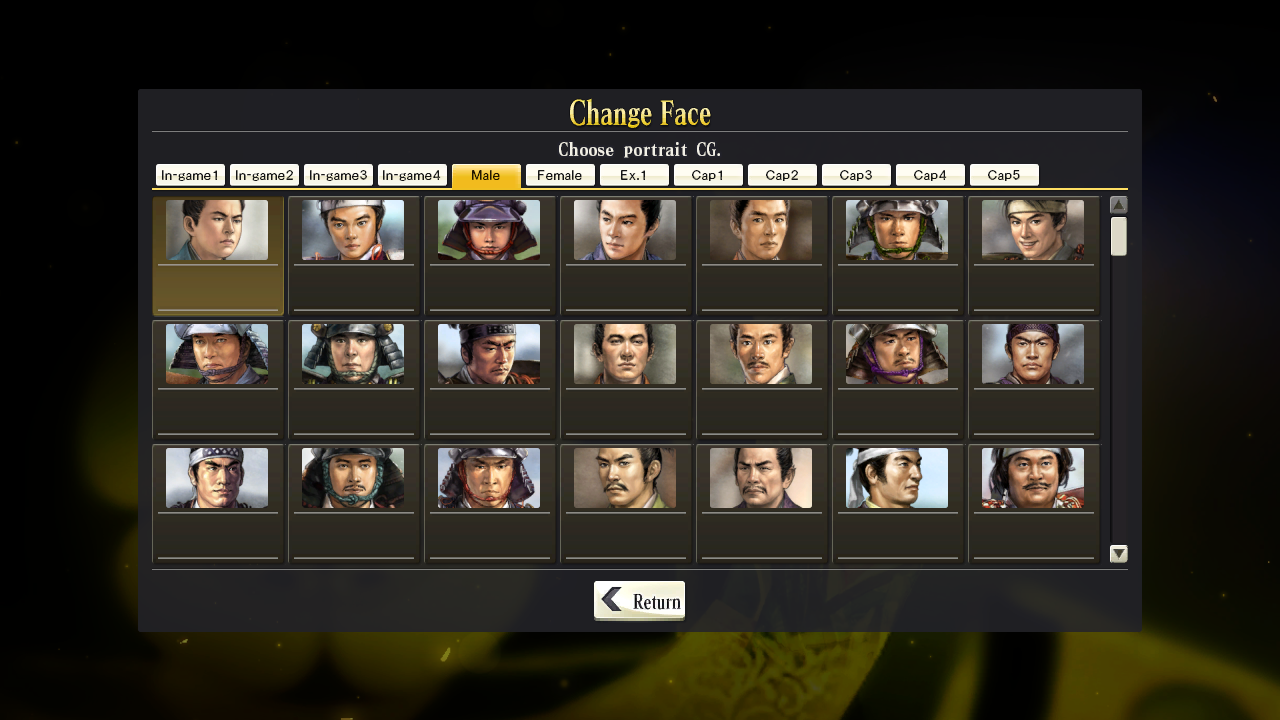
- The tabs labeled “In-game1” to “In-game4” contain portraits used by the vanilla game’s characters, from Oda Nobunaga to the merchant.
- The “Male” and “Female” tabs contain portraits that are unused in the vanilla game.
- The “Ex.1” tab contains the extra officers’ portraits, as well as DLC portraits (those DLCs are part of the base English game).
- The “Cap1” to “Cap5” tabs contain portraits created with the Portrait Editor.


- Whether your character is male or female.
Please know that custom female characters are treated as male for some of the game’s mechanics, and are exempt from marrying. - The voice of the character. Note the huge gender inequality here.
- The character’s father.
You can only select a male character who is at least 16 years older than your character.
A character is considered “of age” when they reach 16 years old. - One blood relative. Yes, only one.
However, you can set it to any character, except default females and extra officers.
Note about relatives: an officer in the same clan as his/her relative(s) will be more loyal to his/her daimyō.

- Tenet, which is the character’s stance towards Innovation. You can choose between CNSV (Conservative), NTRL (Neutral) and PRGS (Progressive).
This affects retainer loyalty (e.g. a PRGS retainer will be more loyal to Oda Nobunaga than Uesugi Kenshin), as well as the clan’s Innovation. - Ideals. If a retainer has the same tenet as his/her daimyō, he/she will be more loyal.
- REQ Loyalty. This is representation of the difficulty of keeping the character loyal if s/he’s a retainer.
If the officer’s loyalty falls below that value, s/he’ll be strongly discontent (red loyalty icon).
A REQ Loyalty of 1 means the officer will never be strongly discontent, as loyalty can’t drop below 1. - Tier. This is only useful if the character is/becomes a rōnin, since it will affect the stipend you need to pay to hire them.
For example, Tier S rōnins need a stipend of 400 coins.
Page 1: Tactics, Lifespan, and Condition
This section is about the options available on page 1 of the character creation/edition menu.

- Strengthen. Tactics in this category give buffs to the character’s unit and/or other allied units. Those buffs usually have drawbacks, like a short duration, a less powerful effect, or even a debuff.
- Restore. There are only two tactics in this category, and they only exist to remove debuffs.
- Obstruct. Tactics in this category are designed to give debuffs to the enemy.

You can set the starting year, as well as the lifespan of the officer. Know that officers become of age when they are 16 years old.
Considering the above info and the fact the game ends when you reach the year 1700, makes a character born in 1684 and/or with a lifespan of 16 years old almost completely useless.

The “Set All” button allows you to set a single base for all scenarios, and the “Set” button will allow you to set a base per scenario.
It is safer to set the starting base to a Castle, as Fortresses can be destroyed (though the AI doesn’t seem to do that).
Clicking a line in this window will change the status from “retainer” to “rōnin” and vice-versa.
Page 2: Abilities and Traits

There are four abilities, which are:
- LEA (Leadership). This mainly affects defense in battles. According to the manual, a base’s lord’s LEA lowers the speed of morale loss if the base is surrounded, as well as the damage the base receives from Storm.
- VAL (Valour). This mainly affects attack power. According to the manual, it also affects damage dealt by Storm.
- INT (Intelligence). This mostly affects Foreign, Covert, and Investigate commands. According to the manual, an officer with high INT will cause morale to drop faster when surrounding a base.
- POL (Politics). This stat will influence the strength of Develop and the time needed for Infrastructure commands.
The Growth Type defines default and prospective traits.
Prospective traits are traits that your character will gain when your character’s Abilities increase, while default traits are available as soon as the game starts.
The Settings window allows you to add, but not remove default traits. Know that characters can only have a maximum of 20 traits, and some traits will replace others.
Page 3: Bio
There is a size limit defined by the text field’s width and height.
It’s only useful if you want to flesh out your characters.
Making Characters Appear In-game
To make a custom character appear in-game, they need to fulfill three conditions:
- They are “Active” in the “Active/Standby” submenu of the “Edit Custom Officers” menu. Characters that were just created are set to “Active” by default.
- They are not dead in the selected scenario. A character who dies in 1590 will never appear in the “Battle of Sekigahara” scenario, even if Lifespan is set to Ageless in the Scenario Settings.
- “Created Officers” must be set to ON in the Scenario Settngs.
Condition number 2 is ignored if a fictional scenario is selected.
Export and Import Characters
To export characters (either to make a backup, or to share it with other players):
- Select the Export/Import option in the Edit Custom Officers menu, and make sure the mode is set to Output.
- Select the character(s) you wish to export, then click Confirm.
To import characters, it’s the same process, but you select Load, instead of Output.
Character files are available in the following folder (copy-paste the text below in the Run dialog or Windows Explorer’s address bar):
Files are, by default, named using the following schema:
Know that exported characters store everything, including the selected portrait’s ID, so be careful if you share a character with a portrait made using the Portrait Editor, since it might not be available for everyone.
Appendix A: Historical/Extra Officers Edition
Historical and Extra officers can also be edited, though some options will be greyed out.
To edit those officers, from the Main Menu, click Edit Historical Officers.
You’ll be offered three options:

- Edit Historical Officers. This is where you’ll do most of the work.
- Reset. This allows you to remove some or all of your edits.
- Apply/Defer. Similar to “Active/Standby” for Custom and Extra Officers, this allows you to apply the changes to new games. Modifications will be applied automatically.
When editing an officer, the following options will be available:


Appendix B: The Portrait Editor
The Portrait Editor is a tool accessible from the game launcher that allows you to add up to 3 000 custom portraits in the game.
Of those 3 000 portraits, you will be able to use 1 000 for custom officers, and the rest for Historical Officers.
From personal experience, the Portrait Editor only accepts the following formats:
- Standard (non-progressive) JPEG files. JPEG files do not support transparency. Depending on the image editor/converter you use, disable the “Progressive” option when saving.
- BMP files, either 24-bit (RGB), or 32-bit (Alpha + RGB). 32-bit BMPs support transparency. Some BMP files (like those created by GIMP) cannot be read by the Portrait Editor.
Note: If you want to convert images to 32-bit (ARGB) BMP, you can refer to Appendix B-II.
The tool’s interface is simple (click image to zoom):

- The Save button allows you to save your changes.
- The Reload button allows you to discard your unsaved changes.
- The Help button allows you to open the Portrait Editor’s ReadMe file and see the program’s version information.
- The Finish button will quit the app. I don’t know if it will ask for a confirmation, however.
The left section contains the following:
- The Delete button, which allows you to delete a portrait set, including the set’s name.
- The Change Display button allows you to change between list view (by default) and grid view.
- The Name column (in list view) is where you can see each portrait set’s name.
- The Edit column (in list view) shows: nothing if the set is empty, ‘I’ (capital ‘i’) if there are changes, ‘>’ if the changes are saved.
The right section contains the following:
- A text field, labeled with “xxxx_Name:”, is where you can enter the portrait set’s name. Confirm it with the Set Name button.
- A checkbox, labeled “Preview with Transparency”. Checking it will show how portraits will look like when transparency is enabled in-game.
- Five slots for images. More information under the Portrait Sizes header.
When you click on an image’s slot, a dialog will pop up, asking you to select a file. Once that’s done, you will be presented with something like this:

You can move the selection frame around and resize it.
If you resized the frame, you can check the “Resize” checkbox, and choose a resize algorithm (smooth has a better quality, but depending how much the image needs to be resized, it might make it blurry).
The Activate Transparency checkbox will allow you to make use of transparency, but only if your image is a 32-bit BMP.
The game uses five different portrait sizes, in a variety of contexts.
- The Extra Large size (422×600 pixels) is used in historical events, and when triggering tactics if your character is the leader of their unit.
- The Large size (240×240 pixels) is used on some info screens, conversations, and when triggering tactics if the character has no Extra Large portrait (I got that one from personal experience).
- The Medium size (204×120 pixels) is mostly used in the Portrait selection of character edition, and during council reports.
- The Small size (96×82 pixels) is displayed on the interface during the Council phase.
- The Extra Small size (48×48 pixels) is used for overseer comments and unit jumplists.
Appendix B-II: Converting images to 32-bit BMP
I learned a little C# just to make an application with the only purpose of converting images to the ARGB (32-bit) BMP format.
The application can be downloaded from Google Drive[pastebin.com] (link available on Pastebin, due to Steam’s intrusive censorship), and requires version 4 of the .NET Framework.
The “Alpha channel already present” option is only useful for PNG files with an alpha channel.
The “Color to alpha” option allows you to create an alpha channel, by changing pixels with a specific color (#FF00FF by default) transparent.
The app will output files in the directory of your choosing.
Closing Notes
Feedback and suggestions are appreciated, and even encouraged.
I also give you the right to translate this guide into another language, as long as the guide is posted on the Steam Community Hub for this game.
However, I want you to contact me if you wish to post this guide on another website.