Overview
SanctuaryRPG is truly lots of fun for the old school gamer, endless amounts of gameplay with nostalgic DOS-style graphics. But wouldn’t it be a little more interesting with a different font instead of that boring old generic console font? (Updated for 2.1.5)
How to Install
Within your SanctuaryRPG folder, you’ll see a folder named “Mods”. Open this folder up.
Once inside, select the font that you would like to use and open it’s respective folder (there’s a preview image file that you can view to see all of the fonts at once).
Once in the font folder, right-click the “Terminal” folder inside and select “Copy”.
Go back to the SanctuaryRPG folder, right-click in an empty space, and select “Paste”.
Windows will ask if you wish to overwrite files; choose to overwrite all files and folders.
Done! You should now see your new fonts the next time you open up SanctuaryRPG
Make your own!
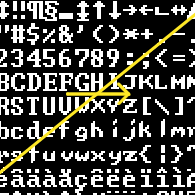
Have your own font style you’d like to put in the game? It’s very easy to do! Using your favorite image editor (I like GIMP, so my guide will be following along with that program), open up the image found in the Terminal/480p folder in the SanctuaryRPG directory. The file should be named “terminal.png”.
Once opened, set yourself up a grid so that you can easily see the boundaries between each character. If using GIMP, go to “Image” –> “Configure Grid”, and set your settings as shown below. Each character is 8 pixels by 12 pixels, so set your width/height accordingly. Set the foreground color of the grid to a nice shade of gray so that it’s not too bright that it blends with the characters, yet not too dark you can’t see it.

Now, grab your trusty pencil, and get ready to draw! Since old fonts didn’t have any smoothness to it, we want to make sure we use a hard edge on our creations, thus we use the pencil over the paintbrush. Make sure to set its size to 1 pixel, so that we draw one pixel at a time. You’ll also want to zoom in really far, so bringing your zoom up to 800% (or even more depending on your monitor and how good your sight is) is essential.


The rest is easy! Simply put black for empty space, or white for parts of the character. Once you’re all done, just save!
Great, now you’re finished…almost. You’ve completed the art for the 480p resolution, but what about those 720p and 1080p resolutions? Don’t worry, you don’t have to re-draw your creation again! The rest is easy: just scale your image up to 200% the size with no interpolation (this will retain its pixelated shape) and save it into the 720p and 1080p folders!
To do this in GIMP, go to “Image” –> “Scale Image”. From there, choose the first dropdown and select “%” for percentage, and set both the width and height to 200. Where it says “Interpolation”, select “None” from the dropdown. Your settings should look like this:

From there, click “Scale”, and you’re all done! Now just export the scaled up .png to both the 720p and 1080p folders and it’s all complete! Now you (and others) can enjoy the custom font in any resolution!
NOTE: You do not have to always use the same 480p image scaled up for your 720p/1080p files! You can re-do the letters if you choose to and make them a little higher quality as each character will be 16×24 in size at those resolutions (though then it’d look much less like an old DOS game!)
Potatoes
This section is made to help balance out the potato-to-text ratio of this guide. Because we all need potatoes.
