Overview
This pictorial guide explains how to make a custom asset LOD in Blender using the “baking” method.
Introduction
**Note: Pretty much all the vital information for this guide is complete but there are a few details that more experienced asset creators are informing me about, particularly with supplemental maps. I will add this info to the guide as quickly as I can.
This guide assumes you have sufficient knowledge to model and texture a regular model, so if you are a complete beginner to asset creation, start here.
Among my reasons for making this guide was to help one of my friends with his own projects in addition to simply making more knowledge readily available to content creators. When I first got into asset creation, I was frustrated with the scant amount of easy-to-understand tutorials on the subject of LOD creation, and more specifically, texture baking. After I became comfortable with making my own LODs, I made it a point to share what I learned with others in order to prevent such frustration.
Once you become familiar with the method, baking is by far the quickest and easiest way to create LOD textures for most assets. Simply put, you don’t have to waste time and energy making a whole other diffuse map from scratch; aside from making the LOD mesh and performing minor UV adjustments, the process is entirely automatic.
Creating the Model Mesh
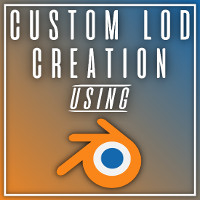
In this tutorial we will be using my Surf Shop as the example.
Before starting with the LOD, be sure that your main model is supplied with its final, game-tested diffuse map. The LOD should be one of the very last things you make for your asset. Again, do not edit the main diffuse map after baking your LOD because the variations between the two diffuse maps, however slight, will show in game and it is a pain to rematch them.
1) Load your main textured model into Blender. I suggest renaming it in the outliner to “Main” or something similar that will differentiate from the LOD model.
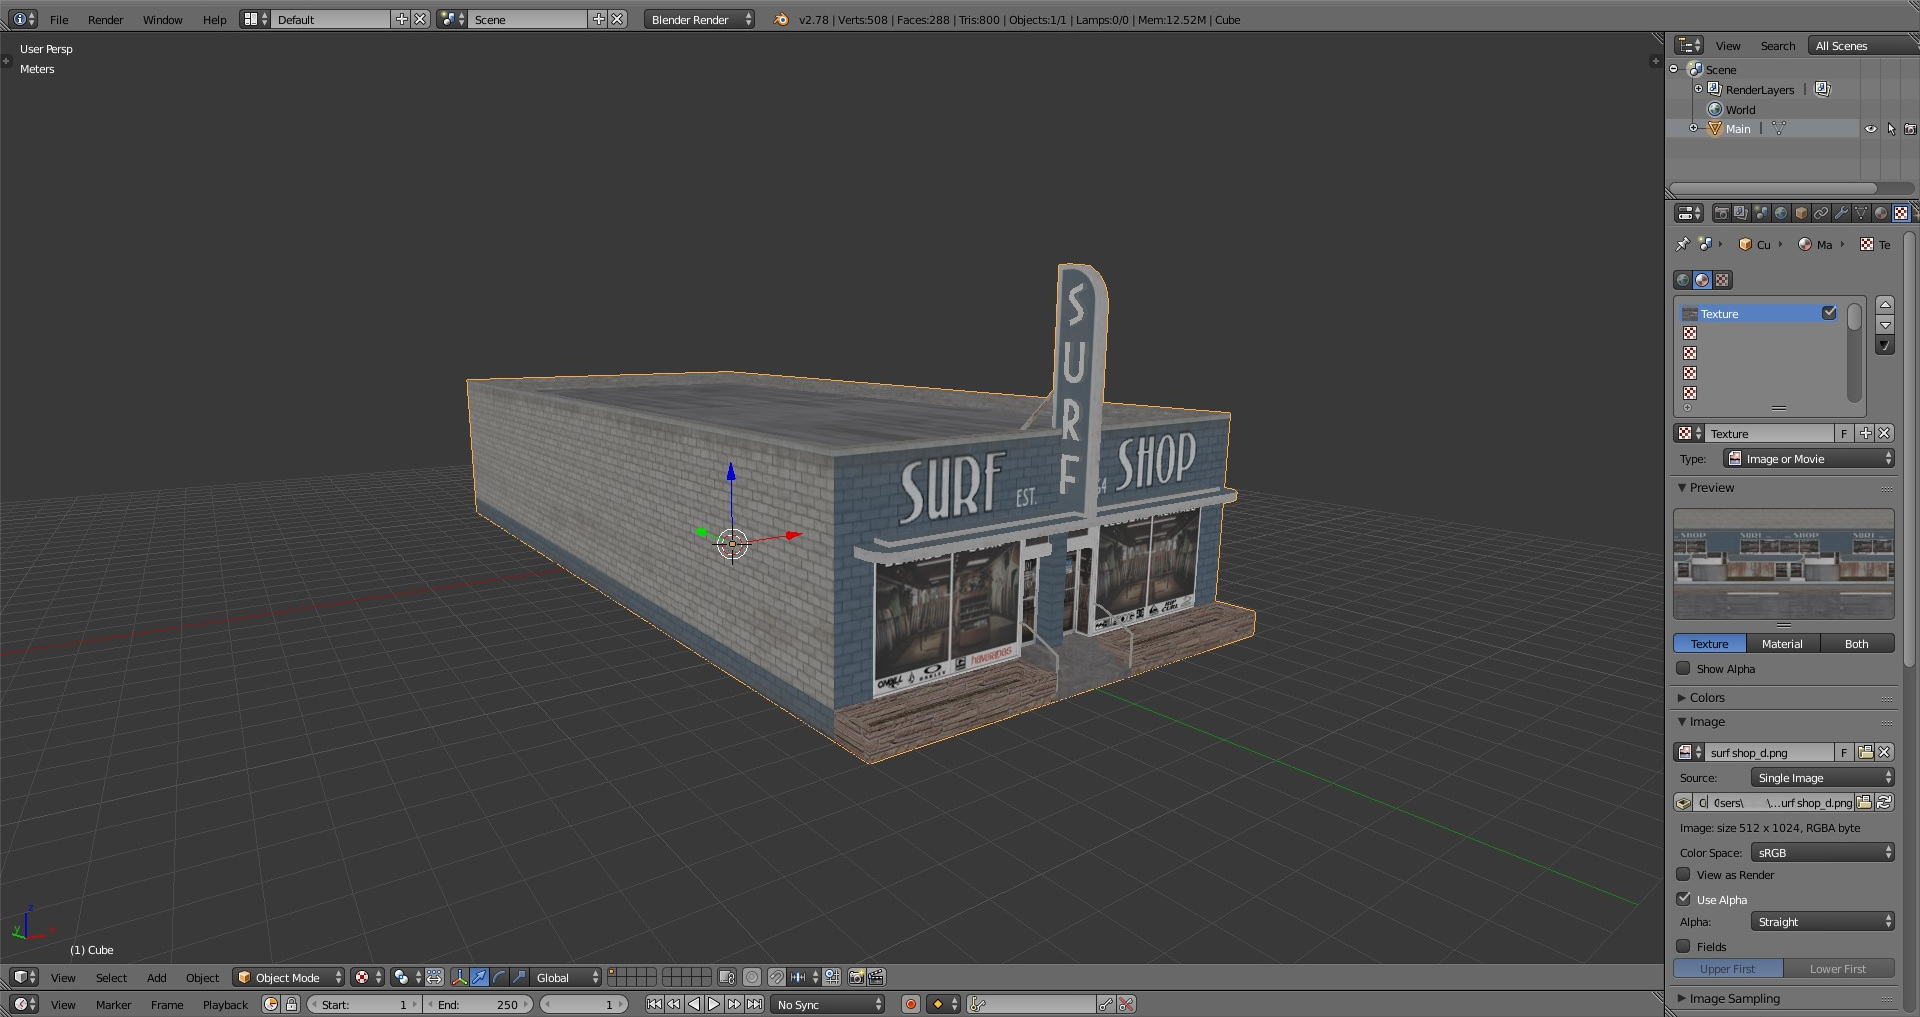
2) Switch to Object mode and create a new cube mesh. This will be your LOD model, so rename it “LOD”. At this time you should take a moment to save the LOD file. After it has been saved, go into Edit mode and move the LOD mesh to the side of your main model and then vertically until the bottoms are parallel.
3) We will now begin shaping the LOD. For this part I suggest switching your viewport shading mode to “Solid” for maximum visibility. You will also need to enable “Snap to vertices” as you will be using the main model as a guide for your LOD model. First, grab the front face of the LOD mesh and move it along the XY plane until the faces of both models are parallel (drag it till it snaps with the main model front face).

Do the same with the rear and top faces. Also, make sure to delete your bottom face(s).

4) Now that we have our overall length and height, we now need our widthwise dimension. While still in Edit mode, select the entire LOD and move it until it snaps to one side of the main model so that it overlaps the main model.

Next, grab the other side of the LOD and snap it to the corresponding side on the main model.

5) Repeat this process as needed for each component of the mesh. It should be noted that only the most visible and primary features of the main model should be replicated in the LOD…in this case, that would be the “Surf” sign.

Just as a reminder, the general rule for maximum LOD triangle counts is 100…the lower the better. Save the file when you’ve finished modeling.
Something to keep in mind…
Avoid placing mesh faces across spaces that are outside the bounds of the main model. In my experience, faces that are not within the confines of the main model space will usually show as a black spot on the baked texture, and this is very noticeable in game.
Texturing
With the LOD mesh complete, we can now move on to the meat and potatoes of this tutorial.
1) First things first, make sure you are switched to Blender Render. Next, with the LOD selected, switch to Object mode and open up the UV Editor tab.
2) In the right-hand toolbar, create a new material for the LOD and assign it a texture. Under the “Image” drop-down menu, click “New”. This will become the diffuse map for your LOD.
In the dialog that pops up, rename it “assetname_lod_d”. For the width and height pixel dimensions, I’ve found that 128×128 works perfectly for assets up to a few stories that occupy a standard 4×4-or-less plot. Feel free to experiment with diffuse map sizes to find an optimum balance for your own assets. Lastly, uncheck the “Alpha” tickbox and click OK.

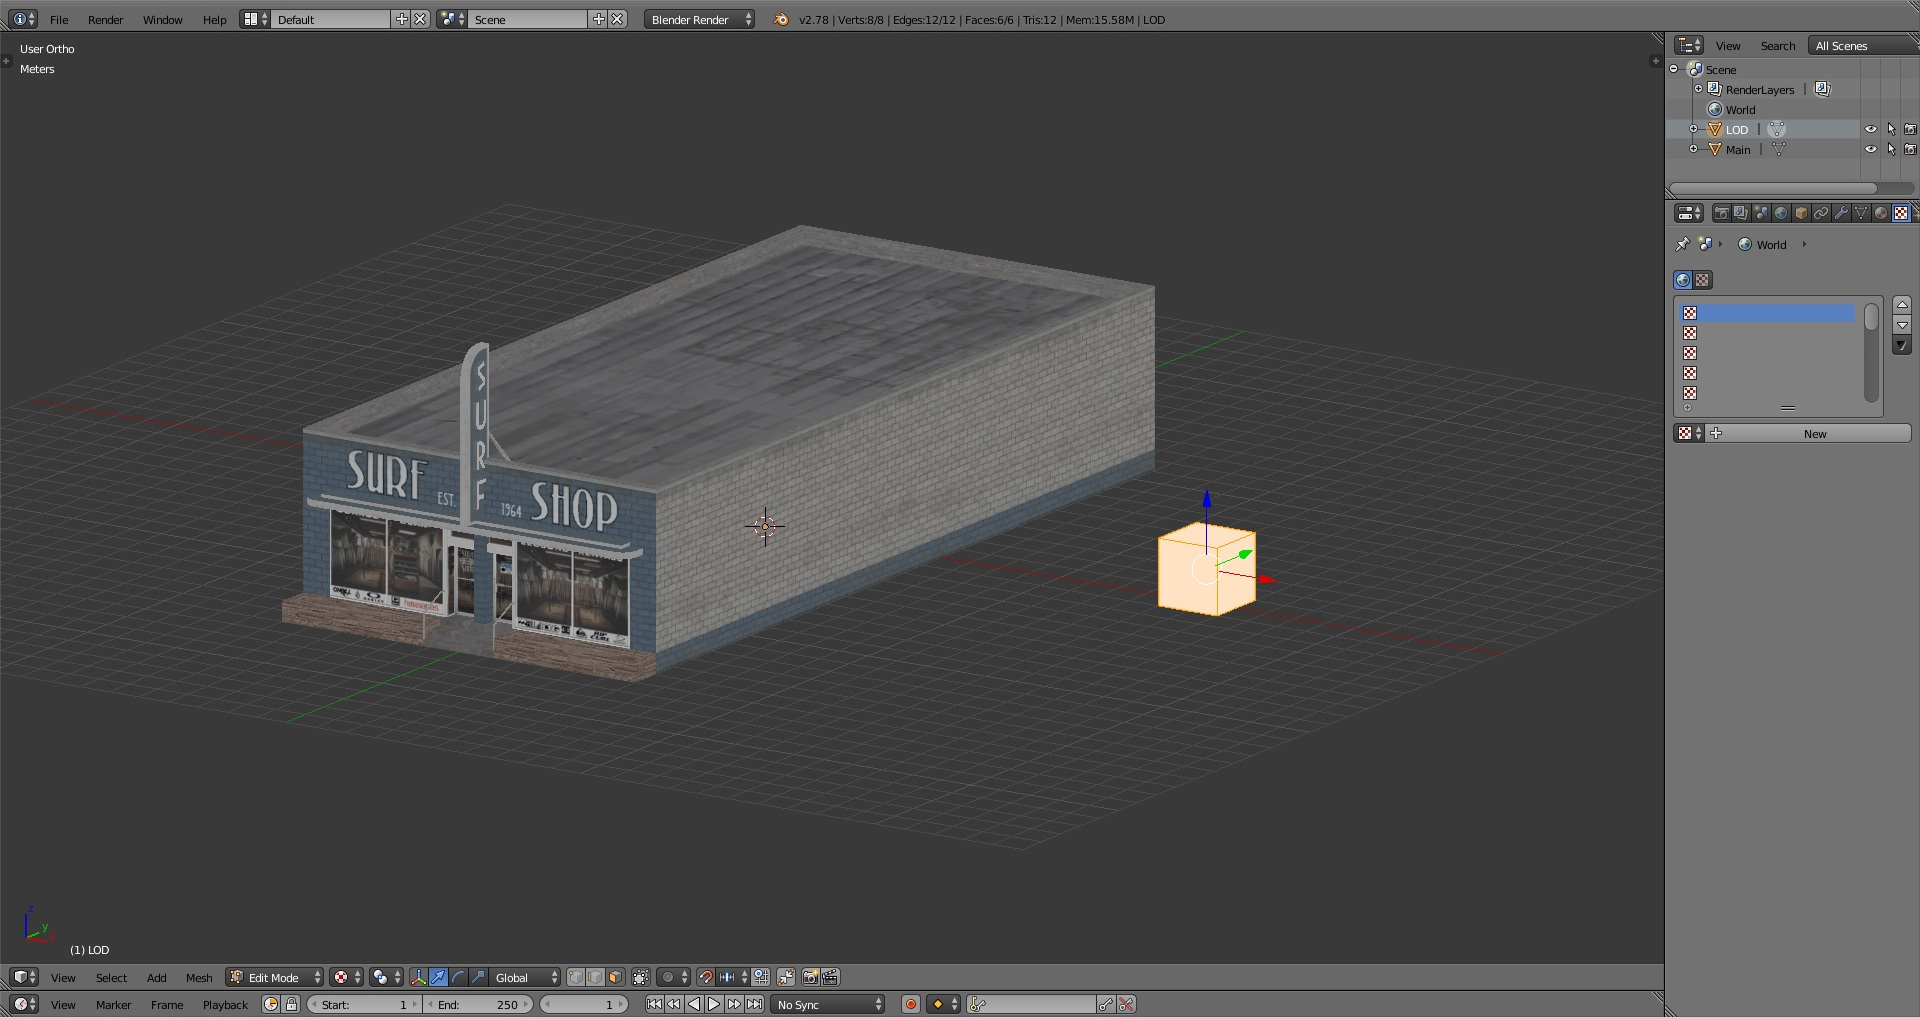
3) We will now UV map the LOD mesh onto the blank diffuse texture. In the model window, press the “U” key > Smart UV Project. In the dialog box, change the angle limit to “1.00” and untick “Stretch to UV Bounds”. Click OK.

4) You should now see fully-projected UV islands in the UV Editor. Before you do anything else, apply the blank diffuse map to every UV island if it isn’t already (ctrl+a > “Browse Image to be Linked” > click blank diffuse). As you can see in the first picture, Smart UV Project usually does a pretty good job of filling out the map space and prioritizing UV islands, but I suggest doing some fine tuning yourself.
Results after a minute of moving around UV islands…

Remember that the roof and walls will be the most visible portions of the LOD, so give those the most texture space.
Now we have arrived at the crux of the LOD texturing process. The baking procedure is actually quite simple; however, this is the part at which the most mistakes are made. Thus, it is important that you save the file at this particular point so as to have a fallback location.
5) Check once more to confirm that you are still in Object mode. The viewport shading mode should also be switched back to “Texture”. In the outliner, click your main model. Next, hold down the shift key and click on your LOD model. The little triangle icon next to your main model tab should be highlighted in orange whereas the icon for your LOD should be yellow.

6) In the right-hand toolbar, open the Render tab > Bake drop-down menu (near bottom). In the Bake Mode drop-down menu, select “Textures”. Next, tick the “Selected to Active” box. “Bake to Vertex Color” should be unticked. Tick “Clear”. The default values for margin, distance, bias, and split seem to work fine for me, I’m not sure what effect changing them would have.
Now, the moment of truth. Click “Bake” to fire up the digital oven. The result should look similar to the picture below.

7) If all has gone well, you should now immediately mouse over to the bottom toolbar > Image > Save As Image. Before you save, there should be an asterisk (*) after “Image”, which should disappear after the diffuse map has been saved. Make sure the file is in .png format.

8) It is now OK to close the UV Editor. In the outliner, select the main model and delete it, its job is finished.

Now simply prepare the LOD for export like you would for a normal model; switch to Object mode if you are not already, select it, and ctrl+a > click location, rotation and scale > Export as .fbx. Apply your usual settings to the .fbx and save to Desktop. Make a final save of the LOD.
9) Double check your filenames for your LOD .fbx and diffuse map.
Examples: surf shop_lod (.fbx); surf shop_lod_d (diffuse map).
Supplemental Maps & In-Game Testing
Now that your LOD’s diffuse map is finished, take a few minutes to create an illumination map. In addition to looking good at a distance during the evening, it will prevent a glitch that causes your entire asset to light up at night. I will provide a quick overview of my own workflow using GIMP. This particular method is derived from Whipplesnoodle’s detailed window illumination guide.
1) Import the LOD diffuse map into GIMP.

2) Using the Rectangle Select Tool, draw boxes to outline each window and glass door as best as you can (it will take a bit of guesswork to accurately determine their extents).
3) Desaturate the box selections. In the Levels menu > Output Levels, change the left box reading “0” to “192”. Click OK.

4) On the top toolbar, click Select > Invert. Next, click the Bucket Fill Tool. Below that, click the Foreground & Background palette. In the dialog, change the “Value” slider amount to “72”. Make sure your threshold value (bottom left) is at “100”, and fill the background with grey.

5) Click the Select tab again > None. You can now save your illumination map.

The filename is exactly the same as your LOD diffuse save for the suffix, which instead of “_d” needs t be changed to “_i”.
Example: surf shop_lod_i.
If you have included a color map to your main model, you must also include one for your LOD. Otherwise, your whole asset will be shaded in whichever color variation your main model is when the LOD is activated, and that simply looks terrible.
To make the color map, simply follow the same steps you would use for the main model’s color map.
It’s alright to forego normal maps as those will likely not be see at LOD distance. Specular maps can also be left out on small assets to save file size, but they should be included on large/tall assets, i.e. sub-buildings and skyscrapers. Alpha maps should only be included if they are an integral part of the main model, i.e. a sign placed on a simple plane.
Don’t assume that your LOD has turned out alright, test it both in the asset editor and in a proper game. The best results you can hope to get is if there is no obvious transition to LOD when zooming out. If you do indeed get this result than feel proud! You have vastly improved your overall asset quality by avoiding game-generated LODs. You have also better optimized your asset since custom LODs usually have significantly lower tri counts.
Additional Resources
A list of various things that will aid you in the creation of custom LODs using Blender.
**Note: I will update this list as often as I can.
Here is a video that briefly covers Blender texture baking.
Final Words
Making LODs is certainly not a glorious part of asset creation but it really does make all the difference during gameplay. Many a time I have eagerly subscribed to what I thought was a great asset on the workshop only to find in game that it is burdened by an abysmal auto-LOD. For this reason, I urge experienced content creators to take a bit of time to update your LOD-less assets (you know who you are). In closing, I hope you have gained some insightful knowledge from my guide that makes your job as an asset creator a bit less stressful. Go forth and create.
If you have further questions or want to contribute your own information feel free to comment below or hit me up at Simtropolis[community.simtropolis.com]. I will also try to frequent the C:S creators’ Discord[discordapp.com] more often, so you can message me there as well.
–Exurbanite